Tag Archives: AWS Cloud Development Kit

Extending CloudFormation and CDK with Third-Party Extensions

Post Syndicated from Lucas Chen original https://aws.amazon.com/blogs/devops/extending-cloudformation-and-cdk-with-third-party-extensions/

Did you know you can use CloudFormation to manage third-party resources? The AWS CloudFormation Public Registry provides a searchable collection of CloudFormation extensions and makes it easy to discover and provision them in CloudFormation templates and AWS Cloud Development Kit (CDK) applications. In the past three months, we’ve added a number of new, exciting partners to the Public Registry, including GitLab, Okta, and PagerDuty.

The extensions available on the registry are wide-ranging and include third-party resources from partners such as MongoDB; hooks, which are preventative controls that add safeguards to provisioning; and modules, which are re-usable components that take into account best practices and opinionated definitions of resources. AWS Partner Network (APN), third parties, and the developer community contribute these extensions to the Public Registry. Using extensions, customers no longer need to create and maintain custom provisioning logic for resource types from third-party vendors.

Over last few months, AWS collaborated with partners to develop and publish over 80 new resources across 14 providers to Public Registry for CloudFormation. Below is a summary of the new resource type additions.

Recently Updated Third-Party Providers

Provider Use case
MongoDB Atlas

Manage components in MongoDB Atlas. Add, edit, or delete administrative objects within Atlas, including projects, users, and database deployments

Note: You cannot read or write data to Atlas Clusters with Atlas Admin APIs and AWS CloudFormation resources. To read and write data in Atlas, you must use the Atlas Data API

GitLab Manage the users and groups in an organization, set up a new project with the right users, groups, and access token, tag a project automatically for every active CI/CD deployment
New Relic Create a new Dashboard with custom Pages, Widgets and Layout, add tags to your data to help improve data organization and findability, workloads-related tasks
GitHub Manage the users and groups in an organization, set up a new project with the right users, groups, and access token, Add a webhook to a repo
Dynatrace Set up a new project with service level objective, locations, monitors and metrics
Okta Onboard a new application into Okta with the right users and groups
PagerDuty Set up monitoring of a new or existing application
Databricks Set up a Databricks cluster and jobs
Fastly Configure Fastly as a CDN for your web app
BigID Connect S3 and DynamoDB data sources into your BigID application
Rollbar Set up a new Rollbar project and manage rules, teams, and users
Cloudflare Configure a DNS record and load-balancing using Cloudflare
Lacework Configure Lacework alert profiles, rules, channels and manage queries
Snowflake Create databases, users, and manage privileges

Key Benefits

Here are some of the benefits for extension builders and consumers when publishing extensions to the public registry:

  1. Discoverability – Publishing your extensions in the public registry will make them discoverable by 1M+ active CloudFormation and CDK customers.
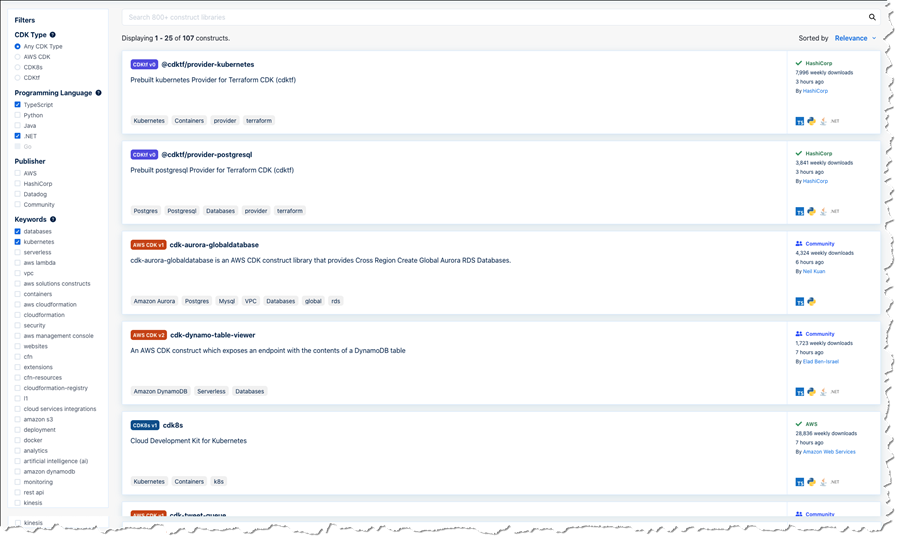
  2. CDK Support – We’re seeing rapid growth in the adoption of the CDK amongst the developer population. Upon publishing to the registry, L1 CDK Constructs will automatically be created for your third party resources making them compatible with the CDK with no added work required. These constructs will also be listed on Construct Hub and aids discoverability discoverable by customers. Note: Automated L1 CDK construct generation is currently an experimental feature.
  3. Drift detection – Third-party resource types in the public registry also integrate with drift detection. After creating a resource from a third-party resource type, CloudFormation will detect changes to the third-party resource from its template configuration, known as configuration drift, just as it would with AWS resources.
  4. AWS Config – You can also use AWS Config to manage compliance for third-party resources consumed from the registry. The resource types are automatically tracked as Configuration Items when you have configured AWS Config to record them, and used CloudFormation to create, update, and delete them. Whether the resource types you use are third-party or AWS resources, you can view configuration history for them, in addition to being able to write AWS Config rules to verify configuration best practices.
  5. Abstraction of Best Practices with Modules – Browse and use modules from the registry when creating your CloudFormation templates to ensure you’re provisioning resources while adhering to best practices.
  6. AWS Cloud Control API – The AWS Cloud Control API allows AWS partners and customers to interface with your resource type through API calls using Create, Read, Update, Delete, and List (CRUD-L) operations. Resources in the registry will be automatically integrated with our AWS Cloud Control API and expands your third party resource compatibility to even more AWS services and IaC tools.

We’ve seen great momentum from our partners and developer community over the past year. We are looking forward to continued investment and innovation in the Public Registry.

How to Get Started

For Resource Type Users: Explore and Activate Third Party Resource Types

Third party resource types must first be activated before they can be used. You do this by logging into your AWS Console > Navigate to CloudFormation > Registry > Public extensions > Set the Publisher to Third Party. This will show you a list of available third-party resources in your region (note that different regions may have a different set of third-party resource types). Select the radio box next to the resource types you want to activate and click the activate button at the top of the list.

Figure 1:

Don’t see the extension you need in the registry?

You can submit requests for new third-party extensions through our Community Registry Extensions Github repo issue tracker! Click the New Issue button and describe the third-party extension along with information about your use case.

For Developers and Publishers: Join the CloudFormation Developer Community and Start Building

You can see several of the community-built registry extensions in the AWS CloudFormation Community Registry Extensions repository and even contribute yourself. You can also read about the experiences and lessons learned from publishing to the Registry through this blog written by Cloudsoft.

For developers looking to create new resource types to add to the public Registry, follow this creating resource types walkthrough help you get started. If you need assistance creating, publishing resources, or just want to join the discussion, you can join the conversation today in our CloudFormation Discord Channel. We’d love to hear about your experiences and use cases in developing innovations with registry extensions.

About the authors:

Anuj Sharma

Anuj Sharma is a Sr Container Partner Solution Architect with Amazon Web Services. He works with ISV partners and drives Partner-AWS product development and integrations.

Lucas Chen

Lucas is a Senior Product Manager at Amazon Web Services. He leads the CloudFormation Registry and its integrations with third-party products. Prior to AWS, he spent 9 years at VMware working on its end user computing product, Workspace ONE.

Rahul Sharma

Rahul is a Senior Product Manager-Technical at Amazon Web Services with over two years of product management spanning AWS CloudFormation and AWS Cloud Control API.

How to build LINE messaging into business communications

Post Syndicated from nnatri original https://aws.amazon.com/blogs/messaging-and-targeting/how-to-build-line-messaging-into-business-communications/

In today’s interconnected world, businesses need to communicate with their customers through multiple channels. This means using a variety of messaging apps, social media platforms, and other communication tools to reach customers where they are. One such platform that has gained immense popularity in select Asian markets is LINE. As the biggest social network in Japan, LINE offers businesses a unique opportunity to connect with customers in this region. Within Japan alone, LINE’s 2021 data shows 86 million users, constituting approximately 85% of Japan’s adult population. However, managing communication through multiple channels can be challenging for businesses.

That’s where Amazon Pinpoint comes in. Amazon Pinpoint is a flexible communication service for businesses that simplifies the process of sending targeted messages to customers across multiple channels. In this blog post, we’ll focus on how to integrate LINE with Amazon Pinpoint. This post is part of a series on integrating different communication channels with Amazon Pinpoint, and it is intended for both marketing operations and communication developers.

If you are already using LINE, this blog post will help you centralize management within Amazon Pinpoint. Additionally, if you are looking to integrate another messaging service with an open API, the steps outlined here will provide a helpful guide. Finally, if you’re a business looking to tap into Asian markets, this blog post is essential reading. By integrating LINE with Amazon Pinpoint, you’ll be able to reach your customers on the platform they are already using, providing seamless end-to-end customer engagements that will greatly enhances customer experience.

Note
Line is a third-party service that is subject to additional terms and charges. Amazon Web Services isn’t responsible for any third-party service that you use to send messages with custom channels.

Why Integrate LINE with Amazon Pinpoint?

Integrating LINE with Amazon Pinpoint has several benefits for businesses:

  • Centralized communication management: With LINE integrated into Amazon Pinpoint, businesses can centralize the management of outbound communication channels and simplify their communication workflows.
  • Increased flexibility for marketing campaigns: With LINE added as a custom channel in Amazon Pinpoint, businesses can create targeted messaging campaigns and reach customers through multiple channels, including LINE. Along with Pinpoint journeys, businesses can craft end-to-end customer engagement journeys that start from one channel and end in another.
  • Access to LINE’s popular messaging platform: With LINE integrated into Amazon Pinpoint, businesses can tap into the app’s massive user base in select Asian markets and engage with their customers through a popular and widely used messaging platform. Having access to LINE’s demographics of approximately 50% office workers with high penetration into 20s-30s age band, brands can tap into this high-spending power segment to drive revenue for their products.

Architecture

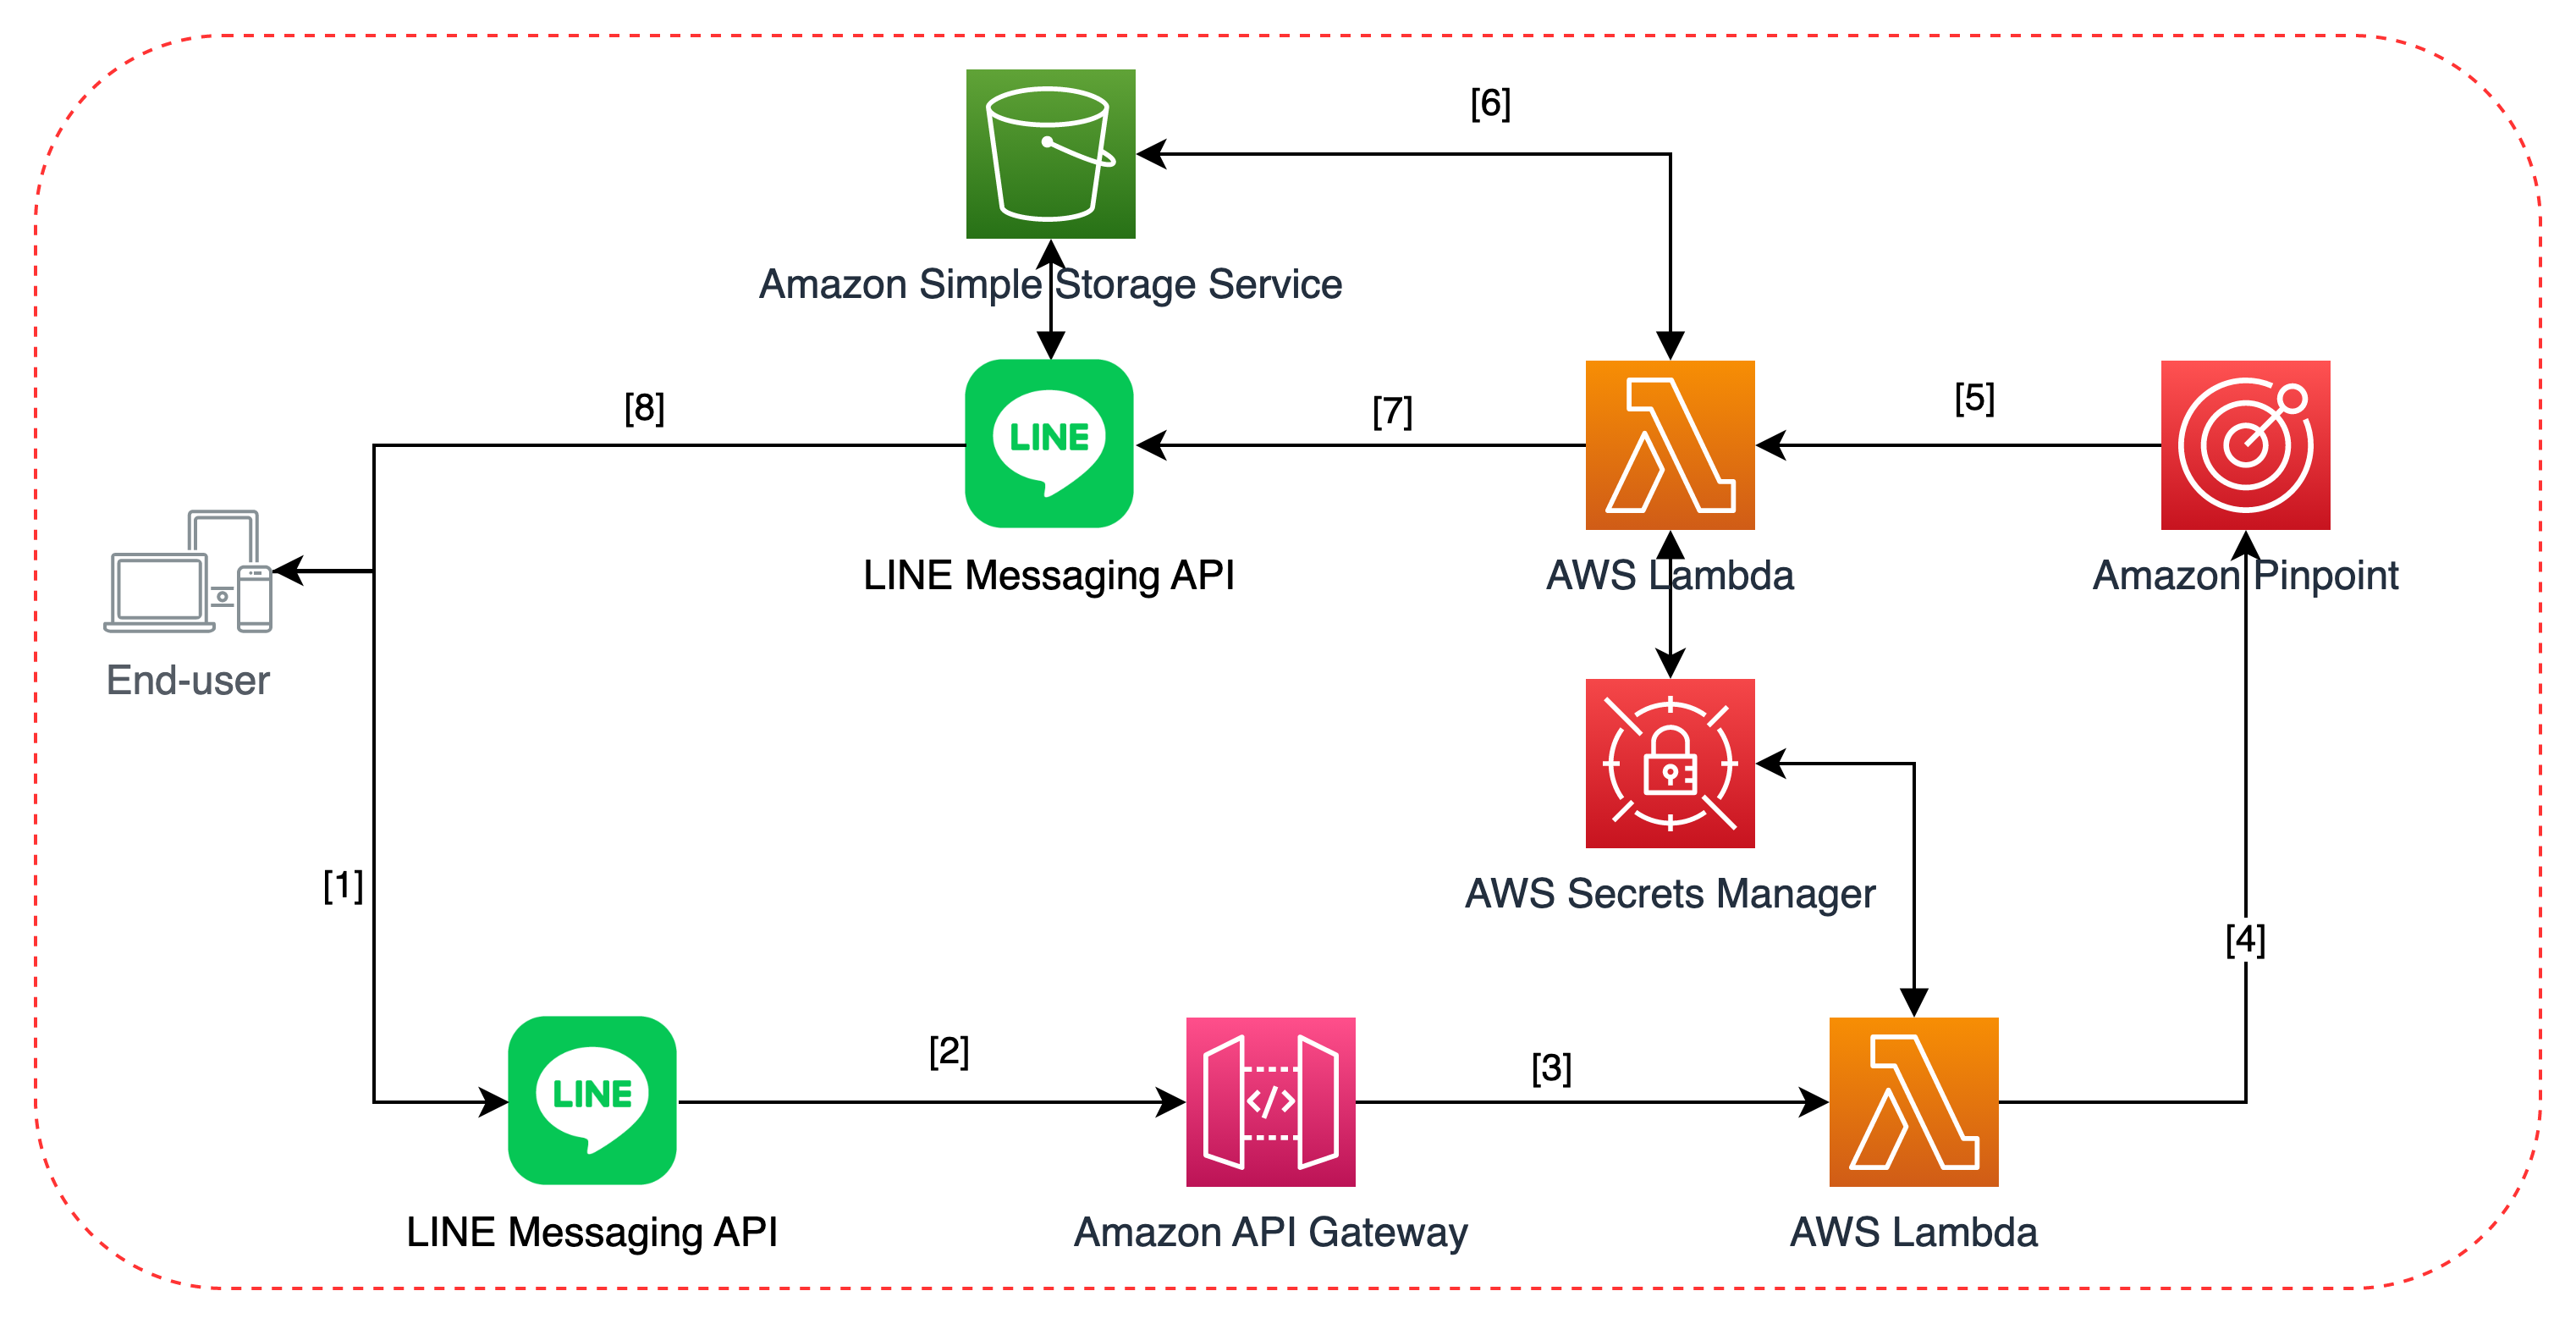
This solution uses Amazon Pinpoint,AWS Lambda, Amazon API Gateway, Amazon Simple Storage Service (Amazon S3), AWS Secrets Manager and LINE Messaging API

Line Pinpoint Solution Architecture

The solution architecture can be broken up into two main sections:

  • Steps 1-4 cover handling inbound user events and managing user data within Amazon Pinpoint.
  • Steps 5-8 cover how to send outbound campaigns via Amazon Pinpoint Custom Channel.
  1. The customer subscribes to the business’ LINE channel.
  2. The subscribe/unsubscribe event is received and checked via Amazon API Gateway.
  3. The edge-optimized Amazon API Gateway passes valid requests via a proxy integration to the backend Lambda.
  4. The backend Lambda compares the request body with the x-line-signature request header to confirm that the request was sent from the LINE Platform, as recommended by LINE API document. Afterwards, the Lambda function processes the user events:
    1. If the user subscribes to the channel, a new endpoint will be added to Amazon Pinpoint’s user database.
    2. If the user unsubscribes from the channel, the corresponding endpoint (identified by the LINE User ID) is deleted from Amazon Pinpoint’s user database.
  5. Amazon Pinpoint initiates a call to a Lambda function via Custom Channel with a payload. Of particular importance would be the Data field contained within the payload, which can be specified within the Amazon Pinpoint console to modify the content of the message.
  6. If the message contains image/audio/video files, the Lambda will request the file from the corresponding Amazon S3 buckets to be included for step 7. Amazon S3 then sends back the presigned URL containing the requested file(s).
  7. The Lambda function puts the message in the correct format expected by the LINE Messaging API and sends it over to the LINE Platform.
  8. The LINE Messaging API receives the request and processes the message content. If necessary, it will retrieve and download the file from Amazon S3 using the presigned URLs generated in step 6 then finally send the message to the corresponding user on the LINE Mobile App.

Step-by-Step Deployment Guide

Prerequisites

To deploy this solution, you must have the following:

  1. An AWS account, with the appropriate AWS CLI profile.
    • Named Profile: Run aws configure with the --profile option. The following steps assumed you have created a profile called line-integration to use with AWS CDK.
  2. Minimum Python v3.7, with pip and venv
  3. AWS CDK v2 installed.
  4. Docker Engine installed. You can download and install the appropriate Docker Desktop Distribution for your system via this link
  5. A LINE Account.
    • If you have never worked with LINE Messaging API before, you should login to to LINE Developers Console using one of the following accounts.
      • LINE account
      • Business account
    • Afterwards, you should create a new provider. Create Line provider
    • Within the provider page, you can then choose to create a new channel. For our Integration purposes, we will be choosing Messaging API channel type.
      Create Line channel

Preparation

The source code can be found in this GitHub Repository.

  1. Fork the GitHub Repo into your account. This way you can experiment with changes as necessary to fit your workload.
  2. In your local compute environment, clone the GitHub Repository and cd into the project directory.
  3. Run the following commands to create a virtual environment, activate it and install required dependencies.
python3 -m venv env \
&& source env/bin/activate \
&& python -m pip install -r requirements.txt

Deploy the CDK

  1. We can set the AWS CLI profile in CDK commands by adding the --profile flag. Run the following commands to bootstrap your AWS environment, synthesize the CDK template and deploy to your environment.
cdk bootstrap --profile LINE-integration \
&& cdk synth --profile LINE-integration  \
&& cdk deploy --profile LINE-integration 

Note
Enter y when prompted with Do you wish to deploy these changes (y/n)?

  1. After the deployment is done, the CDK template will output the API Gateway endpoint URL which takes the form of https://[********].execute-api.[region].amazonaws.com/prod/. Copy down this information as you will need it to set up the webhook connection later on.

Getting LINE Official Account Credentials

  1. Log in to LINE developer console.
    Login to Line account
  2. Once inside, choose the channel you’d like to have integrated with Amazon Pinpoint. This assumes that you’ve created a provider and a channel as mentioned in the Prerequisite section.
    Inside Line account console
  3. In the Basic settings tab, scroll down and note down the Channel Secret.
  4. In the Messaging API tab, scroll down and click on Edit under Webhook URL and enter the API Gateway endpoint URL you have noted down in step 5. Click on Update to save the changes.
    Line Webhook settings
    NOTE Once you have finished entering your Channel Secret token in step 14, you can return to this page to Verify your webhook URL is set up correctly).
  5. Finally, issue a Channel Access Token (at the bottom of the Messaging API tab) and note it down.
    Line channel access token settings

Registering Secrets in AWS Secrets Manager

  1. Navigate to the AWS Secrets Manager console. Make sure you’re in the same region as your CDK deployment region.
  2. Click on Secrets in the left side pane. You should find a secret with the name LINE_secrets
  3. Click on Retrieve Secret Value.
    Set Line secrets in Secrets Manager
  4. Then click on Edit:
    • Replace YOUR_CHANNEL_SECRET secret value with the channel secret you issued in step 10.
    • Replace YOUR_CHANNEL_ACCESS_TOKEN secret value with the access token you issued in step 10

Marketing Operations Demonstration

Once you’ve successfully deployed the CDK and configured your secrets, you can immediately get started sending communications campaign to your customers.

LINE supports multimedia messaging formats, meaning that you can choose to send texts, images, audio and even video files to your customers as part of your campaigns. You just need to make sure that your customers have subscribed to your channel.

Create a segment of subscribed users

The deployed solution has integrated user database management with Amazon Pinpoint so once users start subscribing to your LINE channel, they will be added as endpoints. To start filtering out who we should send to, you can create segments of your subscribers.

  1. Navigate to the Amazon Pinpoint console.
  2. On the All projects page, a project named Line-Pinpoint-Project has been created for you.
  3. On the left-side pane, choose Segments and then Create a segment.Create Segment
  4. Give your segment a descriptive name and add the appropriate criteria to filter down to your target audience (E.g.: filter down to customers who have Custom channel type).Set segment attributes
  5. Confirm the number of endpoints that you will be sending in the Segment estimate section matches your expectations and then choose Create segment.

Upload media files for campaign

If you’d like to use your own image, audio and video files for the campaign, follow along with this section. Otherwise, proceed to the Create Campaigns section (step 9).

Note
Depending on the media type, there are restrictions imposed such as maximum file size and file format extensions. You can find more information here.

  1. Navigate to the Amazon S3 console.
  2. Here you will find a list of buckets which corresponds to the type of media files you want to upload:
    • part-1-stack-images3bucket...: contains image files.
    • part-1-stack-audios3bucket...: contains audio files.
    • part-1-stack-videos3bucket...: contains both video and image cover files.
  3. Upload the corresponding files that you want to use for your campaign by choosing Upload.
    Asset bucket image

Create campaigns

  1. In the navigation pane, choose Campaigns, and then choose Create a campaign.
  2. Give your campaign a descriptive name. Under Campaign Type choose Standard campaign and under Channel, choose Custom. Click Next to confirm.
    Campaign Creation
  3. On the Choose a segment page, choose the segment that you created in step 5, and then choose Next.
  4. In Create your message, depending on the type of message that you want to send, choose the corresponding Lambda function. Your function should be named part-1-stack-send[text/image/audio/video]lambda...
    Choose Lambda function
  5. In the custom data section, you can choose to leave it blank, which will trigger the campaign to send the sample message.
  6. Otherwise, depending on the type of message, you can customize your campaigns to send the content that you want by inputting the following values into Custom Data.
    • Text Campaign: Enter the Text Message that you want to send.
    • Image Campaign: Enter the name of the image file you’ve uploaded in step 8 including the extension name (E.g.: sample_image.png)
    • Audio Campaign: Enter the name of the audio file you’ve uploaded in step 8 including the extension name and the duration of the audio file in milliseconds separated by a comma (E.g.: sample_audio.mp3,5000)
    • Video Campaign: Enter the name of the video file you’ve uploaded in step 8 including the extension name and the name of the image file you’ve uploaded in step 8 including the extension name, separated by a comma (E.g.: sample_video.mp4,sample_image.png)
  7. Choose Next and configure when to send the campaign depending on your needs. Once done, choose Next again.
  8. On the Review and launch page, verify all your information is correct and then click on Launch campaign.

That’s it! Your message will be sent through LINE to the designated recipients.

Cleanup

To delete the sample application that you created, use the AWS CDK.


cdk destroy

You’ll be asked:


Are you sure you want to delete: part-1-stack (y/n)?

Hit “y” and you’ll see your stack being destroyed.

What’s Next?

In conclusion, integrating LINE with Amazon Pinpoint provides businesses with a powerful tool to centralize their communication management, create more flexible marketing campaigns, and tap into LINE’s massive user base. With the step-by-step guide and demo provided in this blog post, you can easily get started with integrating LINE with Pinpoint and start leveraging its benefits for your business.

The solution presented in this blog post serves as a template that you can develop and customize to make it your own:

  1. Adding additional message types: The LINE messaging platform is famous for its rich messaging types and format. The deployed solution only utilized a fraction of what is available. You can add additional Lambda functions to send Stickers, Locations, Image Maps, Buttons or Carousel and more.
  2. Orchestrate LINE with other channels: Using Amazon Pinpoint Journeys, you can now meet the customer where they are most likely to see and respond to your message. Create a journey that starts with an SMS, send targeted communications based on yes/no or multivariate splits via emails and seal the deal with LINE. With Pinpoint and journey custom channel input and response support, you can craft the perfect omni-channel journey for your customers.
  3. Watch this space: Do stay tuned for the next blog post in this series, where we’ll show you how to manage inbound communications through LINE using Amazon Connect and Amazon Lex bots.

Implementing architectural patterns with Amazon EventBridge Pipes

Post Syndicated from David Boyne original https://aws.amazon.com/blogs/compute/implementing-architectural-patterns-with-amazon-eventbridge-pipes/

This post is written by Dominik Richter (Solutions Architect)

Architectural patterns help you solve recurring challenges in software design. They are blueprints that have been used and tested many times. When you design distributed applications, enterprise integration patterns (EIP) help you integrate distributed components. For example, they describe how to integrate third-party services into your existing applications. But patterns are technology agnostic. They do not provide any guidance on how to implement them.

This post shows you how to use Amazon EventBridge Pipes to implement four common enterprise integration patterns (EIP) on AWS. This helps you to simplify your architectures. Pipes is a feature of Amazon EventBridge to connect your AWS resources. Using Pipes can reduce the complexity of your integrations. It can also reduce the amount of code you have to write and maintain.

Content filter pattern

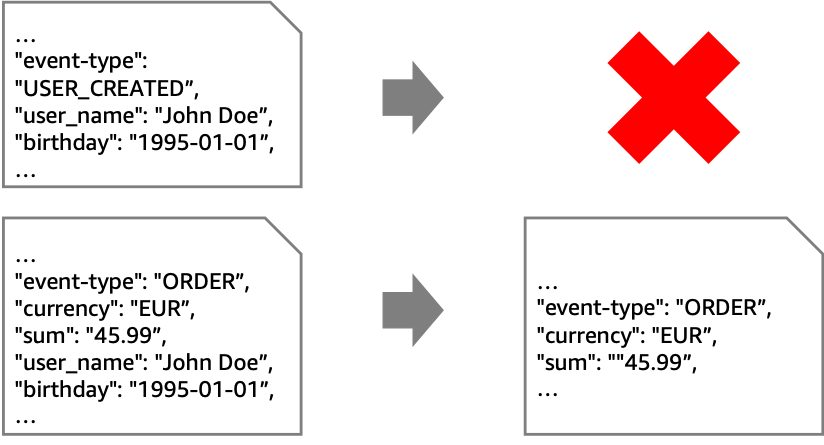
The content filter pattern removes unwanted content from a message before forwarding it to a downstream system. Use cases for this pattern include reducing storage costs by removing unnecessary data or removing personally identifiable information (PII) for compliance purposes.

In the following example, the goal is to retain only non-PII data from “ORDER”-events. To achieve this, you must remove all events that aren’t “ORDER” events. In addition, you must remove any field in the “ORDER” events that contain PII.

While you can use this pattern with various sources and targets, the following architecture shows this pattern with Amazon Kinesis. EventBridge Pipes filtering discards unwanted events. EventBridge Pipes input transformers remove PII data from events that are forwarded to the second stream with longer retention.

Instead of using Pipes, you could connect the streams using an AWS Lambda function. This requires you to write and maintain code to read from and write to Kinesis. However, Pipes may be more cost effective than using a Lambda function.

Some situations require an enrichment function. For example, if your goal is to mask an attribute without removing it entirely. For example, you could replace the attribute “birthday” with an “age_group”-attribute.

In this case, if you use Pipes for integration, the Lambda function contains only your business logic. On the other hand, if you use Lambda for both integration and business logic, you do not pay for Pipes. At the same time, you add complexity to your Lambda function, which now contains integration code. This can increase its execution time and cost. Therefore, your priorities determine the best option and you should compare both approaches to make a decision.

To implement Pipes using the AWS Cloud Development Kit (AWS CDK), use the following source code. The full source code for all of the patterns that are described in this blog post can be found in the AWS samples GitHub repo.

const filterPipe = new pipes.CfnPipe(this, 'FilterPipe', {
  roleArn: pipeRole.roleArn,
  source: sourceStream.streamArn,
  target: targetStream.streamArn,
  sourceParameters: { filterCriteria: { filters: [{ pattern: '{"data" : {"event_type" : ["ORDER"] }}' }] }, kinesisStreamParameters: { startingPosition: 'LATEST' } },
  targetParameters: { inputTemplate: '{"event_type": <$.data.event_type>, "currency": <$.data.currency>, "sum": <$.data.sum>}', kinesisStreamParameters: { partitionKey: 'event_type' } },
});

To allow access to source and target, you must assign the correct permissions:

const pipeRole = new iam.Role(this, 'FilterPipeRole', { assumedBy: new iam.ServicePrincipal('pipes.amazonaws.com') });

sourceStream.grantRead(pipeRole);
targetStream.grantWrite(pipeRole);

Message translator pattern

In an event-driven architecture, event producers and consumers are independent of each other. Therefore, they may exchange events of different formats. To enable communication, the events must be translated. This is known as the message translator pattern. For example, an event may contain an address, but the consumer expects coordinates.

If a computation is required to translate messages, use the enrichment step. The following architecture diagram shows how to accomplish this enrichment via API destinations. In the example, you can call an existing geocoding service to resolve addresses to coordinates.

There may be cases where the translation is purely syntactical. For example, a field may have a different name or structure.

You can achieve these translations without enrichment by using input transformers.

Here is the source code for the pipe, including the role with the correct permissions:

const pipeRole = new iam.Role(this, 'MessageTranslatorRole', { assumedBy: new iam.ServicePrincipal('pipes.amazonaws.com'), inlinePolicies: { invokeApiDestinationPolicy } });

sourceQueue.grantConsumeMessages(pipeRole);
targetStepFunctionsWorkflow.grantStartExecution(pipeRole);

const messageTranslatorPipe = new pipes.CfnPipe(this, 'MessageTranslatorPipe', {
  roleArn: pipeRole.roleArn,
  source: sourceQueue.queueArn,
  target: targetStepFunctionsWorkflow.stateMachineArn,
  enrichment: enrichmentDestination.apiDestinationArn,
  sourceParameters: { sqsQueueParameters: { batchSize: 1 } },
});

Normalizer pattern

The normalizer pattern is similar to the message translator but there are different source components with different formats for events. The normalizer pattern routes each event type through its specific message translator so that downstream systems process messages with a consistent structure.

The example shows a system where different source systems store the name property differently. To process the messages differently based on their source, use an AWS Step Functions workflow. You can separate by event type and then have individual paths perform the unifying process. This diagram visualizes that you can call a Lambda function if needed. However, in basic cases like the preceding “name” example, you can modify the events using Amazon States Language (ASL).

In the example, you unify the events using Step Functions before putting them on your event bus. As is often the case with architectural choices, there are alternatives. Another approach is to introduce separate queues for each source system, connected by its own pipe containing only its unification actions.

This is the source code for the normalizer pattern using a Step Functions workflow as enrichment:

const pipeRole = new iam.Role(this, 'NormalizerRole', { assumedBy: new iam.ServicePrincipal('pipes.amazonaws.com') });

sourceQueue.grantConsumeMessages(pipeRole);
enrichmentWorkflow.grantStartSyncExecution(pipeRole);
normalizerTargetBus.grantPutEventsTo(pipeRole);

const normalizerPipe = new pipes.CfnPipe(this, 'NormalizerPipe', {
  roleArn: pipeRole.roleArn,
  source: sourceQueue.queueArn,
  target: normalizerTargetBus.eventBusArn,
  enrichment: enrichmentWorkflow.stateMachineArn,
  sourceParameters: { sqsQueueParameters: { batchSize: 1 } },
});

Claim check pattern

To reduce the size of the events in your event-driven application, you can temporarily remove attributes. This approach is known as the claim check pattern. You split a message into a reference (“claim check”) and the associated payload. Then, you store the payload in external storage and add only the claim check to events. When you process events, you retrieve relevant parts of the payload using the claim check. For example, you can retrieve a user’s name and birthday based on their userID.

The claim check pattern has two parts. First, when an event is received, you split it and store the payload elsewhere. Second, when the event is processed, you retrieve the relevant information. You can implement both aspects with a pipe.

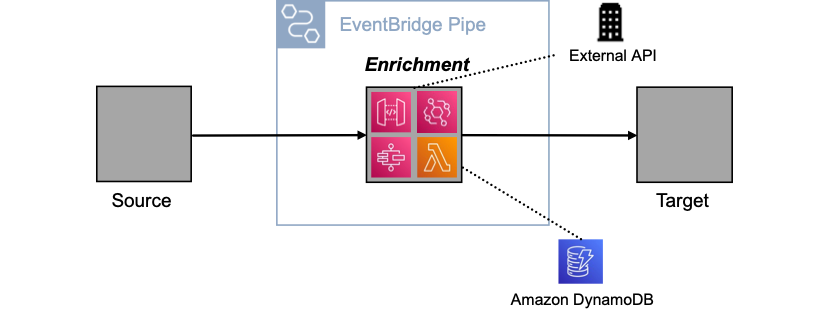
In the first pipe, you use the enrichment to split the event, in the second to retrieve the payload. Below are several enrichment options, such as using an external API via API Destinations, or using Amazon DynamoDB via Lambda. Other enrichment options are Amazon API Gateway and Step Functions.

Using a pipe to split and retrieve messages has three advantages. First, you keep events concise as they move through the system. Second, you ensure that the event contains all relevant information when it is processed. Third, you encapsulate the complexity of splitting and retrieving within the pipe.

The following code implements a pipe for the claim check pattern using the CDK:

const pipeRole = new iam.Role(this, 'ClaimCheckRole', { assumedBy: new iam.ServicePrincipal('pipes.amazonaws.com') });

claimCheckLambda.grantInvoke(pipeRole);
sourceQueue.grantConsumeMessages(pipeRole);
targetWorkflow.grantStartExecution(pipeRole);

const claimCheckPipe = new pipes.CfnPipe(this, 'ClaimCheckPipe', {
  roleArn: pipeRole.roleArn,
  source: sourceQueue.queueArn,
  target: targetWorkflow.stateMachineArn,
  enrichment: claimCheckLambda.functionArn,
  sourceParameters: { sqsQueueParameters: { batchSize: 1 } },
  targetParameters: { stepFunctionStateMachineParameters: { invocationType: 'FIRE_AND_FORGET' } },
});

Conclusion

This blog post shows how you can implement four enterprise integration patterns with Amazon EventBridge Pipes. In many cases, this reduces the amount of code you have to write and maintain. It can also simplify your architectures and, in some scenarios, reduce costs.

You can find the source code for all the patterns on the AWS samples GitHub repo.

For more serverless learning resources, visit Serverless Land. To find more patterns, go directly to the Serverless Patterns Collection.

Automating your workload deployments in AWS Local Zones

Post Syndicated from Sheila Busser original https://aws.amazon.com/blogs/compute/automating-your-workload-deployments-in-aws-local-zones/

This blog post is written by Enrico Liguori, SA – Solutions Builder , WWPS Solution Architecture.

AWS Local Zones are a type of infrastructure deployment that places compute, storage,and other select AWS services close to large population and industry centers.

We now have a total of 32 Local Zones; 15 outside of the US (Bangkok, Buenos Aires, Copenhagen, Delhi, Hamburg, Helsinki, Kolkata, Lagos, Lima, Muscat, Perth, Querétaro, Santiago, Taipei, and Warsaw) and 17 in the US. We will continue to launch Local Zones in 21 metro areas in 18 countries, including Australia, Austria, Belgium, Brazil, Canada, Colombia, Czech Republic, Germany, Greece, India, Kenya, Netherlands, New Zealand, Norway, Philippines, Portugal, South Africa, and Vietnam.

Customers using AWS Local Zones can provision the infrastructure and services needed to host their workloads with the same APIs and tools for automation that they use in the AWS Region, included the AWS Cloud Development Kit (AWS CDK).

The AWS CDK is an open source software development framework to model and provision your cloud application resources using familiar programming languages, including TypeScript, JavaScript, Python, C#, and Java. For the solution in this post, we use Python.

Overview

In this post we demonstrate how to:

  1. Programmatically enable the Local Zone of your interest.
  2. Explore the supported APIs to check the types of Amazon Elastic Compute Cloud (Amazon EC2) instances available in a specific Local Zone and get their associated price per hour;
  3. Deploy a simple WordPress application in the Local Zone through AWS CDK.

Prerequisites

To be able to try the examples provided in this post, you must configure:

  1. AWS Command Line Interface (AWS CLI)
  2. Python version 3.8 or above
  3. AWS CDK

Enabling a Local Zone programmatically

To get started with Local Zones, you must first enable the Local Zone that you plan to use in your AWS account. In this tutorial, you can learn how to select the Local Zone that provides the lowest latency to your site and understand how to opt into the Local Zone from the AWS Management Console.

If you prefer to interact with AWS APIs programmatically, then you can enable the Local Zone of your interest by calling the ModifyAvailabilityZoneGroup API through the AWS CLI or one of the supported AWS SDKs.

The following examples show how to opt into the Atlanta Local Zone through the AWS CLI and through the Python SDK:

AWS CLI:

aws ec2 modify-availability-zone-group \
  --region us-east-1 \
  --group-name us-east-1-atl-1 \
  --opt-in-status opted-in

Python SDK:

ec2 = boto3.client('ec2', config=Config(region_name='us-east-1'))
response = ec2.modify_availability_zone_group(
                  GroupName='us-east-1-atl-1',
                  OptInStatus='opted-in'
           )

The opt in process takes approximately five minutes to complete. After this time, you can confirm the opt in status using the DescribeAvailabilityZones API.

From the AWS CLI, you can check the enabled Local Zones with:

aws ec2 describe-availability-zones --region us-east-1

Or, once again, we can use one of the supported SDKs. Here is an example using Phyton:

ec2 = boto3.client('ec2', config=Config(region_name='us-east-1'))
response = ec2.describe_availability_zones()

In both cases, a JSON object similar to the following, will be returned:

{
"State": "available",
"OptInStatus": "opted-in",
"Messages": [],
"RegionName": "us-east-1",
"ZoneName": "us-east-1-atl-1a",
"ZoneId": "use1-atl1-az1",
"GroupName": "us-east-1-atl-1",
"NetworkBorderGroup": "us-east-1-atl-1",
"ZoneType": "local-zone",
"ParentZoneName": "us-east-1d",
"ParentZoneId": "use1-az4"
}

The OptInStatus confirms that we successful enabled the Atlanta Local Zone and that we can now deploy resources in it.

How to check available EC2 instances in Local Zones

The set of instance types available in a Local Zone might change from one Local Zone to another. This means that before starting deploying resources, it’s a good practice to check which instance types are supported in the Local Zone.

After enabling the Local Zone, we can programmatically check the instance types that are available by using DescribeInstanceTypeOfferings. To use the API with Local Zones, we must pass availability-zone as the value of the LocationType parameter and use a Filter object to select the correct Local Zone that we want to check. The resulting AWS CLI command will look like the following example:

aws ec2 describe-instance-type-offerings --location-type "availability-zone" --filters 
Name=location,Values=us-east-1-atl-1a --region us-east-1

Using Python SDK:

ec2 = boto3.client('ec2', config=Config(region_name='us-east-1'))
response = ec2.describe_instance_type_offerings(
      LocationType='availability-zone',
      Filters=[
            {
            'Name': 'location',
            'Values': ['us-east-1-atl-1a']
            }
            ]
      )

How to check prices of EC2 instances in Local Zones

EC2 instances and other AWS resources in Local Zones will have different prices than in the parent Region. Check the pricing page for the complete list of pricing options and associated price-per-hour.

To access the pricing list programmatically, we can use the GetProducts API. The API returns the list of pricing options available for the AWS service specified in the ServiceCode parameter. We also recommend defining Filters to restrict the number of results returned. For example, to retrieve the On-Demand pricing list of a T3 Medium instance in Atlanta from the AWS CLI, we can use the following:

aws pricing get-products --format-version aws_v1 --service-code AmazonEC2 --region us-east-1 \
--filters 'Type=TERM_MATCH,Field=instanceType,Value=t3.medium' \
--filters 'Type=TERM_MATCH,Field=location,Value=US East (Atlanta)'

Similarly, with Python SDK we can use the following:

pricing = boto3.client('pricing',config=Config(region_name="us-east-1")) response = pricing.get_products(
         ServiceCode='AmazonEC2',
         Filters= [
          {
          "Type": "TERM_MATCH",
          "Field": "instanceType",
          "Value": "t3.medium"
          },
          {
          "Type": "TERM_MATCH",
          "Field": "regionCode",
          "Value": "us-east-1-atl-1"
          }
        ],
         FormatVersion='aws_v1',
)

Note that the Region specified in the CLI command and in Boto3, is the location of the AWS Price List service API endpoint. This API is available only in us-east-1 and ap-south-1 Regions.

Deploying WordPress in Local Zones using AWS CDK

In this section, we see how to use the AWS CDK and Python to deploy a simple non-production WordPress installation in a Local Zone.

Architecture overview

architecture overview

The AWS CDK stack will deploy a new standard Amazon Virtual Private Cloud (Amazon VPC) in the parent Region (us-east-1) that will be extended to the Local Zone. This creates two subnets associated with the Atlanta Local Zone: a public subnet to expose resources on the Internet, and a private subnet to host the application and database layers. Review the AWS public documentation for a definition of public and private subnets in a VPC.

The application architecture is made of the following:

  • A front-end in the private subnet where a WordPress application is installed, through a User Data script, in a type T3 medium EC2 instance.
  • A back-end in the private subnet where MySQL database is installed, through a User Data script, in a type T3 medium EC2 instance.
  • An Application Load Balancer (ALB) in the public subnet that will act as the entry point for the application.
  • A NAT instance to allow resources in the private subnet to initiate traffic to the Internet.

Clone the sample code from the AWS CDK examples repository

We can clone the AWS CDK code hosted on GitHub with:

$ git clone https://github.com/aws-samples/aws-cdk-examples.git

Then navigate to the directory aws-cdk-examples/python/vpc-ec2-local-zones using the following:

$ cd aws-cdk-examples/python/vpc-ec2-local-zones

Before starting the provisioning, let’s look at the code in the following sections.

Networking infrastructure

The networking infrastructure is usually the first building block that we must define. In AWS CDK, this can be done using the VPC construct:

import aws_cdk.aws_ec2 as ec2
vpc = ec2.Vpc(
            self,
            "Vpc",
            cidr=”172.31.100.0/24”,
            subnet_configuration=[
                ec2.SubnetConfiguration(
                    name = 'Public-Subnet',
                    subnet_type = ec2.SubnetType.PUBLIC,
                    cidr_mask = 26,
                ),
                ec2.SubnetConfiguration(
                    name = 'Private-Subnet',
                    subnet_type = ec2.SubnetType.PRIVATE_ISOLATED,
                    cidr_mask = 26,
                ),
            ]      
        )

Together with the VPC CIDR (i.e. 172.31.100.0/24), we define also the subnets configuration through the subnet_configuration parameter.

Note that in the subnet definitions above there is no specification of the Availability Zone or Local Zone that we want to associate them with. We can define this setting at the VPC level, overwriting the availability_zones method as shown here:

@property
def availability_zones(self):
   return [“us-east-1-atl-1a”]

As an alternative, you can use a Local Zone Name as the value of the availability_zones parameter in each Subnet definition. For a complete list of Local Zone Names, check out the Zone Names on the Local Zones Locations page.

Specifying ec2.SubnetType.PUBLIC  in the subnet_type parameter, AWS CDK  automatically creates an Internet Gateway (IGW) associated with our VPC and a default route in its routing table pointing to the IGW. With this setup, the Internet traffic will go directly to the IGW in the Local Zone without going through the parent AWS Region. For other connectivity options, check the AWS Local Zone User Guide.

The last piece of our networking infrastructure is a self-managed NAT instance. This will allow instances in the private subnet to communicate with services outside of the VPC and simultaneously prevent them from receiving unsolicited connection requests.

We can implement the best practices for NAT instances included in the AWS public documentation using a combination of parameters of the Instance construct, as shown here:

nat = ec2.Instance(self, "NATInstanceInLZ",
                 vpc=vpc,
                 security_group=self.create_nat_SG(vpc),
                 instance_type=ec2.InstanceType.of(ec2.InstanceClass.T3, ec2.InstanceSize.MEDIUM),
                 machine_image=ec2.MachineImage.latest_amazon_linux(),
                 user_data=ec2.UserData.custom(user_data),
                 vpc_subnets=ec2.SubnetSelection(availability_zones=[“us-east-1-atl-1a”], subnet_type=ec2.SubnetType.PUBLIC),
                 source_dest_check=False
                )

In the previous code example, we specify the following as parameters:

The final required step is to update the route table of the private subnet with the following:

priv_subnet.add_route("DefRouteToNAT",
            router_id=nat_instance.instance_id,
            router_type=ec2.RouterType.INSTANCE,
            destination_cidr_block="0.0.0.0/0",
            enables_internet_connectivity=True)

The application stack

The other resources, including the front-end instance managed by AutoScaling, the back-end instance, and ALB are deployed using the standard AWS CDK constructs. Note that the ALB service is only available in some Local Zones. If you plan to use a Local Zone where ALB isn’t supported, then you must deploy a load balancer on a self-managed EC2 instance, or use a load balancer available in AWS Marketplace.

Stack deployment

Next, let’s go through the AWS CDK bootstrapping process. This is required only for the first time that we use AWS CDK in a specific AWS environment (an AWS environment is a combination of an AWS account and Region).

$ cdk bootstrap

Now we can deploy the stack with the following:

$ cdk deploy

After the deployment is completed, we can connect to the application with a browser using the URL returned in the output of the cdk deploy command:

terminal screenshot

The WordPress install wizard will be displayed in the browser, thereby confirming that the deployment worked as expected:

The WordPress install wizard

Note that in this post we use the Local Zone in Atlanta. Therefore, we must deploy the stack in its parent Region, US East (N. Virginia). To select the Region used by the stack, configure the AWS CLI default profile.

Cleanup

To terminate the resources that we created in this post, you can simply run the following:

$ cdk destroy

Conclusion

In this post, we demonstrated how to interact programmatically with the different AWS APIs available for Local Zones. Furthermore, we deployed a simple WordPress application in the Atlanta Local Zone after analyzing the AWS CDK code used for the deployment.

We encourage you to try the examples provided in this post and get familiar with the programmatic configuration and deployment of resources in a Local Zone.

New – Deployment Pipelines Reference Architecture and Reference Implementations

Post Syndicated from Sébastien Stormacq original https://aws.amazon.com/blogs/aws/new_deployment_pipelines_reference_architecture_and_-reference_implementations/

Today, we are launching a new reference architecture and a set of reference implementations for enterprise-grade deployment pipelines. A deployment pipeline automates the building, testing, and deploying of applications or infrastructures into your AWS environments. When you deploy your workloads to the cloud, having deployment pipelines is key to gaining agility and lowering time to market.

When I talk with you at conferences or on social media, I frequently hear that our documentation and tutorials are good resources to get started with a new service or a new concept. However, when you want to scale your usage or when you have complex or enterprise-grade use cases, you often lack resources to dive deeper.

This is why we have created over the years hundreds of reference architectures based on real-life use cases and also the security reference architecture. Today, we are adding a new reference architecture to this collection.

We used the best practices and lessons learned at Amazon and with hundreds of customer projects to create this deployment pipeline reference architecture and implementations. They go well beyond the typical “Hello World” example: They document how to architect and how to implement complex deployment pipelines with multiple environments, multiple AWS accounts, multiple Regions, manual approval, automated testing, automated code analysis, etc. When you want to increase the speed at which you deliver software to your customers through DevOps and continuous delivery, this new reference architecture shows you how to combine AWS services to work together. They document the mandatory and optional components of the architecture.

Having an architecture document and diagram is great, but having an implementation is even better. Each pipeline type in the reference architecture has at least one reference implementation. One of the reference implementations uses an AWS Cloud Development Kit (AWS CDK) application to deploy the reference architecture on your accounts. It is a good starting point to study or customize the reference architecture to fit your specific requirements.

You will find this reference architecture and its implementations at https://pipelines.devops.aws.dev.

Deployment pipeline reference architecture

Let’s Deploy a Reference Implementation
The new deployment pipeline reference architecture demonstrates how to build a pipeline to deploy a Java containerized application and a database. It comes with two reference implementations. We are working on additional pipeline types to deploy Amazon EC2 AMIs, manage a fleet of accounts, and manage dynamic configuration for your applications.

The sample application is developed with SpringBoot. It runs on top of Corretto, the Amazon-provided distribution of the OpenJDK. The application is packaged with the CDK and is deployed on AWS Fargate. But the application is not important here; you can substitute your own application. The important parts are the infrastructure components and the pipeline to deploy an application. For this pipeline type, we provide two reference implementations. One deploys the application using Amazon CodeCatalyst, the new service that we announced at re:Invent 2022, and one uses AWS CodePipeline. This is the one I choose to deploy for this blog post.

The pipeline starts building the applications with AWS CodeBuild. It runs the unit tests and also runs Amazon CodeGuru to review code quality and security. Finally, it runs Trivy to detect additional security concerns, such as known vulnerabilities in the application dependencies. When the build is successful, the pipeline deploys the application in three environments: beta, gamma, and production. It deploys the application in the beta environment in a single Region. The pipeline runs end-to-end tests in the beta environment. All the tests must succeed before the deployment continues to the gamma environment. The gamma environment uses two Regions to host the application. After deployment in the gamma environment, the deployment into production is subject to manual approval. Finally, the pipeline deploys the application in the production environment in six Regions, with three waves of deployments made of two Regions each.

Deployment Pipelines Reference Architecture

I need four AWS accounts to deploy this reference implementation: one to deploy the pipeline and tooling and one for each environment (beta, gamma, and production). At a high level, there are two deployment steps: first, I bootstrap the CDK for all four accounts, and then I create the pipeline itself in the toolchain account. You must plan for 2-3 hours of your time to prepare your accounts, create the pipeline, and go through a first deployment.

Once the pipeline is created, it builds, tests, and deploys the sample application from its source in AWS CodeCommit. You can commit and push changes to the application source code and see it going through the pipeline steps again.

My colleague Irshad Buch helped me try the pipeline on my account. He wrote a detailed README with step-by-step instructions to let you do the same on your side. The reference architecture that describes this implementation in detail is available on this new web page. The application source code, the AWS CDK scripts to deploy the application, and the AWS CDK scripts to create the pipeline itself are all available on AWS’s GitHub. Feel free to contribute, report issues or suggest improvements.

Available Now
The deployment pipeline reference architecture and its reference implementations are available today, free of charge. If you decide to deploy a reference implementation, we will charge you for the resources it creates on your accounts. You can use the provided AWS CDK code and the detailed instructions to deploy this pipeline on your AWS accounts. Try them today!

— seb

AWS Week in Review – September 19, 2022

Post Syndicated from Jeff Barr original https://aws.amazon.com/blogs/aws/aws-week-in-review-september-19-2022/

Things are heating up in Seattle, with preparation for AWS re:Invent 2022 well underway. Later this month the entire News Blog team will participate in our now-legendary “speed storming” event. Over the course of three or four days, each of the AWS service teams with a launch in the works for re:Invent will give us an overview and share their PRFAQ (Press Release + FAQ) with us. After the meetings conclude, we’ll divvy up the launches and get to work on our blog posts!

Last Week’s Launches
Here are some of the launches that caught my eye last week:

Amazon Lex Visual Conversation Builder – This new tool makes bot design easier than ever. You get a complete view of the conversation in one place, and you can manage complex conversations that have dynamic paths. To learn more and see the builder in action, read Announcing Visual Conversation Builder for Amazon Lex on the AWS Machine Learning Blog.

AWS Config Conformance Pack Price Reduction – We have reduced the price for evaluation of AWS Config Conformance Packs by up to 58%. These packs contain AWS Config rules and remediation actions that can be deployed as a single entity in account and a region, or across an entire organization. The price reduction took effect September 14, 2022; it lowers the cost per evaluation and decreases the number of evaluations needed to reach each pricing tier.

CDK (Cloud Development Kit) Tree View – The AWS CloudFormation console now includes a Constructs tree view that automatically organizes the resources that were synthesized by AWS CDK constructs. The top level of the tree view includes the named constructs and the second level includes all of the resources generated by the named construct. Read the What’s New to learn more!

AWS Incident Detection and ResponseAWS Enterprise Support customers now have access to proactive monitoring and incident management for selected workloads running on AWS. As part of the onboarding process, AWS experts review workloads for reliability and operational excellence, and work with the customer to identify critical metrics and associated alarms. Incident Management Engineers then monitor the workloads, detect critical incidents, and initiate a call bridge to accelerate recovery. Read the AWS Incident Detection and Response page and the What’s New to learn more.

ECS Cluster Scale-In Speed – Auto-Scaled ECS clusters can now scale-in (reduce capacity) faster than ever before. Previously, each scale-in would reduce the capacity within an Auto Scaling Group (ASG) by 5% at a time. Now, capacity can be reduced by up to 50%. This change makes scaling more responsive to workload changes while still maintaining availability for spiky traffic patterns. Read Faster Scaling-In for Amazon ECS Cluster Auto Scaling and the What’s New to learn more.

AWS Outposts Rack Networking – AWS Outposts racks now support local gateway ingress routing to redirect incoming traffic to an Elastic Network Interface (ENI) attached to an EC2 instance before traffic reaches workloads running on the Outpost; read Deploying Local Gateway Ingress Routing on AWS Outposts to learn more. Outposts racks now also support direct VPC routing to simplify the process of communicating with your on-premises network; read the What’s New to learn more.

Amazon SWF Console Experience Updated – The new console experience for Amazon Simple Workflow Service (SWF) gives you better visibility of your SWF domains along with additional information about your workflow executions and events. You can efficiently manage high-volume workloads and quickly find the detailed information that helps you to operate at peak efficiency. Read the What’s New to learn more.

Dynamic Intermediate Certificate Authorities – According to a post on the AWS Security Blog, public certificates issued through AWS Certificate Manager (ACM) will soon (October 11, 2022) be issued from one of several intermediate certificate authorities managed by Amazon. This change will be transparent to most customers and applications, except those that make use of certificate pinning. In some cases, older browsers will need to be updated in order to properly trust the Amazon Trust Services CAs.

X in Y – We launched existing AWS services and instance types in additional regions:

Other AWS News
AWS Open Source – Check out Installment #127 of the AWS Open Source News and Updates Newsletter to learn about new tools for AWS CloudFormation, AWS Lambda, Terraform / EKS, AWS Step Functions, AWS Identity and Access Management (IAM), and more.

New Case Study – Read this new case study to learn how the Deep Data Research Computing Center at Stanford University is creating tools designed to bridge the gap between biology and computer science in order to help researchers in precision medicine deliver tangible medical solutions.

Application Management – The AWS DevOps Blog showed you how to Implement Long-Running Deployments with AWS CloudFormation Custom Resources Using AWS Step Functions.

Architecture – The AWS Architecture Blog showed you how to Maintain Visibility Over the Use of Cloud Architecture Patterns.

Big Data – The AWS Big Data Blog showed you how to Optimize Amazon EMR Costs for Legacy and Spark Workloads.

Migration – In a two-part series on the AWS Compute Blog, Marcia showed you how to Lift and Shift a Web Application to AWS Serverless (Part 1, Part 2).

Mobile – The AWS Mobile Blog showed you how to Build Your Own Application for Route Optimization and Tracking using AWS Amplify and Amazon Location Service.

Security – The AWS Security Blog listed 10 Reasons to Import a Certificate into AWS Certificate Manager and 154 AWS Services that have achieved HITRUST Certificiation.

Training and Certification – The AWS Training and Certification Blog talked about The Value of Data and Pursuing the AWS Certified Data Analytics – Specialty Certification.

Containers – The AWS Containers Blog encouraged you to Achieve Consistent Application-Level Tagging for Cost Tracking in AWS.

Upcoming AWS Events
Check your calendar and sign up for an AWS event in your locale:

AWS Summits – Come together to connect, collaborate, and learn about AWS. Registration is open for the following in-person AWS Summits: Mexico City (September 21–22), Bogotá (October 4), and Singapore (October 6).

AWS Community DaysAWS Community Day events are community-led conferences to share and learn with one another. In September, the AWS community in the US will run events in Arlington, Virginia (September 30). In Europe, Community Day events will be held in October. Join us in Amersfoort, Netherlands (October 3), Warsaw, Poland (October 14), and Dresden, Germany (October 19).

AWS Fest – This third-party event will feature AWS influencers, community heroes, industry leaders, and AWS customers, all sharing AWS optimization secrets (September 29th), register here.

Stay Informed
I hope that you have enjoyed this look back at some of what took place in AWS-land last week! To better keep up with all of this news, please check out the following resources:

Jeff;

DevOps with serverless Jenkins and AWS Cloud Development Kit (AWS CDK)

Post Syndicated from sangusah original https://aws.amazon.com/blogs/devops/devops-with-serverless-jenkins-and-aws-cloud-development-kit-aws-cdk/

The objective of this post is to walk you through how to set up a completely serverless Jenkins environment on AWS Fargate using AWS Cloud Development Kit (AWS CDK).

Jenkins is a popular open-source automation server that provides hundreds of plugins to support building, testing, deploying, and automation. Jenkins uses a controller-agent architecture in which the controller is responsible for serving the web UI, stores the configurations and related data on disk, and delegates the jobs to the worker agents that run these jobs as their primary responsibility.

Amazon Elastic Container Service (Amazon ECS)  using Fargate is a fully-managed container orchestration service that helps you easily deploy, manage, and scale containerized applications. It deeply integrates with the rest of the AWS platform to provide a secure and easy-to-use solution for running container workloads in the cloud and now on your infrastructure. Fargate is a serverless, pay-as-you-go compute engine that lets you focus on building applications without managing servers. Fargate is compatible with both Amazon ECS and Amazon Elastic Kubernetes Service (Amazon EKS).

Solution overview

The following diagram illustrates the solution architecture. The dashed lines indicate the AWS CDK deployment.

Figure 1 This diagram shows AWS CDK and how it deploys using AWS CloudFormation to create the Elastic Load Balancer, AWS Fargate, and Amazon EFS

Figure 1 This diagram shows AWS CDK and how it deploys using AWS CloudFormation to create the Elastic Load Balancer, AWS Fargate, and Amazon EFS

You’ll be using the following:

  1. The Jenkins controller URL backed by an Application Load Balancer (ALB).
  2. You’ll be using your default Amazon Virtual Private Cloud (Amazon VPC) for this example.
  3. The Jenkins controller runs as a service in Amazon ECS using Fargate as the launch type. You’ll use Amazon Elastic File System (Amazon EFS) as the persistent backing store for the Jenkins controller task. The Jenkins controller and Amazon EFS are launched in private subnets.

Prerequisites

For this post, you’ll utilize AWS CDK using TypeScript.

Follow the guide on Getting Started for AWS CDK to:

  • Get your local environment setup
  • Bootstrap your development account

Code

Let’s review the code used to define the Jenkins environment in AWS using the AWS CDK.

Setup your imports

import { Duration, IResource, RemovalPolicy, Stack, Tags } from 'aws-cdk-lib';
import { Construct } from 'constructs';

import * as cdk from 'aws-cdk-lib';

import * as ecs from 'aws-cdk-lib/aws-ecs';
import * as efs from 'aws-cdk-lib/aws-efs';
import { Port } from 'aws-cdk-lib/aws-ec2';
import * as elbv2 from 'aws-cdk-lib/aws-elasticloadbalancingv2';

Setup your Amazon ECS, which is a logical grouping of tasks or services and set vpc

export class AppStack extends Stack {
  constructor(scope: Construct, id: string, props?: cdk.StackProps) {
    super(scope, id, props);

    const jenkinsHomeDir: string = 'jenkins-home';
    const appName: string = 'jenkins-cdk';

    const cluster = new ecs.Cluster(this, `${appName}-cluster`, {
      clusterName: appName,
    });

    const vpc = cluster.vpc;

Setup Amazon EFS to store the data

    const fileSystem = new efs.FileSystem(this, `${appName}-efs`, {
      vpc: vpc,
      fileSystemName: appName,
      removalPolicy: RemovalPolicy.DESTROY,
    });

Setup Access Point, which are application-specific entry points into an Amazon EFS file system that makes it easier to manage application access to shared datasets

const accessPoint = fileSystem.addAccessPoint(`${appName}-ap`, {
      path: `/${jenkinsHomeDir}`,
      posixUser: {
        uid: '1000',
        gid: '1000',
      },
      createAcl: {
        ownerGid: '1000',
        ownerUid: '1000',
        permissions: '755',
      },
    });

Setup Task Definition to run Docker containers in Amazon ECS

const taskDefinition = new ecs.FargateTaskDefinition(
      this,
      `${appName}-task`,
      {
        family: appName,
        cpu: 1024,
        memoryLimitMiB: 2048,
      }
    );

Setup a Volume mapping the Amazon EFS from above to the Task Definition

taskDefinition.addVolume({
      name: jenkinsHomeDir,
      efsVolumeConfiguration: {
        fileSystemId: fileSystem.fileSystemId,
        transitEncryption: 'ENABLED',
        authorizationConfig: {
          accessPointId: accessPoint.accessPointId,
          iam: 'ENABLED',
        },
      },
    });

Setup the Container using the Task Definition and the Jenkins image from the registry

const containerDefinition = taskDefinition.addContainer(appName, {
      image: ecs.ContainerImage.fromRegistry('jenkins/jenkins:lts'),
      logging: ecs.LogDrivers.awsLogs({ streamPrefix: 'jenkins' }),
      portMappings: [{ containerPort: 8080 }],
    });

Setup Mount Points to bind ephemeral storage to the container

containerDefinition.addMountPoints({
      containerPath: '/var/jenkins_home',
      sourceVolume: jenkinsHomeDir,
      readOnly: false,
    });

Setup Fargate Service to run the container serverless

    const fargateService = new ecs.FargateService(this, `${appName}-service`, {
      serviceName: appName,
      cluster: cluster,
      taskDefinition: taskDefinition,
      desiredCount: 1,
      maxHealthyPercent: 100,
      minHealthyPercent: 0,
      healthCheckGracePeriod: Duration.minutes(5),
    });
    fargateService.connections.allowTo(fileSystem, Port.tcp(2049));

Setup ALB and add listener to checks for connection requests, using the protocol and port that you configure.

    const loadBalancer = new elbv2.ApplicationLoadBalancer(
      this,
      `${appName}-elb`,
      {
        loadBalancerName: appName,
        vpc: vpc,
        internetFacing: true,
      }
    );
    const lbListener = loadBalancer.addListener(`${appName}-listener`, {
      port: 80,
    });

Setup Target to route requests to Jenkins running on Amazon ECS using Fargate

const loadBalancerTarget = lbListener.addTargets(`${appName}-target`, {
      port: 8080,
      targets: [fargateService],
      deregistrationDelay: Duration.seconds(10),
      healthCheck: { path: '/login' },
    });
  }
}

Jenkins Deployment

Now that you have all the code, let’s deploy the AWS CDK definition:

  1. Make sure that you have done the Prerequisite steps from earlier.
  2. Install packages by running the following command in your IDE CLI:
npm i
  1. Now you’ll deploy your AWS CDK definition to your dev account:
cdk deploy

Let’s now login to Jenkins

  1. In your browser, use the DNS Name from the deployed Load Balancer
  2. In Amazon CloudWatch, there will be a Log group that will be created that is associated to Cluster Service.
    1. Go into that log and you’ll see it output the Password to login to Jenkins
  1. In Jenkins, follow the wizard to continue the setup

Cleaning up

To avoid incurring future charges, delete the resources.

Let’s destroy our deploy solution

  1. In your IDE CLI:
cdk destroy

Conclusion

With this overview we were able to cover the following:

  • Build an Elastic Load Balancer
  • Use AWS Fargate with a Jenkins AMI
  • All resources running serverlessly
  • All build using the AWS CDK

About the author:

Josh Thornes

Josh Thornes is a Sr. Technical Account Manager at AWS. He works with AWS Partners at any stage of their software-as-a-service (SaaS) journey in order to help build new products, migrate existing applications, or optimize SaaS solutions on AWS. His areas of interest include builder experience (e.g., developer tools, DevOps culture, CI/CD, Front-end, Mobile, Microservices), security, IoT, analytics.

Easily protect your AWS CDK-defined infrastructure with AWS WAFv2

Post Syndicated from Ramon Lopez Narvaez original https://aws.amazon.com/blogs/devops/easily-protect-your-aws-cdk-defined-infrastructure-with-aws-wafv2/

Security is a shared responsibility between AWS and the customer. When we use infrastructure as code (IaC) we want to describe workloads wholistically, and that includes the configuration of firewalls alongside the entrypoints to web applications. As we evolve the infrastructure that our application is built upon, we can adjust firewall rules in the same place.

In this post, you’ll learn how you can easily add a layer of protection to your web application that is defined in AWS Cloud Development Kit (AWS CDK) and built using Amazon CloudFront, Amazon API Gateway, Application Load Balancer, or AWS AppSync.

To accomplish this, we’ll use AWS WAFv2. Although it’s usually complex to write your own firewall rules, we can simply use AWS Managed Rules. No tedious setup required!

What is AWS WAFv2?

AWS WAFv2 is a managed web application firewall. It can be natively enabled on CloudFront, API Gateway, Application Load Balancer, or AWS AppSync and is deployed alongside these services. AWS services terminate the TCP/TLS connection, process incoming HTTP requests, and then pass the request to AWS WAF for inspection and filtering.

For example, you can use AWS WAFv2 to protect against attacks, such as cross-site request forgery (CSRF), cross-site scripting (XSS), and SQL injection (SQLi) among other threats in the OWASP Top 10.

AWS Managed Rules for AWS WAF is a set of AWS WAF rules curated and maintained by the AWS Threat Research Team that provides protection against common application vulnerabilities or other unwanted traffic, without having to write your own rules.

Prerequisites

For this walkthrough, you should have the following prerequisites:

  • An AWS account
  • An application fronted by one or more of the following services: Amazon Cloudfront, Amazon API Gateway, Application Load Balancer or AWS AppSync. From here on these are called ‘entrypoint’.
  • At least the above mentioned ‘entrypoint’ defined in AWS CDK.

Solution overview

When AWS WAF is applied to Amazon CloudFront, Amazon API Gateway, Application Load Balancer, or AWS AppSync, it inspects and filters requests before they’re forwarded to your compute infrastructure.

Figure 1. AWS WAFv2 can protect endpoints built by Amazon CloudFront, Amazon API Gateway, Application Load Balancer and AWS AppSync

Given that you have an existing web application defined in AWS CDK, we want to add a WAFv2 web ACL to its entrypoint. Instead of writing our own firewall rules to inspect and filter requests, we want to leverage an AWS Managed Rules rule group. Simultaneously, we must be able to disable or reconfigure some of the rules in the case that they cause undesirable behavior in the application.

A good first rule group to use is the core rule set (CRS) managed rule group, also named AWSManagedRulesCommonRuleSet. It contains rules that are generally applicable to web applications and provides protection against exploitation of various vulnerabilities, such as the ones described in the OWASP Top 10. You can later add more managed rule groups or write your own rules, which are specific to your application (e.g., for Windows, Linux, or WordPress).

Define the AWS WAFv2 web ACL

First, let’s give the AWS WAF module a nicely readable name:

import { aws_wafv2 as wafv2 } from 'aws-cdk-lib';

Then, we define the AWS WAFv2 web ACL in AWS CDK:

const cfnWebACL = new wafv2.CfnWebACL(this,'MyCDKWebAcl'
      defaultAction: {
        allow: {}
      },
      scope: 'REGIONAL',
      visibilityConfig: {
        cloudWatchMetricsEnabled: true,
        metricName:'MetricForWebACLCDK',
        sampledRequestsEnabled: true,
      },
      name:‘MyCDKWebAcl’,
      rules: [{
        name: 'CRSRule',
        priority: 0,
        statement: {
          managedRuleGroupStatement: {
            name:'AWSManagedRulesCommonRuleSet',
            vendorName:'AWS'
          }
        },
        visibilityConfig: {
          cloudWatchMetricsEnabled: true,
          metricName:'MetricForWebACLCDK-CRS',
          sampledRequestsEnabled: true,
        },
        overrideAction: {
          none: {}
        },
      }]
    });

The highlighted line references the CRS managed rule group as one Rule in the list. You could add more Rule elements, either referencing the managed rule groups or custom rules.

Note the scope attribute. If you want to attach this web ACL to an API Gateway, AWS AppSync API, or Application Load Balancer, then it will be REGIONAL. If you want to attach it to a CloudFront distribution, then make sure that your AWS WAFv2 web ACL is defined in the US East (N. Virginia) Region and the scope is CLOUDFRONT.

Attach the AWS WAFv2 web ACL to an Application Load Balancer, AWS AppSync API, or API Gateway

Now that we have a web ACL defined, we must attach it to a resource. This works exactly the same across API Gateway API’s, an AWS AppSync API, or an Application Load Balancer. We must create a CfnWebACLAssociation and point it to the previously created web ACL and the resource to protect:

const cfnWebACLAssociation = new wafv2.CfnWebACLAssociation(this,'MyCDKWebACLAssociation', {
      resourceArn:<ARN of resource to protect>,
      webAclArn:cfnWebACL.attrArn,
    });

Amazon Resource Names (ARNs) uniquely identify AWS resources. The highlighted line shows how AWS CDK lets you get the ARN of the previously defined CfnWebAcl.

Depending on what type of service you’re using, jump to one of the three following sections to learn how to retrieve the resourceArn of API Gateway, AWS AppSync, or Application Load Balancers.

Retrieving ARN for AWS AppSync API’s

To retrieve the ARN of an AWS AppSync API, call the .arn property:

const api = new appsync.GraphqlApi(…)
const cfnWebACLAssociation = new wafv2.CfnWebACLAssociation(this,'MyCDKWebACLAssociation', {
      resourceArn:api.arn,
      webAclArn: cfnWebACL.attrArn,
    });

Retrieving ARN for Amazon API Gateway REST API’s

In this case, we must specify which stage of the REST API we want to protect with the web ACL. Then, we reference the ARN of the stage:

const api = new apigateway.RestApi(…)
const deployment = new apigateway.Deployment(…)
const stage = apigateway.Stage(…)
const cfnWebACLAssociation = new wafv2.CfnWebACLAssociation(this,'MyCDKWebACLAssociation', {
      resourceArn:stage.stageArn,
      webAclArn: cfnWebACL.attrArn,
    });

Retrieving ARN for Application Load Balancers

If you’re dealing with an Application Load Balancer, then this is how you can retrieve its ARN:

const lb = new elbv2.ApplicationLoadBalancer(…)

const cfnWebACLAssociation = new wafv2.CfnWebACLAssociation(this,'MyCDKWebACLAssociation', {
      resourceArn:lb.loadBalancerArn,
      webAclArn: cfnWebACL.attrArn,
    });

Attach the AWS WAFv2 web ACL to a CloudFront distribution

Attaching a web ACL to CloudFront follows a different approach. Instead of defining a cfnWebACLAssociation, we reference the web ACL inside of the Distribution definition:

const distribution = new cloudfront.Distribution(this,'distro', {
      defaultBehavior: {
        origin: new origins.S3Origin(s3Bucket)
      },
     webAclId:cfnWebACL.attrArn
    });

Note that even though the property is called webAclId, because we’re using AWS WAFv2, we must supply the ARN of the web ACL.

Exclude rules from the web ACL

Lastly, let’s understand how we can customize the web ACL further. If a rule of the managed rule group causes undesired behavior in the application, then we can exclude it from the webACL. Assume that we want to exclude the SizeRestrictions_BODY rule, which limits the request body size to 8 KB.

Go back to the definition of the web ACL, and add the highlighted lines:

const cfnWebACL = new wafv2.CfnWebACL(this, 'MyCDKWebAcl', {
      defaultAction: {
        allow: {}
      },
      scope:'REGIONAL',
      visibilityConfig: {
        cloudWatchMetricsEnabled: true,
        metricName:'MetricForWebACLCDK',
        sampledRequestsEnabled: true,
      },
      name:'MyCDKWebAcl',
      rules: [{
        name:'CRSRule',
        priority: 0,
        statement: {
          managedRuleGroupStatement: {
            name: 'AWSManagedRulesCommonRuleSet',
            vendorName: 'AWS',
            excludedRules: [{
             ‘SizeRestrictions_BODY’ }]
          }
        },
        visibilityConfig: {
          cloudWatchMetricsEnabled: true,
          metricName:'MetricForWebACLCDK-CRS',
          sampledRequestsEnabled: true,
        },
        overrideAction: {
          none: {}
        },
      }]

    });

Other customizations you can do include pinning the version of the rule group and narrowing the scope of the request that the rule evaluates, using Scope-down statements.

Conclusion

In this post, you’ve seen how an AWS WAFv2 web ACL can be added to your existing infrastructure defined in AWS CDK. By using Managed Rules, your application benefits from a layer of protection that is curated and maintained by AWS security experts.

As a next step, you can learn how to include AWS WAFv2 metrics from Amazon CloudWatch into your application dashboards. This will give you perspective on how your web application is performing in conjunction with the AWS WAFv2 web ACL.

To learn more about AWS WAFv2 and how to manage web ACL’s, check out the official developer guide.

About the author:

Ramon Lopez

Ramon is a Senior Solutions Architect at AWS, where he guides, educates, and empowers customers of all sizes and industries to build successful businesses in the AWS cloud. He also built web services for 150+ million Amazon Prime customers and led a team of software engineers in a fast-paced global environment. After being immersed in one of the largest micro-service environments, he is a believer in the DevOps mantra of “You build it, you run it”.

Manage application security and compliance with the AWS Cloud Development Kit and cdk-nag

Post Syndicated from Rodney Bozo original https://aws.amazon.com/blogs/devops/manage-application-security-and-compliance-with-the-aws-cloud-development-kit-and-cdk-nag/

Infrastructure as Code (IaC) is an important part of Cloud Applications. Developers rely on various Static Application Security Testing (SAST) tools to identify security/compliance issues and mitigate these issues early on, before releasing their applications to production. Additionally, SAST tools often provide reporting mechanisms that can help developers verify compliance during security reviews.

cdk-nag integrates directly into AWS Cloud Development Kit (AWS CDK) applications to provide identification and reporting mechanisms similar to SAST tooling.

This post demonstrates how to integrate cdk-nag into an AWS CDK application to provide continual feedback and help align your applications with best practices.

Overview of cdk-nag

cdk-nag (inspired by cfn_nag) validates that the state of constructs within a given scope comply with a given set of rules. Additionally, cdk-nag provides a rule suppression and compliance reporting system. cdk-nag validates constructs by extending AWS CDK Aspects. If you’re interested in learning more about the AWS CDK Aspect system, then you should check out this post.

cdk-nag includes several rule sets (NagPacks) to validate your application against. As of this post, cdk-nag includes the AWS Solutions, HIPAA Security, NIST 800-53 rev 4, NIST 800-53 rev 5, and PCI DSS 3.2.1 NagPacks. You can pick and choose different NagPacks and apply as many as you wish to a given scope.

cdk-nag rules can either be warnings or errors. Both warnings and errors will be displayed in the console and compliance reports. Only unsuppressed errors will prevent applications from deploying with the cdk deploy command.

You can see which rules are implemented in each of the NagPacks in the Rules Documentation in the GitHub repository.

Walkthrough

This walkthrough will setup a minimal AWS CDK v2 application, as well as demonstrate how to apply a NagPack to the application, how to suppress rules, and how to view a report of the findings. Although cdk-nag has support for Python, TypeScript, Java, and .NET AWS CDK applications, we’ll use TypeScript for this walkthrough.

Prerequisites

For this walkthrough, you should have the following prerequisites:

  • A local installation of and experience using the AWS CDK.

Create a baseline AWS CDK application

In this section you will create and synthesize a small AWS CDK v2 application with an Amazon Simple Storage Service (Amazon S3) bucket. If you are unfamiliar with using the AWS CDK, then learn how to install and setup the AWS CDK by looking at their open source GitHub repository.

  1. Run the following commands to create the AWS CDK application:
mkdir CdkTest
cd CdkTest
cdk init app --language typescript
  1. Replace the contents of the lib/cdk_test-stack.ts with the following:
import { Stack, StackProps } from 'aws-cdk-lib';
import { Construct } from 'constructs';
import { Bucket } from 'aws-cdk-lib/aws-s3';

export class CdkTestStack extends Stack {
  constructor(scope: Construct, id: string, props?: StackProps) {
    super(scope, id, props);
    const bucket = new Bucket(this, 'Bucket')
  }
}
  1. Run the following commands to install dependencies and synthesize our sample app:
npm install
npx cdk synth

You should see an AWS CloudFormation template with an S3 bucket both in your terminal and in cdk.out/CdkTestStack.template.json.

Apply a NagPack in your application

In this section, you’ll install cdk-nag, include the AwsSolutions NagPack in your application, and view the results.

  1. Run the following command to install cdk-nag:
npm install cdk-nag
  1. Replace the contents of the bin/cdk_test.ts with the following:
#!/usr/bin/env node
import 'source-map-support/register';
import * as cdk from 'aws-cdk-lib';
import { CdkTestStack } from '../lib/cdk_test-stack';
import { AwsSolutionsChecks } from 'cdk-nag'
import { Aspects } from 'aws-cdk-lib';

const app = new cdk.App();
// Add the cdk-nag AwsSolutions Pack with extra verbose logging enabled.
Aspects.of(app).add(new AwsSolutionsChecks({ verbose: true }))
new CdkTestStack(app, 'CdkTestStack', {});
  1. Run the following command to view the output and generate the compliance report:
npx cdk synth

The output should look similar to the following (Note: SSE stands for Server-side encryption):

[Error at /CdkTestStack/Bucket/Resource] AwsSolutions-S1: The S3 Bucket has server access logs disabled. The bucket should have server access logging enabled to provide detailed records for the requests that are made to the bucket.

[Error at /CdkTestStack/Bucket/Resource] AwsSolutions-S2: The S3 Bucket does not have public access restricted and blocked. The bucket should have public access restricted and blocked to prevent unauthorized access.

[Error at /CdkTestStack/Bucket/Resource] AwsSolutions-S3: The S3 Bucket does not default encryption enabled. The bucket should minimally have SSE enabled to help protect data-at-rest.

[Error at /CdkTestStack/Bucket/Resource] AwsSolutions-S10: The S3 Bucket does not require requests to use SSL. You can use HTTPS (TLS) to help prevent potential attackers from eavesdropping on or manipulating network traffic using person-in-the-middle or similar attacks. You should allow only encrypted connections over HTTPS (TLS) using the aws:SecureTransport condition on Amazon S3 bucket policies.

Found errors

Note that applying the AwsSolutions NagPack to the application rendered several errors in the console (AwsSolutions-S1, AwsSolutions-S2, AwsSolutions-S3, and AwsSolutions-S10). Furthermore, the cdk.out/AwsSolutions-CdkTestStack-NagReport.csv contains the errors as well:

Rule ID,Resource ID,Compliance,Exception Reason,Rule Level,Rule Info
"AwsSolutions-S1","CdkTestStack/Bucket/Resource","Non-Compliant","N/A","Error","The S3 Bucket has server access logs disabled."
"AwsSolutions-S2","CdkTestStack/Bucket/Resource","Non-Compliant","N/A","Error","The S3 Bucket does not have public access restricted and blocked."
"AwsSolutions-S3","CdkTestStack/Bucket/Resource","Non-Compliant","N/A","Error","The S3 Bucket does not default encryption enabled."
"AwsSolutions-S5","CdkTestStack/Bucket/Resource","Compliant","N/A","Error","The S3 static website bucket either has an open world bucket policy or does not use a CloudFront Origin Access Identity (OAI) in the bucket policy for limited getObject and/or putObject permissions."
"AwsSolutions-S10","CdkTestStack/Bucket/Resource","Non-Compliant","N/A","Error","The S3 Bucket does not require requests to use SSL."

Remediating and suppressing errors

In this section, you’ll remediate the AwsSolutions-S10 error, suppress the  AwsSolutions-S1 error on a Stack level, suppress the  AwsSolutions-S2 error on a Resource level errors, and not remediate the  AwsSolutions-S3 error and view the results.

  1. Replace the contents of the lib/cdk_test-stack.ts with the following:
import { Stack, StackProps } from 'aws-cdk-lib';
import { Construct } from 'constructs';
import { Bucket } from 'aws-cdk-lib/aws-s3';
import { NagSuppressions } from 'cdk-nag'

export class CdkTestStack extends Stack {
  constructor(scope: Construct, id: string, props?: StackProps) {
    super(scope, id, props);
    // The local scope 'this' is the Stack. 
    NagSuppressions.addStackSuppressions(this, [
      {
        id: 'AwsSolutions-S1',
        reason: 'Demonstrate a stack level suppression.'
      },
    ])
    // Remediating AwsSolutions-S10 by enforcing SSL on the bucket.
    const bucket = new Bucket(this, 'Bucket', { enforceSSL: true })
    NagSuppressions.addResourceSuppressions(bucket, [
      {
        id: 'AwsSolutions-S2',
        reason: 'Demonstrate a resource level suppression.'
      },
    ])
  }
}
  1. Run the cdk synth command again:
npx cdk synth

The output should look similar to the following:

[Error at /CdkTestStack/Bucket/Resource] AwsSolutions-S3: The S3 Bucket does not default encryption enabled. The bucket should minimally have SSE enabled to help protect data-at-rest.

Found errors

The cdk.out/AwsSolutions-CdkTestStack-NagReport.csv contains more details about rule compliance, non-compliance, and suppressions.

Rule ID,Resource ID,Compliance,Exception Reason,Rule Level,Rule Info
"AwsSolutions-S1","CdkTestStack/Bucket/Resource","Suppressed","Demonstrate a stack level suppression.","Error","The S3 Bucket has server access logs disabled."
"AwsSolutions-S2","CdkTestStack/Bucket/Resource","Suppressed","Demonstrate a resource level suppression.","Error","The S3 Bucket does not have public access restricted and blocked."
"AwsSolutions-S3","CdkTestStack/Bucket/Resource","Non-Compliant","N/A","Error","The S3 Bucket does not default encryption enabled."
"AwsSolutions-S5","CdkTestStack/Bucket/Resource","Compliant","N/A","Error","The S3 static website bucket either has an open world bucket policy or does not use a CloudFront Origin Access Identity (OAI) in the bucket policy for limited getObject and/or putObject permissions."
"AwsSolutions-S10","CdkTestStack/Bucket/Resource","Compliant","N/A","Error","The S3 Bucket does not require requests to use SSL."

Moreover, note that the resultant cdk.out/CdkTestStack.template.json template contains the cdk-nag suppression data. This provides transparency with what rules weren’t applied to an application, as the suppression data is included in the resources.

{
  "Metadata": {
    "cdk_nag": {
      "rules_to_suppress": [
        {
          "id": "AwsSolutions-S1",
          "reason": "Demonstrate a stack level suppression."
        }
      ]
    }
  },
  "Resources": {
    "BucketDEB6E181": {
      "Type": "AWS::S3::Bucket",
      "UpdateReplacePolicy": "Retain",
      "DeletionPolicy": "Retain",
      "Metadata": {
        "aws:cdk:path": "CdkTestStack/Bucket/Resource",
        "cdk_nag": {
          "rules_to_suppress": [
            {
              "id": "AwsSolutions-S2",
              "reason": "Demonstrate a resource level suppression."
            }
          ]
        }
      }
    },
  ...
  },
  ...
}

Reflecting on the Walkthrough

In this section, you learned how to apply a NagPack to your application, remediate/suppress warnings and errors, and review the compliance reports. The reporting and suppression systems provide mechanisms for the development and security teams within organizations to work together to identify and mitigate potential security/compliance issues. Security can choose which NagPacks developers should apply to their applications. Then, developers can use the feedback to quickly remediate issues. Security can use the reports to validate compliances. Furthermore, developers and security can work together to use suppressions to transparently document exceptions to rules that they’ve decided not to follow.

Advanced usage and further reading

This section briefly covers some advanced options for using cdk-nag.

Unit Testing with the AWS CDK Assertions Library

The Annotations submodule of the AWS CDK assertions library lets you check for cdk-nag warnings and errors without AWS credentials by integrating a NagPack into your application unit tests. Read this post for further information about the AWS CDK assertions module. The following is an example of using assertions with a TypeScript AWS CDK application and Jest for unit testing.

import { Annotations, Match } from 'aws-cdk-lib/assertions';
import { App, Aspects, Stack } from 'aws-cdk-lib';
import { AwsSolutionsChecks } from 'cdk-nag';
import { CdkTestStack } from '../lib/cdk_test-stack';

describe('cdk-nag AwsSolutions Pack', () => {
  let stack: Stack;
  let app: App;
  // In this case we can use beforeAll() over beforeEach() since our tests 
  // do not modify the state of the application 
  beforeAll(() => {
    // GIVEN
    app = new App();
    stack = new CdkTestStack(app, 'test');

    // WHEN
    Aspects.of(stack).add(new AwsSolutionsChecks());
  });

  // THEN
  test('No unsuppressed Warnings', () => {
    const warnings = Annotations.fromStack(stack).findWarning(
      '*',
      Match.stringLikeRegexp('AwsSolutions-.*')
    );
    expect(warnings).toHaveLength(0);
  });

  test('No unsuppressed Errors', () => {
    const errors = Annotations.fromStack(stack).findError(
      '*',
      Match.stringLikeRegexp('AwsSolutions-.*')
    );
    expect(errors).toHaveLength(0);
  });
});

Additionally, many testing frameworks include watch functionality. This is a background process that reruns all of the tests when files in your project have changed for fast feedback. For example, when using the AWS CDK in JavaScript/Typescript, you can use the Jest CLI watch commands. When Jest watch detects a file change, it attempts to run unit tests related to the changed file. This can be used to automatically run cdk-nag-related tests when making changes to your AWS CDK application.

CDK Watch

When developing in non-production environments, consider using AWS CDK Watch with a NagPack for fast feedback. AWS CDK Watch attempts to synthesize and then deploy changes whenever you save changes to your files. Aspects are run during synthesis. Therefore, any NagPacks applied to your application will also run on save. As in the walkthrough, all of the unsuppressed errors will prevent deployments, all of the messages will be output to the console, and all of the compliance reports will be generated. Read this post for further information about AWS CDK Watch.

Conclusion

In this post, you learned how to use cdk-nag in your AWS CDK applications. To learn more about using cdk-nag in your applications, check out the README in the GitHub Repository. If you would like to learn how to create your own rules and NagPacks, then check out the developer documentation. The repository is open source and welcomes community contributions and feedback.

Author:

Arun Donti

Arun Donti is a Senior Software Engineer with Twitch. He loves working on building automated processes and tools that enable builders and organizations to focus on and deliver their mission critical needs. You can find him on GitHub.

AWS Week In Review – May 23, 2022

Post Syndicated from Sébastien Stormacq original https://aws.amazon.com/blogs/aws/aws-week-in-review-may-27-2022/

This post is part of our Week in Review series. Check back each week for a quick roundup of interesting news and announcements from AWS!

This is the right place to quickly learn about recent AWS news from last week, in just about five minutes or less. This week, I have collected a couple of news items that might be of interest to you, the IT professionals, developers, system administrators, or any type of builders that have their hands on the AWS console, the CLI, or that are writing code.

Last Week’s Launches
The launches that caught my attention last week are the following:

EC2 now supports NitroTPM and SecureBoot – A Trusted Platform Module is often a discrete chip in a computer where you can store secrets and release them to the operating system only when the system is in a known good state. You typically use TPM modules to store operating-system-level volume encryption keys, such as the ones used by BitLocker on Windows or LUKS. NitroTPM is a virtual TPM module available on selected instance families that allows you to deploy your workloads depending on TPM functionalities on EC2 instances.

Amazon EC2 Auto Scaling now backfills predictive scaling forecasts so you can quickly validate forecast accuracy. Auto Scaling Predictive Scaling is a capability of Auto Scaling that allows you to scale your fleet in and out based on observed usage patterns. It uses AI/ML to predict when your fleet needs more or less capacity. It allows you to scale a fleet in advance of the scaling event and have the fleet prepared at peak times. The new backfills shows you how predictive scaling would have scaled your fleet during the last 14 days. This allows you to quickly decide if the predictive scaling policy is accurate for your applications by comparing the demand and capacity forecasts against actual demand immediately after you create a predictive scaling policy.

AWS Backup adds support for two new managed file systems, Amazon FSx for OpenZFS and Amazon Fsx for NetApp ONTAP. These additions helps you meet your centralized data protection and regulatory compliance needs. You can now use AWS Backup’s policy-based capabilities to centrally protect Amazon FSx for NetApp ONTAP or Amazon Fsx for OpenZFS, along with the other AWS services for storage, database, and compute that AWS Backup supports.

AWS App Mesh now supports IPv6 AWS App Mesh is a service mesh that provides application-level networking to make it easy for your services to communicate with each other across multiple types of compute infrastructure. The new support for IPv6 allows you to support workloads running in IPv6 networks and to invoke App Mesh APIs over IPv6. This helps you meet IPv6 compliance requirements, and removes the need for complex networking configuration to handle address translation between IPv4 and IPv6.

Amazon Chime SDK now supports video background replacement and blur on iOS and Android. When you want to integrate audio and video call capabilities in your mobile applications, the Chime SDK is the easiest way to get started. It provides an easy-to-use API that uses the scalable and robust Amazon Chime backend to power your communications. For example, Slack is using Chime as backend for the communications in their apps. The Chime SDK client libraries for iOS and Android now include video background replacement and blur, which developers can use to reduce visual distractions and help increase visual privacy for mobile users on iOS and Android.

For a full list of AWS announcements, be sure to keep an eye on the What’s New at AWS page.

Other AWS News
Some other updates and news that you may have missed:

Amazon Redshift: Ten years of continuous reinvention. This is an Amazon Redshift research paper that will be presented at a leading international forum for database researchers. The authors reflect on how far the first petabyte-scale cloud data warehouse has advanced since it was announced ten years ago.

Improve Your Security at the Edge with AWS IoT Services is a new blog post on the IoT channel. We understand the risks associated with operating at the edge and that you need additional capabilities to ensure that your data is protected. AWS IoT services can help you with end-to-end data protection, device security, and device identification to create the foundation of an expanded information security model and confidently operate at the edge.

AWS Open Source News and Updates – Ricardo Sueiras, my colleague from the AWS Developer Relation team, runs this newsletter. It brings you all the latest open-source projects, posts, and more. Read edition #113 here.

Upcoming AWS Events
CDK Day, on May 26 is a one-day fully virtual event dedicated to the AWS Cloud Development Kit. With four versions of the CDK released (AWS, Terraform, CDK8s, and Projen), we tought the CDK deserves its own full-fledged conference. We will take one day and showcase the brightest and best of CDK from across the whole product family. Let’s talk serverless, Kubernetes and multi-cloud all on the same day! CDK Day will take place on May 26, 2022 and will be fully virtual, live-streamed to our YouTube channel. Book your ticket now, it’s free.

The AWS Summit season is mostly over in Europe, but there are upcoming Summits in North America and the Asia Pacific Regions. Here are some virtual and in-person Summits that might be close to you:

More to come in July, August, and September.

You can register for re:MARS to get fresh ideas on topics such as machine learning, automation, robotics, and space. The conference will be in person in Las Vegas, June 21–24.

That’s all for this week. Check back next Monday for another Week in Review!

— seb

Govern CI/CD best practices via AWS Service Catalog

Post Syndicated from César Prieto Ballester original https://aws.amazon.com/blogs/devops/govern-ci-cd-best-practices-via-aws-service-catalog/

Introduction

AWS Service Catalog enables organizations to create and manage Information Technology (IT) services catalogs that are approved for use on AWS. These IT services can include resources such as virtual machine images, servers, software, and databases to complete multi-tier application architectures. AWS Service Catalog lets you centrally manage deployed IT services and your applications, resources, and metadata , which helps you achieve consistent governance and meet your compliance requirements. In addition,  this configuration enables users to quickly deploy only approved IT services.

In large organizations, as more products are created, Service Catalog management can become exponentially complicated when different teams work on various products. The following solution simplifies Service Catalog products provisioning by considering elements such as shared accounts, roles, or users who can run portfolios or tags in the form of best practices via Continuous Integrations and Continuous Deployment (CI/CD) patterns.

This post demonstrates how Service Catalog Products can be delivered by taking advantage of the main benefits of CI/CD principles along with reducing complexity required to sync services. In this scenario, we have built a CI/CD Pipeline exclusively using AWS Services and the AWS Cloud Development Kit (CDK) Framework to provision the necessary Infrastructure.

Customers need the capability to consume services in a self-service manner, with services built on patterns that follow best practices, including focus areas such as compliance and security. The key tenants for these customers are: the use of infrastructure as code (IaC), and CI/CD. For these reasons, we built a scalable and automated deployment solution covered in this post.Furthermore, this post is also inspired from another post from the AWS community, Building a Continuous Delivery Pipeline for AWS Service Catalog.

Solution Overview

The solution is built using a unified AWS CodeCommit repository with CDK v1 code, which manages and deploys the Service Catalog Product estate. The solution supports the following scenarios: 1) making Products available to accounts and 2) provisioning these Products directly into accounts. The configuration provides flexibility regarding which components must be deployed in accounts as opposed to making a collection of these components available to account owners/users who can in turn build upon and provision them via sharing.

Figure shows the pipeline created comprised of stages

The pipeline created is comprised of the following stages:

  1. Retrieving the code from the repository
  2. Synthesize the CDK code to transform it into a CloudFormation template
  3. Ensure the pipeline is defined correctly
  4. Deploy and/or share the defined Portfolios and Products to a hub account or multiple accounts

Deploying and using the solution

Deploy the pipeline

We have created a Python AWS Cloud Development Kit (AWS CDK) v1 application hosted in a Git Repository. Deploying this application will create the required components described in this post. For a list of the deployment prerequisites, see the project README.

Clone the repository to your local machine. Then, bootstrap and deploy the CDK stack following the next steps.

git clone https://github.com/aws-samples/aws-cdk-service-catalog-pipeline
cd aws-cdk-service-catalog
pip install -r requirements.txt
cdk bootstrap aws://account_id/eu-west-1
cdk deploy

The infrastructure creation takes around 3-5 minutes to complete deploying the AWS CodePipelines and repository creation. Once CDK has deployed the components, you will have a new empty repository where we will define the target Service Catalog estate. To do so, clone the new repository and push our sample code into it:

git clone https://git-codecommit.eu-west-1.amazonaws.com/v1/repos/service-catalog-repo
git checkout -b main
cd service-catalog-repo
cp -aR ../cdk-service-catalog-pipeline/* .
git add .
git commit -am "First commit"
git push origin main

Review and update configuration

Our cdk.json file is used to manage context settings such as shared accounts, permissions, region to deploy, etc.

shared_accounts_ecs: AWS account IDs where the ECS portfolio will be shared
shared_accounts_storage: AWS account IDs where the Storage portfolio will be shared
roles: ARN for the roles who will have permissions to access to the Portfolio
users: ARN for the users who will have permissions to access to the Portfolio
groups: ARN for the groups who will have permissions to access to the Portfolio
hub_account: AWS account ID where the Portfolio will be created
pipeline_account: AWS account ID where the main Infrastructure Pipeline will be created
region: the AWS region to be used for the deployment of the account
"shared_accounts_ecs":["012345678901","012345678902"],
    "shared_accounts_storage":["012345678901","012345678902"],
    "roles":[],
    "users":[],
    "groups":[],
    "hub_account":"012345678901",
    "pipeline_account":"012345678901",
    "region":"eu-west-1"

There are two mechanisms that can be used to create Service Catalog Products in this solution: 1) providing a CloudFormation template or 2) declaring a CDK stack (that will be transformed as part of the pipeline). Our sample contains two Products, each demonstrating one of these options: an Amazon Elastic Container Services (ECS) deployment and an Amazon Simple Storage Service (S3) product.

These Products are automatically shared with accounts specified in the shared_accounts_storage variable. Each product is managed by a CDK Python file in the cdk_service_catalog folder.

Figure shows Pipeline stages that AWS CodePipeline runs through

Figure shows Pipeline stages that AWS CodePipeline runs through

Figure shows Pipeline stages that AWS CodePipeline runs through

The Pipeline stages that AWS CodePipeline runs through are as follows:

  1. Download the AWS CodeCommit code
  2. Synthesize the CDK code to transform it into a CloudFormation template
  3. Auto-modify the Pipeline in case you have made manual changes to it
  4. Display the different Portfolios and Products associated in a Hub account in a Region or in multiple accounts

Adding new Portfolios and Products

To add a new Portfolio to the Pipeline, we recommend creating a new class under cdk_service_catalog similar to cdk_service_catalog_ecs_stack.py from our sample. Once the new class is created with the products you wish to associate, we instantiate the new class inside cdk_pipelines.py, and then add it inside the wave in the stage. There are two ways to create portfolio products. The first one is by creating a CloudFormation template, as can be seen in the Amazon Elastic Container Service (ECS) example.  The second way is by creating a CDK stack that will be transformed into a template, as can be seen in the Storage example.

Product and Portfolio definition:

class ECSCluster(servicecatalog.ProductStack):
    def __init__(self, scope, id):
        super().__init__(scope, id)
        # Parameters for the Product Template
        cluster_name = cdk.CfnParameter(self, "clusterName", type="String", description="The name of the ECS cluster")
        container_insights_enable = cdk.CfnParameter(self, "container_insights", type="String",default="False",allowed_values=["False","True"],description="Enable Container Insights")
        vpc = cdk.CfnParameter(self, "vpc", type="AWS::EC2::VPC::Id", description="VPC")
        ecs.Cluster(self,"ECSCluster_template", enable_fargate_capacity_providers=True,cluster_name=cluster_name.value_as_string,container_insights=bool(container_insights_enable.value_as_string),vpc=vpc)
              cdk.Tags.of(self).add("key", "value")

Clean up

The following will help you clean up all necessary parts of this post: After completing your demo, feel free to delete your stack using the CDK CLI:

cdk destroy --all

Conclusion

In this post, we demonstrated how Service Catalog deployments can be accelerated by building a CI/CD pipeline using self-managed services. The Portfolio & Product estate is defined in its entirety by using Infrastructure-as-Code and automatically deployed based on your configuration. To learn more about AWS CDK Pipelines or AWS Service Catalog, visit the appropriate product documentation.

Authors:


César Prieto Ballester

César Prieto Ballester is a Senior DevOps Consultant at AWS. He enjoys automating everything and building infrastructure using code. Apart from work, he plays electric guitar and loves riding his mountain bike.

Daniel Mutale

Daniel Mutale is a Cloud Infrastructure Architect at AWS Professional Services. He enjoys creating cloud based architectures and building out the underlying infrastructure to support the architectures using code. Apart from work, he is an avid animal photographer and has a passion for interior design.

Raphael Sack

Raphael is a technical business development manager for Service Catalog & Control Tower. He enjoys tinkering with automation and code and active member of the management tools community.

Let’s Architect! Using open-source technologies on AWS

Post Syndicated from Luca Mezzalira original https://aws.amazon.com/blogs/architecture/lets-architect-using-open-source-technologies-on-aws/

With open-source technology, authors make software available to the public, who can view, use, or change it and add new features or support new capabilities. Open-source technology promotes collaboration across different teams, organizations, and people because the process often includes different perspectives and ideas, which typically results a stronger solution.

It can be difficult to create a multi-use solution when building to solve for a specific challenge. With an open-source project or an initiative, multiple teams work together, which prevents coupling and makes the solution easier to generalize.

In this edition of Let’s Architect!, we show you some open-source technologies built with AWS and options for running well-known, open-source projects on AWS.

Firecracker: Secure and Fast microVMs for Serverless Computing

Firecracker was developed at AWS to improve the customer experience of services like AWS Lambda and AWS Fargate. This technology is used to deploy workloads in lightweight virtual machines (VMs), called microVMs. For example, when a new Lambda function is triggered in response to an event, AWS Lambda provisions a microVM (if none already exists) to handle the request. Behind the scenes, this is powered by Firecracker.

This video introduces Firecracker and the concept of virtual machine monitor as a technology to create and manage microVMs. This talk explains Firecracker’s foundation, the minimal device model, and how it interacts with various containers. You’ll learn about the performance, security, and utilization improvements enabled by Firecracker and how Firecracker is used for Lambda and Fargate.

An example host running Firecracker microVMs

An example host running Firecracker microVMs

Deep dive into AWS Cloud Development Kit

AWS Cloud Development Kit (CDK) is an open-source software development framework that allows you to define your cloud application resources using familiar programming languages. It uses object-oriented design to create resources and build an end-to-end process for application development from infrastructure and software-development perspectives.

This video introduces AWS CDK core concepts and demonstrates how to create custom resources and deploy them to the cloud. With AWS CDK, you can make deployments repeatable, automate operations through infrastructure as code, and use the software design patterns while coding your architecture.

AWS CDK is an open-source software development framework for defining cloud infrastructure as code

AWS CDK is an open-source software development framework for defining cloud infrastructure as code

Using Apollo Server on AWS Lambda with Amazon EventBridge for real-time, event-driven streaming

Apollo Server is an open-source, spec-compliant GraphQL server that’s compatible with any GraphQL client. This blog posts covers how you can architect Apollo Server on AWS Lambda in an event-driven architecture. It shows you how to use the Apollo Server on AWS Lambda, integrate it with REST and WebSocket APIs and communicate asynchronously via event bus.

Sample application: a chat app that receives a text message from the client and responds with French and German translations of the message

Sample application: a chat app that receives a text message from the client and responds with French and German translations of the message

Observability the open-source way

Removing the undifferentiated heavy lifting for implementing open-source software can allow you to plug-and-play your favorite solutions with existing AWS services. This video addresses best practices and real-world use cases for Amazon Managed Service for Prometheus, Amazon Managed Grafana, and AWS Distro for OpenTelemetry to gain observability. Observability is fundamental to collect and analyze data coming from your architecture, understand the status of your system, and take action to improve application performance.

Setting up Amazon Managed Service for Prometheus

Setting up Amazon Managed Service for Prometheus

See you next time!

See you in a couple of weeks when we discuss strategies for running serverless applications on AWS!

Looking for more architecture content? AWS Architecture Center provides reference architecture diagrams, vetted architecture solutions, Well-Architected best practices, patterns, icons, and more!

Other posts in this series

How MarketAxess® uses AWS Developer Tools to create scalable and secure CI/CD pipelines

Post Syndicated from Aaron Lima original https://aws.amazon.com/blogs/devops/how-marketaxess-uses-aws-developer-tools-to-create-scalable-and-secure-ci-cd-pipelines/

Very often,  enterprise organizations strive to adopt modern DevOps practices, tofocus on governance and security without sacrificing development velocity. In this guest post, Prashant Joshi, Senior Cloud Engineer at MarketAxess, explains how they use the AWS Cloud Development Kit (AWS CDK), AWS CodePipeline, and AWS CodeBuild to simplify the developer experience by dynamically provisioning pipelines and maintaining governance at MarketAxess.

Problem Statement

MarketAxess is a financial technology company that operates an e-trading platform, for institutional credit markets. As MarketAxess adopted DevOps firm-wide, we struggled to ensure pipeline consistency. We had developers using static code analysis and linting, but it wasn’t enforced. As more teams began to adopt DevOps practices, the importance of providing consistency over code quality, security scanning, and artifact management grew. However, we were challenged with increasing our engineering workforce and implementing best practices in the various pipelines. As a small team, we needed a way to reliably manage and scale pipelines while reducing engineering overhead. We thought about the DevOps tenets, as well as the importance of automation, and we decided to build automation that would provision pipelines for development teams.  These pipelines included best practices for Continuous Integration and Continuous Deployment (CI/CD). We wanted to build this automation with self-service, so that teams can get started developing a solution to a business problem, without having to spend too much time around the CI/CD aspects of their projects.

We chose the AWS CDK to deploy AWS CodePipeline, AWS CodeBuild, and AWS Identity and Access Management (IAM) resources, and used an API webhook using AWS Lambda and Amazon API Gateway for integration. In this post, we provide an example of how these services can be used to create dynamic cross account CI/CD pipelines.

Solution

In developing our solution, we wanted to accomplish three main goals:

  1. Standardization and Governance of Pipelines – We wanted to ensure consistent practices in each team’s pipeline to make sure of code quality and security.
  2. Simplified Developer Interaction – We wanted developers to focus mainly on interacting with the code repository for their project.
  3. Improve Management of Dynamically Provisioned Pipelines – Knowing that we would need to make changes, improvements, and enhancements, we wanted tools and a process that was flexible.

We achieved these goals using AWS CDK to automate the creation of CodePipeline and define mandatory actions in the pipeline. We also created a webhook using API Gateway to integrate with our Bitbucket repositories to automatically trigger the automation. The pipelines can dynamically be provisioned or updated based on the YAML manifest file submitted to the repository. We process the manifest file with Amazon Elastic Container Service (Amazon ECS) Fargate tasks, because we had containerized the processing components using Docker. However, with the release of container support in Lambda, we are now considering this as a potential replacement. These pipelines run CI stages based on the programing language defined by development teams in the manifest file, and they deploy a tested versioned artifact to the corresponding environments via standard Software Defined Lifecycle (SDLC) practices. As a part of CI stages, we semantically version our code and tag our commits accordingly. This lets us trace commit to pipeline execution. The following architecture diagram shows a CloudFormation pipeline generated via AWS CDK.

CloudFormation Pipeline Architecture Diagram

The process flow is as follows:

  1. Developer pushes a change to the repository.
  2. A webhook is triggered when the Pull Request is merged that creates or modifies the pipeline based on the manifest file submitted to the repository.
  3. This triggers a Lambda function that performs the following:
    1. Clones the repository from Internally hosted BitBucket repos.
    2. Uploads the repository to the source Amazon Simple Storage Service (Amazon S3) bucket, which is encrypted using Customer Managed Keys (CMK) with the AWS Key Management Service (KMS).
    3. An ECS Task is run, and a manifest file is passed which gives the project parameters. Pipelines are built according to these project parameters.
  4. An ECS Task processes the metadata file and runs cdk Logic, finally it triggers the pipeline.
    1. As source code is progressed through the pipeline, the build stage output to the artifact bucket. Pipeline artifacts are encrypted with a CMK. The IAM roles in the target account only have access to this bucket.

Additionally, through the power of the IAM integration with CodePipeline, the team could implement session tags with IAM roles and Okta to make sure that independent teams only approve pipelines, which are owned by respective teams. Furthermore, we use attribute-based tags to protect the production environment from unauthorized actions, so that deployment to production can only come through the pipeline.

The AWS CDK-based pipelines let MarketAxess enable teams to independently build and obtain immediate feedback, while still centrally governing CI and CD patterns. The solution took six months of two DevOps engineers working full time to build the cdk structure and support for the core languages and their corresponding CI and CD stages. We continue to iterate on the cdk code base and pipelines, incorporating feedback from our development community to ensure developer satisfaction.

Simplified Developer Interaction

Although we were enforcing standards via the automation, we still wanted to give development teams autonomy through a simple mechanism. We wanted developers to interact with our pipeline creation process through a pipeline manifest file that they submitted to their repository. An example of the manifest file schema is in the following screenshot:

Manifest File Schema

As shown above, the manifest lets developers define custom application configurations, while preserving consistent quality gates. This manifest is checked in to source control, and upon a commit to the code repository it triggers our automation. This lets our pipelines mutate on manifest file changes, and it makes sure that the latest commit goes through the latest quality gates. Each repository gets its own pipeline, and, to maintain the security of the pipeline, we used IAM Session Tags with Okta. We tag each pipeline and its associated resources with a unique attribute that is mapped to the development team so that they only have access to their pipelines, and only authorized individuals may approve production deployments.

Using AWS CDK, AWS CodePipeline, and other AWS Services, we have been able to improve the stability and quality of the code being delivered. CodePipeline and AWS CDK have helped us develop a cloud native pipeline solution that meets our governance best practices and compliance requirements. We met our three goals, and we can iterate and change easily moving forward.

Conclusion

Organizations that achieve the automation and self-service ideals of DevOps can build, release, and deploy features and apps to users faster and at higher levels of quality. In this post, we saw a real-life example of using Infrastructure as Code with AWS CDK to build a service that helps maintain governance and helps developers get work done. Here are two other posts that demonstrate using AWS Service Catalog to create secure DevOps pipelines or DevOps pipelines that deploy containerized applications.


Prashant Joshi

Prashant Joshi

Prashant Joshi is a Senior Cloud Engineer working in the Cloud Foundation team at MarketAxess. MarketAxess is a registered trademark of MarketAxess Holdings Inc.

Deploying Sample UI Forms using React, Formik, and AWS CDK

Post Syndicated from Kevin Rivera original https://aws.amazon.com/blogs/architecture/deploying-sample-ui-forms-using-react-formik-and-aws-cdk/

Companies in many industries use UI forms to collect customer data for account registrations, online shopping, and surveys. It can be tedious to create form fields. Proper use of input validation can help users easily find and fix mistakes. Best practice is that users should not see a form filled with “this field is required” or “your email is invalid” errors until they have first attempted to complete the form.

Forms can be difficult to write, maintain, and test. They often have to be repeated in multiple areas on even the most basic interactive web application. Fortunately, third-party libraries provide front-end developers with tools to manage these complexities.

This blog post will describe an example solution for implementing simple forms for a user interface using the JavaScript libraries React and Formik. We will also use AWS resources to host the application. The blog will describe how the application is provisioned using the AWS Cloud Development Kit (CDK).

Our sample form and code

Our solution demonstrates a straightforward way for a front-end or full stack developer to rapidly create forms. We will show how a popular React form library, Formik, abstracts input field state management and reduces the amount of written code.

Our sample form will collect the user’s information (name, email, and date of birth) and store the data to a private Amazon S3 bucket for later retrieval using a presigned URL. The sample code gives developers a structure with which to build on and experiment. The code provides example integration with AWS services to host a React form application.

Figure 1 demonstrates how the user’s information flows through various AWS services and finally gets uploaded to private Amazon S3 bucket.

Figure 1. User interface communicating with API Gateway to upload a file to a S3 bucket using a presigned URL

Figure 1. User interface communicating with API Gateway to upload a file to a S3 bucket using a presigned URL

  1. Click the Upload button. The user visits the webpage, fills the form, and clicks the ‘Upload Data’ button
  2. HTTP request to Amazon API Gateway. The front end makes an HTTP request to the API Gateway
  3. Forward HTTP request. The API Gateway forwards the HTTP request to the Lambda function that generates a presigned URL for uploading data to a S3 bucket
  4. Presigned URL. The presigned URL for uploading data to a S3 bucket is returned by the Lambda function to the API Gateway as HTTP response.
  5. Forward HTTP response. The API Gateway forwards the presigned URL to the client application
  6. Upload data to Amazon S3. The client application uses the presigned URL to upload the form data to a S3 bucket

The code also demonstrates the flow of data when a download request is made by the user. The download process is shown in Figure 2.

Figure 2. User interface communicating with API Gateway to download a file from a S3 bucket using presigned URL

Figure 2. User interface communicating with API Gateway to download a file from a S3 bucket using presigned URL

  1. Click Download button. The user clicks the ‘Download Data’ button
  2. HTTP request to API Gateway. The front end makes an HTTP request to the API Gateway
  3. Forward HTTP request. The API Gateway forwards the HTTP request to the Lambda function that generates a presigned URL for downloading data from a S3 bucket
  4. Presigned URL. The presigned URL for downloading data from a S3 bucket is returned by the Lambda function to the API Gateway as HTTP response.
  5. Forward HTTP response. The API Gateway forwards the presigned URL to the client application
  6. Upload data to Amazon S3. The client application uses the presigned URL to download the form data to S3 bucket
  7. File downloads. The file downloads to user’s computer

Here are the four steps to demonstrate this solution:

  1. Provisioning the infrastructure (backend). The infrastructure will consist of:
    • An AWS Lambda function, which will generate a presigned URL when requested by the UI and respond with the URL for uploading/downloading data
    • An API Gateway, which will handle the requests and responses from UI and Lambda
    • Two separate S3 buckets, which will host the static UI forms and store the uploaded data (different buckets for each).
  2. Deploying the front end. We will use sample React/Formik code on S3.
  3. Testing. Once our code is deployed, we will test the form by uploading a file though the UI, and then retrieve that file.
  4. Clean up. Finally, we will clean up the S3 bucket.

Prerequisites

For this walkthrough, you should have the following prerequisites:

Deploying the backend and front end

Clone code

The sample code for this application is available on GitHub. Clone the repo to follow along in a terminal.

git clone https://github.com/aws-samples/react-formik-on-aws

Install dependencies

Change the directory to the folder the clone created and install dependencies for the API.

cd formik-presigned-s3/ npm install

After installing the dependencies for the API, let’s install the dependencies in the UI.

cd ui/formik-s3-react-app
npm install

Bundling

Let’s bundle our Lambda function that currently exists in the index.js file inside the resources/lambda directory. This will create our Lambda function inside a directory that our stack can read from, to create the handler.

npx esbuild resources/lambda/index.js –bundle –platform=node –target=node12 –external:aws-sdk –outfile=dist/lambda/build/index.js

Let’s go into more detail about the function of the Lambda handler. As seen in Figure 3, the handler is using three helper functions that are written in the file (isExisted, fetchUploadUrl, fetchViewUrl). It creates a presigned URL for uploads/downloads of data, confirms that the URL was created, and fetches the URL. Lines 6874 are calling the helper functions based on the API request needed.

Figure 3. Lambda’s handler function for GET request type

Figure 3. Lambda’s handler function for GET request type

Build the React app

#Make sure you are in the ui/formik-s3-react-app directory
npm run build

This command will create your index.html file and its dependencies, which will be the source of your UI site. When we deploy our stack, we will inspect the CDK code. The Lambda bundler and the React app build step work together to source the directory and create the S3 bucket that will eventually host the React application.

Note: If you are deploying AWS CDK apps into an AWS environment, you must provision these resources for a specific location and account. In this case you must run the following command:

cdk bootstrap aws://<aws_account_number>/<aws_region>

This is the error that you will see if you do not bootstrap:

This stack uses assets, so the toolkit stack must be deployed to the environment (Run "cdk bootstrap aws://aws_account_number/aws_region")

Let’s deploy!

Before we run the deploy command, let’s understand what exactly we are deploying and the advantages of the CDK.

Note: We won’t go into depth on how the AWS CDK works, but we will demonstrate implementation of the code for our infrastructure and website hosting.

Our configuration code for deploying our CDK is found in the root directory in a file called cdk.json. It’s important that we can configure certain properties. This is where we map to our bin file that creates our CDK app. As you can see in Figure 4, the app key points to bin/formic-s3.ts.

Figure 4. cdk.json file

Figure 4. Contents of cdk.json file

Now let’s look at the CDK stack code, shown in Figure 5. This can be found in the lib directory of the root file and it is called formik-s3-stack.ts.

Figure 5. CDK stack code that creates a new S3 bucket for hosting the React webpage

Figure 5. CDK stack code that creates a new S3 bucket for hosting the React webpage

This is the part of the code that creates our S3 bucket for hosting our React UI. The first few lines create the bucket name and point to the file that will be seen by the world (index.html). The deployment function has a source that will be searching for the path in your local directory where the build files were created. This will source the directory and then create it in an S3 bucket in the cloud.

Notice how our publicReadAccess is commented out. This is because it is not best practice to leave your bucket exposed publicly. For this blog, we will host this simple form site and allow public access. However, a CDN such as Amazon CloudFront should be used for distribution of traffic to keep your S3 bucket secure.

Figure 6. CDK stack code that creates a new S3 bucket

Figure 6. CDK stack code that creates a new S3 bucket for uploading and downloading data using S3 presigned URL

Figure 6 shows the second S3 bucket that will be used for our Formik data.

Figure 7. CDK code stack used to create the Lambda function

Figure 7. CDK code stack used to create the Lambda function

Figure 7 shows how to create your Lambda function, which also will be reading from the ‘bundling’ step.

Figure 8. CDK code stack used to create API Gateway

Figure 8. CDK code stack used to create API Gateway

Figure 8 shows how to create your API Gateway resources. Notice the ‘OPTIONS’ document is used here. This is because our front-end request URLs are not from the same origin as our APIs. Including the ‘OPTIONS’ document enables our browser to succeed in its preflight request and avoid any CORS issues.

Now that we understand our CDK, let’s finally DEPLOY!

npx cdk deploy

You will receive the output in the terminal that will be the storage API endpoint. You can also view this in CloudFormation under the Output tab for the stack the CDK spun up (FormikS3Stack). You should also see your S3 URL to view your React app.

What is React’s form?

Once you have your URL, you should see the form, shown in Figure 9.

Figure 9. Portal form designed using Formik in ReactJS

Figure 9. Portal form designed using Formik in ReactJS

Why is Formik so special?

Let’s preface this with how our forms had to be created using the old method, shown in Figure 10.

Figure 10. This is from https://www.bitnative.com/2020/08/19/formik-vs-plain-react-for-forms-worth-it/ showing a form without Formik

Figure 10. This is from https://www.bitnative.com/2020/08/19/formik-vs-plain-react-for-forms-worth-it/ showing a form without Formik

Figure 11 shows our code:

Figure 11. React code with the UI components

Figure 11. React code with the UI components

One of the first things you can notice when comparing both methods, is the location of your initial values. Formik handles the state of your fields. Without it, we would need to manage this with React’s state object if we were using class components, or with hooks inside functional components. With Formik, we don’t have to handle these tasks.

Another benefit of using Formik is its handling of input validation, errors, and handler functions that we can use to manage our UI (lines 7079 and 8793.) Formik reduces the need to write extra lines of code to handle validation and errors, managing states, and creating event handler logic.

Read this blog post that compares both methods of creating forms.

Making our API calls from the UI

Our Formik form is simple to implement, but one more step remains. We need to handle uploading the information, and then downloading it.

With all our resources created and our form done, we put it all together by creating our API requests, shown in Figure 12.

Figure 12. Code to upload to S3 bucket and download from S3 bucket

Figure 12. Code to upload to S3 bucket and download from S3 bucket

Due to the efficiency of AWS and Formik, we can upload and download with fewer than 50 lines of code.

Lines 1126 is where we call our API Gateway URL that our CDK created for us. With this API, when the user first clicks the upload button, the request hits the endpoint to create the presigned URL. It waits for its creation and in lines 2125 we PUT our data into our S3 bucket.

Lastly, we are able to hit that same presigned URL to download our information we uploaded into a JSON file.

Cleaning up

To avoid incurring future charges, delete the resources. Let’s run:

npx cdk destroy

You can confirm the removal by going into CloudFormation and confirming the resources were deleted.

Conclusion

In this blog post, we learned how we can create a simple server for our form submissions. We spun it up easily with the CDK toolkit and provisioned our resources. We hosted our UI and created a sample form using Formik, which handles state and reduces the amount of code we must write. We then hit the endpoints given to us by the deployment and tested the app by uploading and downloading our form data. Traditional form data management requires a separate function for handling data and errors in forms. This is a cleaner and more efficient way to handle form data.

For further reading:

Automate Amazon Connect Data Streaming using AWS CDK

Post Syndicated from Tarik Makota original https://aws.amazon.com/blogs/architecture/automate-amazon-connect-data-streaming-using-aws-cdk/

Many customers want to provision Amazon Web Services (AWS) cloud resources quickly and consistently with lifecycle management, by treating infrastructure as code (IaC). Commonly used services are AWS CloudFormation and HashiCorp Terraform. Currently, customers set up Amazon Connect data streaming manually, as the service is not available under CloudFormation resource types. Customers may want to extend it to retrieve real-time contact and agent data. Integration is done manually and can result in issues with IaC.

Amazon Connect contact trace records (CTRs) capture the events associated with a contact in the contact center. Amazon Connect agent event streams are Amazon Kinesis Data Streams that provide near real-time reporting of agent activity within the Amazon Connect instance. The events published to the stream include these contact control panel (CCP) events:

  • Agent login
  • Agent logout
  • Agent connects with a contact
  • Agent status change, such as to available to handle contacts, or on break, or at training.

In this blog post, we will show you how to automate Amazon Connect data streaming using AWS Cloud Development Kit (AWS CDK). AWS CDK is an open source software development framework to define your cloud application resources using familiar programming languages. We will create a custom CDK resource, which in turn uses Amazon Connect API. This can be used as a template to automate other parts of Amazon Connect, or for other AWS services that don’t expose its full functionality through CloudFormation.

Overview of Amazon Connect automation solution

Amazon Connect is an omnichannel cloud contact center that helps you provide superior customer service. We will stream Amazon Connect agent activity and contact trace records to Amazon Kinesis. We will assume that data will then be used by other services or third-party integrations for processing. Here are the high-level steps and AWS services that we are going use, see Figure 1:

  1. Amazon Connect: We will create an instance and enable data streaming
  2. Cloud Deployment Toolkit: We will create custom resource and orchestrate automation
  3. Amazon Kinesis Data Streams and Amazon Kinesis Data Firehose: To stream data out of Connect
  4. AWS Identity and Access Management (IAM): To govern access and permissible actions across all AWS services
  5. Third-party tool or Amazon S3: Used as a destination of Connect data via Amazon Kinesis data
Figure 1. Connect data streaming automation workflow

Figure 1. Connect data streaming automation workflow

Walkthrough and deployment tasks

Sample code for this solution is provided in this GitHub repo. The code is packaged as a CDK application, so the solution can be deployed in minutes. The deployment tasks are as follows:

  • Deploy the CDK app
  • Update Amazon Connect instance settings
  • Import the demo flow and data

Custom Resources enables you to write custom logic in your CloudFormation deployment. You implement the creation, update, and deletion logic to define the custom resource deployment.

CDK implements the AWSCustomResource, which is an AWS Lambda backed custom resource that uses the AWS SDK to provision your resources. This means that the CDK stack deploys a provisioning Lambda. Upon deployment, it calls the AWS SDK API operations that you defined for the resource lifecycle (create, update, and delete).

Prerequisites

For this walkthrough, you need the following prerequisites:

Deploy and verify

1. Deploy the CDK application.

The resources required for this demo are packaged as a CDK app. Before proceeding, confirm you have command line interface (CLI) access to the AWS account where you would like to deploy your solution.

  • Open a terminal window and clone the GitHub repository in a directory of your choice:
    git clone [email protected]:aws-samples/connect-cdk-blog
  • Navigate to the cdk-app directory and follow the deployment instructions. The default Region is usually us-east-1. If you would like to deploy in another Region, you can run:
    export AWS_DEFAULT_REGION=eu-central-1

2. Create the CloudFormation stack by initiating the following commands.

source .env/bin/activate
pip install -r requirements.txt
cdk synth
cdk bootstrap
cdk deploy  --parametersinstanceId={YOUR-AMAZON-CONNECT-INSTANCE-ID}

--parameters ctrStreamName={CTRStream}

--parameters agentStreamName={AgentStream}

Note: By default, the stack will create contact trace records stream [ctrStreamName] as a Kinesis Data Stream. If you want to use an Amazon Kinesis Data Firehose delivery stream instead, you can modify this behavior by going to cdk.json and adding “ctr_stream_type”: “KINESIS_FIREHOSE” as a parameter under “context.”

Once the status of CloudFormation stack is updated to CREATE_COMPLETE, the following resources are created:

  • Kinesis Data Stream
  • IAM roles
  • Lambda

3. Verify the integration.

  • Kinesis Data Streams are added to the Amazon Connect instance
Figure 2. Screenshot of Amazon Connect with Data Streaming enabled

Figure 2. Screenshot of Amazon Connect with Data Streaming enabled

Cleaning up

You can remove all resources provisioned for the CDK app by running the following command under connect-app directory:

cdk destroy

This will not remove your Amazon Connect instance. You can remove it by navigating to the AWS Management Console -> Services -> Amazon Connect. Find your Connect instance and click Delete.

Conclusion

In this blog, we demonstrated how to maintain Amazon Connect as Infrastructure as Code (IaC). Using a custom resource of AWS CDK, we have shown how to automate setting Amazon Kinesis Data Streams to Data Streaming in Amazon Connect. The same approach can be extended to automate setting other Amazon Connect properties such as Amazon Lex, AWS Lambda, Amazon Polly, and Customer Profiles. This approach will help you to integrate Amazon Connect with your Workflow Management Application in a faster and consistent manner, and reduce manual configuration.

For more information, refer to Enable Data Streaming for your instance.

Unify log aggregation and analytics across compute platforms

Post Syndicated from Hari Ohm Prasath original https://aws.amazon.com/blogs/big-data/unify-log-aggregation-and-analytics-across-compute-platforms/

Our customers want to make sure their users have the best experience running their application on AWS. To make this happen, you need to monitor and fix software problems as quickly as possible. Doing this gets challenging with the growing volume of data needing to be quickly detected, analyzed, and stored. In this post, we walk you through an automated process to aggregate and monitor logging-application data in near-real time, so you can remediate application issues faster.

This post shows how to unify and centralize logs across different computing platforms. With this solution, you can unify logs from Amazon Elastic Compute Cloud (Amazon EC2), Amazon Elastic Container Service (Amazon ECS), Amazon Elastic Kubernetes Service (Amazon EKS), Amazon Kinesis Data Firehose, and AWS Lambda using agents, log routers, and extensions. We use Amazon OpenSearch Service (successor to Amazon Elasticsearch Service) with OpenSearch Dashboards to visualize and analyze the logs, collected across different computing platforms to get application insights. You can deploy the solution using the AWS Cloud Development Kit (AWS CDK) scripts provided as part of the solution.

Customer benefits

A unified aggregated log system provides the following benefits:

  • A single point of access to all the logs across different computing platforms
  • Help defining and standardizing the transformations of logs before they get delivered to downstream systems like Amazon Simple Storage Service (Amazon S3), Amazon OpenSearch Service, Amazon Redshift, and other services
  • The ability to use Amazon OpenSearch Service to quickly index, and OpenSearch Dashboards to search and visualize logs from its routers, applications, and other devices

Solution overview

In this post, we use the following services to demonstrate log aggregation across different compute platforms:

  • Amazon EC2 – A web service that provides secure, resizable compute capacity in the cloud. It’s designed to make web-scale cloud computing easier for developers.
  • Amazon ECS – A web service that makes it easy to run, scale, and manage Docker containers on AWS, designed to make the Docker experience easier for developers.
  • Amazon EKS – A web service that makes it easy to run, scale, and manage Docker containers on AWS.
  • Kinesis Data Firehose – A fully managed service that makes it easy to stream data to Amazon S3, Amazon Redshift, or Amazon OpenSearch Service.
  • Lambda – A compute service that lets you run code without provisioning or managing servers. It’s designed to make web-scale cloud computing easier for developers.
  • Amazon OpenSearch Service – A fully managed service that makes it easy for you to perform interactive log analytics, real-time application monitoring, website search, and more.

The following diagram shows the architecture of our solution.

The architecture uses various log aggregation tools such as log agents, log routers, and Lambda extensions to collect logs from multiple compute platforms and deliver them to Kinesis Data Firehose. Kinesis Data Firehose streams the logs to Amazon OpenSearch Service. Log records that fail to get persisted in Amazon OpenSearch service will get written to AWS S3. To scale this architecture, each of these compute platforms streams the logs to a different Firehose delivery stream, added as a separate index, and rotated every 24 hours.

The following sections demonstrate how the solution is implemented on each of these computing platforms.

Amazon EC2

The Kinesis agent collects and streams logs from the applications running on EC2 instances to Kinesis Data Firehose. The agent is a standalone Java software application that offers an easy way to collect and send data to Kinesis Data Firehose. The agent continuously monitors files and sends logs to the Firehose delivery stream.

BDB-1742-Ec2

The AWS CDK script provided as part of this solution deploys a simple PHP application that generates logs under the /etc/httpd/logs directory on the EC2 instance. The Kinesis agent is configured via /etc/aws-kinesis/agent.json to collect data from access_logs and error_logs, and stream them periodically to Kinesis Data Firehose (ec2-logs-delivery-stream).

Because Amazon OpenSearch Service expects data in JSON format, you can add a call to a Lambda function to transform the log data to JSON format within Kinesis Data Firehose before streaming to Amazon OpenSearch Service. The following is a sample input for the data transformer:

46.99.153.40 - - [29/Jul/2021:15:32:33 +0000] "GET / HTTP/1.1" 200 173 "-" "Mozilla/5.0 (Windows NT 6.1; WOW64) AppleWebKit/537.36 (KHTML, like Gecko) Chrome/51.0.2704.103 Safari/537.36"

The following is our output:

{
    "logs" : "46.99.153.40 - - [29/Jul/2021:15:32:33 +0000] \"GET / HTTP/1.1\" 200 173 \"-\" \"Mozilla/5.0 (Windows NT 6.1; WOW64) AppleWebKit/537.36 (KHTML, like Gecko) Chrome/51.0.2704.103 Safari/537.36\"",
}

We can enhance the Lambda function to extract the timestamp, HTTP, and browser information from the log data, and store them as separate attributes in the JSON document.

Amazon ECS

In the case of Amazon ECS, we use FireLens to send logs directly to Kinesis Data Firehose. FireLens is a container log router for Amazon ECS and AWS Fargate that gives you the extensibility to use the breadth of services at AWS or partner solutions for log analytics and storage.

BDB-1742-ECS

The architecture hosts FireLens as a sidecar, which collects logs from the main container running an httpd application and sends them to Kinesis Data Firehose and streams to Amazon OpenSearch Service. The AWS CDK script provided as part of this solution deploys a httpd container hosted behind an Application Load Balancer. The httpd logs are pushed to Kinesis Data Firehose (ecs-logs-delivery-stream) through the FireLens log router.

Amazon EKS

With the recent announcement of Fluent Bit support for Amazon EKS, you no longer need to run a sidecar to route container logs from Amazon EKS pods running on Fargate. With the new built-in logging support, you can select a destination of your choice to send the records to. Amazon EKS on Fargate uses a version of Fluent Bit for AWS, an upstream conformant distribution of Fluent Bit managed by AWS.

BDB-1742-EKS

The AWS CDK script provided as part of this solution deploys an NGINX container hosted behind an internal Application Load Balancer. The NGINX container logs are pushed to Kinesis Data Firehose (eks-logs-delivery-stream) through the Fluent Bit plugin.

Lambda

For Lambda functions, you can send logs directly to Kinesis Data Firehose using the Lambda extension. You can deny the records being written to Amazon CloudWatch.

BDB-1742-Lambda

After deployment, the workflow is as follows:

  1. On startup, the extension subscribes to receive logs for the platform and function events. A local HTTP server is started inside the external extension, which receives the logs.
  2. The extension buffers the log events in a synchronized queue and writes them to Kinesis Data Firehose via PUT records.
  3. The logs are sent to downstream systems.
  4. The logs are sent to Amazon OpenSearch Service.

The Firehose delivery stream name gets specified as an environment variable (AWS_KINESIS_STREAM_NAME).

For this solution, because we’re only focusing on collecting the run logs of the Lambda function, the data transformer of the Kinesis Data Firehose delivery stream filters out the records of type function ("type":"function") before sending it to Amazon OpenSearch Service.

The following is a sample input for the data transformer:

[
   {
      "time":"2021-07-29T19:54:08.949Z",
      "type":"platform.start",
      "record":{
         "requestId":"024ae572-72c7-44e0-90f5-3f002a1df3f2",
         "version":"$LATEST"
      }
   },
   {
      "time":"2021-07-29T19:54:09.094Z",
      "type":"platform.logsSubscription",
      "record":{
         "name":"kinesisfirehose-logs-extension-demo",
         "state":"Subscribed",
         "types":[
            "platform",
            "function"
         ]
      }
   },
   {
      "time":"2021-07-29T19:54:09.096Z",
      "type":"function",
      "record":"2021-07-29T19:54:09.094Z\tundefined\tINFO\tLoading function\n"
   },
   {
      "time":"2021-07-29T19:54:09.096Z",
      "type":"platform.extension",
      "record":{
         "name":"kinesisfirehose-logs-extension-demo",
         "state":"Ready",
         "events":[
            "INVOKE",
            "SHUTDOWN"
         ]
      }
   },
   {
      "time":"2021-07-29T19:54:09.097Z",
      "type":"function",
      "record":"2021-07-29T19:54:09.097Z\t024ae572-72c7-44e0-90f5-3f002a1df3f2\tINFO\tvalue1 = value1\n"
   },   
   {
      "time":"2021-07-29T19:54:09.098Z",
      "type":"platform.runtimeDone",
      "record":{
         "requestId":"024ae572-72c7-44e0-90f5-3f002a1df3f2",
         "status":"success"
      }
   }
]

Prerequisites

To implement this solution, you need the following prerequisites:

Build the code

Check out the AWS CDK code by running the following command:

mkdir unified-logs && cd unified-logs
git clone https://github.com/aws-samples/unified-log-aggregation-and-analytics .

Build the lambda extension by running the following command:

cd lib/computes/lambda/extensions
chmod +x extension.sh
./extension.sh
cd ../../../../

Make sure to replace default AWS region specified under the value of firehose.endpoint attribute inside lib/computes/ec2/ec2-startup.sh.

Build the code by running the following command:

yarn install && npm run build

Deploy the code

If you’re running AWS CDK for the first time, run the following command to bootstrap the AWS CDK environment (provide your AWS account ID and AWS Region):

cdk bootstrap \
    --cloudformation-execution-policies arn:aws:iam::aws:policy/AdministratorAccess \
    aws://<AWS Account Id>/<AWS_REGION>

You only need to bootstrap the AWS CDK one time (skip this step if you have already done this).

Run the following command to deploy the code:

cdk deploy --requires-approval

You get the following output:

 ✅  CdkUnifiedLogStack

Outputs:
CdkUnifiedLogStack.ec2ipaddress = xx.xx.xx.xx
CdkUnifiedLogStack.ecsloadbalancerurl = CdkUn-ecsse-PY4D8DVQLK5H-xxxxx.us-east-1.elb.amazonaws.com
CdkUnifiedLogStack.ecsserviceLoadBalancerDNS570CB744 = CdkUn-ecsse-PY4D8DVQLK5H-xxxx.us-east-1.elb.amazonaws.com
CdkUnifiedLogStack.ecsserviceServiceURL88A7B1EE = http://CdkUn-ecsse-PY4D8DVQLK5H-xxxx.us-east-1.elb.amazonaws.com
CdkUnifiedLogStack.eksclusterClusterNameCE21A0DB = ekscluster92983EFB-d29892f99efc4419bc08534a3d253160
CdkUnifiedLogStack.eksclusterConfigCommand515C0544 = aws eks update-kubeconfig --name ekscluster92983EFB-d29892f99efc4419bc08534a3d253160 --region us-east-1 --role-arn arn:aws:iam::xxx:role/CdkUnifiedLogStack-clustermasterroleCD184EDB-12U2TZHS28DW4
CdkUnifiedLogStack.eksclusterGetTokenCommand3C33A2A5 = aws eks get-token --cluster-name ekscluster92983EFB-d29892f99efc4419bc08534a3d253160 --region us-east-1 --role-arn arn:aws:iam::xxx:role/CdkUnifiedLogStack-clustermasterroleCD184EDB-12U2TZHS28DW4
CdkUnifiedLogStack.elasticdomainarn = arn:aws:es:us-east-1:xxx:domain/cdkunif-elasti-rkiuv6bc52rp
CdkUnifiedLogStack.s3bucketname = cdkunifiedlogstack-logsfailederrcapturebucket0bcc-xxxxx
CdkUnifiedLogStack.samplelambdafunction = CdkUnifiedLogStack-LambdatransformerfunctionFA3659-c8u392491FrW

Stack ARN:
arn:aws:cloudformation:us-east-1:xxxx:stack/CdkUnifiedLogStack/6d53ef40-efd2-11eb-9a9d-1230a5204572

AWS CDK takes care of building the required infrastructure, deploying the sample application, and collecting logs from different sources to Amazon OpenSearch Service.

The following is some of the key information about the stack:

  • ec2ipaddress – The public IP address of the EC2 instance, deployed with the sample PHP application
  • ecsloadbalancerurl – The URL of the Amazon ECS Load Balancer, deployed with the httpd application
  • eksclusterClusterNameCE21A0DB – The Amazon EKS cluster name, deployed with the NGINX application
  • samplelambdafunction – The sample Lambda function using the Lambda extension to send logs to Kinesis Data Firehose
  • opensearch-domain-arn – The ARN of the Amazon OpenSearch Service domain

Generate logs

To visualize the logs, you first need to generate some sample logs.

  1. To generate Lambda logs, invoke the function using the following AWS CLI command (run it a few times):
aws lambda invoke \
--function-name "<<samplelambdafunction>>" \
--payload '{"payload": "hello"}' /tmp/invoke-result \
--cli-binary-format raw-in-base64-out \
--log-type Tail

Make sure to replace samplelambdafunction with the actual Lambda function name. The file path needs to be updated based on the underlying operating system.

The function should return "StatusCode": 200, with the following output:

{
    "StatusCode": 200,
    "LogResult": "<<Encoded>>",
    "ExecutedVersion": "$LATEST"
}
  1. Run the following command a couple of times to generate Amazon EC2 logs:
curl http://ec2ipaddress:80

Make sure to replace ec2ipaddress with the public IP address of the EC2 instance.

  1. Run the following command a couple of times to generate Amazon ECS logs:
curl http://ecsloadbalancerurl:80

Make sure to replace ecsloadbalancerurl with the public ARN of the AWS Application Load Balancer.

We deployed the NGINX application with an internal load balancer, so the load balancer hits the health checkpoint of the application, which is sufficient to generate the Amazon EKS access logs.

Visualize the logs

To visualize the logs, complete the following steps:

  1. On the Amazon OpenSearch Service console, choose the hyperlink provided for the OpenSearch Dashboard 7URL.
  2. Configure access to the OpenSearch Dashboard.
  3. Under OpenSearch Dashboard, on the Discover menu, start creating a new index pattern for each compute log.

We can see separate indexes for each compute log partitioned by date, as in the following screenshot.

BDB-1742-create-index

The following screenshot shows the process to create index patterns for Amazon EC2 logs.

BDB-1742-ec2

After you create the index pattern, we can start analyzing the logs using the Discover menu under OpenSearch Dashboard in the navigation pane. This tool provides a single searchable and unified interface for all the records with various compute platforms. We can switch between different logs using the Change index pattern submenu.

BDB-1742-unified

Clean up

Run the following command from the root directory to delete the stack:

cdk destroy

Conclusion

In this post, we showed how to unify and centralize logs across different compute platforms using Kinesis Data Firehose and Amazon OpenSearch Service. This approach allows you to analyze logs quickly and the root cause of failures, using a single platform rather than different platforms for different services.

If you have feedback about this post, submit your comments in the comments section.

Resources

For more information, see the following resources:


About the author

HariHari Ohm Prasath is a Senior Modernization Architect at AWS, helping customers with their modernization journey to become cloud native. Hari loves to code and actively contributes to the open source initiatives. You can find him in Medium, Github & Twitter @hariohmprasath.

balluBallu Singh is a Principal Solutions Architect at AWS. He lives in the San Francisco Bay area and helps customers architect and optimize applications on AWS. In his spare time, he enjoys reading and spending time with his family.

Announcing General Availability of Construct Hub and AWS Cloud Development Kit Version 2

Post Syndicated from Steve Roberts original https://aws.amazon.com/blogs/aws/announcing-general-availability-of-construct-hub-and-aws-cloud-development-kit-version-2/

Today, I’m happy to announce that both the Construct Hub and AWS Cloud Development Kit (AWS CDK) version 2 are now generally available (GA).

The AWS CDK is an open-source framework that simplifies working with cloud resources using familiar programming languages: C#, TypeScript, Java, Python, and Go (in developer preview). Within their applications, developers create and configure cloud resources using reusable types called constructs, which they use just as they would any other types in their chosen language. It’s also possible to write custom constructs, which can then be shared across your teams and organization.

With the new releases generally available today, defining your cloud resources using the CDK is now even more simple and convenient, and the Construct Hub enables sharing of open-source construct libraries within the wider cloud development community.

Construct Hub home page

AWS Cloud Development Kit (AWS CDK) Version 2
Version 2 of the AWS CDK focuses on productivity improvements for developers working with CDK projects. The individual packages (libraries) used in version 1 to distribute and consume the constructs available for each AWS service have been consolidated into a single monolithic package. This simplifies dependency management in your CDK applications and when publishing construct libraries. It also makes working with CDK projects that reference constructs from multiple services more convenient, especially when those services have peer dependencies (for example, an Amazon Simple Storage Service (Amazon S3) bucket that needs to be configured with an AWS Key Management Service (KMS) key).

Version 1 of the CDK contained some APIs that were experimental. Over time, some of these were marked as deprecated in favor of other preferred approaches based on community experience and feedback. The deprecated APIs have been removed in version 2 to aid clarity for developers working with construct properties and methods. Additionally, the CDK team has adopted a new release process for creating and releasing experimental constructs without needing to include them in the monolithic GA package. From version 2 onwards, the monolithic CDK package will contain only stable APIs that customers can always rely on. Experimental APIs will be shipped in separate packages, making it easier for the team and community to revise them and ensure customers don’t incur the accidental breaking changes that caused some issues in version 1.

You can read about all the changes in version 2 of the AWS CDK, and how you can update your CDK applications to use it, in the Developer Guide.

Construct Hub
The Construct Hub is a single home where the open-source community, AWS, and cloud technology providers can discover and share construct libraries for all CDKs. The most popular CDKs today are AWS CDK, which generates AWS CloudFormation templates; cdk8s, which generates Kubernetes manifests; and cdktf, which generates Terraform JSON files. Anyone can create a CDK, and we are open to adding other construct-based tools as they evolve!

As of this post’s publication, the Construct Hub contains over 700 CDK libraries, including core AWS CDK modules, to help customers build their cloud applications using their preferred programming languages, for their preferred use case, and with their preferred provisioning engine (CloudFormation, Terraform, or Kubernetes). For example, there are 99 libraries for working with containers, 210 libraries for serverless development, 53 libraries for websites, 65 libraries for integrations with cloud services providers like Datadog, Logz.io, Cloudflare, Snyk, and more, and dozens of additional libraries which integrate with Slack, Twitter, GitLab, Grafana, Prometheus, WordPress, Next.js, and more. Many of these were created by the open-source community.

Anyone can contribute construct libraries to the Construct Hub. New libraries that you wish to share need to be published to the npm public registry and tagged. The Construct Hub will automatically detect the published libraries and make them visible and discoverable to consumers on the hub. Consumers can search and filter for construct libraries for familiar technologies, third-party integrations, AWS services, and use cases such as compliance, monitoring, websites, containers, serverless, and more. Filters are available for publisher, language, CDK type, and keywords. In the screenshot below, I’m searching the hub for .NET and TypeScript libraries related to databases and Kubernetes across all CDKs. I could also filter to a specific CDK or a CDK version.

Searching across publishers

Publishers determine which programming languages should be supported by their packages. Construct Hub then automatically generates API references for all the supported languages and transliterates all code samples the authors provide to those supported languages. The screenshots below show an example of language-specific API documentation for the cdk-spa-deploy construct library, which you can use to deploy a single-page web application (SPA). First, the documentation for .NET developers working with the library:

Generated sample code and documentation for a .NET construct library

The second image below shows the generated documentation for the same construct library, but this time for TypeScript developers:

Generated sample code and documentation for the same library in TypeScript

All construct libraries published to the Construct Hub must be open-source. This enables users to exercise their good judgment and perform due diligence to verify that the libraries meet their security and compliance needs, just as they would with any other third-party package source consumed in their applications. Issues with a published construct library can be raised on the library’s GitHub repository using convenient links accessible from the hub entry for the library.

The Construct Hub employs a trust-through-transparency model. Users can report libraries for abuse by clicking the ‘Report abuse’ link in the hub, which will engage AWS Support teams to investigate the issue and remove the offending packages from Construct Hub listings if problems are found. Users can also send us feedback by clicking a ‘Provide feedback to Construct Hub’ link, which allows them to open an issue on our GitHub repository. And last but not least, they can click ‘Provide feedback to publisher’, which redirects to the repository the publisher provided with the package.

Feedback links in the Construct Hub

Just like the AWS CDK, the Construct Hub is open-source, built as a construct, and is, in fact, itself available on the Construct Hub! If you’re interested, you can see how the CDK team uses the CDK to develop the hub in their GitHub repository.

Construct Hub - on the Construct Hub!

Get Started with the AWS CDK Version 2 and the Construct Hub, Today
If you’ve built CDK applications to define your cloud infrastructure using version 1 of the AWS Cloud Development Kit (AWS CDK), then I encourage you to take a look at the documented changes for version 2 and see how the new version can help simplify your project setup going forward. And, if you’re interested in sharing new constructs with the wider community, please get involved with the Construct Hub.

— Steve

Deep learning image vector embeddings at scale using AWS Batch and CDK

Post Syndicated from Filip Saina original https://aws.amazon.com/blogs/devops/deep-learning-image-vector-embeddings-at-scale-using-aws-batch-and-cdk/

Applying various transformations to images at scale is an easily parallelized and scaled task. As a Computer Vision research team at Amazon, we occasionally find that the amount of image data we are dealing with can’t be effectively computed on a single machine, but also isn’t large enough to justify running a large and potentially costly AWS Elastic Map Reduce (EMR) job. This is when we can utilize AWS Batch as our main computing environment, as well as Cloud Development Kit (CDK) to provision the necessary infrastructure in order to solve our task.

In Computer Vision, we often need to represent images in a more concise and uniform way. Working with standard image files would be challenging, as they can vary in resolution or are otherwise too large in terms of dimensionality to be provided directly to our models. For that reason, the common practice for deep learning approaches is to translate high-dimensional information representations, such as images, into vectors that encode most (if not all) information present in them — in other words, to create vector embeddings.

This post will demonstrate how we utilize the AWS Batch platform to solve a common task in many Computer Vision projects — calculating vector embeddings from a set of images so as to allow for scaling.

 Architecture Overview

Diagram explained in post.

Figure 1: High-level architectural diagram explaining the major solution components.

As seen in Figure 1, AWS Batch will pull the docker image containing our code onto provisioned hosts and start the docker containers. Our sample code, referenced in this post, will then read the resources from S3, conduct the vectorization, and write the results as entries in the DynamoDB Table.

In order to run our image vectorization task, we will utilize the following AWS cloud components:

  • Amazon ECR — Elastic Container Registry is a Docker image repository from which our batch instances will pull the job images;
  • S3 — Amazon Simple Storage Service will act as our image source from which our batch jobs will read the image;
  • Amazon DynamoDB — NoSQL database in which we will write the resulting vectors and other metadata;
  • AWS Lambda — Serverless compute environment which will conduct some pre-processing and, ultimately, trigger the batch job execution; and
  • AWS Batch — Scalable computing environment powering our models as embarrassingly parallel tasks running as AWS Batch jobs.

To translate an image to a vector, we can utilize a pre-trained model architecture, such as AlexNet, ResNet, VGG, or more recent ones, like ResNeXt and Vision Transformers. These model architectures are available in most of the popular deep learning frameworks, and they can be further modified and extended depending on our project requirements. For this post, we will utilize a pre-trained ResNet18 model from MxNet. We will output an intermediate layer of the model, which will result in a 512 dimensional representation, or, in other words, a 512 dimensional vector embedding.

Deployment using Cloud Development Kit (CDK)

In recent years, the idea of provisioning cloud infrastructure components using popular programming languages was popularized under the term of infrastructure as code (IaC). Instead of writing a file in the YAML/JSON/XML format, which would define every cloud component we want to provision, we might want to define those components trough a popular programming language.

As part of this post, we will demonstrate how easy it is to provision infrastructure on AWS cloud by using Cloud Development Kit (CDK). The CDK code included in the exercise is written in Python and defines all of the relevant exercise components.

Hands-on exercise

1. Deploying the infrastructure with AWS CDK

For this exercise, we have provided a sample batch job project that is available on Github (link). By using that code, you should have every component required to do this exercise, so make sure that you have the source on your machine. The root of your sample project local copy should contain the following files:

batch_job_cdk - CDK stack code of this batch job project
src_batch_job - source code for performing the image vectorization
src_lambda - source code for the lambda function which will trigger the batch job execution
app.py - entry point for the CDK tool
cdk.json - config file specifying the entry point for CDK
requirements.txt - list of python dependencies for CDK 
README.md  
  1. Make sure you have installed and correctly configured the AWS CLI and AWS CDK in your environment. Refer to the CDK documentation for more information, as well as the CDK getting started guide.
  2. Set the CDK_DEPLOY_ACCOUNT and CDK_DEPLOY_REGION environmental variables, as described in the project README.md.
  3. Go to the sample project root and install the CDK python dependencies by running pip install -r requirements.txt.
  4. Install and configure Docker in your environment.
  5. If you have multiple AWS CLI profiles, utilize the --profile option to specify which profile to use for deployment. Otherwise, simply run cdk deploy and deploy the infrastructure to your AWS account set in step 1.

NOTE: Before deploying, make sure that you are familiar with the restrictions and limitations of the AWS services we are using in this post. For example, if you choose to set an S3 bucket name in the CDK Bucket construct, you must avoid naming conflicts that might cause deployment errors.

The CDK tool will now trigger our docker image build, provision the necessary AWS infrastructure (i.e., S3 Bucket, DynamoDB table, roles and permissions), and, upon completion, upload the docker image to a newly created repository on Amazon Elastic Container Registry (ECR).

2. Upload data to S3

Console explained in post.

Figure 2: S3 console window with uploaded images to the `images` directory.

After CDK has successfully finished deploying, head to the S3 console screen and upload images you want to process to a path in the S3 bucket. For this exercise, we’ve added every image to the `images` directory, as seen in Figure 2.

For larger datasets, utilize the AWS CLI tool to sync your local directory with the S3 bucket. In that case, consider enabling the ‘Transfer acceleration’ option of your S3 bucket for faster data transfers. However, this will incur an additional fee.

3. Trigger batch job execution

Once CDK has completed provisioning our infrastructure and we’ve uploaded the image data we want to process, open the newly created AWS Lambda in the AWS console screen in order to trigger the batch job execution.

To do this, create a test event with the following JSON body:

{
"Paths": [
    "images"
   ]
}

The JSON body that we provide as input to the AWS Lambda function defines a list of paths to directories in the S3 buckets containing images. Having the ability to dynamically provide paths to directories with images in S3, lets us combine multiple data sources into a single AWS Batch job execution. Furthermore, if we decide in the future to put an API Gateway in front of the Lambda, you could pass every parameter of the batch job with a simple HTTP method call.

In this example, we specified just one path to the `images` directory in the S3 bucket, which we populated with images in the previous step.

Console screen explained in post.

Figure 3: AWS Lambda console screen of the function that triggers batch job execution. Modify the batch size by modifying the `image_batch_limit` variable. The value of this variable will depend on your particular use-case, computation type, image sizes, as well as processing time requirements.

The python code will list every path under the images S3 path, batch them into batches of desired size, and finally save the paths to batches as txt files under tmp S3 path. Each path to a txt files in S3 will be passed as an input to a batch jobs.

Select the newly created event, and then trigger the Lambda function execution. The AWS Lambda function will submit the AWS Batch jobs to the provisioned AWS Batch compute environment.

Batch job explained in post.

Figure 4: Screenshot of a running AWS Batch job that creates feature vectors from images and stores them to DynamoDB.

Once the AWS Lambda execution finishes its execution, we can monitor the AWS Batch jobs being processed on the AWS console screen, as seen in Figure 4. Wait until every job has finished successfully.

4. View results in DynamoDB

Image vectorization results.

Figure 5: Image vectorization results stored for each image as a entry in the DynamoDB table.

Once every batch job is successfully finished, go to the DynamoDB AWS cloud console and see the feature vectors stored as strings obtained from the numpy tostring method, as well as other data we stored in the table.

When you are ready to access the vectors in one of your projects, utilize the code snippet provided here:

#!/usr/bin/env python3

import numpy as np
import boto3

def vector_from(item):
    '''
    Parameters
    ----------
    item : DynamoDB response item object
    '''
    vector = np.frombuffer(item['Vector'].value, dtype=item['DataType'])
    assert len(vector) == item['Dimension']
    return vector

def vectors_from_dydb(dynamodb, table_name, image_ids):
    '''
    Parameters
    ----------
    dynamodb : DynamoDB client
    table_name : Name of the DynamoDB table
    image_ids : List of id's to query the DynamoDB table for
    '''

    response = dynamodb.batch_get_item(
        RequestItems={table_name: {'Keys': [{'ImageId': val} for val in image_ids]}},
        ReturnConsumedCapacity='TOTAL'
    )

    query_vectors =  [vector_from(item) for item in response['Responses'][table_name]]
    query_image_ids =  [item['ImageId'] for item in response['Responses'][table_name]]

    return zip(query_vectors, query_image_ids)
    
def process_entry(vector, image_id):
    '''
    NOTE - Add your code here.
    '''
    pass

def main():
    '''
    Reads vectors from the batch job DynamoDB table containing the vectorization results.
    '''
    dynamodb = boto3.resource('dynamodb', region_name='eu-central-1')
    table_name = 'aws-blog-batch-job-image-transform-dynamodb-table'

    image_ids = ['B000KT6OK6', 'B000KTC6X0', 'B000KTC6XK', 'B001B4THHG']

    for vector, image_id in vectors_from_dydb(dynamodb, table_name, image_ids):
        process_entry(vector, image_id)

if __name__ == "__main__":
    main()

This code snippet will utilize the boto3 client to access the results stored in the DynamoDB table. Make sure to update the code variables, as well as to modify this implementation to one that fits your use-case.

5. Tear down the infrastructure using CDK

To finish off the exercise, we will tear down the infrastructure that we have provisioned. Since we are using CDK, this is very simple — go to the project root directory and run:

cdk destroy

After a confirmation prompt, the infrastructure tear-down should be underway. If you want to follow the process in more detail, then go to the CloudFormation console view and monitor the process from there.

NOTE: The S3 Bucket, ECR image, and DynamoDB table resource will not be deleted, since the current CDK code defaults to RETAIN behavior in order to prevent the deletion of data we stored there. Once you are sure that you don’t need them, remove those remaining resources manually or modify the CDK code for desired behavior.

Conclusion

In this post we solved an embarrassingly parallel job of creating vector embeddings from images using AWS batch. We provisioned the infrastructure using Python CDK, uploaded sample images, submitted AWS batch job for execution, read the results from the DynamoDB table, and, finally, destroyed the AWS cloud resources we’ve provisioned at the beginning.

AWS Batch serves as a good compute environment for various jobs. For this one in particular, we can scale the processing to more compute resources with minimal or no modifications to our deep learning models and supporting code. On the other hand, it lets us potentially reduce costs by utilizing smaller compute resources and longer execution times.

The code serves as a good point for beginning to experiment more with AWS batch in a Deep Leaning/Machine Learning setup. You could extend it to utilize EC2 instances with GPUs instead of CPUs, utilize Spot instances instead of on-demand ones, utilize AWS Step Functions to automate process orchestration, utilize Amazon SQS as a mechanism to distribute the workload, as well as move the lambda job submission to another compute resource, or pretty much tailor your project for anything else you might need AWS Batch to do.

And that brings us to the conclusion of this post. Thanks for reading, and feel free to leave a comment below if you have any questions. Also, if you enjoyed reading this post, make sure to share it with your friends and colleagues!

About the author

Filip Saina

Filip is a Software Development Engineer at Amazon working in a Computer Vision team. He works with researchers and engineers across Amazon to develop and deploy Computer Vision algorithms and ML models into production systems. Besides day-to-day coding, his responsibilities also include architecting and implementing distributed systems in AWS cloud for scalable ML applications.

Parallel and dynamic SaaS deployments with AWS CDK Pipelines

Post Syndicated from Jani Muuriaisniemi original https://aws.amazon.com/blogs/devops/parallel-and-dynamic-saas-deployments-with-cdk-pipelines/

Software as a Service (SaaS) is an increasingly popular business model for independent software vendors (ISVs), including benefits such as a pay-as-you-go pricing model, scalability, and availability.

SaaS services can be built by using numerous architectural models. The silo model provides each tenant with dedicated resources and a shared-nothing architecture. Silo deployments also provide isolation between tenants’ compute resources and their data, and they help eliminate the noisy-neighbor problem. On the other hand, the pool model offers several benefits, such as lower maintenance overhead, simplified management and operations, and cost-saving opportunities, all due to a more efficient utilization of computing resources and capacity. In the bridge model, both silo and pool models are utilized side-by-side. The bridge model is a hybrid model, where parts of the system can be in a silo model, and parts in a pool.

End-customers benefit from SaaS delivery in numerous ways. For example, the service can be available from multiple locations, letting the customer choose what is best for them. The tenant onboarding process is often real-time and frictionless. To realize these benefits for their end-customers, SaaS providers need methods for reliable, fast, and multi-region capable provisioning and software lifecycle management.

This post will describe a deployment system for automating the provision and lifecycle management of workload components in pool or silo deployment models by using AWS Cloud Development Kit (AWS CDK) and CDK Pipelines. We will explore the system’s dynamic and database driven deployment model, as well as its multi-account and multi-region capabilities, and we will provision demo deployments of workload components in both the silo and pool models.

AWS Cloud Development Kit and CDK Pipelines

For this solution, we utilized AWS Cloud Development Kit (AWS CDK) and its CDK Pipelines construct library. AWS CDK is an open-source software development framework for modeling and provisioning cloud application resources by using familiar programming languages. AWS CDK lets you define your infrastructure as code and provision it through AWS CloudFormation.

CDK Pipelines is a high-level construct library with an opinionated implementation of a continuous deployment pipeline for your CDK applications. It is powered by AWS CodePipeline, a fully managed continuous delivery service that helps automate your release pipelines for fast and reliable application as well as infrastructure updates. No servers need to be provisioned or setup, and you only pay for what you use. This solution utilizes the recently released and stable CDK Pipelines modern API.

Business Scenario

As a baseline use case, we have selected the consideration of a fictitious ISV called Unicorn that wants to implement an SaaS business model.

Unicorn operates in several countries, and requires the storing of customer data within the customers’ chosen region. Currently, Unicorn needs two regions in order to satisfy its main customer base: one in EU and one in US. Unicorn expects rapid growth, and it needs a solution that can scale to thousands of tenants. Unicorn plans to have different tenant tiers with different isolation requirements. Their planned deployment model has the majority of tenants in shared pool instances, but they also plan to support dedicated silo instances for the tenants requiring it. The solution must also be easily extendable to new Regions as Unicorn’s business expands.

Unicorn is starting small with just a single development team responsible for currently the only component in their SaaS workload architecture. Following industry best practices, Unicorn has designed its workload architecture so that each component has a clear technical ownership boundary. The chosen solution must grow together with Unicorn, and support multiple independently developed and deployed components in the future.

Solution Overview

Today, many customers utilize AWS CodePipeline to build, test, and deploy their cloud applications. For an SaaS provider such as Unicorn, considering utilizing a single pipeline for managing every deployment presented concerns. At the scale that Unicorn requires, a single pipeline with potentially hundreds of actions runs the risk of becoming throughput limited. Moreover, a single pipeline would offer Unicorn limited control over how changes are released.

Our solution addresses this problem by having a separate dynamically provisioned pipeline for each pool and silo deployment. The solution is designed to manage multiple deployments of Unicorn’s single workload component, thereby aligning with their current needs — and with small changes, including future needs.

CDK Best Practices state that an AWS CDK application maps to a component as defined by the AWS Well-Architected Framework. A component is the code, configuration, and AWS Resources that together deliver against a workload requirement. And this is typically the unit of technical ownership. A component usually includes logical units (e.g., api, database), and can have a continuous deployment pipeline.

Utilizing CDK Pipelines provides a significant benefit: with no additional code, we can deploy cross-account and cross-region just as easily as we would to a single account and region. CDK Pipelines automatically creates and manages the required cross-account encryption keys and cross-region replication buckets. Furthermore, we only need to establish a trust relationship between the accounts during the CDK bootstrapping process.

The following diagram illustrates the solution architecture:

Solution Architecture Diagram

Figure 1: Solution architecture

Let’s look closer at the two primary high level solution flows: silo and pool pipeline provisioning (1 and 2), and component code deployment (3 and 4).

Provisioning is separated into a dedicated flow, so that code deployments do not interfere with tenant onboarding, and vice versa. At the heart of the provisioning flow is the deployment database (1), which is implemented by using an Amazon DynamoDB table.

Utilizing DynamoDB Streams and AWS Lambda Triggers, a new AWS CodeBuild provisioning project build (2) is automatically started after a record is inserted into the deployment database. The provisioning project directly provisions new silo and pool pipelines by using the “cdk deploy” command. Provisioning events are processed in parallel, so that the solution can handle possible bursts in Unicorn’s tenant onboarding volumes.

CDK best practices suggest that infrastructure and runtime code live in the same package. A single AWS CodeCommit repository (3) contains everything needed: the CI/CD pipeline definitions as well as the workload component code. This repository is the source artifact for every CodePipeline pipeline and CodeBuild project. The chapter “Managing application resources as code” describes related implementation details.

The CI/CD pipeline (4) is a CDK Pipelines pipeline, and it is responsible for the component’s Software Development Life Cycle (SDLC) activities. In addition to implementing the update release process, it is expected that most SaaS providers will also implement additional activities. This includes a variety of tests and pre-production environment deployments. The chapter “Controlling deployment updates” dives deeper into this topic.

Deployments have two parts: The pipeline (5) and the component resource stack(s) (6) that it manages. The pipelines are deployed to the central toolchain account and region, whereas the component resources are deployed to the AWS Account and Region, as specified in the deployments’ record in the deployment database.

Sample code for the solution is available in GitHub. The sample code is intended for utilization in conjunction with this post. Our solution is implemented in TypeScript.

Deployment Database

Our deployment database is an Amazon DynamoDB table, with the following structure:

Table structure explained in post.

Figure 2: DynamoDB table

  • ‘id’ is a unique identifier for each deployment.
  • ‘account’ is the AWS account ID for the component resources.
  • ‘region’ is the AWS region ID for the component resources.
  • ‘type’ is either ‘silo’ or ‘pool’, which defines the deployment model.

This design supports tenant deployment to multiple silo and pool deployments. Each of these can target any available and bootstrapped AWS Account and Region. For example, different pools can support tenants in different regions, with select tenants deployed to dedicated silos. As pools may be limited to how many tenants they can serve, the design also supports having multiple pools within a region, and it can easily be extended with an additional attribute to support the tiers concept.

Note that the deployment database does not contain tenant information. It is expected that such mapping is maintained in a separate tenant database, where each tenant record can map to the ID of the deployment that it is associated with.

Now that we have looked at our solution design and architecture, let’s move to the hands-on section, starting with the deployment requirements for the solution.

Prerequisites

The following tools are required to deploy the solution:

To follow this tutorial completely, you should have administrator access to at least one, but preferably two AWS accounts:

  • Toolchain: Account for the SDLC toolchain: the pipelines, the provisioning project, the repository, and the deployment database.
  • Workload (optional): Account for the component resources.

If you have only a single account, then the toolchain account can be used for both purposes. Credentials for the account(s) are assumed to be configured in AWS CLI profile(s).

The instructions in this post use the following placeholders, which you must replace with your specific values:

  • <TOOLCHAIN_ACCOUNT_ID>: The AWS Account ID for the toolchain account
  • <TOOLCHAIN_PROFILE_NAME>: The AWS CLI profile name for the toolchain account credentials
  • <WORKLOAD_ACCOUNT_ID>: The AWS Account ID for the workload account
  • <WORKLOAD_PROFILE_NAME>: The AWS CLI profile name for the workload account credentials

Bootstrapping

The toolchain account, and all workload account(s), must be bootstrapped prior to first-time deployment.

AWS CDK and our solutions’ dependencies must be installed to start with. The easiest way to do this is to install them locally with npm. First, we need to download our sample code, so that the we have the package.json configuration file available for npm.

Note that throughout these instructions, many commands are broken over multiple lines for readability. Take care to execute the commands completely. It is always safe to execute each code block as a whole.

Clone the sample code repository from GitHub, and then install the dependencies by using npm:

git clone https://github.com/aws-samples/aws-saas-parallel-deployments
cd aws-saas-parallel-deployments
npm ci 

CDK Pipelines requires use of modern bootstrapping. To ensure that this is enabled, start by setting the related environment variable:

export CDK_NEW_BOOTSTRAP=1

Then, bootstrap the toolchain account. You must bootstrap both the region where the toolchain stack is deployed, as well as every target region for component resources. Here, we will first bootstrap only the us-east-1 region, and later you can optionally bootstrap additional region(s).

To bootstrap, we use npx to execute the locally installed version of AWS CDK:

npx cdk bootstrap <TOOLCHAIN_ACCOUNT_ID>/us-east-1 --profile <TOOLCHAIN_PROFILE_NAME>

If you have a workload account that is separate from the toolchain account, then that account must also be bootstrapped. When bootstrapping the workload account, we will establish a trust relationship with the toolchain account. Skip this step if you don’t have a separate workload account.

The workload account boostrappings follows the security best practice of least privilege. First create an execution policy with the minimum permissions required to deploy our demo component resources. We provide a sample policy file in the solution repository for this purpose. Then, use that policy as the execution policy for the trust relationship between the toolchain account and the workload account

aws iam create-policy \
  --profile <WORKLOAD_PROFILE_NAME> \
  --policy-name CDK-Exec-Policy \
  --policy-document file://policies/workload-cdk-exec-policy.json
npx cdk bootstrap <WORKLOAD_ACCOUNT_ID>/us-east-1 \
  --profile <WORKLOAD_PROFILE_NAME> \
  --trust <TOOLCHAIN_ACCOUNT_ID> \
  --cloudformation-execution-policies arn:aws:iam::<WORKLOAD_ACCOUNT_ID>:policy/CDK-Exec-Policy

Toolchain deployment

Prior to being able to deploy for the first time, you must create an AWS CodeCommit repository for the solution. Create this repository in the toolchain account:

aws codecommit create-repository \
  --profile <TOOLCHAIN_PROFILE_NAME> \
  --region us-east-1 \
  --repository-name unicorn-repository

Next, you must push the contents to the CodeCommit repository. For this, use the git command together with the git-remote-codecommit extension in order to authenticate to the repository with your AWS CLI credentials. Our pipelines are configured to use the main branch.

git remote add unicorn codecommit::us-east-1://<TOOLCHAIN_PROFILE_NAME>@unicorn-repository
git push unicorn main

Now we are ready to deploy the toolchain stack:

export AWS_REGION=us-east-1
npx cdk deploy --profile <TOOLCHAIN_PROFILE_NAME>

Workload deployments

At this point, our CI/CD pipeline, provisioning project, and deployment database have been created. The database is initially empty.

Note that the DynamoDB command line interface demonstrated below is not intended to be the SaaS providers provisioning interface for production use. SaaS providers typically have online registration portals, wherein the customer signs up for the service. When new deployments are needed, then a record should automatically be inserted into the solution’s deployment database.

To demonstrate the solution’s capabilities, first we will provision two deployments, with an optional third cross-region deployment:

  1. A silo deployment (silo1) in the us-east-1 region.
  2. A pool deployment (pool1) in the us-east-1 region.
  3. A pool deployment (pool2) in the eu-west-1 region (optional).

To start, configure the AWS CLI environment variables:

export AWS_REGION=us-east-1
export AWS_PROFILE=<TOOLCHAIN_PROFILE_NAME>

Add the deployment database records for the first two deployments:

aws dynamodb put-item \
  --table-name unicorn-deployments \
  --item '{
    "id": {"S":"silo1"},
    "type": {"S":"silo"},
    "account": {"S":"<WORKLOAD_ACCOUNT_ID>"},
    "region": {"S":"us-east-1"}
  }'
aws dynamodb put-item \
  --table-name unicorn-deployments \
  --item '{
    "id": {"S":"pool1"},
    "type": {"S":"pool"},
    "account": {"S":"<WORKLOAD_ACCOUNT_ID>"},
    "region": {"S":"us-east-1"}
  }'

This will trigger two parallel builds of the provisioning CodeBuild project. Use the CodeBuild Console in order to observe the status and progress of each build.

Cross-region deployment (optional)

Optionally, also try a cross-region deployment. Skip this part if a cross-region deployment is not relevant for your use case.

First, you must bootstrap the target region in the toolchain and the workload accounts. Bootstrapping of eu-west-1 here is identical to the bootstrapping of the us-east-1 region earlier. First bootstrap the toolchain account:

npx cdk bootstrap <TOOLCHAIN_ACCOUNT_ID>/eu-west-1 --profile <TOOLCHAIN_PROFILE_NAME>

If you have a separate workload account, then we must also bootstrap it for the new region. Again, please skip this if you have only a single account:

npx cdk bootstrap <WORKLOAD_ACCOUNT_ID>/eu-west-1 \
  --profile <WORKLOAD_PROFILE_NAME> \
  --trust <TOOLCHAIN_ACCOUNT_ID> \
  --cloudformation-execution-policies arn:aws:iam::<WORKLOAD_ACCOUNT_ID>:policy/CDK-Exec-Policy

Then, add the cross-region deployment:

aws dynamodb put-item \
  --table-name unicorn-deployments \
  --item '{
    "id": {"S":"pool2"},
    "type": {"S":"pool"},
    "account": {"S":"<WORKLOAD_ACCOUNT_ID>"},
    "region": {"S":"eu-west-1"}
  }'

Validation of deployments

After the builds have completed, use the CodePipeline console to verify that the deployment pipelines were successfully created in the toolchain account:

CodePipeline console showing Pool-pool2-pipeline, Pool-pool1-pipeline and Silo-silo1-pipeline all Succeeded most recent execution.

Figure 3: CodePipeline console

Similarly, in the workload account, stacks containing your component resources will have been deployed to each configured region for the deployments. In this demo, we are deploying a single “hello world” container application utilizing AWS App Runner as runtime environment. Successful deployment can be verified by using CloudFormation Console:

Console showing Pool-pool1-resources with status of CREATE_COMPLETE

Figure 4: CloudFormation console

Now that we have successfully finished with our demo deployments, let’s look at how updates to the pipelines and the component resources can be managed.

Managing application resources as code

As highlighted earlier in the Solution Overview, every aspect of our solution shares a single source repository. With all of our code in a single source, we can easily deliver complex changes impacting multiple aspects of our solution. And all of this can be packaged, tested, and released as a single change set. For example, a change can introduce a new stage to the CI/CD pipeline, modify an existing stage in the silo and pool pipelines, and/or make code and resource changes to the component resources.

Managing the pipeline definitions is made simple by the self-mutate capability of the CDK Pipelines. Once initially deployed, each CDK Pipelines pipeline can update its own definition. This is implemented by using a separate SelfMutate stage in the pipeline definition. This stage is executed before any deployment actions, thereby ensuring that the pipeline always executes the latest version that is defined by the source code.

Managing how and when the pipelines trigger to execute also required attention. CDK Pipelines configures pipelines by default to utilize event-based polling of the source repository. While this is a reasonable default, and it is great for the CI/CD pipeline, it is undesired for our silo and pool pipelines. If all of these pipelines would execute automatically on code commits to the source repository, the CI/CD pipeline could not manage the release flow. To address this, we have configured the silo and pool pipelines with the trigger in the CodeCommitSourceOptions to NONE.

Controlling deployment updates

A key aspect of SaaS delivery is controlling how you roll out changes to tenants. Significant business risk can arise if changes are released to all tenants all-at-once in a single big bang.

This risk can be managed by utilizing a combination of silo and pool deployments. Reduce your risk by spreading tenants into multiple pools, and gradually rolling out your changes to these pools. Based on business needs and/or risk assessment, select customers can be provisioned into dedicated silo deployments, thereby allowing update control for those customers separately. Note that while all of a pool’s tenants get the same underlying update simultaneously, you can utilize feature flags to selectively enable new features only for specific tenants in the deployment.

In the demo solution, the CI/CD pipeline contains only a single custom stage “UpdateDeployments”. This CodeBuild action implements a simple “one-at-a-time” strategy. The code has been purposely written so that it is simple and provides you with a starting point to implement your own more complex strategy, as based on your unique business needs. In the default implementation, every silo and pool pipeline tracks the same “main” branch of the repository. Releases are governed by controlling when each pipeline executes to update its resources.

When designing your release strategy, look into how the planned process helps implement releases and changes with high quality and frequency. A typical starting point is a CI/CD pipeline with continuous automated deployments via multiple test and staging environments in order to validate your changes prior to deployment to any production tenants.

Furthermore, consider if utilizing a canary release strategy would help identify potential issues with your changes prior to rolling them out across all deployments in production. In a canary release, each change is first deployed only to a small subset of your deployments. Once you are satisfied with the change quality, then the change can either automatically or manually be released to the rest of your deployments. As an example, an AWS Step Functions state machine could be combined with the solution, and then utilized to control the release flow, execute validation tests, implement approval steps (either manual or automatic), and even conduct rollback if necessary.

Further considerations

The example in this post provisions every silo and pool deployment to a single AWS account. However, the solution is not limited to a single account, and it can deploy equally easily to multiple AWS accounts. When operating at scale, it is best-practice to spread your workloads to several accounts. The Organizing Your AWS Environment using Multiple Accounts whitepaper has in-depth guidance on strategies for spreading your workloads.

If combined with an AWS account-vending machine implementation, such as an AWS Control Tower Landing Zone, then the demo solution could be adapted so that new AWS accounts are provisioned automatically. This would be useful if your business requires full account-level deployment isolation, and you also want automated provisioning.

To meet Unicorn’s future needs for spreading their solution architecture over multiple separate components, the deployment database and associated lambda function could be decoupled from the rest of the toolchain components in order to provide a central deployment service. When provisioned as standalone, and amended with Amazon Simple Notification Service-based notifications sent to the component deployment systems for example, this central deployment service could be utilized for managing the deployments for multiple components.

In addition, you should analyze your deployment lifecycle transitions, and then consider what action should be taken when a tenant is disabled and/or deleted. Implementing a deployment archival/deletion process is not in the scope of this post.

Cleanup

To cleanup every resource deployed in this post, conduct the following actions:

  1. In the workload account:
    1. In us-east-1 Region, delete CloudFormation stacks named “pool-pool1-resources” and “silo-silo1-resources” and the CDK bootstrap stack “CDKToolKit”.
    2. In eu-west-1 Region, delete CloudFormation stack named “pool-pool2-resources” and the CDK Bootstrap stack “CDKToolKit”
  2. In the toolchain account:
    1. In us-east-1 Region, delete CloudFormation stacks “toolchain”, “pool-pool1-pipeline”, “pool-pool2-pipeline”, “silo-silo1-pipeline” and the CDK bootstrap stack “CDKToolKit”.
    2. In eu-west-1 Region, delete CloudFormation stack “pool-pool2-pipeline-support-eu-west-1” and the CDK bootstrap stack “CDKToolKit”
    3. Cleanup and delete S3 buckets “toolchain-*”, “pool-pool1-pipeline-*”, “pool-pool2-pipeline-*”, and “silo-silo1-pipeline-*”.

Conclusion

This solution demonstrated an implementation of an automated SaaS application component deployment factory. We covered how an ISV venturing into the SaaS model can utilize AWS CDK and CDK Pipelines in order to avoid a multitude of undifferentiated heavy lifting by leveraging and combining AWS CDK’s cross-region and cross-account capabilities with CDK Pipelines’ self-mutating deployment pipelines. Furthermore, we demonstrated how all of this can be written, managed, and released just like any other code you write. We also demonstrated how a single dynamic provisioning system can be utilized to operate in a mixed mode, with both silo and pool deployments.

Visit the AWS SaaS Factory Program page for further information on how AWS can help you on your SaaS journey — regardless of the stage you are currently in.

About the authors

Jani Muuriaisniemi

Jani is a Principal Solutions Architect at Amazon Web Services based out of Helsinki, Finland. With more than 20 years of industry experience, he works as a trusted advisor with a broad range of customers across different industries and segments, helping the customers on their cloud journey.

Jose Juhala

Jose is a Solutions Architect at Amazon Web Services based out of Tampere, Finland. He works with customers in Nordic and Baltic, from different industries, and guides them in their technical implementations architectural questions.

Automate building an integrated analytics solution with AWS Analytics Automation Toolkit

Post Syndicated from Manash Deb original https://aws.amazon.com/blogs/big-data/automate-building-an-integrated-analytics-solution-with-aws-analytics-automation-toolkit/

Amazon Redshift is a fast, fully managed, widely popular cloud data warehouse that powers the modern data architecture enabling fast and deep insights or machine learning (ML) predictions using SQL across your data warehouse, data lake, and operational databases. A key differentiating factor of Amazon Redshift is its native integration with other AWS services, which makes it easy to build complete, comprehensive, and enterprise-level analytics applications.

As analytics solutions have moved away from the one-size-fits-all model to choosing the right tool for the right function, architectures have become more optimized and performant while simultaneously becoming more complex. You can use Amazon Redshift for a variety of use cases, along with other AWS services for ingesting, transforming, and visualizing the data.

Manually deploying these services is time-consuming. It also runs the risk of making human errors and deviating from best practices.

In this post, we discuss how to automate the process of building an integrated analytics solution by using a simple script.

Solution overview

The framework described in this post uses Infrastructure as Code (IaC) to solve the challenges with manual deployments, by using AWS Cloud Development Kit (CDK)  to automate provisioning AWS analytics services. You can indicate the services and resources you want to incorporate in your infrastructure by editing a simple JSON configuration file.

The script then instantly auto-provisions all the required infrastructure components in a dynamic manner, while simultaneously integrating them according to AWS recommended best practices.

In this post, we go into further detail on the specific steps to build this solution.

Prerequisites

Prior to deploying the AWS CDK stack, complete the following prerequisite steps:

  1. Verify that you’re deploying this solution in a Region that supports AWS CloudShell. For more information, see AWS CloudShell endpoints and quotas.
  2. Have an AWS Identity and Access Management (IAM) user with the following permissions:
    1. AWSCloudShellFullAccess
    2. IAM Full Access
    3. AWSCloudFormationFullAccess
    4. AmazonSSMFullAccess
    5. AmazonRedshiftFullAccess
    6. AmazonS3ReadOnlyAccess
    7. SecretsManagerReadWrite
    8. AmazonEC2FullAccess
    9. Create a custom AWS Database Migration Service (AWS DMS) policy called AmazonDMSRoleCustom with the following permissions:
{
	"Version": "2012-10-17",
	"Statement": [
		{
		"Effect": "Allow",
		"Action": "dms:*",
		"Resource": "*"
		}
	]
}
  1. Optionally, create a key pair that you have access to. This is only required if deploying the AWS Schema Conversion Tool (AWS SCT).
  2. Optionally, if using resources outside your AWS account, open firewalls and security groups to allow traffic from AWS. This is only applicable for AWS DMS and AWS SCT deployments.

Prepare the config file

To launch the target infrastructures, download the user-config-template.json file from the GitHub repo.

To prep the config file, start by entering one of the following values for each key in the top section: CREATE, N/A, or an existing resource ID to indicate whether you want to have the component provisioned on your behalf, skipped, or integrated using an existing resource in your account.

For each of the services with the CREATE value, you then edit the appropriate section under it with the specific parameters to use for that service. When you’re done customizing the form, save it as user-config.json.

You can see an example of the completed config file under user-config-sample.json in the GitHub repo, which illustrates a config file for the following architecture by newly provisioning all the services, including Amazon Virtual Private Cloud (Amazon VPC), Amazon Redshift, an Amazon Elastic Compute Cloud (Amazon EC2) instance with AWS SCT, and AWS DMS instance connecting an external source SQL Server on Amazon EC2 to the Amazon Redshift cluster.

Launch the toolkit

This project uses CloudShell, a browser-based shell service, to programatically initiate the deployment through the AWS Management Console. Prior to opening CloudShell, you need to configure an IAM user, as described in the prerequisites.

  1. On the CloudShell console, clone the Git repository:
    git clone https://github.com/aws-samples/amazon-redshift-infrastructure-automation.git

  2. Run the deployment script:
    ~/amazon-redshift-infrastructure-automation/scripts/deploy.sh

  3. On the Actions menu, choose Upload file and upload user-config.json.
  4. Enter a name for the stack.
  5. Depending on the resources being deployed, you may have to provide additional information, such as the password for an existing database or Amazon Redshift cluster.
  6. Press Enter to initiate the deployment.

Monitor the deployment

After you run the script, you can monitor the deployment of resource stacks through the CloudShell terminal, or through the AWS CloudFormation console, as shown in the following screenshot.

Each stack corresponds to the creation of a resource from the config file. You can see the newly created VPC, Amazon Redshift cluster, EC2 instance running AWS SCT, and AWS DMS instance. To test the success of the deployment, you can test the newly created AWS DMS endpoint connectivity to the source system and the target Amazon Redshift cluster. Select your endpoint and on the Actions menu, choose Test connection.

If both statuses say Success, the AWS DMS workflow is fully integrated.

Troubleshooting

If the stack launch stalls at any point, visit our GitHub repository for troubleshooting instructions.

Conclusion

In this post, we discussed how you can use the AWS Analytics Infrastructure Automation utility to quickly get started with Amazon Redshift and other AWS services. It helps you provision your entire solution on AWS instantly without any spending any time on challenges around integrating the services or scaling your solution.


About the Authors

Manash Deb is a Software Development Engineer in the AWS Directory Service team. He has worked on building end-to-end applications in different database and technologies for over 15 years. He loves to learn new technologies and solving, automating, and simplifying customer problems on AWS.

Samir Kakli is an Analytics Specialist Solutions Architect at AWS. He has worked with building and tuning databases and data warehouse solutions for over 20 years. His focus is  architecting end-to-end analytics solutions designed to meet the specific needs for each customer.

Julia Beck is a Specialist Solutions Architect at AWS. She supports customers building analytics proof of concept workloads. Outside of work, she enjoys traveling, cooking, and puzzles.