This post was written by Josh Kahn, Tech Leader, Serverless.
Amazon VPC Lattice is a new, generally available application networking service that simplifies connectivity between services. Builders can connect, secure, and monitor services on instances, containers, or serverless compute in a simplified and consistent manner.
VPC Lattice supports AWS Lambda functions as both a target and a consumer of services. This blog post explores how to incorporate VPC Lattice into your serverless workloads to simplify private access to HTTP-based APIs built with Lambda.
Overview
VPC Lattice is an application networking service that enables discovery and connectivity of services across VPCs and AWS accounts. VPC Lattice includes features that allow builders to define policies for network access, traffic management, and monitoring. It also supports custom domain names for private endpoints.
VPC Lattice is composed of several key components:
Service network – a logical grouping mechanism for a collection of services on which you can apply common policies. Associate one or more VPCs to allow access from services in the VPC to the service network.
Service – a unit of software that fulfills a specific task or function. Services using VPC Lattice can run on instances, containers, or serverless compute. This post focuses on services built with Lambda functions.
Target group – in a serverless application, a Lambda function that performs business logic in response to a request. Routing rules within the service route requests to the appropriate target group.
Auth policy – an AWS Identity and Access Management (IAM) resource policy that can be associated with a service network and a service that defines access to those services.
VPC Lattice enables connectivity across VPC and account boundaries, while alleviating the complexity of the underlying networking. It supports HTTP/HTTPS and gRPC protocols, though gRPC is not currently applicable for Lambda target groups.
VPC Lattice and Lambda
Lambda is one of the options to build VPC Lattice services. The AWS Lambda console supports VPC Lattice as a trigger, similar to previously existing triggers such as Amazon API Gateway and Amazon EventBridge. You can also connect VPC Lattice as an event source using infrastructure as code, such as AWS CloudFormation and Terraform.
To configure VPC Lattice as a trigger for a Lambda function in the Console, navigate to the desired function and select the Configuration tab. Select the Triggers menu on the left and then choose Add trigger.
The trigger configuration wizard allows you to define a new VPC Lattice service provided by the Lambda function or to add to an existing service. When adding to an existing service, the wizard allows configuration of path-based routing that sends requests to the target group that includes the function. Path-based and other routing mechanisms available from VPC Lattice are useful in migration scenarios.
This example shows creating a new service. Provide a unique name for the service and select the desired VPC Lattice service network. If you have not created a service network, follow the link to create a new service network in the VPC Console (to create a new service network, read the VPC Lattice documentation).
The listener configuration allows you to configure the protocol and port on which the service is accessible. HTTPS (port 443) is the default configuration, though you can also configure the listener for HTTP (port 80). Note that configuring the listener for HTTP does not change the behavior of Lambda: it is still invoked by VPC Lattice over an HTTPS endpoint, but the service endpoint is available as HTTP. Choose Add to complete setup.
In addition to configuring the VPC Lattice service and target group, the Lambda wizard also adds a resource policy to the function that allows the VPC Lattice target group to invoke the function.
VPC Lattice integration
When a client sends a request to a VPC Lattice service backed by a Lambda target group, VPC Lattice synchronously invokes the target Lambda function. During a synchronous invocation, the client waits for the result of the function and all retry handling is performed by the client. VPC Lattice has an idle timeout of one minute and connection timeout of ten minutes to both the client and target.
The event payload received by the Lambda function when invoked by VPC Lattice is similar to the following example. Note that base64 encoding is dependent on the content type.
The response payload returned by the Lambda function includes a status code, headers, base64 encoding, and an optional body as shown in the following example. A response payload that does not meet the required specification results in an error. To return binary content, you must set isBase64Encoded to true.
For more details on the integration between VPC Lattice and Lambda, visit the Lambda documentation.
Calling VPC Lattice services from Lambda
VPC Lattice services support connectivity over HTTP/HTTPS and gRPC protocols as well as open access or authorization using IAM. To call a VPC Lattice service, the Lambda function must be attached to a VPC that is associated to a VPC Lattice service network:
While a function that calls a VPC Lattice service must be associated with an appropriate VPC, a Lambda function that is part of a Lattice service target group does not need to be attached to a VPC. Remember that Lambda functions are always invoked via an AWS endpoint with access controlled by AWS IAM.
Calls to a VPC Lattice service are similar to sending a request to other HTTP/HTTPS services. VPC Lattice allows builders to define an optional auth policy to enforce authentication and perform context-specific authorization and implement network-level controls with security groups. Callers of the service must meet networking and authorization requirements to access the service. VPC Lattice blocks traffic if it does not explicitly meet all conditions before your function is invoked.
If the auth policy associated with your service network or service requires authenticated requests, any requests made to that service must contain a valid request signature computed using Signature Version 4 (SigV4). An example of computing a SigV4 signature can be found in the VPC Lattice documentation. VPC Lattice does not support payload signing at this time. In TypeScript, you can sign a request using the AWS SDK and Axios library as follows:
import { SignatureV4 } from "@aws-sdk/signature-v4";
import { Sha256 } from "@aws-crypto/sha256-js";
import axios from "axios";

const endpointUrl = new URL(VPC_LATTICE_SERVICE_ENDPOINT);
const sigv4 = new SignatureV4({
    service: "vpc-lattice-svcs",
    region: process.env.AWS_REGION!,
    credentials: {
        accessKeyId: process.env.AWS_ACCESS_KEY_ID!,
        secretAccessKey: process.env.AWS_SECRET_ACCESS_KEY!,
        sessionToken: process.env.AWS_SESSION_TOKEN
    },
    sha256: Sha256
});

const signedRequest = await sigv4.sign({
    method: "PUT",
    hostname: endpointUrl.host,
    path: endpointUrl.pathname,
    protocol: endpointUrl.protocol,
    headers: {
        'Content-Type': 'application/json',
        host: endpointUrl.hostname,
        // Include following header as VPC Lattice does not support signed payloads
        "x-amz-content-sha256": "UNSIGNED-PAYLOAD"
    }
  });
  const { data } = await axios({
    ...signedRequest,
    data: {
        // some data
    },
    url: VPC_LATTICE_SERVICE_ENDPOINT
  });
VPC Lattice provides several layers of security controls, including network-level and auth policies, that allow (or deny) access from a client to your service. These controls can be implemented at the service network, applying those controls across all services in the network.
Connecting to any VPC Lattice service
VPC Lattice supports services built using Amazon EKS and Amazon EC2 in addition to Lambda. Calling services built using these other compute options looks exactly the same to the caller as the preceding sample. VPC Lattice provides an endpoint that abstracts how the service itself is actually implemented.
A Lambda function configured to access resources in a VPC can potentially access VPC Lattice services that are part of the service network associated with that VPC. IAM permissions, the auth policy associated with the service, and security groups may also impact whether the function can invoke the service (see VPC Lattice documentation for details on securing your services).
Services deployed to an Amazon EKS cluster can also invoke Lambda functions exposed as VPC Lattice services using native Kubernetes semantics. They can use either the VPC Lattice-generated domain name or a configured custom domain name to invoke the Lambda function instead of API Gateway or an Application Load Balancer (ALB). Refer to this blog post on the AWS Container Blog for details on how an Amazon EKS service invokes a VPC Lattice service with access control enabled.
Building private serverless APIs
With the launch of VPC Lattice, AWS now offers several options to build serverless APIs accessible only within your customer VPC. These options include API Gateway, ALB, and VPC Lattice. Each of these services offers a unique set of features and trade-offs that may make one a better fit for your workload than others.
Private APIs with API Gateway provide a rich set of features, including throttling, caching, and API keys. API Gateway also offers a rich set of authorization and routing options. Detailed networking and DNS knowledge may be required in complex environments. Both network-level and resource policy controls are available to control access and the OpenAPI specification allows schema sharing.
Application Load Balancer provides flexibility and a rich set of routing options, including to a variety of targets. ALB also can offer a static IP address via AWS Global Accelerator. Detailed networking knowledge is required to configure cross-VPC/account connectivity. ALB relies on network-level controls.
Service networks in VPC Lattice simplify access to services on EC2, EKS, and Lambda across VPCs and accounts without requiring detailed knowledge of networking and DNS. VPC Lattice provides a centralized means of managing access control and guardrails for service-to-service communication. VPC Lattice also readily supports custom domain names and routing features (path, method, header) that enable customers to build complex private APIs without the complexity of managing networking. VPC Lattice can be used to provide east-west interservice communication in combination with API Gateway and AWS AppSync to provide public endpoints for your services.
Conclusion
We’re excited about the simplified connectivity now available with VPC Lattice. Builders can focus on creating customer value and differentiated features instead of complex networking in much the same way that Lambda allows you to focus on writing code. If you are interested in learning more about VPC Lattice, we recommend the VPC Lattice User Guide.
To learn more about serverless, visit Serverless Land for a wide array of reusable patterns, tutorials, and learning materials.
This blog is written by Poornima Chand, Senior Solutions Architect, Strategic Accounts and Giedrius Praspaliauskas, Senior Solutions Architect, Serverless.
AWS Lambda functions allow both synchronous and asynchronous invocations, which both have different function behaviors and error handling:
When you invoke a function synchronously, Lambda returns any unhandled errors in the function code back to the caller. The caller can then decide how to handle the errors. With asynchronous invocations, the caller does not wait for a response from the function code. It hands off the event to the Lambda service to handle the process.
As the caller does not have visibility of any downstream errors, error handling for asynchronous invocations can be more challenging and must be implemented at the Lambda service layer.
This post explains the error behaviors and approaches for handling errors in Lambda asynchronous invocations to build reliable serverless applications.
Overview
AWS services such as Amazon S3, Amazon SNS, and Amazon EventBridge invoke Lambda functions asynchronously. When you invoke a function asynchronously, the Lambda service places the event in an internal queue and returns a success response without additional information. A separate process reads the events from the queue and sends those to the function.
You can configure how a Lambda function handles the errors either by implementing error handling within the code and using the error handling features provided by the Lambda service. The following diagram depicts the solution options for observing and handling errors in asynchronous invocations.
Architectural overview
Understanding the error behavior
When you invoke a function, two types of errors can occur. Invocation errors occur if the Lambda service rejects the request before the function receives it (throttling and system errors (400-series and 500-series)). Function errors occur when the function’s code or runtime returns an error (exceptions and timeouts). The Lambda service retries the function invocation if it encounters unhandled errors in an asynchronous invocation.
The retry behavior is different for invocation errors and function errors. For function errors, the Lambda service retries twice by default, and these additional invocations incur cost. For throttling and system errors, the service returns the event to the event queue and attempts to run the function again for up to 6 hours, using exponential backoff. You can control the default retry behavior by setting the maximum age of an event (up to 6 hours) and the retry attempts (0, 1 or 2). This allows you to limit the number of retries and avoids retrying obsolete events.
Handling the errors
Depending on the error type and behaviors, you can use the following options to implement error handling in Lambda asynchronous invocations.
Lambda function code
The most typical approach to handling errors is to address failures directly in the function code. While implementing this approach varies across programming languages, it commonly involves the use of a try/catch block in your code.
Error handling within the code may not cover all potential errors that could occur during the invocation. It may also affect Lambda error metrics in CloudWatch if you suppress the error. You can address these scenarios by using the error handling features provided by Lambda.
Failure destinations
You can configure Lambda to send an invocation record to another service, such as Amazon SQS, SNS, Lambda, or EventBridge, using AWS Lambda Destination. The invocation record contains details about the request and response in JSON format. You can configure separate destinations for events that are processed successfully, and events that fail all processing attempts.
With failure destinations, after exhausting all retries, Lambda sends a JSON document with details about the invocation and error to the destination. You can use this information to determine re-processing strategy (for example, extended logging, separate error flow, manual processing).
ProcessOrderForShipping:
    Type: AWS::Serverless::Function
    Properties:
      Description: Function that processes order before shipping
      Handler: src/process_order_for_shipping.lambda_handler
      EventInvokeConfig:
        DestinationConfig:
          OnSuccess:
            Type: SQS
            Destination: !GetAtt ShipmentsJobsQueue.Arn
          OnFailure:
            Type: Lambda
            Destination: !GetAtt ErrorHandlingFunction.Arn
Dead-letter queues
You can use dead-letter queues (DLQ) to capture failed events for re-processing. With DLQs, message attributes capture error details. You can configure a standard SQS queue or standard SNS topic as a dead-letter queue for discarded events. For dead-letter queues, Lambda only sends the content of the event, without details about the response.
This is an example of using dead-letter queues in an AWS SAM template:
SendOrderToShipping:
    Type: AWS::Serverless::Function
    Properties:
      Description: Function that sends order to shipping
      Handler: src/send_order_to_shipping.lambda_handler
      DeadLetterQueue:
        Type: SQS
        TargetArn: !GetAtt OrderShippingFunctionDLQ.Arn
Design considerations
There are a number of design considerations when using DLQs:
Error handling within the function code works well for issues that you can easily address in the code. For example, retrying database transactions in the case of failures because of disruptions in network connectivity.
Scenarios that require complex error handling logic (for example, sending failed messages for manual re-processing) are better handled using Lambda service features. This approach would keep the function code simpler and easy to maintain.
Even though the dead-letter queue’s behavior is the same as an on-failure destination, a dead-letter queue is part of a function’s version-specific configuration.
Invocation records sent to on-failure destinations contain more information about the failure than DLQ message attributes. This includes the failure condition, error message, stack trace, request, and response payloads.
Lambda destinations also support additional targets, such as other Lambda functions and EventBridge. This allows destinations to give you more visibility and control of function execution results, and reduce code.
Gaining visibility into errors
Understanding of the behavior and errors cannot rely on error handling alone.
You also want to know why errors address the underlying issues. You must also know when there is elevated error rate, the expected baseline for the errors, other activities in the system when errors happen. Monitoring and observability, including metrics, logs and tracing, brings visibility to the errors and underlying issues.
Metrics
When a function finishes processing an event, Lambda sends metrics about the invocation to Amazon CloudWatch. This includes metrics for the errors that happen during the invocation that you should monitor and react to:
Errors – the number of invocations that result in a function error (include exceptions that both your code and the Lambda runtime throw).
Throttles – the number of invocation requests that are throttled (note that throttled requests and other invocation errors don’t count as errors in the previous metric).
AsyncEventsDropped – the number of events that are dropped without successfully running the function.
DeadLetterErrors – the number of times that Lambda attempts to send an event to a dead-letter queue (DLQ) but fails (typically because of mis-configured resources or size limits).
DestinationDeliveryFailures – the number of times that Lambda attempts to send an event to a destination but fails (typically because of permissions, mis-configured resources, or size limits).
CloudWatch Logs
Lambda automatically sends logs to Amazon CloudWatch Logs. You can write to these logs using the standard logging functionality for your programming language. The resulting logs are in the CloudWatch Logs group that is specific to your function, named /aws/lambda/<function name>. You can use CloudWatch Logs Insights to query logs across multiple functions.
AWS X-Ray
AWS X-Ray can visualize the components of your application, identify performance bottlenecks, and troubleshoot requests that resulted in an error. Keep in mind that AWS X-Ray does not trace all requests. The sampling rate is one request per second and 5 percent of additional requests (this is non-configurable). Do not rely on AWS X-Ray as an only tool while troubleshooting a particular failed invocation as it may be missing in the sampled traces.
Conclusion
This blog post walks through error handling in the asynchronous Lambda function invocations using various approaches and discusses how to gain observability into those errors.
In this blog post, we will explore the process of creating a Continuous Integration/Continuous Deployment (CI/CD) pipeline for a .NET AWS Lambda function using the CDK Pipelines. We will cover all the necessary steps to automate the deployment of the .NET Lambda function, including setting up the development environment, creating the pipeline with AWS CDK, configuring the pipeline stages, and publishing the test reports. Additionally, we will show how to promote the deployment from a lower environment to a higher environment with manual approval.
Background
AWS CDK makes it easy to deploy a stack that provisions your infrastructure to AWS from your workstation by simply running cdk deploy. This is useful when you are doing initial development and testing. However, in most real-world scenarios, there are multiple environments, such as development, testing, staging, and production. It may not be the best approach to deploy your CDK application in all these environments using cdk deploy. Deployment to these environments should happen through more reliable, automated pipelines. CDK Pipelines makes it easy to set up a continuous deployment pipeline for your CDK applications, powered by AWS CodePipeline.
The AWS CDK Developer Guide’s Continuous integration and delivery (CI/CD) using CDK Pipelines page shows you how you can use CDK Pipelines to deploy a Node.js based Lambda function. However, .NET based Lambda functions are different from Node.js or Python based Lambda functions in that .NET code first needs to be compiled to create a deployment package. As a result, we decided to write this blog as a step-by-step guide to assist our .NET customers with deploying their Lambda functions utilizing CDK Pipelines.
In this post, we dive deeper into creating a real-world pipeline that runs build and unit tests, and deploys a .NET Lambda function to one or multiple environments.
Architecture
CDK Pipelines is a construct library that allows you to provision a CodePipeline pipeline. The pipeline created by CDK pipelines is self-mutating. This means, you need to run cdk deploy one time to get the pipeline started. After that, the pipeline automatically updates itself if you add new application stages or stacks in the source code.
The following diagram captures the architecture of the CI/CD pipeline created with CDK Pipelines. Let’s explore this architecture at a high level before diving deeper into the details.
Figure 1: Reference architecture diagram
The solution creates a CodePipeline with a AWS CodeCommit repo as the source (CodePipeline Source Stage). When code is checked into CodeCommit, the pipeline is automatically triggered and retrieves the code from the CodeCommit repository branch to proceed to the Build stage.
Build stage compiles the CDK application code and generates the cloud assembly.
Update Pipeline stage updates the pipeline (if necessary).
Publish Assets stage uploads the CDK assets to Amazon S3.
After Publish Assets is complete, the pipeline deploys the Lambda function to both the development and production environments. For added control, the architecture includes a manual approval step for releases that target the production environment.
Before you use AWS CDK to deploy CDK Pipelines, you must bootstrap the AWS environments where you want to deploy the Lambda function. An environment is the target AWS account and Region into which the stack is intended to be deployed.
In this post, you deploy the Lambda function into a development environment and, optionally, a production environment. This requires bootstrapping both environments. However, deployment to a production environment is optional; you can skip bootstrapping that environment for the time being, as we will cover that later.
This is one-time activity per environment for each environment to which you want to deploy CDK applications. To bootstrap the development environment, run the below command, substituting in the AWS account ID for your dev account, the region you will use for your dev environment, and the locally-configured AWS CLI profile you wish to use for that account. See the documentation for additional details.
‐‐profile specifies the AWS CLI credential profile that will be used to bootstrap the environment. If not specified, default profile will be used. The profile should have sufficient permissions to provision the resources for the AWS CDK during bootstrap process.
‐‐cloudformation-execution-policies specifies the ARNs of managed policies that should be attached to the deployment role assumed by AWS CloudFormation during deployment of your stacks.
For this post, you will use CodeCommit to store your source code. First, create a git repository named dotnet-lambda-cdk-pipeline in CodeCommit by following these steps in the CodeCommit documentation.
After you have created the repository, generate git credentials to access the repository from your local machine if you don’t already have them. Follow the steps below to generate git credentials.
Sign in to the AWS Management Console and open the IAM console.
Next. open the user details page, choose the Security Credentials tab, and in HTTPS Git credentials for AWS CodeCommit, choose Generate.
Download credentials to download this information as a .CSV file.
Clone the recently created repository to your workstation, then cd into dotnet-lambda-cdk-pipeline directory.
git clone <CODECOMMIT-CLONE-URL>
cd dotnet-lambda-cdk-pipeline
Alternatively, you can use git-remote-codecommit to clone the repository with git clone codecommit::<REGION>://<PROFILE>@<REPOSITORY-NAME> command, replacing the placeholders with their original values. Using git-remote-codecommit does not require you to create additional IAM users to manage git credentials. To learn more, refer AWS CodeCommit with git-remote-codecommit documentation page.
Initialize the CDK project
From the command prompt, inside the dotnet-lambda-cdk-pipeline directory, initialize a AWS CDK project by running the following command.
cdk init app --language csharp
Open the generated C# solution in Visual Studio, right-click the DotnetLambdaCdkPipeline project and select Properties. Set the Target framework to .NET 6.
Create a CDK stack to provision the CodePipeline
Your CDK Pipelines application includes at least two stacks: one that represents the pipeline itself, and one or more stacks that represent the application(s) deployed via the pipeline. In this step, you create the first stack that deploys a CodePipeline pipeline in your AWS account.
From Visual Studio, open the solution by opening the .sln solution file (in the src/ folder). Once the solution has loaded, open the DotnetLambdaCdkPipelineStack.cs file, and replace its contents with the following code. Note that the filename, namespace and class name all assume you named your Git repository as shown earlier.
Note: be sure to replace “<CODECOMMIT-REPOSITORY-NAME>” in the code below with the name of your CodeCommit repository (in this blog post, we have used dotnet-lambda-cdk-pipeline).
using Amazon.CDK;
using Amazon.CDK.AWS.CodeBuild;
using Amazon.CDK.AWS.CodeCommit;
using Amazon.CDK.AWS.IAM;
using Amazon.CDK.Pipelines;
using Constructs;
using System.Collections.Generic;

namespace DotnetLambdaCdkPipeline
{
    public class DotnetLambdaCdkPipelineStack : Stack
    {
        internal DotnetLambdaCdkPipelineStack(Construct scope, string id, IStackProps props = null) : base(scope, id, props)
        {

            var repository = Repository.FromRepositoryName(this, "repository", "<CODECOMMIT-REPOSITORY-NAME>");

            // This construct creates a pipeline with 3 stages: Source, Build, and UpdatePipeline
            var pipeline = new CodePipeline(this, "pipeline", new CodePipelineProps
            {
                PipelineName = "LambdaPipeline",
                SelfMutation = true,

                // Synth represents a build step that produces the CDK Cloud Assembly.
                // The primary output of this step needs to be the cdk.out directory generated by the cdk synth command.
                Synth = new CodeBuildStep("Synth", new CodeBuildStepProps
                {
                    // The files downloaded from the repository will be placed in the working directory when the script is executed
                    Input = CodePipelineSource.CodeCommit(repository, "master"),

                    // Commands to run to generate CDK Cloud Assembly
                    Commands = new string[] { "npm install -g aws-cdk", "cdk synth" },

                    // Build environment configuration
                    BuildEnvironment = new BuildEnvironment
                    {
                        BuildImage = LinuxBuildImage.AMAZON_LINUX_2_4,
                        ComputeType = ComputeType.MEDIUM,

                        // Specify true to get a privileged container inside the build environment image
                        Privileged = true
                    }
                })
            });
        }
    }
}
In the preceding code, you use CodeBuildStep instead of ShellStep, since ShellStep doesn’t provide a property to specify BuildEnvironment. We need to specify the build environment in order to set privileged mode, which allows access to the Docker daemon in order to build container images in the build environment. This is necessary to use the CDK’s bundling feature, which is explained in later in this blog post.
Open the file src/DotnetLambdaCdkPipeline/Program.cs, and edit its contents to reflect the below. Be sure to replace the placeholders with your AWS account ID and region for your dev environment.
using Amazon.CDK;

namespace DotnetLambdaCdkPipeline
{
    sealed class Program
    {
        public static void Main(string[] args)
        {
            var app = new App();
            new DotnetLambdaCdkPipelineStack(app, "DotnetLambdaCdkPipelineStack", new StackProps
            {
                Env = new Amazon.CDK.Environment
                {
                    Account = "<DEV-ACCOUNT-ID>",
                    Region = "<DEV-REGION>"
                }
            });
            app.Synth();
        }
    }
}
Note: Instead of committing the account ID and region to source control, you can set environment variables on the CodeBuild agent and use them; see Environments in the AWS CDK documentation for more information. Because the CodeBuild agent is also configured in your CDK code, you can use the BuildEnvironmentVariableType property to store environment variables in AWS Systems Manager Parameter Store or AWS Secrets Manager.
After you make the code changes, build the solution to ensure there are no build issues. Next, commit and push all the changes you just made. Run the following commands (or alternatively use Visual Studio’s built-in Git functionality to commit and push your changes):
Then navigate to the root directory of repository where your cdk.json file is present, and run the cdk deploy command to deploy the initial version of CodePipeline. Note that the deployment can take several minutes.
The pipeline created by CDK Pipelines is self-mutating. This means you only need to run cdk deploy one time to get the pipeline started. After that, the pipeline automatically updates itself if you add new CDK applications or stages in the source code.
After the deployment has finished, a CodePipeline is created and automatically runs. The pipeline includes three stages as shown below.
Source – It fetches the source of your AWS CDK app from your CodeCommit repository and triggers the pipeline every time you push new commits to it.
Build – This stage compiles your code (if necessary) and performs a cdk synth. The output of that step is a cloud assembly.
UpdatePipeline – This stage runs cdk deploy command on the cloud assembly generated in previous stage. It modifies the pipeline if necessary. For example, if you update your code to add a new deployment stage to the pipeline to your application, the pipeline is automatically updated to reflect the changes you made.
Figure 2: Initial CDK pipeline stages
Define a CodePipeline stage to deploy .NET Lambda function
In this step, you create a stack containing a simple Lambda function and place that stack in a stage. Then you add the stage to the pipeline so it can be deployed.
To create a Lambda project, do the following:
In Visual Studio, right-click on the solution, choose Add, then choose New Project.
In the New Project dialog box, choose the AWS Lambda Project (.NET Core – C#) template, and then choose OK or Next.
For Project Name, enter SampleLambda, and then choose Create.
From the Select Blueprint dialog, choose Empty Function, then choose Finish.
Next, create a new file in the CDK project at src/DotnetLambdaCdkPipeline/SampleLambdaStack.cs to define your application stack containing a Lambda function. Update the file with the following contents (adjust the namespace as necessary):
using Amazon.CDK;
using Amazon.CDK.AWS.Lambda;
using Constructs;
using AssetOptions = Amazon.CDK.AWS.S3.Assets.AssetOptions;

namespace DotnetLambdaCdkPipeline
{
    class SampleLambdaStack: Stack
    {
        public SampleLambdaStack(Construct scope, string id, StackProps props = null) : base(scope, id, props)
        {
            // Commands executed in a AWS CDK pipeline to build, package, and extract a .NET function.
            var buildCommands = new[]
            {
                "cd /asset-input",
                "export DOTNET_CLI_HOME=\"/tmp/DOTNET_CLI_HOME\"",
                "export PATH=\"$PATH:/tmp/DOTNET_CLI_HOME/.dotnet/tools\"",
                "dotnet build",
                "dotnet tool install -g Amazon.Lambda.Tools",
                "dotnet lambda package -o output.zip",
                "unzip -o -d /asset-output output.zip"
            };

            new Function(this, "LambdaFunction", new FunctionProps
            {
                Runtime = Runtime.DOTNET_6,
                Handler = "SampleLambda::SampleLambda.Function::FunctionHandler",

                // Asset path should point to the folder where .csproj file is present.
                // Also, this path should be relative to cdk.json file.
                Code = Code.FromAsset("./src/SampleLambda", new AssetOptions
                {
                    Bundling = new BundlingOptions
                    {
                        Image = Runtime.DOTNET_6.BundlingImage,
                        Command = new[]
                        {
                            "bash", "-c", string.Join(" && ", buildCommands)
                        }
                    }
                })
            });
        }
    }
}
Building inside a Docker container
The preceding code uses bundling feature to build the Lambda function inside a docker container. Bundling starts a new docker container, copies the Lambda source code inside /asset-input directory of the container, runs the specified commands that write the package files under /asset-output directory. The files in /asset-output are copied as assets to the stack’s cloud assembly directory. In a later stage, these files are zipped and uploaded to S3 as the CDK asset.
Building Lambda functions inside Docker containers is preferable than building them locally because it reduces the host machine’s dependencies, resulting in greater consistency and reliability in your build process.
Bundling requires the creation of a docker container on your build machine. For this purpose, the privileged: true setting on the build machine has already been configured.
Adding development stage
Create a new file in the CDK project at src/DotnetLambdaCdkPipeline/DotnetLambdaCdkPipelineStage.cs to hold your stage. This class will create the development stage for your pipeline.
using Amazon.CDK;
using Constructs;

namespace DotnetLambdaCdkPipeline
{
    public class DotnetLambdaCdkPipelineStage : Stage
    {
        internal DotnetLambdaCdkPipelineStage(Construct scope, string id, IStageProps props = null) : base(scope, id, props)
        {
            Stack lambdaStack = new SampleLambdaStack(this, "LambdaStack");
        }
    }
}
Edit src/DotnetLambdaCdkPipeline/DotnetLambdaCdkPipelineStack.cs to add the stage to your pipeline. Add the bolded line from the code below to your file.
using Amazon.CDK;
using Amazon.CDK.Pipelines;

namespace DotnetLambdaCdkPipeline
{
    public class DotnetLambdaCdkPipelineStack : Stack
    {
        internal DotnetLambdaCdkPipelineStack(Construct scope, string id, IStackProps props = null) : base(scope, id, props)
        {

            var repository = Repository.FromRepositoryName(this, "repository", "dotnet-lambda-cdk-application");

            // This construct creates a pipeline with 3 stages: Source, Build, and UpdatePipeline
            var pipeline = new CodePipeline(this, "pipeline", new CodePipelineProps
            {
                PipelineName = "LambdaPipeline",
                .
                .
                .
            });

            var devStage = pipeline.AddStage(new DotnetLambdaCdkPipelineStage(this, "Development"));
        }
    }
}
Next, build the solution, then commit and push the changes to the CodeCommit repo. This will trigger the CodePipeline to start.
When the pipeline runs, UpdatePipeline stage detects the changes and updates the pipeline based on the code it finds there. After the UpdatePipeline stage completes, pipeline is updated with additional stages.
Let’s observe the changes:
An Assets stage has been added. This stage uploads all the assets you are using in your app to Amazon S3 (the S3 bucket created during bootstrapping) so that they could be used by other deployment stages later in the pipeline. For example, the CloudFormation template used by the development stage, includes reference to these assets, which is why assets are first moved to S3 and then referenced in later stages.
A Development stage with two actions has been added. The first action is to create the change set, and the second is to execute it.
Figure 3: CDK pipeline with development stage to deploy .NET Lambda function
After the Deploy stage has completed, you can find the newly-deployed Lambda function by visiting the Lambda console, selecting “Functions” from the left menu, and filtering the functions list with “LambdaStack”. Note the runtime is .NET.
Right click on the solution, choose Add, then choose New Project.
In the New Project dialog box, choose the xUnit Test Project template, and then choose OK or Next.
For Project Name, enter SampleLambda.Tests, and then choose Create or Next. Depending on your version of Visual Studio, you may be prompted to select the version of .NET to use. Choose .NET 6.0 (Long Term Support), then choose Create.
Right click on SampleLambda.Tests project, choose Add, then choose Project Reference. Select SampleLambda project, and then choose OK.
Next, edit the src/SampleLambda.Tests/UnitTest1.cs file to add a unit test. You can use the code below, which verifies that the Lambda function returns the input string as upper case.
using Xunit;

namespace SampleLambda.Tests
{
    public class UnitTest1
    {
        [Fact]
        public void TestSuccess()
        {
            var lambda = new SampleLambda.Function();

            var result = lambda.FunctionHandler("test string", context: null);

            Assert.Equal("TEST STRING", result);
        }
    }
}
You can add pre-deployment or post-deployment actions to the stage by calling its AddPre() or AddPost() method. To execute above test cases, we will use a pre-deployment action.
To add a pre-deployment action, we will edit the src/DotnetLambdaCdkPipeline/DotnetLambdaCdkPipelineStack.cs file in the CDK project, after we add code to generate test reports.
To run the unit test(s) and publish the test report in CodeBuild, we will construct a BuildSpec for our CodeBuild project. We also provide IAM policy statements to be attached to the CodeBuild service role granting it permissions to run the tests and create reports. Update the file by adding the new code (starting with “// Add this code for test reports”) below the devStage declaration you added earlier:
using Amazon.CDK;
using Amazon.CDK.Pipelines;
...

namespace DotnetLambdaCdkPipeline
{
    public class DotnetLambdaCdkPipelineStack : Stack
    {
        internal DotnetLambdaCdkPipelineStack(Construct scope, string id, IStackProps props = null) : base(scope, id, props)
        {
            // ...
            // ...
            // ...
            var devStage = pipeline.AddStage(new DotnetLambdaCdkPipelineStage(this, "Development"));


            // Add this code for test reports
            var reportGroup = new ReportGroup(this, "TestReports", new ReportGroupProps
            {
                ReportGroupName = "TestReports"
            });

            // Policy statements for CodeBuild Project Role
            var policyProps = new PolicyStatementProps()
            {
                Actions = new string[] {
                    "codebuild:CreateReportGroup",
                    "codebuild:CreateReport",
                    "codebuild:UpdateReport",
                    "codebuild:BatchPutTestCases"
                },
                Effect = Effect.ALLOW,
                Resources = new string[] { reportGroup.ReportGroupArn }
            };

            // PartialBuildSpec in AWS CDK for C# can be created using Dictionary
            var reports = new Dictionary<string, object>()
            {
                {
                    "reports", new Dictionary<string, object>()
                    {
                        {
                            reportGroup.ReportGroupArn, new Dictionary<string,object>()
                            {
                                { "file-format", "VisualStudioTrx" },
                                { "files", "**/*" },
                                { "base-directory", "./testresults" }
                            }
                        }
                    }
                }
            };
            // End of new code block
        }
    }
}
Finally, add the CodeBuildStep as a pre-deployment action to the development stage with necessary CodeBuildStepProps to set up reports. Add this after the new code you added above.
devStage.AddPre(new Step[]
{
    new CodeBuildStep("Unit Test", new CodeBuildStepProps
    {
        Commands= new string[]
        {
            "dotnet test -c Release ./src/SampleLambda.Tests/SampleLambda.Tests.csproj --logger trx --results-directory ./testresults",
        },
        PrimaryOutputDirectory = "./testresults",
        PartialBuildSpec= BuildSpec.FromObject(reports),
        RolePolicyStatements = new PolicyStatement[] { new PolicyStatement(policyProps) },
        BuildEnvironment = new BuildEnvironment
        {
            BuildImage = LinuxBuildImage.AMAZON_LINUX_2_4,
            ComputeType = ComputeType.MEDIUM
        }
    })
});
Build the solution, then commit and push the changes to the repository. Pushing the changes triggers the pipeline, runs the test cases, and publishes the report to the CodeBuild console. To view the report, after the pipeline has completed, navigate to TestReports in CodeBuild’s Report Groups as shown below.
Figure 4: Test report in CodeBuild report group
Deploying to production environment with manual approval
CDK Pipelines makes it very easy to deploy additional stages with different accounts. You have to bootstrap the accounts and Regions you want to deploy to, and they must have a trust relationship added to the pipeline account.
To bootstrap an additional production environment into which AWS CDK applications will be deployed by the pipeline, run the below command, substituting in the AWS account ID for your production account, the region you will use for your production environment, the AWS CLI profile to use with the prod account, and the AWS account ID where the pipeline is already deployed (the account you bootstrapped at the start of this blog).
The --trust option indicates which other account should have permissions to deploy AWS CDK applications into this environment. For this option, specify the pipeline’s AWS account ID.
Use below code to add a new stage for production deployment with manual approval. Add this code below the “devStage.AddPre(...)” code block you added in the previous section, and remember to replace the placeholders with your AWS account ID and region for your prod environment.
var prodStage = pipeline.AddStage(new DotnetLambdaCdkPipelineStage(this, "Production", new StageProps
{
    Env = new Environment
    {
        Account = "<PROD-ACCOUNT-ID>",
        Region = "<PROD-REGION>"
    }
}), new AddStageOpts
{
    Pre = new[] { new ManualApprovalStep("PromoteToProd") }
});
To support deploying CDK applications to another account, the artifact buckets must be encrypted, so add a CrossAccountKeys property to the CodePipeline near the top of the pipeline stack file, and set the value to true (see the line in bold in the code snippet below). This creates a KMS key for the artifact bucket, allowing cross-account deployments.
var pipeline = new CodePipeline(this, "pipeline", new CodePipelineProps
{
PipelineName = "LambdaPipeline",
SelfMutation = true,
CrossAccountKeys = true,EnableKeyRotation = true, //Enable KMS key rotation for the generated KMS keys
// ...
}
After you commit and push the changes to the repository, a new manual approval step called PromoteToProd is added to the Production stage of the pipeline. The pipeline pauses at this step and awaits manual approval as shown in the screenshot below.
Figure 5: Pipeline waiting for manual review
When you click the Review button, you are presented with the following dialog. From here, you can choose to approve or reject and add comments if needed.
Figure 6: Manual review approval dialog
Once you approve, the pipeline resumes, executes the remaining steps and completes the deployment to production environment.
Figure 7: Successful deployment to production environment
Clean up
To avoid incurring future charges, log into the AWS console of the different accounts you used, go to the AWS CloudFormation console of the Region(s) where you chose to deploy, select and click Delete on the stacks created for this activity. Alternatively, you can delete the CloudFormation Stack(s) using cdk destroy command. It will not delete the CDKToolkit stack that the bootstrap command created. If you want to delete that as well, you can do it from the AWS Console.
Conclusion
In this post, you learned how to use CDK Pipelines for automating the deployment process of .NET Lambda functions. An intuitive and flexible architecture makes it easy to set up a CI/CD pipeline that covers the entire application lifecycle, from build and test to deployment. With CDK Pipelines, you can streamline your development workflow, reduce errors, and ensure consistent and reliable deployments. For more information on CDK Pipelines and all the ways it can be used, see the CDK Pipelines reference documentation.
This post is written by Josh Kahn, Tech Leader, and Chloe Jeon, Senior PMTes Lambda.
Serverless applications can lower the total cost of ownership (TCO) when compared to a server-based cloud execution model because it effectively shifts operational responsibilities such as managing servers to a cloud provider. Deloitte research on serverless TCO with Fortune 100 clients across industries show that serverless applications can offer up to 57% cost savings compared with server-based solutions.
Serverless applications can offer lower costs in:
Initial development: Serverless enables builders to be more agile, deliver features more rapidly, and focus on differentiated business logic.
Ongoing maintenance and infrastructure: Serverless shifts operational burden to AWS. Ongoing maintenance tasks, including patching and operating system updates.
This post focuses on options available to reduce direct AWS costs when building serverless applications. AWS Lambda is often the compute layer in these workloads and may comprise a meaningful portion of the overall cost.
To help optimize your Lambda-related costs, this post discusses some of the most commonly used cost optimization techniques with an emphasis on configuration changes over code updates. This post is intended for architects and developers new to building with serverless.
Building with serverless makes both experimentation and iterative improvement easier. All of the techniques described here can be applied before application development, or after you have deployed your application to production. The techniques are roughly by applicability: The first can apply to any workload; the last applies to a smaller number of workloads.
Right-sizing your Lambda functions
Lambda uses a pay-per-use cost model that is driven by three metrics:
Memory configuration: allocated memory from 128MB to 10,240MB. CPU and other resources available to the function are allocated proportionally to memory.
Function duration: time function runs, measures in milliseconds.
Number of invocations: the number of times your function runs.
Over-provisioning memory is one of the primary drivers of increased Lambda cost. This is particularly acute among builders new to Lambda who are used to provisioning hosts running multiple processes. Lambda scales such that each execution environment of a function only handles one request at a time. Each execution environment has access to fixed resources (memory, CPU, storage) to complete work on the request.
By right-sizing the memory configuration, the function has the resources to complete its work and you are paying for only the needed resources. While you also have direct control of function duration, this is a less effective cost optimization to implement. The engineering costs to create a few milliseconds of savings may outweigh the cost savings. Depending on the workload, the number of times your function is invoked may be outside your control. The next section discusses a technique to reduce the number of invocations for some types of workloads.
Memory configuration is accessible via the AWS Management Console or your favorite infrastructure as code (IaC) option. The memory configuration setting defines allocated memory, not memory used by your function. Right-sizing memory is an adjustment that can reduce the cost (or increase performance) of your function. However, lowering the function-memory may not always result in cost savings. Lowering function memory means lowering available CPU for the Lambda function, which could increase the function duration, resulting in either no cost savings or higher cost. It is important to identify the optimal memory configuration for cost savings while preserving performance.
AWS Lambda Power Tuning is an open-source tool that can be used to empirically find the optimal memory configuration for your function by trading off cost against execution time. The tool runs multiple concurrent versions of your function against mock input data at different memory allocations. The result is a chart that can help you find the “sweet spot” between cost and duration/performance. Depending on the workload, you may prioritize one over the other. AWS Lambda Power Tuning is a good choice for new functions and can also help select between the two instruction set architectures offered by Lambda.
AWS Compute Optimizer uses machine learning to recommend an optimal memory configuration based on historical data. Compute Optimizer requires that your function be invoked at least 50 times over the trailing 14 days to provide a recommendation based on past utilization, so is most effective once your function is in production.
Both Lambda Power Tuning and Compute Optimizer help derive the right-sized memory allocation for your function. Use this value to update the configuration of your function using the AWS Management Console or IaC.
MyFunction:
  Type: AWS::Serverless::Function
  Properties:
    Runtime: nodejs18.x
    Handler: app.handler
    MemorySize: 1024   # Set memory configuration to optimize for cost or performance
Setting a realistic function timeout
Lambda functions are configured with a maximum time that each invocation can run, up to 15 minutes. Setting an appropriate timeout can be beneficial in containing costs of your Lambda-based application. Unhandled exceptions, blocking actions (for example, opening a network connection), slow dependencies, and other conditions can lead to longer-running functions or functions that run until the configured timeout. Proper timeouts are the best protection against both slow and erroneous code. At some point, the work the function is performing and the per-millisecond cost of that work is wasted.
Our recommendation is to set a timeout of less than 29-seconds for all synchronous invocations, or those in which the caller is waiting for a response. Longer timeouts are appropriate for asynchronous invocations, but consider timeouts longer than 1-minute to be an exception that requires review and testing.
Choosing Graviton can save money in two ways. First, your functions may run more efficiently due to the Graviton2 architecture. Second, you may pay less for the time that they run. Lambda functions powered by Graviton2 are designed to deliver up to 19 percent better performance at 20 percent lower cost. Consider starting with Graviton when developing new Lambda functions, particularly those that do not require natively compiled binaries.
If your function relies on native compiled binaries or is packaged as a container image, you must rebuild to move between arm64 and x86. Lambda layers may also include dependencies targeted for one architecture or the other. We encourage you to review dependencies and test your function before changing the architecture. The AWS Lambda Power Tuning tool also allows you to compare the price and performance of arm64 and x86 at different memory settings.
You can modify the architecture configuration of your function in the console or your IaC of choice. For example, in AWS SAM:
MyFunction:
  Type: AWS::Serverless::Function
  Properties:
    Architectures:
      - arm64. # Set architecture to use Graviton2
    Runtime: nodejs18.x
    Handler: app.handler
When working with one of these event sources, builders can configure filters to limit the events sent to your function. This technique can greatly reduce the number of times your function is invoked depending on the number of events and specificity of your filters. When not using event filtering, the function must be invoked to first determine if an event should be processed before performing the actual work. Event filtering alleviates the need to perform this upfront check while reducing the number of invocations.
For example, you may only want a function to run when orders of over $200 are found in a message on a Kinesis data stream. You can configure an event filtering pattern using the console or IaC in a manner similar to memory configuration.
To implement the Kinesis stream filter using AWS SAM:
If an event satisfies one of the event filters associated with the event source, Lambda sends the event to your function for processing. Otherwise, the event is discarded as processed successfully without invoking the function.
If you are building or running a Lambda function that is invoked by one of the previously mentioned event sources, it’s recommended that you review the filtering options available. This technique requires no code changes to your Lambda function – even if the function performs some preprocessing check, that check still completes successfully with filtering implemented.
You may be familiar with the programming concept of a recursive function or a function/routine that calls itself. Though rare, customers sometimes unintentionally build recursion in their architecture, so a Lambda function continuously calls itself.
The most common recursive pattern is between Lambda and Amazon S3. Actions in an S3 bucket can trigger a Lambda function, and recursion can occur when that Lambda function writes back to the same bucket.
Consider a use case in which a Lambda function is used to generate a thumbnail of user-submitted images. You configure the bucket to trigger the thumbnail generation function when a new object is put in the bucket. What happens if the Lambda function writes the thumbnail to the same bucket? The process starts anew and the Lambda function then runs on the thumbnail image itself. This is recursion and can lead to an infinite loop condition.
While there are multiple ways to prevent against this condition, it’s best practice to use a second S3 bucket to store thumbnails. This approach minimizes changes to the architecture as you do not need to change the notification settings nor the primary S3 bucket. To learn about other approaches, read Avoiding recursive invocation with Amazon S3 and AWS Lambda.
If you do encounter recursion in your architecture, set Lambda reserved concurrency to zero to stop the function from running. Allow minutes to hours before lifting the reserved concurrency cap. Since S3 events are asynchronous invocations that have automatic retries, you may continue to see recursion until you resolve the issue or all events have expired.
Conclusion
Lambda offers a number of techniques that you can use to minimize infrastructure costs whether you are just getting started with Lambda or have numerous functions already deployed in production. When combined with the lower costs of initial development and ongoing maintenance, serverless can offer a low total cost of ownership. Get hands-on with these techniques and more with the Serverless Optimization Workshop.
To learn more about serverless architectures, find reusable patterns, and keep up-to-date, visit Serverless Land.
This post is written by Suresh Poopandi, Senior Solutions Architect, Global Life Sciences.
AWS Lambda now supports Python 3.10 as both a managed runtime and container base image. With this release, Python developers can now take advantage of new features and improvements introduced in Python 3.10 when creating serverless applications on Lambda.
Thanks to its simplicity, readability, and extensive community support, Python is a popular language for building serverless applications. The Python 3.10 release includes several new features, such as:
Structural pattern matching (PEP 634): Structural pattern matching is one of the most significant additions to Python 3.10. With structural pattern matching, developers can use patterns to match against data structures such as lists, tuples, and dictionaries and run code based on the match. This feature enables developers to write code that processes complex data structures more easily and can improve code readability and maintainability.
Parenthesized context managers (BPO-12782): Python 3.10 introduces a new syntax for parenthesized context managers, making it easier to read and write code that uses the “with” statement. This feature simplifies managing resources such as file handles or database connections, ensuring they are released correctly.
Writing union types as X | Y (PEP 604): Python 3.10 allows writing union types as X | Y instead of the previous versions’ syntax of typing Union[X, Y]. Union types represent a value that can be one of several types. This change does not affect the functionality of the code and is backward-compatible, so code written with the previous syntax will still work. The new syntax aims to reduce boilerplate code, and improve readability and maintainability of Python code by providing a more concise and intuitive syntax for union types.
User-defined type guards (PEP 647): User-defined type guards allow developers to define their own type guards to handle custom data types or to refine the types of built-in types. Developers can define their own functions that perform more complex type checks as user-defined typed guards. This feature improves Python code readability, maintainability, and correctness, especially in projects with complex data structures or custom data types.
Improved error messages: Python 3.10 has improved error messages, providing developers with more information about the source of the error and suggesting possible solutions. This helps developers identify and fix issues more quickly. The improved error messages in Python 3.10 include more context about the error, such as the line number and location where the error occurred, as well as the exact nature of the error. Additionally, Python 3.10 error messages now provide more helpful information about how to fix the error, such as suggestions for correct syntax or usage.
Performance improvements
The faster PEP 590 vectorcall calling convention allows for quicker and more efficient Python function calls, particularly those that take multiple arguments. The specific built-in functions that benefit from this optimization include map(), filter(), reversed(), bool(), and float(). By using the vectorcall calling convention, according to Python 3.10 release notes, these inbuilt functions’ performance improved by a factor of 1.26x.
When a function is defined with annotations, these are stored in a dictionary that maps the parameter names to their respective annotations. In previous versions of Python, this dictionary was created immediately when the function was defined. However, in Python 3.10, this dictionary is created only when the annotations are accessed, which can happen when the function is called. By delaying the creation of the annotation dictionary until it is needed, Python can avoid the overhead of creating and initializing the dictionary during function definition. This can result in a significant reduction in CPU time, as the dictionary creation can be a time-consuming operation, particularly for functions with many parameters or complex annotations.
In Python 3.10, the LOAD_ATTR instruction, which is responsible for loading attributes from objects in the code, has been improved with a new mechanism called the “per opcode cache”. This mechanism works by storing frequently accessed attributes in a cache specific to each LOAD_ATTR instruction, which reduces the need for repeated attribute lookups. As a result of this improvement, according to Python 3.10 release notes, the LOAD_ATTR instruction is now approximately 36% faster when accessing regular attributes and 44% faster when accessing attributes defined using the slots mechanism.
In Python, the str(), bytes(), and bytearray() constructors are used to create new instances of these types from existing data or values. Based on the result of the performance tests conducted as part of BPO-41334, constructors str(), bytes(), and bytearray() are around 30–40% faster for small objects.
Lambda functions developed with Python that read and process Gzip compressed files can gain a performance improvement. Adding _BlocksOutputBuffer for the bz2/lzma/zlib module eliminated the overhead of resizing bz2/lzma buffers, preventing excessive memory footprint of the zlib buffer. According to Python 3.10 release notes, bz2 decompression is now 1.09x faster, lzma decompression 1.20x faster, and GzipFile read is 1.11x faster
Using Python 3.10 in Lambda
AWS Management Console
To use the Python 3.10 runtime to develop your Lambda functions, specify a runtime parameter value Python 3.10 when creating or updating a function. Python 3.10 version is now available in the Runtime dropdown in the Create function page.
To update an existing Lambda function to Python 3.10, navigate to the function in the Lambda console, then choose Edit in the Runtime settings panel. The new version of Python is available in the Runtime dropdown:
AWS Serverless Application Model (AWS SAM)
In AWS SAM, set the Runtime attribute to python3.10 to use this version.
AWSTemplateFormatVersion: ‘2010-09-09’ Transform: AWS::Serverless-2016-10-31 Description: Simple Lambda Function
Resources:
  MyFunction:
    Type: AWS::Serverless::Function
    Properties:
      Description: My Python Lambda Function
      CodeUri: my_function/
      Handler: lambda_function.lambda_handler
      Runtime: python3.10
AWS SAM supports the generation of this template with Python 3.10 out of the box for new serverless applications using the sam init command. Refer to the AWS SAM documentation here.
AWS Cloud Development Kit (AWS CDK)
In the AWS CDK, set the runtime attribute to Runtime.PYTHON_3_10 to use this version. In Python:
from constructs import Construct
from aws_cdk import (
    App, Stack,
    aws_lambda as _lambda
)


class SampleLambdaStack(Stack):

    def __init__(self, scope: Construct, id: str, **kwargs) -> None:
        super().__init__(scope, id, **kwargs)

        base_lambda = _lambda.Function(self, 'SampleLambda',
                                       handler='lambda_handler.handler',
                                       runtime=_lambda.Runtime.PYTHON_3_10,
                                       code=_lambda.Code.from_asset('lambda'))
In TypeScript:
import * as cdk from 'aws-cdk-lib';
import * as lambda from 'aws-cdk-lib/aws-lambda'
import * as path from 'path';
import { Construct } from 'constructs';

export class CdkStack extends cdk.Stack {
  constructor(scope: Construct, id: string, props?: cdk.StackProps) {
    super(scope, id, props);

    // The code that defines your stack goes here

    // The python3.10 enabled Lambda Function
    const lambdaFunction = new lambda.Function(this, 'python310LambdaFunction', {
      runtime: lambda.Runtime.PYTHON_3_10,
      memorySize: 512,
      code: lambda.Code.fromAsset(path.join(__dirname, '/../lambda')),
      handler: 'lambda_handler.handler'
    })
  }
}
AWS Lambda – Container Image
Change the Python base image version by modifying FROM statement in the Dockerfile:
FROM public.ecr.aws/lambda/python:3.10

# Copy function code
COPY lambda_handler.py ${LAMBDA_TASK_ROOT}
We are excited to bring Python 3.10 runtime support to Lambda and empower developers to build more efficient, powerful, and scalable serverless applications. Try Python 3.10 runtime in Lambda today and experience the benefits of this updated language version and take advantage of improved performance.
For more serverless learning resources, visit Serverless Land.
This post is written by Siarhei Kazhura, Senior Specialist Solutions Architect, Serverless.
Customers use AWS Lambda extensions to integrate monitoring, observability, security, and governance tools with their Lambda functions. AWS, along with AWS Lambda Ready Partners, like Datadog, Dynatrace, New Relic, provides ready-to-run extensions. You can also develop your own extensions to address your specific needs.
External Lambda extensions are designed as a companion process running in the same execution environment as the function code. That means that the Lambda function shares resources like memory, CPU, and disk I/O, with the extension. Improperly designed extensions can result in a performance degradation and extra costs.
This post shows how to measure the impact an extension has on the function performance using key performance metrics on an Amazon CloudWatch dashboard.
This post focuses on Lambda extensions written in C# and Rust. It shows the benefits of choosing to write Lambda extensions in Rust. Also, it explains how you can optimize a Lambda extension written in C# to deliver three times better performance. The solution can be converted to the programming languages of your choice.
Overview
A C# Lambda function (running on .NET 6) called HeaderCounter is used as a baseline. The function counts the number of headers in a request and returns the number in the response. A static delay of 500 ms is inserted in the function code to simulate extra computation. The function has the minimum memory setting (128 MB), which magnifies the impact that extension has on performance.
A load test is performed via a curl command that is issuing 5000 requests (with 250 requests running simultaneously) against a public Amazon API Gateway endpoint backed by the Lambda function. A CloudWatch dashboard, named lambda-performance-dashboard, displays performance metrics for the function.
Metrics captured by the dashboard:
The Max Duration, and Average Duration metrics allow you to assess the impact the extension has on the function execution duration.
The PostRuntimeExtensionsDuration metric measures the extra time that the extension takes after the function invocation.
The Average Memory Used, and Memory Allocated metrics allow you to assess the impact the extension has on the function memory consumption.
The Cold Start Duration, and Cold Starts metrics allow you to assess the impact the extension has on the function cold start.
Running the extensions
There are a few differences between how the extensions written in C# and Rust are run.
The extension written in Rust is published as an executable. The advantage of an executable is that it is compiled to native code, and is ready to run. The extension is environment agnostic, so it can run alongside with a Lambda function written in another runtime.
The disadvantage of an executable is the size. Extensions are served as Lambda layers, and the size of the extension counts towards the deployment package size. The maximum unzipped deployment package size for Lambda is 250 MB.
The extension written in C# is published as a dynamic-link library (DLL). The DLL contains the Common Intermediate Language (CIL), that must be converted to native code via a just-in-time (JIT) compiler. The .NET runtime must be present for the extension to run. The dotnet command runs the DLL in the example provided with the solution.
Blank extension
Three instances of the HeaderCounter function are deployed:
The first instance, available via a no-extension endpoint, has no extensions.
The second instance, available via a dotnet-extension endpoint, is instrumented with a blank extension written in C#. The extension does not provide any extra functionality, except logging the event received to CloudWatch.
The third instance, available via a rust-extension endpoint, is instrumented with a blank extension written in Rust. The extension does not provide any extra functionality, except logging the event received to CloudWatch.
The dashboard shows that the extensions add minimal overhead to the Lambda function. The extension written in C# adds more overhead in the higher percentile metrics, such as the Maximum Cold Start Duration and Maximum Duration.
EventCollector extension
Three instances of the HeaderCounter function are deployed:
The first instance, available via a no-extension endpoint, has no extensions.
The second instance, available via a dotnet-extension endpoint, is instrumented with an EventCollector extension written in C#. The extension is pushing all the extension invocation events to Amazon S3.
The third instance, available via a rust-extension endpoint, is instrumented with an EventCollector extension written in Rust. The extension is pushing all the extension invocation events to S3.
The Rust extension adds little overhead in terms of the Duration, number of Cold Starts, and Average PostRuntimeExtensionDuration metrics. Yet there is a clear performance degradation for the function that is instrumented with an extension written in C#. Average Duration jumped almost three times, and the Maximum Duration is now around six times higher.
The function is now consuming almost all the memory allocated. CPU, networking, and storage for Lambda functions are allocated based on the amount of memory selected. Currently, the memory is set to 128 MB, the lowest setting possible. Constrained resources influence the performance of the function.
Increasing the memory to 512 MB and re-running the load test improves the performance. Maximum Duration is now 721 ms (including the static 500 ms delay).
For the C# function, the Average Duration is now only 59 ms longer than the baseline. The AveragePostRuntimeExtensionDuration is at 36.9 ms (compared with 584 ms previously). This performance gain is due to the memory increase without any code changes.
You can also use the Lambda Power Tuning to determine the optimal memory setting for a Lambda function.
Garbage collection
Unlike C#, Rust is not a garbage collected language. Garbage collection (GC) is a process of managing the allocation and release of memory for an application. This process can be resource intensive, and can affect higher percentile metrics. The impact of GC is visible with the blank extension’s and EventCollector extension’s metrics.
Rust uses ownership and borrowing features, allowing for safe memory release without relying on GC. This makes Rust a good runtime choice for tools like Lambda extensions.
EventCollector native AOT extension
Native ahead-of-time (Native AOT) compilation (available in .NET 7 and .NET 8), allows for the extensions written in C# to be delivered as executables, similar to the extensions written in Rust.
Native AOT does not use a JIT compiler. The application is compiled into a self-contained (all the resources that it needs are encapsulated) executable. The executable runs in the target environment (for example, Linux x64) that is specified at compilation time.
These are the results of compiling the .NET extension using Native AOT and re-running the performance test (with function memory set to 128 MB):
For the C# extension, Average Duration is now close the baseline (compared to three times the baseline as a DLL). AveragePostRuntimeExtensionDuration is now 0.77 ms (compared with 584 ms as a DLL). The C# extension also outperforms the Rust extension for the Maximum PostRuntimeExtensionDuration metric – 297 ms versus 497 ms.
Overall, the Rust extension still has better Average/Maximum Duration, Average/MaximumCold Start Duration, and Memory Consumption. The Lambda function with the C# extension still uses almost all the allocated memory.
Another metric to consider is the binary size. The Rust extension compiles into a 12.3 MB binary, while the C# extension compiles into a 36.4 MB binary.
Example walkthroughs
To follow the example walkthrough, visit the GitHub repository. The walkthrough explains:
The prerequisites required.
A detailed solution deployment walkthrough.
The cleanup process.
Cost considerations.
Conclusion
This post demonstrates techniques that can be used for running and profiling different types of Lambda extensions. This post focuses on Lambda extensions written in C# and Rust. This post outlines the benefits of writing Lambda extensions in Rust and shows the techniques that can be used to improve Lambda extension written in C# to deliver better performance.
Inventory management is a critical function for any business that deals with physical products. The primary challenge businesses face with inventory management is balancing the cost of holding inventory with the need to ensure that products are available when customers demand them.
The consequences of poor inventory management can be severe. Overstocking can lead to increased holding costs and waste, while understocking can result in lost sales, reduced customer satisfaction, and damage to the business’s reputation. Inefficient inventory management can also tie up valuable resources, including capital and warehouse space, and can impact profitability.
Forecasting is another critical component of effective inventory management. Accurately predicting demand for products allows businesses to optimize inventory levels, minimize stockouts, and reduce holding costs. However, forecasting can be a complex process, and inaccurate predictions can lead to missed opportunities and lost revenue.
To address these challenges, businesses need an inventory management and forecasting solution that can provide real-time insights into inventory levels, demand trends, and customer behavior. Such a solution should use the latest technologies, including Internet of Things (IoT) sensors, cloud computing, and machine learning (ML), to provide accurate, timely, and actionable data. By implementing such a solution, businesses can improve their inventory management processes, reduce holding costs, increase revenue, and enhance customer satisfaction.
In this post, we discuss how to streamline inventory management forecasting systems with AWS managed analytics, AI/ML, and database services.
Solution overview
In today’s highly competitive business landscape, it’s essential for retailers to optimize their inventory management processes to maximize profitability and improve customer satisfaction. With the proliferation of IoT devices and the abundance of data generated by them, it has become possible to collect real-time data on inventory levels, customer behavior, and other key metrics.
To take advantage of this data and build an effective inventory management and forecasting solution, retailers can use a range of AWS services. By collecting data from store sensors using AWS IoT Core, ingesting it using AWS Lambda to Amazon Aurora Serverless, and transforming it using AWS Glue from a database to an Amazon Simple Storage Service (Amazon S3) data lake, retailers can gain deep insights into their inventory and customer behavior.
With Amazon Athena, retailers can analyze this data to identify trends, patterns, and anomalies, and use Amazon ElastiCache for customer-facing applications with reduced latency. Additionally, by building a point of sales application on Amazon QuickSight, retailers can embed customer 360 views into the application to provide personalized shopping experiences and drive customer loyalty.
Finally, we can use Amazon SageMaker to build forecasting models that can predict inventory demand and optimize stock levels.
With these AWS services, retailers can build an end-to-end inventory management and forecasting solution that provides real-time insights into inventory levels and customer behavior, enabling them to make informed decisions that drive business growth and customer satisfaction.
The following diagram illustrates a sample architecture.
With the appropriate AWS services, your inventory management and forecasting system can have optimized collection, storage, processing, and analysis of data from multiple sources. The solution includes the following components.
Data ingestion and storage
Retail businesses have event-driven data that requires action from downstream processes. It’s critical for an inventory management application to handle the data ingestion and storage for changing demands.
The data ingestion process is typically triggered by an event such as an order being placed, kicking off the inventory management workflow, which requires actions from backend services. Developers are responsible for the operational overhead of trying to maintain the data ingestion load from an event driven-application.
The volume and velocity of data can change in the retail industry each day. Events like Black Friday or a new campaign can create volatile demand in what is required to process and store the inventory data. Serverless services designed to scale to businesses’ needs help reduce the architectural and operational challenges that are driven from high-demand retail applications.
Understanding the scaling challenges that occur when inventory demand spikes, we can deploy Lambda, a serverless, event-driven compute service, to trigger the data ingestion process. As inventory events occur like purchases or returns, Lambda automatically scales compute resources to meet the volume of incoming data.
After Lambda responds to the inventory action request, the updated data is stored in Aurora Serverless. Aurora Serverless is a serverless relational database that is designed to scale to the application’s needs. When peak loads hit during events like Black Friday, Aurora Serverless deploys only the database capacity necessary to meet the workload.
Inventory management applications have ever-changing demands. Deploying serverless services to handle the ingestion and storage of data will not only optimize cost but also reduce the operational overhead for developers, freeing up bandwidth for other critical business needs.
Data performance
Customer-facing applications require low latency to maintain positive user experiences with microsecond response times. ElastiCache, a fully managed, in-memory database, delivers high-performance data retrieval to users.
In-memory caching provided by ElastiCache is used to improve latency and throughput for read-heavy applications that online retailers experience. By storing critical pieces of data in-memory like commonly accessed product information, the application performance improves. Product information is an ideal candidate for a cached store due to data staying relatively the same.
Functionality is often added to retail applications to retrieve trending products. Trending products can be cycled through the cache dependent on customer access patterns. ElastiCache manages the real-time application data caching, allowing your customers to experience microsecond response times while supporting high-throughput handling of hundreds of millions of operations per second.
Data transformation
Data transformation is essential in inventory management and forecasting solutions for both data analysis around sales and inventory, as well as ML for forecasting. This is because raw data from various sources can contain inconsistencies, errors, and missing values that may distort the analysis and forecast results.
In the inventory management and forecasting solution, AWS Glue is recommended for data transformation. The tool addresses issues such as cleaning, restructuring, and consolidating data into a standard format that can be easily analyzed. As a result of the transformation, businesses can obtain a more precise understanding of inventory, sales trends, and customer behavior, influencing data-driven decisions to optimize inventory management and sales strategies. Furthermore, high-quality data is crucial for ML algorithms to make accurate forecasts.
By transforming data, organizations can enhance the accuracy and dependability of their forecasting models, ultimately leading to improved inventory management and cost savings.
Data analysis
Data analysis has become increasingly important for businesses because it allows leaders to make informed operational decisions. However, analyzing large volumes of data can be a time-consuming and resource-intensive task. This is where Athena come in. With Athena, businesses can easily query historical sales and inventory data stored in S3 data lakes and combine it with real-time transactional data from Aurora Serverless databases.
The federated capabilities of Athena allow businesses to generate insights by combining datasets without the need to build ETL (extract, transform, and load) pipelines, saving time and resources. This enables businesses to quickly gain a comprehensive understanding of their inventory and sales trends, which can be used to optimize inventory management and forecasting, ultimately improving operations and increasing profitability.
With Athena’s ease of use and powerful capabilities, businesses can quickly analyze their data and gain valuable insights, driving growth and success without the need for complex ETL pipelines.
Forecasting
Inventory forecasting is an important aspect of inventory management for businesses that deal with physical products. Accurately predicting demand for products can help optimize inventory levels, reduce costs, and improve customer satisfaction. ML can help simplify and improve inventory forecasting by making more accurate predictions based on historical data.
SageMaker is a powerful ML platform that you can use to build, train, and deploy ML models for a wide range of applications, including inventory forecasting. In this solution, we use SageMaker to build and train an ML model for inventory forecasting, covering the basic concepts of ML, the data preparation process, model training and evaluation, and deploying the model for use in a production environment.
The solution also introduces the concept of hierarchical forecasting, which involves generating coherent forecasts that maintain the relationships within the hierarchy or reconciling incoherent forecasts. The workshop provides a step-by-step process for using the training capabilities of SageMaker to carry out hierarchical forecasting using synthetic retail data and the scikit-hts package. The FBProphet model was used along with bottom-up and top-down hierarchical aggregation and disaggregation methods. We used Amazon SageMaker Experiments to train multiple models, and the best model was picked out of the four trained models.
Although the approach was demonstrated on a synthetic retail dataset, you can use the provided code with any time series dataset that exhibits a similar hierarchical structure.
Security and authentication
The solution takes advantage of the scalability, reliability, and security of AWS services to provide a comprehensive inventory management and forecasting solution that can help businesses optimize their inventory levels, reduce holding costs, increase revenue, and enhance customer satisfaction. By incorporating user authentication with Amazon Cognito and Amazon API Gateway, the solution ensures that the system is secure and accessible only by authorized users.
Next steps
The next step to build an inventory management and forecasting solution on AWS would be to go through the Inventory Management workshop. In the workshop, you will get hands-on with AWS managed analytics, AI/ML, and database services to dive deep into an end-to-end inventory management solution. By the end of the workshop, you will have gone through the configuration and deployment of the critical pieces that make up an inventory management system.
Conclusion
In conclusion, building an inventory management and forecasting solution on AWS can help businesses optimize their inventory levels, reduce holding costs, increase revenue, and enhance customer satisfaction. With AWS services like IoT Core, Lambda, Aurora Serverless, AWS Glue, Athena, ElastiCache, QuickSight, SageMaker, and Amazon Cognito, businesses can use scalable, reliable, and secure technologies to collect, store, process, and analyze data from various sources.
The end-to-end solution is designed for individuals in various roles, such as business users, data engineers, data scientists, and data analysts, who are responsible for comprehending, creating, and overseeing processes related to retail inventory forecasting. Overall, an inventory management and forecasting solution on AWS can provide businesses with the insights and tools they need to make data-driven decisions and stay competitive in a constantly evolving retail landscape.
About the Authors
Jason D’Alba is an AWS Solutions Architect leader focused on databases and enterprise applications, helping customers architect highly available and scalable solutions.
Navnit Shukla is an AWS Specialist Solution Architect, Analytics, and is passionate about helping customers uncover insights from their data. He has been building solutions to help organizations make data-driven decisions.
Vetri Natarajan is a Specialist Solutions Architect for Amazon QuickSight. Vetri has 15 years of experience implementing enterprise business intelligence (BI) solutions and greenfield data products. Vetri specializes in integration of BI solutions with business applications and enable data-driven decisions.
Sindhura Palakodety is a Solutions Architect at AWS. She is passionate about helping customers build enterprise-scale Well-Architected solutions on the AWS platform and specializes in Data Analytics domain.
The AWS Summit season has started. AWS Summits are free technical and business conferences happening in large cities across the planet. This week, we were happy to welcome our customers and partners in Sydney and Paris. In France, 9,973 customers and partners joined us for the day to meet and exchange ideas but also to attend one of the more than 145 technical breakout sessions and the keynote. This is the largest cloud computing event in France, and I can’t resist sharing a picture from the main room during the opening keynote.
There are AWS Summits on all continents ; you can find the list and the links for registration here https://aws.amazon.com/events/summits. The next on my agenda are listed at the end of this post.
AWS Lambda response streaming – Response streaming is a new invocation pattern that lets functions progressively stream response payloads back to clients. You can use Lambda response payload streaming to send response data to callers as it becomes available. Response streaming also allows you to build functions that return larger payloads and perform long-running operations while reporting incremental progress (within the 15 minutes execution period). My colleague Julian wrote an incredibly detailed blog post to help you to get started.
AWS Supply Chain Now Generally Available – AWS Supply Chain is a cloud application that mitigates risk and lowers costs with unified data and built-in contextual collaboration. It connects to your existing enterprise resource planning (ERP) and supply chain management systems to bring you ML-powered actionable insights into your supply chain.
AWS Service Catalog Supports Terraform Templates – With AWS Service Catalog, you can create, govern, and manage a catalog of infrastructure as code (IaC) templates that are approved for use on AWS. You can now define AWS Service Catalog products and their resources using either AWS CloudFormation or Hashicorp Terraform and choose the tool that better aligns with your processes and expertise.
Amazon S3 enforces two security best practices and brings new visibility into object replication status – As announced on December 13, 2022, Amazon S3 is now deploying two new default bucket security settings by automatically enabling S3 Block Public Access and disabling S3 access control lists (ACLs) for all new S3 buckets. Amazon S3 also adds a new Amazon CloudWatch metric that can be used to diagnose and correct S3 Replication configuration issues more quickly. The OperationFailedReplication metric, available in both the Amazon S3 console and in Amazon CloudWatch, gives you per-minute visibility into the number of objects that did not replicate to the destination bucket for each of your replication rules.
AWS Cloud Operation Competency Partners – AWS Cloud Operations covers five fundamental solution areas: Cloud Governance, Cloud Financial Management, Monitoring and Observability, Compliance and Auditing, and Operations Management. The new competency enables customers to select validated AWS Partners who offer comprehensive solutions with an integrated approach across multiple areas.
Amplify Library for Swift on macOS – Amplify is an open-source, client-side library making it easier to access a cloud backend from your front-end application code. It provides language-specific constructs to abstract low-level details of the cloud API. It helps you to integrate services such as analytics, object storage, REST or GraphQL APIs, user authentication, geolocation and mapping, and push notifications. You can now write beautiful macOS applications that connect to the same cloud backend as their iOS counterparts.
X in Y Jeff started this section a while ago to list the expansion of new services and capabilities to additional Regions. I noticed 11 Regional expansions this week:
Upcoming AWS Events And to finish this post, I recommend you check your calendars and sign up for these AWS-led events:
.Net Developer Day – .NET Enterprise Developer Day EMEA 2023 (April 25) is a free, one-day virtual conference providing enterprise developers with the most relevant information to swiftly and efficiently migrate and modernize their .NET applications and workloads on AWS.
AWS re:Inforce 2023 – Now register AWS re:Inforce, in Anaheim, California, June 13–14. AWS Chief Information Security Officer CJ Moses will share the latest innovations in cloud security and what AWS Security is focused on. The breakout sessions will provide real-world examples of how security is embedded into the way businesses operate. To learn more and get the limited discount code to register, see CJ’s blog post of Gain insights and knowledge at AWS re:Inforce 2023 in the AWS Security Blog.
AWS Global Summits – Check your calendars and sign up for the AWS Summit close to where you live or work: Seoul (May 3–4), Berlin and Singapore (May 4), Stockholm (May 11), Hong Kong (May 23), Amsterdam (June 1), London (June 7), Madrid (June 15), and Milano (June 22).
AWS Community Day – Join community-led conferences driven by AWS user group leaders close to your city: Lima (April 15), Helsinki (April 20), Chicago (June 15), Manila (June 29–30), and Munich (September 14). Recently, we have been bringing together AWS user groups from around the world into Meetup Pro accounts. Find your group and its meetups in your city!
The Official AWS Podcast – Listen each week for updates on the latest AWS news and deep dives into exciting use cases. There are also official AWS podcasts in your local languages. Check out the ones in French, German, Italian, and Spanish.
Today, AWS Lambda is announcing support for response payload streaming. Response streaming is a new invocation pattern that lets functions progressively stream response payloads back to clients.
You can use Lambda response payload streaming to send response data to callers as it becomes available. This can improve performance for web and mobile applications. Response streaming also allows you to build functions that return larger payloads and perform long-running operations while reporting incremental progress.
In traditional request-response models, the response needs to be fully generated and buffered before it is returned to the client. This can delay the time to first byte (TTFB) performance while the client waits for the response to be generated. Web applications are especially sensitive to TTFB and page load performance. Response streaming lets you send partial responses back to the client as they become ready, improving TTFB latency to within milliseconds. For web applications, this can improve visitor experience and search engine rankings.
Other applications may have large payloads, like images, videos, large documents, or database results. Response streaming lets you transfer these payloads back to the client without having to buffer the entire payload in memory. You can use response streaming to send responses larger than Lambda’s 6 MB response payload limit up to a soft limit of 20 MB.
Response streaming currently supports the Node.js 14.x and subsequent managed runtimes. You can also implement response streaming using custom runtimes. You can progressively stream response payloads through Lambda function URLs, including as an Amazon CloudFront origin, along with using the AWS SDK or using Lambda’s invoke API. You can also use Amazon API Gateway and Application Load Balancer to stream larger payloads.
Writing response streaming enabled functions
Writing the handler for response streaming functions differs from typical Node handler patterns. To indicate to the runtime that Lambda should stream your function’s responses, you must wrap your function handler with the streamifyResponse() decorator. This tells the runtime to use the correct stream logic path, allowing the function to stream responses.
This is an example handler with response streaming enabled:
The streamifyResponse decorator accepts the following additional parameter, responseStream, besides the default node handler parameters, event, and context.
The new responseStream object provides a stream object that your function can write data to. Data written to this stream is sent immediately to the client. You can optionally set the Content-Type header of the response to pass additional metadata to your client about the contents of the stream.
Writing to the response stream
The responseStream object implements Node’s Writable Stream API. This offers a write() method to write information to the stream. However, we recommend that you use pipeline() wherever possible to write to the stream. This can improve performance, ensuring that a faster readable stream does not overwhelm the writable stream.
An example function using pipeline() showing how you can stream compressed data:
const pipeline = require("util").promisify(require("stream").pipeline);
const zlib = require('zlib');
const { Readable } = require('stream');

exports.gzip = awslambda.streamifyResponse(async (event, responseStream, _context) => {
    // As an example, convert event to a readable stream.
    const requestStream = Readable.from(Buffer.from(JSON.stringify(event)));

    await pipeline(requestStream, zlib.createGzip(), responseStream);
});
Ending the response stream
When using the write() method, you must end the stream before the handler returns. Use responseStream.end() to signal that you are not writing any more data to the stream. This is not required if you write to the stream with pipeline().
Reading streamed responses
Response streaming introduces a new InvokeWithResponseStream API. You can read a streamed response from your function via a Lambda function URL or use the AWS SDK to call the new API directly.
Neither API Gateway nor Lambda’s target integration with Application Load Balancer support chunked transfer encoding. It therefore does not support faster TTFB for streamed responses. You can, however, use response streaming with API Gateway to return larger payload responses, up to API Gateway’s 10 MB limit. To implement this, you must configure an HTTP_PROXY integration between your API Gateway and a Lambda function URL, instead of using the LAMBDA_PROXY integration.
You can also configure CloudFront with a function URL as origin. When streaming responses through a function URL and CloudFront, you can have faster TTFB performance and return larger payload sizes.
Using Lambda response streaming with function URLs
You can configure a function URL to invoke your function and stream the raw bytes back to your HTTP client via chunked transfer encoding. You configure the Function URL to use the new InvokeWithResponseStream API by changing the invoke mode of your function URL from the default BUFFERED to RESPONSE_STREAM.
RESPONSE_STREAM enables your function to stream payload results as they become available if you wrap the function with the streamifyResponse() decorator. Lambda invokes your function using the InvokeWithResponseStream API. If InvokeWithResponseStream invokes a function that is not wrapped with streamifyResponse(), Lambda does not stream the response and instead returns a buffered response which is subject to the 6 MB size limit.
Using generic HTTP client libraries with function URLs
Each language or framework may use different methods to form an HTTP request and parse a streamed response. Some HTTP client libraries only return the response body after the server closes the connection. These clients do not work with functions that return a response stream. To get the benefit of response streams, use an HTTP client that returns response data incrementally. Many HTTP client libraries already support streamed responses, including the Apache HttpClient for Java, Node’s built-in http client, and Python’s requests and urllib3 packages. Consult the documentation for the HTTP library that you are using.
Example applications
There are a number of example Lambda streaming applications in the Serverless Patterns Collection. They use AWS SAM to build and deploy the resources in your AWS account.
Clone the repository and explore the examples. The README file in each pattern folder contains additional information.
git clone https://github.com/aws-samples/serverless-patterns/
cd serverless-patterns
Use AWS SAM to deploy the resources to your AWS account. Run a guided deployment to set the default parameters for the first deployment.
sam deploy -g --stack-name lambda-streaming-ttfb-write-sam
For subsequent deployments you can use sam deploy.
Enter a Stack Name and accept the initial defaults.
AWS SAM deploys a Lambda function with streaming support and a function URL.
AWS SAM deploy –g
Once the deployment completes, AWS SAM provides details of the resources.
AWS SAM resources
The AWS SAM output returns a Lambda function URL.
Use curl with your AWS credentials to view the streaming response as the URL uses AWS Identity and Access Management (IAM) for authorization. Replace the URL and Region parameters for your deployment.
curl --request GET https://<url>.lambda-url.<Region>.on.aws/ --user AKIAIOSFODNN7EXAMPLE:wJalrXUtnFEMI/K7MDENG/bPxRfiCYEXAMPLEKEY --aws-sigv4 'aws:amz:<Region>:lambda'
You can see the gradual display of the streamed response.
Using curl to stream response from write () function
Use AWS SAM to deploy the resources to your AWS account. Run a guided deployment to set the default parameters for the first deploy.
sam deploy -g --stack-name lambda-streaming-ttfb-pipeline-sam
Enter a Stack Name and accept the initial defaults.
Use curl with your AWS credentials to view the streaming response. Replace the URL and Region parameters for your deployment.
curl --request GET https://<url>.lambda-url.<Region>.on.aws/ --user AKIAIOSFODNN7EXAMPLE:wJalrXUtnFEMI/K7MDENG/bPxRfiCYEXAMPLEKEY --aws-sigv4 'aws:amz:<Region>:lambda'
You can see the pipelined response stream returned.
Using curl to stream response from function
Large payloads
To show how streaming enables you to return larger payloads, deploy the lambda-streaming-large-sam application. AWS SAM deploys a Lambda function, which returns a 7 MB PDF file which is larger than Lambda’s non-stream 6 MB response payload limit.
cd ..
cd lambda-streaming-large-sam
sam deploy -g --stack-name lambda-streaming-large-sam
The AWS SAM output returns a Lambda function URL. Use curl with your AWS credentials to view the streaming response.
This downloads the PDF file SVS401-ri22.pdf to your current directory and displays the content type as application/pdf.
You can also use API Gateway to stream a large payload with an HTTP_PROXY integration with a Lambda function URL.
Invoking a function with response streaming using the AWS SDK
You can use the AWS SDK to stream responses directly from the new Lambda InvokeWithResponseStream API. This provides additional functionality such as handling midstream errors. This can be helpful when building, for example, internal microservices. Response streaming is supported with the AWS SDK for Java 2.x, AWS SDK for JavaScript v3, and AWS SDKs for Go version 1 and version 2.
The SDK response returns an event stream that you can read from. The event stream contains two event types. PayloadChunk contains a raw binary buffer with partial response data received by the client. InvokeComplete signals that the function has completed sending data. It also contains additional metadata, such as whether the function encountered an error in the middle of the stream. Errors can include unhandled exceptions thrown by your function code and function timeouts.
Using the AWS SDK for Javascript v3
To see how to use the AWS SDK to stream responses from a function, deploy the lambda-streaming-sdk-sam pattern.
cd ..
cd lambda-streaming-sdk-sam
sam deploy -g --stack-name lambda-streaming-sdk-sam
Enter a Stack Name and accept the initial defaults.
AWS SAM deploys three Lambda functions with streaming support.
HappyPathFunction: Returns a full stream.
MidstreamErrorFunction: Simulates an error midstream.
TimeoutFunction: Function times out before stream completes.
Run the SDK example application, which invokes each Lambda function and outputs the result.
npm install @aws-sdk/client-lambda
node index.mjs
You can see each function and how the midstream and timeout errors are returned back to the SDK client.
Streaming midstream error
Streaming timeout error
Quotas and pricing
Streaming responses incur an additional cost for network transfer of the response payload. You are billed based on the number of bytes generated and streamed out of your Lambda function over the first 6 MB. For more information, see Lambda pricing.
There is an initial maximum response size of 20 MB, which is a soft limit you can increase. There is a maximum bandwidth throughput limit of 16 Mbps (2 MB/s) for streaming functions.
Conclusion
Today, AWS Lambda is announcing support for response payload streaming to send partial responses to callers as the responses become available. This can improve performance for web and mobile applications. You can also use response streaming to build functions that return larger payloads and perform long-running operations while reporting incremental progress. Stream partial responses through Lambda function URLs, or using the AWS SDK. Response streaming currently supports the Node.js 14.x and subsequent runtimes, as well as custom runtimes.
There are a number of example Lambda streaming applications in the Serverless Patterns Collection to explore the functionality.
The fleet management market is expected to grow at a Compound Annual Growth Rate (CAGR) of 15.5 percent—from 25.5 billion US dollars in 2022 to USD 52.4 billion in 2027. Optimizing how your organization uses its vehicle fleet is important for logistics and service providers such as last mile, middle mile, and field services.
In this post, we demonstrate how to build and run a solution for many-to-many vehicle routing using HERE Tour Planning and Amazon Location Service. HERE Technologies is a data provider for Amazon Location Service and provides it with map rendering, geocoding, search, and routing. HERE Tour Planning expands on functionality such as geocoding, basic routing, and matrix routing to consider parameters such as time windows, job requirements or priorities, vehicle capabilities, range, and traffic information. They also support immediate re-planning when conditions change.
The architecture described in this post can help you optimize your fleets for delivering shipments, such as perishable items on pallets, from a central distribution center to multiple retail locations. The architecture uses the AWS Cloud Development Kit (AWS CDK) to help you provision and version control your infrastructure. The architecture also uses Event Driven Architecture (EDA) based on AWS Lambda and Amazon DynamoDB. It uses Amazon Simple Storage Service (Amazon S3) and DynamoDB to store the artifacts generated and integrates with Amazon Location Service to plot the routes visually on a map for each delivery driver.
Solution overview
This post will help you:
Configure the many-to-many vehicle routing architecture using HERE Tour Planning and Amazon Location Service
This is needed to invoke the HERE Tour Planning API for generating solutions to new routing problems.
The GitHub sample repository includes a problem and pre-solved solution file, so you don’t need to acquire a HERE API key to learn about these offerings.
There can be additional charges based on API key use. For more details, see the HERE Tour Planning section within HERE service rates.
Walkthrough
Provision the infrastructure
The architecture uses NPM node modules. Run the following commands to install the dependencies:
# AWS Lambda function dependencies cd lib/lambda/calculate-route npm install
# Sample Frontend application dependencies cd frontend/here-driver-app npm install
If you have never used AWS CDK in your AWS account, you must first bootstrap the solution, which creates Amazon S3 buckets and metadata to support AWS CDK operations. Note: Architectural components described in this article are covered under AWS Free Tier and HERE Free monthly usage, but additional charges can occur based on usage beyond the Free Tier limits. We recommend following the Cleanup instructions after completing the walkthrough.
From the root of the repository, run the following command to generate the needed infrastructure:
cdk bootstrap
Output similar to the following indicates that you successfully bootstrapped the AWS account with what AWS CDK requires.
Figure 2. Successful bootstrap of AWS account with AWS CDK requirements
Deploy the infrastructure for this solution by running the following command. This provisions much of the infrastructure required for this solution such as DynamoDB, Lambda functions, and Amazon S3 buckets:
cdk deploy
Next, Amplify provisions the remaining resources to complete the architecture. Navigate to the folder for the frontend by running the following command:
To accept the defaults, run the following command:
amplify init
To push the infrastructure out to the AWS account, run the following command:
amplify push
To publish the environment, run the following command:
amplify publish
Create problem and generate architecture files
The next step is to create the HERE Tour Planning problem file and submit it to the HERE Tour Planning API to solve. Note: You can either sign up for the HERE Developer program to receive an API key to test this solution live or use the problem and pre-solved solution provided in the /data folder of the repository.
Open the Amazon S3 bucket that the previous step created.
Upload a problem file (in JSON format) to the bucket.
An Amazon S3 event notification invokes a Lambda function that performs a synchronous call to the HERE Tour Planning API and generates vehicle routing problem solution file in JSON format.
The Lambda function saves the solution file to the Amazon S3 bucket and additional details about the solution to a DynamoDB table.
The delivery drivers can use the example React app to view the list of vehicles and the routes.
Figure 3. Creating a problem file and submitting it to HERE Tour Planning API
Frontend
The next step is to run the React Frontend app to see the results. Access to the app and the API Gateway is secured with Amazon Cognito.
To run the web application, run the following command:
npm start
A local web server runs on http://localhost:3000.
To use the system, the user must authenticate. Amazon Cognito allows users to sign in or create a new account.
After you authenticate, the Home screen displays a list of available vehicles and routes.
Figure 4. Available vehicles and routes
Choose a vehicle to see the detail of the route. Each red marker is a stop.
Figure 5. Vehicle route details
Cleanup
To avoid incurring future charges, delete all resources created.
Run the following commands to delete the application in AWS Amplify. As an alternative, you can use the Amplify console to delete Amplify resources:
cd frontend/here-driver-app amplify pull amplify delete
With AWS CDK, run the following command to delete the AWS CloudFormation stack that was used to provision the resources. Note: You can leave the AWS CLI, Amplify CLI, and CDK CLI installed on your computer for future development:
cdk destroy
Conclusion
In this post, using shipment delivery from a central distribution center use case, we’ve demonstrated how you can build your own serverless solution for optimizing middle and last mile operations. The solution uses multi-vehicle and multi-stop optimization services provided by HERE Tour Planning and Amazon Location Service to visualize the generated routes for each delivery vehicle driver. For additional details about HERE’s offerings on AWS Marketplace, see AWS Marketplace: HERE Technologies.
Welcome to the 21st edition of the AWS Serverless ICYMI (in case you missed it) quarterly recap. Every quarter, we share all the most recent product launches, feature enhancements, blog posts, webinars, live streams, and other interesting things that you might have missed!
In case you missed our last ICYMI, check out what happened last quarter here.
Example notification of a story hosted with Next.js and App Runner
Serverless Land is a website maintained by the Serverless Developer Advocate team to help you build serverless applications and includes workshops, code examples, blogs, and videos. There is now enhanced search functionality so you can search across resources, patterns, and video content.
ServerlessLand search
AWS Lambda
AWS Lambda has improved how concurrency works with Amazon SQS. You can now control the maximum number of concurrent Lambda functions invoked.
The launch blog post explains the scaling behavior of Lambda using this architectural pattern, challenges this feature helps address, and a demo of maximum concurrency in action.
Maximum concurrency is set to 10 for the SQS queue.
AWS Lambda Powertools is an open-source library to help you discover and incorporate serverless best practices more easily. Lambda Powertools for .NET is now generally available and currently focused on three observability features: distributed tracing (Tracer), structured logging (Logger), and asynchronous business and application metrics (Metrics). Powertools is also available for Python, Java, and Typescript/Node.js programming languages.
Lambda announced a new feature, runtime management controls, which provide more visibility and control over when Lambda applies runtime updates to your functions. The runtime controls are optional capabilities for advanced customers that require more control over their runtime changes. You can now specify a runtime management configuration for each function with three settings, Automatic (default), Function update, or manual.
There are three new Amazon CloudWatch metrics for asynchronous Lambda function invocations: AsyncEventsReceived, AsyncEventAge, and AsyncEventsDropped. You can track the asynchronous invocation requests sent to Lambda functions to monitor any delays in processing and take corrective actions if required. The launch blog post explains the new metrics and how to use them to troubleshoot issues.
Lambda now supports Amazon DocumentDB change streams as an event source. You can use Lambda functions to process new documents, track updates to existing documents, or log deleted documents. You can use any programming language that is supported by Lambda to write your functions.
There is a helpful blog post suggesting best practices for developing portable Lambda functions that allow you to port your code to containers if you later choose to.
AWS Step Functions
AWS Step Functions has expanded its AWS SDK integrations with support for 35 additional AWS services including Amazon EMR Serverless, AWS Clean Rooms, AWS IoT FleetWise, AWS IoT RoboRunner and 31 other AWS services. In addition, Step Functions also added support for 1000+ new API actions from new and existing AWS services such as Amazon DynamoDB and Amazon Athena. For the full list of added services, visit AWS SDK service integrations.
EventBridge event buses now also support enhanced integration with Service Quotas. Your quota increase requests for limits such as PutEvents transactions-per-second, number of rules, and invocations per second among others will be processed within one business day or faster, enabling you to respond quickly to changes in usage.
AWS SAM
The AWS Serverless Application Model (SAM) Command Line Interface (CLI) has added the sam list command. You can now show resources defined in your application, including the endpoints, methods, and stack outputs required to test your deployed application.
AWS SAM has a preview of sam build support for building and packaging serverless applications developed in Rust. You can use cargo-lambda in the AWS SAM CLI build workflow and AWS SAM Accelerate to iterate on your code changes rapidly in the cloud.
You can now use AWS SAM connectors as a source resource parameter. Previously, you could only define AWS SAM connectors as a AWS::Serverless::Connector resource. Now you can add the resource attribute on a connector’s source resource, which makes templates more readable and easier to update over time.
AWS SAM connectors now also support multiple destinations to simplify your permissions. You can now use a single connector between a single source resource and multiple destination resources.
In October 2022, AWS released OpenID Connect (OIDC) support for AWS SAM Pipelines. This improves your security posture by creating integrations that use short-lived credentials from your CI/CD provider. There is a new blog post on how to implement it.
Amazon S3 now automatically applies default encryption to all new objects added to S3, at no additional cost and with no impact on performance.
You can now use an S3 Object Lambda Access Point alias as an origin for your Amazon CloudFront distribution to tailor or customize data to end users. For example, you can resize an image depending on the device that an end user is visiting from.
S3 has introduced Mountpoint for S3, a high performance open source file client that translates local file system API calls to S3 object API calls like GET and LIST.
S3 Multi-Region Access Points now support datasets that are replicated across multiple AWS accounts. They provide a single global endpoint for your multi-region applications, and dynamically route S3 requests based on policies that you define. This helps you to more easily implement multi-Region resilience, latency-based routing, and active-passive failover, even when data is stored in multiple accounts.
Amazon Kinesis
Amazon Kinesis Data Firehose now supports streaming data delivery to Elastic. This is an easier way to ingest streaming data to Elastic and consume the Elastic Stack (ELK Stack) solutions for enterprise search, observability, and security without having to manage applications or write code.
Amazon DynamoDB
Amazon DynamoDB now supports table deletion protection to protect your tables from accidental deletion when performing regular table management operations. You can set the deletion protection property for each table, which is set to disabled by default.
Amazon SNS
Amazon SNS now supports AWS X-Ray active tracing to visualize, analyze, and debug application performance. You can now view traces that flow through Amazon SNS topics to destination services, such as Amazon Simple Queue Service, Lambda, and Kinesis Data Firehose, in addition to traversing the application topology in Amazon CloudWatch ServiceLens.
SNS also now supports setting content-type request headers for HTTPS notifications so applications can receive their notifications in a more predictable format. Topic subscribers can create a DeliveryPolicy that specifies the content-type value that SNS assigns to their HTTPS notifications, such as application/json, application/xml, or text/plain.
EDA Visuals collection added to Serverless Land
The Serverless Developer Advocate team has extended Serverless Land and introduced EDA visuals. These are small bite sized visuals to help you understand concept and patterns about event-driven architectures. Find out about batch processing vs. event streaming, commands vs. events, message queues vs. event brokers, and point-to-point messaging. Discover bounded contexts, migrations, idempotency, claims, enrichment and more!
There is also a new section on Serverless Land containing helpful code repositories. You can search for code repos to use for examples, learning or building serverless applications. You can also filter by use-case, runtime, and level.
Weekly office hours live stream. In each session we talk about a specific topic or technology related to serverless and open it up to helping you with your real serverless challenges and issues. Ask us anything you want about serverless technologies and applications.
Marcia Villalba frequently publishes new videos on her popular serverless YouTube channel. You can view all of Marcia’s videos at https://www.youtube.com/c/FooBar_codes.
Eric Johnson is exploring how developers are building serverless applications. We spend time talking about AWS SAM as well as others like AWS CDK, Terraform, Wing, and AMPT.
The Serverless landing page has more information. The Lambda resources page contains case studies, webinars, whitepapers, customer stories, reference architectures, and even more Getting Started tutorials.
This was written by Michele Ricciardi, Specialist Solutions Architect, DevAx.
AWS Lambda SnapStart enables customers to reduce cold starts by caching an encrypted snapshot of an initiated Lambda function, and reusing that snapshot for subsequent invocations.
This blog post describes in more detail how to enable SnapStart with different infrastructure as code tooling: AWS Serverless Application Model (AWS SAM), AWS CloudFormation, and Terraform. It shows what happens during a Lambda deployment when SnapStart is enabled, as well as best practices to apply in CI/CD pipelines.
Snapstart can significantly reduce the cold start times for Lambda functions written in Java. The example described in the launch blog post reduces the cold start duration from over 6 seconds to less than 200ms.
Using SnapStart
You activate the SnapStart feature through a Lambda configuration setting. However, there are additional steps to use the SnapStart feature.
Enable Lambda function versions
SnapStart works in conjunction with Lambda function versions. It initializes the function when you publish a new Lambda function version. Therefore, you must enable Lambda versions to use SnapStart. For more information, read the Lambda Developer Guide.
Optionally create a Lambda function alias
A Lambda function alias allows you to define a custom pointer, and control which Lambda version it is attached to. While this is optional, creating a Lambda function alias makes the management operations easier. You can change the Lambda version tied to a Lambda alias without modifying the applications using the Lambda function.
Modify the application or AWS service invoking the Lambda function
Once you have a SnapStart-ready Lambda version, you must change the mechanism that invokes the Lambda function to use a qualified Lambda ARN. This can either invoke the specific Lambda Version directly or invoke the Lambda alias, which points at the correct Lambda version.
If you do not modify the mechanism that invokes the Lambda function, or use an unqualified ARN, you cannot take advantage of the optimizations that SnapStart provides.
To deploy a new Lambda function version with CloudFormation, change the resource name from UnicornStockBrokerFunctionVersion1 to UnicornStockBrokerFunctionVersion2.
Update API Gateway to invoke the Lambda function alias, instead of using an unqualified ARN. This ensures that API Gateway invokes the specified Lambda alias:
After these updates, the CloudFormation template with SnapStart enabled looks like this. You can deploy the sample application and take advantage of SnapStart.
Enable Lambda versions and create a Lambda alias by adding a AutoPublishAlias property, AWS SAM automatically publishes a new Lambda function version for each new deployment, and automatically assigns the Lambda alias to the new published version:
This example uses the AWS::Serverless::Function resource with the AutoPublishAlias property. AWS SAM implicitly creates an Amazon API Gateway with the correct permissions and configuration to invoke the Lambda function using the declared Lambda alias.
You can see the modified AWS SAM template here. You can deploy the sample application with AWS SAM and take advantage of SnapStart.
You can see the modified Terraform template here. You can deploy the sample application with Terraform and take advantage of SnapStart.
How does the deployment change with SnapStart?
This section describes how the deployment changes after enabling Lambda SnapStart.
Before adding Lambda versions, Lambda alias and SnapStart, this is the process of publishing new code to a function:
After you enable Lambda versions, Lambda alias and Lambda SnapStart, there are more steps to the deployment:
During the deployment of a Lambda version, Lambda creates a new execution environment and initializes it with the new code. Once the code is initialized, Lambda takes a Snapshot of the initialized code. The deployment now takes longer than it did without SnapStart as it takes additional time to initialize the execution environment and to create the initialized function snapshot.
While the new Lambda version is being created, the Lambda alias remains unchanged and invokes the previous Lambda version when invoked. The calling application is unaware of the deployment; therefore, the additional deployment time does not impact calling applications.
When the new function version is ready, you can update the Lambda alias to point at the new Lambda version (this is done automatically in the preceding IaC examples).
By using a Lambda alias, you don’t need to direct all the Lambda invocations to the latest version. You can use the Alias routing configuration to shift traffic gradually to the new Lambda version, giving you an easier way to test new Lambda versions gradually and rollback in case of issues with the latest version.
There is an additional failure mode with this deployment. The initialization of a new Lambda version can fail in case of errors within the code. For example, Lambda does not initialize your code if there is an unhandled exception during the initialization phase. This is an additional failure mode that you must handle in the deployment cycle.
CI/CD considerations
Longer deployments
The first consideration is that enabling Lambda SnapStart increases the deployment time.
When your CI/CD pipeline deploys a new SnapStart-enabled Lambda version, Lambda initializes a new Lambda execution environment and takes a snapshot of both the memory and disk of the initialized code. This takes time and its latency would depend on the initialization time of your Lambda function, and the overall size of the snapshot.
This additional delay could be significant for CI/CD pipelines with large number of Lambda functions. Therefore, if you have an application with multiple Lambda functions, enable Lambda SnapStart on the Lambda functions gradually, and adjust the CI/CD pipeline timeout accordingly.
Deployment failure modes
With Lambda SnapStart, there is an additional failure mode that you would need to handle in your CI/CD pipeline.
As described earlier, during the new Lambda version creation there could be failures linked to the code initialization of the Lambda code. This additional failure scenario can be managed in 2 ways:
Add a testing step in your CI/CD pipeline. You can add a testing step to validate that the function would initialize successfully. This testing step could include running your Lambda function locally, with sam local, or running local tests using the Lambda Java Test library.
Deploy the Lambda function to a test environment with SnapStart enabled. An additional check to detect issues early, is to deploy your Lambda function to a testing environment with SnapStart enabled. By deploying your Lambda functions with SnapStart in a testing environment, you can catch issues earlier in your development cycle, and run additional end-to-end testing and performance tests.
Conclusion
This blog post shows the steps needed to leverage Lambda SnapStart, with examples for AWS CloudFormation, AWS SAM, and Terraform.
When you use the feature, there are additional steps that Lambda performs during the deployment. Lambda initializes a new Lambda version with the new code and takes a snapshot. This operation takes time and may fail if the code initialization fails, therefore you may need to make adjustments to your CI/CD pipeline to handle those scenarios.
Many customers migrate their systems to Amazon Web Services (AWS) to increase their competitive edge and drive business value. To maximize the benefits of a cloud migration, companies tend to move their applications in conjunction with modernization initiatives. These joined efforts help your applications gain more agility, scalability, and resilience. Modernizing the portfolio of workloads with AWS means that you can re-platform, refactor, or replace these workloads by using containers, serverless technologies, purpose-built data stores, and software automation. These functionalities allow you to benefit from the best of the AWS agility and total cost optimization (TCO) benefits.
In this edition of Let’s Architect! we share hands-on activities, customer stories, and tips and tricks to migrate and modernize your applications with AWS.
Would you think that small companies always migrate faster than large enterprises? Actually, cloud migration speed doesn’t necessarily depend on the size of the business! Company size is not a clear indicator of migration and modernization success, but a shift of culture and mindset is essential for successful company evolution.
When it comes to migration, the cost of doing nothing is not just financial: Businesses can also expect a slower pace of innovation and a higher security burden. This video analyzes the financial benefits of migration and shares mental models for approaching an AWS cloud migration, and Marriott team members explain how they planned their migration and the lessons learned along the way.
Organizations aim to deliver the best technological solutions based on customer needs. At any stage in their cloud adoption journey, businesses often end up managing and building monolithic applications. Let’s explore a migration path for a monolithic .NET Framework application to a modern microservices-based stack on AWS, and discuss AWS tools to break the monolith into microservices and containerize applications.
Cost optimization is another key factor for modernizing your workloads and solutions include moving to Linux-based systems or using open-source database engines. This Migrate and Modernize enterprise workloads with AWS video walks you through the process of migrating and modernizing enterprise workloads with AWS.
Organizations of all sizes want to benefit from the agility, cost savings, and developer experience that serverless architectures can provide on AWS. For large enterprises, the return on investment (ROI) can be massive, but overcoming architecture inertia while ensuring security best practices and governance stay in place is a hurdle that many struggle with. In this lightning talk, learn how your organization can implement a serverless-first strategy to overcome these obstacles. Delta Air Lines shares the story of making serverless-first a reality as part of their AWS journey.
This workshop shows you how to migrate and modernize a fictional application to the AWS Cloud by:
Performing a database migration
Migrating and modernizing your web server using different migration strategies (for example, breaking down the monolith into containers)
Teaching you how to improve Operation excellence, Security, Performance efficiency, and Cost optimization of the deployed architecture by following these pillars of the AWS Well-Architected Framework.
Launching and running genomics workflows can take hours and involves large pools of compute instances that process data at a petabyte scale. Benchmarking helps you evaluate workflow performance and discover faster and cheaper ways of running them.
In practice, performance evaluations happen irregularly because of the associated heavy lifting. In this blog post, we discuss how life-science research teams can automate evaluations.
Business Benefits
An automated benchmarking solution provides:
more accurate enterprise resource planning by performing historical analytics,
lower cost to the business by comparing performance on different resource types, and
cost transparency to the business by quantifying periodical chargeback.
We’ve used automated benchmarking to compare processing times on different services such as Amazon Elastic Compute Cloud (Amazon EC2), AWS Batch, AWS ParallelCluster, Amazon Elastic Kubernetes Service (Amazon EKS), and on-premises HPC clusters. Scientists, financiers, technical leaders, and other stakeholders can build reports and dashboards to compare consumption data by consumer, workflow type, and time period.
Design pattern
Our automated benchmarking solution measures performance on two dimensions:
Timing: measures the duration of a workflow launch on a specific dataset
Pricing: measures the associated cost
This solution can be extended to other performance metrics such as iterations per second or process/thread distribution across compute nodes.
Our requirements include the following:
Consistent measurement of timing based on workflow status (such as preparing, waiting, ready, running, failed, complete)
Extensible pricing models based on unit prices (the Amazon EC2 Spot price at a specific period of time compared to Amazon EC2 On-Demand pricing)
Scalable, cost-efficient, and flexible data store enabling historical benchmarking and estimations
Minimal infrastructure management overhead
We choose a serverless design pattern using AWS Step Functions orchestration, AWS Lambda for our application code, and Amazon DynamoDB to track workflow launch IDs and states (as described in Part 3). We assume that the genomics workflows run on AWS Batch with genomics data on Amazon FSx for Lustre (Part 1). AWS Step Functions allows us to break down processing into smaller steps and avoid monolithic application code. Our evaluation process runs in four steps:
Monitor for completed workflow launches in the DynamoDB stream using an Amazon EventBridge pipe with a Step Functions workflow as target. This event-driven approach is more efficient than periodic polling and avoids custom code for parsing status and cost values in all records of the DynamoDB stream.
Collect a list of all compute resources associated with the workflow launch. Design a Lambda function that queries the AWS Batch API (see Part 1) to describe compute environment parameters like the Amazon EC2 instance IDs and their details, such as processing times, instance family/size, and allocation strategy (for example, Spot Instances, Reserved Instances, On-Demand Instances).
Calculate the cost of all consumed resources. We achieve this with another Lambda function, which calculates the total price based on unit prices from the AWS Price List Query API.
Our state machine updates the total price in the DynamoDB table without the need for additional application code.
Figure 1 visualizes these steps.
Figure 1. Automated benchmarking of genomics workflows
Implementation considerations
AWS Step Functions orchestrates our benchmarking workflow reliably and makes our application code easy to maintain. Figure 2 summarizes the state machine transitions that we’ll describe.
Figure 2. AWS Step Functions state machine for automated benchmarking
Gather consumption details
Configure the DynamoDB stream view type to New image so that the entire item is passed through as it appears after it was changed. We set up an Amazon EventBridge pipe with event filtering and the DynamoDB stream as a source. Our event filter uses multiple matching on records with a status of COMPLETE, but no cost entry in order to avoid an infinite loop. Once our state machine has updated the DynamoDB item with the workflow price, the resulting record in the DynamoDB stream will not pass our event filter.
We use an input transformer to simplify follow-on parsing by removing unnecessary metadata from the event.
The consumed resources included in the stream record are the auto-scaling group ID for AWS Batch and the Amazon FSx for Lustre volume ID. We use the DescribeJobs API (describe_jobs in Boto3) to determine which compute resources were used. If the response is a list of EC2 instances, we then look up consumption information including start and end times using the ListJobs API (list_jobs in Boto3) for each compute node. We use describe_volumes with filters on the identified EC2 instances to obtain the size and type of Amazon Elastic Block Store (Amazon EBS) volumes.
Calculate prices
Another Lambda function obtains the associated unit prices of all consumed resources using the GetProducts request of AWS Price List Query API (get_products in Boto3) and then parsing the pricePerUnit value. For Spot Instances, we use describe_spot_price_history of the EC2 client in Boto3 and specify the time range and instance types for which we want to receive prices.
Calculate the price of workflow launches based on the following factors:
Number and size of EC2 instances in auto-scaling node groups
Lastly, we put the price breakdown to the DynamoDB table using UpdateItem directly from the Amazon States Language.
Note that AWS credits and enterprise discounts might not be reflected in the responses of the AWS Price List Query API unless applied to the particular AWS account. This is often considered best practice in light of least-privilege considerations.
In the past, we’ve also used AWS Cost Explorer instead of the AWS Price List API. AWS Cost Explorer data is updated at least once every 24 hours. You can denote the pending price status in the DynamoDB table item and use the Wait state to delay the calculation process.
The presented solution can be extended to other compute services such as Amazon Elastic Kubernetes Service (Amazon EKS). For Amazon EKS, events are enriched with the cluster ID from the DynamoDB table and the price calculation should also include control plane costs.
Conclusion
Life-science research teams use benchmarking to compare workflow performance and inform their architectural decisions. Such evaluations are effort-intensive and therefore done irregularly.
In this blog post, we showed how life-science research teams can automate benchmarking for their scientific workflows. The insights teams gain from automated benchmarking indicate continuous optimization opportunities, such as by adjusting compute node configuration. The evaluation data is also available on demand for other purposes including chargeback.
Stay tuned for our next post in which we show how to use historical benchmarking data for price estimations of future workflow launches.
When building serverless event-driven applications using AWS Lambda, it is best practice to validate individual components. Unit testing can quickly identify and isolate issues in AWS Lambda function code. The techniques outlined in this blog demonstrates unit test techniques for Python-based AWS Lambda functions and interactions with AWS Services.
The full code for this blog is available in the GitHub project as a demonstrative example.
Example use case
Let’s consider unit testing a serverless application which provides an API endpoint to generate a document. When the API endpoint is called with a customer identifier and document type, the Lambda function retrieves the customer’s name from DynamoDB, then retrieves the document text from DynamoDB for the given document type, finally generating and writing the resulting document to S3.
Figure 1. Example application architecture
Amazon API Gateway provides an endpoint to request the generation of a document for a given customer. A document type and customer identifier are provided in this API call.
The endpoint invokes an AWS Lambda function that generates a document using the customer identifier and the document type provided.
An Amazon DynamoDB table stores the contents of the documents and the users name, which are retrieved by the Lambda function.
The resulting text document is stored to Amazon S3.
Our testing goal is to determine if an isolated “unit” of code works as intended. In this blog, we will be writing tests to provide confidence that the logic written in the above AWS Lambda function behaves as we expect. We will mock the service integrations to Amazon DynamoDB and S3 to isolate and focus our tests on the Lambda function code, and not on the behavior of the AWS Services.
Define the AWS Service resources in the Lambda function
Before writing our first unit test, let’s look at the Lambda function that contains the behavior we wish to test. The full code for the Lambda function is available in the GitHub repository as src/sample_lambda/app.py.
As part of our Best practices for working AWS Lambda functions, we recommend initializing AWS service resource connections outside of the handler function and in the global scope. Additionally, we can retrieve any relevant environment variables in the global scope so that subsequent invocations of the Lambda function do not repeatedly need to retrieve them. For organization, we can put the resource and variables in a dictionary:
However, globally scoped code and global variables are challenging to test in Python, as global statements are executed on import, and outside of the controlled test flow. To facilitate testing, we define classes for supporting AWS resource connections that we can override (patch) during testing. These classes will accept a dictionary containing the boto3 resource and relevant environment variables.
For example, we create a DynamoDB resource class with a parameter “boto3_dynamodb_resource” that accepts a boto3 resource connected to DynamoDB:
The Lambda function handler is the method in the AWS Lambda function code that processes events. When the function is invoked, Lambda runs the handler method. When the handler exits or returns a response, it becomes available to process another event.
To facilitate unit test of the handler function, move as much of logic as possible to other functions that are then called by the Lambda hander entry point. Also, pass the AWS resource global variables to these subsequent function calls. This approach enables us to mock and intercept all resources and calls during test.
In our example, the handler references the global variables, and instantiates the resource classes to setup the connections to specific AWS resources. (We will be able to override and mock these connections during unit test.)
Then the handler calls the create_letter_in_s3 function to perform the steps of creating the document, passing the resource classes. This downstream function avoids directly referencing the global context or any AWS resource connections directly.
Our Lambda function code has now been written and is ready to be tested, let’s take a look at the unit test code! The full code for the unit test is available in the GitHub repository as tests/unit/src/test_sample_lambda.py.
In production, our Lambda function code will directly access the AWS resources we defined in our function handler; however, in our unit tests we want to isolate our code and replace the AWS resources with simulations. This isolation facilitates running unit tests in an isolated environment to prevent accidental access to actual cloud resources.
Moto is a python library for Mocking AWS Services that we will be using to simulate AWS resource our tests. Moto supports many AWS resources, and it allows you to test your code with little or no modification by emulating functionality of these services.
Moto uses decorators to intercept and simulate responses to and from AWS resources. By adding a decorator for a given AWS service, subsequent calls from the module to that service will be re-directed to the mock.
@moto.mock_dynamodb
@moto.mock_s3
Configure Test Setup and Tear-down
The mocked AWS resources will be used during the unit test suite. Using the setUp() method allows you to define and configure the mocked global AWS Resources before the tests are run.
We define the test class and a setUp() method and initialize the mock AWS resource. This includes configuring the resource to prepare it for testing, such as defining a mock DynamoDB table or creating a mock S3 Bucket.
After creating the mocked resources, the setup function creates resource class object referencing those mocked resources, which will be used during testing.
Test #1: Verify the code writes the document to S3
Our first test will validate our Lambda function writes the customer letter to an S3 bucket in the correct manner. We will follow the standard test format of arrange, act, assert when writing this unit test.
Arrange the data we need in the DynamoDB table:
def test_create_letter_in_s3(self) -> None:

    self.mocked_dynamodb_class.table.put_item(Item={"PK":"D#UnitTestDoc",
                                                        "data":"Unit Test Doc Corpi"})
    self.mocked_dynamodb_class.table.put_item(Item={"PK":"C#UnitTestCust",
                                                        "data":"Unit Test Customer"})
Act by calling the create_letter_in_s3 function. During these act calls, the test passes the AWS resources as created in the setUp().
Assert by reading the data written to the mock S3 bucket, and testing conformity to what we are expecting:
bucket_key = "UnitTestCust/UnitTestDoc.txt"
    body = self.mocked_s3_class.bucket.Object(bucket_key).get()['Body'].read()

    self.assertEqual(test_return_value["statusCode"], 200)
    self.assertIn("UnitTestCust/UnitTestDoc.txt", test_return_value["body"])
    self.assertEqual(body.decode('ascii'),"Dear Unit Test Customer;\nUnit Test Doc Corpi")
Tests #2 and #3: Data not found error conditions
We can also test error conditions and handling, such as keys not found in the database. For example, if a customer identifier is submitted, but does not exist in the database lookup, does the logic handle this and return a “Not Found” code of 404?
To test this in test #2, we add data to the mocked DynamoDB table, but then submit a customer identifier that is not in the database.
As the application logic resides in independently tested functions, the Lambda handler function provides only interface validation and function call orchestration. Therefore, the test for the handler validates that the event is parsed correctly, any functions are invoked as expected, and the return value is passed back.
To emulate the global resource variables and other functions, patch both the global resource classes and logic functions.
We need to provide event data when invoking the Lambda handler. A good practice is to save test events as separate JSON files, rather than placing them inline as code. In the example project, test events are located in the folder “tests/events/”. During test execution, the event object is created from the JSON file using the utility function named load_sample_event_from_file.
Assert by ensuring the create_letter_in_s3 function is called with the expected parameters based on the event, and a create_letter_in_s3 function return value is passed back to the caller. In our example, this value is simply passed with no alterations.
The tearDown() method is called immediately after the test method has been run and the result is recorded. In our example tearDown() method, we clean up any data or state created so the next test won’t be impacted.
Running the unit tests
The unittest Unit testing framework can be run using the Python pytest utility. To ensure network isolation and verify the unit tests are not accidently connecting to AWS resources, the pytest-socket project provides the ability to disable network communication during a test.
pytest -v --disable-socket -s tests/unit/src/
The pytest command results in a PASSED or FAILED status for each test. A PASSED status verifies that your unit tests, as written, did not encounter errors or issues,
Conclusion
Unit testing is a software development process in which different parts of an application, called units, are individually and independently tested. Tests validate the quality of the code and confirm that it functions as expected. Other developers can gain familiarity with your code base by consulting the tests. Unit tests reduce future refactoring time, help engineers get up to speed on your code base more quickly, and provide confidence in the expected behaviour.
We’ve seen in this blog how to unit test AWS Lambda functions and mock AWS Services to isolate and test individual logic within our code.
AWS Lambda Powertools for Python has been used in the project to validate hander events. Powertools provide a suite of utilities for AWS Lambda functions to ease adopting best practices such as tracing, structured logging, custom metrics, idempotency, batching, and more.
A new week starts, and Spring is almost here! If you’re curious about AWS news from the previous seven days, I got you covered.
Last Week’s Launches Here are the launches that got my attention last week:
Amazon S3 – Last week there was AWS Pi Day 2023 celebrating 17 years of innovation since Amazon S3 was introduced on March 14, 2006. For the occasion, the team released many new capabilities:
Amazon S3 has also simplified private connectivity from on-premises networks: with private DNS for S3, on-premises applications can use AWS PrivateLink to access S3 over an interface endpoint, while requests from your in-VPC applications access S3 using gateway endpoints.
We released Mountpoint for Amazon S3, a high performance open source file client. Read more in the blog. Note that Mountpoint isn’t a general-purpose networked file system, and comes with some restrictions on file operations.
Amazon Neptune – Now offers a graph summary API to help understand important metadata about property graphs (PG) and resource description framework (RDF) graphs. Neptune added support for Slow Query Logs to help identify queries that need performance tuning.
Amazon OpenSearch Service – The team introduced security analytics that provides new threat monitoring, detection, and alerting features. The service now supports OpenSearchversion 2.5 that adds several new features such as support for Point in Time Search and improvements to observability and geospatial functionality.
AWS Lake Formation and Apache Hive on Amazon EMR – Introduced fine-grained access controls that allow data administrators to define and enforce fine-grained table and column level security for customers accessing data via Apache Hive running on Amazon EMR.
Amazon Athena is a serverless and interactive query service that allows you to easily analyze data in Amazon Simple Storage Service (Amazon S3) and 25-plus data sources, including on-premises data sources or other cloud systems using SQL or Python. Athena built-in capabilities include querying for geospatial data; for example, you can count the number of earthquakes in each Californian county. One disadvantage of analyzing at county-level is that it may give you a misleading impression of which parts of California have had the most earthquakes. This is because the counties aren’t equally sized; a county may have had more earthquakes simply because it’s a big county. What if we wanted a hierarchical system that allowed us to zoom in and out to aggregate data over different equally-sized geographic areas?
In this post, we present a solution that uses Uber’s Hexagonal Hierarchical Spatial Index (H3) to divide the globe into equally-sized hexagons. We then use an Athena user-defined function (UDF) to determine which hexagon each historical earthquake occurred in. Because the hexagons are equally-sized, this analysis gives a fair impression of where earthquakes tend to occur.
At the end, we’ll produce a visualization like the one below that shows the number of historical earthquakes in different areas of the western US.
H3 divides the globe into equal-sized regular hexagons. The number of hexagons depends on the chosen resolution, which may vary from 0 (122 hexagons, each with edge lengths of about 1,100 km) to 15 (569,707,381,193,162 hexagons, each with edge lengths of about 50 cm). H3 enables analysis at the area level, and each area has the same size and shape.
A CSV file of historical earthquakes is uploaded into an S3 bucket.
An AWS Glue external table is created based on the earthquake CSV.
A Lambda function calculates H3 hexagons for parameters (latitude, longitude, resolution). The function is written in Java and can be called as a UDF using queries in Athena.
A SageMaker notebook uses an AWS SDK for pandas package to run a SQL query in Athena, including the UDF.
A Plotly Express package renders a choropleth map of the number of earthquakes in each hexagon.
Prerequisites
For this post, we use Athena to read data in Amazon S3 using the table defined in the AWS Glue Data Catalog associated with our earthquake dataset. In terms of permissions, there are two main requirements:
Athena has access to the S3 bucket where you store the earthquake data and another S3 bucket used to store the output of Athena queries.
There are several options for deploying a UDF using Lambda. In this example, we use the AWS Management Console. For production deployments, you probably want to use infrastructure as code such as the AWS Cloud Development Kit (AWS CDK). For information about how to use the AWS CDK to deploy the Lambda function, refer to the project code repository. Another possible deployment option is using AWS Serverless Application Repository (SAR).
Deploy the UDF
Deploy the Uber H3 binding UDF using the console as follows:
Go to binary directory in the GitHub repository, and download aws-h3-athena-udf-*.jar to your local desktop.
Create a Lambda function called H3UDF with Runtime set to Java 11 (Corretto), and Architecture set to x86_64.
Upload the aws-h3-athena-udf*.jar file.
Change the handler name to com.aws.athena.udf.h3.H3AthenaHandler.
In the General configuration section, choose Edit to set the memory of the Lambda function to 4096 MB, which is an amount of memory that works for our examples. You may need to set the memory size larger for your use cases.
Use the Lambda function as an Athena UDF
After you create the Lambda function, you’re ready to use it as a UDF. The following screenshot shows the function details.
You can now use the function as an Athena UDF. On the Athena console, run the following command:
USING EXTERNAL FUNCTION lat_lng_to_cell_address(lat DOUBLE, lng DOUBLE, res INTEGER)
RETURNS VARCHAR
LAMBDA '<MY-LAMBDA-ARN>'-- Replace with ARN of your Lambda function.
SELECT *,
       lat_lng_to_cell_address(latitude, longitude, 4) AS h3_cell
FROM earthquakes
WHERE latitude BETWEEN 18 AND 70;
The udf/examples folder in the GitHub repository includes more examples of the Athena queries.
Developing the UDFs
Now that we showed you how to deploy a UDF for Athena using Lambda, let’s dive deeper into how to develop these kinds of UDFs. As explained in Querying with user defined functions, in order to develop a UDF, we first need to implement a class that inherits UserDefinedFunctionHandler. Then we need to implement the functions inside the class that can be used as UDFs of Athena.
We begin the UDF implementation by defining a class H3AthenaHandler that inherits the UserDefinedFunctionHandler. Then we implement functions that act as wrappers of functions defined in the Uber H3 Java binding. We make sure that all the functions defined in the H3 Java binding API are mapped, so that they can be used in Athena as UDFs. For example, we map the lat_lng_to_cell_address function used in the preceding example to the latLngToCell of the H3 Java binding.
On top of the call to the Java binding, many of the functions in the H3AthenaHandler check whether the input parameter is null. The null check is useful because we don’t assume the input to be non-null. In practice, null values for an H3 index or address are not unusual.
The following code shows the implementation of the get_resolution function:
/** Returns the resolution of an index.
     *  @param h3 the H3 index.
     *  @return the resolution. Null when h3 is null.
     *  @throws IllegalArgumentException when index is out of range.
     */
    public Integer get_resolution(Long h3){
        final Integer result;
        if (h3 == null) {
            result = null;
        } else {
            result = h3Core.getResolution(h3);
        }
        return result;
    }
Some H3 API functions such as cellToLatLng return List<Double> of two elements, where the first element is the latitude and the second is longitude. The H3 UDF that we implement provides a function that returns well-known text (WKT) representation. For example, we provide cell_to_lat_lng_wkt, which returns a Point WKT string instead of List<Double>. We can then use the output of cell_to_lat_lng_wkt in combination with the built-in spatial Athena function ST_GeometryFromText as follows:
USING EXTERNAL FUNCTION cell_to_lat_lng_wkt(h3 BIGINT)
RETURNS VARCHAR
LAMBDA '<MY-LAMBDA-ARN>'
SELECT ST_GeometryFromText(cell_to_lat_lng_wkt(622506764662964223))
Athena UDF only supports scalar data types and does not support nested types. However, some H3 APIs return nested types. For example, the polygonToCells function in H3 takes a List<List<List<GeoCoord>>>. Our implementation of polygon_to_cells UDF receives a Polygon WKT instead. The following shows an example Athena query using this UDF:
-- get all h3 hexagons that cover Toulouse, Nantes, Lille, Paris, Nice
USING EXTERNAL FUNCTION polygon_to_cells(polygonWKT VARCHAR, res INT)
RETURNS ARRAY(BIGINT)
LAMBDA '<MY-LAMBDA-ARN>'
SELECT polygon_to_cells('POLYGON ((43.604652 1.444209, 47.218371 -1.553621, 50.62925 3.05726, 48.864716 2.349014, 43.6961 7.27178, 3.604652 1.444209))', 2)
Use SageMaker notebooks for visualization
A SageMaker notebook is a managed machine learning compute instance that runs a Jupyter notebook application. In this example, we will use a SageMaker notebook to write and run our code to visualize our results, but if your use case includes Apache Spark then using Amazon Athena for Apache Spark would be a great choice. For advice on security best practices for SageMaker, see Building secure machine learning environments with Amazon SageMaker. You can create your own SageMaker notebook by following these instructions:
On the SageMaker console, choose Notebook in the navigation pane.
Choose Notebook instances.
Choose Create notebook instance.
Enter a name for the notebook instance.
Choose an existing IAM role or create a role that allows you to run SageMaker and grants access to Amazon S3 and Athena.
Choose Create notebook instance.
Wait for the notebook status to change from Creating to InService.
Open the notebook instance by choosing Jupyter or JupyterLab.
Explore the data
We’re now ready to explore the data.
On the Jupyter console, under New, choose Notebook.
On the Select Kernel drop-down menu, choose conda_python3.
Add new cells by choosing the plus sign.
In your first cell, download the following Python modules that aren’t included in the standard SageMaker environment:
GeoJSON is a popular format for storing spatial data in a JSON format. The geojson module allows you to easily read and write GeoJSON data with Python. The second module we install, awswrangler, is the AWS SDK for pandas. This is a very easy way to read data from various AWS data sources into Pandas data frames. We use it to read earthquake data from the Athena table.
Next, we import all the packages that we use to import the data, reshape it, and visualize it:
from geomet import wkt
import plotly.express as px
from shapely.geometry import Polygon, mapping
import awswrangler as wr
import pandas as pd
from shapely.wkt import loads
import geojson
import ast
We begin importing our data using the athena.read_sql._query function in AWS SDK for pandas. The Athena query has a subquery that uses the UDF to add a column h3_cell to each row in the earthquakes table, based on the latitude and longitude of the earthquake. The analytic function COUNT is then used to find out the number of earthquakes in each H3 cell. For this visualization, we’re only interested in earthquakes within the US, so we filter out rows in the data frame that are outside the area of interest:
def run_query(lambda_arn, db, resolution):
    query = f"""USING EXTERNAL FUNCTION cell_to_boundary_wkt(cell VARCHAR)
                    RETURNS ARRAY(VARCHAR)
                    LAMBDA '{lambda_arn}'
                       SELECT h3_cell, cell_to_boundary_wkt(h3_cell) as boundary, quake_count FROM(
                        USING EXTERNAL FUNCTION lat_lng_to_cell_address(lat DOUBLE, lng DOUBLE, res INTEGER)
                         RETURNS VARCHAR
                        LAMBDA '{lambda_arn}'
                    SELECT h3_cell, COUNT(*) AS quake_count
                      FROM
                        (SELECT *,
                           lat_lng_to_cell_address(latitude, longitude, {resolution}) AS h3_cell
                         FROM earthquakes
                         WHERE latitude BETWEEN 18 AND 70        -- For this visualisation, we're only interested in earthquakes within the USA.
                           AND longitude BETWEEN -175 AND -50
                         )
                       GROUP BY h3_cell ORDER BY quake_count DESC) cell_quake_count"""
    return wr.athena.read_sql_query(query, database=db)

lambda_arn = '<MY-LAMBDA-ARN>' # Replace with ARN of your lambda.
db_name = '<MY-DATABASE-NAME>' # Replace with name of your Glue database.
earthquakes_df = run_query(lambda_arn=lambda_arn,db=db_name, resolution=4)
earthquakes_df.head()
The following screenshot shows our results.
Follow along with the rest of the steps in our Jupyter notebook to see how we analyze and visualize our example with H3 UDF data.
Visualize the results
To visualize our results, we use the Plotly Express module to create a choropleth map of our data. A choropleth map is a type of visualization that is shaded based on quantitative values. This is a great visualization for our use case because we’re shading different regions based on the frequency of earthquakes.
In the resulting visual, we can see the ranges of frequency of earthquakes in different areas of North America. Note, the H3 resolution in this map is lower than in the earlier map, which makes each hexagon cover a larger area of the globe.
Clean up
To avoid incurring extra charges on your account, delete the resources you created:
On the SageMaker console, select the notebook and on the Actions menu, choose Stop.
Wait for the status of the notebook to change to Stopped, then select the notebook again and on the Actions menu, choose Delete.
On the Amazon S3 console, select the bucket you created and choose Empty.
Enter the bucket name and choose Empty.
Select the bucket again and choose Delete.
Enter the bucket name and choose Delete bucket.
On the Lambda console, select the function name and on the Actions menu, choose Delete.
Conclusion
In this post, you saw how to extend functions in Athena for geospatial analysis by adding your own user-defined function. Although we used Uber’s H3 geospatial index in this demonstration, you can bring your own geospatial index for your own custom geospatial analysis.
In this post, we used Athena, Lambda, and SageMaker notebooks to visualize the results of our UDFs in the western US. Code examples are in the h3-udf-for-athena GitHub repo.
As a next step, you can modify the code in this post and customize it for your own needs to gain further insights from your own geographical data. For example, you could visualize other cases such as droughts, flooding, and deforestation.
About the Authors
John Telford is a Senior Consultant at Amazon Web Services. He is a specialist in big data and data warehouses. John has a Computer Science degree from Brunel University.
Anwar Rizal is a Senior Machine Learning consultant based in Paris. He works with AWS customers to develop data and AI solutions to sustainably grow their business.
Pauline Ting is a Data Scientist in the AWS Professional Services team. She supports customers in achieving and accelerating their business outcome by developing sustainable AI/ML solutions. In her spare time, Pauline enjoys traveling, surfing, and trying new dessert places.
Customers are adopting microservices architecture to build innovative and scalable applications on Amazon Web Services (AWS). These microservices applications are deployed across multiple AWS services, and customers are looking for comprehensive observability solutions that can help them effectively monitor and manage the performance of their applications in real-time.
IBM Instana is a fully automated application performance management (APM) solution, available to customers as a fully managed software as a service (SaaS) solution on AWS. It is specifically designed to help customers address the challenges of monitoring microservices and cloud-native applications in real-time. It uses artificial intelligence and machine learning to provide detailed insights into the health and behavior of applications, allowing developers and IT teams to gain real-time insights into their microservices applications, optimize performance, and quickly identify and troubleshoot issues.
This post explains the capabilities of IBM Instana to automatically collect observability metrics, traces, and events from microservices deployed on AWS cloud, as well as on-premises, to provide full visibility into the performance of individual components and applications as a whole.
IBM Instana solution overview
IBM Instana is designed to be highly scalable and adaptable to changing microservices applications environments. Its architecture (Figure 1) consists of several components that work together to provide comprehensive monitoring for microservices and cloud-native applications.
Instana’s main building blocks are host agents and agent sensors that are deployed in a customer’s AWS account and responsible for collecting, aggregating, and sending detailed monitoring information of applications and AWS services to the Instana SaaS backend.
The Instana SaaS backend services provide several key components, including data collectors, storage services, analytics engines, and user interfaces. It allows customers to process and analyze data in real-time, generate actionable insights, have a comprehensive view of their applications and infrastructure performance, enabling them to quickly identify and resolve issues and improve their overall operations.
Figure 1. IBM Instana architecture on AWS
Monitoring data
Instana monitors and observes microservices and cloud-native applications by collecting beacons, traces, and one-second metrics:
Beacons are small monitoring payloads that are transmitted by a JavaScript agent to the Instana servers, modeling specific events occurring within the lifecycle of a page view of a website; for example, page loading, resource retrieval, and HTTP requests.
Traces are detailed records of the requests and transactions that flow through a microservice architecture. They record the sequence of events that occur when a request is processed, including the services that are involved, the duration of each service, and any errors or exceptions that occur. Instana automatically correlates traces across services to provide a complete view of an entire transaction. This allows for easy identification and diagnosis of performance issues.
Metrics are numerical values that represent the performance and resource utilization of a microservice or infrastructure component. Metrics are collected by Instana Agents and sent to the Instana backend at regular intervals. Instana Agents collect hundreds of different metrics, including (but not limited to) CPU usage, memory usage, network traffic, and disk I/O.
This information is captured by Instana agents and sensors, which also collect application configurations and events, plus discover application building blocks, including clusters, containers, and services.
Once Instana agents are running, they automatically detect applications and services, such as containers running on Amazon EKS, and processes like Nginx, NodeJS, Spring Boot, Postgres, Elasticsearch, or Cassandra. For each component detected, different Instana sensors are automatically downloaded, installed, and configured to monitor the environment.
Instana sensors are small programs that are designed to attach and monitor one specific technology and pass their data to the agent. They are automatically managed, updated, loaded, and unloaded by the host agent.
Instana also provides tracers, which are used with runtimes like Java, .NET, NodeJS, plus others. They modify code execution to capture logs, traces at request level, and send those back to the Instana agent.
With the use of sensors, the host agent collects configuration data and monitors the applications it has detected. The host agent also handles communications with the Instana SaaS backend services. It collects, aggregates and sends logs, traces and records metrics (such as response times, error rates, and resource utilization) every second to the Instana SaaS backend in real-time, using secure and efficient communication protocols.
IBM Instana SaaS
The Instana SaaS backend is the heart of the Instana APM solution and responsible for processing, storing, and analyzing the monitoring data collected from the Instana agents and sensors installed in the customer’s infrastructure.
It consists of several components and services that work together to provide real-time monitoring and analysis of microservices applications, including:
Data collectors: Receive and process data from the Instana agents and sensors, and store it in the Instana backend for further analysis.
Analytics engine: Analyzes the data collected by the agents and sensors to provide insights into the performance and health of the microservices applications.
User interface: Web-based interface that customers use to view and analyze their monitoring data.
Alerting engine: Generates alerts when thresholds or anomalies are detected in the monitoring data.
Data storage: Time-series database that stores the monitoring data collected by the agents and sensors. Allows customers to query and analyze the data in real-time.
Integrations: Integrates with various third-party tools, such as Slack, PagerDuty, and ServiceNow, providing seamless alerting and incident management.
IBM Instana backend: making sense of the situation in real time
The Instana SaaS platform automatically ingests data from agents and continuously updates a dependency map (Figure 2). This map presents every dependency in context, giving users an easy way to understand the interrelationships between application components and services.
This understanding enables users to identify the upstream and downstream impacts of any issue, ensuring that they stay informed about any potential impacts.
Figure 2. An example of an IBM Instana dependency map
Instana traces every request end-to-end without sampling. The traces are analyzed in real-time, providing metrics that make any performance problems immediately visible. In the event of an incident, Instana can illustrate how a single issue can generate a ripple effect and impact a number of directly and indirectly connected services. Using the relationship information from the Dynamic Graph, Instana’s automatic root-cause analysis can precisely aggregate the individual issues into a single incident.
Figure 3. Applications monitoring with IBM Instana
Developers, IT operations, or site reliability engineers (SREs) can access the Instana backend end-user monitoring interface (Figure 3) or end-user monitoring (EUM) interface (Figure 4) to view monitoring data of their workloads. These can be websites, mobile applications, AWS services, and infrastructure levels. From this UI, these personas can access service dashboards that show key performance indicators (KPIs), like response time and error rate.
Figure 4. End-user monitoring with IBM Instana
The following actions demonstrate how an EUM for a JavaScript application, deployed to Amazon S3 can be completed:
Developers inject Instana JavaScript code (Figure 5) into the static website (HTML).
When a user visits the website, the JavaScript agent sends beacons to the Instana backend.
Dashboards show specific events of the website lifecycle, including page loading, JS errors, and HTTP requests.
Teams access Instana UI to check performance matrices. They can configure Smart Alerts with custom alerting policies based on specific metrics and KPIs.
Smart Alerts can send alerts via various channels, such as email, Slack, or IBM Watson AIOps Webhook.
In case of an incident, teams can use Instana to retrieve various performance metrics for root-cause analysis.
Developers can resolve the issues and apply the patch.
Figure 5. IBM Instana EUM JavaScript agent
Instana also offers Smart Alerts (Figure 6) to provide a more intuitive process of managing alerts. With Smart Alerts, customers can automatically generate alerting configurations using relevant KPIs and automatic threshold detection for use cases like website slowness or website errors.
Figure 6. IBM Instana Smart Alerts
Conclusion
In this post, we discussed how IBM Instana provides a comprehensive monitoring solution with the right tools to help you implement a real-time observability and monitoring solution. It allows you to gain insight into your microservices and cloud-native applications, including visibility into AWS services, containers, on-premises infrastructure, and other technologies. Instana can quickly identify and resolve issues before they impact end-users, ensuring that your applications are performing optimally.
As an IT administrator, developer, or business owner, IBM Instana on AWS give a deeper understanding of your applications and help you make data-driven decisions to improve overall performance.
Today, we are launching aliases for S3 Object Lambda Access Points. Aliases are now automatically generated when S3 Object Lambda Access Points are created and are interchangeable with bucket names anywhere you use a bucket name to access data stored in Amazon S3. Therefore, your applications don’t need to know about S3 Object Lambda and can consider the alias to be a bucket name.
You can now use an S3 Object Lambda Access Point alias as an origin for your Amazon CloudFront distribution to tailor or customize data for end users. You can use this to implement automatic image resizing or to tag or annotate content as it is downloaded. Many images still use older formats like JPEG or PNG, and you can use a transcoding function to deliver images in more efficient formats like WebP, BPG, or HEIC. Digital images contain metadata, and you can implement a function that strips metadata to help satisfy data privacy requirements.
Let’s see how this works in practice. First, I’ll show a simple example using text that you can follow along by just using the AWS Management Console. After that, I’ll implement a more advanced use case processing images.
Using an S3 Object Lambda Access Point as the Origin of a CloudFront Distribution For simplicity, I am using the same application in the launch post that changes all text in the original file to uppercase. This time, I use the S3 Object Lambda Access Point alias to set up a public distribution with CloudFront.
To test that this is working, I open the same file from the bucket and through the S3 Object Lambda Access Point. In the S3 console, I select the bucket and a sample file (called s3.txt) that I uploaded earlier and choose Open.
A new browser tab is opened (you might need to disable the pop-up blocker in your browser), and its content is the original file with mixed-case text:
Amazon Simple Storage Service (Amazon S3) is an object storage service that offers...
I choose Object Lambda Access Points from the navigation pane and select the AWS Region I used before from the dropdown. Then, I search for the S3 Object Lambda Access Point that I just created. I select the same file as before and choose Open.
In the new tab, the text has been processed by the Lambda function and is now all in uppercase:
AMAZON SIMPLE STORAGE SERVICE (AMAZON S3) IS AN OBJECT STORAGE SERVICE THAT OFFERS...
Now that the S3 Object Lambda Access Point is correctly configured, I can create the CloudFront distribution. Before I do that, in the list of S3 Object Lambda Access Points in the S3 console, I copy the Object Lambda Access Point alias that has been automatically created:
In the CloudFront console, I choose Distributions in the navigation pane and then Create distribution. In the Origin domain, I use the S3 Object Lambda Access Point alias and the Region. The full syntax of the domain is:
ALIAS.s3.REGION.amazonaws.com
S3 Object Lambda Access Points cannot be public, and I use CloudFront origin access control (OAC) to authenticate requests to the origin. For Origin access, I select Origin access control settings and choose Create control setting. I write a name for the control setting and select Sign requests and S3 in the Origin type dropdown.
Now, my Origin access control settings use the configuration I just created.
To reduce the number of requests going through S3 Object Lambda, I enable Origin Shield and choose the closest Origin Shield Region to the Region I am using. Then, I select the CachingOptimized cache policy and create the distribution. As the distribution is being deployed, I update permissions for the resources used by the distribution.
Setting Up Permissions to Use an S3 Object Lambda Access Point as the Origin of a CloudFront Distribution First, the S3 Object Lambda Access Point needs to give access to the CloudFront distribution. In the S3 console, I select the S3 Object Lambda Access Point and, in the Permissions tab, I update the policy with the following:
The supporting access point also needs to allow access to CloudFront when called via S3 Object Lambda. I select the access point and update the policy in the Permissions tab:
Finally, CloudFront needs to be able to invoke the Lambda function. In the Lambda console, I choose the Lambda function used by S3 Object Lambda, and then, in the Configuration tab, I choose Permissions. In the Resource-based policy statements section, I choose Add permissions and select AWS Account. I enter a unique Statement ID. Then, I enter cloudfront.amazonaws.com as Principal and select lambda:InvokeFunction from the Action dropdown and Save. We are working to simplify this step in the future. I’ll update this post when that’s available.
Testing the CloudFront Distribution When the distribution has been deployed, I test that the setup is working with the same sample file I used before. In the CloudFront console, I select the distribution and copy the Distribution domain name. I can use the browser and enter https://DISTRIBUTION_DOMAIN_NAME/s3.txt in the navigation bar to send a request to CloudFront and get the file processed by S3 Object Lambda. To quickly get all the info, I use curl with the -i option to see the HTTP status and the headers in the response:
curl -i https://DISTRIBUTION_DOMAIN_NAME/s3.txt

HTTP/2 200
content-type: text/plain
content-length: 427
x-amzn-requestid: a85fe537-3502-4592-b2a9-a09261c8c00c
date: Mon, 06 Mar 2023 10:23:02 GMT
x-cache: Miss from cloudfront
via: 1.1 a2df4ad642d78d6dac65038e06ad10d2.cloudfront.net (CloudFront)
x-amz-cf-pop: DUB56-P1
x-amz-cf-id: KIiljCzYJBUVVxmNkl3EP2PMh96OBVoTyFSMYDupMd4muLGNm2AmgA==

AMAZON SIMPLE STORAGE SERVICE (AMAZON S3) IS AN OBJECT STORAGE SERVICE THAT OFFERS...
It works! As expected, the content processed by the Lambda function is all uppercase. Because this is the first invocation for the distribution, it has not been returned from the cache (x-cache: Miss from cloudfront). The request went through S3 Object Lambda to process the file using the Lambda function I provided.
Let’s try the same request again:
curl -i https://DISTRIBUTION_DOMAIN_NAME/s3.txt

HTTP/2 200
content-type: text/plain
content-length: 427
x-amzn-requestid: a85fe537-3502-4592-b2a9-a09261c8c00c
date: Mon, 06 Mar 2023 10:23:02 GMT
x-cache: Hit from cloudfront
via: 1.1 145b7e87a6273078e52d178985ceaa5e.cloudfront.net (CloudFront)
x-amz-cf-pop: DUB56-P1
x-amz-cf-id: HEx9Fodp184mnxLQZuW62U11Fr1bA-W1aIkWjeqpC9yHbd0Rg4eM3A==
age: 3

AMAZON SIMPLE STORAGE SERVICE (AMAZON S3) IS AN OBJECT STORAGE SERVICE THAT OFFERS...
This time the content is returned from the CloudFront cache (x-cache: Hit from cloudfront), and there was no further processing by S3 Object Lambda. By using S3 Object Lambda as the origin, the CloudFront distribution serves content that has been processed by a Lambda function and can be cached to reduce latency and optimize costs.
Resizing Images Using S3 Object Lambda and CloudFront As I mentioned at the beginning of this post, one of the use cases that can be implemented using S3 Object Lambda and CloudFront is image transformation. Let’s create a CloudFront distribution that can dynamically resize an image by passing the desired width and height as query parameters (w and h respectively). For example:
For this setup to work, I need to make two changes to the CloudFront distribution. First, I create a new cache policy to include query parameters in the cache key. In the CloudFront console, I choose Policies in the navigation pane. In the Cache tab, I choose Create cache policy. Then, I enter a name for the cache policy.
In the Query settings of the Cache key settings, I select the option to Include the following query parameters and add w (for the width) and h (for the height).
Then, in the Behaviors tab of the distribution, I select the default behavior and choose Edit.
There, I update the Cache key and origin requests section:
In the Cache policy, I use the new cache policy to include the w and h query parameters in the cache key.
In the Origin request policy, use the AllViewerExceptHostHeader managed policy to forward query parameters to the origin.
Now I can update the Lambda function code. To resize images, this function uses the Pillow module that needs to be packaged with the function when it is uploaded to Lambda. You can deploy the function using a tool like the AWS SAM CLI or the AWS CDK. Compared to the previous example, this function also handles and returns HTTP errors, such as when content is not found in the bucket.
import io
import boto3
from urllib.request import urlopen, HTTPError
from PIL import Image

from urllib.parse import urlparse, parse_qs

s3 = boto3.client('s3')

def lambda_handler(event, context):
    print(event)

    object_get_context = event['getObjectContext']
    request_route = object_get_context['outputRoute']
    request_token = object_get_context['outputToken']
    s3_url = object_get_context['inputS3Url']

    # Get object from S3
    try:
        original_image = Image.open(urlopen(s3_url))
    except HTTPError as err:
        s3.write_get_object_response(
            StatusCode=err.code,
            ErrorCode='HTTPError',
            ErrorMessage=err.reason,
            RequestRoute=request_route,
            RequestToken=request_token)
        return

    # Get width and height from query parameters
    user_request = event['userRequest']
    url = user_request['url']
    parsed_url = urlparse(url)
    query_parameters = parse_qs(parsed_url.query)

    try:
        width, height = int(query_parameters['w'][0]), int(query_parameters['h'][0])
    except (KeyError, ValueError):
        width, height = 0, 0

    # Transform object
    if width > 0 and height > 0:
        transformed_image = original_image.resize((width, height), Image.ANTIALIAS)
    else:
        transformed_image = original_image

    transformed_bytes = io.BytesIO()
    transformed_image.save(transformed_bytes, format='JPEG')

    # Write object back to S3 Object Lambda
    s3.write_get_object_response(
        Body=transformed_bytes.getvalue(),
        RequestRoute=request_route,
        RequestToken=request_token)

    return
I upload a picture I took of the Trevi Fountain in the source bucket. To start, I generate a small thumbnail (200 by 150 pixels).
It works as expected. The first invocation with a specific size is processed by the Lambda function. Further requests with the same width and height are served from the CloudFront cache.
Availability and Pricing Aliases for S3 Object Lambda Access Points are available today in all commercial AWS Regions. There is no additional cost for aliases. With S3 Object Lambda, you pay for the Lambda compute and request charges required to process the data, and for the data S3 Object Lambda returns to your application. You also pay for the S3 requests that are invoked by your Lambda function. For more information, see Amazon S3 Pricing.
Aliases are now automatically generated when an S3 Object Lambda Access Point is created. For existing S3 Object Lambda Access Points, aliases are automatically assigned and ready for use.
It’s now easier to use S3 Object Lambda with existing applications, and aliases open many new possibilities. For example, you can use aliases with CloudFront to create a website that converts content in Markdown to HTML, resizes and watermarks images, or masks personally identifiable information (PII) from text, images, and documents.
This post demonstrates how to integrate AWS serverless services with artificial intelligence (AI) technologies, ChatGPT, and DALL-E. This full stack event-driven application showcases a method of generating unique bedtime stories for children by using predetermined characters and scenes as a prompt for ChatGPT.
Every night at bedtime, the serverless scheduler triggers the application, initiating an event-driven workflow to create and store new unique AI-generated stories with AI-generated images and supporting audio.
These datasets are used to showcase the story on a custom website built with Next.js hosted with AWS App Runner. After the story is created, a notification is sent to the user containing a URL to view and read the story to the children.
Example notification of a story hosted with Next.js and App Runner
By integrating AWS services with AI technologies, you can now create new and innovative ideas that were previously unimaginable.
The following image shows the serverless architecture used to generate stories:
Architecture diagram for Serverless bed time story generation with ChatGPT and DALL-E
A new children’s story is generated every day at configured time using Amazon EventBridge Scheduler (Step 1). EventBridge Scheduler is a service capable of scaling millions of schedules with over 200 targets and over 6000 API calls. This example application uses EventBridge scheduler to trigger an AWS Lambda function every night at the same time (7:15pm). The Lambda function is triggered to start the generation of the story.
EventBridge scheduler triggers Lambda function every day at 7:15pm (bed time)
The “Scenes” and “Characters” Amazon DynamoDB tables contain the characters involved in the story and a scene that is randomly selected during its creation. As a result, ChatGPT receives a unique prompt each time. An example of the prompt may look like this:
“` Write a title and a rhyming story on 2 main characters called Parker and Jackson. The story needs to be set within the scene haunted woods and be at least 200 words long
“`
After the story is created, it is then saved in the “Stories” DynamoDB table (Step 2).
Scheduler triggering Lambda function to generate the story and store story into DynamoDB
Once the story is created this initiates a change data capture event using DynamoDB Streams (Step 3). This event flows through point-to-point messaging with EventBridge pipes and directly into EventBridge. Input transforms are then used to convert the DynamoDB Stream event into a custom EventBridge event, which downstream consumers can comprehend. Adopting this pattern is beneficial as it allows us to separate contracts from the DynamoDB event schema and not having downstream consumers conform to this schema structure, this mapping allows us to remain decoupled from implementation details.
EventBridge Pipes connecting DynamoDB streams directly into EventBridge.
Upon triggering the StoryCreated event in EventBridge, three targets are triggered to carry out several processes (Step 4). Firstly, AI Images are processed, followed by the creation of audio for the story. Finally, the end user is notified of the completed story through Amazon SNS and email subscriptions. This fan-out pattern enables these tasks to be run asynchronously and in parallel, allowing for faster processing times.
EventBridge pub/sub pattern used to start async processing of notifications, audio, and images.
An SNS topic is triggered by the `StoryCreated` event to send an email to the end user using email subscriptions (Step 6). The email consists of a URL with the id of the story that has been created. Clicking on the URL takes the user to the frontend application that is hosted with App Runner.
Using SNS to notify the user of a new story
Example email sent to the user
Amazon Polly is used to generate the audio files for the story (Step 6). Upon triggering the `StoryCreated` event, a Lambda function is triggered, and the story description is used and given to Amazon Polly. Amazon Polly then creates an audio file of the story, which is stored in Amazon S3. A presigned URL is generated and saved in DynamoDB against the created story. This allows the frontend application and browser to retrieve the audio file when the user views the page. The presigned URL has a validity of two days, after which it can no longer be accessed or listened to.
Lambda function to generate audio using Amazon Polly, store in S3 and update story with presigned URL
The `StoryCreated` event also triggers another Lambda function, which uses the OpenAI API to generate an AI image using DALL-E based on the generated story (Step 7). Once the image is generated, the image is downloaded and stored in Amazon S3. Similar to the audio file, the system generates a presigned URL for the image and saves it in DynamoDB against the story. The presigned URL is only valid for two days, after which it becomes inaccessible for download or viewing.
Lambda function to generate images, store in S3 and update story with presigned URL.
In the event of a failure in audio or image generation, the frontend application still loads the story, but does not display the missing image or audio at that moment. This ensures that the frontend can continue working and provide value. If you wanted more control and only trigger the user’s notification event once all parallel tasks are complete the aggregator messaging pattern can be considered.
Hosting the frontend Next.js application with AWS App Runner
Next.js is used by the frontend application to render server-side rendered (SSR) pages that can access the stories from the DynamoDB table, which are then hosted with AWS App Runner after being containerized.
Next.js application hosted with App Runner, with permissions into DynamoDB table.
AWS App Runner enables you to deploy containerized web applications and APIs securely, without needing any prior knowledge of containers or infrastructure. With App Runner, developers can concentrate on their application, while the service handles container startup, running, scaling, and load balancing. After deployment, App Runner provides a secure URL for clients to begin making HTTP requests against.
With App Runner, you have two primary options for deploying your container: source code connections or source images. Using source code connections grants App Runner permission to pull the image file directly from your source code, and with Automatic deployment configured, it can redeploy the application when changes are made. Alternatively, source images provide App Runner with the image’s location in an image registry, and this image is deployed by App Runner.
In this example application, CDK deploys the application using the DockerImageAsset construct with the App Runner construct. Once deployed, App Runner builds and uploads the frontend image to Amazon Elastic Container Registry (ECR) and deploys it. Downstream consumers can access the application using the secure URL provided by App Runner. In this example, the URL is used when the SNS notification is sent to the user when the story is ready to be viewed.
Giving the frontend container permission to DynamoDB table
To grant the Next.js application permission to obtain stories from the Stories DynamoDB table, App Runner instance roles are configured. These roles are optional and can provide the necessary permissions for the container to access AWS services required by the compute service.
The DynamoDB Time to Live (TTL) feature is ideal for the short-lived nature of daily generated stories. DynamoDB handle the deletion of stories after two days by setting the TTL attribute on each story. Once a story is deleted, it becomes inaccessible through the generated story URLs.
Using Amazon S3 presigned URLs is a method to grant temporary access to a file in S3. This application creates presigned URLs for the audio file and generated images that last for 2 days, after which the URLs for the S3 items become invalid.
Input transforms are used between DynamoDB streams and EventBridge events to decouple the schemas and events consumed by downstream targets. Consuming the events as they are is known as the “conformist” pattern, and couples us to implementation details of DynamoDB streams with downstream EventBridge consumers. This allows the application to remain decoupled from implementation details and remain flexible.
Conclusion
The adoption of artificial intelligence (AI) technology has significantly increased in various industries. ChatGPT, a large language model that can understand and generate human-like responses in natural language, and DALL-E, an image generation system that can create realistic images based on textual descriptions, are examples of such technology. These systems have demonstrated the potential for AI to provide innovative solutions and transform the way we interact with technology.
This blog post explores ways in which you can utilize AWS serverless services with ChatGTP and DALL-E to create a story generation application fronted by a Next.js application hosted with App Runner. EventBridge Scheduler is used to trigger the story creation process then react to change data capture events with DynamoDB streams and EventBridge Pipes, and use Amazon EventBridge to fan out compute tasks to process notifications, images, and audio files.
For more serverless learning resources, visit Serverless Land.
The collective thoughts of the interwebz
Manage Consent
To provide the best experiences, we use technologies like cookies to store and/or access device information. Consenting to these technologies will allow us to process data such as browsing behavior or unique IDs on this site. Not consenting or withdrawing consent, may adversely affect certain features and functions.
Functional
Always active
The technical storage or access is strictly necessary for the legitimate purpose of enabling the use of a specific service explicitly requested by the subscriber or user, or for the sole purpose of carrying out the transmission of a communication over an electronic communications network.
Preferences
The technical storage or access is necessary for the legitimate purpose of storing preferences that are not requested by the subscriber or user.
Statistics
The technical storage or access that is used exclusively for statistical purposes.The technical storage or access that is used exclusively for anonymous statistical purposes. Without a subpoena, voluntary compliance on the part of your Internet Service Provider, or additional records from a third party, information stored or retrieved for this purpose alone cannot usually be used to identify you.
Marketing
The technical storage or access is required to create user profiles to send advertising, or to track the user on a website or across several websites for similar marketing purposes.
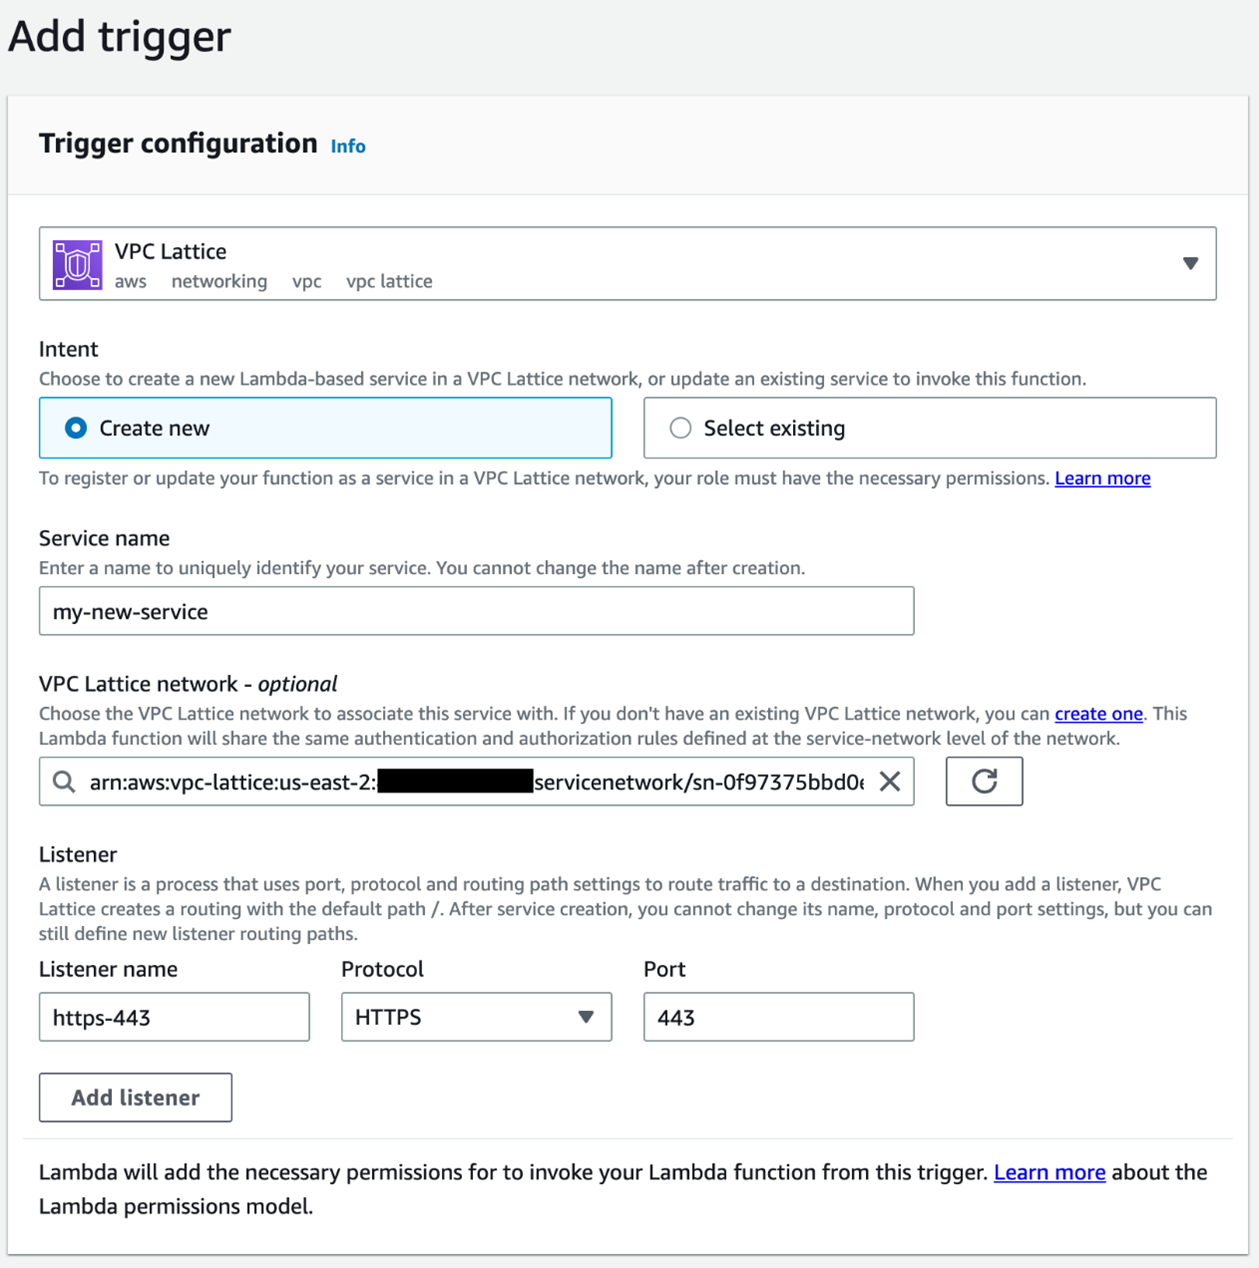

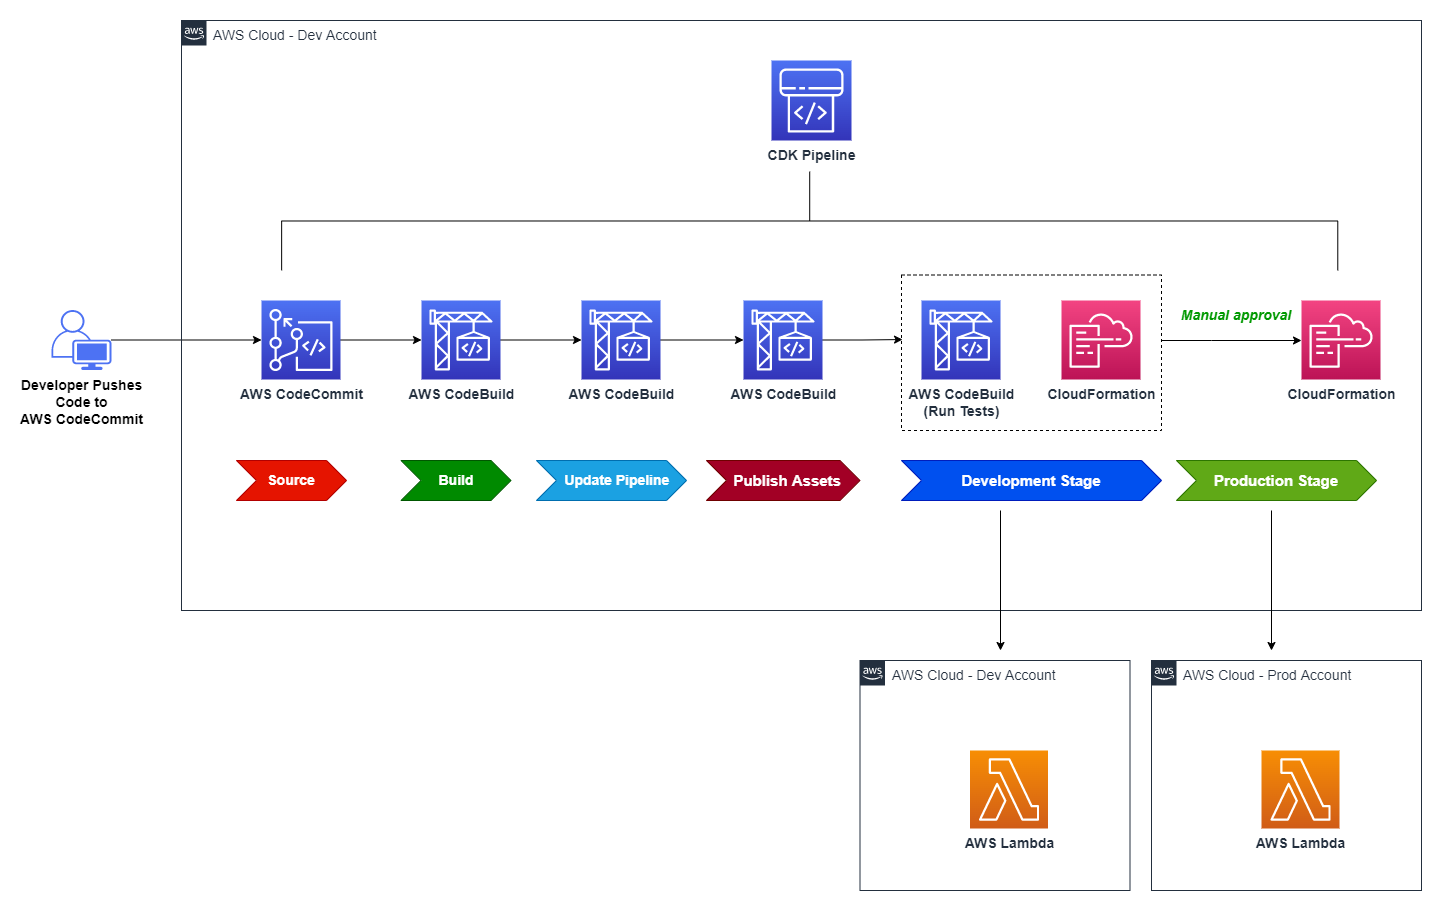
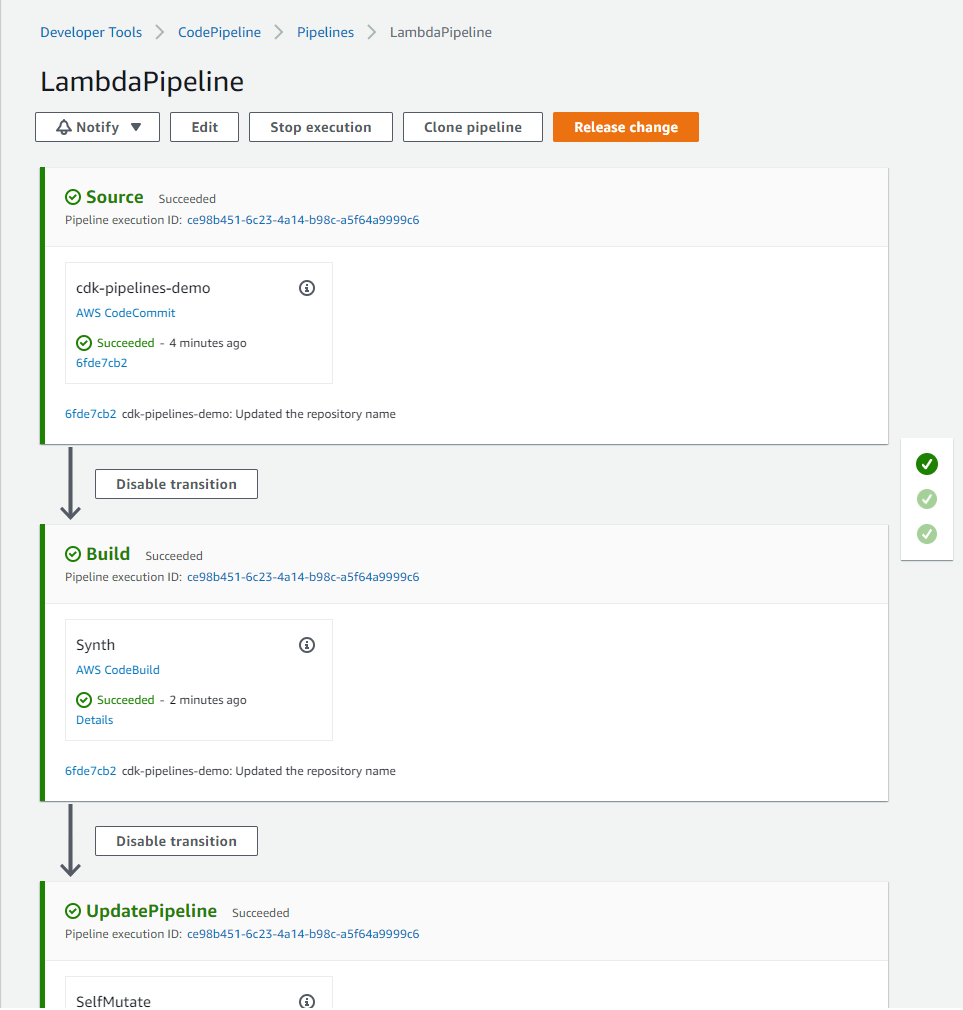
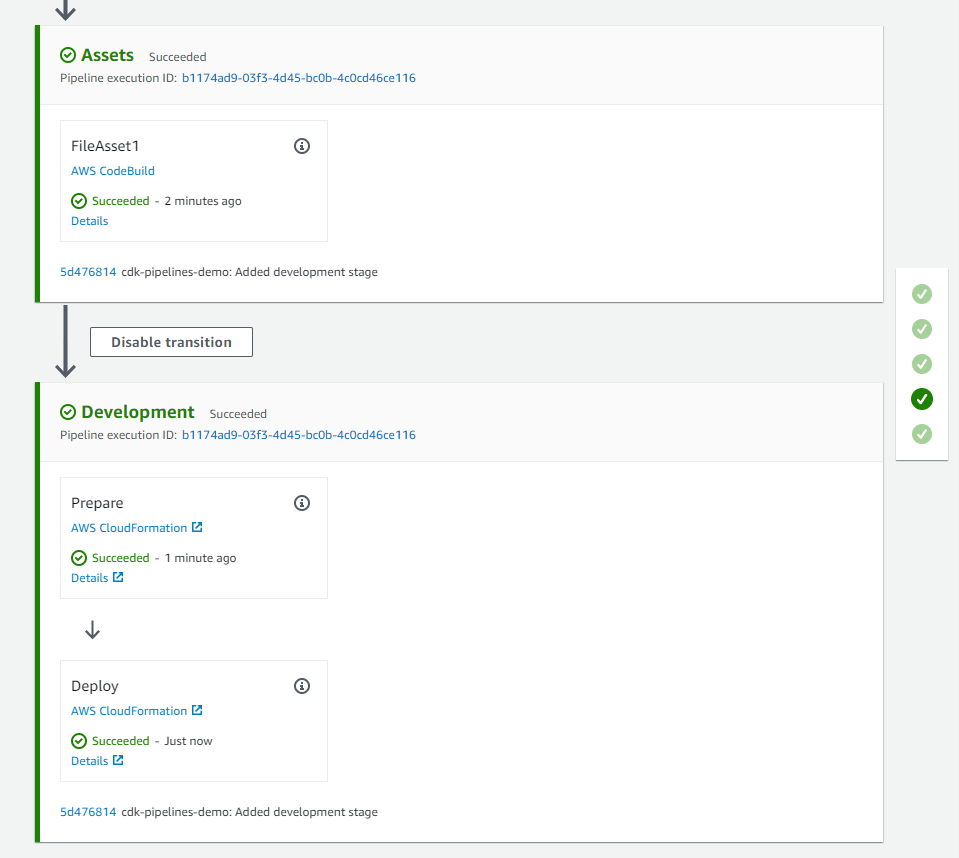
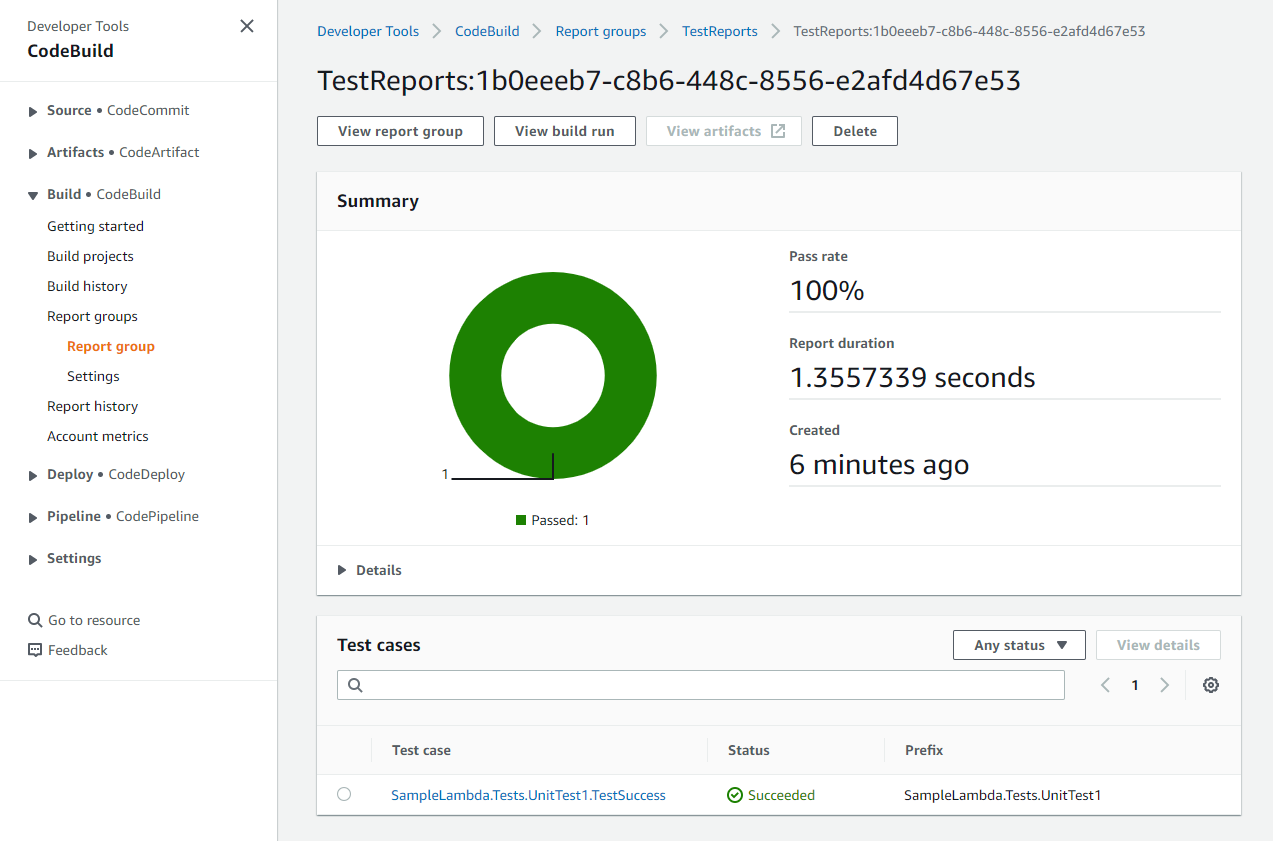
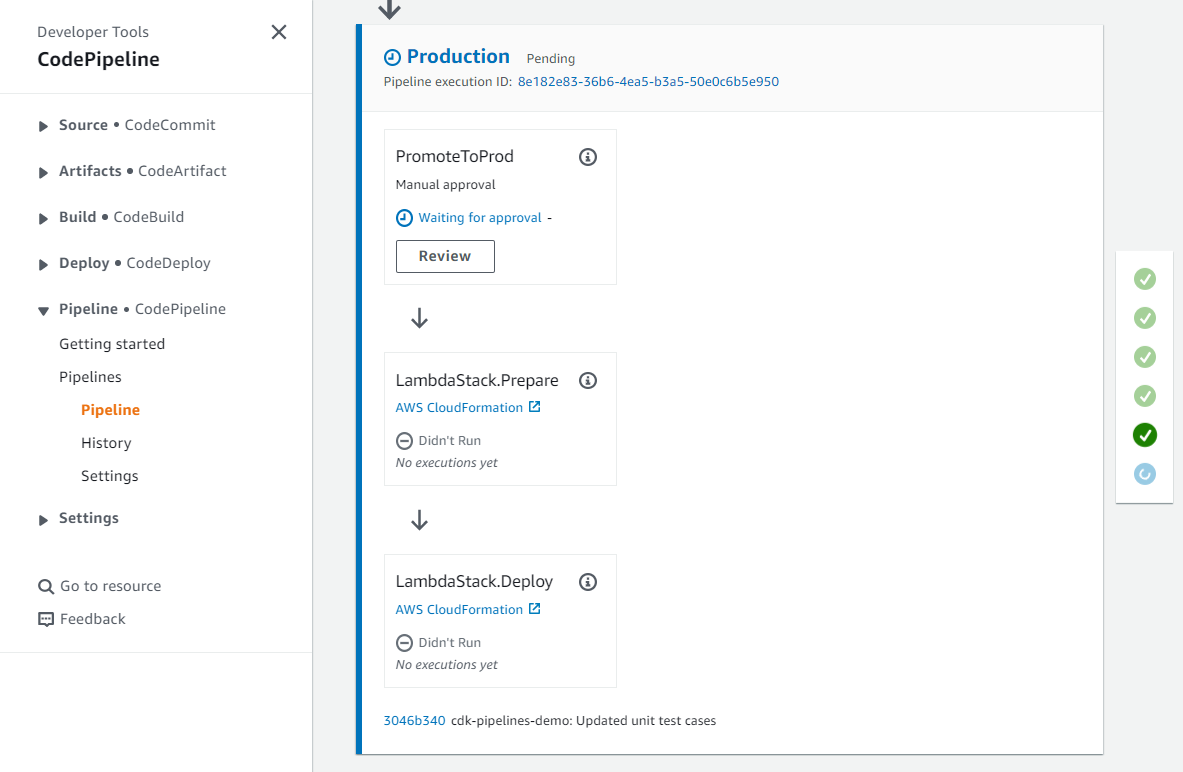
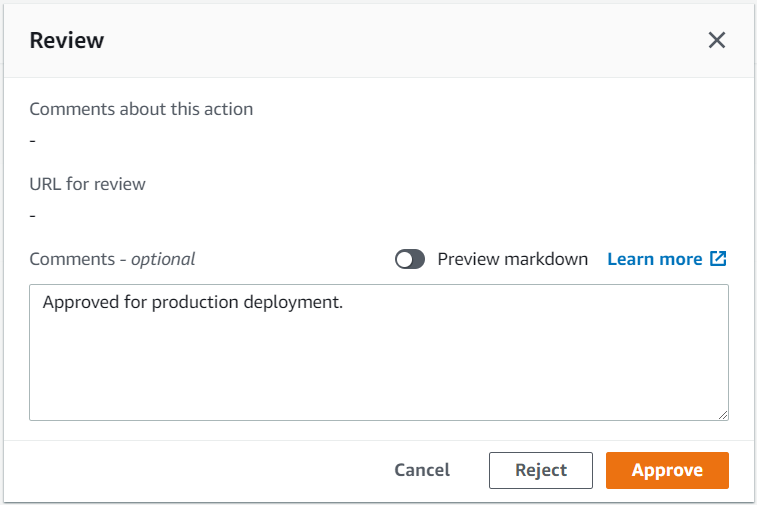
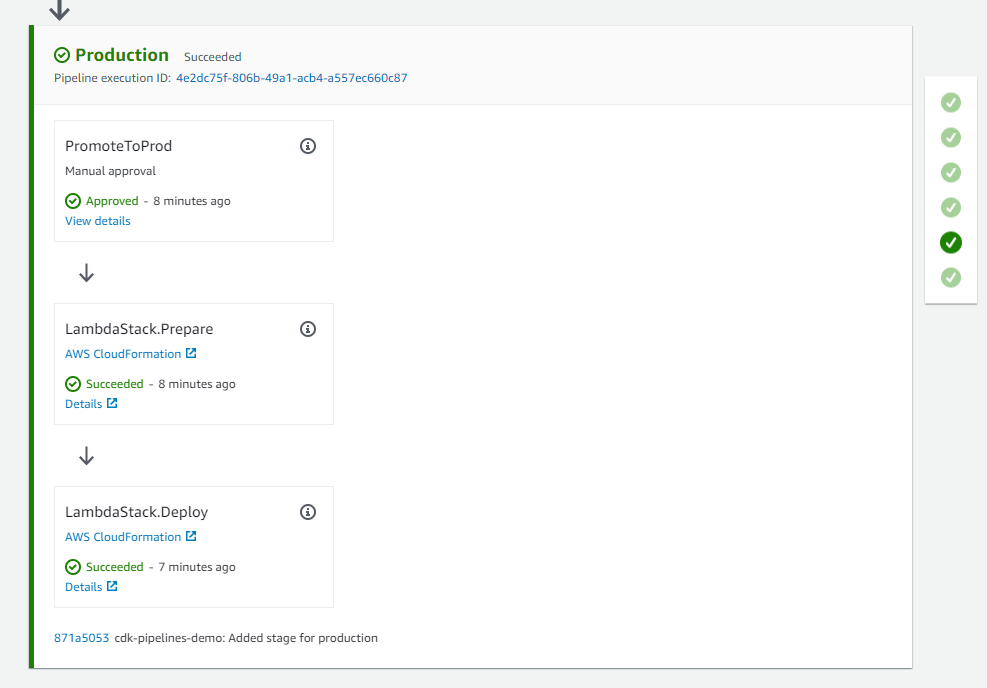


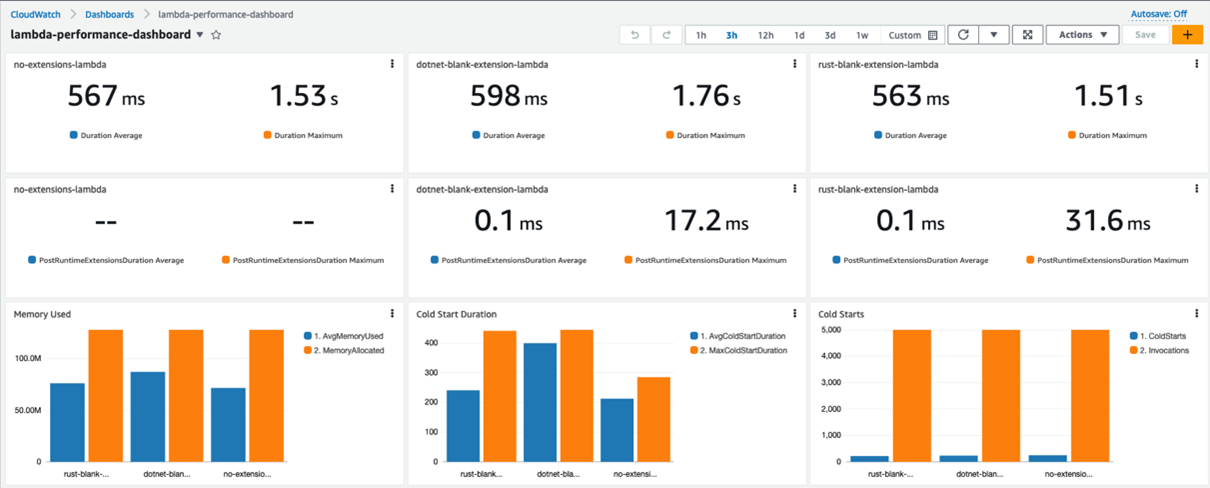


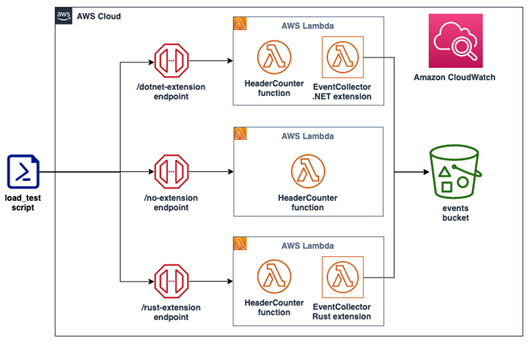
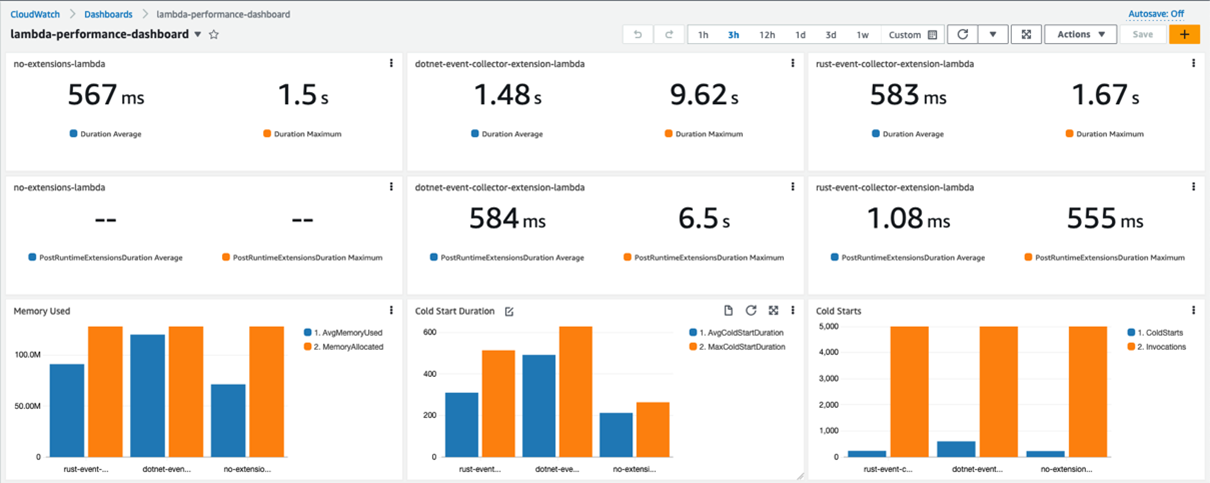


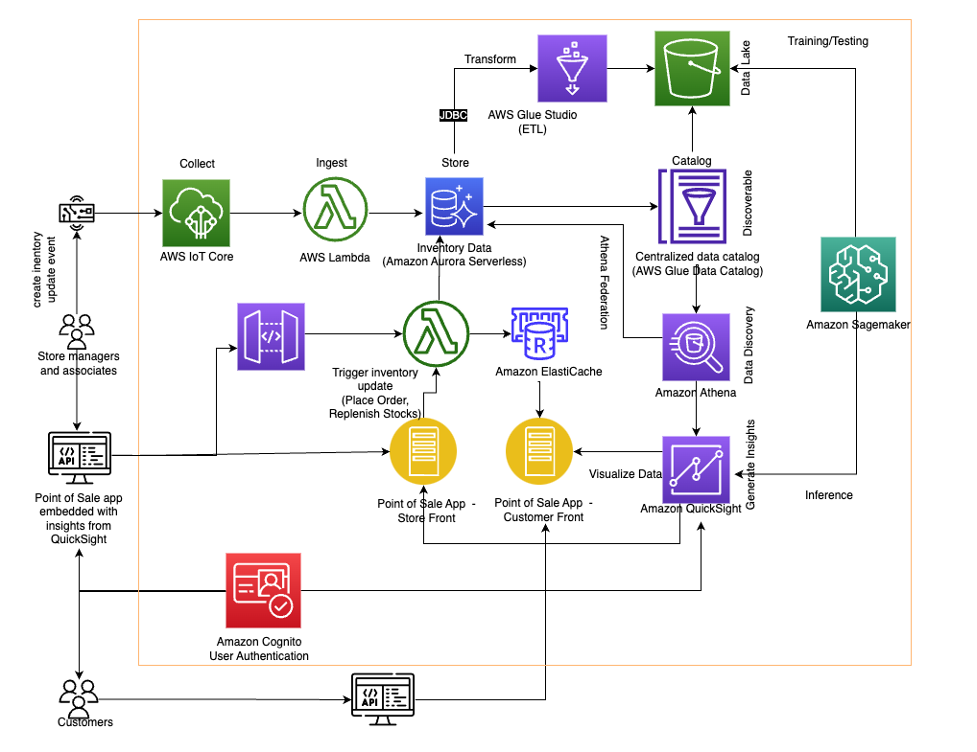
 Jason D’Alba is an AWS Solutions Architect leader focused on databases and enterprise applications, helping customers architect highly available and scalable solutions.
 Navnit Shukla is an AWS Specialist Solution Architect, Analytics, and is passionate about helping customers uncover insights from their data. He has been building solutions to help organizations make data-driven decisions.
 Vetri Natarajan is a Specialist Solutions Architect for Amazon QuickSight. Vetri has 15 years of experience implementing enterprise business intelligence (BI) solutions and greenfield data products. Vetri specializes in integration of BI solutions with business applications and enable data-driven decisions.
 Sindhura Palakodety is a Solutions Architect at AWS. She is passionate about helping customers build enterprise-scale Well-Architected solutions on the AWS platform and specializes in Data Analytics domain.
 .Net Developer Day –
  AWS Global Summits – Check your calendars and sign up for the AWS Summit close to where you live or work:


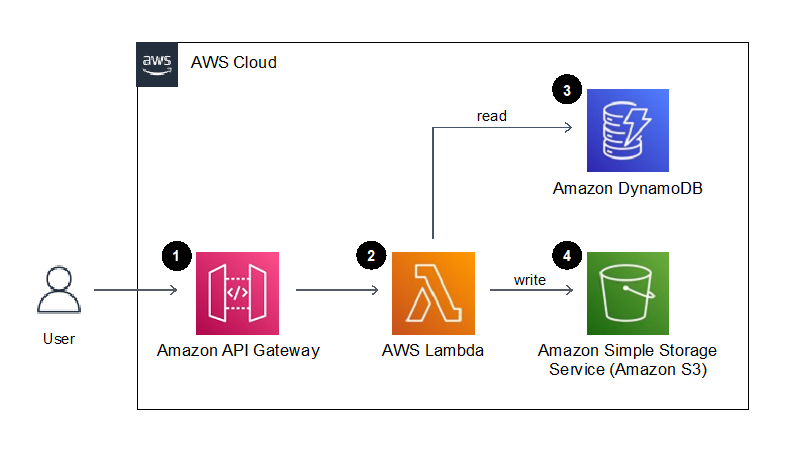


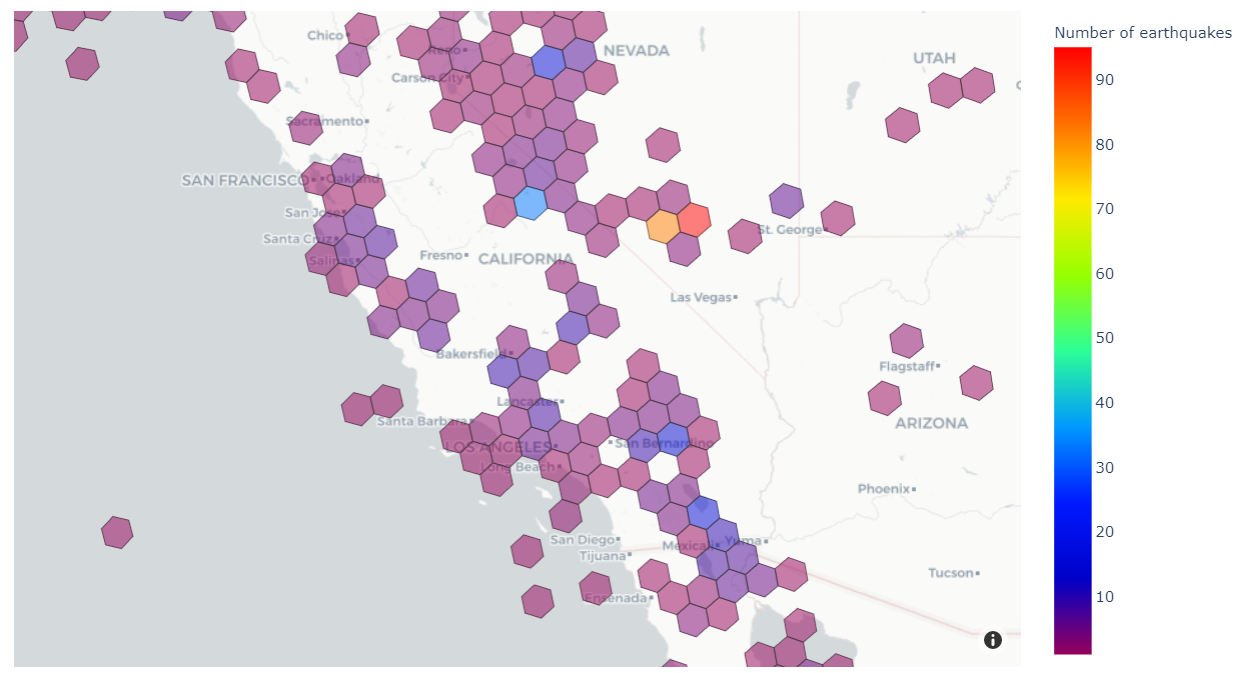

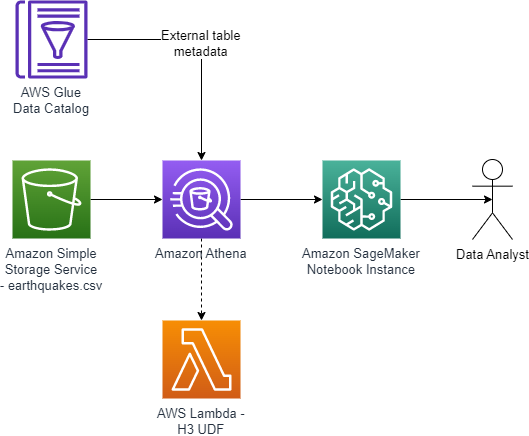
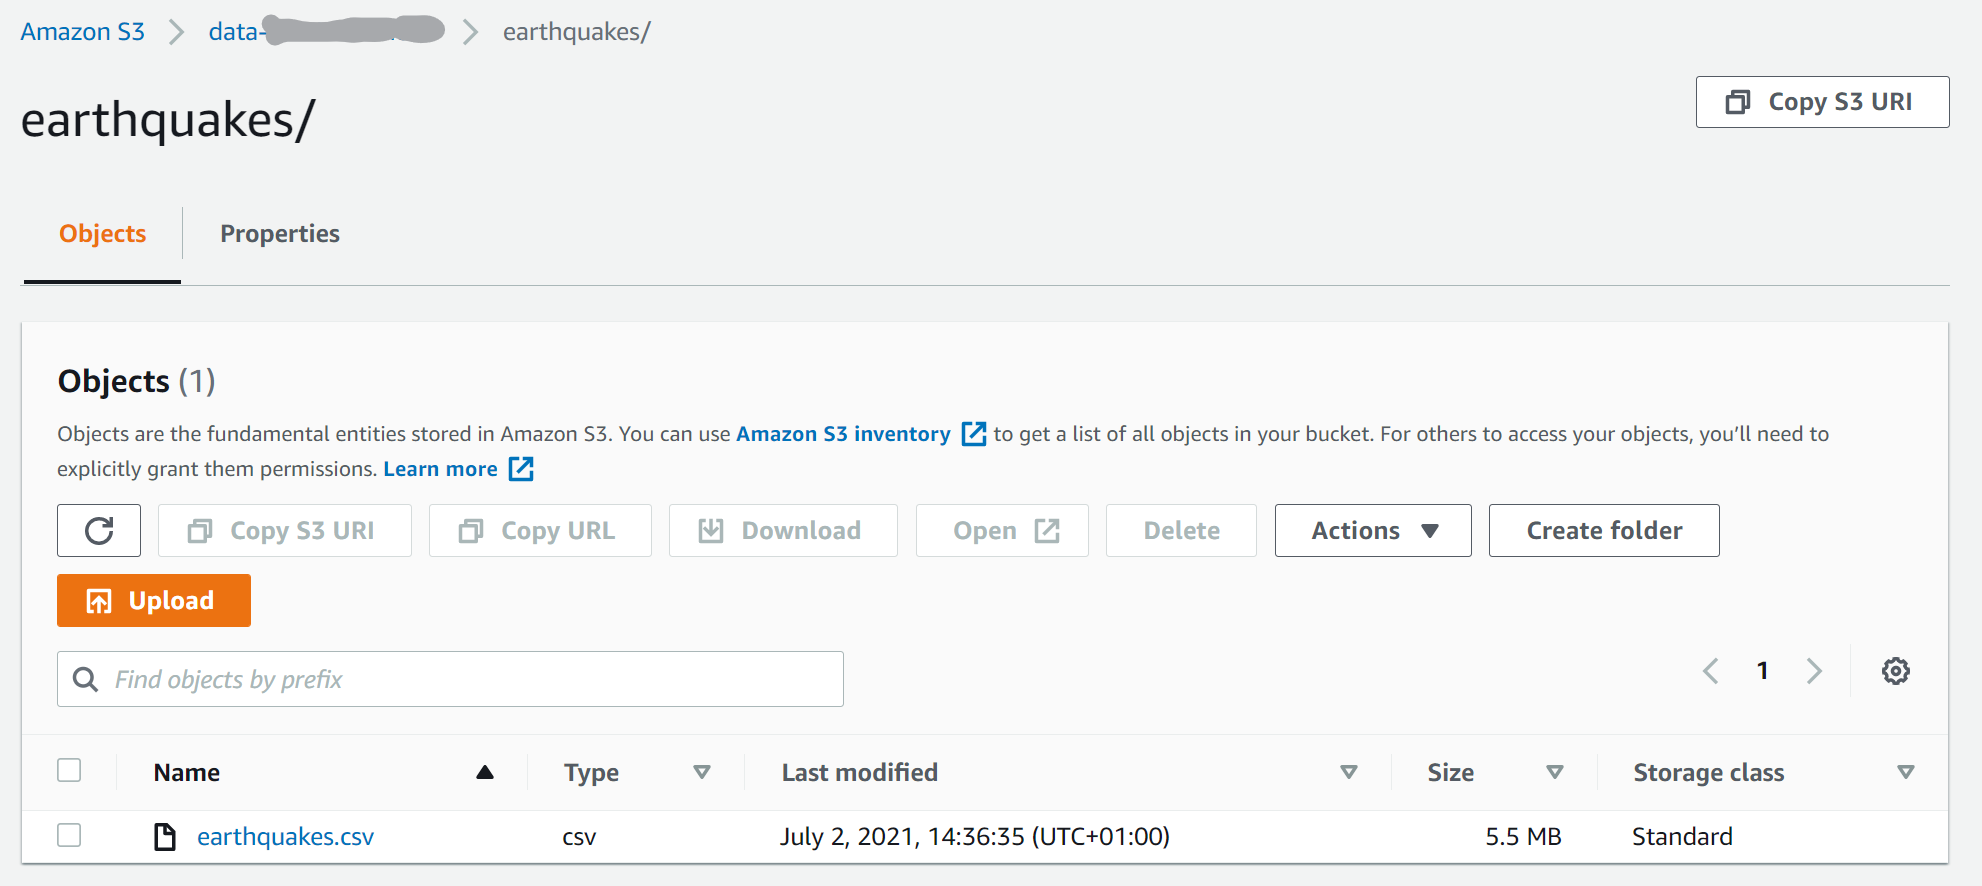


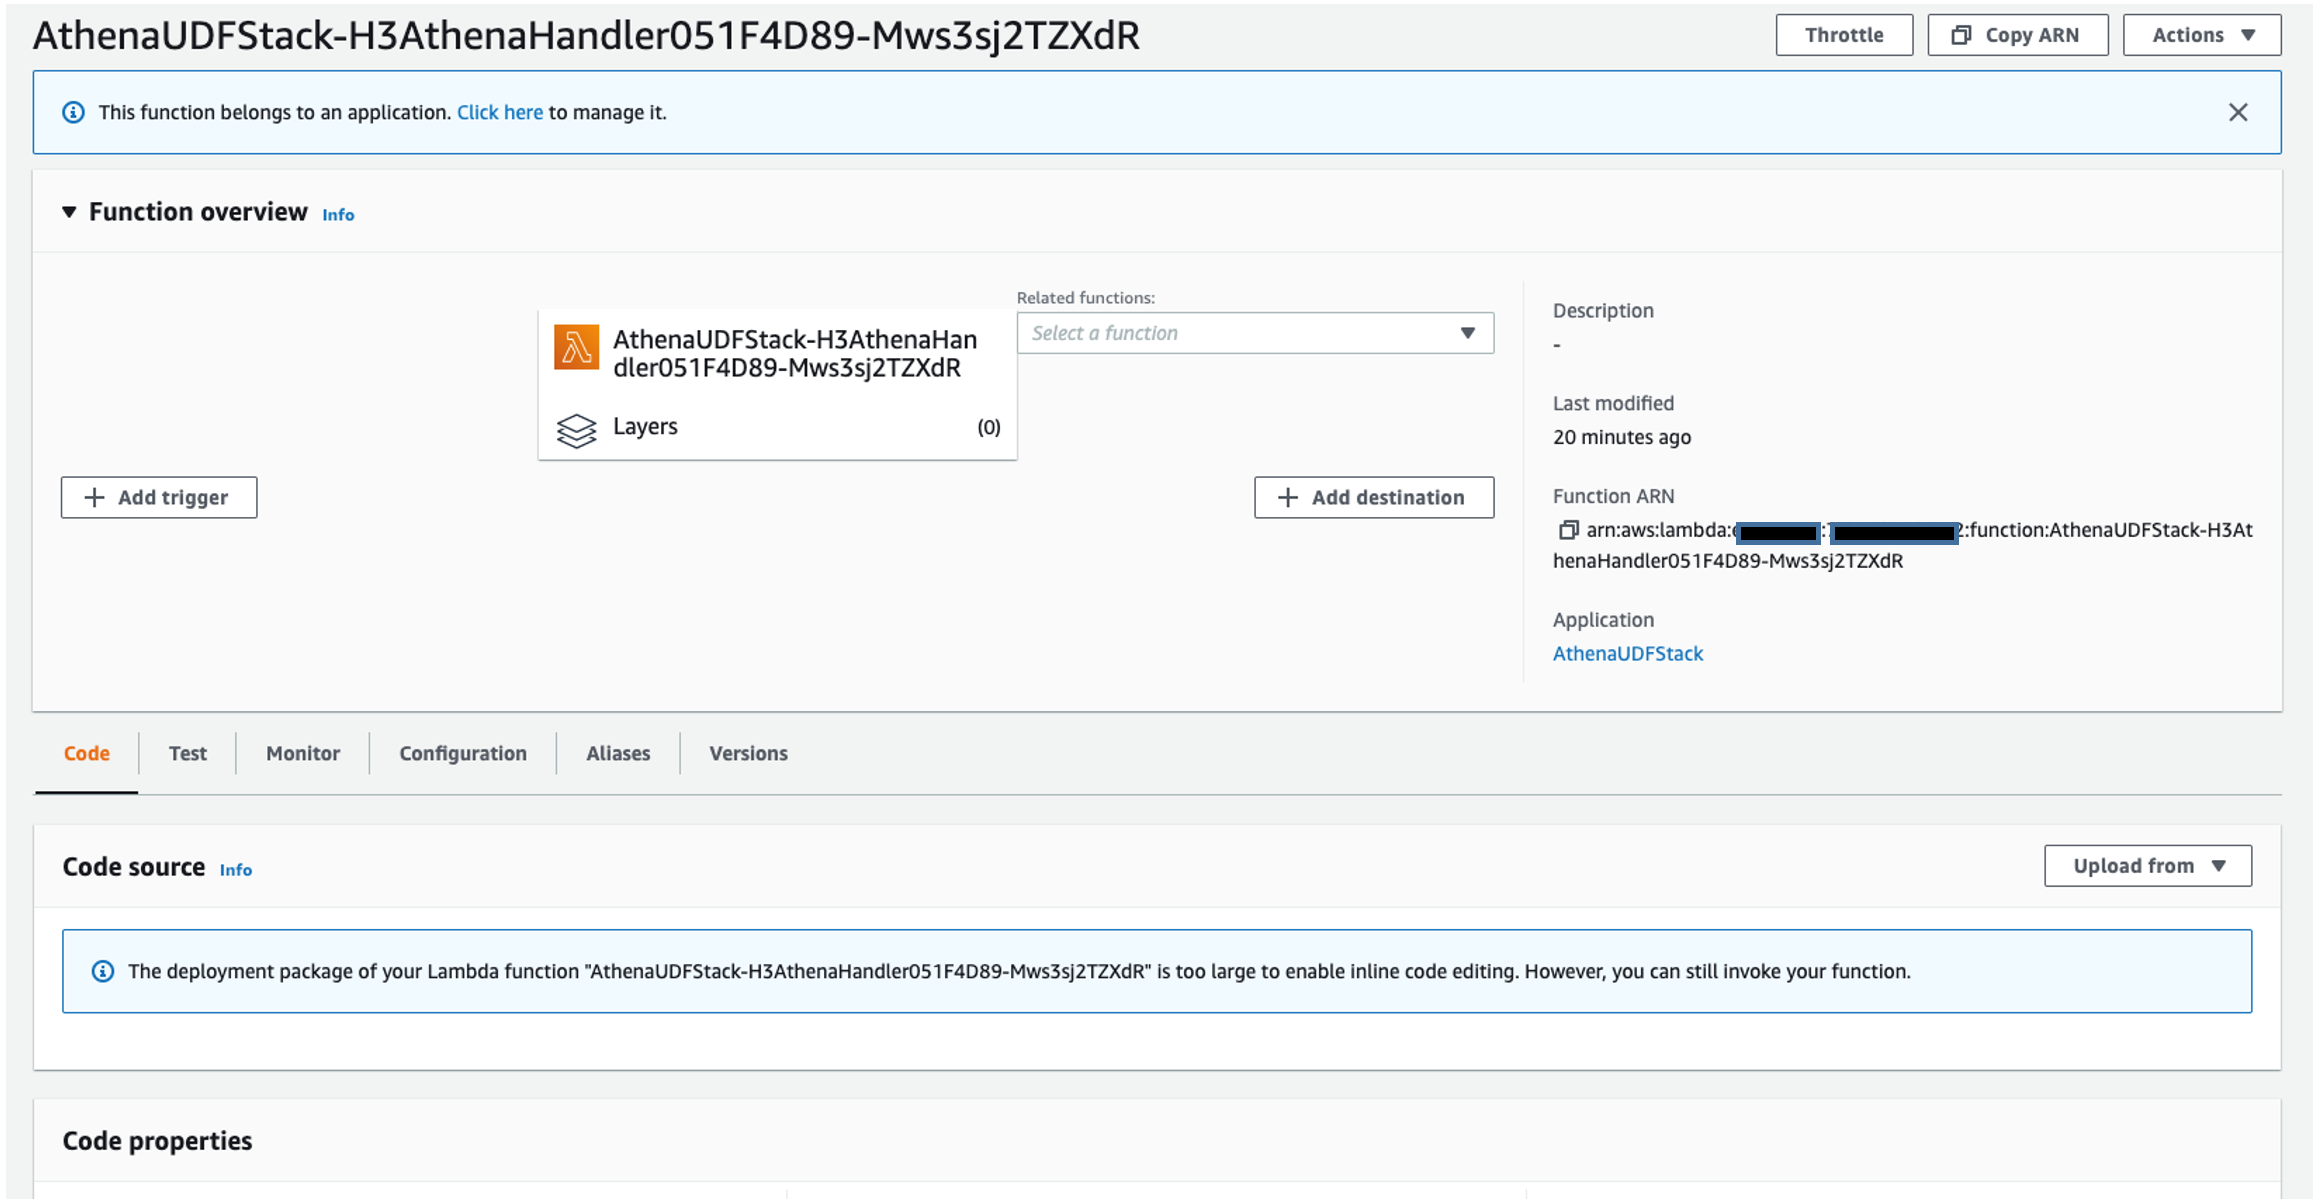


 John Telford is a Senior Consultant at Amazon Web Services. He is a specialist in big data and data warehouses. John has a Computer Science degree from Brunel University.
 Anwar Rizal is a Senior Machine Learning consultant based in Paris. He works with AWS customers to develop data and AI solutions to sustainably grow their business.
 Pauline Ting is a Data Scientist in the AWS Professional Services team. She supports customers in achieving and accelerating their business outcome by developing sustainable AI/ML solutions. In her spare time, Pauline enjoys traveling, surfing, and trying new dessert places.