Tag Archives: AWS Lambda

Creating faster AWS Lambda functions with AVX2

Post Syndicated from James Beswick original https://aws.amazon.com/blogs/compute/creating-faster-aws-lambda-functions-with-avx2/

Customers use AWS Lambda to build a wide range of applications, including mission-critical and compute-intensive applications. The most demanding workloads include machine learning inferencing, media processing, high performance computing (HPC), scientific simulations, and financial modeling. With the release of Advanced Vector Extensions 2 (AVX2) support for Lambda, builders can benefit from improved performance for these types of applications.

Overview

This blog post explains AVX2 and how you can take advantage of this instruction set in your Lambda functions. I walk through an example of how to enhance performance of a typical use case using AVX2 and measure the performance gain. This feature is available for new or existing Lambda-based workloads at no additional cost.

AVX2 provides extensions to the x86 instruction set architecture. This is a Single Instruction Multiple Data (SIMD) instruction set that enables running a set of highly parallelizable operations simultaneously. AVX2 allows CPUs to perform a higher number of integer and floating-point operations per clock cycle. For vectorizable algorithms, this can enhance performance resulting in lower latencies and higher throughput.

AVX2 for Lambda

Implementing AVX2 in an example application

Pillow is a popular Python-based imaging library. It provides powerful image manipulation functions that use computationally complex processes. Computer vision operations such as convolution resampling can benefit from parallelization. This is because the filters are applied on different windows that are independent and can be processed in parallel. In this section, I compare the performance of an image transformation after applying AVX2 instructions.

The following example downloads an original JPEG object from an Amazon S3 bucket, resizes the image, and then saves the result to another S3 bucket. There are three resizing filters used – bilinear, bicubic, and Lanczos.

import boto3
import os

from PIL import Image

# Download the image to /tmp
s3 = boto3.client('s3')
s3.download_file('my-input-bucket', 'photo.jpeg', '/tmp/photo.jpeg')

def lambda_handler(event, context):
    # Open image and perform resize
    image = Image.open('/tmp/photo.jpeg')

    # Select one of the three algorithms
    image = image.resize((256, 128), Image.BILINEAR) 
    # image = image.resize((256, 128), Image.BICUBIC) 
    # image = image.resize((256, 128), Image.LANCZOS) 
    
    # Save and upload to S3
    image.save('/tmp/thumbnail.jpeg', 'JPEG')
    s3.upload_file('/tmp/thumbnail.jpeg', 'my-output-bucket', 'thumbnail.jpeg')
    
    return "Success!"

To convert code to use AVX2, you must recompile the source code with the appropriate flags, or use packages and dependencies optimized for AVX2. In this example, you can use a production-ready fork of Pillow called pillow-simd. When compiled for AVX2, it uses the AVX2 instructions to accelerate many of the features in Pillow.

First, you must compile the library using the same Amazon Linux AMI and kernel version that is used by the Lambda service. To do this, use an EC2 or AWS Cloud9 instance running Amazon Linux 2, or using a Docker container with a Lambda-supported image. Compile the library using the following commands:

# Install dependencies
~ yum install -y \
    freetype-devel \
    gcc \
    ghostscript \
    lcms2-devel \
    libffi-devel \
    libimagequant-devel \
    libjpeg-devel \
    libraqm-devel \
    libtiff-devel \
    libwebp-devel \
    make \
    openjpeg2-devel \
    rh-python36 \
    rh-python36-python-virtualenv \
    sudo \
    tcl-devel \
    tk-devel \
    tkinter \
    which \
    xorg-x11-server-Xvfb \
    zlib-devel \
    && yum clean all

# Compile code with AVX2 flag
CC="cc -mavx2" pip install --force-reinstall --no-cache-dir -t . --compile  pillow-simd

You can then use this compiled, AVX2-compatible version of the Pillow library in a Lambda function. This can be bundled with the deployment code or you can deploy the library as a Lambda layer. Depending on the version, you may have to include the following binaries from the `/usr/lib64` directory with the function. If so, add this location to LD_LIBRARY_PATH so the binaries are discoverable:

cp /usr/lib64/libtiff.so.5 lib/libtiff.so.5
cp /usr/lib64/libjpeg.so.62 lib/libjpeg.so.62
cp /usr/lib64/libjbig.so.2.0 lib/libjbig.so.2.0

In this test, I compare the performance of both the original function and the AVX2-optimized version with 1024 MB of memory. The test uses the following image:

Resampled photo

Source: https://unsplash.com/photos/IMXhx6qhvf0. Photo credit: Daniel Seßler.

  1. Bilinear filter.
  2. Bicubic filter.
  3. Lanczos filter.

The timings exclude S3 transfers and only compare the image transformation operation. The results of the three resize operations are:

Filter Without AVX2 With AVX2 Performance
improvement
Bilinear

105 ms

71 ms

32%

Bicubic

122 ms

73 ms

40%

Lanczos

136 ms

77 ms

43%

Using AVX2 in popular Lambda runtimes

This process involves recompiling the source code with appropriate flags, or by selecting packages and dependencies optimized for AVX2. For popular runtimes used in Lambda:

  • Python: Python developers frequently use scipy and numpy libraries to support scientific or computationally complex work. These libraries can be compiled with the AVX2 flag or linked with MKL to take advantage of AVX2.
  • Java: Java’s JIT compiler can auto-vectorize code to run with AVX2 instructions. To learn more, see this post on how to detect vectorization and potentially optimize code to take advantage of this.
  • Golang: the standard golang compiler does not currently support auto-vectorization. However, you can use the gcc compiler for Go, gccgo.
  • Node: for compute intensive workloads, use the AVX2-enabled or MKL-enabled versions of libraries.
  • Compiling from source: for C or C++ libraries for vectorizable work, compile with the appropriate flags to allow the compiler to automatically vectorize your code. See the documentation for additional details.

Enabling AVX2 for the Intel Math Kernel Library

The Intel Math Kernel Library (MKL) is a library of optimized math operations that implicitly use AVX2 instructions when available on the compute platform. Many popular frameworks, such as PyTorch, build with MKL by default so you don’t need to take additional actions. Some libraries, such as TensorFlow, provide options in their build process to specify MKL optimization (set –config=mkl as an option).

You can also build popular scientific Python libraries, such as SciPy and NumPy, with MKL. For instructions on building libraries with MKL, read Numpy/Scipy with Intel MKL and Intel Compilers. Intel also provides a Python distribution that includes SciPy and NumPy with MKL.

Performance improvements

After enabling AVX2 for your Lambda functions, you can compare the before-and-after performance. Lambda emits a latency metric in CloudWatch that you can use to measure the performance improvement. Other third-party production monitoring tools (for example, Datadog or New Relic) can also capture these metrics to profile the performance.

Pricing and availability

Starting today, customers can either compile their existing workloads or deploy new ones to target this instruction set at no additional cost. To learn more on how to build AVX2 compatible applications on AWS Lambda, read the Lambda Developer Guide.

Support for AVX2 is available in all Regions where Lambda is available, except for the Regions in China. For more information on availability, see the AWS Region table.

Conclusion

With the release of AVX2 for Lambda, customers can now run AVX2-optimized workloads while benefitting from the pay-for-use, reduced operational model of AWS Lambda. This feature is provided at no additional cost.

Developers can create highly scalable synchronous, asynchronous, or streaming applications. Compared to the x86 Intel baseline instruction set, AVX2 allows CPUs to perform more integer and floating-point operations per clock cycle. This speeds up compute-intensive applications with parallelizable operations to process data faster and improve throughput. Developers can schedule queues with data-intensive jobs and deliver performant end user experiences.

To learn more, read the Lambda documentation. For more serverless learning resources, visit Serverless Land.


Introducing Amazon API Gateway service integration for AWS Step Functions

Post Syndicated from Benjamin Smith original https://aws.amazon.com/blogs/compute/introducing-amazon-api-gateway-service-integration-for-aws-step-functions/

AWS Step Functions now integrates with Amazon API Gateway to enable backend orchestration with minimal code and built-in error handling.

API Gateway is a fully managed service that makes it easy for developers to create, publish, maintain, monitor, and secure APIs at any scale. These APIs enable applications to access data, business logic, or functionality from your backend services.

Step Functions allows you to build resilient serverless orchestration workflows with AWS services such as AWS Lambda, Amazon SNS, Amazon DynamoDB, and more. AWS Step Functions integrates with a number of services natively. Using Amazon States Language (ASL), you can coordinate these services directly from a task state.

What’s new?

The new Step Functions integration with API Gateway provides an additional resource type, arn:aws:states:::apigateway:invoke and can be used with both Standard and Express workflows. It allows customers to call API Gateway REST APIs and API Gateway HTTP APIs directly from a workflow, using one of two integration patterns:

  1. Request-Response: calling a service and let Step Functions progress to the next state immediately after it receives an HTTP response. This pattern is supported by Standard and Express Workflows.
  2. Wait-for-Callback: calling a service with a task token and have Step Functions wait until that token is returned with a payload. This pattern is supported by Standard Workflows.

The new integration is configured with the following Amazon States Language parameter fields:

  • ApiEndpoint: The API root endpoint.
  • Path: The API resource path.
  • Method: The HTTP request method.
  • HTTP headers: Custom HTTP headers.
  • RequestBody: The body for the API request.
  • Stage: The API Gateway deployment stage.
  • AuthType: The authentication type.

Refer to the documentation for more information on API Gateway fields and concepts.

Getting started

The API Gateway integration with Step Functions is configured using AWS Serverless Application Model (AWS SAM), the AWS Command Line Interface (AWS CLI), AWS CloudFormation or from within the AWS Management Console.

To get started with Step Functions and API Gateway using the AWS Management Console:

  1. Go to the Step Functions page of the AWS Management Console.
  2. Choose Run a sample project and choose Make a call to API Gateway.The Definition section shows the ASL that makes up the example workflow. The following example shows the new API Gateway resource and its parameters:
  3. Review example Definition, then choose Next.
  4. Choose Deploy resources.

This deploys a Step Functions standard workflow and a REST API with a /pets resource containing a GET and a POST method. It also deploys an IAM role with the required permissions to invoke the API endpoint from Step Functions.

The RequestBody field lets you customize the API’s request input. This can be a static input or a dynamic input taken from the workflow payload.

Running the workflow

  1. Choose the newly created state machine from the Step Functions page of the AWS Management Console
  2. Choose Start execution.
  3. Paste the following JSON into the input field:
    {
      "NewPet": {
        "type": "turtle",
        "price": 74.99
      }
    }
  4. Choose Start execution
  5. Choose the Retrieve Pet Store Data step, then choose the Step output tab.

This shows the successful responseBody output from the “Add to pet store” POST request and the response from the “Retrieve Pet Store Data” GET request.

Access control

The API Gateway integration supports AWS Identity and Access Management (IAM) authentication and authorization. This includes IAM roles, policies, and tags.

AWS IAM roles and policies offer flexible and robust access controls that can be applied to an entire API or individual methods. This controls who can create, manage, or invoke your REST API or HTTP API.

Tag-based access control allows you to set more fine-grained access control for all API Gateway resources. Specify tag key-value pairs to categorize API Gateway resources by purpose, owner, or other criteria. This can be used to manage access for both REST APIs and HTTP APIs.

API Gateway resource policies are JSON policy documents that control whether a specified principal (typically an IAM user or role) can invoke the API. Resource policies can be used to grant access to a REST API via AWS Step Functions. This could be for users in a different AWS account or only for specified source IP address ranges or CIDR blocks.

To configure access control for the API Gateway integration, set the AuthType parameter to one of the following:

  1. {“AuthType””: “NO_AUTH”}
    Call the API directly without any authorization. This is the default setting.
  2. {“AuthType””: “IAM_ROLE”}
    Step Functions assumes the state machine execution role and signs the request with credentials using Signature Version 4.
  3. {“AuthType””: “RESOURCE_POLICY”}
    Step Functions signs the request with the service principal and calls the API endpoint.

Orchestrating microservices

Customers are already using Step Functions’ built in failure handling, decision branching, and parallel processing to orchestrate application backends. Development teams are using API Gateway to manage access to their backend microservices. This helps to standardize request, response formats and decouple business logic from routing logic. It reduces complexity by allowing developers to offload responsibilities of authentication, throttling, load balancing and more. The new API Gateway integration enables developers to build robust workflows using API Gateway endpoints to orchestrate microservices. These microservices can be serverless or container-based.

The following example shows how to orchestrate a microservice with Step Functions using API Gateway to access AWS services. The example code for this application can be found in this GitHub repository.

To run the application:

  1. Clone the GitHub repository:
    $ git clone https://github.com/aws-samples/example-step-functions-integration-api-gateway.git
    $ cd example-step-functions-integration-api-gateway
  2. Deploy the application using AWS SAM CLI, accepting all the default parameter inputs:
    $ sam build && sam deploy -g

    This deploys 17 resources including a Step Functions standard workflow, an API Gateway REST API with three resource endpoints, 3 Lambda functions, and a DynamoDB table. Make a note of the StockTradingStateMachineArn value. You can find this in the command line output or in the Applications section of the AWS Lambda Console:


  3. Manually trigger the workflow from a terminal window:
    aws stepFunctions start-execution \
    --state-machine-arn <StockTradingStateMachineArnValue>

The response looks like:


When the workflow is run, a Lambda function is invoked via a GET request from API Gateway to the /check resource. This returns a random stock value between 1 and 100. This value is evaluated in the Buy or Sell choice step, depending on if it is less or more than 50. The Sell and Buy states use the API Gateway integration to invoke a Lambda function, with a POST method. A stock_value is provided in the POST request body. A transaction_result is returned in the ResponseBody and provided to the next state. The final state writes a log of the transition to a DynamoDB table.

Defining the resource with an AWS SAM template

The Step Functions resource is defined in this AWS SAM template. The DefinitionSubstitutions field is used to pass template parameters to the workflow definition.

StockTradingStateMachine:
    Type: AWS::Serverless::StateMachine # More info about State Machine Resource: https://docs.aws.amazon.com/serverless-application-model/latest/developerguide/sam-resource-statemachine.html
    Properties:
      DefinitionUri: statemachine/stock_trader.asl.json
      DefinitionSubstitutions:
        StockCheckPath: !Ref CheckPath
        StockSellPath: !Ref SellPath
        StockBuyPath: !Ref BuyPath
        APIEndPoint: !Sub "${ServerlessRestApi}.execute-api.${AWS::Region}.amazonaws.com"
        DDBPutItem: !Sub arn:${AWS::Partition}:states:::dynamodb:putItem
        DDBTable: !Ref TransactionTable

The workflow is defined on a separate file (/statemachine/stock_trader.asl.json).

The following code block defines the Check Stock Value state. The new resource, arn:aws:states:::apigateway:invoke declares the API Gateway service integration type.

The parameters object holds the required fields to configure the service integration. The Path and ApiEndpoint values are provided by the DefinitionsSubstitutions field in the AWS SAM template. The RequestBody input is defined dynamically using Amazon States Language. The .$ at the end of the field name RequestBody specifies that the parameter use a path to reference a JSON node in the input.

"Check Stock Value": {
  "Type": "Task",
  "Resource": "arn:aws:states:::apigateway:invoke",
  "Parameters": {
      "ApiEndpoint":"${APIEndPoint}",
      "Method":"GET",
      "Stage":"Prod",
      "Path":"${StockCheckPath}",
      "RequestBody.$":"$",
      "AuthType":"NO_AUTH"
  },
  "Retry": [
      {
          "ErrorEquals": [
              "States.TaskFailed"
          ],
          "IntervalSeconds": 15,
          "MaxAttempts": 5,
          "BackoffRate": 1.5
      }
  ],
  "Next": "Buy or Sell?"
},

The deployment process validates the ApiEndpoint value. The service integration builds the API endpoint URL from the information provided in the parameters block in the format https://[APIendpoint]/[Stage]/[Path].

Conclusion

The Step Functions integration with API Gateway provides customers with the ability to call REST APIs and HTTP APIs directly from a Step Functions workflow.

Step Functions’ built in error handling helps developers reduce code and decouple business logic. Developers can combine this with API Gateway to offload responsibilities of authentication, throttling, load balancing and more. This enables developers to orchestrate microservices deployed on containers or Lambda functions via API Gateway without managing infrastructure.

This feature is available in all Regions where both AWS Step Functions and Amazon API Gateway are available. View the AWS Regions table to learn more. For pricing information, see Step Functions pricing. Normal service limits of API Gateway and service limits of Step Functions apply.

For more serverless learning resources, visit Serverless Land.

New – Code Signing, a Trust and Integrity Control for AWS Lambda

Post Syndicated from Channy Yun original https://aws.amazon.com/blogs/aws/new-code-signing-a-trust-and-integrity-control-for-aws-lambda/

Code signing is an industry standard technique used to confirm that the code is unaltered and from a trusted publisher. Code running inside AWS Lambda functions is executed on highly hardened systems and runs in a secure manner. However, function code is susceptible to alteration as it moves through deployment pipelines that run outside AWS.

Today, we are launching Code Signing for AWS Lambda. It is a trust and integrity control that helps administrators enforce that only signed code packages from trusted publishers run in their Lambda functions and that the code has not been altered since signing.

Code Signing for Lambda provides a first-class mechanism to enforce that only trusted code is deployed in Lambda. This frees up organizations from the burden of building gatekeeper components in their deployment pipelines. Code Signing for AWS Lambda leverages AWS Signer, a fully managed code signing service from AWS. Administrators create Signing Profile, a resource in AWS Signer that is used for creating signatures and grant developers access to the signing profile using AWS Identity and Access Management (IAM). Within Lambda, administrators specify the allowed signing profiles using a new resource called Code Signing Configuration (CSC). CSC enables organizations to implement a separation of duties between administrators and developers. Administrators can use CSC to set code signing policies on the functions, and developers can deploy code to the functions.

How to Create a Signing Profile
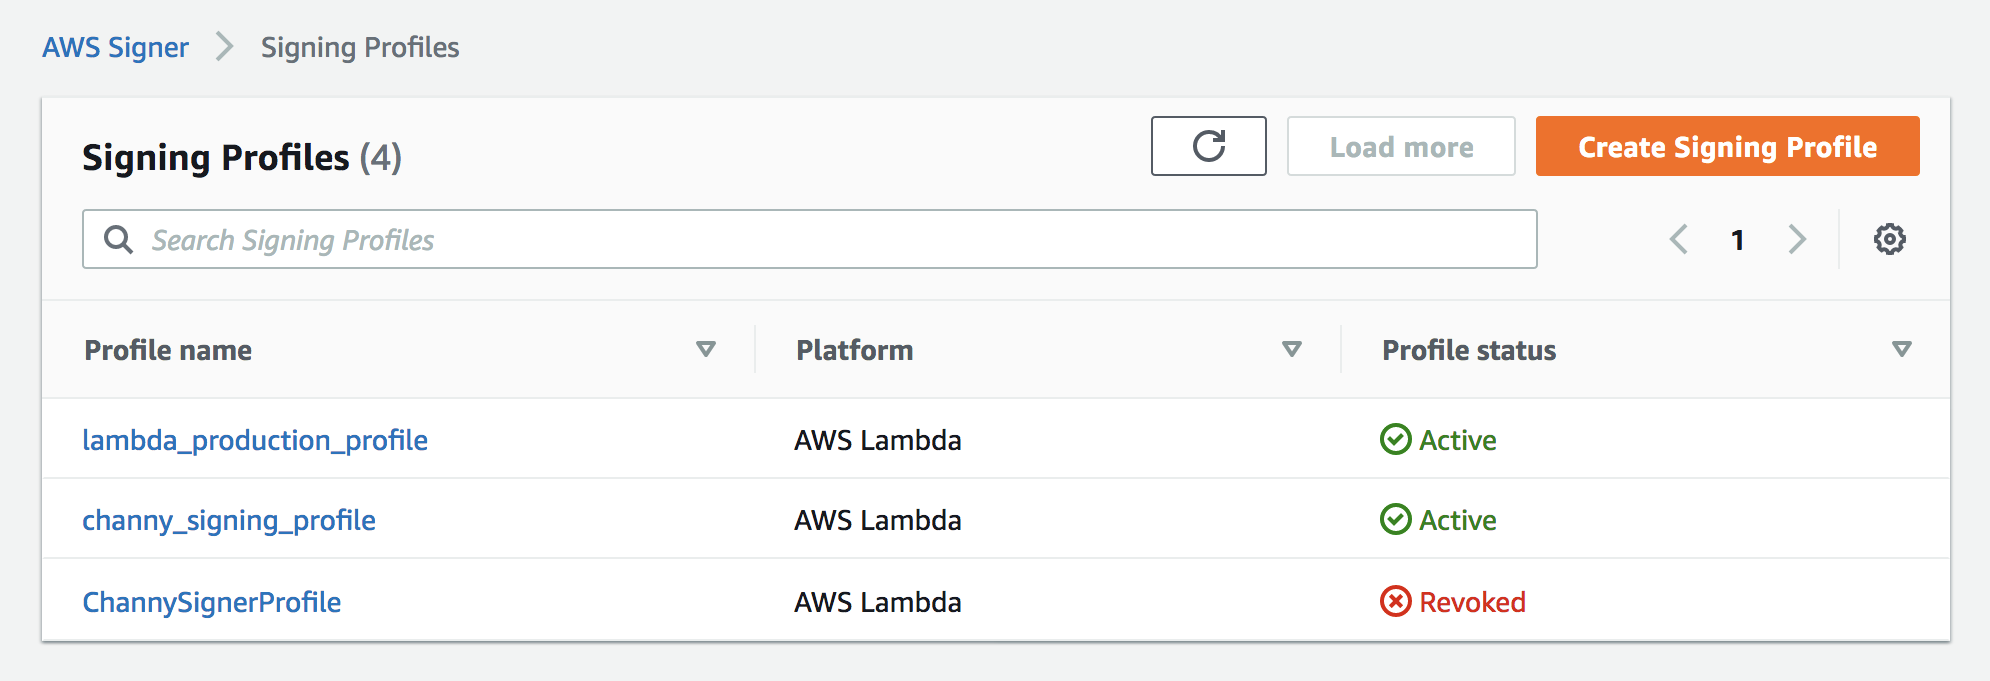
You can use AWS Signer console to create a new Signing profile. A signing profile can represent a group of trusted publishers and is analogous to the use of a digital signing certificate.

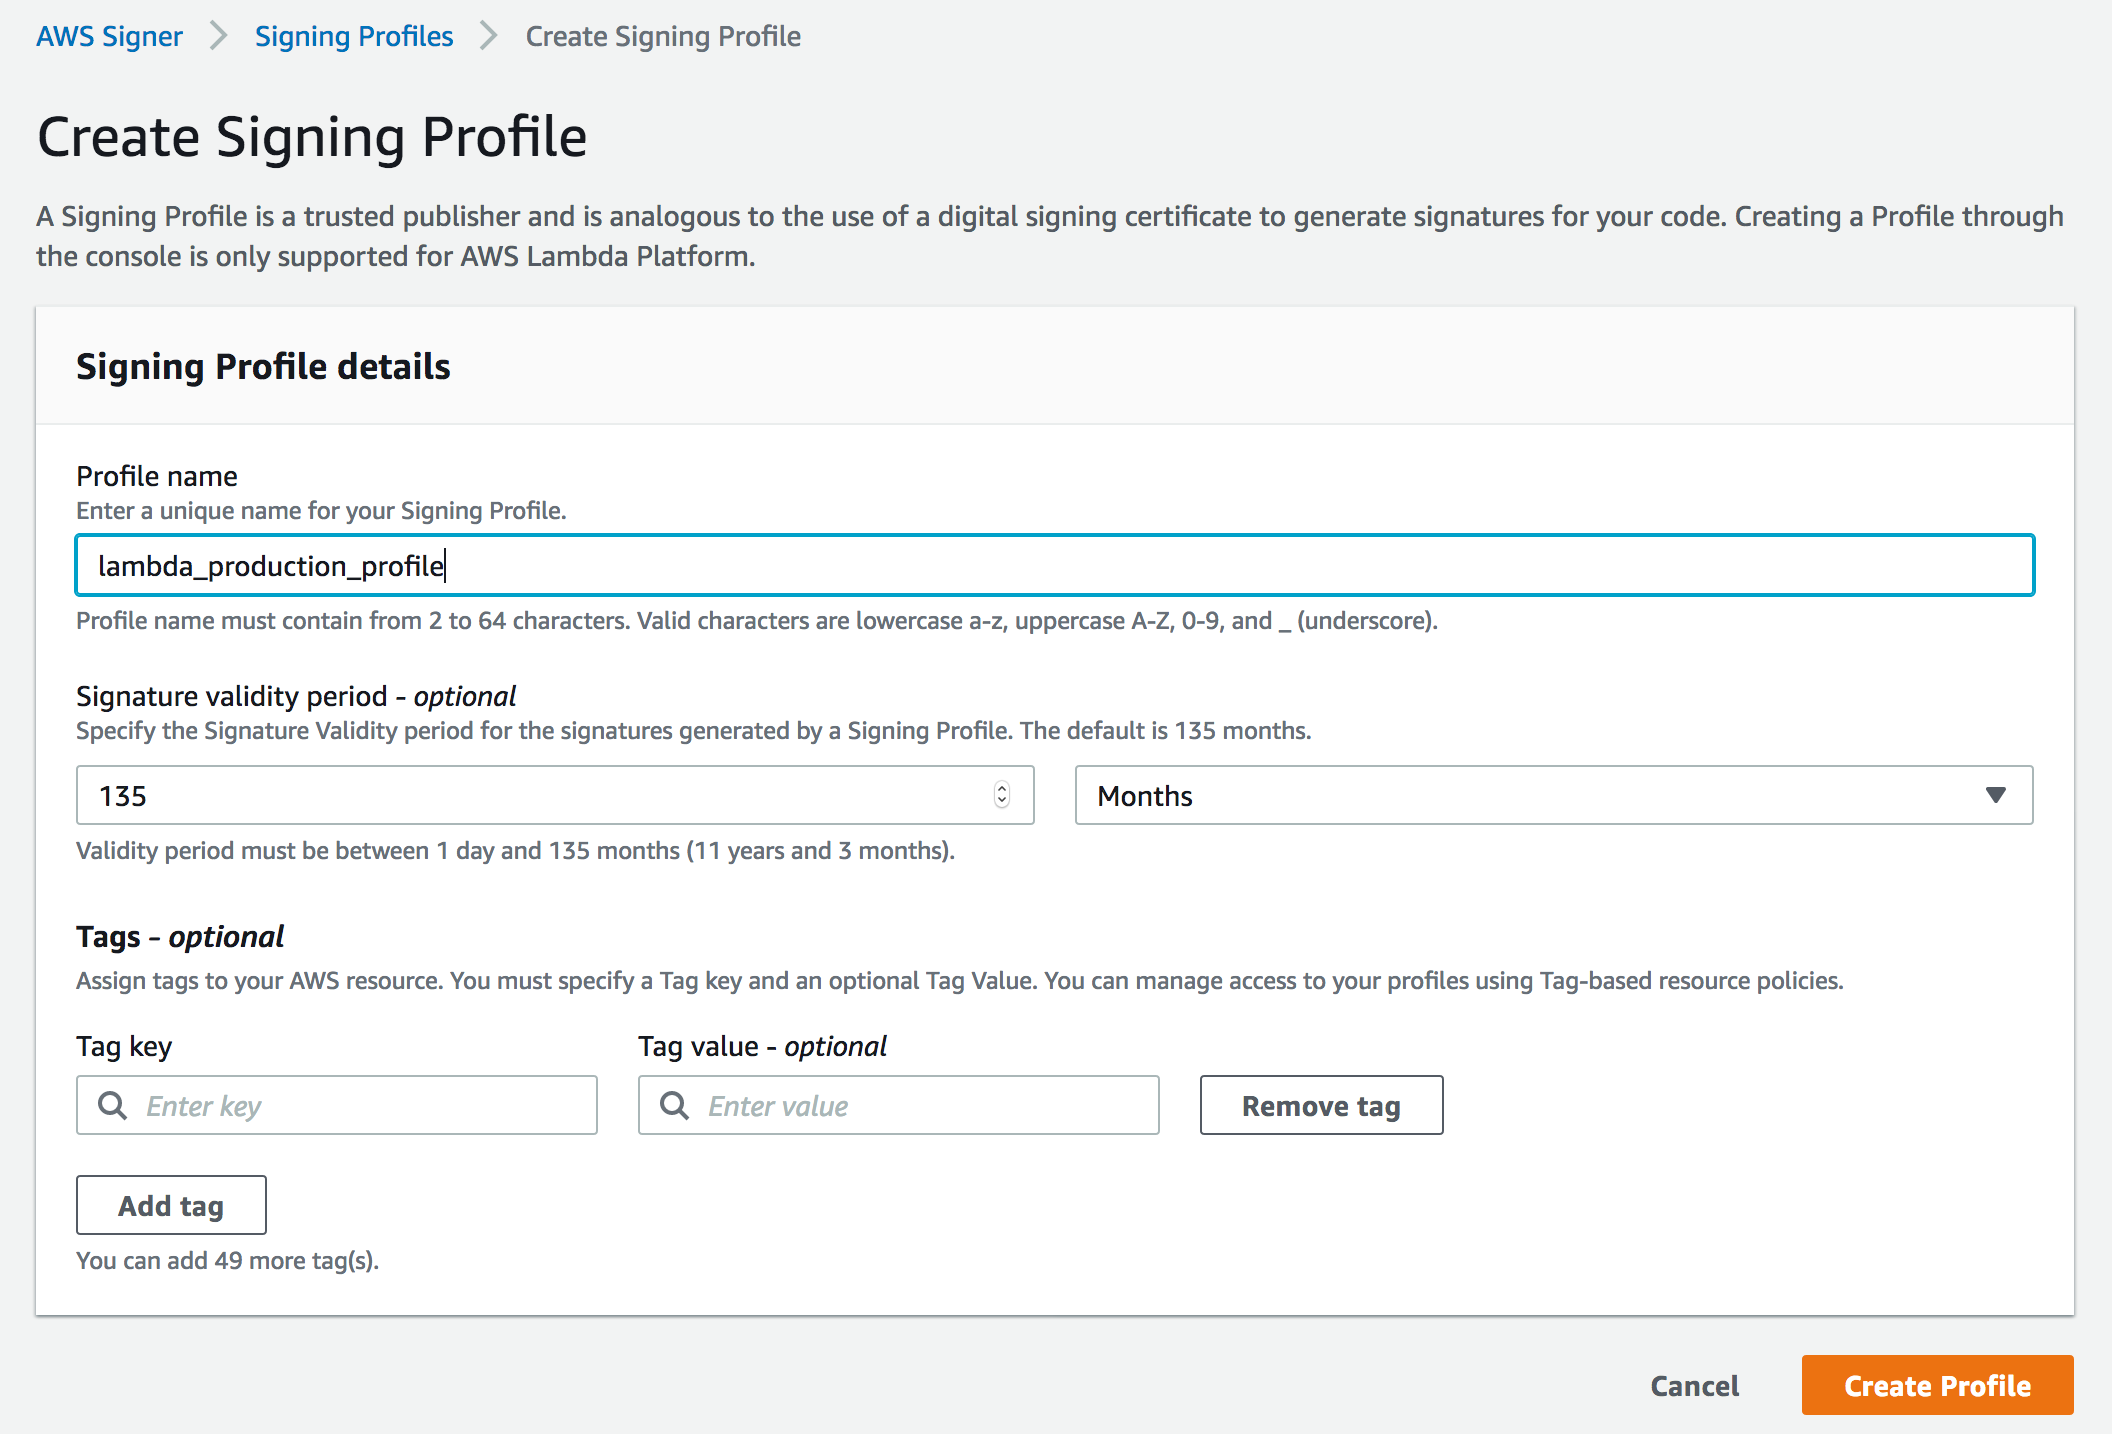
By clicking Create Signing Profile, you can create a Signing Profile that can be used to create signed code packages.

You can assign Signature validity period for the signatures generated by a Signing Profile between 1 day and 135 months.

How to create a Code Signing Configuration (CSC)
You can configure your functions to use Code Signing through the AWS Lambda console, Command-line Interface (CLI), or APIs by creating and attaching a new resource called Code Signing Configuration to the function. You can find Code signing configurations under Additional resources menu.

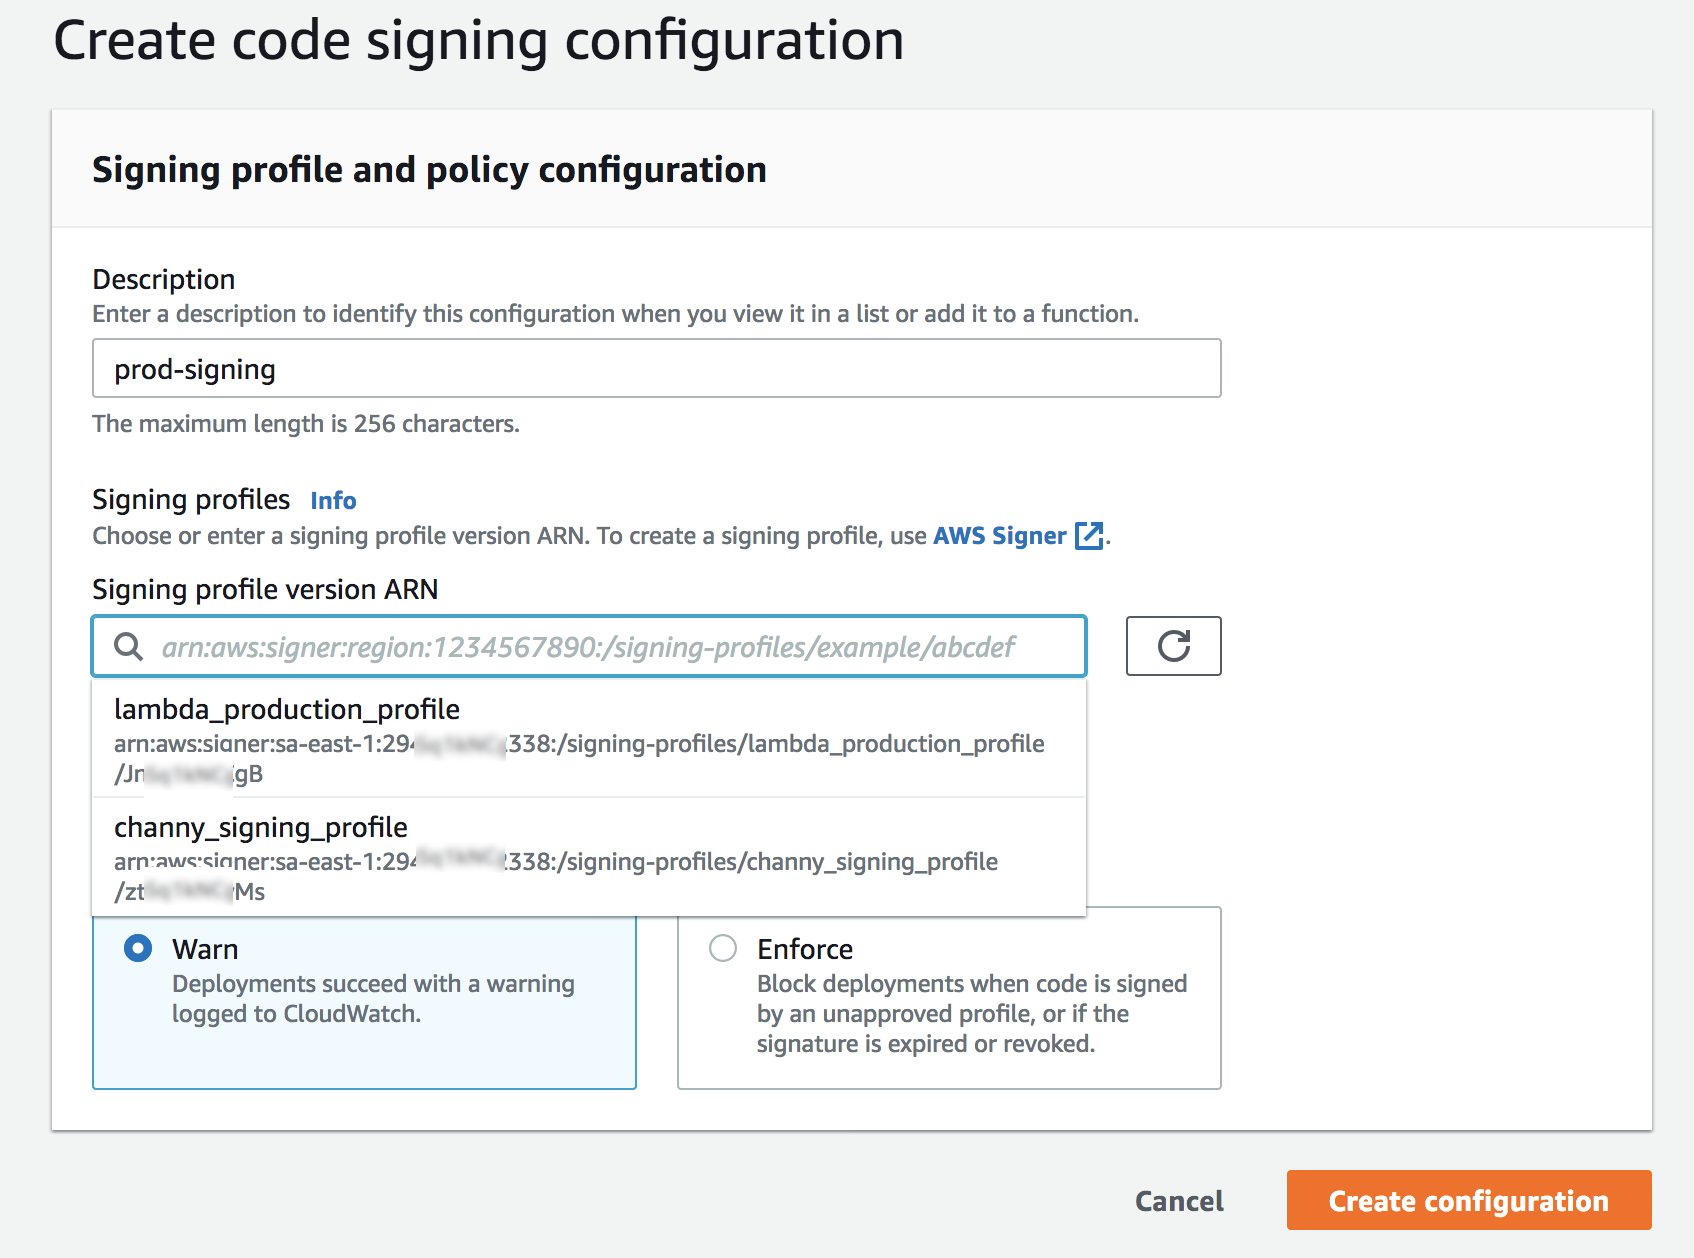
You can click Create configuration to define signing profiles that are allowed to sign code artifacts for this configuration, and set signature validation policy. To add an allowed signing profile, you can either select from the dropdown, which shows all signing profiles in your AWS account, or add a signing profile from a different account by specifying the version ARN.

Also, you can set the signature validation policy to either ‘Warn’ or ‘Enforce’. With ‘Warn’, Lambda logs a Cloudwatch metric if there is a signature check failure but accepts the deployment. With ‘Enforce’, Lambda rejects the deployment if there is a signature check failure. Signature check fails if the signature signing profile does not match one of the allowed signing profiles in the CSC, the signature is expired, or the signature is revoked. If the code package is tampered or altered since signing, the deployment is always rejected, irrespective of the signature validation policy.

You can use new Lambda API CreateCodeSigningConfig to create a CSC too. You can see the JSON request syntax below.

{
     "CodeSigningConfigId": string,
     "CodeSigningConfigArn": string,
     "Description": string,
     "AllowedPublishers": {
           "SigningProfileVersionArns": [string]
      },
     "CodeSigningPolicies": {
     "UntrustedArtifactOnDeployment": string,   // WARN OR ENFORCE
    },
     "LastModified”: string
}

Let’s Enable Code Signing for Your Lambda Functions
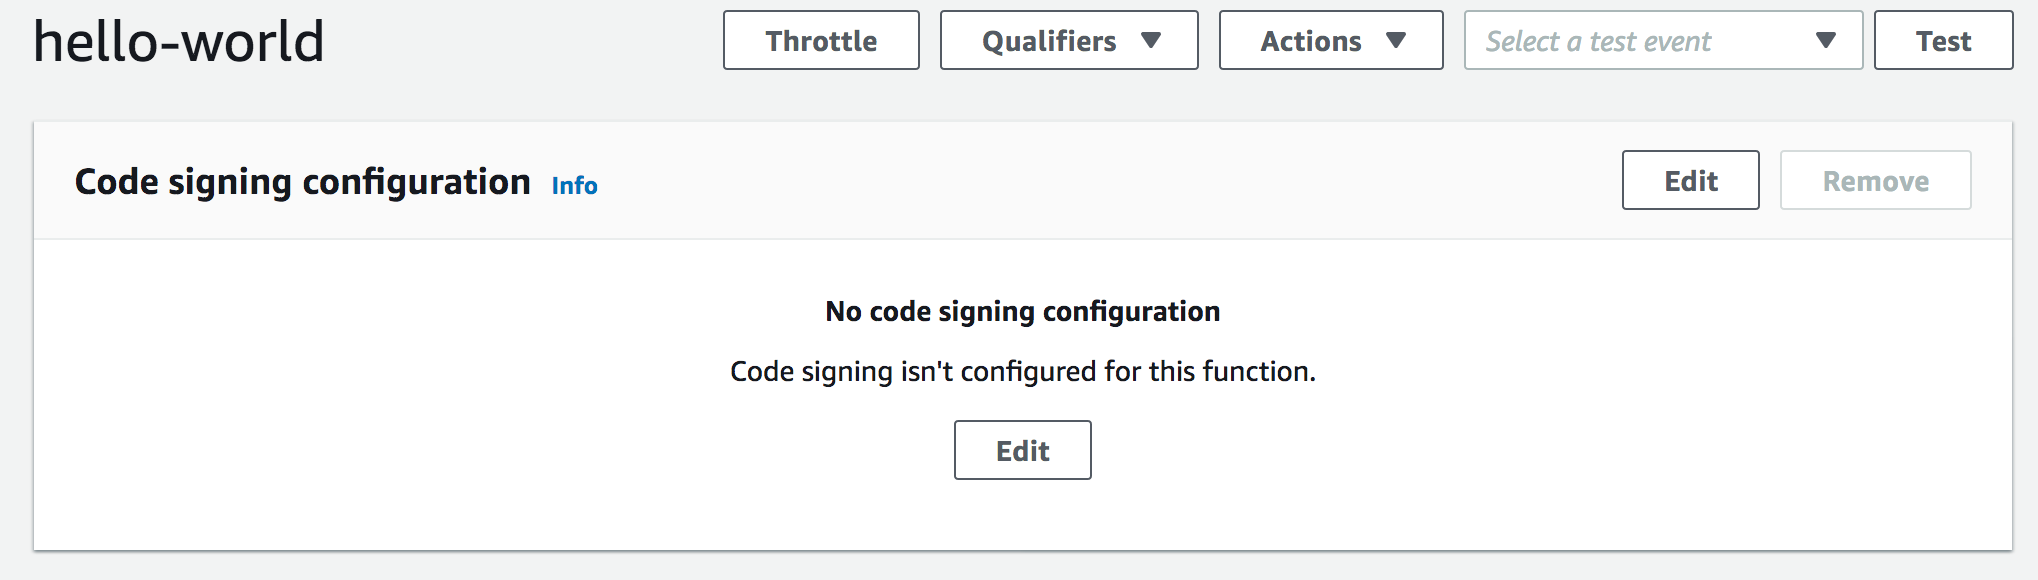
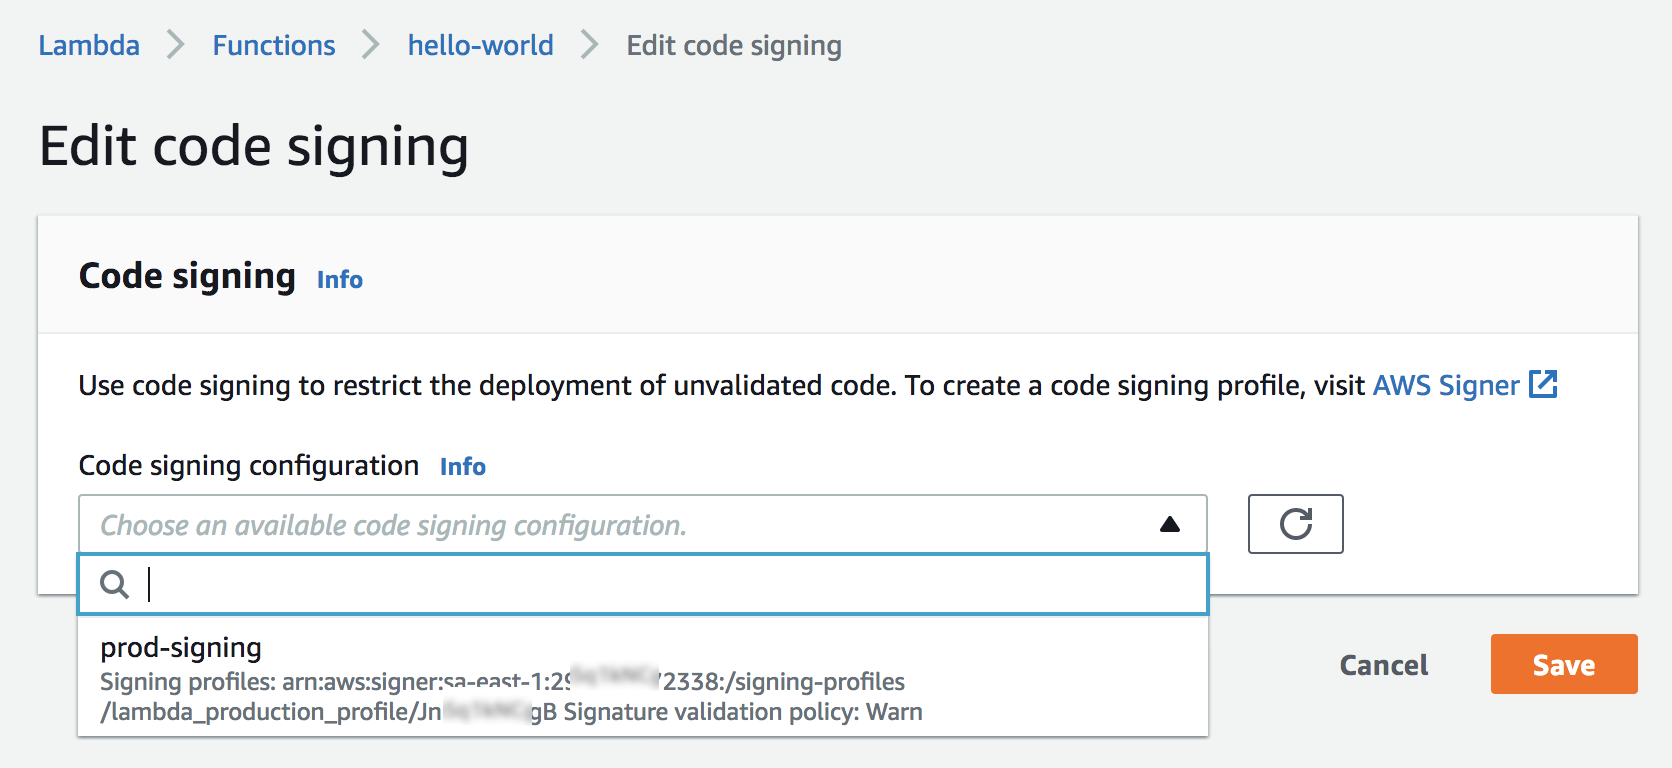
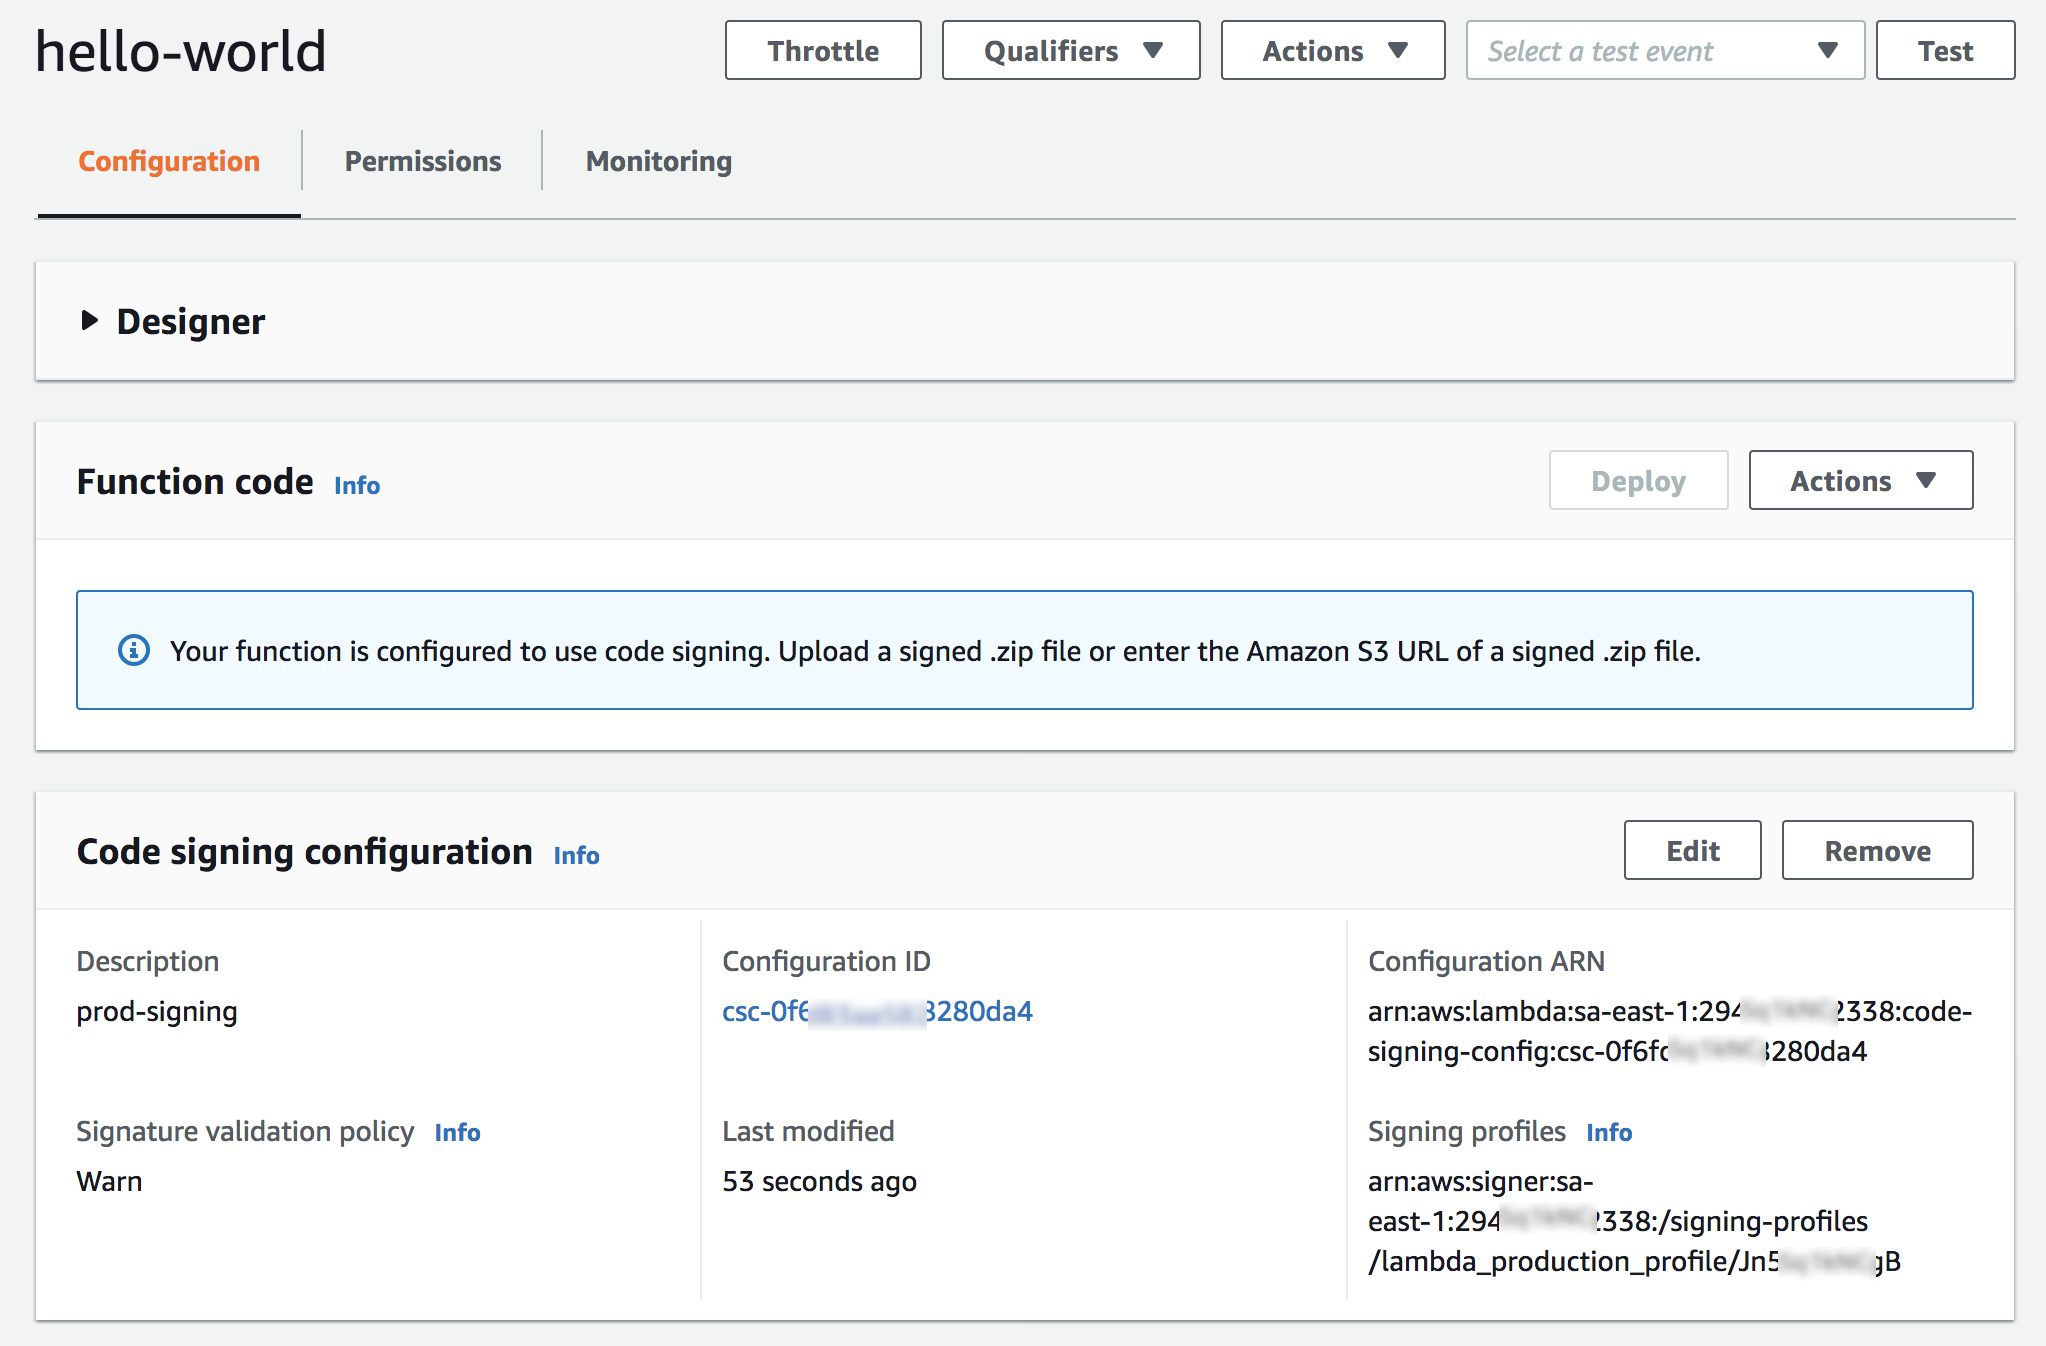
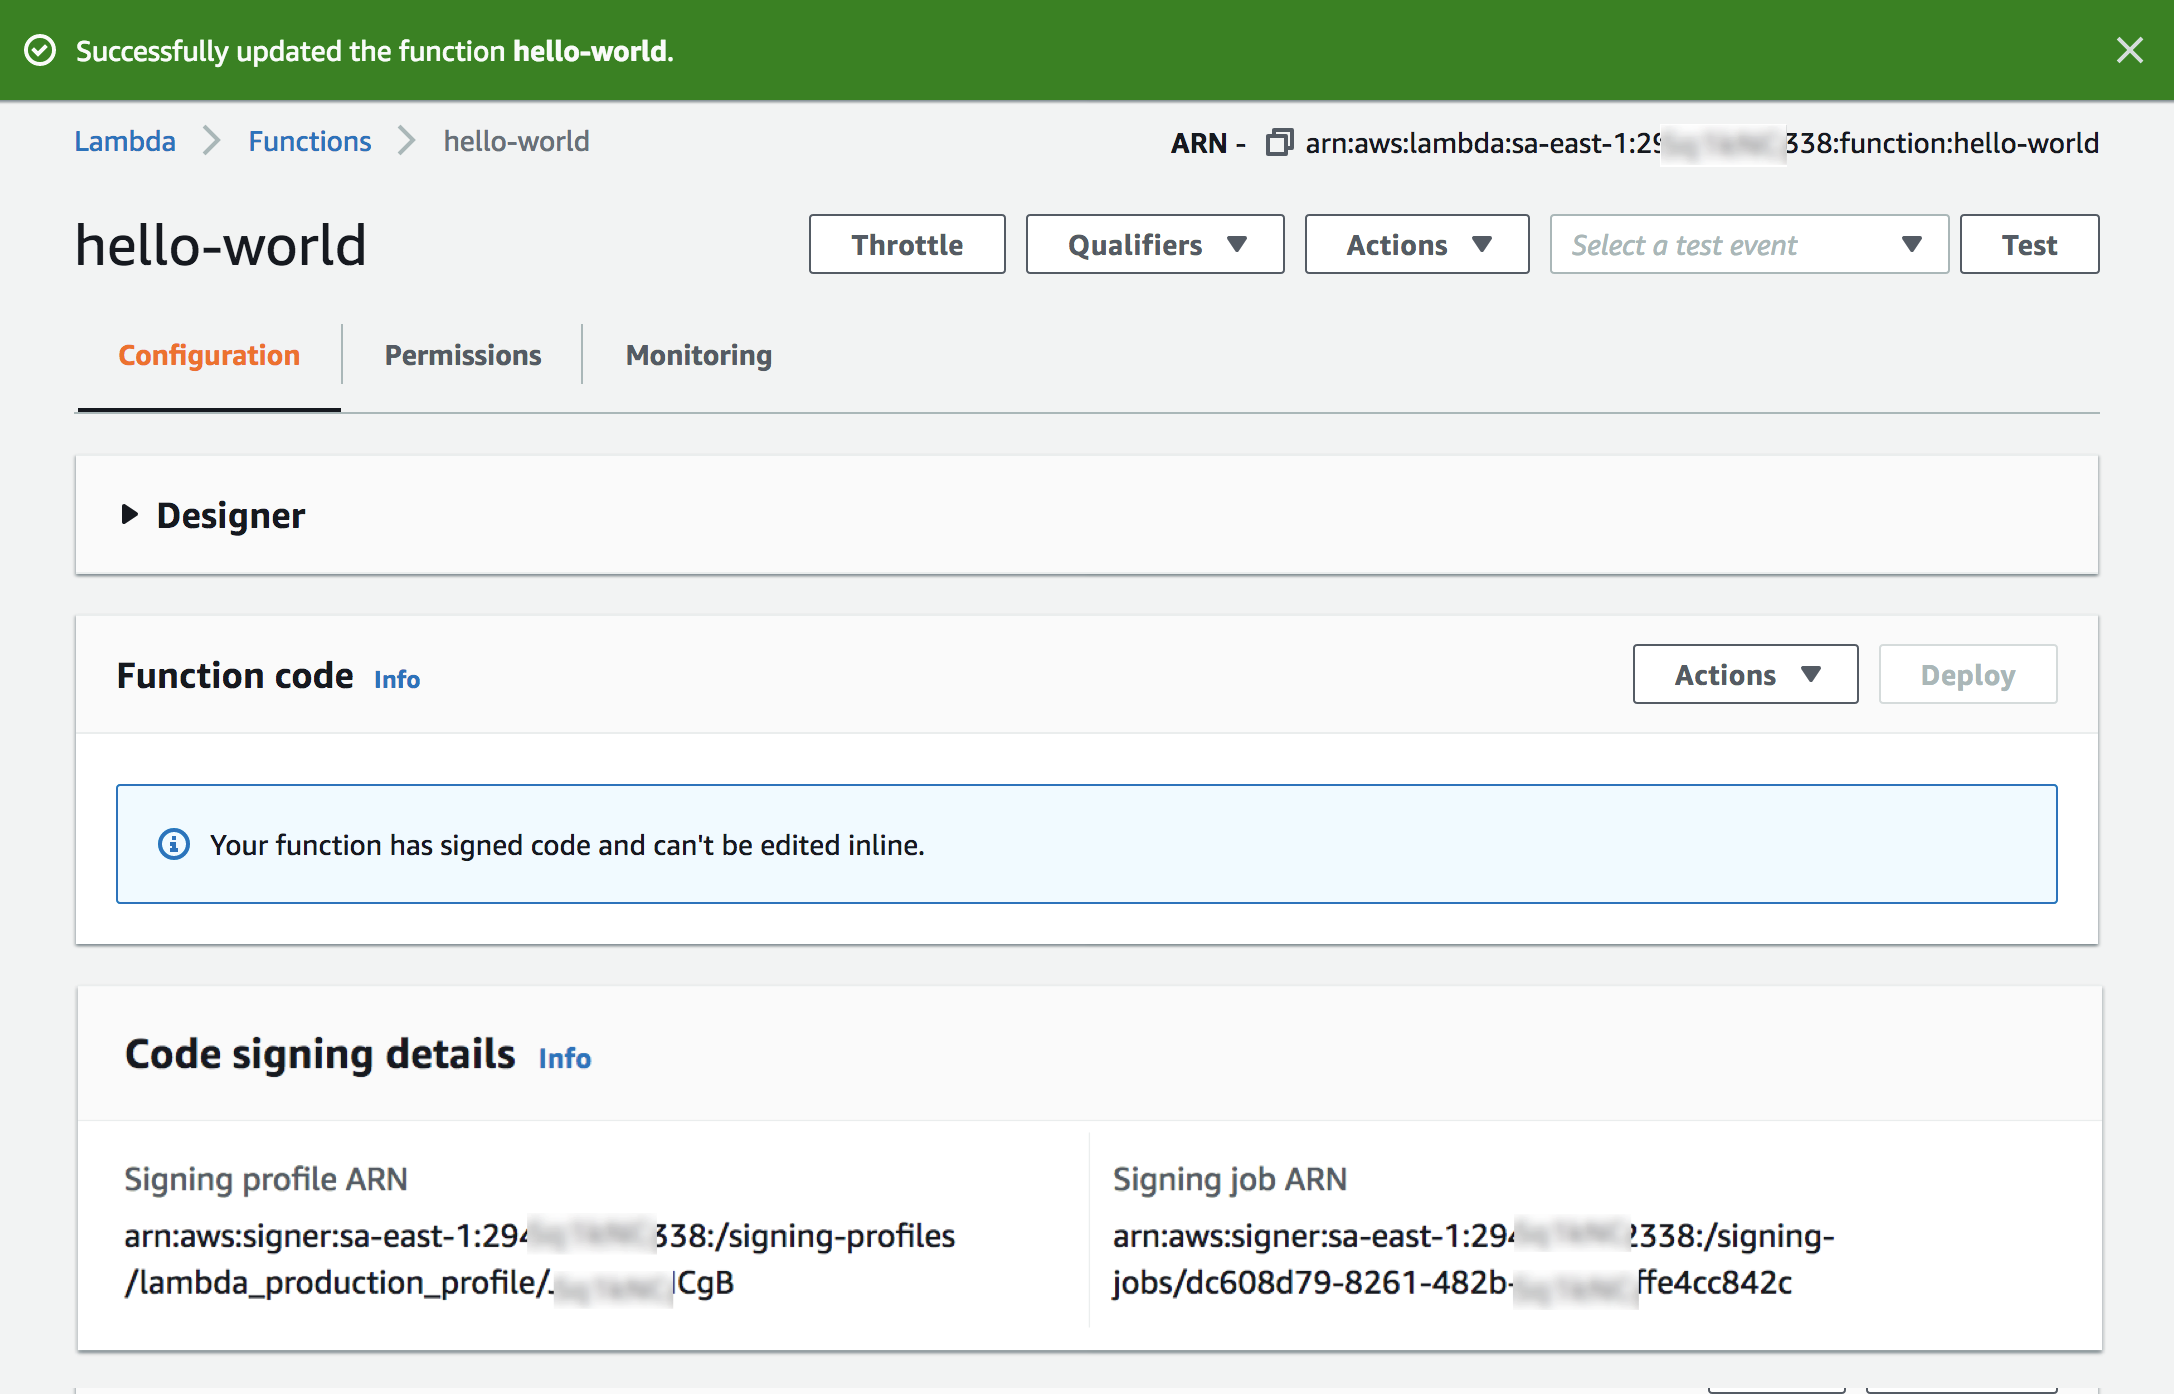
To enable Code Signing feature for your Lambda functions, you can select a function and click Edit in Code signing configuration section.

Select one of the available CSCs and click the Save button.

Once your function is configured to use code signing, you need to upload signed .zip file or Amazon S3 URL of a signed .zip made by a signing job in AWS Signer.

How to Create a Signed Code Package
Choose one of the allowed signing profiles and specify the S3 location of the code package ZIP file to be signed. Also, specify a destination path where the signed code package should be uploaded.

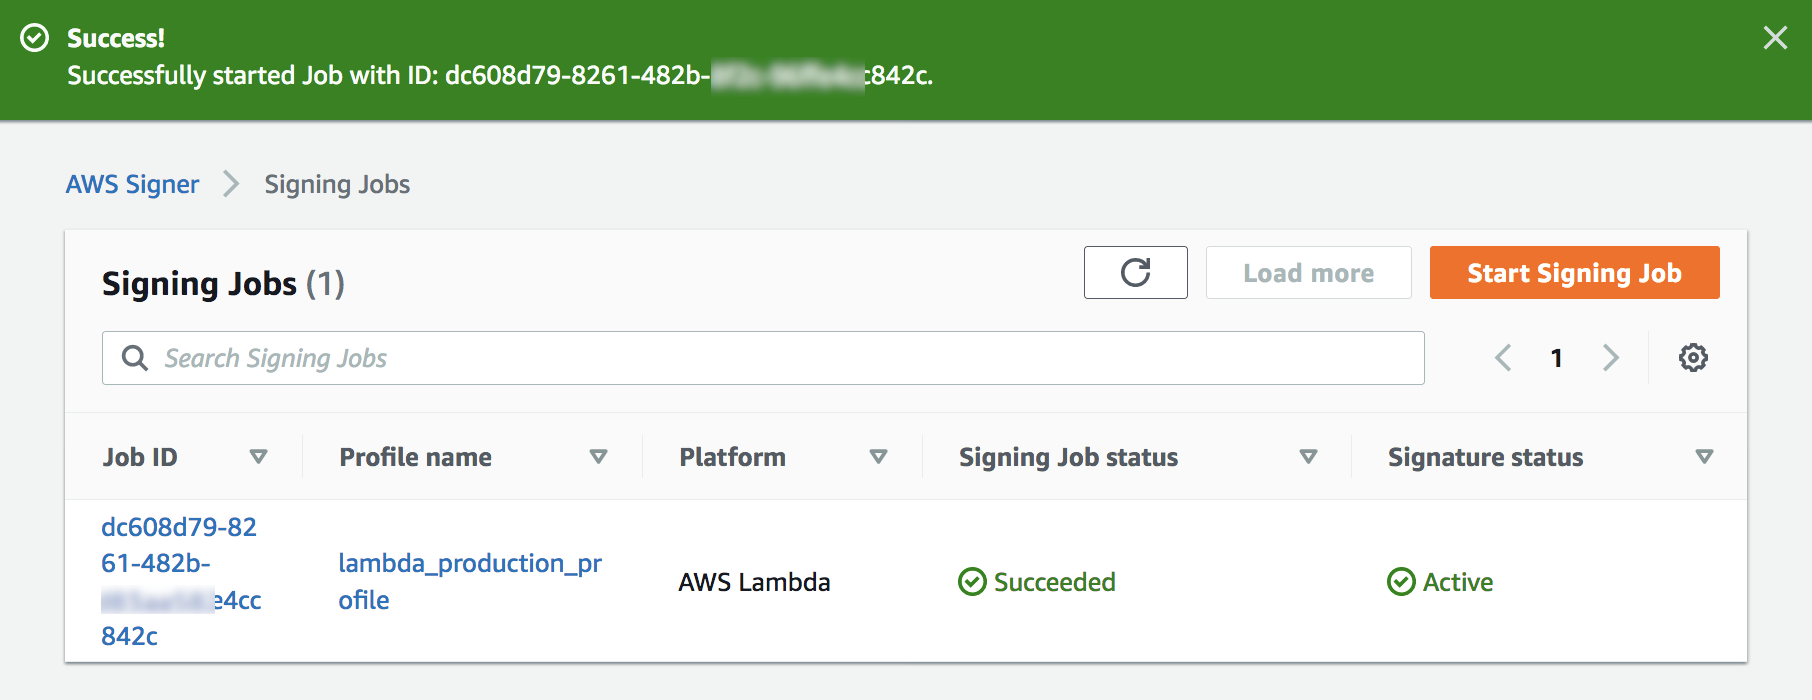
A signing job is an asynchronous process that generates a signature for your code package and puts the signed code package in the specified destination path.

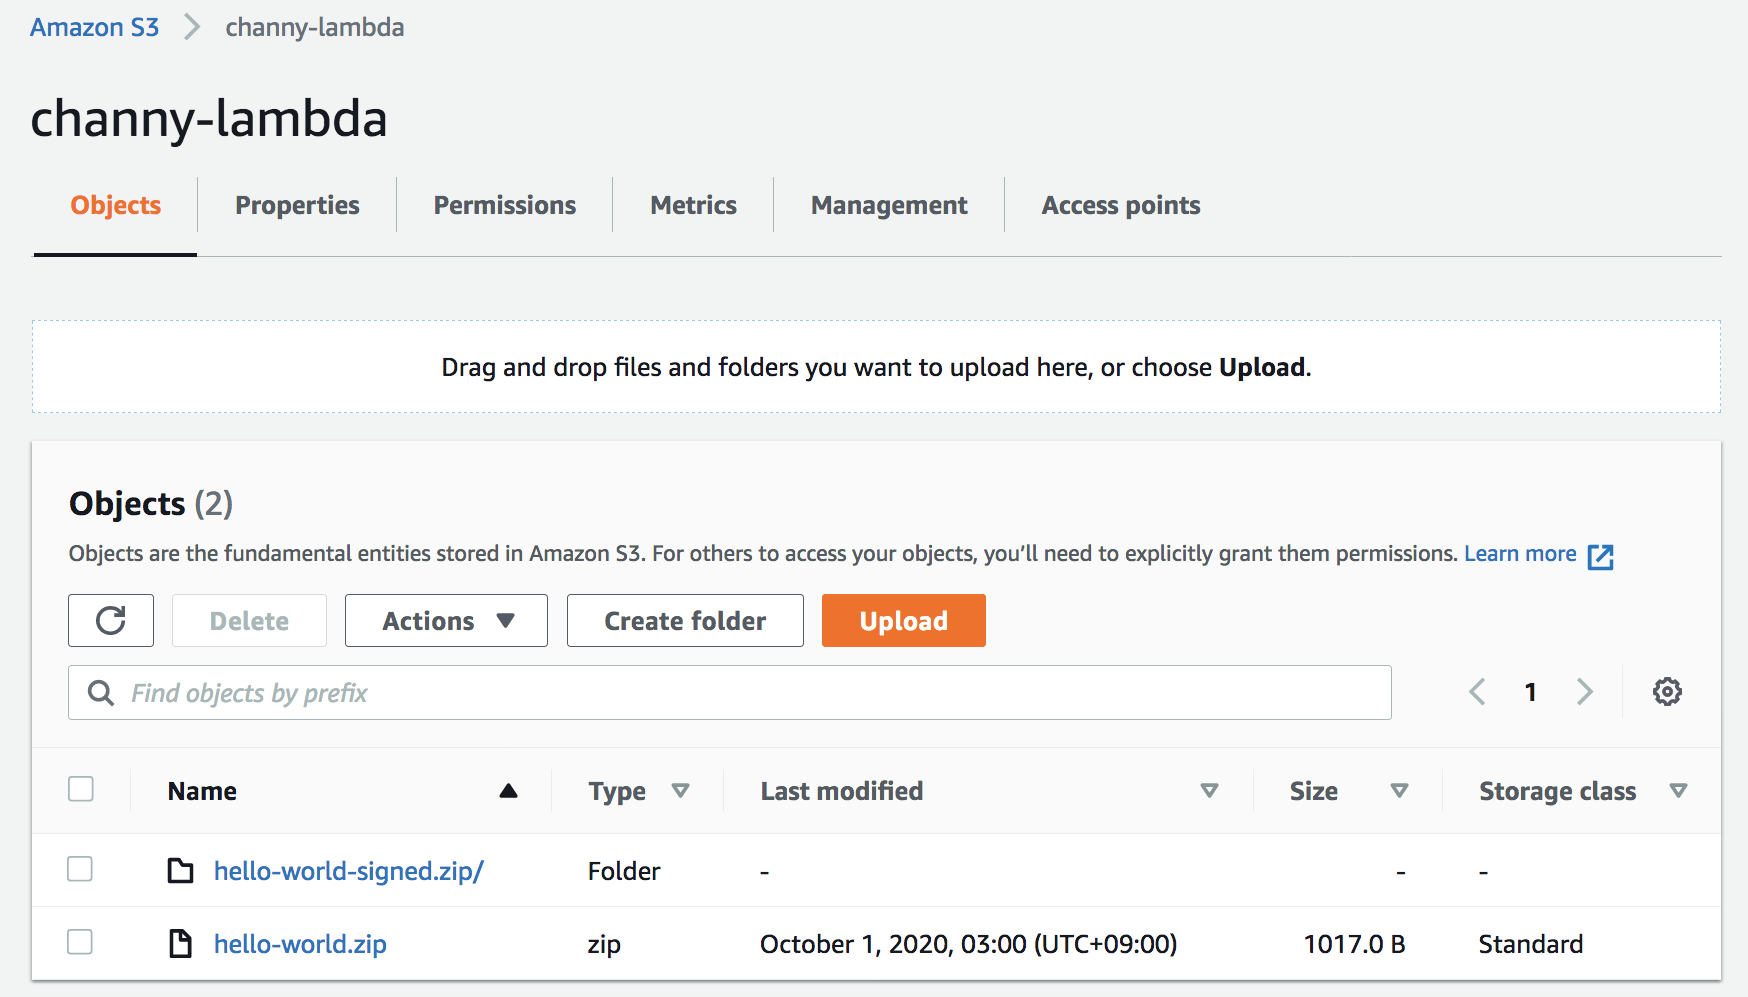
Once signing job is succeeded, you can find signed ZIP packages in your assigned S3 bucket.

Back to Lambda console, you can now publish the signed code package to the Lambda function. Lambda will perform signature checks to verify that the code has not been altered since signing and that the code is signed by one of the allowed signing profile.

You can also enable code signing for a function using CreateFunction or PutFunctionCodeSigningConfig APIs by attaching a CSC to the function.

Developers can also use SAM CLI to sign code packages. They do this by specifying the signing profiles at package or deploy stage. SAM CLI automatically starts the signing workflow before deploying the code to Lambda.

Code Signing is also supported by Infrastructure as code tools like AWS CloudFormation and Terraform. Terraform also allows developers to sign code, in addition to declaring and creating code signing resources.

Now Available
Code Signing for AWS Lambda is available in all commercial regions except AWS China Regions, AWS GovCloud (US) Regions, and Asia Pacific (Osaka) Region. There is no additional charge for using code signing, and customers pay the standard price for Lambda functions.

To learn more about Code Signing for AWS Lambda and AWS Signer, please visit the Lambda developer guide and send us feedback either in the forum for AWS Lambda or through your usual AWS support contacts.

— Channy;

Fast and Cost-Effective Image Manipulation with Serverless Image Handler

Post Syndicated from Ajay Swamy original https://aws.amazon.com/blogs/architecture/fast-and-cost-effective-image-manipulation-with-serverless-image-handler/

As a modern company, you most likely have both a web-based and mobile app platform to provide content to customers who view it on a range of devices. This means you need to store multiple versions of images, depending on the device. The resulting image management can be a headache as it can be expensive and cumbersome to manage.

Serverless Image Handler (SIH) is an AWS Solution Implementation you use to store a single version of every image featured in your content, while dynamically delivering different versions at runtime based on your end user’s device. The solution simplifies code, saves on storage costs, and is ideal for use with web applications and mobile apps. SIH features include the ability to resize images, change background colors, apply formatting, and add watermarks.

Architecture overview

The SIH solution utilizes an AWS CloudFormation template to deploy the solution within minutes, and it’s for those of you who have multiple image assets needing an option to dynamically change or manipulate customer-facing images. SIH deploys best-in-class AWS services such as Amazon CloudFront, Amazon API Gateway, and AWS Lambda functions, and it connects to your Amazon Simple Storage Service (Amazon S3) bucket for storage.

Deploying this solution with the default parameters builds the following environment in AWS Cloud:

SIH: Emvironment in AWS Cloud-2

SIH uses the following AWS services:

  • Amazon CloudFront to quickly and securely  deliver images to your end users at scale
  • AWS Lambda to run code for image manipulation without the need for provisioning or managing servers (thereby reducing costs and overhead)
  • Your Amazon S3 bucket for storage of your image assets
  • AWS Secrets Manager to support the signing of image URLs so that image access is protected

How does Serverless Image Handler work?

When an HTTP request is received from a customer device, it is passed from CloudFront to API Gateway, and then forwarded to the Lambda function for processing. If the image is cached by CloudFront because of an earlier request, CloudFront will return the cached image instead of forwarding the request to the API Gateway. This reduces latency and eliminates the cost of reprocessing the image.

Requests that are not cached are passed to the API Gateway, and the entire request is forwarded to the Lambda function. The Lambda function retrieves the original image from your Amazon S3 bucket and uses Sharp (the open source image processing software) to return a modified version of the image to the API Gateway. SIH also utilizes Thumbor to apply dynamic filters on the fly. Additionally, the solution generates a CloudFront domain name that supports caching in CloudFront. The newly manipulated image is now cached at CloudFront for easy access and retrieval. The end-to-end request and response can be secured by using the solution’s signed URL feature via AWS Secrets Manager, which allows you to prevent unauthorized use of your proprietary images.

Lastly, SIH uses Amazon Rekognition for face detection in images submitted for smart cropping, allowing for easy cropping for specific content and image needs.

Code example of image manipulation

Please refer to the SIH implementation guide to quickly set up and use SIH. Using Node.js, you can create an image request as illustrated below. The code block specifies the image location as myImageBucket and specifies edits of grayscale :true to change the image to grayscale.

const imageRequest = JSON.stringify({
    bucket: “myImageBucket”,
    key: “myImage.jpg”,
    edits: {
        grayscale: true
    }
});

const url = `${CloudFrontUrl}/${Buffer.from(imageRequest).toString(‘base64’)}`;

With the generated URL, SIH can serve the grayscale image.

Conclusion

If you’re looking for a fast and cost-effective solution for image management, Serverless Image Handler provides a great way to manipulate and serve images on the fly with speed and security. Learn more about SIH and watch the accompanying Solving with AWS Solutions video below.

Automatically update security groups for Amazon CloudFront IP ranges using AWS Lambda

Post Syndicated from Yeshwanth Kottu original https://aws.amazon.com/blogs/security/automatically-update-security-groups-for-amazon-cloudfront-ip-ranges-using-aws-lambda/

Amazon CloudFront is a content delivery network that can help you increase the performance of your web applications and significantly lower the latency of delivering content to your customers. For CloudFront to access an origin (the source of the content behind CloudFront), the origin has to be publicly available and reachable. Anyone with the origin domain name or IP address could request content directly and bypass CloudFront. In this blog post, I describe an automated solution that uses security groups to permit only CloudFront to access the origin.

Amazon Simple Storage Service (Amazon S3) origins provide a feature called Origin Access Identity, which blocks public access to selected buckets, making them accessible only through CloudFront. When you use CloudFront to secure your web applications, it’s important to ensure that only CloudFront can access your origin (such as Amazon Elastic Cloud Compute (Amazon EC2) or Application Load Balancer (ALB)) and any direct access to origin is restricted. This blog post shows you how to create an AWS Lambda function to automatically update Amazon Virtual Private Cloud (Amazon VPC) security groups with CloudFront service IP ranges to permit only CloudFront to access the origin.

AWS publishes the IP ranges in JSON format for CloudFront and other AWS services. If your origin is an Elastic Load Balancer or an Amazon EC2 instance, you can use VPC security groups to allow only CloudFront IP ranges to access your applications. The IP ranges in the list are separated by service and Region, and you must specify only the IP ranges that correspond to CloudFront.

The IP ranges that AWS publishes change frequently and without an automated solution, you would need to retrieve this document frequently to understand the current IP ranges for CloudFront. Frequent polling is inefficient because there is no notice of when the IP ranges change, and if these IP ranges aren’t modified immediately, your client might see 504 errors when they access CloudFront. Additionally, there are numerous IP ranges for each service, performing the change manually isn’t an efficient way of updating these ranges. This means you need infrastructure to support the task. However, in that case you end up with another host to manage—complete with the typical patching, deployment, and monitoring. As you can see, a small task could quickly become more complicated than the problem you intended to solve.

An Amazon Simple Notification Service (Amazon SNS) message is sent to a topic whenever the AWS IP ranges change. Enabling you to build an event-driven, serverless solution that updates the IP ranges for your security groups, as needed by using a Lambda function that is triggered in response to the SNS notification.

Here are the steps we are going to take to implement the solution:

  1. Create your resources
    1. Create an IAM policy and execution role for the Lambda function
    2. Create your Lambda function
  2. Test your Lambda function
  3. Configure your Lambda function’s trigger

Create your resources

The first thing you need to do is create a Lambda function execution role and policy. Lambda function uses execution role to access or create AWS resources. This Lambda function is triggered by an SNS notification whenever there’s a change in the IP ranges document. Based on the number of IP ranges present for CloudFront and also the number of ports (for example, 80,443) that you want to whitelist on the origin, this Lambda function creates the required security groups. These security groups will allow only traffic from CloudFront to your ELB load balancers or EC2 instances.

Create an IAM policy and execution role for the Lambda function

When you create a Lambda function, it’s important to understand and properly define the security context for the Lambda function. Using AWS Identity and Access Management (IAM), you can create the Lambda execution role that determines the AWS service calls that the function is authorized to complete. (Learn more about the Lambda permissions model.)

To create the IAM policy for your role

  1. Log in to the IAM console with the user account that you will use to manage the Lambda function. This account must have administrator permissions.
  2. In the navigation pane, choose Policies.
  3. In the content pane, choose Create policy.
  4. Choose the JSON tab and copy the text from the following JSON policy document. Paste this text into the JSON text box.
    {
      "Version": "2012-10-17",
      "Statement": [
        {
          "Sid": "CloudWatchPermissions",
          "Effect": "Allow",
          "Action": [
            "logs:CreateLogGroup",
            "logs:CreateLogStream",
            "logs:PutLogEvents"
          ],
          "Resource": "arn:aws:logs:*:*:*"
        },
        {
          "Sid": "EC2Permissions",
          "Effect": "Allow",
          "Action": [
            "ec2:DescribeSecurityGroups",
            "ec2:AuthorizeSecurityGroupIngress",
            "ec2:RevokeSecurityGroupIngress",
            "ec2:CreateSecurityGroup",
            "ec2:DescribeVpcs",
    		"ec2:CreateTags",
            "ec2:ModifyNetworkInterfaceAttribute",
            "ec2:DescribeNetworkInterfaces"
            
          ],
          "Resource": "*"
        }
      ]
    }
    

  5. When you’re finished, choose Review policy.
  6. On the Review page, enter a name for the policy name (e.g. LambdaExecRolePolicy-UpdateSecurityGroupsForCloudFront). Review the policy Summary to see the permissions granted by your policy, and then choose Create policy to save your work.

To understand what this policy allows, let’s look closely at both statements in the policy. The first statement allows the Lambda function to create and write to CloudWatch Logs, which is vital for debugging and monitoring our function. The second statement allows the function to get information about existing security groups, get existing VPC information, create security groups, and authorize and revoke ingress permissions. It’s an important best practice that your IAM policies be as granular as possible, to support the principal of least privilege.

Now that you’ve created your policy, you can create the Lambda execution role that will use the policy.

To create the Lambda execution role

  1. In the navigation pane of the IAM console, choose Roles, and then choose Create role.
  2. For Select type of trusted entity, choose AWS service.
  3. Choose the service that you want to allow to assume this role. In this case, choose Lambda.
  4. Choose Next: Permissions.
  5. Search for the policy name that you created earlier and select the check box next to the policy.
  6. Choose Next: Tags.
  7. (Optional) Add metadata to the role by attaching tags as key-value pairs. For more information about using tags in IAM, see Tagging IAM Users and Roles.
  8. Choose Next: Review.
  9. For Role name (e.g. LambdaExecRole-UpdateSecurityGroupsForCloudFront), enter a name for your role.
  10. (Optional) For Role description, enter a description for the new role.
  11. Review the role, and then choose Create role.

Create your Lambda function

Now, create your Lambda function and configure the role that you created earlier as the execution role for this function.

To create the Lambda function

  1. Go to the Lambda console in N. Virginia region and choose Create function. On the next page, choose Author from scratch. (I’ll be providing the code for your Lambda function, but for other functions, the Use a blueprint option can be a great way to get started.)
  2. Give your Lambda function a name (e.g UpdateSecurityGroupsForCloudFront) and description, and select Python 3.8 from the Runtime menu.
  3. Choose or create an execution role: Select the execution role you created earlier by selecting the option Use an Existing Role.
  4. After confirming that your settings are correct, choose Create function.
  5. Paste the Lambda function code from here.
  6. Select Save.

Additionally, in the Basic Settings of the Lambda function, increase the timeout to 10 seconds.

To set the timeout value in the Lambda console

  1. In the Lambda console, choose the function you just created.
  2. Under Basic settings, choose Edit.
  3. For Timeout, select 10s.
  4. Choose Save.

By default, the Lambda function has these settings:

  • The Lambda function is configured to create security groups in the default VPC.
  • CloudFront IP ranges are updated as inbound rules on port 80.
  • The created security groups are tagged with the name prefix AUTOUPDATE.
  • Debug logging is turned off.
  • The service for which IP ranges are extracted is set to CloudFront.
  • The SDK client in the Lambda function set to us-east-1(N. Virginia).

If you want to customize these settings, set the following environment variables for the Lambda function. For more details, see Using AWS Lambda environment variables.

Action Key-value data
To create security groups in a specific VPC Key: VPC_ID
Value: vpc-id
To create security groups rules for a different port or multiple ports
 
The solution in this example supports a total of two ports. One can be used for HTTP and another for HTTPS.

Key: PORTS
Value: portnumber
or
Key: PORTS
Value: portnumber,portnumber
To customize the prefix name tag of your security groups Key: PREFIX_NAME
Value: custom-name
To enable debug logging to CloudWatch Key: DEBUG
Value: true
To extract IP ranges for a different service other than CloudFront Key: SERVICE
Value: servicename
To configure the Region for the SDK client used in the Lambda function
 
If the CloudFront origin is present in a different Region than N. Virginia, the security groups must be created in that region.
Key: REGION
Value: regionname

To set environment variables in the Lambda console

  1. In the Lambda console, choose the function you created.
  2. Under Environment variables, choose Edit.
  3. Choose Add environment variable.
  4. Enter a key and value.
  5. Choose Save.

Test your Lambda function

Now that you’ve created your function, it’s time to test it and initialize your security group.

To create your test event for the Lambda function

  1. In the Lambda console, on the Functions page, choose your function. In the drop-down menu next to Actions, choose Configure test events.
  2. Enter an Event Name (e.g. TriggerSNS)
  3. Replace the following as your sample event, which will represent an SNS notification and then select Create.
    {
        "Records": [
            {
                "EventVersion": "1.0",
                "EventSubscriptionArn": "arn:aws:sns:EXAMPLE",
                "EventSource": "aws:sns",
                "Sns": {
                    "SignatureVersion": "1",
                    "Timestamp": "1970-01-01T00:00:00.000Z",
                    "Signature": "EXAMPLE",
                    "SigningCertUrl": "EXAMPLE",
                    "MessageId": "95df01b4-ee98-5cb9-9903-4c221d41eb5e",
                    "Message": "{\"create-time\": \"yyyy-mm-ddThh:mm:ss+00:00\", \"synctoken\": \"0123456789\", \"md5\": \"7fd59f5c7f5cf643036cbd4443ad3e4b\", \"url\": \"https://ip-ranges.amazonaws.com/ip-ranges.json\"}",
                    "Type": "Notification",
                    "UnsubscribeUrl": "EXAMPLE",
                    "TopicArn": "arn:aws:sns:EXAMPLE",
                    "Subject": "TestInvoke"
                }
      		}
        ]
    }
    

  4. After you’ve added the test event, select Save and then select Test. Your Lambda function is then invoked, and you should see log output at the bottom of the console in Execution Result section, similar to the following.
    Updating from https://ip-ranges.amazonaws.com/ip-ranges.json
    MD5 Mismatch: got 2e967e943cf98ae998efeec05d4f351c expected 7fd59f5c7f5cf643036cbd4443ad3e4b: Exception
    Traceback (most recent call last):
      File "/var/task/lambda_function.py", line 29, in lambda_handler
        ip_ranges = json.loads(get_ip_groups_json(message['url'], message['md5']))
      File "/var/task/lambda_function.py", line 50, in get_ip_groups_json
        raise Exception('MD5 Missmatch: got ' + hash + ' expected ' + expected_hash)
    Exception: MD5 Mismatch: got 2e967e943cf98ae998efeec05d4f351c expected 7fd59f5c7f5cf643036cbd4443ad3e4b
    

  5. Edit the sample event again, and this time change the md5 value in the sample event to be the first MD5 hash provided in the log output. In this example, you would update the md5 value in the sample event configured earlier with the hash value seen in the error ‘2e967e943cf98ae998efeec05d4f351c’. Lambda code successfully executes only when the original hash of the IP ranges document and the hash received from the event trigger match. After you modify the hash value from the error message received earlier, the test event matches the hash of the IP ranges document.
  6. Select Save and test. This invokes your Lambda function.

After the function is invoked the second time with updated md5 has Lambda function should execute without any errors. You should be able to see the new security groups created and the IP ranges of CloudFront updated in the rules in the EC2 console, as shown in Figure 1.
 

Figure 1: EC2 console showing the security groups created

Figure 1: EC2 console showing the security groups created

In the initial successful run of this function, it created the total number of security groups required to update all the IP ranges of CloudFront for the ports mentioned. The function creates security groups based on the maximum number of rules that can be added to individual security groups. The new security groups can be identified from the EC2 console by the name AUTOUPDATE_random if you used the default configuration, or a custom name if you provided a PREFIX_NAME.

You can now attach these security groups to your Elastic LoadBalancer or EC2 instances. If your log output is different from what is described here, the output should help you identify the issue.

Configure your Lambda function’s trigger

After you’ve validated that your function is executing properly, it’s time to connect it to the SNS topic for IP changes. To do this, use the AWS Command Line Interface (CLI). Enter the following command, making sure to replace Lambda ARN with the Amazon Resource Name (ARN) of your Lambda function. You can find this ARN at the top right when viewing the configuration of your Lambda function.

aws sns subscribe - -topic-arn "arn:aws:sns:us-east-1:806199016981:AmazonIpSpaceChanged" - -region us-east-1 - -protocol lambda - -notification-endpoint "Lambda ARN"

You should receive the ARN of your Lambda function’s SNS subscription.

Now add a permission that allows the Lambda function to be invoked by the SNS topic. The following command also adds the Lambda trigger.

aws lambda add-permission - -function-name "Lambda ARN" - -statement-id lambda-sns-trigger - -region us-east-1 - -action lambda:InvokeFunction - -principal sns.amazonaws.com - -source-arn "arn:aws:sns:us-east-1:806199016981:AmazonIpSpaceChanged"

When AWS changes any of the IP ranges in the document, an SNS notification is sent and your Lambda function will be triggered. This Lambda function verifies the modified ranges in the document and efficiently updates the IP ranges on the existing security groups. Additionally, the function dynamically scales and creates additional security groups if the number of IP ranges for CloudFront is increased in future. Any newly created security groups are automatically attached to the network interface where the previous security groups are attached in order to avoid service interruption.

Summary

As you followed this blog post, you created a Lambda function to create a security groups and update the security group’s rules dynamically whenever AWS publishes new internal service IP ranges. This solution has several advantages:

  • The solution isn’t designed as a periodic poll, so it only runs when it needs to.
  • It’s automatic, so you don’t need to update security groups manually which lowers the operational cost.
  • It’s simple, because you have no extra infrastructure to maintain as the solution is completely serverless.
  • It’s cost effective, because the Lambda function runs only when triggered by the AmazonIpSpaceChanged SNS topic and only runs for a few seconds, this solution costs only pennies to operate.

If you have feedback about this post, submit comments in the Comments section below. If you have questions about this post, start a new thread on the Amazon CloudFront forum. If you have any other use cases for using Lambda functions to dynamically update security groups, or even other networking configurations such as VPC route tables or ACLs, we’d love to hear about them!

Want more AWS Security how-to content, news, and feature announcements? Follow us on Twitter.

Author

Yeshwanth Kottu

Yeshwanth is a Systems Development Engineer at AWS in Cupertino, CA. With a focus on CloudFront and Lambda@Edge, he enjoys helping customers tackle challenges through cloud-scale architectures. Yeshwanth has an MS in Computer Systems Networking and Telecommunications from Northeastern University. Outside of work, he enjoys travelling, visiting national parks, and playing cricket.

How to deploy the AWS Solution for Security Hub Automated Response and Remediation

Post Syndicated from Ramesh Venkataraman original https://aws.amazon.com/blogs/security/how-to-deploy-the-aws-solution-for-security-hub-automated-response-and-remediation/

In this blog post I show you how to deploy the Amazon Web Services (AWS) Solution for Security Hub Automated Response and Remediation. The first installment of this series was about how to create playbooks using Amazon CloudWatch Events, AWS Lambda functions, and AWS Security Hub custom actions that you can run manually based on triggers from Security Hub in a specific account. That solution requires an analyst to directly trigger an action using Security Hub custom actions and doesn’t work for customers who want to set up fully automated remediation based on findings across one or more accounts from their Security Hub master account.

The solution described in this post automates the cross-account response and remediation lifecycle from executing the remediation action to resolving the findings in Security Hub and notifying users of the remediation via Amazon Simple Notification Service (Amazon SNS). You can also deploy these automated playbooks as custom actions in Security Hub, which allows analysts to run them on-demand against specific findings. You can deploy these remediations as custom actions or as fully automated remediations.

Currently, the solution includes 10 playbooks aligned to the controls in the Center for Internet Security (CIS) AWS Foundations Benchmark standard in Security Hub, but playbooks for other standards such as AWS Foundational Security Best Practices (FSBP) will be added in the future.

Solution overview

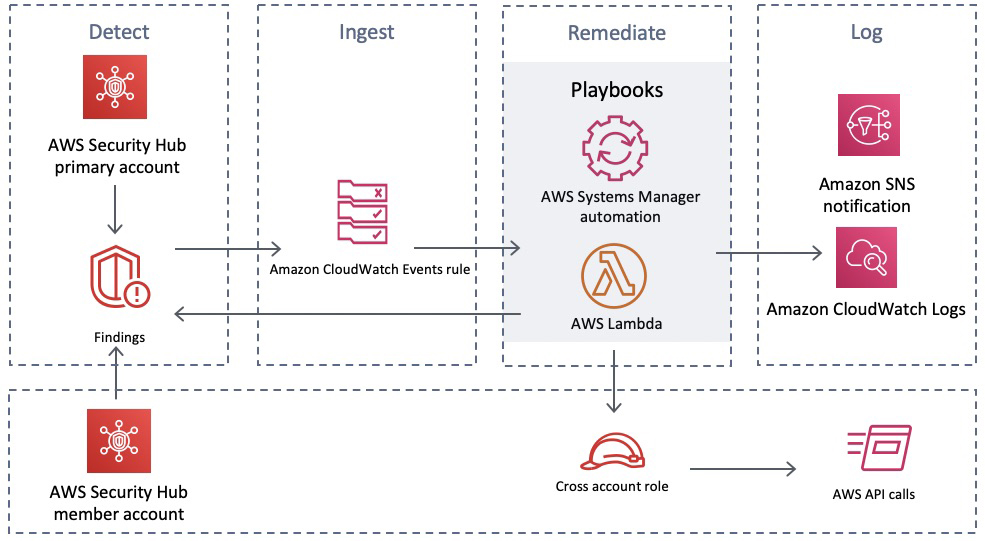
Figure 1 shows the flow of events in the solution described in the following text.

Figure 1: Flow of events

Figure 1: Flow of events

Detect

Security Hub gives you a comprehensive view of your security alerts and security posture across your AWS accounts and automatically detects deviations from defined security standards and best practices.

Security Hub also collects findings from various AWS services and supported third-party partner products to consolidate security detection data across your accounts.

Ingest

All of the findings from Security Hub are automatically sent to CloudWatch Events and Amazon EventBridge and you can set up CloudWatch Events and EventBridge rules to be invoked on specific findings. You can also send findings to CloudWatch Events and EventBridge on demand via Security Hub custom actions.

Remediate

The CloudWatch Event and EventBridge rules can have AWS Lambda functions, AWS Systems Manager automation documents, or AWS Step Functions workflows as the targets of the rules. This solution uses automation documents and Lambda functions as response and remediation playbooks. Using cross-account AWS Identity and Access Management (IAM) roles, the playbook performs the tasks to remediate the findings using the AWS API when a rule is invoked.

Log

The playbook logs the results to the Amazon CloudWatch log group for the solution, sends a notification to an Amazon Simple Notification Service (Amazon SNS) topic, and updates the Security Hub finding. An audit trail of actions taken is maintained in the finding notes. The finding is updated as RESOLVED after the remediation is run. The security finding notes are updated to reflect the remediation performed.

Here are the steps to deploy the solution from this GitHub project.

  • In the Security Hub master account, you deploy the AWS CloudFormation template, which creates an AWS Service Catalog product along with some other resources. For a full set of what resources are deployed as part of an AWS CloudFormation stack deployment, you can find the full set of deployed resources in the Resources section of the deployed AWS CloudFormation stack. The solution uses the AWS Service Catalog to have the remediations available as a product that can be deployed after granting the users the required permissions to launch the product.
  • Add an IAM role that has administrator access to the AWS Service Catalog portfolio.
  • Deploy the CIS playbook from the AWS Service Catalog product list using the IAM role you added in the previous step.
  • Deploy the AWS Security Hub Automated Response and Remediation template in the master account in addition to the member accounts. This template establishes AssumeRole permissions to allow the playbook Lambda functions to perform remediations. Use AWS CloudFormation StackSets in the master account to have a centralized deployment approach across the master account and multiple member accounts.

Deployment steps for automated response and remediation

This section reviews the steps to implement the solution, including screenshots of the solution launched from an AWS account.

Launch AWS CloudFormation stack on the master account

As part of this AWS CloudFormation stack deployment, you create custom actions to configure Security Hub to send findings to CloudWatch Events. Lambda functions are used to provide remediation in response to actions sent to CloudWatch Events.

Note: In this solution, you create custom actions for the CIS standards. There will be more custom actions added for other security standards in the future.

To launch the AWS CloudFormation stack

  1. Deploy the AWS CloudFormation template in the Security Hub master account. In your AWS console, select CloudFormation and choose Create new stack and enter the S3 URL.
  2. Select Next to move to the Specify stack details tab, and then enter a Stack name as shown in Figure 2. In this example, I named the stack SO0111-SHARR, but you can use any name you want.
     
    Figure 2: Creating a CloudFormation stack

    Figure 2: Creating a CloudFormation stack

  3. Creating the stack automatically launches it, creating 21 new resources using AWS CloudFormation, as shown in Figure 3.
     
    Figure 3: Resources launched with AWS CloudFormation

    Figure 3: Resources launched with AWS CloudFormation

  4. An Amazon SNS topic is automatically created from the AWS CloudFormation stack.
  5. When you create a subscription, you’re prompted to enter an endpoint for receiving email notifications from Amazon SNS as shown in Figure 4. To subscribe to that topic that was created using CloudFormation, you must confirm the subscription from the email address you used to receive notifications.
     
    Figure 4: Subscribing to Amazon SNS topic

    Figure 4: Subscribing to Amazon SNS topic

Enable Security Hub

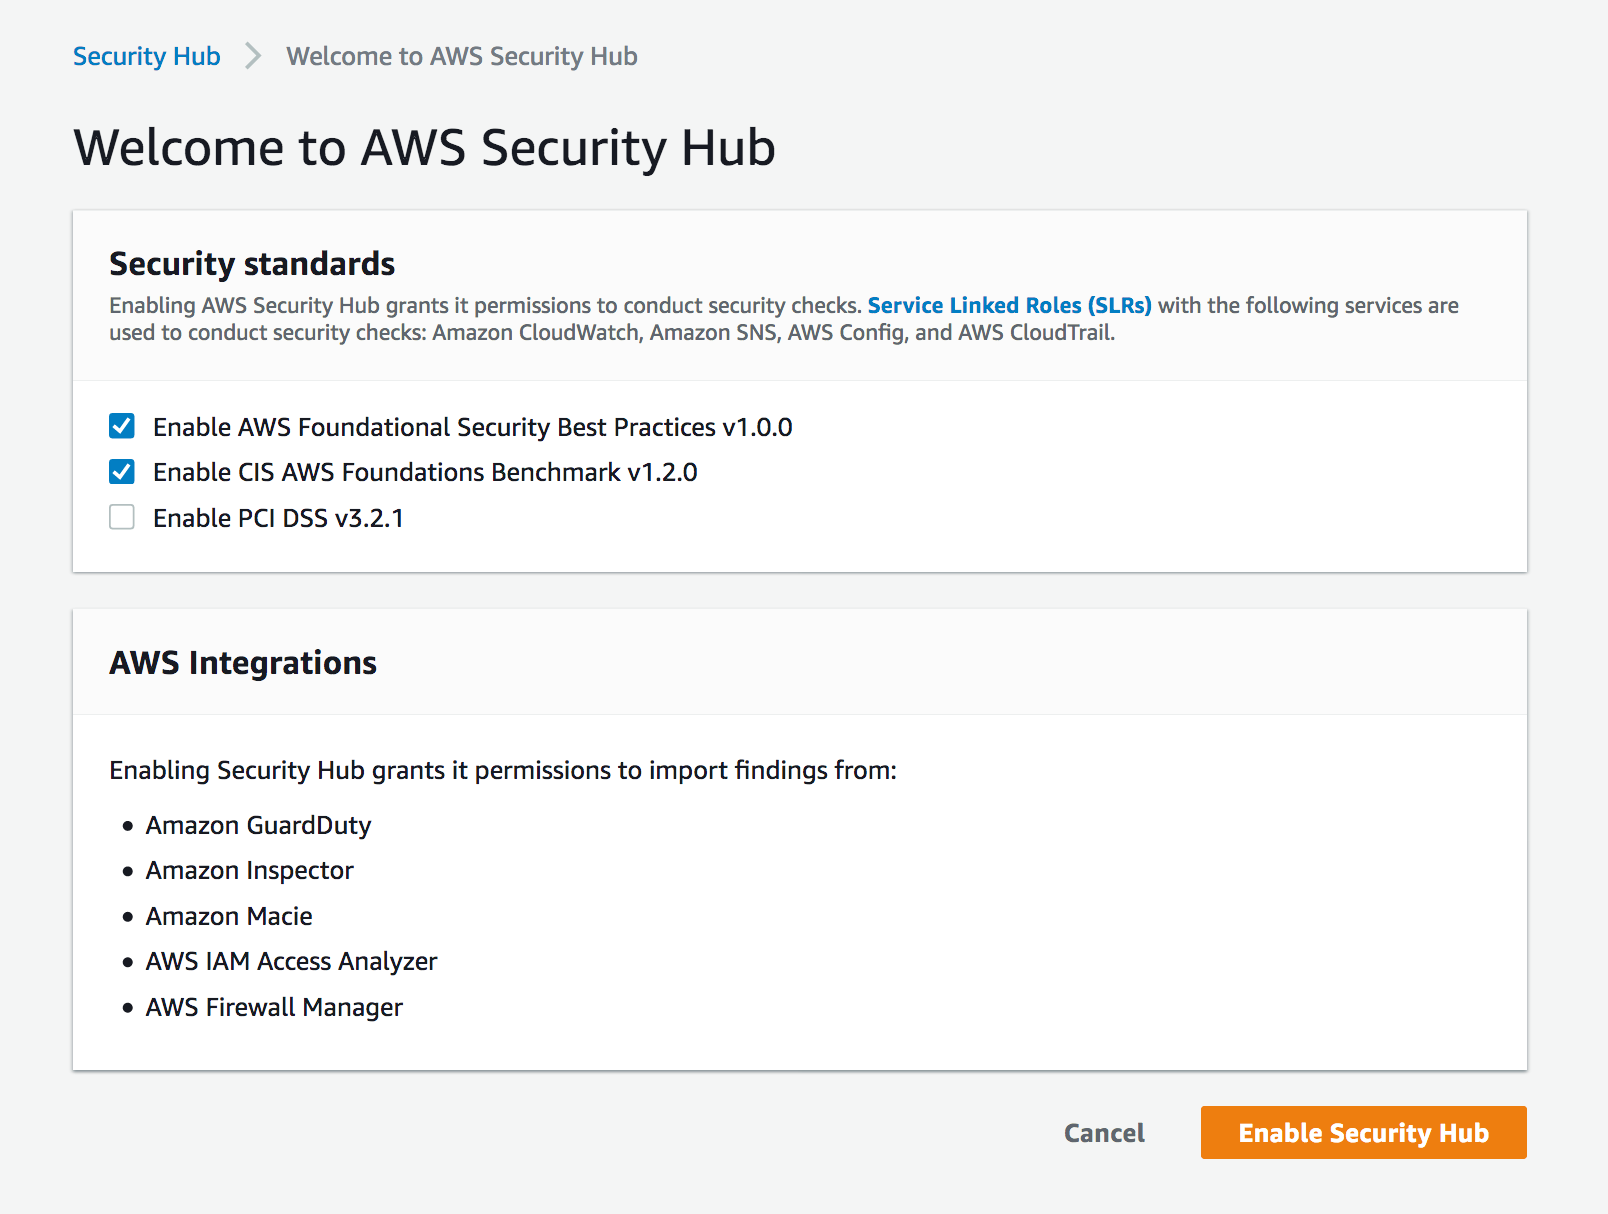
You should already have enabled Security Hub and AWS Config services on your master account and the associated member accounts. If you haven’t, you can refer to the documentation for setting up Security Hub on your master and member accounts. Figure 5 shows an AWS account that doesn’t have Security Hub enabled.
 

Figure 5: Enabling Security Hub for first time

Figure 5: Enabling Security Hub for first time

AWS Service Catalog product deployment

In this section, you use the AWS Service Catalog to deploy Service Catalog products.

To use the AWS Service Catalog for product deployment

  1. In the same master account, add roles that have administrator access and can deploy AWS Service Catalog products. To do this, from Services in the AWS Management Console, choose AWS Service Catalog. In AWS Service Catalog, select Administration, and then navigate to Portfolio details and select Groups, roles, and users as shown in Figure 6.
     
    Figure 6: AWS Service Catalog product

    Figure 6: AWS Service Catalog product

  2. After adding the role, you can see the products available for that role. You can switch roles on the console to assume the role that you granted access to for the product you added from the AWS Service Catalog. Select the three dots near the product name, and then select Launch product to launch the product, as shown in Figure 7.
     
    Figure 7: Launch the product

    Figure 7: Launch the product

  3. While launching the product, you can choose from the parameters to either enable or disable the automated remediation. Even if you do not enable fully automated remediation, you can still invoke a remediation action in the Security Hub console using a custom action. By default, it’s disabled, as highlighted in Figure 8.
     
    Figure 8: Enable or disable automated remediation

    Figure 8: Enable or disable automated remediation

  4. After launching the product, it can take from 3 to 5 minutes to deploy. When the product is deployed, it creates a new CloudFormation stack with a status of CREATE_COMPLETE as part of the provisioned product in the AWS CloudFormation console.

AssumeRole Lambda functions

Deploy the template that establishes AssumeRole permissions to allow the playbook Lambda functions to perform remediations. You must deploy this template in the master account in addition to any member accounts. Choose CloudFormation and create a new stack. In Specify stack details, go to Parameters and specify the Master account number as shown in Figure 9.
 

Figure 9: Deploy AssumeRole Lambda function

Figure 9: Deploy AssumeRole Lambda function

Test the automated remediation

Now that you’ve completed the steps to deploy the solution, you can test it to be sure that it works as expected.

To test the automated remediation

  1. To test the solution, verify that there are 10 actions listed in Custom actions tab in the Security Hub master account. From the Security Hub master account, open the Security Hub console and select Settings and then Custom actions. You should see 10 actions, as shown in Figure 10.
     
    Figure 10: Custom actions deployed

    Figure 10: Custom actions deployed

  2. Make sure you have member accounts available for testing the solution. If not, you can add member accounts to the master account as described in Adding and inviting member accounts.
  3. For testing purposes, you can use CIS 1.5 standard, which is to require that the IAM password policy requires at least one uppercase letter. Check the existing settings by navigating to IAM, and then to Account Settings. Under Password policy, you should see that there is no password policy set, as shown in Figure 11.
     
    Figure 11: Password policy not set

    Figure 11: Password policy not set

  4. To check the security settings, go to the Security Hub console and select Security standards. Choose CIS AWS Foundations Benchmark v1.2.0. Select CIS 1.5 from the list to see the Findings. You will see the Status as Failed. This means that the password policy to require at least one uppercase letter hasn’t been applied to either the master or the member account, as shown in Figure 12.
     
    Figure 12: CIS 1.5 finding

    Figure 12: CIS 1.5 finding

  5. Select CIS 1.5 – 1.11 from Actions on the top right dropdown of the Findings section from the previous step. You should see a notification with the heading Successfully sent findings to Amazon CloudWatch Events as shown in Figure 13.
     
    Figure 13: Sending findings to CloudWatch Events

    Figure 13: Sending findings to CloudWatch Events

  6. Return to Findings by selecting Security standards and then choosing CIS AWS Foundations Benchmark v1.2.0. Select CIS 1.5 to review Findings and verify that the Workflow status of CIS 1.5 is RESOLVED, as shown in Figure 14.
     
    Figure 14: Resolved findings

    Figure 14: Resolved findings

  7. After the remediation runs, you can verify that the Password policy is set on the master and the member accounts. To verify that the password policy is set, navigate to IAM, and then to Account Settings. Under Password policy, you should see that the account uses a password policy, as shown in Figure 15.
     
    Figure 15: Password policy set

    Figure 15: Password policy set

  8. To check the CloudWatch logs for the Lambda function, in the console, go to Services, and then select Lambda and choose the Lambda function and within the Lambda function, select View logs in CloudWatch. You can see the details of the function being run, including updating the password policy on both the master account and the member account, as shown in Figure 16.
     
    Figure 15: Lambda function log

    Figure 16: Lambda function log

Conclusion

In this post, you deployed the AWS Solution for Security Hub Automated Response and Remediation using Lambda and CloudWatch Events rules to remediate non-compliant CIS-related controls. With this solution, you can ensure that users in member accounts stay compliant with the CIS AWS Foundations Benchmark by automatically invoking guardrails whenever services move out of compliance. New or updated playbooks will be added to the existing AWS Service Catalog portfolio as they’re developed. You can choose when to take advantage of these new or updated playbooks.

If you have feedback about this post, submit comments in the Comments section below. If you have questions about this post, start a new thread on the AWS Security Hub forum or contact AWS Support.

Want more AWS Security how-to content, news, and feature announcements? Follow us on Twitter.

Author

Ramesh Venkataraman

Ramesh is a Solutions Architect who enjoys working with customers to solve their technical challenges using AWS services. Outside of work, Ramesh enjoys following stack overflow questions and answers them in any way he can.

Detect change points in your event data stream using Amazon Kinesis Data Streams, Amazon DynamoDB and AWS Lambda

Post Syndicated from Marco Guerriero original https://aws.amazon.com/blogs/big-data/detect-change-points-in-your-event-data-stream-using-amazon-kinesis-data-streams-amazon-dynamodb-and-aws-lambda/

The success of many modern streaming applications depends on the ability to sequentially detect each change as soon as possible after it occurs, while continuing to monitor the data stream as it evolves. Applications of change point detection range across genomics, marketing, and finance, to name a few. In genomics, change point detection can help identify genes that are damaged. In marketing, we can identify things like customer churns in real time or when customer engagement changes over time. This is very useful in areas like online retail where, if change detection is implemented, we can adapt much more quickly to customer behavior. In finance, we can detect moments in time when stock prices have significantly changed. As opposed to online batch methodologies that take a batch of historical data and look for the change points in that data, we use a streaming procedure where we detect change points as fast as possible in real time as new data comes in.

In this post, we demonstrate automated event detection (AED), a fully automated, non-parametric, multiple change point detection algorithm that can operate on massive streaming data with low computational complexity, quickly reacting to the changes. Quick change detection [1] can help a system raise a timely alarm. Quickly reacting to a sudden fault arising in an industrial process or a production process could lead to significant savings in unplanned downtime. Detecting the onset of the outbreak of a disease, or the effect of a bio-terrorist attack, is critical, both for effective initiation of public health intervention measures and to timely alert government agencies and the general public.

In AED, no statistical assumption (such as Gaussian) is made on the generative process of the time series or data streams being processed. We rely on a class of tests called non-parametric or distribution-free tests [2, 3, 4, 5]. These tests are the natural choice for performing change point detection on data streams with unknown statistical distribution, which represents a common scenario that applies to a wide variety of real-world processes. We demonstrate a Python implementation of AED embedded within AWS Lambda over a data stream processed and managed by Amazon Kinesis Data Streams.

Understanding event detection

Let’s talk for a moment about anomaly detection, data drift, and change point detection in time series.

In machine learning (ML), we hear a lot about anomaly detection. In the context of a time series, that often means a data point that is outside the expected range. That range may have a static definition, such as “we never expect the temperature to exceed 130F,” or a dynamic definition, such as “it should not vary from recent averages by more than three standard deviations.” An example of a dynamic anomaly detection algorithm is Random Cut Forest.

In contrast, data drift describes a slower shift in the stream’s data distribution. It may mean a shift in the mean of a variable, such as a shift in temperatures between summer and winter, or a change in behavior of visitors to a website as certain product categories fall out of favor and others become fashionable. A frequently recommended approach for dealing with data drift is frequent retraining of an ML model, to keep recommendations fresh and relevant based on recent data.

The events AED focuses on are in a different category altogether: sudden shifts in the data stream to a new level, sometimes called regime change. These are occasions where human intervention may be desired to see whether automated responses are appropriate. For example, a slow shift in readings from a temperature sensor may be normal, whereas a sudden large change may be a sign of a major malfunction in progress. Other data streams that constantly fluctuate but where a sudden large change may require oversight include equipment monitoring and malfunctions, cyber attacks, stock market movements, power grids and outages, and operational variations in manufacturing processes, to name a few [1].

Our goal is to automatically detect multiple events when the time series or the data streams change their behavior. In this version, we focus on sudden changes in mean or offset in time series. AED is an unsupervised, automatic, statistically rigorous, real-time procedure for detecting relevant events, which doesn’t require any training data. It can also be used as an automatic process for feature extraction (such as time series segmentation) that can be used in downstream ML systems.

Automated event detection

AED operates sequentially as data comes in, continuously performing a novel statistical test to identify a change event—a significant shift in the data from the data that preceded that point in time. If an event is detected at time ti, all the previous data prior to ti is discarded. AED is then reset to process new data points starting with the (ti +1)th data point, looking for a new change event. This procedure is repeated sequentially until no more data points are available.

The core of AED is represented by the statistical test called the Modified Practical Pettitt (MPP) test. The MPP test is a variant of the Pettitt test [6], which is a very powerful and robust non-parametrical statistical procedure to detect a single change point in data streams where the distribution is completely unknown. Pettitt’s test is based on Null Hypothesis Significance Testing (NHST), which comes with some constraints and fallacies. In fact, a very important problem with NHST is that the result of the test doesn’t provide information about the magnitude of the effect of the event—which is key information we’re interested in. A consequence of this limit is that an event (change point) can be detected despite a very small effect. But is an increase of 0.001 Celsius degrees in temperature data streams coming from some IoT devices or a decrease of $1 in a particular stock price noteworthy events? Statistical significance doesn’t tell us anything about practical relevance. The MPP test solves this problem by incorporating a practical significance threshold into the definition of the decision test statistic. In this way, only events that are both statistically and practically significant are detected and reported by AED.

The decision statistic of the MPP test can be computed recursively, resulting in a computational complexity that is linear in the number of data points processed by AED up to the reset time.

Prerequisites

To get started, we need the following:

  • A continuous or discrete time series (data stream). No knowledge of the distribution of the data is needed.
  • Some guidance for the algorithm in terms of when to alert us:
    • The statistical confidence level we require that an event has occurred (p value).
    • The practical significance level we require (our practical significance threshold).

The output of AED is a list of change points specified by their time of occurrence, their p-value, and the magnitude of the offset.

Solution overview

The following diagram illustrates the AWS services used to implement the solution.

The steps in the process are as follows:

  1. One or more programs, devices, or sensors generate events and place them into a Kinesis data stream. These events make up a time series. In our case, we provide a sample generator function.
  2. The event recorder Lambda function consumes records from the data stream.
  3. The Lambda function stores them in an Amazon DynamoDB events table.
  4. The DynamoDB table streams the inserted events to the event detection Lambda function.
  5. The Lambda function checks each event to see whether this is a change point. To do so, it performs the following actions:
    • Reads the last change point recorded from the DynamoDB change points table (or creates one if this is the first data point for this device).
    • Reads the prior events since the last change point from the events table, as a time series.
    • Runs the event-detection algorithm over the retrieved time series.
  6. If a new change point is detected, the function does the following:
    • Writes the change point into the DynamoDB change points table, for later use.
    • Sends an Amazon Simple Notification Service (Amazon SNS) message to a topic with the change point details.

Setting up the solution infrastructure

To set up the infrastructure components and configure the connections, launch a predefined AWS CloudFormation stack. The stack sets up the following resources:

  • A Kinesis data stream.
  • Two Lambda functions: the event recorder, and the event detection. Each function has an associated AWS Identity and Access Management (IAM) role.
  • Two DynamoDB tables: one to hold events, and one for detected change points.
  • An SNS topic and a subscription, for notifying that a change point has been detected.

To see this solution in operation in the US East (N. Virginia) Region, launch the provided CloudFormation stack. The total solution costs approximately $0.02 per hour to run, depending on the volume of data sent to the components. Remember to delete the CloudFormation stack when you’re finished with the solution to avoid additional charges.

To run the stack, complete the following steps:

  1. Choose Launch Stack:
  1. Choose Next.
  2. Update the email address for notifications to be a valid email address of your choice.
  3. Update the following parameters for your environment if necessary, or, for now, leave the defaults:
    1. Environment parameters – Names for your DynamoDB tables, Kinesis stream, and SNS topic
    2. AED parameters – Startup, alpha level, change difference window, and practical significance threshold
  4. Choose Next.
  5. Select I acknowledge that AWS CloudFormation might create IAM resources with custom names.
  6. Choose Create stack.
  7. Wait for the CloudFormation stack to reach a status of CREATE COMPLETE (around 5 minutes).
  8. Check the Outputs tab for the resources created.

If you want to receive the SNS messages for detected change points, remember to confirm your SNS subscription for the email address.

Generating data

After AWS CloudFormation creates the system resources for us, we’re ready to start generating some data. For this post, we provide a client that generates a time series with periodic regime shifts. For simplicity and to show generality, the client also runs AED over the time series it creates. At the end, it generates a time series plot of the generated data along with the detected change points. These should match the SNS notifications you receive.

  1. To download and set up the test clients, copy the following files to your local desktop:
    1. time series client.py
    2. time series validation client.py
    3. AmazonAED.py
  2. Install boto3, numpy, and matplotlib, if you don’t already have them installed.

Two test clients are provided:

  • The time_series_client.py generates data and puts it into Kinesis Data Streams; this is what your device does.
  • For easier demonstration, we also provide a time_series_validation_client. This version also runs AED locally and generates an annotated plot showing the input data, where the change points are detected, and where the change actually occurred.

To run the validation client, open a command prompt to the folder where you copied the client files and run the following code:

python time_series_validation_client.py  -r us-east-1 -s aed_events_data_stream

You can pass the –h parameter to find out the other parameters. By default, the client generates 1 minute’s worth of data. The parameters let you configure the client for your environment, and, when running the validation client, for the local AED detection (which is independent of that being performed in the Lambda function).

You can use four parameters to configure AED’s behavior to match your environment:

  • “-a”, “–alpha” – The AED alpha level, that is, the smallest change to identify. The default is 0.01.
  • “-w”, “–window” – The AED change difference window, the number of points around the change to ignore. The default is 5.
  • “-x”, “–startup” – The number of samples to include in the AED initialization stage. The default is 5.
  • “-p”, “–practicalthreshold” – The AED practical significance threshold. Changes smaller than this are not designated as change points. The default is 0.

At the end of the time period, the client displays an image of the generated time series. The following time series is annotated with a small blue triangle whenever the client created a change point. The small red triangles mark the points where the AED algorithm, running independently over the generated data, detected the change points. The blue triangle always precedes the red triangle in our DetectBeforeDecide framework, where the AED algorithm has to first detect that something is changing (red triangle) and then work backwards to decide when in time the change most likely occurred (blue triangle).

The turquoise dot shows where the data generation was restarted; this change point may not be detected because AED isn’t running at that time. As you can see, each generated change point was detected. At the same time, the significant variation between the change points—in essence, within a single regime—didn’t cause a spurious change point detection.

The practical significance threshold additionally allows you to specify when the change is small enough that it’s not relevant and should be ignored.

You can also review the contents of the DynamoDB tables on the AWS Management Console (see the following screenshot). The table aed_stream_data shows each event in the stream logged. The aed_change_points table shows the individual change points detected, along with the timestamp of the detection and the data point at the time the change was detected by the Lambda function running over the stream data. This data lets you construct a history of the event stream and the change points, and manipulate them according to your need.

Each Lambda function is started by the Kinesis stream; it checks to see when the last change point occurred. It then retrieves the data since that change point from the aed_stream_data table and reprocesses it, looking for a new change point. As the gaps between change points get very large, this may become a large sequence to retrieve and process. If this is your use case, you may wish to artificially create a new set point every so often to reduce the amount of data that must be reread.

Cleaning up

To avoid additional charges, you should delete the CloudFormation stack after walking through the solution.

To implement AED in a different Region or to adapt it to your own needs, download the aed.zip file.

Conclusion

In this post, we introduced automated event detection (AED), a new, fast, scalable, fully automated, non-parametric, multiple change point detection service that can operate on massive streaming data with low computational complexity. AED efficiently identifies shifts in the data stream that have both statistical and practical significance. This ability to locate the time and magnitude of a shift in the data stream, and to differentiate it from normal data fluctuations, is key in many applications. The appropriate action varies by use case: it may be appropriate to take automated action, or call a human to evaluate whether the preplanned actions should be taken. A natural extension of AED would be to add an algorithm to detect trends (gradual changes as opposed to sudden shifts) in data streams using non-parametric tests such as Mann-Kendall [7, 8]. Combining these functions allows you to identify both kinds of changes in your incoming data stream and distinguish between them, further broadening the use cases.

In this post, we demonstrated a Python implementation of AED embedded within Lambda over a data stream processed and managed by Kinesis Data Streams. We also provided a standalone client implementation to show an alternate implementation. The code is available for you to download and integrate into your applications. Do you have any data streams where sudden shifts may happen? Do you want to know when they happen? Are there automated actions that should be taken, or should someone be alerted? If your answer to any of these questions is “Yes!” then consider implementing AED.

If you have any comments about this post, submit them in the comments section.

References

[1] H. V. Poor and O. Hadjiliadis (2009). Quickest detection. Cambridge University Press, 2009.

[2] Brodsky, E., and Boris S. Darkhovsky (2013). Nonparametric methods in change point problems. Vol. 243. Springer Science & Business Media.

[3] Csörgö, Miklós, and Lajos Horváth (1997). Limit theorems in change-point analysis. Vol. 18. John Wiley & Sons Inc,.

[4] Ross GJ, Tasoulis DK, Adams NM (2011). Nonparametric Monitoring of Data Streams for Changes in Location and Scale. Technometrics, 53(4), 379–389.

[5] Chu, Lynna, and Hao Chen (2019). Asymptotic distribution-free change-point detection for multivariate and non-euclidean data. The Annals of Statistics 47.1, 382-414.

[6] Pettitt AN (1979). A Non-Parametric Approach to the Change-Point Problem. Journal of the Royal Statistical Society C, 28(2), 126–135.

[7] H. B. Mann (1945). Nonparametric tests against trend, Econometrica, vol. 13, pp. 245–259, 1945.

[8] M. G. Kendal (1975). Rank Correlation Methods, Griffin, London, UK, 1975


About the Authors

Marco Guerriero, PhD, is a Practice Manager for Emergent Technologies and Intelligence Platform for AWS Professional Services. I love working on ways for emergent technologies such as AI/ML, Big Data, IoT, and Quantum to help businesses across different industry vertical succeed within their innovation journey.


Veronika Megler, PhD, is Principal Data Scientist for Amazon.com Customer Packaging Experience. Until recently, she was the Principal Data Scientist for AWS Professional Services. She enjoys adapting innovative big data, AI, and ML technologies to help companies solve new problems, and to solve old problems more efficiently and effectively. Her work has lately been focused more heavily on economic impacts of ML models and exploring causality.

Tracking the latest server images in Amazon EC2 Image Builder pipelines

Post Syndicated from Eric Johnson original https://aws.amazon.com/blogs/compute/tracking-the-latest-server-images-in-amazon-ec2-image-builder-pipelines/

This post courtesy of Anoop Rachamadugu, Cloud Architect at AWS

The Amazon EC2 Image Builder service helps users to build and maintain server images. The images created by EC2 Image Builder can be used with Amazon Elastic Compute Cloud (EC2) and on-premises. Image Builder reduces the effort of keeping images up-to-date and secure by providing a graphical interface, built-in automation, and AWS-provided security settings. Customers have told us that they manage multiple server images and are looking for ways to track the latest server images created by the pipelines.

In this blog post, I walk through a solution that uses AWS Lambda and AWS Systems Manager (SSM) Parameter Store. It tracks and updates the latest Amazon Machine Image (AMI) IDs every time an Image Builder pipeline is run. With Lambda, you pay only for what you use. You are charged based on the number of requests for your functions and the time it takes for your code to run. In this case, the Lambda function is invoked upon the completion of the image builder pipeline. Standard SSM parameters are available at no additional charge.

Users can reference the SSM parameters in automation scripts and AWS CloudFormation templates providing access to the latest AMI ID for your EC2 infrastructure. Consider the use case of updating Amazon Machine Image (AMI) IDs for the EC2 instances in your CloudFormation templates. Normally, you might map AMI IDs to specific instance types and Regions. Then to update these, you would manually change them in each of your templates. With the SSM parameter integration, your code remains untouched and a CloudFormation stack update operation automatically fetches the latest Parameter Store value.

Overview

This solution uses a Lambda function written in Python that subscribes to an Amazon Simple Notification Service (SNS) topic. The Lambda function and the SNS topic are deployed using AWS SAM CLI. Once deployed, the SNS topic must be configured in an existing Image Builder pipeline. This results in the Lambda function being invoked at the completion of the Image Builder pipeline.

When a Lambda function subscribes to an SNS topic, it is invoked with the payload of the published messages. The Lambda function receives the message payload as an input parameter. The Lambda function first checks the message payload to see if the image status is available. If the image state is available, it retrieves the AMI ID from the message payload and updates the SSM parameter.

EC2 Image builder architecture diagram

EC2 Image builder architecture diagram

Prerequisites

To get started with this solution, the following is required:

Deploying the solution

The solution consists of two files, which can be downloaded from the amazon-ec2-image-builder GitHub repository.

  1. The Python file image-builder-lambda-update-ssm.py contains the code for the Lambda function. It first checks the SNS message payload to determine if the image is available. If it’s available, it extracts the AMI ID from the SNS message payload and updates the SSM parameter specified.The ‘ssm_parameter_name’ variable specifies the SSM parameter path where the AMI ID should be stored and updated. The Lambda function finishes by adding tags to the SSM parameter.
  2. The template.yaml file is an AWS SAM template. It deploys the Lambda function, SNS topic, and IAM role required for the Lambda function. I use Python 3.7 as the runtime and assign a memory of 256 MB for the Lambda function. The IAM policy gives the Lambda function permissions to retrieve and update SSM parameters. Deploy this application using the AWS SAM CLI guided deploy:
    sam deploy --guided

After deploying the application, note the ARN of the created SNS topic. Next, update the infrastructure settings of an existing Image Builder pipeline with this newly created SNS topic. This results in the Lambda function being invoked upon the completion of the image builder pipeline.

Configuration details

Configuration details

Verifying the solution

After the completion of the image builder pipeline, use the AWS CLI or check the AWS Management Console to verify the updated SSM parameter. To verify via AWS CLI, run the following commands to retrieve and list the tags attached to the SSM parameter:

aws ssm get-parameter --name ‘/ec2-imagebuilder/latest’
aws ssm list-tags-for-resource --resource-type "Parameter" --resource-id ‘/ec2-imagebuilder/latest’

To verify via the AWS Management Console, navigate to the Parameter Store under AWS Systems Manager. Search for the parameter /ec2-imagebuilder/latest:

AWS Systems Manager: Parameter Store

AWS Systems Manager: Parameter Store

Select the Tags tab to view the tags attached to the SSM parameter:

Image builder tags list

Image builder tags list

Referencing the SSM Parameter in CloudFormation templates

Users can reference the SSM parameters in automation scripts and AWS CloudFormation templates providing access to the latest AMI ID for your EC2 infrastructure. This sample code shows how to reference the SSM parameter in a CloudFormation template.

Parameters :
  LatestAmiId :
    Type : 'AWS::SSM::Parameter::Value<AWS::EC2::Image::Id>'
    Default: ‘/ec2-imagebuilder/latest’

Resources :
  Instance :
    Type : 'AWS::EC2::Instance'
    Properties :
      ImageId : !Ref LatestAmiId

Conclusion

In this blog post, I demonstrate a solution that allows users to track and update the latest AMI ID created by the Image Builder pipelines. The Lambda function retrieves the AMI ID of the image created by a pipeline and update an AWS Systems Manager parameter. This Lambda function is triggered via an SNS topic configured in an Image Builder pipeline.

The solution is deployed using AWS SAM CLI. I also note how users can reference Systems Manager parameters in AWS CloudFormation templates providing access to the latest AMI ID for your EC2 infrastructure.

The amazon-ec2-image-builder-samples GitHub repository provides a number of examples for getting started with EC2 Image Builder. Image Builder can make it easier for you to build virtual machine (VM) images.

Building an event-driven application with AWS Lambda and the Amazon Redshift Data API

Post Syndicated from Manash Deb original https://aws.amazon.com/blogs/big-data/building-an-event-driven-application-with-aws-lambda-and-the-amazon-redshift-data-api/

Event–driven applications are becoming popular with many customers, where applications run in response to events. A primary benefit of this architecture is the decoupling of producer and consumer processes, allowing greater flexibility in application design and building decoupled processes.

An example of an even-driven application is an automated workflow being triggered by an event, which runs a series of transformations in the data warehouse. At the end of this workflow, another event gets initiated to notify end-users about the completion of those transformations and that they can start analyzing the transformed dataset.

In this post, we explain how you can easily design a similar event-driven application with Amazon Redshift, AWS Lambda, and Amazon EventBridge. In response to a scheduled event defined in EventBridge, this application automatically triggers a Lambda function to run a stored procedure performing extract, load, and transform (ELT) operations in an Amazon Redshift data warehouse, using its out-of-the-box integration with the Amazon Redshift Data API. This stored procedure copies the source data from Amazon Simple Storage Service (Amazon S3) to Amazon Redshift and aggregates the results. When complete, it sends an event to EventBridge, which triggers a Lambda function to send notification to end-users through Amazon Simple Notification Service (Amazon SNS) to inform them about the availability of updated data in Amazon Redshift.

This event-driven server-less architecture offers greater extensibility and simplicity, making it easier to maintain and faster to release new features, and also reduces the impact of changes. It also simplifies adding other components or third-party products to the application without many changes.

Prerequisites

As a prerequisite for creating the application in this post, you need to set up an Amazon Redshift cluster and associate it with an AWS Identity and Access Management (IAM) role. For more information, see Getting Started with Amazon Redshift.

Solution overview

The following architecture diagram highlights the end-to-end solution, which you can provision automatically with an AWS CloudFormation template.

The workflow includes the following steps:

  1. The EventBridge rule EventBridgeScheduledEventRule is initiated based on a cron schedule.
  2. The rule triggers the Lambda function LambdaRedshiftDataApiETL, with the action run_sql as an input parameter. The Python code for the Lambda function is available in the GitHub repo.
  3. The function performs an asynchronous call to the stored procedure run_elt_process in Amazon Redshift, performing ELT operations using the Amazon Redshift Data API.
  4. The stored procedure uses the Amazon S3 location event-driven-app-with-lambda-redshift/nyc_yellow_taxi_raw/ as the data source for the ELT process. We have pre-populated this with the NYC Yellow Taxi public dataset for the year 2015 to test this solution.
  5. When the stored procedure is complete, the EventBridge rule EventBridgeRedshiftEventRule is triggered automatically to capture the event based on the source parameter redshift-data from the Amazon Redshift Data API.
  6. The rule triggers the Lambda function LambdaRedshiftDataApiETL, with the action notify as an input parameter.
  7. The function uses the SNS topic RedshiftNotificationTopicSNS to send an automated email notification to end-users that the ELT process is complete.

The Amazon Redshift database objects required for this solution are provisioned automatically by the Lambda function LambdaSetupRedshiftObjects as part of the CloudFormation template initiation by invoking the function LambdaRedshiftDataApiETL, which creates the following objects in Amazon Redshift:

  • Table nyc_yellow_taxi, which we use to copy the New York taxi dataset from Amazon S3
  • Materialized view nyc_yellow_taxi_volume_analysis, providing an aggregated view of table
  • Stored procedure run_elt_process to take care of data transformations

The Python code for this function is available in the GitHub repo.

We also use the IAM role LambdaRedshiftDataApiETLRole for the Lambda function and  LambdaRedshiftDataApiETL to allow the following permissions:

  • Federate to the Amazon Redshift cluster through getClusterCredentials permission, avoiding password credentials
  • Initiate queries in the Amazon Redshift cluster through redshift-data API calls
  • Log with Amazon CloudWatch for troubleshooting purposes
  • Send notifications through Amazon SNS

A sample IAM role for this function is available in the GitHub repo.

Lambda is a key service in this solution because it initiates queries in Amazon Redshift using the redshift-data client. Based on the input parameter action, this function can asynchronously initiate Structured Query Language (SQL) statements in Amazon Redshift, thereby avoiding chances of timing out in case of long-running SQL statements[MOU1] [MOU2]   [MOU1]I think we should put reference to Redshift Data API and highlight that there is no need to configure drivers and connections [MOU2]done. It can also publish custom notifications through Amazon SNS. Also, it uses the Amazon Redshift Data API temporary credentials functionality, which allows it to communicate with Amazon Redshift using IAM permissions without the need of any password-based authentication. With the Data API, you also don’t need to configure drivers and connections for your Amazon Redshift cluster, because it’s handled automatically.

Deploying the CloudFormation template

When your Amazon Redshift cluster is set up, use the provided CloudFormation template to automatically create all required resources for this solution in your AWS account. For more information, see Getting started with AWS CloudFormation.

The template requires you to provide the following parameters:
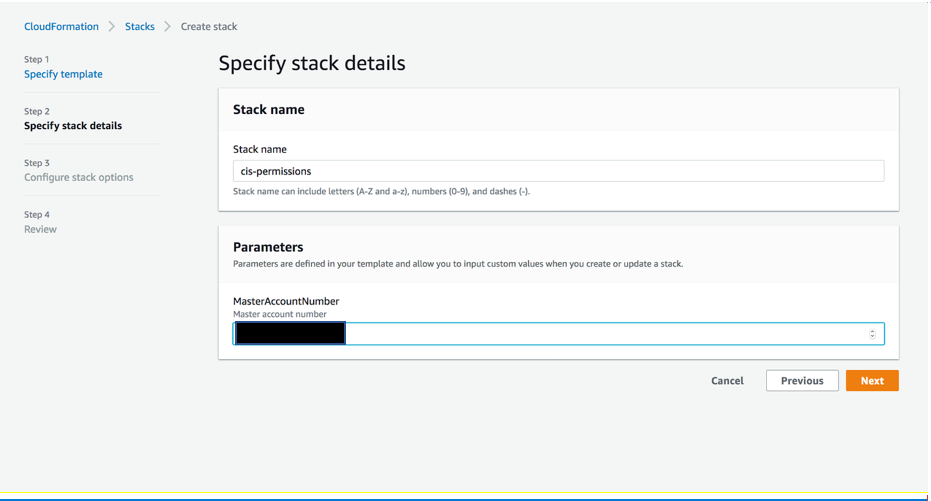
  • RedshiftClusterIdentifier – Cluster identifier for your Amazon Redshift cluster.
  • DbUsername – Amazon Redshift database user name that has access to run the SQL script.
  • DatabaseName – Name of the Amazon Redshift database where the SQL script runs.
  • RedshiftIAMRoleARN – ARN of the IAM role associated with the Amazon Redshift cluster.
  • NotificationEmailId – Email to send event notifications through Amazon SNS.
  • ExecutionSchedule – Cron expression to schedule the ELT process through an EventBridge rule.
  • SqlText – SQL text to run as part of the ELT process. Don’t change the default value call run_elt_process(); if you want to test this solution with the test dataset provided for this post.

The following screenshot shows the stack details on the AWS CloudFormation console.

Testing the pipeline

After setting up the architecture, you should have an automated pipeline to trigger based on the schedule you defined in the EventBridge rule’s cron expression. You can view the CloudWatch logs and troubleshoot issues in the Lambda function. The following screenshot shows the logs for our setup.

You can also view the query status on the Amazon Redshift console, which allows you to view detailed execution plans for the queries you ran. Although the stored procedure may take around 6 minutes to complete, the Lambda function finishes in seconds. This is primarily because the execution from Lambda on Amazon Redshift was asynchronous. Therefore, the function is complete after initiating the process in Amazon Redshift without caring about the query completion.

When this process is complete, you receive the email notification that the ELT process is complete.

You may then view the updated data in your business intelligence tool, like Amazon QuickSight, or query data directly in Amazon Redshift Query Editor (see the following screenshot) to view the most recent data processed by this event-driven architecture.

Conclusion

The Amazon Redshift Data API enables you to painlessly interact with Amazon Redshift and enables you to build event-driven and cloud-native applications. We demonstrated how to build an event-driven application with Amazon Redshift, Lambda, and EventBridge. For more information about the Data API, see Using the Amazon Redshift Data API to interact with Amazon Redshift clusters and Using the Amazon Redshift Data API.


About the Authors

Manash Deb is a Senior Analytics Specialist Solutions Architect. He has worked in different database and data warehousing technologies for more than 15 years.


Debu Panda, a senior product manager at AWS, is an industry leader in analytics, application platform, and database technologies. He has more than 20 years of experience in the IT industry and has published numerous articles on analytics, enterprise Java, and databases and has presented at multiple conferences. He is lead author of the EJB 3 in Action (Manning Publications 2007, 2014) and Middleware Management (Packt).


Fei Peng is a Software Dev Engineer working in the Amazon Redshift team.

Using AWS Lambda extensions to send logs to custom destinations

Post Syndicated from Julian Wood original https://aws.amazon.com/blogs/compute/using-aws-lambda-extensions-to-send-logs-to-custom-destinations/

You can now send logs from AWS Lambda functions directly to a destination of your choice using AWS Lambda Extensions. Lambda Extensions are a new way for monitoring, observability, security, and governance tools to easily integrate with AWS Lambda. For more information, see “Introducing AWS Lambda Extensions – In preview”.

To help you troubleshoot failures in Lambda functions, AWS Lambda automatically captures and streams logs to Amazon CloudWatch Logs. This stream contains the logs that your function code and extensions generate, in addition to logs the Lambda service generates as part of the function invocation.

Previously, to send logs to a custom destination, you typically configure and operate a CloudWatch Log Group subscription. A different Lambda function forwards logs to the destination of your choice.

Logging tools, running as Lambda extensions, can now receive log streams directly from within the Lambda execution environment, and send them to any destination. This makes it even easier for you to use your preferred extensions for diagnostics.

Today, you can use extensions to send logs to Coralogix, Datadog, Honeycomb, Lumigo, New Relic, and Sumo Logic.

Overview

To receive logs, extensions subscribe using the new Lambda Logs API.

Lambda Logs API

Lambda Logs API

The Lambda service then streams the logs directly to the extension. The extension can then process, filter, and route them to any preferred destination. Lambda still sends the logs to CloudWatch Logs.

You deploy extensions, including ones that use the Logs API, as Lambda layers, with the AWS Management Console and AWS Command Line Interface (AWS CLI). You can also use infrastructure as code tools such as AWS CloudFormation, the AWS Serverless Application Model (AWS SAM), Serverless Framework, and Terraform.

Logging extensions from AWS Lambda Ready Partners and AWS Partners available at launch

Today, you can use logging extensions with the following tools:

  • The Datadog extension now makes it easier than ever to collect your serverless application logs for visualization, analysis, and archival. Paired with Datadog’s AWS integration, end-to-end distributed tracing, and real-time enhanced AWS Lambda metrics, you can proactively detect and resolve serverless issues at any scale.
  • Lumigo provides monitoring and debugging for modern cloud applications. With the open source extension from Lumigo, you can send Lambda function logs directly to an S3 bucket, unlocking new post processing use cases.
  • New Relic enables you to efficiently monitor, troubleshoot, and optimize your Lambda functions. New Relic’s extension allows you send your Lambda service platform logs directly to New Relic’s unified observability platform, allowing you to quickly visualize data with minimal latency and cost.
  • Coralogix is a log analytics and cloud security platform that empowers thousands of companies to improve security and accelerate software delivery, allowing you to get deep insights without paying for the noise. Coralogix can now read Lambda function logs and metrics directly, without using Cloudwatch or S3, reducing the latency, and cost of observability.
  • Honeycomb is a powerful observability tool that helps you debug your entire production app stack. Honeycomb’s extension decreases the overhead, latency, and cost of sending events to the Honeycomb service, while increasing reliability.
  • The Sumo Logic extension enables you to get instant visibility into the health and performance of your mission-critical applications using AWS Lambda. With this extension and Sumo Logic’s continuous intelligence platform, you can now ensure that all your Lambda functions are running as expected, by analyzing function, platform, and extension logs to quickly identify and remediate errors and exceptions.

You can also build and use your own logging extensions to integrate your organization’s tooling.

Showing a logging extension to send logs directly to S3

This demo shows an example of using a simple logging extension to send logs to Amazon Simple Storage Service (S3).

To set up the example, visit the GitHub repo and follow the instructions in the README.md file.

The example extension runs a local HTTP endpoint listening for HTTP POST events. Lambda delivers log batches to this endpoint. The example creates an S3 bucket to store the logs. A Lambda function is configured with an environment variable to specify the S3 bucket name. Lambda streams the logs to the extension. The extension copies the logs to the S3 bucket.

Lambda environment variable specifying S3 bucket

Lambda environment variable specifying S3 bucket

The extension uses the Extensions API to register for INVOKE and SHUTDOWN events. The extension, using the Logs API, then subscribes to receive platform and function logs, but not extension logs.

As the example is an asynchronous system, logs for one invoke may be processed during the next invocation. Logs for the last invoke may be processed during the SHUTDOWN event.

Testing the function from the Lambda console, Lambda sends logs to CloudWatch Logs. The logs stream shows logs from the platform, function, and extension.

Lambda logs visible in CloudWatch Logs

Lambda logs visible in CloudWatch Logs

The logging extension also receives the log stream directly from Lambda, and copies the logs to S3.

Browsing to the S3 bucket, the log files are available.

S3 bucket containing copied logs

S3 bucket containing copied logs.

Downloading the file shows the log lines. The log contains the same platform and function logs, but not the extension logs, as specified during the subscription.

[{'time': '2020-11-12T14:55:06.560Z', 'type': 'platform.start', 'record': {'requestId': '49e64413-fd42-47ef-b130-6fd16f30148d', 'version': '$LATEST'}},
{'time': '2020-11-12T14:55:06.774Z', 'type': 'platform.logsSubscription', 'record': {'name': 'logs_api_http_extension.py', 'state': 'Subscribed', 'types': ['platform', 'function']}},
{'time': '2020-11-12T14:55:06.774Z', 'type': 'platform.extension', 'record': {'name': 'logs_api_http_extension.py', 'state': 'Ready', 'events': ['INVOKE', 'SHUTDOWN']}},
{'time': '2020-11-12T14:55:06.776Z', 'type': 'function', 'record': 'Function: Logging something which logging extension will send to S3\n'}, {'time': '2020-11-12T14:55:06.780Z', 'type': 'platform.end', 'record': {'requestId': '49e64413-fd42-47ef-b130-6fd16f30148d'}}, {'time': '2020-11-12T14:55:06.780Z', 'type': 'platform.report', 'record': {'requestId': '49e64413-fd42-47ef-b130-6fd16f30148d', 'metrics': {'durationMs': 4.96, 'billedDurationMs': 100, 'memorySizeMB': 128, 'maxMemoryUsedMB': 87, 'initDurationMs': 792.41}, 'tracing': {'type': 'X-Amzn-Trace-Id', 'value': 'Root=1-5fad4cc9-70259536495de84a2a6282cd;Parent=67286c49275ac0ad;Sampled=1'}}}]

Lambda has sent specific logs directly to the subscribed extension. The extension has then copied them directly to S3.

For more example log extensions, see the Github repository.

How do extensions receive logs?

Extensions start a local listener endpoint to receive the logs using one of the following protocols:

  1. TCP – Logs are delivered to a TCP port in Newline delimited JSON format (NDJSON).
  2. HTTP – Logs are delivered to a local HTTP endpoint through PUT or POST, as an array of records in JSON format. http://sandbox:${PORT}/${PATH}. The $PATH parameter is optional.

AWS recommends using an HTTP endpoint over TCP because HTTP tracks successful delivery of the log messages to the local endpoint that the extension sets up.

Once the endpoint is running, extensions use the Logs API to subscribe to any of three different logs streams:

  • Function logs that are generated by the Lambda function.
  • Lambda service platform logs (such as the START, END, and REPORT logs in CloudWatch Logs).
  • Extension logs that are generated by extension code.

The Lambda service then sends logs to endpoint subscribers inside of the execution environment only.

Even if an extension subscribes to one or more log streams, Lambda continues to send all logs to CloudWatch.

Performance considerations

Extensions share resources with the function, such as CPU, memory, disk storage, and environment variables. They also share permissions, using the same AWS Identity and Access Management (IAM) role as the function.

Log subscriptions consume memory resources as each subscription opens a new memory buffer to store the logs. This memory usage counts towards memory consumed within the Lambda execution environment.

For more information on resources, security and performance with extensions, see “Introducing AWS Lambda Extensions – In preview”.

What happens if Lambda cannot deliver logs to an extension?

The Lambda service stores logs before sending to CloudWatch Logs and any subscribed extensions. If Lambda cannot deliver logs to the extension, it automatically retries with backoff. If the log subscriber crashes, Lambda restarts the execution environment. The logs extension re-subscribes, and continues to receive logs.

When using an HTTP endpoint, Lambda continues to deliver logs from the last acknowledged delivery. With TCP, the extension may lose logs if an extension or the execution environment fails.

The Lambda service buffers logs in memory before delivery. The buffer size is proportional to the buffering configuration used in the subscription request. If an extension cannot process the incoming logs quickly enough, the buffer fills up. To reduce the likelihood of an out of memory event due to a slow extension, the Lambda service drops records and adds a platform.logsDropped log record to the affected extension to indicate the number of dropped records.

Disabling logging to CloudWatch Logs

Lambda continues to send logs to CloudWatch Logs even if extensions subscribe to the logs stream.

To disable logging to CloudWatch Logs for a particular function, you can amend the Lambda execution role to remove access to CloudWatch Logs.

{
"Version": "2012-10-17",
"Statement": [
    {
        "Effect": "Deny",
        "Action": [
            "logs:CreateLogGroup",
            "logs:CreateLogStream",
            "logs:PutLogEvents"
        ],
        "Resource": [
            "arn:aws:logs:*:*:*"
        ]
    }
  ]
}

Logs are no longer delivered to CloudWatch Logs for functions using this role, but are still streamed to subscribed extensions. You are no longer billed for CloudWatch logging for these functions.

Pricing

Logging extensions, like other extensions, share the same billing model as Lambda functions. When using Lambda functions with extensions, you pay for requests served and the combined compute time used to run your code and all extensions, in 100 ms increments. To learn more about the billing for extensions, visit the Lambda FAQs page.

Conclusion

Lambda extensions enable you to extend the Lambda service to more easily integrate with your favorite tools for monitoring, observability, security, and governance.

Extensions can now subscribe to receive log streams directly from the Lambda service, in addition to CloudWatch Logs. Today, you can install a number of available logging extensions from AWS Lambda Ready Partners and AWS Partners. Extensions make it easier to use your existing tools with your serverless applications.

To try the S3 demo logging extension, follow the instructions in the README.md file in the GitHub repository.

Extensions are now available in preview in all commercial regions other than the China regions.

For more serverless learning resources, visit https://serverlessland.com.

Building Serverless Land: Part 2 – An auto-building static site

Post Syndicated from Benjamin Smith original https://aws.amazon.com/blogs/compute/building-serverless-land-part-2-an-auto-building-static-site/

In this two-part blog series, I show how serverlessland.com is built. This is a static website that brings together all the latest blogs, videos, and training for AWS serverless. It automatically aggregates content from a number of sources. The content exists in a static JSON file, which generates a new static site each time it is updated. The result is a low-maintenance, low-latency serverless website, with almost limitless scalability.

A companion blog post explains how to build an automated content aggregation workflow to create and update the site’s content. In this post, you learn how to build a static website with an automated deployment pipeline that re-builds on each GitHub commit. The site content is stored in JSON files in the same repository as the code base. The example code can be found in this GitHub repository.

The growing adoption of serverless technologies generates increasing amounts of helpful and insightful content from the developer community. This content can be difficult to discover. Serverless Land helps channel this into a single searchable location. By collating this into a static website, users can enjoy a browsing experience with fast page load speeds.

The serverless nature of the site means that developers don’t need to manage infrastructure or scalability. The use of AWS Amplify Console to automatically deploy directly from GitHub enables a regular release cadence with a fast transition from prototype to production.

Static websites

A static site is served to the user’s web browser exactly as stored. This contrasts to dynamic webpages, which are generated by a web application. Static websites often provide improved performance for end users and have fewer or no dependant systems, such as databases or application servers. They may also be more cost-effective and secure than dynamic websites by using cloud storage, instead of a hosted environment.

A static site generator is a tool that generates a static website from a website’s configuration and content. Content can come from a headless content management system, through a REST API, or from data referenced within the website’s file system. The output of a static site generator is a set of static files that form the website.

Serverless Land uses a static site generator for Vue.js called Nuxt.js. Each time content is updated, Nuxt.js regenerates the static site, building the HTML for each page route and storing it in a file.

The architecture

Serverless Land static website architecture

When the content.json file is committed to GitHub, a new build process is triggered in AWS Amplify Console.

Deploying AWS Amplify

AWS Amplify helps developers to build secure and scalable full stack cloud applications. AWS Amplify Console is a tool within Amplify that provides a user interface with a git-based workflow for hosting static sites. Deploy applications by connecting to an existing repository (GitHub, BitBucket Cloud, GitLab, and AWS CodeCommit) to set up a fully managed, nearly continuous deployment pipeline.

This means that any changes committed to the repository trigger the pipeline to build, test, and deploy the changes to the target environment. It also provides instant content delivery network (CDN) cache invalidation, atomic deploys, password protection, and redirects without the need to manage any servers.

Building the static website

  1. To get started, use the Nuxt.js scaffolding tool to deploy a boiler plate application. Make sure you have npx installed (npx is shipped by default with npm version 5.2.0 and above).
    $ npx create-nuxt-app content-aggregator

    The scaffolding tool asks some questions, answer as follows:Nuxt.js scaffolding tool inputs

  2. Navigate to the project directory and launch it with:
    $ cd content-aggregator
    $ npm run dev

    The application is now running on http://localhost:3000.The pages directory contains your application views and routes. Nuxt.js reads the .vue files inside this directory and automatically creates the router configuration.

  3. Create a new file in the /pages directory named blogs.vue:$ touch pages/blogs.vue
  4. Copy the contents of this file into pages/blogs.vue.
  5. Create a new file in /components directory named Post.vue :$ touch components/Post.vue
  6. Copy the contents of this file into components/Post.vue.
  7. Create a new file in /assets named content.json and copy the contents of this file into it.$ touch /assets/content.json

The blogs Vue component

The blogs page is a Vue component with some special attributes and functions added to make development of your application easier. The following code imports the content.json file into the variable blogPosts. This file stores the static website’s array of aggregated blog post content.

import blogPosts from '../assets/content.json'

An array named blogPosts is initialized:

data(){
    return{
      blogPosts: []
    }
  },

The array is then loaded with the contents of content.json.

 mounted(){
    this.blogPosts = blogPosts
  },

In the component template, the v-for directive renders a list of post items based on the blogPosts array. It requires a special syntax in the form of blog in blogPosts, where blogPosts is the source data array and blog is an alias for the array element being iterated on. The Post component is rendered for each iteration. Since components have isolated scopes of their own, a :post prop is used to pass the iterated data into the Post component:

<ul>
  <li v-for="blog in blogPosts" :key="blog">
     <Post :post="blog" />
  </li>
</ul>

The post data is then displayed by the following template in components/Post.vue.

<template>
    <div class="hello">
      <h3>{{ post.title }} </h3>
      <div class="img-holder">
          <img :src="post.image" />
      </div>
      <p>{{ post.intro }} </p>
      <p>Published on {{post.date}}, by {{ post.author }} p>
      <a :href="post.link"> Read article</a>
    </div>
</template>

This forms the framework for the static website. The /blogs page displays content from /assets/content.json via the Post component. To view this, go to http://localhost:3000/blogs in your browser:

The /blogs page

Add a new item to the content.json file and rebuild the static website to display new posts on the blogs page. The previous content was generated using the aggregation workflow explained in this companion blog post.

Connect to Amplify Console

Clone the web application to a GitHub repository and connect it to Amplify Console to automate the rebuild and deployment process:

  1. Upload the code to a new GitHub repository named ‘content-aggregator’.
  2. In the AWS Management Console, go to the Amplify Console and choose Connect app.
  3. Choose GitHub then Continue.
  4. Authorize to your GitHub account, then in the Recently updated repositories drop-down select the ‘content-aggregator’ repository.
  5. In the Branch field, leave the default as master and choose Next.
  6. In the Build and test settings choose edit.
  7. Replace - npm run build with – npm run generate.
  8. Replace baseDirectory: / with baseDirectory: dist

    This runs the nuxt generate command each time an application build process is triggered. The nuxt.config.js file has a target property with the value of static set. This generates the web application into static files. Nuxt.js creates a dist directory with everything inside ready to be deployed on a static hosting service.
  9. Choose Save then Next.
  10. Review the Repository details and App settings are correct. Choose Save and deploy.

    Amplify Console deployment

Once the deployment process has completed and is verified, choose the URL generated by Amplify Console. Append /blogs to the URL, to see the static website blogs page.

Any edits pushed to the repository’s content.json file trigger a new deployment in Amplify Console that regenerates the static website. This companion blog post explains how to set up an automated content aggregator to add new items to the content.json file from an RSS feed.

Conclusion

This blog post shows how to create a static website with vue.js using the nuxt.js static site generator. The site’s content is generated from a single JSON file, stored in the site’s assets directory. It is automatically deployed and re-generated by Amplify Console each time a new commit is pushed to the GitHub repository. By automating updates to the content.json file you can create low-maintenance, low-latency static websites with almost limitless scalability.

This application framework is used together with this automated content aggregator to pull together articles for http://serverlessland.com. Serverless Land brings together all the latest blogs, videos, and training for AWS Serverless. Download the code from this GitHub repository to start building your own automated content aggregation platform.

Using Amazon MQ as an event source for AWS Lambda

Post Syndicated from James Beswick original https://aws.amazon.com/blogs/compute/using-amazon-mq-as-an-event-source-for-aws-lambda/

Amazon MQ is a managed, highly available message broker for Apache ActiveMQ. The service manages the provisioning, setup, and maintenance of ActiveMQ. Now, with Amazon MQ as an event source for AWS Lambda, you can process messages from the service. This allows you to integrate Amazon MQ with downstream serverless workflows.

ActiveMQ is a popular open source message broker that uses open standard APIs and protocols. You can move from any message broker that uses these standards to Amazon MQ. With Amazon MQ, you can deploy production-ready broker configurations in minutes, and migrate existing messaging services to the AWS Cloud. Often, this does not require you to rewrite any code, and in many cases you only need to update the application endpoints.

In this blog post, I explain how to set up an Amazon MQ broker and networking configuration. I also show how to create a Lambda function that is invoked by messages from Amazon MQ queues.

Overview

Using Amazon MQ as an event source operates in a similar way to using Amazon SQS or Amazon Kinesis. In all cases, the Lambda service internally polls for new records or messages from the event source, and then synchronously invokes the target Lambda function. Lambda reads the messages in batches and provides these to your function as an event payload.

Lambda is a consumer application for your Amazon MQ queue. It processes records from one or more partitions and sends the payload to the target function. Lambda continues to process batches until there are no more messages in the topic.

The Lambda function’s event payload contains an array of records in the messages attribute. Each array item contains envelope details of the message, together with the base64 encoded message in the data attribute:

Base64 encoded data in payload

How to configure Amazon MQ as an event source for Lambda

Amazon MQ is a highly available service, so it must be configured to run in a minimum of two Availability Zones in your preferred Region. You can also run a single broker in one Availability Zone for development and test purposes. In this walk through, I show how to run a production, public broker and then configure an event source mapping for a Lambda function.

MQ broker architecture

There are four steps:

  • Configure the Amazon MQ broker and security group.
  • Create a queue on the broker.
  • Set up AWS Secrets Manager.
  • Build the Lambda function and associated permissions.

Configuring the Amazon MQ broker and security group

In this step, you create an Amazon MQ broker and then configure the broker’s security group to allow inbound access on ports 8162 and 61617.

  1. Navigate to the Amazon MQ console and choose Create brokers.
  2. In Step 1, keep the defaults and choose Next.
  3. In Configure settings, in the ActiveMQ Access panel, enter a user name and password for broker access.ActiveMQ access
  4. Expand the Additional settings panel, keep the defaults, and ensure that Public accessibility is set to Yes. Choose Create broker.Public accessibility setting
  5. The creation process takes up to 15 minutes. From the Brokers list, select the broker name. In the Details panel, choose the Security group.Security group setting
  6. On the Inbound rules tab, choose Edit inbound rules. Add rules to enable inbound TCP traffic on ports 61617 and 8162:Editing inbound rules
  • Port 8162 is used to access the ActiveMQ Web Console to configure the broker settings.
  • Port 61667 is used by the internal Lambda poller to connect with your broker, using the OpenWire endpoint.

Create a queue on the broker

The Lambda service subscribes to a queue on the broker. In this step, you create a new queue:

  1. Navigate to the Amazon MQ console and choose the newly created broker. In the Connections panel, locate the URLs for the web console.ActiveMQ web console URLs
  2. Only one endpoint is active at a time. Select both and one resolves to the ActiveMQ Web Console application. Enter the user name and password that you configured earlier.ActiveMQ Web Console
  3. In the top menu, select Queues. For Queue Name, enter myQueue and choose Create. The new queue appears in the Queues list.Creating a queue

Keep this webpage open, since you use this later for sending messages to the Lambda function.

Set up Secrets Manager

The Lambda service needs access to your Amazon MQ broker, using the user name and password you configured earlier. To avoid exposing secrets in plaintext in the Lambda function, it’s best practice to use a service like Secrets Manager. To create a secret, use the create-secret AWS CLI command. To do this, ensure you have the AWS CLI installed.

From a terminal window, enter this command, replacing the user name and password with your own values:

aws secretsmanager create-secret --name MQaccess --secret-string '{"username": "your-username", "password": "your-password"}'

The command responds with the ARN of the stored secret:

Secrets Manager CLI response

Build the Lambda function and associated permissions

The Lambda must have permission to access the Amazon MQ broker and stored secret. It must also be able to describe VPCs and security groups, and manage elastic network interfaces. These execution roles permissions are:

  • mq:DescribeBroker
  • secretsmanager:GetSecretValue
  • ec2:CreateNetworkInterface
  • ec2:DescribeNetworkInterfaces
  • ec2:DescribeVpcs
  • ec2:DeleteNetworkInterface
  • ec2:DescribeSubnets
  • ec2:DescribeSecurityGroups

If you are using an encrypted customer managed key, you must also add the kms:Decrypt permission.

To set up the Lambda function:

  1. Navigate to the Lambda console and choose Create Function.
  2. For function name, enter MQconsumer and choose Create Function.
  3. In the Permissions tab, choose the execution role to edit the permissions.Lambda function permissions tab
  4. Choose Attach policies then choose Create policy.
  5. Select the JSON tab and paste the following policy. Choose Review policy.
    {
        "Version": "2012-10-17",
        "Statement": [
            {
                "Effect": "Allow",
                "Action": [
                    "mq:DescribeBroker",
                    "secretsmanager:GetSecretValue",
                    "ec2:CreateNetworkInterface",
                    "ec2:DescribeNetworkInterfaces",
                    "ec2:DescribeVpcs",
                    "ec2:DeleteNetworkInterface",
                    "ec2:DescribeSubnets",
                    "ec2:DescribeSecurityGroups",
                    "logs:CreateLogGroup",
                    "logs:CreateLogStream",
                    "logs:PutLogEvents"
                ],
                "Resource": "*"
            }
        ]
    }
    

    Create IAM policy

  6. For name, enter ‘AWSLambdaMQExecutionRole’. Choose Create policy.
  7. In the IAM Summary panel, choose Attach policies. Search for AWSLambdaMQExecutionRole and choose Attach policy.Attaching the IAM policy to the role
  8. On the Lambda function page, in the Designer panel, choose Add trigger. Select MQ from the drop-down. Choose the broker name, enter ‘myQueue’ for Queue name, and choose the secret ARN. Choose Add.Add trigger to Lambda function
  9. The status of the Amazon MQ trigger changes from Creating to Enabled after a couple of minutes. The trigger configuration confirms the settings.Trigger configuration settings

Testing the event source mapping

  1. In the ActiveMQ Web Console, choose Active consumers to confirm that the Lambda service has been configured to consume events.Active consumers
  2. In the main dashboard, choose Send To on the queue. For Number of messages to send, enter 10 and keep the other defaults. Enter a test message then choose Send.Send message to queue
  3. In the MQconsumer Lambda function, select the Monitoring tab and then choose View logs in CloudWatch. The log streams show that the Lambda function has been invoked by Amazon MQ.Lambda function logs

A single Lambda function consumes messages from a single queue in an Amazon MQ broker. You control the rate of message processing using the Batch size property in the event source mapping. The Lambda service limits the concurrency to one execution environment per queue.

For example, in a queue with 100,000 messages and a batch size of 100 and function duration of 2000 ms, the Monitoring tab shows this behavior. The Concurrent executions graph remains at 1 as the internal Lambda poller fetches messages. It continues to invoke the Lambda function until the queue is empty.

CloudWatch metrics for consuming function

Using AWS SAM

In AWS SAM templates, you can configure a Lambda function with an Amazon MQ event source mapping and the necessary permissions. For example:

Resources:
  ProcessMSKfunction:
    Type: AWS::Serverless::Function 
    Properties:
      CodeUri: code/
      Timeout: 3
      Handler: app.lambdaHandler
      Runtime: nodejs12.x
      Events:
  MQEvent:
    Type: MQ
    Properties:
      BatchSize: 100
      Stream: arn:aws:mq:us-east-1:123456789012:broker:myMQbroker:b-bf02ad26-cc1a-4598-aa0d-82f2d88eb2ae
      QueueName:
        - myQueue
Policies:
  - Statement:
    - Effect: Allow
      Resource: '*'
      Action:
      - mq:DescribeBroker
      - secretsmanager:GetSecretValue
      - ec2:CreateNetworkInterface
      - ec2:DescribeNetworkInterfaces
      - ec2:DescribeVpcs
      - ec2:DeleteNetworkInterface
      - ec2:DescribeSubnets
      - ec2:DescribeSecurityGroups
      - logs:CreateLogGroup
      - logs:CreateLogStream
      - logs:PutLogEvents

Conclusion

Amazon MQ provide a fully managed, highly available message broker service for Apache ActiveMQ. Now Lambda supports Amazon MQ as an event source, you can invoke Lambda functions from messages in Amazon MQ queues to integrate into your downstream serverless workflows.

In this post, I give an overview of how to set up an Amazon MQ broker. I show how to configure the networking and create the event source mapping with Lambda. I also show how to set up a consumer Lambda function in the AWS Management Console, and refer to the equivalent AWS SAM syntax to simplify deployment.

To learn more about how to use this feature, read the documentation. For more serverless learning resources, visit https://serverlessland.com.

Field Notes: How to Identify and Block Fake Crawler Bots Using AWS WAF

Post Syndicated from Vijay Menon original https://aws.amazon.com/blogs/architecture/field-notes-how-to-identify-and-block-fake-crawler-bots-using-aws-waf/

In this blog post, we focus on how to identify fake bots using these AWS services: AWS WAF, Amazon Kinesis Data Firehose, Amazon S3 and AWS Lambda. We use fake Google/Bing bots to demonstrate, but the principles can be applied to other popular crawlers like Slurp Bot from Yahoo, DuckDuckBot from DuckDuckGo, Alexa crawler from Alexa internet ranking service.

For industries like media, online retailors, news or social websites, content is critical and often sets them apart from other competitors. These companies put in a significant amount of effort to make the content as visible and accessible as possible. To do that these companies rely on crawler bots, so that legitimate users searching for content can find the content easily. Crawler bots are useful for indexing the site pages and helping make the content more searchable and improve rankings.

However, this capability can be misused. So it is important to distinguish between genuine crawler bots and fake ones that are doing more than just indexing your site. It’s important to properly identify good and bad actors so that you can stop the bad ones without impacting the ability of good ones, and at scale. This helps in driving more traffic, visitors, and more revenue from your websites.

Identifying bots

There are two primary sources of information required to identify a fake bot:

  • HTTP Header User-Agent: Fake bots try to present themselves as real bots, for example as Google or Bing, by using the same user agent string used by Google or Bing.
  • IP Address: You can look at the source IP address of the incoming request and determine if it belongs to the search engine provider network like Google or Bing. You can do this by performing a forward and reverse look up and comparing the results. These methods are well documented by the search engine providers Google and Bing.

Solution Overview

The solution leverages the capabilities of AWS WAF. Our demonstration application is a static website hosted on Amazon S3 fronted by Amazon CloudFront. This means that we can provide permission of access to the S3 bucket only to CloudFront using origin access identity.

The logs are streamed in near real time using Amazon Kinesis Data Firehose, inspected using a Lambda function to help identify fake bots before storing the logs on Amazon S3. The Lambda function does two things:

  1. Inspect the traffic using the rules to identify bad or fake bots. In this case it uses forward and reverse DNS lookup results of the Client IP address of packets with User-Agent string resembling GoogleBot or BingBot.
  2. Once identified as a fake bot, the Lambda function updates AWS WAF IP-Set to permanently block the requests coming from IP addresses of fake bots.

Note: For the sake of this demonstration, we are using a static website hosted on Amazon S3 with CloudFront. This requires the AWS WAF and IP-Set used by AWS WAF to be of scope ‘CLOUDFRONT’. You can modify it to use scope ‘REGIONAL’ if you chose to protect your web properties behind Application Load Balancer or API Gateway.

Solution Architecture

WAF Solution Architecture

Prerequisites

Readers of this blog post should be familiar with HTTP and the following AWS services:

For this walkthrough, you should have the following:

  • AWS Account
  • AWS Command Line Interface (AWS CLI): You need AWS CLI installed and configured on the workstation from where you are going to try the steps mentioned below.
  • Credentials configured in AWS CLI should have the required IAM permissions to spin up and modify the resources mentioned in this post.
  • Make sure that you deploy the solution to us-east-1 Region and your AWS CLI default Region is us-east-1. If us-east-1 is not the default Region, reference the Regions explicitly while executing AWS CLI commands using --region us-east-1 switch.
  • Amazon S3 bucket in us-east-1 region

Walkthrough

1.     Create an Amazon S3 static Website and put it behind an Amazon CloudFront distribution. You can follow these steps. Note down the CloudFront distribution ID. We will use it in subsequent steps.

2.     Download and unzip the file containing CloudFormation template and lambda function code from here to a folder in your local workstation. You will need to run all of the subsequent commands from this folder.

3.     Zip the lambda function lambda_function.py and upload it to an Amazon S3 bucket of your choice in us-east-1. Note the bucket name as it will be used in the subsequent steps. The blog uses waf-logs-fake-bots-us-east-1 for reference as the S3 bucket name.

$ zip lambda_function.py lambda_function.py.zip
$ aws s3 cp lambda_function.py.zip s3://waf-logs-fake-bots-us-east-1/

4.     Create the resources required for this blog post by deploying the AWS CloudFormation template and running the below command:

aws cloudformation create-stack \
--stack-name FakeBotBlockBlog \
--template-body file://BotBlog.yml \
--parameters ParameterKey=KinesisBufferIntervalSeconds,ParameterValue=900 ParameterKey=KinesisBufferSizeMB,ParameterValue=3 ParameterKey=IPSetName,ParameterValue=BlockFakeBotIPSet ParameterKey=IPSetScope,ParameterValue=CLOUDFRONT ParameterKey=S3BucketWithDeploymentPackage,ParameterValue=waf-logs-fake-bots-us-east-1 ParameterKey=DeploymentPackageZippedFilename,ParameterValue=lambda_function.py.zip \
--capabilities CAPABILITY_IAM \
--region us-east-1

You need to provide the following information, and you can change the parameters based on your specific needs:

a.     KinesisBufferIntervalSeconds and KinesisBufferSizeMB. These will define the interval at which Kinesis Firehose ships the logs to Amazon S3, the Default is 900 seconds and 3MB respectively, whichever is met first.

b.     IPSetName. Name of the IP Set which will be used to record the client IP address of fake bots. Default value is BlockFakeBotIPSet.

c.     IPSetScope. Scope of the IP Set. I am using CLOUDFRONT and associate it with the CloudFront distribution created in step 1. You can choose to make it REGIONAL in which case WebACLassociation will need to be with an ALB or an API Gateway.

d.     S3BucketWithDeploymentPackage. Name of S3 bucket used in step 3. The blog assumes waf-logs-fake-bots-us-east-1.

e.     DeploymentPackageZipedFilename. Lambda function filename without the file extension. For example, the blog assumes lambda_function.py.zip is available on the Amazon S3 bucket and uses this value for this parameter.

Some stack templates might include resources that can affect permissions in your AWS account, for example, by creating new AWS Identity and Access Management (IAM) role. For those stacks, you must explicitly acknowledge this by specifying CAPABILITY_IAM or CAPABILITY_NAMED_IAM value for the –capabilities parameter.

Stack creation will take you approximately 5-7 minutes. Check the status of the stack by executing the below command every few minutes. You should see StackStatus value as CREATE_COMPLETE.

Example:

aws cloudformation describe-stacks --stack-name FakeBotBlockBlog | grep StackStatus

The CloudFormation template will create the following resources:

  • IP Set for AWS WAF
  • WebACL with rules to block the client IP addresses of fake bots, and an AWS-managed common rule set.
  • Lambda function to help detect fake bots and modify the AWS WAF IP Set to block them
  • Kinesis Firehose delivery stream, which will use the above Lambda function for processing
  • IAM roles with required permissions for the Lambda function and Kinesis Firehose
  • S3 bucket for AWS WAF logs

5.     Enable logging for the WebACL using AWS CLI. For this you need the ARN of the WebACL and Kinesis Firehose. You can find that information from the output of the CloudFormation stack created in step 4 using the below AWS CLI command

aws cloudformation describe-stacks --stack-name FakeBotBlockBlog

Please note the 2 ARNs and run the following commands by replacing (1) ResourceArn value with WebACL ARN and (2) LogDestinationConfigs value with Kinesis Firehose delivery stream ARN.

Example:

aws wafv2 put-logging-configuration –-logging-configuration ResourceArn=arn:aws:wafv2:us-east-1:123456789012:global/webacl/FakeBotWebACL/259ea98f-24ba-4acd-8803-3e7d02e8d482,LogDestinationConfigs=arn:aws:firehose:us-east-1:123456789012:deliverystream/aws-waf-logs-FakeBotBlockBlog --region us-east-1

6.     Associate CloudFront distribution with this WebACL: Sign in to the AWS Management Console and open the AWS WAF and Shield console at https://console.aws.amazon.com/wafv2/homev2/web-acls?region=global .

  • Click on the WebACL created earlier in this procedure
  • Navigate to ‘Associated AWS resources’ tab and select Add AWS resources
  • In the subsequent screen, select the CloudFront distribution created in step 1
  • Select Add

Note: If you are using an ALB or API Gateway for your web property, then you need to use REGIONAL WebACL and IP Set.  Review the procedure to associate an ALB or API Gateway to the WebACL.

You can monitor WebACL performance from the Overview section of WebACL from the AWS WAF and Shield console.

Testing

To test, you will need to generate some traffic which will trigger the lambda function to detect and block the fake bots created earlier in this blog. The web traffic can be generated from the local machine or from an EC2 instance with access to the internet using curl. Manually set the user agent to resemble Googlebot by running the following command from shell:

Replace http://www.awsdemodesign.com/ with the URL of your CloudFront distribution you created in step 1 of the walkthrough.

for i in {1..1000}; do curl -I -A "Mozilla/5.0 (compatible; Googlebot/2.1; +http://www.google.com/bot.html)" http://www.awsdemodesign.com/; done

Initially you will see HTTP1.1/ 200 OK response. This will trigger Lambda and modify the IP Set to include your public IP address to be blocked. You can verify that by inspecting the IP set from AWS WAF and Shield console.

  • Sign in to the AWS Management Console and open the AWS WAF and Shield console
  • Click on IP Set created earlier in this blog. In the subsequent screen you can see your public IP address in the list of IP addresses.

If you run the curl command again, you will see that the response now is HTTP/1.1 403 Forbidden.

Clean Up

  • Disassociate the CloudFront Distribution from WebACL
  • Delete the S3 bucket and CloudFront Distribution created in Step 1
  • Empty and delete the S3 bucket created by the CloudFormation stack for AWS WAF logs.
  • Delete CloudFormation stack created in Step 4.

Conclusion

In this blog post, we demonstrated how you can set up and inspect incoming web traffic using AWS Lambda, AWS WAF native logging capabilities, and Kinesis Firehose to help detect and block bad or fake bots at scale. Furthermore, the solution outlined in this post provides a framework which can be extended to identify similar unwanted traffic impersonating as other good bots.

Field Notes provides hands-on technical guidance from AWS Solutions Architects, consultants, and technical account managers, based on their experiences in the field solving real-world business problems for customers.


Building Serverless Land: Part 1 – Automating content aggregation

Post Syndicated from Benjamin Smith original https://aws.amazon.com/blogs/compute/building-serverless-land-part-1-automating-content-aggregation/

In this two part blog series, I show how serverlessland.com is built. This is a static website that brings together all the latest blogs, videos, and training for AWS Serverless. It automatically aggregates content from a number of sources. The content exists in static JSON files, which generate a new site build each time they are updated. The result is a low-maintenance, low-latency serverless website, with almost limitless scalability.

This blog post explains how to automate the aggregation of content from multiple RSS feeds into a JSON file stored in GitHub. This workflow uses AWS Lambda and AWS Step Functions, triggered by Amazon EventBridge. The application can be downloaded and deployed from this GitHub repository.

The growing adoption of serverless technologies generates increasing amounts of helpful and insightful content from the developer community. This content can be difficult to discover. Serverless Land helps channel this into a single searchable location. By automating the collection of this content with scheduled serverless workflows, the process robustly scales to near infinite numbers. The Step Functions MAP state allows for dynamic parallel processing of multiple content sources, without the need to alter code. On-boarding a new content source is as fast and simple as making a single CLI command.

The architecture

Automating content aggregation with AWS Step Functions

The application consists of six Lambda functions orchestrated by a Step Functions workflow:

  1. The workflow is triggered every 2 hours by an EventBridge scheduler. The schedule event passes an RSS feed URL to the workflow.
  2. The first task invokes a Lambda function that runs an HTTP GET request to the RSS feed. It returns an array of recent blog URLs. The array of blog URLs is provided as the input to a MAP state. The MAP state type makes it possible to run a set of steps for each element of an input array in parallel. The number of items in the array can be different for each execution. This is referred to as dynamic parallelism.
  3. The next task invokes a Lambda function that uses the GitHub REST API to retrieve the static website’s JSON content file.
  4. The first Lambda function in the MAP state runs an HTTP GET request to the blog post URL provided in the payload. The URL is scraped for content and an object containing detailed metadata about the blog post is returned in the response.
  5. The blog post metadata is compared against the website’s JSON content file in GitHub.
  6. A CHOICE state determines if the blog post metadata has already been committed to the repository.
  7. If the blog post is new, it is added to an array of “content to commit”.
  8. As the workflow exits the MAP state, the results are passed to the final Lambda function. This uses a single git commit to add each blog post object to the website’s JSON content file in GitHub. This triggers an event that rebuilds the static site.

Using Secrets in AWS Lambda

Two of the Lambda functions require a GitHub personal access token to commit files to a repository. Sensitive credentials or secrets such as this should be stored separate to the function code. Use AWS Systems Manager Parameter Store to store the personal access token as an encrypted string. The AWS Serverless Application Model (AWS SAM) template grants each Lambda function permission to access and decrypt the string in order to use it.

  1. Follow these steps to create a personal access token that grants permission to update files to repositories in your GitHub account.
  2. Use the AWS Command Line Interface (AWS CLI) to create a new parameter named GitHubAPIKey:
aws ssm put-parameter \
--name /GitHubAPIKey \
--value ReplaceThisWithYourGitHubAPIKey \
--type SecureString

{
    "Version": 1,
    "Tier": "Standard"
}

Deploying the application

  1. Fork this GitHub repository to your GitHub Account.
  2. Clone the forked repository to your local machine and deploy the application using AWS SAM.
  3. In a terminal, enter:
    git clone https://github.com/aws-samples/content-aggregator-example
    sam deploy -g
  4. Enter the required parameters when prompted.

This deploys the application defined in the AWS SAM template file (template.yaml).

The business logic

Each Lambda function is written in Node.js and is stored inside a directory that contains the package dependencies in a `node_modules` folder. These are defined for each function by its relative package.json file. The function dependencies are bundled and deployed using the sam build && deploy -g command.

The GetRepoContents and WriteToGitHub Lambda functions use the octokit/rest.js library to communicate with GitHub. The library authenticates to GitHub by using the GitHub API key held in Parameter Store. The AWS SDK for Node.js is used to obtain the API key from Parameter Store. With a single synchronous call, it retrieves and decrypts the parameter value. This is then used to authenticate to GitHub.

const AWS = require('aws-sdk');
const SSM = new AWS.SSM();


//get Github API Key and Authenticate
    const singleParam = { Name: '/GitHubAPIKey ',WithDecryption: true };
    const GITHUB_ACCESS_TOKEN = await SSM.getParameter(singleParam).promise();
    const octokit = await  new Octokit({
      auth: GITHUB_ACCESS_TOKEN.Parameter.Value,
    })

Lambda environment variables are used to store non-sensitive key value data such as the repository name and JSON file location. These can be entered when deploying with AWS SAM guided deploy command.

Environment:
        Variables:
          GitHubRepo: !Ref GitHubRepo
          JSONFile: !Ref JSONFile

The GetRepoContents function makes a synchronous HTTP request to the GitHub repository to retrieve the contents of the website’s JSON file. The response SHA and file contents are returned from the Lambda function and acts as the input to the next task in the Step Functions workflow. This SHA is used in final step of the workflow to save all new blog posts in a single commit.

Map state iterations

The MAP state runs concurrently for each element in the input array (each blog post URL).

Each iteration must compare a blog post URL to the existing JSON content file and decide whether to ignore the post. To do this, the MAP state requires both the input array of blog post URLs and the existing JSON file contents. The ItemsPath, ResultPath, and Parameters are used to achieve this:

  • The ItemsPath sets input array path to $.RSSBlogs.body.
  • The ResultPath states that the output of the branches is placed in $.mapResults.
  • The Parameters block replaces the input to the iterations with a JSON node. This contains both the current item data from the context object ($$.Map.Item.Value) and the contents of the GitHub JSON file ($.RepoBlogs).
"Type":"Map",
    "InputPath": "$",
    "ItemsPath": "$.RSSBlogs.body",
    "ResultPath": "$.mapResults",
    "Parameters": {
        "BlogUrl.$": "$$.Map.Item.Value",
        "RepoBlogs.$": "$.RepoBlogs"
     },
    "MaxConcurrency": 0,
    "Iterator": {
       "StartAt": "getMeta",

The Step Functions resource

The AWS SAM template uses the following Step Functions resource definition to create a Step Functions state machine:

  MyStateMachine:
    Type: AWS::Serverless::StateMachine
    Properties:
      DefinitionUri: statemachine/my_state_machine.asl.JSON
      DefinitionSubstitutions:
        GetBlogPostArn: !GetAtt GetBlogPost.Arn
        GetUrlsArn: !GetAtt GetUrls.Arn
        WriteToGitHubArn: !GetAtt WriteToGitHub.Arn
        CompareAgainstRepoArn: !GetAtt CompareAgainstRepo.Arn
        GetRepoContentsArn: !GetAtt GetRepoContents.Arn
        AddToListArn: !GetAtt AddToList.Arn
      Role: !GetAtt StateMachineRole.Arn

The actual workflow definition is defined in a separate file (statemachine/my_state_machine.asl.JSON). The DefinitionSubstitutions property specifies mappings for placeholder variables. This enables the template to inject Lambda function ARNs obtained by the GetAtt intrinsic function during template translation:

Step Functions mappings with placeholder variables

A state machine execution role is defined within the AWS SAM template. It grants the `Lambda invoke function` action. This is tightly scoped to the six Lambda functions that are used in the workflow. It is the minimum set of permissions required for the Step Functions to carry out its task. Additional permissions can be granted as necessary, which follows the zero-trust security model.

Action: lambda:InvokeFunction
Resource:
- !GetAtt GetBlogPost.Arn
- !GetAtt GetUrls.Arn
- !GetAtt CompareAgainstRepo.Arn
- !GetAtt WriteToGitHub.Arn
- !GetAtt AddToList.Arn
- !GetAtt GetRepoContents.Arn

The Step Functions workflow definition is authored using the AWS Toolkit for Visual Studio Code. The Step Functions support allows developers to quickly generate workflow definitions from selectable examples. The render tool and automatic linting can help you debug and understand the workflow during development. Read more about the toolkit in this launch post.

Scheduling events and adding new feeds

The AWS SAM template creates a new EventBridge rule on the default event bus. This rule is scheduled to invoke the Step Functions workflow every 2 hours. A valid JSON string containing an RSS feed URL is sent as the input payload. The feed URL is obtained from a template parameter and can be set on deployment. The AWS Compute Blog is set as the default feed URL. To aggregate additional blog feeds, create a new rule to invoke the Step Functions workflow. Provide the RSS feed URL as valid JSON input string in the following format:

{“feedUrl”:”replace-this-with-your-rss-url”}

ScheduledEventRule:
    Type: "AWS::Events::Rule"
    Properties:
      Description: "Scheduled event to trigger Step Functions state machine"
      ScheduleExpression: rate(2 hours)
      State: "ENABLED"
      Targets:
        -
          Arn: !Ref MyStateMachine
          Id: !GetAtt MyStateMachine.Name
          RoleArn: !GetAtt ScheduledEventIAMRole.Arn
          Input: !Sub
            - >
              {
                "feedUrl" : "${RssFeedUrl}"
              }
            - RssFeedUrl: !Ref RSSFeed

A completed workflow with step output

Conclusion

This blog post shows how to automate the aggregation of content from multiple RSS feeds into a single JSON file using serverless workflows.

The Step Functions MAP state allows for dynamic parallel processing of each item. The recent increase in state payload size limit means that the contents of the static JSON file can be held within the workflow context. The application decision logic is separated from the business logic and events.

Lambda functions are scoped to finite business logic with Step Functions states managing decision logic and iterations. EventBridge is used to manage the inbound business events. The zero-trust security model is followed with minimum permissions granted to each service and Parameter Store used to hold encrypted secrets.

This application is used to pull together articles for http://serverlessland.com. Serverless land brings together all the latest blogs, videos, and training for AWS Serverless. Download the code from this GitHub repository to start building your own automated content aggregation platform.

Rapid and flexible Infrastructure as Code using the AWS CDK with AWS Solutions Constructs

Post Syndicated from Biff Gaut original https://aws.amazon.com/blogs/devops/rapid-flexible-infrastructure-with-solutions-constructs-cdk/

Introduction

As workloads move to the cloud and all infrastructure becomes virtual, infrastructure as code (IaC) becomes essential to leverage the agility of this new world. JSON and YAML are the powerful, declarative modeling languages of AWS CloudFormation, allowing you to define complex architectures using IaC. Just as higher level languages like BASIC and C abstracted away the details of assembly language and made developers more productive, the AWS Cloud Development Kit (AWS CDK) provides a programming model above the native template languages, a model that makes developers more productive when creating IaC. When you instantiate CDK objects in your Typescript (or Python, Java, etc.) application, those objects “compile” into a YAML template that the CDK deploys as an AWS CloudFormation stack.

AWS Solutions Constructs take this simplification a step further by providing a library of common service patterns built on top of the CDK. These multi-service patterns allow you to deploy multiple resources with a single object, resources that follow best practices by default – both independently and throughout their interaction.

Comparison of an Application stack with Assembly Language, 4th generation language and Object libraries such as Hibernate with an IaC stack of CloudFormation, AWS CDK and AWS Solutions Constructs

Application Development Stack vs. IaC Development Stack

Solution overview

To demonstrate how using Solutions Constructs can accelerate the development of IaC, in this post you will create an architecture that ingests and stores sensor readings using Amazon Kinesis Data Streams, AWS Lambda, and Amazon DynamoDB.

An architecture diagram showing sensor readings being sent to a Kinesis data stream. A Lambda function will receive the Kinesis records and store them in a DynamoDB table.

Prerequisite – Setting up the CDK environment

Tip – If you want to try this example but are concerned about the impact of changing the tools or versions on your workstation, try running it on AWS Cloud9. An AWS Cloud9 environment is launched with an AWS Identity and Access Management (AWS IAM) role and doesn’t require configuring with an access key. It uses the current region as the default for all CDK infrastructure.

To prepare your workstation for CDK development, confirm the following:

  • Node.js 10.3.0 or later is installed on your workstation (regardless of the language used to write CDK apps).
  • You have configured credentials for your environment. If you’re running locally you can do this by configuring the AWS Command Line Interface (AWS CLI).
  • TypeScript 2.7 or later is installed globally (npm -g install typescript)

Before creating your CDK project, install the CDK toolkit using the following command:

npm install -g aws-cdk

Create the CDK project

  1. First create a project folder called stream-ingestion with these two commands:

mkdir stream-ingestion
cd stream-ingestion

  1. Now create your CDK application using this command:

npx [email protected] init app --language=typescript

Tip – This example will be written in TypeScript – you can also specify other languages for your projects.

At this time, you must use the same version of the CDK and Solutions Constructs. We’re using version 1.68.0 of both based upon what’s available at publication time, but you can update this with a later version for your projects in the future.

Let’s explore the files in the application this command created:

  • bin/stream-ingestion.ts – This is the module that launches the application. The key line of code is:

new StreamIngestionStack(app, 'StreamIngestionStack');

This creates the actual stack, and it’s in StreamIngestionStack that you will write the CDK code that defines the resources in your architecture.

  • lib/stream-ingestion-stack.ts – This is the important class. In the constructor of StreamIngestionStack you will add the constructs that will create your architecture.

During the deployment process, the CDK uploads your Lambda function to an Amazon S3 bucket so it can be incorporated into your stack.

  1. To create that S3 bucket and any other infrastructure the CDK requires, run this command:

cdk bootstrap

The CDK uses the same supporting infrastructure for all projects within a region, so you only need to run the bootstrap command once in any region in which you create CDK stacks.

  1. To install the required Solutions Constructs packages for our architecture, run the these two commands from the command line:

npm install @aws-solutions-constructs/[email protected]

Write the code

First you will write the Lambda function that processes the Kinesis data stream messages.

  1. Create a folder named lambda under stream-ingestion
  2. Within the lambda folder save a file called lambdaFunction.js with the following contents:
var AWS = require("aws-sdk");

// Create the DynamoDB service object
var ddb = new AWS.DynamoDB({ apiVersion: "2012-08-10" });

AWS.config.update({ region: process.env.AWS_REGION });

// We will configure our construct to 
// look for the .handler function
exports.handler = async function (event) {
  try {
    // Kinesis will deliver records 
    // in batches, so we need to iterate through
    // each record in the batch
    for (let record of event.Records) {
      const reading = parsePayload(record.kinesis.data);
      await writeRecord(record.kinesis.partitionKey, reading);
    };
  } catch (err) {
    console.log(`Write failed, err:\n${JSON.stringify(err, null, 2)}`);
    throw err;
  }
  return;
};

// Write the provided sensor reading data to the DynamoDB table
async function writeRecord(partitionKey, reading) {

  var params = {
    // Notice that Constructs automatically sets up 
    // an environment variable with the table name.
    TableName: process.env.DDB_TABLE_NAME,
    Item: {
      partitionKey: { S: partitionKey },  // sensor Id
      timestamp: { S: reading.timestamp },
      value: { N: reading.value}
    },
  };

  // Call DynamoDB to add the item to the table
  await ddb.putItem(params).promise();
}

// Decode the payload and extract the sensor data from it
function parsePayload(payload) {

  const decodedPayload = Buffer.from(payload, "base64").toString(
    "ascii"
  );

  // Our CLI command will send the records to Kinesis
  // with the values delimited by '|'
  const payloadValues = decodedPayload.split("|", 2)
  return {
    value: payloadValues[0],
    timestamp: payloadValues[1]
  }
}

We won’t spend a lot of time explaining this function – it’s pretty straightforward and heavily commented. It receives an event with one or more sensor readings, and for each reading it extracts the pertinent data and saves it to the DynamoDB table.

You will use two Solutions Constructs to create your infrastructure:

The aws-kinesisstreams-lambda construct deploys an Amazon Kinesis data stream and a Lambda function.

  • aws-kinesisstreams-lambda creates the Kinesis data stream and Lambda function that subscribes to that stream. To support this, it also creates other resources, such as IAM roles and encryption keys.

The aws-lambda-dynamodb construct deploys a Lambda function and a DynamoDB table.

  • aws-lambda-dynamodb creates an Amazon DynamoDB table and a Lambda function with permission to access the table.
  1. To deploy the first of these two constructs, replace the code in lib/stream-ingestion-stack.ts with the following code:
import * as cdk from "@aws-cdk/core";
import * as lambda from "@aws-cdk/aws-lambda";
import { KinesisStreamsToLambda } from "@aws-solutions-constructs/aws-kinesisstreams-lambda";

import * as ddb from "@aws-cdk/aws-dynamodb";
import { LambdaToDynamoDB } from "@aws-solutions-constructs/aws-lambda-dynamodb";

export class StreamIngestionStack extends cdk.Stack {
  constructor(scope: cdk.Construct, id: string, props?: cdk.StackProps) {
    super(scope, id, props);

    const kinesisLambda = new KinesisStreamsToLambda(
      this,
      "KinesisLambdaConstruct",
      {
        lambdaFunctionProps: {
          // Where the CDK can find the lambda function code
          runtime: lambda.Runtime.NODEJS_10_X,
          handler: "lambdaFunction.handler",
          code: lambda.Code.fromAsset("lambda"),
        },
      }
    );

    // Next Solutions Construct goes here
  }
}

Let’s explore this code:

  • It instantiates a new KinesisStreamsToLambda object. This Solutions Construct will launch a new Kinesis data stream and a new Lambda function, setting up the Lambda function to receive all the messages in the Kinesis data stream. It will also deploy all the additional resources and policies required for the architecture to follow best practices.
  • The third argument to the constructor is the properties object, where you specify overrides of default values or any other information the construct needs. In this case you provide properties for the encapsulated Lambda function that informs the CDK where to find the code for the Lambda function that you stored as lambda/lambdaFunction.js earlier.
  1. Now you’ll add the second construct that connects the Lambda function to a new DynamoDB table. In the same lib/stream-ingestion-stack.ts file, replace the line // Next Solutions Construct goes here with the following code:
    // Define the primary key for the new DynamoDB table
    const primaryKeyAttribute: ddb.Attribute = {
      name: "partitionKey",
      type: ddb.AttributeType.STRING,
    };

    // Define the sort key for the new DynamoDB table
    const sortKeyAttribute: ddb.Attribute = {
      name: "timestamp",
      type: ddb.AttributeType.STRING,
    };

    const lambdaDynamoDB = new LambdaToDynamoDB(
      this,
      "LambdaDynamodbConstruct",
      {
        // Tell construct to use the Lambda function in
        // the first construct rather than deploy a new one
        existingLambdaObj: kinesisLambda.lambdaFunction,
        tablePermissions: "Write",
        dynamoTableProps: {
          partitionKey: primaryKeyAttribute,
          sortKey: sortKeyAttribute,
          billingMode: ddb.BillingMode.PROVISIONED,
          removalPolicy: cdk.RemovalPolicy.DESTROY
        },
      }
    );

    // Add autoscaling
    const readScaling = lambdaDynamoDB.dynamoTable.autoScaleReadCapacity({
      minCapacity: 1,
      maxCapacity: 50,
    });

    readScaling.scaleOnUtilization({
      targetUtilizationPercent: 50,
    });

Let’s explore this code:

  • The first two const objects define the names and types for the partition key and sort key of the DynamoDB table.
  • The LambdaToDynamoDB construct instantiated creates a new DynamoDB table and grants access to your Lambda function. The key to this call is the properties object you pass in the third argument.
    • The first property sent to LambdaToDynamoDB is existingLambdaObj – by setting this value to the Lambda function created by KinesisStreamsToLambda, you’re telling the construct to not create a new Lambda function, but to grant the Lambda function in the other Solutions Construct access to the DynamoDB table. This illustrates how you can chain many Solutions Constructs together to create complex architectures.
    • The second property sent to LambdaToDynamoDB tells the construct to limit the Lambda function’s access to the table to write only.
    • The third property sent to LambdaToDynamoDB is actually a full properties object defining the DynamoDB table. It provides the two attribute definitions you created earlier as well as the billing mode. It also sets the RemovalPolicy to DESTROY. This policy setting ensures that the table is deleted when you delete this stack – in most cases you should accept the default setting to protect your data.
  • The last two lines of code show how you can use statements to modify a construct outside the constructor. In this case we set up auto scaling on the new DynamoDB table, which we can access with the dynamoTable property on the construct we just instantiated.

That’s all it takes to create the all resources to deploy your architecture.

  1. Save all the files, then compile the Typescript into a CDK program using this command:

npm run build

  1. Finally, launch the stack using this command:

cdk deploy

(Enter “y” in response to Do you wish to deploy all these changes (y/n)?)

You will see some warnings where you override CDK default values. Because you are doing this intentionally you may disregard these, but it’s always a good idea to review these warnings when they occur.

Tip – Many mysterious CDK project errors stem from mismatched versions. If you get stuck on an inexplicable error, check package.json and confirm that all CDK and Solutions Constructs libraries have the same version number (with no leading caret ^). If necessary, correct the version numbers, delete the package-lock.json file and node_modules tree and run npm install. Think of this as the “turn it off and on again” first response to CDK errors.

You have now deployed the entire architecture for the demo – open the CloudFormation stack in the AWS Management Console and take a few minutes to explore all 12 resources that the program deployed (and the 380 line template generated to created them).

Feed the Stream

Now use the CLI to send some data through the stack.

Go to the Kinesis Data Streams console and copy the name of the data stream. Replace the stream name in the following command and run it from the command line.

aws kinesis put-records \
--stream-name StreamIngestionStack-KinesisLambdaConstructKinesisStreamXXXXXXXX-XXXXXXXXXXXX \
--records \
PartitionKey=1301,'Data=15.4|2020-08-22T01:16:36+00:00' \
PartitionKey=1503,'Data=39.1|2020-08-22T01:08:15+00:00'

Tip – If you are using the AWS CLI v2, the previous command will result in an “Invalid base64…” error because v2 expects the inputs to be Base64 encoded by default. Adding the argument --cli-binary-format raw-in-base64-out will fix the issue.

To confirm that the messages made it through the service, open the DynamoDB console – you should see the two records in the table.

Now that you’ve got it working, pause to think about what you just did. You deployed a system that can ingest and store sensor readings and scale to handle heavy loads. You did that by instantiating two objects – well under 60 lines of code. Experiment with changing some property values and deploying the changes by running npm run build and cdk deploy again.

Cleanup

To clean up the resources in the stack, run this command:

cdk destroy

Conclusion

Just as languages like BASIC and C allowed developers to write programs at a higher level of abstraction than assembly language, the AWS CDK and AWS Solutions Constructs allow us to create CloudFormation stacks in Typescript, Java, or Python instead JSON or YAML. Just as there will always be a place for assembly language, there will always be situations where we want to write CloudFormation templates manually – but for most situations, we can now use the AWS CDK and AWS Solutions Constructs to create complex and complete architectures in a fraction of the time with very little code.

AWS Solutions Constructs can currently be used in CDK applications written in Typescript, Javascript, Java and Python and will be available in C# applications soon.

About the Author

Biff Gaut has been shipping software since 1983, from small startups to large IT shops. Along the way he has contributed to 2 books, spoken at several conferences and written many blog posts. He is now a Principal Solutions Architect at AWS working on the AWS Solutions Constructs team, helping customers deploy better architectures more quickly.

Register for the Modern Applications Online Event

Post Syndicated from Rachel Richardson original https://aws.amazon.com/blogs/compute/register-for-the-modern-applications-online-event/

Earlier this year we hosted the first serverless themed virtual event, the Serverless-First Function. We enjoyed the opportunity to virtually connect with our customers so much that we want to do it again. This time, we’re expanding the scope to feature serverless, containers, and front-end development content. The Modern Applications Online Event is scheduled for November 4-5, 2020.

This free, two-day event addresses how to build and operate modern applications at scale across your organization, enabling you to become more agile and respond to change faster. The event covers topics including serverless application development, containers best practices, front-end web development and more. If you missed the containers or serverless virtual events earlier this year, this is great opportunity to watch the content and interact directly with expert moderators. The full agenda is listed below.

Register now

Organizational Level Operations

Wednesday, November 4, 2020, 9:00 AM – 1:00 PM PT

Move fast and ship things: Using serverless to increase speed and agility within your organization
In this session, Adrian Cockcroft demonstrates how you can use serverless to build modern applications faster than ever. Cockcroft uses real-life examples and customer stories to debunk common misconceptions about serverless.

Eliminating busywork at the organizational level: Tips for using serverless to its fullest potential 
In this session, David Yanacek discusses key ways to unlock the full benefits of serverless, including building services around APIs and using service-oriented architectures built on serverless systems to remove the roadblocks to continuous innovation.

Faster Mobile and Web App Development with AWS Amplify
In this session, Brice Pellé, introduces AWS Amplify, a set of tools and services that enables mobile and front-end web developers to build full stack serverless applications faster on AWS. Learn how to accelerate development with AWS Amplify’s use-case centric open-source libraries and CLI, and its fully managed web hosting service with built-in CI/CD.

Built Serverless-First: How Workgrid Software transformed from a Liberty Mutual project to its own global startup
Connected through a central IT team, Liberty Mutual has embraced serverless since AWS Lambda’s inception in 2014. In this session, Gillian McCann discusses Workgrid’s serverless journey—from internal microservices project within Liberty Mutual to independent business entity, all built serverless-first. Introduction by AWS Principal Serverless SA, Sam Dengler.

Market insights: A conversation with Forrester analyst Jeffrey Hammond & Director of Product for Lambda Ajay Nair
In this session, guest speaker Jeffrey Hammond and Director of Product for AWS Lambda, Ajay Nair, discuss the state of serverless, Lambda-based architectural approaches, Functions-as-a-Service platforms, and more. You’ll learn about the high-level and enduring enterprise patterns and advancements that analysts see driving the market today and determining the market in the future.

AWS Fargate Platform Version 1.4
In this session we will go through a brief introduction of AWS Fargate, what it is, its relation to EKS and ECS and the problems it addresses for customers. We will later introduce the concept of Fargate “platform versions” and we will then dive deeper into the new features that the new platform version 1.4 enables.

Persistent Storage on Containers
Containerizing applications that require data persistence or shared storage is often challenging since containers are ephemeral in nature, are scaled in and out dynamically, and typically clear any saved state when terminated. In this session you will learn about Amazon Elastic File System (EFS), a fully managed, elastic, highly-available, scalable, secure, high-performance, cloud native, shared file system that enables data to be persisted separately from compute for your containerized applications.

Security Best Practices on Amazon ECR
In this session, we will cover best practices with securing your container images using ECR. Learn how user access controls, image assurance, and image scanning contribute to securing your images.

Application Level Design

Thursday, November 5, 2020, 9:00 AM – 1:00 PM PT

Building a Live Streaming Platform with Amplify Video
In this session, learn how to build a live-streaming platform using Amplify Video and the platform powering it, AWS Elemental Live. Amplify video is an open source plugin for the Amplify CLI that makes it easy to incorporate video streaming into your mobile and web applications powered by AWS Amplify.

Building Serverless Web Applications
In this session, follow along as Ben Smith shows you how to build and deploy a completely serverless web application from scratch. The application will span from a mobile friendly front end to complex business logic on the back end.

Automating serverless application development workflows
In this talk, Eric Johnson breaks down how to think about CI/CD when building serverless applications with AWS Lambda and Amazon API Gateway. This session will cover using technologies like AWS SAM to build CI/CD pipelines for serverless application back ends.

Observability for your serverless applications
In this session, Julian Wood walks you through how to add monitoring, logging, and distributed tracing to your serverless applications. Join us to learn how to track platform and business metrics, visualize the performance and operations of your application, and understand which services should be optimized to improve your customer’s experience.

Happy Building with AWS Copilot
The hard part’s done. You and your team have spent weeks pouring over pull requests, building micro-services and containerizing them. Congrats! But what do you do now? How do you get those services on AWS? Copilot is a new command line tool that makes building, developing and operating containerized apps on AWS a breeze. In this session, we’ll talk about how Copilot helps you and your team set up modern applications that follow AWS best practices

CDK for Kubernetes
The CDK for Kubernetes (cdk8s) is a new open-source software development framework for defining Kubernetes applications and resources using familiar programming languages. Applications running on Kubernetes are composed of dozens of resources maintained through carefully maintained YAML files. As applications evolve and teams grow, these YAML files become harder and harder to manage. It’s also really hard to reuse and create abstractions through config files — copying & pasting from previous projects is not the solution! In this webinar, the creators of cdk8s show you how to define your first cdk8s application, define reusable components called “constructs” and generally say goodbye (and thank you very much) to writing in YAML.

Machine Learning on Amazon EKS
Amazon EKS has quickly emerged as a leading choice for machine learning workloads. In this session, we’ll walk through some of the recent ML related enhancements the Kubernetes team at AWS has released. We will then dive deep with walkthroughs of how to optimize your machine learning workloads on Amazon EKS, including demos of the latest features we’ve contributed to popular open source projects like Spark and Kubeflow

Deep Dive on Amazon ECS Capacity Providers
In this talk, we’ll dive into the different ways that ECS Capacity Providers can enable teams to focus more on their core business, and less on the infrastructure behind the scenes. We’ll look at the benefits and discuss scenarios where Capacity Providers can help solve the problems that customers face when using container orchestration. Lastly, we’ll review what features have been released with Capacity Providers, as well as look ahead at what’s to come.

Register now

Field Notes: Integrating IoT and ITSM using AWS IoT Greengrass and AWS Secrets Manager – Part 2

Post Syndicated from Gary Emmerton original https://aws.amazon.com/blogs/architecture/field-notes-integrating-iot-and-itsm-using-aws-iot-greengrass-and-aws-secrets-manager-part-2/

In part 1 of this blog I introduced the need for organizations to securely connect thousands of IoT devices with many different systems in the hyperconnected world that exists today, and how that can be addressed using AWS IoT Greengrass and AWS Secrets Manager.  We walked through the creation of ServiceNow credentials in AWS Secrets Manager, the creation of IAM roles and the Lambda functions that will run on our edge device (a Raspberry Pi).

In this second part of the blog, we will setup AWS IoT Greengrass, on our Raspberry Pi, and AWS IoT Core so that we can run the AWS Lambda functions and access our ServiceNow credentials, retrieved securely from AWS Secrets Manager.

Setting up AWS IoT Core and AWS IoT Greengrass

The overall sequence for configuring AWS IoT Core and AWS IoT Greengrass is:

  • Create a certificate, and IoT Thing and link them
  • Create AWS IoT Greengrass group
  • Associate IAM role to the AWS IoT Greengrass group
  • Create and attach a policy to the certificate
  • Create an AWS IoT Greengrass Resource Definition for our ‘Secret’
  • Create an AWS IoT Greengrass Function Definition for our Lambda functions
  • Create an AWS IoT Greengrass Subscription Definition for IoT Topics to be used
  • Finally associate our Resource, Function and Subscription Definitions with our AWS IoT Greengrass Core

Steps

For this walkthrough, I have selected the AWS region “eu-west-1”, however, feel free to use other Regions where AWS IoT Core and AWS IoT Greengrass are available.

First, let’s install Greengrass on the Raspberry Pi:

  • Follow the instructions to configure the pre-requisites on the Raspberry Pi
  • Then we download the AWS IoT Greengrass software
  • And then we unzip the AWS IoT Greengrass software using the following command (note, this command is for version 1.10.0 of Greengrass and will change as later versions are released):

sudo tar -xzvf greengrass-linux-armv6l-1.10.0.tar.gz -C /

Note that AWS IoT Greengrass must be compatible with the version of the AWS Greengrass SDK installed to identify what versions are compatible and use sudo pip3 install greengrasssdk==<version_number> to install the SDK compatible with the version of AWS IoT Greengrass that we installed.

Our AWS IoT Greengrass core will authenticate with AWS IoT Core in AWS using certificates, so we need to generate these first using the following command:

aws iot create-keys-and-certificate --set-as-active --certificate-pem-outfile "iot-ge.cert.pem" --public-key-outfile "iot-ge.public.key" --private-key-outfile "iot-ge.private.key"

This command will generate three files containing the private key, public key and certificate.  All of these files need to be copied to the /greengrass/certs folder on the Raspberry Pi.  Also, the output of the preceding command will give the ARN of the certificate – we need to make a note of this ARN as we will use it in the next steps.

We also need to download a copy of the Amazon Root CA into the /greegrass/certs folder using the command below:

sudo wget -O root.ca.pem https://www.amazontrust.com/repository/AmazonRootCA1.pem

For the next step we need our AWS account number and IoT Host address unique to our account – we get the IoT Host address using the command:

aws iot describe-endpoint --endpoint-type iot:Data-ATS

Now we need to create a config.json file on the Raspberry Pi in the /greengrass/config folder, with the account number and IoT Host address obtained in the previous step;

{
  "coreThing" : {
    "caPath" : "root.ca.pem",
    "certPath" : "iot-ge.cert.pem",
    "keyPath" : "iot-ge.private.key",
    "thingArn" : "arn:aws:iot:eu-west-1:<aws_account_number>:thing/IoT-blog_Core",
    "iotHost" : "<endpoint_address>",
    "ggHost" : "greengrass-ats.iot.eu-west-1.amazonaws.com",
    "keepAlive" : 600
  },
  "runtime" : {
    "cgroup" : {
      "useSystemd" : "yes"
    },
    "allowFunctionsToRunAsRoot" : "yes"
  },
  "managedRespawn" : false,
  "crypto" : {
    "principals" : {
      "SecretsManager" : {
        "privateKeyPath" : "file:///greengrass/certs/iot-ge.private.key"
      },
      "IoTCertificate" : {
        "privateKeyPath" : "file:///greengrass/certs/iot-ge.private.key",
        "certificatePath" : "file:///greengrass/certs/iot-ge.cert.pem"
      }
    },
    "caPath" : "file:///greengrass/certs/root.ca.pem"
  }
}

Note that the line "allowFunctionsToRunAsRoot" : "yes" allows the Lambda functions to easily access the SenseHat on the Raspberry Pi. This configuration should normally be avoided in Production environments for security reasons but has been used here for simplicity.

Next we create the IoT Thing to represent our Raspberry Pi to match the entry we added into the config.json file previously:

aws iot create-thing --thing-name IoT-blog_Core

Now that our config.json file is in place and our IoT ‘thing’ created we can start the AWS IoT Greengrass software using the following commands:

cd /greengrass/ggc/core/
sudo ./greengrassd start

Then we attach the certificate to our new Thing – we need the ARN of the certificate that was noted in the earlier steps when we created the certificates:

aws iot attach-thing-principal --thing-name "IoT-blog_Core" --principal "<certificate_arn>"

Now we create the AWS IoT Greengrass group – make a note of the Group ID in the output of this command as we use it later:

aws greengrass create-group --name IoT-blog-group

Next we create the AWS IoT Greengrass Core definition file – create this using a text editor and save as core-def.json

{
  "Cores": [
    {
      "CertificateArn": "<certificate_arn>",
      "Id": "<IoT Thing Name>",
      "SyncShadow": true,
      "ThingArn": "<thing_arn>"
    }
  ]
}

Then, using the preceding file we just created, we create the core definition using the following command:

aws greengrass create-core-definition --name "IoT-blog_Core" --initial-version file://core-def.json

Now we associate the AWS IoT Greengrass core with the AWS IoT Greengrass group – we need the LatestVersionARN from the output of the command above and the group ID of your existing AWS IoT Greengrass group (in the output from the command for creation of the group in previous steps):

aws greengrass create-group-version --group-id "<greengrass_group_id>" --core-definition-version-arn "<core_definition_version_arn>"

Then we associate the IAM role (created earlier) to the AWS IoT Greengrass group;

aws greengrass associate-role-to-group --group-id "<greengrass_group_id>" --role-arn "arn:aws:iam::<aws_account_number>:role/IoTGGRole"

We need to create a policy to associate with the certificate so that our AWS IoT Greengrass Core (authenticated/authorized by our certificates) has rights to interact with AWS IoT Core.  To do this we create the policy.json file:

{
  "Version": "2012-10-17",
  "Statement": [
    {
      "Effect": "Allow",
      "Action": [
        "iot:Publish",
        "iot:Subscribe",
        "iot:Connect",
        "iot:Receive"
      ],
      "Resource": [
        "*"
      ]
    },
    {
      "Effect": "Allow",
      "Action": [
        "iot:GetThingShadow",
        "iot:UpdateThingShadow",
        "iot:DeleteThingShadow"
      ],
      "Resource": [
        "*"
      ]
    },
    {
      "Effect": "Allow",
      "Action": [
        "greengrass:*"
      ],
      "Resource": [
        "*"
      ]
    }
  ]
}

Then create the policy using the policy file using the command below:

aws iot create-policy --policy-name myGGPolicy --policy-document file://policy.json

And finally attach our new policy to the certificate – as the certificate is attached to our AWS IoT Greengrass Core, this gives the rights defined in the policy to our AWS IoT Greengrass Core;

aws iot attach-policy --target "<certificate_arn>" --policy-name "myGGPolicy"

Now we have the AWS IoT Greengrass Core and permissions in place, it’s time to add our Secret as a resource for AWS IoT Greengrass.

First, we need to create a resource definition that refers to the ARN of the secret we created earlier.  Get the ARN of the secret using the following command:

aws secretsmanager describe-secret --secret-id "greengrass-snow-creds"

And then we create a text file containing the following and save it as resource.json:

{
"Resources": [
    {
      "Id": "SNOW-Credentials",
      "Name": "SNOW-Credentials",
      "ResourceDataContainer": {
        "SecretsManagerSecretResourceData": {
          "ARN": "<secret_arn>"
        }
      }
    }
  ]
}

Now we command to create the resource reference in IoT to the Secret:

aws greengrass create-resource-definition --name "MySNOWSecret" --initial-version file://resource.json

Note the Resource ID from the output as it is needed as it has to be added to the Lambda definition json file in the next steps.  The function definition file contains the details of the Lambda function(s) that we will attach to our AWS IoT Greengrass group.  We create a text file with the content below and save as lambda-def.json.

We also specify a couple of variables in the definition file; these are the same as the environment variables that can be specified for Lambda, but they make the variables available in AWS IoT Greengrass.

Note, if we specify environment variables for the functions in the Lambda console then these will NOT be available when the function is running under AWS IoT Greengrass.  We will need our ServiceNow API URL to add to the configuration below, and this will be in the form of https://devXXXXX.service-now.com/api/now/table/incident, where XXXXX is the developer instance number assigned by ServiceNow when our instance is created.

We need the ARNs of the Lambda functions that we created in part 1 of the blog – these appear in the output after successfully creating the functions from the command line, or can be obtained using the aws lambda list-functions command – we need to have the ‘:1’ at the end of the ARN as AWS IoT Greengrass needs to reference published function versions.

{
  "DefaultConfig": {
    "Execution": {
      "IsolationMode": "NoContainer",
      "RunAs": {
        "Gid": 0,
        "Uid": 0
      }
    }
  },
  "Functions": [
    {
      "FunctionArn": "<lambda_function1_arn>:1",
      "FunctionConfiguration": {
        "EncodingType": "json",
        "Environment": {
          "Execution": {
            "IsolationMode": "NoContainer"
          },
          "Variables": { 
            "tempLimit": "30",
            "humidLimit": "50"
          }
        },
        "ExecArgs": "string",
        "Executable": "lambda_function.lambda_handler",
        "Pinned": true,
        "Timeout": 10
      },
    "Id": "sensorLambda"
    },
    {
      "FunctionArn": "<lambda_function2_arn>:1",
      "FunctionConfiguration": {
        "EncodingType": "json",
        "Environment": {
          "Execution": {
            "IsolationMode": "NoContainer"
          },
          "ResourceAccessPolicies": [
            {
              "Permission": "ro",
              "ResourceId": "SNOW-Credentials"
            }
          ],
          "Variables": { 
            "snowUrl": "<service_now_api_url>"
          }
        },
        "ExecArgs": "string",
        "Executable": "lambda_function.lambda_handler",
        "Pinned": false,
        "Timeout": 10
      },
    "Id": "anomalyLambda"
    }
  ]
}

The Lambda function now needs to be registered within our AWS IoT Greengrass core using the definition file just created, using the following command:

aws greengrass create-function-definition --name "IoT-blog-lambda" --initial-version file://lambda-def.json

Create Subscriptions

We now need to create some IoT Topics to pass data between the two Lambda functions and also to submit all sensor data to AWS IoT Core, which gives us visibility of the successful collection of sensor data.cd.

First, let’s create a subscription configuration file (subscriptions.json) for sensor data and anomaly data:

{
  "Subscriptions": [
    {
      "Id": "SensorData",
      "Source": "<lambda_function1_arn>:1",
      "Subject": "IoTBlog/sensorData",
      "Target": "cloud"
    },
    {
      "Id": "AnomalyData",
      "Source": "<lambda_function1_arn>:1",
      "Subject": "IoTBlog/anomaly",
      "Target": "<lambda_function2_arn>:1"
    },
    {
      "Id": "AnomalyDataB",
      "Source": "<lambda_function1_arn>:1",
      "Subject": "IoTBlog/anomaly",
      "Target": "cloud"
    }
  ]
}

And next, we run the command to create the subscription from this configuration:

aws greengrass create-subscription-definition --name "IoT-sensor-subs" --initial-version file://subscriptions.json

Update AWS IoT Greengrass Group Associations and Deploy

Now that the functions, subscriptions and resources have been defined, we run the following command to update our AWS IoT Greengrass group to the new version with those components included:

aws greengrass create-group-version --group-id <gg_group_id> --core-definition-version-arn "<core_def_version_arn>" --function-definition-version-arn "<function_def_version_arn>" --resource-definition-version-arn "<resource_def_version_arn>" --subscription-definition-version-arn "<subscription_def_version_arn>"

And finally, we can deploy our configuration.  Use the following command to deploy the Greengrass group to our device, using the group-version-id from the output of the previous command and also the group-id:

aws greengrass create-deployment --deployment-type NewDeployment --group-id <gg_group_id> --group-version-id <gg_group_version_id>

Summarized below is the integration between the different functions and components that we have now deployed to get from our sensor data through to an incident being raised in ServiceNow:

Raspberry PI

Create an Incident

Everything is setup now from an IoT perspective, so we can attempt to trigger a threshold breach on the sensors to trigger the creation of an incident in ServiceNow.  In order to trigger the incident creation, let’s raise the humidity around the sensor so that it breaches the threshold defined in the environment variables of the Lambda function.

Under normal conditions we will just see the data published by the first Lambda function in the IoTBlog/sensorData topic:

IoTblog sensordata

However, when a threshold is breached (in our example, humidity above 50%), the data is published to the IoTBlog/anomaly topic as shown below:

ioTblog Anomaly

Via the AWS IoT Greengrass subscriptions created earlier, this message arriving in the anomaly topic also triggers the second Lambda function to create the ticket in ServiceNow.

The log for the second Lambda function on AWS IoT Greengrass (stored in /greengrass/ggc/var/log/user/<region>/<aws_account_number>/ on the Raspberry Pi) will show a ‘201’ return code if the incident is successfully created in ServiceNow.

201 response

Now let’s log on to ServiceNow and check out our new incident.  Good news, our new incident appears correctly:

And when we click on our incident we can see the detail, including the full data from the IoT topic in the Activities section;

This is only a basic use of the ServiceNow API and there are many other parameters that you can use to increase the richness of the incident, refer to the ServiceNow API documentation for more details.

Cleaning up

To avoid incurring future charges, delete the resources that you created in the walkthrough.

Conclusion

We have built an IoT device (Raspberry Pi), running AWS IoT Greengrass, AWS Lambda, and using ServiceNow credentials managed in AWS Secrets Manager.  Using this we have triggered an anomaly event that has created an incident automatically in ServiceNow, directly from the Lambda function running on our Pi.  You can use this architecture as the foundation to integrate your edge devices and ITSM solution to automate ticket generation in your organization.

Look out for follow-up blogs that will extend this solution to provide a real-time dashboard for the sensor data and store the sensor data in a Data Lake for historical visualization.

Find out more about deploying Secrets to AWS IoT Greengrass Core.

Check out the AWS IoT Blog for more examples of how to use AWS to integrate your edge devices with the AWS Cloud.

Field Notes provides hands-on technical guidance from AWS Solutions Architects, consultants, and technical account managers, based on their experiences in the field solving real-world business problems for customers.


Building, bundling, and deploying applications with the AWS CDK

Post Syndicated from Cory Hall original https://aws.amazon.com/blogs/devops/building-apps-with-aws-cdk/

The AWS Cloud Development Kit (AWS CDK) is an open-source software development framework to model and provision your cloud application resources using familiar programming languages.

The post CDK Pipelines: Continuous delivery for AWS CDK applications showed how you can use CDK Pipelines to deploy a TypeScript-based AWS Lambda function. In that post, you learned how to add additional build commands to the pipeline to compile the TypeScript code to JavaScript, which is needed to create the Lambda deployment package.

In this post, we dive deeper into how you can perform these build commands as part of your AWS CDK build process by using the native AWS CDK bundling functionality.

If you’re working with Python, TypeScript, or JavaScript-based Lambda functions, you may already be familiar with the PythonFunction and NodejsFunction constructs, which use the bundling functionality. This post describes how to write your own bundling logic for instances where a higher-level construct either doesn’t already exist or doesn’t meet your needs. To illustrate this, I walk through two different examples: a Lambda function written in Golang and a static site created with Nuxt.js.

Concepts

A typical CI/CD pipeline contains steps to build and compile your source code, bundle it into a deployable artifact, push it to artifact stores, and deploy to an environment. In this post, we focus on the building, compiling, and bundling stages of the pipeline.

The AWS CDK has the concept of bundling source code into a deployable artifact. As of this writing, this works for two main types of assets: Docker images published to Amazon Elastic Container Registry (Amazon ECR) and files published to Amazon Simple Storage Service (Amazon S3). For files published to Amazon S3, this can be as simple as pointing to a local file or directory, which the AWS CDK uploads to Amazon S3 for you.

When you build an AWS CDK application (by running cdk synth), a cloud assembly is produced. The cloud assembly consists of a set of files and directories that define your deployable AWS CDK application. In the context of the AWS CDK, it might include the following:

  • AWS CloudFormation templates and instructions on where to deploy them
  • Dockerfiles, corresponding application source code, and information about where to build and push the images to
  • File assets and information about which S3 buckets to upload the files to

Use case

For this use case, our application consists of front-end and backend components. The example code is available in the GitHub repo. In the repository, I have split the example into two separate AWS CDK applications. The repo also contains the Golang Lambda example app and the Nuxt.js static site.

Golang Lambda function

To create a Golang-based Lambda function, you must first create a Lambda function deployment package. For Go, this consists of a .zip file containing a Go executable. Because we don’t commit the Go executable to our source repository, our CI/CD pipeline must perform the necessary steps to create it.

In the context of the AWS CDK, when we create a Lambda function, we have to tell the AWS CDK where to find the deployment package. See the following code:

new lambda.Function(this, 'MyGoFunction', {
  runtime: lambda.Runtime.GO_1_X,
  handler: 'main',
  code: lambda.Code.fromAsset(path.join(__dirname, 'folder-containing-go-executable')),
});

In the preceding code, the lambda.Code.fromAsset() method tells the AWS CDK where to find the Golang executable. When we run cdk synth, it stages this Go executable in the cloud assembly, which it zips and publishes to Amazon S3 as part of the PublishAssets stage.

If we’re running the AWS CDK as part of a CI/CD pipeline, this executable doesn’t exist yet, so how do we create it? One method is CDK bundling. The lambda.Code.fromAsset() method takes a second optional argument, AssetOptions, which contains the bundling parameter. With this bundling parameter, we can tell the AWS CDK to perform steps prior to staging the files in the cloud assembly.

Breaking down the BundlingOptions parameter further, we can perform the build inside a Docker container or locally.

Building inside a Docker container

For this to work, we need to make sure that we have Docker running on our build machine. In AWS CodeBuild, this means setting privileged: true. See the following code:

new lambda.Function(this, 'MyGoFunction', {
  code: lambda.Code.fromAsset(path.join(__dirname, 'folder-containing-source-code'), {
    bundling: {
      image: lambda.Runtime.GO_1_X.bundlingDockerImage,
      command: [
        'bash', '-c', [
          'go test -v',
          'GOOS=linux go build -o /asset-output/main',
      ].join(' && '),
    },
  })
  ...
});

We specify two parameters:

  • image (required) – The Docker image to perform the build commands in
  • command (optional) – The command to run within the container

The AWS CDK mounts the folder specified as the first argument to fromAsset at /asset-input inside the container, and mounts the asset output directory (where the cloud assembly is staged) at /asset-output inside the container.

After we perform the build commands, we need to make sure we copy the Golang executable to the /asset-output location (or specify it as the build output location like in the preceding example).

This is the equivalent of running something like the following code:

docker run \
  --rm \
  -v folder-containing-source-code:/asset-input \
  -v cdk.out/asset.1234a4b5/:/asset-output \
  lambci/lambda:build-go1.x \
  bash -c 'GOOS=linux go build -o /asset-output/main'

Building locally

To build locally (not in a Docker container), we have to provide the local parameter. See the following code:

new lambda.Function(this, 'MyGoFunction', {
  code: lambda.Code.fromAsset(path.join(__dirname, 'folder-containing-source-code'), {
    bundling: {
      image: lambda.Runtime.GO_1_X.bundlingDockerImage,
      command: [],
      local: {
        tryBundle(outputDir: string) {
          try {
            spawnSync('go version')
          } catch {
            return false
          }

          spawnSync(`GOOS=linux go build -o ${path.join(outputDir, 'main')}`);
          return true
        },
      },
    },
  })
  ...
});

The local parameter must implement the ILocalBundling interface. The tryBundle method is passed the asset output directory, and expects you to return a boolean (true or false). If you return true, the AWS CDK doesn’t try to perform Docker bundling. If you return false, it falls back to Docker bundling. Just like with Docker bundling, you must make sure that you place the Go executable in the outputDir.

Typically, you should perform some validation steps to ensure that you have the required dependencies installed locally to perform the build. This could be checking to see if you have go installed, or checking a specific version of go. This can be useful if you don’t have control over what type of build environment this might run in (for example, if you’re building a construct to be consumed by others).

If we run cdk synth on this, we see a new message telling us that the AWS CDK is bundling the asset. If we include additional commands like go test, we also see the output of those commands. This is especially useful if you wanted to fail a build if tests failed. See the following code:

$ cdk synth
Bundling asset GolangLambdaStack/MyGoFunction/Code/Stage...
✓  . (9ms)
✓  clients (5ms)

DONE 8 tests in 11.476s
✓  clients (5ms) (coverage: 84.6% of statements)
✓  . (6ms) (coverage: 78.4% of statements)

DONE 8 tests in 2.464s

Cloud Assembly

If we look at the cloud assembly that was generated (located at cdk.out), we see something like the following code:

$ cdk synth
Bundling asset GolangLambdaStack/MyGoFunction/Code/Stage...
✓  . (9ms)
✓  clients (5ms)

DONE 8 tests in 11.476s
✓  clients (5ms) (coverage: 84.6% of statements)
✓  . (6ms) (coverage: 78.4% of statements)

DONE 8 tests in 2.464s

It contains our GolangLambdaStack CloudFormation template that defines our Lambda function, as well as our Golang executable, bundled at asset.01cf34ff646d380829dc4f2f6fc93995b13277bde7db81c24ac8500a83a06952/main.

Let’s look at how the AWS CDK uses this information. The GolangLambdaStack.assets.json file contains all the information necessary for the AWS CDK to know where and how to publish our assets (in this use case, our Golang Lambda executable). See the following code:

{
  "version": "5.0.0",
  "files": {
    "01cf34ff646d380829dc4f2f6fc93995b13277bde7db81c24ac8500a83a06952": {
      "source": {
        "path": "asset.01cf34ff646d380829dc4f2f6fc93995b13277bde7db81c24ac8500a83a06952",
        "packaging": "zip"
      },
      "destinations": {
        "current_account-current_region": {
          "bucketName": "cdk-hnb659fds-assets-${AWS::AccountId}-${AWS::Region}",
          "objectKey": "01cf34ff646d380829dc4f2f6fc93995b13277bde7db81c24ac8500a83a06952.zip",
          "assumeRoleArn": "arn:${AWS::Partition}:iam::${AWS::AccountId}:role/cdk-hnb659fds-file-publishing-role-${AWS::AccountId}-${AWS::Region}"
        }
      }
    }
  }
}

The file contains information about where to find the source files (source.path) and what type of packaging (source.packaging). It also tells the AWS CDK where to publish this .zip file (bucketName and objectKey) and what AWS Identity and Access Management (IAM) role to use (assumeRoleArn). In this use case, we only deploy to a single account and Region, but if you have multiple accounts or Regions, you see multiple destinations in this file.

The GolangLambdaStack.template.json file that defines our Lambda resource looks something like the following code:

{
  "Resources": {
    "MyGoFunction0AB33E85": {
      "Type": "AWS::Lambda::Function",
      "Properties": {
        "Code": {
          "S3Bucket": {
            "Fn::Sub": "cdk-hnb659fds-assets-${AWS::AccountId}-${AWS::Region}"
          },
          "S3Key": "01cf34ff646d380829dc4f2f6fc93995b13277bde7db81c24ac8500a83a06952.zip"
        },
        "Handler": "main",
        ...
      }
    },
    ...
  }
}

The S3Bucket and S3Key match the bucketName and objectKey from the assets.json file. By default, the S3Key is generated by calculating a hash of the folder location that you pass to lambda.Code.fromAsset(), (for this post, folder-containing-source-code). This means that any time we update our source code, this calculated hash changes and a new Lambda function deployment is triggered.

Nuxt.js static site

In this section, I walk through building a static site using the Nuxt.js framework. You can apply the same logic to any static site framework that requires you to run a build step prior to deploying.

To deploy this static site, we use the BucketDeployment construct. This is a construct that allows you to populate an S3 bucket with the contents of .zip files from other S3 buckets or from a local disk.

Typically, we simply tell the BucketDeployment construct where to find the files that it needs to deploy to the S3 bucket. See the following code:

new s3_deployment.BucketDeployment(this, 'DeployMySite', {
  sources: [
    s3_deployment.Source.asset(path.join(__dirname, 'path-to-directory')),
  ],
  destinationBucket: myBucket
});

To deploy a static site built with a framework like Nuxt.js, we need to first run a build step to compile the site into something that can be deployed. For Nuxt.js, we run the following two commands:

  • yarn install – Installs all our dependencies
  • yarn generate – Builds the application and generates every route as an HTML file (used for static hosting)

This creates a dist directory, which you can deploy to Amazon S3.

Just like with the Golang Lambda example, we can perform these steps as part of the AWS CDK through either local or Docker bundling.

Building inside a Docker container

To build inside a Docker container, use the following code:

new s3_deployment.BucketDeployment(this, 'DeployMySite', {
  sources: [
    s3_deployment.Source.asset(path.join(__dirname, 'path-to-nuxtjs-project'), {
      bundling: {
        image: cdk.BundlingDockerImage.fromRegistry('node:lts'),
        command: [
          'bash', '-c', [
            'yarn install',
            'yarn generate',
            'cp -r /asset-input/dist/* /asset-output/',
          ].join(' && '),
        ],
      },
    }),
  ],
  ...
});

For this post, we build inside the publicly available node:lts image hosted on DockerHub. Inside the container, we run our build commands yarn install && yarn generate, and copy the generated dist directory to our output directory (the cloud assembly).

The parameters are the same as described in the Golang example we walked through earlier.

Building locally

To build locally, use the following code:

new s3_deployment.BucketDeployment(this, 'DeployMySite', {
  sources: [
    s3_deployment.Source.asset(path.join(__dirname, 'path-to-nuxtjs-project'), {
      bundling: {
        local: {
          tryBundle(outputDir: string) {
            try {
              spawnSync('yarn --version');
            } catch {
              return false
            }

            spawnSync('yarn install && yarn generate');

       fs.copySync(path.join(__dirname, ‘path-to-nuxtjs-project’, ‘dist’), outputDir);
            return true
          },
        },
        image: cdk.BundlingDockerImage.fromRegistry('node:lts'),
        command: [],
      },
    }),
  ],
  ...
});

Building locally works the same as the Golang example we walked through earlier, with one exception. We have one additional command to run that copies the generated dist folder to our output directory (cloud assembly).

Conclusion

This post showed how you can easily compile your backend and front-end applications using the AWS CDK. You can find the example code for this post in this GitHub repo. If you have any questions or comments, please comment on the GitHub repo. If you have any additional examples you want to add, we encourage you to create a Pull Request with your example!

Our code also contains examples of deploying the applications using CDK Pipelines, so if you’re interested in deploying the example yourself, check out the example repo.


About the author

Cory Hall

Cory is a Solutions Architect at Amazon Web Services with a passion for DevOps and is based in Charlotte, NC. Cory works with enterprise AWS customers to help them design, deploy, and scale applications to achieve their business goals.

Choosing between AWS Lambda data storage options in web apps

Post Syndicated from James Beswick original https://aws.amazon.com/blogs/compute/choosing-between-aws-lambda-data-storage-options-in-web-apps/

AWS Lambda is an on-demand compute service that powers many serverless applications. Lambda functions are ephemeral, with execution environments only existing for a brief time when the function is invoked. Many compute operations need access to external data for a variety of purposes. This includes importing third-party libraries, accessing machine learning models, or exporting the output of the compute operation.

Lambda provides a comprehensive range of storage options to meet the needs of web application developers. These include other AWS services such as Amazon S3 and Amazon EFS. There are also native storage options available, such as temporary storage or Lambda layers. In this blog post, I explain the differences between these options, and discuss common use-cases to help you choose for your own applications.

This post references the Happy Path web application series, and you can download the code for that application from the repository.

Amazon S3 – Object storage

Amazon S3 is an object storage service that scales elastically. It offers high availability and 11 9’s of durability. The service is ideal for storing unstructured data. This includes binary data, such as images or media, log files and sensor data.

Sample contents from an S3 bucket.

There are certain characteristics of S3 object storage that are important to remember. While S3 objects can be versioned, you cannot append data as you could in a file system. You have to store an entirely new version of an object. S3 also has a flat storage hierarchy that’s different to a file system. Instead of directories, you use folders to logically organize objects, by prefixing ‘foldername/’ in the key name.

S3 has important event integrations for serverless developers. It has a native integration with Lambda, which allows you to invoke a function in response to an S3 event. This can provide a scalable way to trigger application workflows when objects are created or deleted in S3. In the Happy Path application, the image-processing workflows are initiated by this event integration. To learn more about using S3 to trigger automated serverless workflows, visit the learning path.

S3 is often an important repository for an organization’s data lake. If your application writes data to S3 buckets, this can be a useful staging area for downstream processing. For analytics workloads, you can use AWS Glue to perform extract, transform, and loan (ETL) operations. To create ad hoc visualizations and business analysis reports, Amazon QuickSight can connect to your S3 buckets and produce interactive dashboards. To learn how to build business intelligence dashboards for your web application, visit the Innovator Island workshop.

S3 also provides object lifecycle management. This allows you to automatically change storage classes when certain conditions are met. For example, an application for uploading expenses could automatically archive PDFs after 1 year to Amazon S3 Glacier to reduce storage costs. In the Happy Path application, the original high-resolution uploads are stored in a separate bucket from the optimized distribution assets. To reduce storage costs, lifecycle management could be configured to automatically delete these original photo assets after 30 days.

Temporary storage with /tmp

The Lambda execution environment provides a file system for your code to use at /tmp. This space has a fixed size of 512 MB. The same Lambda execution environment may be reused by multiple Lambda invocations to optimize performance. The /tmp area is preserved for the lifetime of the execution environment and provides a transient cache for data between invocations. Each time a new execution environment is created, this area is deleted.

Consequently, this is intended as an ephemeral storage area. While functions may cache data here between invocations, it should be used only for data needed by code in a single invocation. It’s not a place to store data permanently, and is better-used to support operations required by your code.

Operationally, working with files in /tmp is the same as your local hard disk, and offers fast I/O throughput. For example, to unzip a file into this space in Python, use:

import os, zipfile
os.chdir('/tmp')
with zipfile.ZipFile(myzipfile, 'r') as zip:
    zip.extractall()

Lambda layers

Your Lambda functions may use additional libraries as part of the deployment package. You can bundle these in the deployment archive or optionally move to a layer instead. A Lambda function can have up to five layers, and is subject to the maximum deployment size of 50 MB (zipped). Packages in layers are available in the /opt directory during invocations. While layers are private to you by default, you can also share layers with other AWS accounts, or make layers public.

Lambda layers in the console

There are many benefits to using layers throughout the functions in your serverless application. It’s best practice to include the AWS SDK instead of depending on the version bundled with the Lambda service. This enables you to pin the version of the SDK. By using a layer, you don’t need to bundle the package with each function, which can increase your deployment package size and slow down deployments. You can create an AWS SDK layer and then include a reference to the layer in each function.

Layers can be an effective way to bundle large dependencies, or share compiled libraries with binaries that vary by operating system. For example, the Happy Path application uses the Sharp npm graphics library to process images. Similarly, the Innovator Island workshop uses the OpenCV library to perform image manipulation, and this is imported using a shared layer.

Layers are static once they are deployed. You can only change the contents of a layer by deploying a new version. Any Lambda function using the layer binds to a specific version and must be updated to change layer versions. To learn more, see using Lambda layers to simplify your development process.

Amazon EFS for Lambda

Amazon EFS is a fully managed, elastic, shared file system that integrates with other AWS services. It is durable storage option that offers high availability. You can now mount EFS volumes in Lambda functions, which makes it simpler to share data across invocations. The file system grows and shrinks as you add or delete data, so you do not need to manage storage limits.

EFS file system in the console.

The Lambda service mounts EFS file systems when the execution environment is prepared. This happens in parallel with other initialization operations so typically does not impact cold start latency. If the execution environment is warm from previous invocations, the mount is already prepared. To use EFS, your Lambda function must be in the same VPC as the file system.

EFS enables new capabilities for serverless applications. The file system is a dynamic binding for Lambda functions, unlike layers. This makes it useful for deploying code libraries where you want to always use the latest version. You configure the mount path when integrating the file system with your function, and then include packages from this location. Additionally, you can use this to include packages that exceed the limits of layers.

Due to its speed and support of standard file operations, EFS is also useful for ingesting or writing large numbers files durably. This can be helpful for zipping or unzipping large archives, for example. For appending to existing files, EFS is also a preferred option to using S3.

To learn more, see using Amazon EFS for AWS Lambda in your serverless applications.

Comparing the different data storage options

This table compares the characteristics of these four different data storage options for Lambda:

Amazon S3 /tmp Lambda Layers Amazon EFS
Maximum size Elastic 512 MB 50 MB Elastic
Persistence Durable Ephemeral Durable Durable
Content Dynamic Dynamic Static Dynamic
Storage type Object File system Archive File system
Lambda event source integration Native N/A N/A N/A
Operations supported Atomic with versioning Any file system operation Immutable Any file system operation
Object tagging Y N N N
Object metadata Y N N N
Pricing model Storage + requests + data transfer Included in Lambda Included in Lambda Storage + data transfer + throughput
Sharing/permissions model IAM Function-only IAM IAM + NFS
Source for AWS Glue Y N N N
Source for Amazon QuickSight Y N N N
Relative data access speed from Lambda Fast Fastest Fastest Very fast

Conclusion

Lambda is a flexible, on-demand compute service for serverless application. It supports a wide variety of workloads by providing a number of different data storage options.

In this post, I compare the capabilities and use-cases of S3, EFS, Lambda layers, and temporary storage for Lambda functions. There are benefits to each approach, as each type has different behaviors and characteristics. For web application developers, these storage types support different operations depending upon the needs of your serverless backend.

As the newest integration with Lambda, EFS now enables new workloads and capabilities. This includes sharing large code packages with Lambda, or durably operating on large numbers of files. It also opens up new possibilities for developers working on deep learning inference models.

To learn more about storage options available, visit the AWS Serverless homepage. For more serverless learning resources, visit https://serverlessland.com.

Field Notes: Customizing the AWS Control Tower Account Factory with AWS Service Catalog

Post Syndicated from Remek Hetman original https://aws.amazon.com/blogs/architecture/field-notes-customizing-the-aws-control-tower-account-factory-with-aws-service-catalog/

Many AWS customers who are managing hundreds or thousands of accounts know how complex and time consuming this process can be. To reduce the burden and simplify the process of creating new accounts, last year AWS released a new service, AWS Control Tower.

AWS Control Tower helps you automate the process of setting up a multi-account AWS environment (AWS Landing Zone) that is secure, well-architected, and ready to use. This Landing Zone is created following best practices established through AWS’ experience working with thousands of enterprises as they move to the cloud. This includes the configuration of AWS Organizations, centralized logging, federated access, mandatory guardrails, and networking.

Those elements are a good starting point to cover the initial configuration of the new account. For some organizations, the next step is to baseline a newly vended account to align it with the company policies and compliance requirements. This means create or deploy necessary roles, policies, governance controls, security groups and so on.

In this blog post, I describe a solution that helps achieve consistent governance and compliance requirements across accounts created by AWS Control Tower. The solution uses the AWS Service Catalog as the repository of products that will be deployed into the new accounts.

Prerequisites and assumptions

Before I get into how it works, let’s first review a few key AWS Service Catalog concepts:

  • An AWS Service Catalog product is a blueprint for building your AWS resources that you want to make available for deployment on AWS along with the configuration information.
  • A portfolio is a collection of products, together with the configuration information.
  • A provisioned product is an AWS CloudFormation stack.
  • Constraints control the way users can deploy a product. With launch constraints, you can specify a role that the AWS Service Catalog can assume to launch a product.
  • Review AWS Service Catalog reference blueprints for a quick way to set up and configure AWS Service Catalog portfolios and products.

You need an AWS Service Catalog portfolio with products that you plan to deploy to the accounts. The portfolio has to be created in the AWS Control Tower primary account. If you don’t have a portfolio, the starting point would be to review these resources:

Solution Overview

This solution supports the following scenarios:

  • Deployment of products to the newly vended AWS Control Tower account (Figure 1)
  • Update and deployment of products to existing accounts (Figure 2)
Figure 1 Deployment to new account

Figure 1 – Deployment to new account

The architecture diagram in figure 1 shows the process of deploying products to the new account.

  1. AWS Control Tower creates a new account
  2. Once an account is created successfully, Amazon CloudWatch Events trigger an AWS Lambda function
  3. The Lambda function pulls the configuration from an Amazon S3 bucket and:
    • Validates configuration
    • Grants Lambda role access to portfolio(s)
    • Creates StackSet constrains for products
  4. Lambda calls the AWS Step Function
  5. The AWS Step Function orchestrates deployment of the AWS Service Catalog products and monitors progress
Figure 2 Update or deployment to an existing account

Figure 2 – Update or deployment to an existing account

The architecture diagram in figure 2 shows process of updating product or deploying product to the existing account.

  1. User uploads update configuration to an Amazon S3 Bucket
  2. Update triggers AWS Lambda Function
  3. Lambda function reads uploaded configuration and:
    • Validates configuration
    • Grants Lambda role access to portfolio(s)
    • Creates StackSet constrains for products
  4. Calls AWS Step Function
  5. AWS Step Function orchestrate update/deployment of AWS Service Catalog products and monitoring progress

Deployment and configuration

Before proceeding with the deployment, you must install Python3.

Then, follow these steps:

  1. Download the solution from GitHub
  2. Go to folder src and run the following command:                                                                                    “pip3 install –r requirements.txt –t .”
  3.  Zip content of the src folder to “control-tower-account-factory-solution.zip” file
  4. Upload zip file to your Amazon S3 bucket created in the AWS Region where you want to deploy the solution
  5. Launch the AWS CloudFormation template

AWS CloudFormation Template Parameters:

  • ConfigurationBucketName – name of the Amazon S3 bucket from where AWS Lambda function should pull the configuration file. You can provide the name of an existing bucket.
  • CreateConfigurationBucket – set to true if you want to create a bucket specified in previous parameter. If a bucket exists, set value to false
  • ConfigurationFileName – name of the configuration file for a new account. Default value: config.yml
  • UpdateFileName – name of the configuration file for updates. Default value: update.yml
  • SourceCodeBucketName – name of the bucket where you uploaded the zipped Lambda code
  • SourceCodePackageName – name of the zipped file contain Lambda. If the file was uploaded to folder, include the name of folder(s) as well. Example: my_folder/control-tower-account-factory-solution.zip
  • BaselineFunctionName –name of the AWS Lambda function. Default value: control-tower- account-factory-lambda
  • BaselinetLambdaRoleName –name of the AWS Lambda function IAM role. Default value: control-tower- account-factory-lambda-role
  • StateMachineName  – name of the AWS Step Function. Default value: control-tower- account-factory-state-machine
  • StateMachineRoleName – name of the AWS Step Function IAM role. Default value: control-tower- account-factory-state-machine-role
  • TrackingTableName – name of the DynamoDB table to track all deployment and updates. Default value: control-tower-account-factory-tracking-table
  • MaxIterations –maximum iteration of the AWS Step Function before the reports time out. Default value: 30. It can be overwrite in configuration file. For more information see Configuration section.
  • TopicName – (optional) name of the SNS Topic that will be used for sending notification. Default value: control-tower- account-factory-account-notification
  • NotificationEmail – (optional) the email address where to send the notification. If this isn’t provided, the SNS topic won’t be created.

Configuration Files

The configuration files have to be in the YAML format, you can use the following schemas for new or existing accounts:
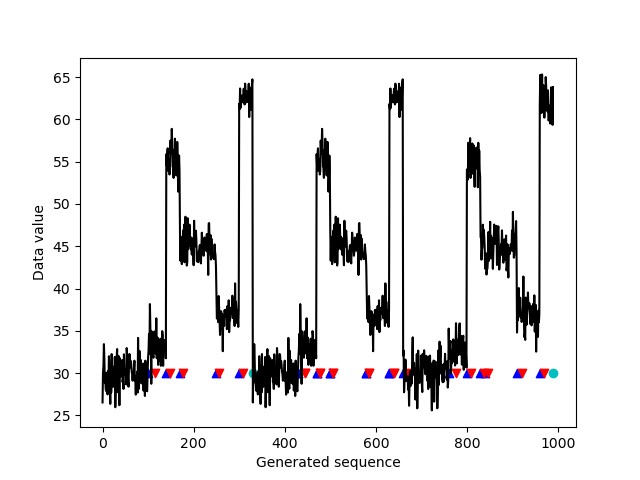
Configuration schema for new account:
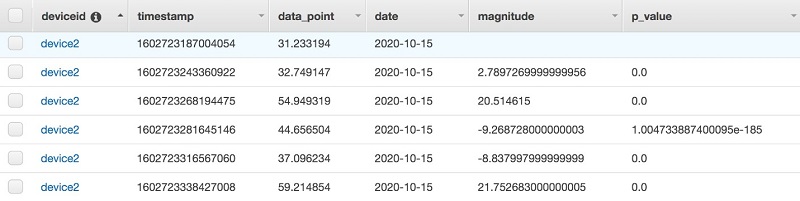
The configuration can apply to all new accounts or can be divided based on the organization unit associated with the new account. Also, you can mix deployments where some products are always deployed and some only to specific organization units.

Example configuration file

Configuration schema for existing accounts

This configuration can be used to update provisioned products or deploy products into existing accounts. You can specify a target location either as account(s), organization unit(s) or both. If you specified an organization unit as a target, the product(s) will be updated/deployed to all accounts associated with organization unit.

If the product doesn’t exist in the account, the Lambda function attempts to deploy it. You can manage this by setting the parameter ‘deployifnotexist’ to true. If omitted or set to false, Lambda won’t provision the product to an existing account.

Example configuration file

All products deployed by the AWS Service Catalog are provisioned under their own name that has to be unique across all provisioned products. In this example, products are provisioned under the following naming convention:

<account id where product is provision>-<”provision_name” from configuration file>

Example:  123456789-my-product

In the configuration file you can specify dependencies between products. Dependencies need to be provided as the list of provisioned product name not a product name. If provided, deployment of the product will be suspended until all dependencies successfully deployed.

The Step Function is running in the loop with interval of 1 minute and checking if dependencies were deployed. In the event of an error in the dependency naming or configuration, the step function iterates only until it reaches the maximum iterations defined in the configuration file. If the maximum iterations are reached, the step function reports time out and interrupts the products’ deployment.

Important: if you updating a product by adding a new AWS Region, you cannot specify the dependency or run updates in existing regions the same time. In this scenario you should break the update as follows:

  • Upload configuration to create dependencies in the new region
  • Upload configuration to create products only in the new region

You can find different examples of configuration files in GitHub.

Note: The name of the configuration file and Amazon S3 location must match the values provided in the AWS CloudFormation template during solution deployment.

AWS Lambda functions deployment considerations

When deploying product is a Lambda function, you need to consider two requirements:

  1. The source code of the Lambda function needs to be in the Amazon S3 bucket created in the same AWS region where you are planning to deploy a Lambda function
  2. The destination account needs to have permission to the source Amazon S3 bucket

To accommodate both requirements, the approach is to create an Amazon S3 bucket under the AWS Control Tower primary account. There is one Amazon S3 bucket in each Region where the functions will be deployed.

Each deployment bucket should have attached the following policy:

{
    "Version": "2008-10-17",
    "Statement": [
        {
            "Effect": "Allow",
            "Principal": {
                "AWS": "*"
            },
            "Action": "s3:GetObject",
            "Resource": "arn:aws:s3:::<S3 bucket name>/*",
            "Condition": {
                "StringEquals": {
                    "aws:PrincipalOrgID": "<AWS Organizations Id>"
                },
                "StringLike": {
                    "aws:PrincipalArn": [
                        "arn:aws:iam::*:role/AWSControlTowerExecution",
        "arn:aws:iam::*:role/< name of the Lambda IAM role – default: control-tower-account-factory-lambda-role>"
                    ]
                }
            }
        }
    ]
}

This allows the deployment role to access Lambda’s source code from any account in your AWS Organizations.

Conclusion

In this blog post, I’ve outlined a solution to help you drive consistent governance and compliance requirements across accounts vended though AWS Control Tower. This solution provides enterprises with mechanisms to manage all deployments from a centralized account. Also, this reduces the need for maintaining multiple separate CI/CD pipelines.  Therefore you can simplify and reduce deployment time in a multi-account environment.

This solution allows you keep provisioned products up to date by updating existing products or bringing old accounts to the same compliance level as the new accounts.

Since this solution supports deployment to existing accounts and can be run without AWS Control Tower, it can be used for deployment of any AWS Service Catalog product either in single or multiple account environments. This solution then becomes an integral part of CI/CD pipeline.

For more information, review the AWS Control Tower documentation and AWS Service Catalog documentation. Also, review the links listed in the “Prerequisites and assumptions” section of this post.

Field Notes provides hands-on technical guidance from AWS Solutions Architects, consultants, and technical account managers, based on their experiences in the field solving real-world business problems for customers.