The IAR provides management and technical information security controls to establish, implement, maintain, and continuously improve information assurance. AWS alignment with IAR requirements demonstrates our ongoing commitment to adhere to the heightened expectations for cloud service providers. As such, IAR-regulated customers can use AWS services with confidence.
Independent third-party auditors from BDO evaluated AWS for the period of November 1, 2021, to October 31, 2022. The assessment report illustrating the status of AWS compliance is available through AWS Artifact. AWS Artifact is a self-service portal for on-demand access to AWS compliance reports. Sign in to AWS Artifact in the AWS Management Console, or learn more at Getting Started with AWS Artifact.
AWS strives to continuously bring services into the scope of its compliance programs to help you meet your architectural and regulatory needs. If you have questions or feedback about IAR compliance, reach out to your AWS account team.
To learn more about our compliance and security programs, see AWS Compliance Programs. As always, we value your feedback and questions; reach out to the AWS Compliance team through the Contact Us page.
If you have feedback about this post, submit comments in the Comments section below.
Want more AWS Security how-to content, news, and feature announcements? Follow us on Twitter.
Uncovering the root cause of an Amazon GuardDuty finding can be a complex task, requiring security operations center (SOC) analysts to collect a variety of logs, correlate information across logs, and determine the full scope of affected resources.
Sometimes you need to do this type of in-depth analysis because investigating individual security findings in insolation doesn’t always capture the full impact of affected resources.
With Amazon Detective, you can analyze and visualize various logs and relationships between AWS entities to streamline your investigation. In this post, you will learn how to use a feature of Detective—finding groups—to simplify and expedite the investigation of a GuardDuty finding.
Detective uses machine learning, statistical analysis, and graph theory to generate visualizations that help you to conduct faster and more efficient security investigations. The finding groups feature reduces triage time and provides a clear view of related GuardDuty findings. With finding groups, you can investigate entities and security findings that might have been overlooked in isolation. Finding groups also map GuardDuty findings and their relevant tactics, techniques, and procedures to the MITRE ATT&CK framework. By using MITRE ATT&CK, you can better understand the event lifecycle of a finding group.
Finding groups are automatically enabled for both existing and new customers in AWS Regions that support Detective. There is no additional charge for finding groups. If you don’t currently use Detective, you can start a free 30-day trial.
Use finding groups to simplify an investigation
Because finding groups are enabled by default, you start your investigation by simply navigating to the Detective console. You will see these finding groups in two different places: the Summary and the Finding groups pages. On the Finding groups overview page, you can also use the search capability to look for collected metadata for finding groups, such as severity, title, finding group ID, observed tactics, AWS accounts, entities, finding ID, and status. The entities information can help you narrow down finding groups that are more relevant for specific workloads.
Figure 1 shows the finding groups area on the Summary page in the Amazon Detective console, which provides high-level information on some of the individual finding groups.
Figure 1: Detective console summary page
Figure 2 shows the Finding groups overview page, with a list of finding groups filtered by status. The finding group shown has a status of Active.
Figure 2: Detective console finding groups overview page
You can choose the finding group title to see details like the severity of the finding group, the status, scope time, parent or child finding groups, and the observed tactics from the MITRE ATT&CK framework. Figure 3 shows a specific finding group details page.
Figure 3: Detective console showing a specific finding group details page
Below the finding group details, you can review the entities and associated findings for this finding group, as shown in Figure 4. From the Involved entities tab, you can pivot to the entity profile pages for more details about that entity’s behavior. From the Involved findings tab, you can select a finding to review the details pane.
Figure 4: Detective console showing involved entities of a finding group
In Figure 4, the search functionality on the Involved entities tab is being used to look at involved entities that are of type AWS role or EC2 instance. With such a search filter in Detective, you have more data in a single place to understand which Amazon Elastic Compute Cloud (Amazon EC2) instances and AWS Identity and Access Management (IAM) roles were involved in the GuardDuty finding and what findings were associated with each entity. You can also select these different entities to see more details. With finding groups, you no longer have to craft specific log searches or search for the AWS resources and entities that you should investigate. Detective has done this correlation for you, which reduces the triage time and provides a more comprehensive investigation.
With the release of finding groups, Detective infers relationships between findings and groups them together, providing a more convenient starting point for investigations. Detective has evolved from helping you determine which resources are related to a single entity (for example, what EC2 instances are communicating with a malicious IP), to correlating multiple related findings together and showing what MITRE tactics are aligned across those findings, helping you better understand a more advanced single security event.
Conclusion
In this blog post, we showed how you can use Detective finding groups to simplify security investigations through grouping related GuardDuty findings and AWS entities, which provides a more comprehensive view of the lifecycle of the potential security incident. Finding groups are automatically enabled for both existing and new customers in AWS Regions that support Detective. There is no additional charge for finding groups. If you don’t currently use Detective, you can start a free 30-day trial. For more information on finding groups, see Analyzing finding groups in the Amazon Detective User Guide.
If you have feedback about this post, submit comments in the Comments section below. You can also start a new thread on the Amazon Detective re:Post or contact AWS Support.
Want more AWS Security news? Follow us on Twitter.
Amazon Web Services (AWS) is pleased to announce that AWS CloudHSM is certified for Payment Card Industry Personal Identification Number (PCI PIN) version 3.1.
With CloudHSM, you can manage and access your keys on FIPS 140-2 Level 3 certified hardware, protected with customer-owned, single-tenant hardware security module (HSM) instances that run in your own virtual private cloud (VPC). This PCI PIN attestation gives you the flexibility to deploy your regulated workloads with reduced compliance overhead.
Coalfire, a third-party Qualified Security Assessor (QSA), evaluated CloudHSM. Customers can access the PCI PIN Attestation of Compliance (AOC) report through AWS Artifact.
To learn more about our PCI program and other compliance and security programs, see the AWS Compliance Programs page. As always, we value your feedback and questions; reach out to the AWS Compliance team through the Contact Us page.
If you have feedback about this post, submit comments in the Comments section below. If you have questions about this post, contact AWS Support.
Want more AWS Security news? Follow us on Twitter.
In this blog post, you’ll learn how you can use a Completely Automated Public Turing test to tell Computers and Humans Apart (CAPTCHA) with other AWS WAF controls as part of a layered approach to provide comprehensive protection against bot traffic. We’ll describe a workflow that tracks the number of incoming requests to a site’s store page. The workflow then limits those requests if they exceed a certain threshold. Requests from IP addresses that exceed the threshold will be presented a CAPTCHA challenge to prove that the requests are being made by a human.
Amazon Web Services (AWS) offers many tools and recommendations that companies can use as they face challenges with bot traffic on their websites. Web applications can be compromised through a variety of vectors, including cross-site scripting, SQL injection, path traversal, local file inclusion, and distributed denial-of-service (DDoS) attacks. AWS WAF offers managed rules that are designed to provide protection against common application vulnerabilities or other unwanted web traffic, without requiring you to write your own rules.
There are some web attacks like web scraping, credential stuffing, and layer 7 DDoS attempts conducted by bots (as well as by humans) that target sensitive areas of your website, such as your store page. A CAPTCHA mitigates undesirable traffic by requiring the visitor to complete challenges before they are allowed to access protected resources. You can implement CAPTCHA to help prevent unwanted activities. Last year, AWS introduced AWS WAF CAPTCHA, which allows customers to set up AWS WAF rules that require CAPTCHA challenges to be completed for common targets such as forms (for example, search forms).
Scenario
Consider an attack where the unauthorized user is attempting to overwhelm a site’s store page by repeatedly sending search requests for different items.
Assume that traffic visits a website that is hosted through Amazon CloudFront and attempts the above behavior on the /store URL. In this scenario, there is a rate-based rule in place that will track the number of requests coming in from each IP. This rate-based rule tracks the rate of requests for each originating IP address and invokes the rule action on IPs with rates that go over the limit. With CAPTCHA implemented as the rule action, excessive attempts to search within a 5-minute window will result in a CAPTCHA challenge being presented to the user. This workflow is shown in Figure 1.
Figure 1: User visits a store page and is evaluated by a rate-based rule
When a user solves a CAPTCHA challenge, AWS automatically generates and encrypts a token and sends it to the client as a cookie. The client requests aren’t challenged again until the token has expired. AWS WAF calculates token expiration by using the immunity time configuration. You can configure the immunity time in a web access control list (web ACL) CAPTCHA configuration and in the configuration for a rule’s action setting. When a user provides an incorrect answer to a CAPTCHA challenge, the challenge informs the user and loads a new puzzle. When the user solves the challenge, the challenge automatically submits the original web request, updated with the CAPTCHA token from the successful puzzle completion.
Walkthrough
This workflow will require an AWS WAF rule within a new or existing rule group or web ACL. The rule will define how web requests are inspected and the action to take.
To create an AWS WAF rate-based rule
Open the AWS WAF console and in the left navigation pane, choose Web ACLs.
Choose an existing web ACL, or choose Create web ACL at the top right to create a new web ACL.
Under Rules, choose Add rules, and then in the drop-down list, choose Add my own rules and rule groups.
For Rule type, choose Rule builder.
In the Rule builder section, for Name, enter your rule name. For Type, choose Rate-based rule.
In the Request rate details section, enter your rate limit (for example, 100). For IP address to use for rate limiting, choose Source IP address, and for Criteria to count requests toward rate limit, choose Only consider requests that match criteria in a rule statement.
For Count only the requests that match the following statement, choose Matches the statement from the drop-down list.
In the Statement section, for Inspect, choose URI path. For Match type , choose Contains string.
For String to match, enter the URI path of your web page (for example, /store).
In the Action section, choose CAPTCHA.
(Optional) For Immunity time, choose Set a custom immunity time for this rule, or keep the default value (300 seconds).
To finish, choose Add rule, and then choose Save to add the rule to your web ACL.
After you add the rule, go to the Rules tab of your web ACL and navigate to your rule. Confirm that the output resembles what is shown in Figure 2. You should have a rate-based rule with a scope-down statement that matches the store URI path you entered earlier, and the action should be set to CAPTCHA.
The following is the JSON for the CAPTCHA rule that you just created. You can use this to validate your configuration. You can also use this JSON in the rule builder while creating the rule.
After you complete this configuration, the rule will be invoked when an IP address unsuccessfully attempts to search the store at a rate that exceeds the threshold. This user will be presented with a CAPTCHA challenge, as shown in Figure 6. If the user is successful, they will be routed back to the store page. Otherwise, they will be served a new puzzle until it is solved.
Figure 3: CAPTCHA challenge presented to a request that exceeded the threshold
Implementing rate-based rules and CAPTCHA also allows you to track IP addresses, limit the number of invalid search attempts, and use the specific IP information available to you within sampled requests and AWS WAF logs to work to prevent that traffic from affecting your resources. Additionally, you have visibility into IPs addresses blocked by rate-based rules so that you can later add these addresses to a block list or create custom logic as needed to mitigate false positives.
Conclusion
In this blog post, you learned how to configure and deploy a CAPTCHA challenge with AWS WAF that checks for web requests that exceed a certain rate threshold and requires the client sending such requests to solve a challenge. Please note the additional charge for enabling CAPTCHA on your web ACL (pricing can be found here). Although CAPTCHA challenges are simple for humans to complete, they should be harder for common bots to complete with any meaningful rate of success. You can use a CAPTCHA challenge when a block action would stop too many legitimate requests, but letting all traffic through would result in unacceptably high levels of unwanted requests, such as from bots.
If you have feedback about this blog post, submit comments in the Comments section below. You can also start a new thread on AWS WAF re:Post to get answers from the community.
Want more AWS Security news? Follow us on Twitter.
We continue to listen to our customers, regulators, and stakeholders to understand their needs regarding audit, assurance, certification, and attestation programs at Amazon Web Services (AWS). We are pleased to announce that Fall 2022 System and Organization Controls (SOC) 1, SOC 2, and SOC 3 reports are now available in Spanish. These translated reports will help drive greater engagement and alignment with customer and regulatory requirements across Latin America and Spain.
The Spanish language version of the reports does not contain the independent opinion issued by the auditors or the control test results, but you can find this information in the English language version. Stakeholders should use the English version as a complement to the Spanish version.
Translated SOC reports in Spanish are available to customers through AWS Artifact. Translated SOC reports in Spanish will be published twice a year, in alignment with the Fall and Spring reporting cycles.
We value your feedback and questions—feel free to reach out to our team or give feedback about this post through the Contact Us page.
If you have feedback about this post, submit comments in the Comments section below.
Want more AWS Security news? Follow us on Twitter.
Spanish
Los informes SOC de Otoño de 2022 ahora están disponibles en español
Seguimos escuchando a nuestros clientes, reguladores y partes interesadas para comprender sus necesidades en relación con los programas de auditoría, garantía, certificación y atestación en Amazon Web Services (AWS). Nos complace anunciar que los informes SOC 1, SOC 2 y SOC 3 de AWS de Otoño de 2022 ya están disponibles en español. Estos informes traducidos ayudarán a impulsar un mayor compromiso y alineación con los requisitos regulatorios y de los clientes en las regiones de América Latina y España.
La versión en inglés de los informes debe tenerse en cuenta en relación con la opinión independiente emitida por los auditores y los resultados de las pruebas de controles, como complemento de las versiones en español.
Los informes SOC traducidos en español están disponibles en AWS Artifact. Los informes SOC traducidos en español se publicarán dos veces al año según los ciclos de informes de Otoño y Primavera.
Valoramos sus comentarios y preguntas; no dude en ponerse en contacto con nuestro equipo o enviarnos sus comentarios sobre esta publicación a través de nuestra página Contáctenos.
Si tienes comentarios sobre esta publicación, envíalos en la sección Comentarios a continuación.
¿Desea obtener más noticias sobre seguridad de AWS? Síguenos en Twitter.
We continue to expand the scope of our assurance programs at Amazon Web Services (AWS), and we are pleased to announce that AWS has successfully completed the 2022 Cloud Computing Compliance Controls Catalogue (C5) attestation cycle with 156 services in scope. This alignment with C5 requirements demonstrates our ongoing commitment to adhere to the heightened expectations for cloud service providers. AWS customers in Germany and across Europe can run their applications on AWS Regions in scope of the C5 report with the assurance that AWS aligns with C5 requirements.
The C5 attestation scheme is backed by the German government and was introduced by the Federal Office for Information Security (BSI) in 2016. AWS has adhered to the C5 requirements since their inception. C5 helps organizations demonstrate operational security against common cyberattacks when using cloud services within the context of the German Government’s Security Recommendations for Cloud Computing Providers.
Independent third-party auditors evaluated AWS for the period October 1, 2021, through September 30, 2022. The C5 report illustrates AWS’ compliance status for both the basic and additional criteria of C5. Customers can download the C5 report through AWS Artifact. AWS Artifact is a self-service portal for on-demand access to AWS compliance reports. Sign in to AWS Artifact in the AWS Management Console, or learn more at Getting Started with AWS Artifact.
AWS has added the following 16 services to the current C5 scope:
At present, the services offered in the Frankfurt, Dublin, London, Paris, Milan, Stockholm and Singapore Regions are in scope of this certification. For up-to-date information, see the AWS Services in Scope by Compliance Program page and choose C5.
AWS strives to continuously bring services into the scope of its compliance programs to help you meet your architectural and regulatory needs. If you have questions or feedback about C5 compliance, reach out to your AWS account team.
To learn more about our compliance and security programs, see AWS Compliance Programs. As always, we value your feedback and questions; reach out to the AWS Compliance team through the Contact Us page.
If you have feedback about this post, submit comments in the Comments section below.
Want more AWS Security how-to content, news, and feature announcements? Follow us on Twitter.
We’re continuing to expand the scope of our assurance programs at Amazon Web Services (AWS) and are pleased to announce that six additional services have been added to the scope of our Payment Card Industry Data Security Standard (PCI DSS) certification. This provides our customers with more options to process and store their payment card data and architect their cardholder data environment (CDE) securely on AWS.
AWS was evaluated by Coalfire, a third-party Qualified Security Assessor (QSA). Customers can access the Attestation of Compliance (AOC) report demonstrating our PCI compliance status through AWS Artifact.
To learn more about our PCI program and other compliance and security programs, see the AWS Compliance Programs page. As always, we value your feedback and questions; reach out to the AWS Compliance team through the Contact Us page.
Want more AWS Security news? Follow us on Twitter.
We’re excited to announce that two additional AWS Regions—Asia Pacific (Jakarta) and Europe (Milan)—have been granted the Health Data Hosting (Hébergeur de Données de Santé, HDS) certification. This alignment with HDS requirements demonstrates our continued commitment to adhere to the heightened expectations for cloud service providers. AWS customers who handle personal health data can use HDS-certified Regions with confidence to manage their workloads.
The following 18 Regions are in scope for this certification:
US East (Ohio)
US East (Northern Virginia)
US West (Northern California)
US West (Oregon)
Asia Pacific (Jakarta)
Asia Pacific (Seoul)
Asia Pacific (Mumbai)
Asia Pacific (Singapore)
Asia Pacific (Sydney)
Asia Pacific (Tokyo)
Canada (Central)
Europe (Frankfurt)
Europe (Ireland)
Europe (London)
Europe (Milan)
Europe (Paris)
Europe (Stockholm)
South America (São Paulo)
Introduced by the French governmental agency for health, Agence Française de la Santé Numérique (ASIP Santé), the HDS certification aims to strengthen the security and protection of personal health data. Achieving this certification demonstrates that AWS provides a framework for technical and governance measures to secure and protect personal health data, governed by French law.
For up-to-date information, including when additional Regions are added, see the AWS Compliance Programs page, and choose HDS.
AWS strives to continuously bring services into the scope of its compliance programs to help you meet your architectural and regulatory needs. If you have questions or feedback about HDS compliance, reach out to your AWS account team.
To learn more about our compliance and security programs, see AWS Compliance Programs. As always, we value your feedback and questions; reach out to the AWS Compliance team through the Contact Us page.
If you have feedback about this post, submit comments in the Comments section below.
Want more AWS Security news? Follow us on Twitter.
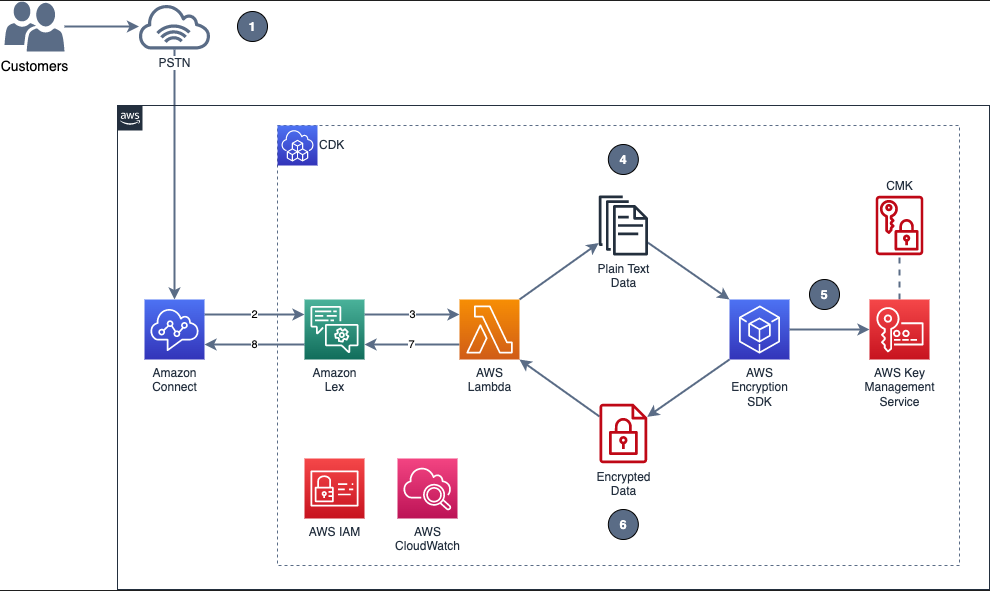
In the telecommunications industry, sensitive authentication and user data are typically received through mobile voice and keypads, and companies are responsible for protecting the data obtained through these channels. The increasing use of voice-driven interactive voice response (IVR) has resulted in a need to provide solutions that can protect user data that is gathered from mobile voice inputs. In this blog post, you’ll see how to protect a caller’s sensitive voice data that was captured through Amazon Lex by using data encryption implemented through AWS Lambda functions. The solution described in this post helps you to protect customer data received through voice channels from inadvertent or unknown access. The solution also includes decryption capabilities, which give an authorized administrator or operator the ability to decrypt user data from a Lambda console.
Solution overview
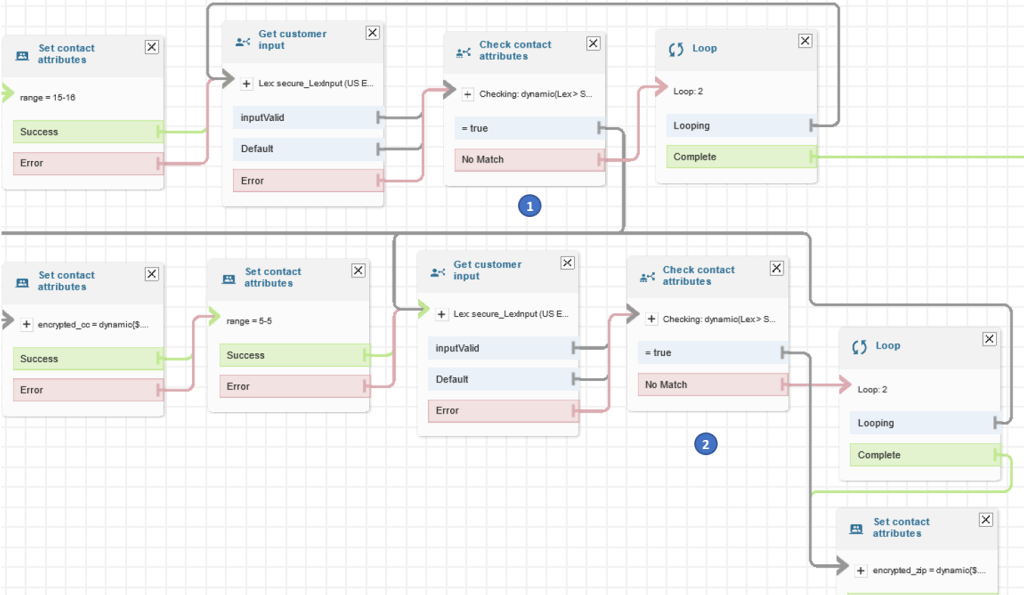
To demonstrate the IVR solution described in this post, a caller speaks two sensitive pieces of data—credit card number and zip code—from an Amazon Connect contact flow. The spoken values are encrypted and returned to the contact flow to be stored in contact attributes. The encrypted ciphertext is retained as a contact attribute for decryption purposes. Amazon CloudWatch Logs is enabled in the contact flow, but only the encrypted values are logged in log streams.
In the newly created Amazon Connect instance, under the Overview section, find the access URL with the format https://<aliasname>.awsapps.com/connect/login
Make note of the access URL, which you will use later to log in to the Amazon Connect Dashboard.
From the Routing menu on the left side, choose Contact flows to show the list of contact flows.
Choose Create Contact flow.
Choose the arrow to the right of the Save button and choose Import flow (beta). This imports the contact flow that you previously downloaded in the procedure To clone or download the solution.
The contact flow already has the Amazon Lex bot configured.
Figure 5: Select Import flow (beta)
In the upper right corner of the contact flow, choose Save, and then choose OK to save the changes.
Choose Publish to make the contact flow ready for use during the validation steps.
(Optional) Claim a phone number (if none is available), using the following steps:
In the Connect Dashboard, on the navigation menu, choose Channels, and then choose Phone numbers.
On the right side of the page, choose Claim a number.
Select the DID(Direct Inward Dialing) tab. Use the drop-down arrow to choose your country/region. When numbers are returned, choose one.
Write down the phone number. You call it later in this post.
(Optional) On the Edit Phone number page, in the Description box, you can type a note if desired.
To assign the contact flow to your claimed phone number, for Contact flow / IVR, choose the drop-down arrow, and then choose Secure_Lex_Input.
Choose Save.
Figure 6: Under Contact flow / IVR, select the imported contact flow
Dial the test phone number to go through the voice prompt flow.
When prompted, speak a 16-digit credit card number (you have a maximum of two retries), then speak a 5-digit zip code (also a maximum of two retries).
After you complete your test call, review the log streams in Amazon CloudWatch Logs to confirm that the digits that you entered are now encrypted and stored as a contact attribute. The two entered values zipcode and creditcard are stored in contact attributes. Both are encrypted.
Figure 7: Sample log showing encrypted values for zipcode and creditcard
Log in to your Amazon Connect Dashboard as a Supervisor. The URL is provided after the connect instance has been created. In the navigation menu, choose Contact search.
Figure 8: Choose Contact search to look for the call information
Locate your inbound call on the Contact search list. Note that it can take up to 60 seconds for data to appear in the Contact search list.
Select the Contact ID for your call.
Figure 9: The Contact search showing the contact details for your test call
Copy the encrypted values for creditcard and zipcode and make note of them; you will use these values in the next procedure.
Figure 10: Contact attributes stored in a contact flow are registered as part of the contact details
Use the Search bar to look for the dev-encryption-core-DecryptFn Lambda function, and then select the name link to open it.
Under folder encryption-master, open the test folder. Under the tab \events, locate the file decrypt.json.
Use the following steps to create a sample test event in the console by using the contents from decrypt.json. For more details, see Testing Lambda functions in the console.
Use the encrypted values saved in the Validate a solution procedure and replace the ones in the recently created test event.
Figure 11: Replace the creditcard or zipCode values with the ones from the Contact Search page
Choose Test. The output from the test shows the values decrypted by the Lambda function. This is shown in Figure 12under the Execution result tab.
Figure 12: Result from the decryption operation
Note: Make sure that only the appropriate authorized administrator or operator, application, or AWS service is able to invoke the decryption Lambda function.
You have now successfully implemented the solution by encrypting and decrypting the voice input of your test call, which you collected through Amazon Lex.
Cleanup
To avoid incurring future charges, follow these steps to clean up the deployed resources that you created when implementing this solution.
To delete the Amazon Connect instance
In the Amazon Connect console, under Instance alias, select the name of the Amazon Connect instance, and choose Delete.
When prompted, type the name of the instance, and then choose Delete.
To delete the Amazon Lex bot
In the Amazon Lex console, choose the bot that you created in the To configure the Amazon Lex bot procedure.
Choose Delete, and then choose Continue.
To delete the AWS CloudFormation stack
In the AWS CloudFormation console, on the Stacks page, select the stack you created in the procedure To create AWS resources needed for encryption and decryption.
In the stack details pane, choose Delete.
Choose Delete stack when prompted. This deletes the Amazon S3 bucket, IAM roles and AWS Lambda functions you created for testing. This will also schedule a deletion date on the AWS KMS key.
Conclusion
In this post, you learned how an Amazon Connect contact flow can collect voice inputs from a caller by using Amazon Lex, and how you can encrypt these inputs by using your own AWS KMS key. This solution can help improve the security of voice input that is collected through Amazon Connect. For cost information, see the Amazon Connect pricing page.
For more information, see the blog post Creating a secure IVR solution with Amazon Connect and the topic Encrypt customer input (using OpenSSL) in the Amazon Connect Administrator Guide. As previously mentioned, the increasing use of voice-driven IVR has resulted in a need to provide solutions that can protect user data gathered from mobile voice inputs.
If you need help with setting up this solution, you can get assistance from AWS Professional Services. You can also seek assistance from Amazon Connect partners available worldwide.
If you have feedback about this post, submit comments in the Comments section below. If you have questions about this post, contact AWS Support.
Want more AWS Security news? Follow us on Twitter.
When you use a centralized identity provider (IdP) for human user access, changes that an identity administrator makes to a user within the IdP won’t invalidate the user’s existing active Amazon Web Services (AWS) sessions. This is due to the nature of session durations that are configured on assumed roles. This situation presents a challenge for identity administrators.
When you configure IAM roles, you have the option of configuring a maximum session duration that specifies how long a session is valid. By default, the temporary credentials provided to the user will last for one hour, but you can change this to a value of up to 12 hours.
When a user assumes a role in AWS by using their IdP credentials, that role’s credentials will remain valid for the length of their session duration. It’s convenient for end users to have a maximum session duration set to 12 hours, because this prevents their sessions from frequently timing out and then requiring re-login. However, a longer session duration also poses a challenge if you, as an identity administrator, attempt to revoke or modify a user’s access to AWS from your IdP.
For example, user John Doe is leaving the company and you want to verify that John has his privileges within AWS revoked. If John has access to IAM roles with long-session durations, then he might have residual access to AWS despite having his session revoked or his user identity deleted within the IdP. Perhaps John assumed a role for his daily work at 8 AM and then you revoked his credentials within the IdP at 9 AM. Because John had already assumed an AWS role, he would still have access to AWS through that role for the duration of the configured session, 8 PM if the session was configured for 12 hours. Therefore, as a security best practice, AWS recommends that you do not set the session duration length longer than is needed. This example is displayed in Figure 1.
Figure 1: Session duration overview
In order to restrict access despite the session duration being active, you could update the roles that are assumable from an IdP with a deny-all policy or delete the role entirely. However, this is a disruptive action for the users that have access to this role. If the role was deleted or the policy was updated to deny all, then users would no longer be able to assume the role or access their AWS environment. Instead, the recommended approach is to revoke access based on the specific user’s principalId or sourceIdentity values.
The principalId is the unique identifier for the entity that made the API call. When requests are made with temporary credentials, such as assumed roles through IdPs, this value also includes the session name, such as [email protected]. The sourceIdentity identifies the original user identity that is making the request, such as a user who is authenticated through SAML federation from an IdP. As a best practice, AWS recommends that you configure this value within the IdP, because this improves traceability for user sessions within AWS. You can find more information on this functionality in the blog post, How to integrate AWS STS SourceIdentity with your identity provider.
Identify the principalId and sourceIdentity by using CloudTrail
You can use AWS CloudTrail to review the actions taken by a user, role, or AWS service that are recorded as events. In the following procedure, you will use CloudTrail to identify the principalId and sourceIdentity contained in the CloudTrail record contents for your IdP assumed role.
To identify the principalId and sourceIdentity by using CloudTrail
Assume a role in AWS by signing in through your IdP.
In this event record, you can see that principalId is “AROATVGBKRLCHXEXAMPLE:[email protected]” and sourceIdentity was specified as “[email protected]”. Now that you have these values, let’s explore how you can revoke access by using SCP and IAM policies.
Use an SCP to deny users based on IdP user name or revoke session token
First, you will create an SCP, a policy that can be applied to an organization to offer central control of the maximum available permissions across the accounts in the organization. More information on SCPs, including steps to create and apply them, can be found in the AWS Organizations User Guide.
The SCP will have a deny-all statement with a condition for aws:userid, which will evaluate the principalId field; and a condition for aws:SourceIdentity, which will evaluate the sourceIdentity field. In the following example SCP, the users John Doe and Mary Major are prevented from accessing AWS, in member accounts, regardless of their session duration, because each action will check against their aws:userid and aws:SourceIdentity values and be denied accordingly.
Use an IAM policy to revoke access in the AWS Organizations management account
SCPs do not affect users or roles in the AWS Organizations management account and instead only affect the member accounts in the organization. Therefore, using an SCP alone to deny access may not be sufficient. However, identity administrators can revoke access in a similar way within their management account by using the following procedure.
To create an IAM policy in the management account
Sign in to the AWS Management Console by using your AWS Organizations management account credentials.
At this point, the user actions on the IdP assumable roles within the AWS organization have been blocked. However, there is still an edge case if the target users use role chaining (use an IdP assumedRole credential to assume a second role) that uses a different RoleSessionName than the one assigned by the IdP. In a role chaining situation, the users will still have access by using the cached credentials for the second role.
This is where the sourceIdentity field is valuable. After a source identity is set, it is present in requests for AWS actions that are taken during the role session. The value that is set persists when a role is used to assume another role (role chaining). The value that is set cannot be changed during the role session. Therefore, it’s recommended that you configure the sourceIdentity field within the IdP as explained previously. This concept is shown in Figure 3.
Figure 3: Role chaining with sourceIdentity configured
A user assumes an IAM role via their IdP (#1), and the CloudTrail record displays sourceIdentity: [email protected] (#2). When the user assumes a new role within AWS (#3), that CloudTrail record continues to display sourceIdentity: [email protected] despite the principalId changing (#4).
However, if a second role is assumed in the account through role chaining and the sourceIdentity is not set, then it’s recommended that you revoke the issued session tokens for the second role. In order to do this, you can use the SCP policy at the end of this section, SCP to revoke active sessions for assumed roles. When you use this policy, the issued credentials related to the roles specified will be revoked for the users currently using them, and only users who were not denied through the previous SCP or IAM policies restricting their aws:userid will be able to reassume the target roles to obtain a new temporary credential.
If you take this approach, you will need to use an SCP to apply across the organization’s member accounts. The SCP must have the human-assumable roles for role chaining listed and a token issue time set to a specific time when you want users’ access revoked. (Normally, this time window would be set to the present time to immediately revoke access, but there might be circumstances in which you wish to revoke the access at a future date, such as when a user moves to a new project or team and therefore requires different access levels.) In addition, you will need to follow the same procedures in your management account by creating a customer-managed policy by using the same JSON with the condition statement for aws:PrincipalArn removed. Then attach the customer managed policy to the individual roles that are human-assumable through role chaining.
In this blog post, I demonstrated how you can revoke a federated user’s active AWS sessions by using SCPs and IAM policies that restrict the use of the aws:userid and aws:SourceIdentity condition keys. I also shared how you can handle a role chaining situation with the aws:TokenIssueTime condition key.
This exercise demonstrates the importance of configuring the session duration parameter on IdP assumed roles. As a security best practice, you should set the session duration to no longer than what is needed to perform the role. In some situations, that could mean an hour or less in a production environment and a longer session in a development environment. Regardless, it’s important to understand the impact of configuring the maximum session duration in the user’s environment and also to have proper procedures in place for revoking a federated user’s access.
This post also covered the recommendation to set the sourceIdentity for assumed roles through the IdP. This value cannot be changed during role sessions and therefore persists when a user conducts role chaining. Following this recommendation minimizes the risk that a user might have assumed another role with a different session name than the one assigned by the IdP and helps prevent the edge case scenario of revoking active sessions based on TokenIssueTime.
You should also consider other security best practices, described in the Security Pillar of the AWS Well-Architected Framework, when you revoke users’ AWS access. For example, rotating credentials such as IAM access keys in situations in which IAM access keys are regularly used and shared among users. The example solutions in this post would not have prevented a user from performing AWS actions if that user had IAM access keys configured for a separate IAM user in the environment. Organizations should limit long-lived security credentials such as IAM keys and instead rotate them regularly or avoid their use altogether. Also, the concept of least privilege is highly important to limit the access that users have and scope it solely to the requirements that are needed to perform their job functions. Lastly, you should adopt a centralized identity provider coupled with the AWS IAM Identity Center (successor to AWS Single Sign-On) service in order to centralize identity management and avoid the need for multiple credentials for users.
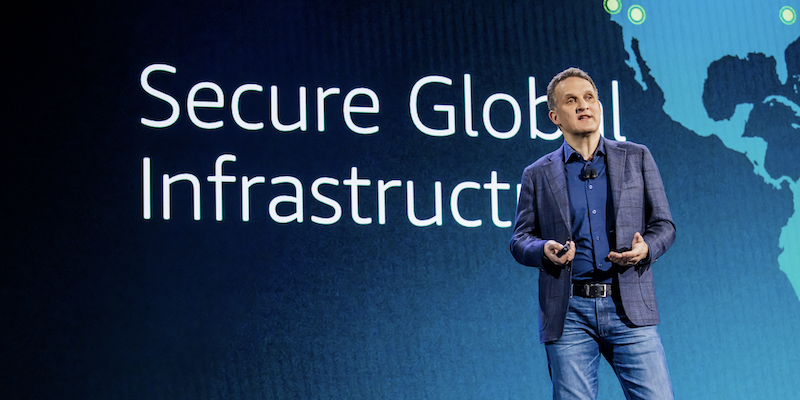
AWS re:Invent returned to Las Vegas, Nevada, November 28 to December 2, 2022. After a virtual event in 2020 and a hybrid 2021 edition, spirits were high as over 51,000 in-person attendees returned to network and learn about the latest AWS innovations.
Now in its 11th year, the conference featured 5 keynotes, 22 leadership sessions, and more than 2,200 breakout sessions and hands-on labs at 6 venues over 5 days.
With well over 100 service and feature announcements—and innumerable best practices shared by AWS executives, customers, and partners—distilling highlights is a challenge. From a security perspective, three key themes emerged.
Turn data into actionable insights
Security teams are always looking for ways to increase visibility into their security posture and uncover patterns to make more informed decisions. However, as AWS Vice President of Data and Machine Learning, Swami Sivasubramanian, pointed out during his keynote, data often exists in silos; it isn’t always easy to analyze or visualize, which can make it hard to identify correlations that spark new ideas.
“Data is the genesis for modern invention.” – Swami Sivasubramanian, AWS VP of Data and Machine Learning
At AWS re:Invent, we launched new features and services that make it simpler for security teams to store and act on data. One such service is Amazon Security Lake, which brings together security data from cloud, on-premises, and custom sources in a purpose-built data lake stored in your account. The service, which is now in preview, automates the sourcing, aggregation, normalization, enrichment, and management of security-related data across an entire organization for more efficient storage and query performance. It empowers you to use the security analytics solutions of your choice, while retaining control and ownership of your security data.
Amazon Security Lake has adopted the Open Cybersecurity Schema Framework (OCSF), which AWS cofounded with a number of organizations in the cybersecurity industry. The OCSF helps standardize and combine security data from a wide range of security products and services, so that it can be shared and ingested by analytics tools. More than 37 AWS security partners have announced integrations with Amazon Security Lake, enhancing its ability to transform security data into a powerful engine that helps drive business decisions and reduce risk. With Amazon Security Lake, analysts and engineers can gain actionable insights from a broad range of security data and improve threat detection, investigation, and incident response processes.
Strengthen security programs
According to Gartner, by 2026, at least 50% of C-Level executives will have performance requirements related to cybersecurity risk built into their employment contracts. Security is top of mind for organizations across the globe, and as AWS CISO CJ Moses emphasized during his leadership session, we are continuously building new capabilities to help our customers meet security, risk, and compliance goals.
In addition to Amazon Security Lake, several new AWS services announced during the conference are designed to make it simpler for builders and security teams to improve their security posture in multiple areas.
Identity and networking
Authorization is a key component of applications. Amazon Verified Permissions is a scalable, fine-grained permissions management and authorization service for custom applications that simplifies policy-based access for developers and centralizes access governance. The new service gives developers a simple-to-use policy and schema management system to define and manage authorization models. The policy-based authorization system that Amazon Verified Permissions offers can shorten development cycles by months, provide a consistent user experience across applications, and facilitate integrated auditing to support stringent compliance and regulatory requirements.
Additional services that make it simpler to define authorization and service communication include Amazon VPC Lattice, an application-layer service that consistently connects, monitors, and secures communications between your services, and AWS Verified Access, which provides secure access to corporate applications without a virtual private network (VPN).
Threat detection and monitoring
Monitoring for malicious activity and anomalous behavior just got simpler. Amazon GuardDuty RDS Protection expands the threat detection capabilities of GuardDuty by using tailored machine learning (ML) models to detect suspicious logins to Amazon Aurora databases. You can enable the feature with a single click in the GuardDuty console, with no agents to manually deploy, no data sources to enable, and no permissions to configure. When RDS Protection detects a potentially suspicious or anomalous login attempt that indicates a threat to your database instance, GuardDuty generates a new finding with details about the potentially compromised database instance. You can view GuardDuty findings in AWS Security Hub, Amazon Detective (if enabled), and Amazon EventBridge, allowing for integration with existing security event management or workflow systems.
To bolster vulnerability management processes, Amazon Inspector now supports AWS Lambda functions, adding automated vulnerability assessments for serverless compute workloads. With this expanded capability, Amazon Inspector automatically discovers eligible Lambda functions and identifies software vulnerabilities in application package dependencies used in the Lambda function code. Actionable security findings are aggregated in the Amazon Inspector console, and pushed to Security Hub and EventBridge to automate workflows.
Data protection and privacy
The first step to protecting data is to find it. Amazon Macie now automatically discovers sensitive data, providing continual, cost-effective, organization-wide visibility into where sensitive data resides across your Amazon Simple Storage Service (Amazon S3) estate. With this new capability, Macie automatically and intelligently samples and analyzes objects across your S3 buckets, inspecting them for sensitive data such as personally identifiable information (PII), financial data, and AWS credentials. Macie then builds and maintains an interactive data map of your sensitive data in S3 across your accounts and Regions, and provides a sensitivity score for each bucket. This helps you identify and remediate data security risks without manual configuration and reduce monitoring and remediation costs.
Encryption is a critical tool for protecting data and building customer trust. The launch of the end-to-end encrypted enterprise communication service AWS Wickr offers advanced security and administrative controls that can help you protect sensitive messages and files from unauthorized access, while working to meet data retention requirements.
Management and governance
Maintaining compliance with regulatory, security, and operational best practices as you provision cloud resources is key. AWS Config rules, which evaluate the configuration of your resources, have now been extended to support proactive mode, so that they can be incorporated into infrastructure-as-code continuous integration and continuous delivery (CI/CD) pipelines to help identify noncompliant resources prior to provisioning. This can significantly reduce time spent on remediation.
Managing the controls needed to meet your security objectives and comply with frameworks and standards can be challenging. To make it simpler, we launched comprehensive controls management with AWS Control Tower. You can use it to apply managed preventative, detective, and proactive controls to accounts and organizational units (OUs) by service, control objective, or compliance framework. You can also use AWS Control Tower to turn on Security Hub detective controls across accounts in an OU. This new set of features reduces the time that it takes to define and manage the controls required to meet specific objectives, such as supporting the principle of least privilege, restricting network access, and enforcing data encryption.
Do more with less
As we work through macroeconomic conditions, security leaders are facing increased budgetary pressures. In his opening keynote, AWS CEO Adam Selipsky emphasized the effects of the pandemic, inflation, supply chain disruption, energy prices, and geopolitical events that continue to impact organizations.
Now more than ever, it is important to maintain your security posture despite resource constraints. Citing specific customer examples, Selipsky underscored how the AWS Cloud can help organizations move faster and more securely. By moving to the cloud, agricultural machinery manufacturer Agco reduced costs by 78% while increasing data retrieval speed, and multinational HVAC provider Carrier Global experienced a 40% reduction in the cost of running mission-critical ERP systems.
“If you’re looking to tighten your belt, the cloud is the place to do it.” – Adam Selipsky, AWS CEO
Security teams can do more with less by maximizing the value of existing controls, and bolstering security monitoring and analytics capabilities. Services and features announced during AWS re:Invent—including Amazon Security Lake, sensitive data discovery with Amazon Macie, support for Lambda functions in Amazon Inspector, Amazon GuardDuty RDS Protection, and more—can help you get more out of the cloud and address evolving challenges, no matter the economic climate.
Security is our top priority
AWS re:Invent featured many more highlights on a variety of topics, such as Amazon EventBridge Pipes and the pre-announcement of GuardDuty EKS Runtime protection, as well as Amazon CTO Dr. Werner Vogels’ keynote, and the security partnerships showcased on the Expo floor. It was a whirlwind week, but one thing is clear: AWS is working harder than ever to make our services better and to collaborate on solutions that ease the path to proactive security, so that you can focus on what matters most—your business.
AWS re:Invent returned to Las Vegas, NV, in November 2022. The conference featured over 2,200 sessions and hands-on labs and more than 51,000 attendees over 5 days. If you weren’t able to join us in person, or just want to revisit some of the security, identity, and compliance announcements and on-demand sessions, this blog post is for you.
Key announcements
Here are some of the security announcements that we made at AWS re:Invent 2022.
We announced the preview of a new service, Amazon Security Lake. Amazon Security Lake automatically centralizes security data from cloud, on-premises, and custom sources into a purpose-built data lake stored in your AWS account. Security Lake makes it simpler to analyze security data so that you can get a more complete understanding of security across your entire organization. You can also improve the protection of your workloads, applications, and data. Security Lake automatically gathers and manages your security data across accounts and AWS Regions.
We introduced the AWS Digital Sovereignty Pledge—our commitment to offering the most advanced set of sovereignty controls and features available in the cloud. As part of this pledge, we launched a new feature of AWS Key Management Service, External Key Store (XKS), where you can use your own encryption keys stored outside of the AWS Cloud to protect data on AWS.
To help you with the building blocks for zero trust, we introduced two new services:
AWS Verified Access provides secure access to corporate applications without a VPN. Verified Access verifies each access request in real time and only connects users to the applications that they are allowed to access, removing broad access to corporate applications and reducing the associated risks.
Amazon Verified Permissions is a scalable, fine-grained permissions management and authorization service for custom applications. Using the Cedar policy language, Amazon Verified Permissions centralizes fine-grained permissions for custom applications and helps developers authorize user actions in applications.
We announced Automated sensitive data discovery for Amazon Macie. This new capability helps you gain visibility into where your sensitive data resides on Amazon Simple Storage Service (Amazon S3) at a fraction of the cost of running a full data inspection across all your S3 buckets. Automated sensitive data discovery automates the continual discovery of sensitive data and potential data security risks across your S3 storage aggregated at the AWS Organizations level.
Amazon Inspector now supports AWS Lambda functions, adding continual, automated vulnerability assessments for serverless compute workloads. Amazon Inspector automatically discovers eligible AWS Lambda functions and identifies software vulnerabilities in application package dependencies used in the Lambda function code. The functions are initially assessed upon deployment to Lambda and continually monitored and reassessed, informed by updates to the function and newly published vulnerabilities. When vulnerabilities are identified, actionable security findings are generated, aggregated in Amazon Inspector, and pushed to Security Hub and Amazon EventBridge to automate workflows.
Amazon GuardDuty now offers threat detection for Amazon Aurora to identify potential threats to data stored in Aurora databases. Currently in preview, Amazon GuardDuty RDS Protection profiles and monitors access activity to existing and new databases in your account, and uses tailored machine learning models to detect suspicious logins to Aurora databases. When a potential threat is detected, GuardDuty generates a security finding that includes database details and contextual information on the suspicious activity. GuardDuty is integrated with Aurora for direct access to database events without requiring you to modify your databases.
AWS Security Hub is now integrated with AWS Control Tower, allowing you to pair Security Hub detective controls with AWS Control Tower proactive or preventive controls and manage them together using AWS Control Tower. Security Hub controls are mapped to related control objectives in the AWS Control Tower control library, providing you with a holistic view of the controls required to meet a specific control objective. This combination of over 160 detective controls from Security Hub, with the AWS Control Tower built-in automations for multi-account environments, gives you a strong baseline of governance and off-the-shelf controls to scale your business using new AWS workloads and services. This combination of controls also helps you monitor whether your multi-account AWS environment is secure and managed in accordance with best practices, such as the AWS Foundational Security Best Practices standard.
We launched our Cloud Audit Academy (CAA) course for Federal and DoD Workloads (FDW) on AWS. This new course is a 12-hour interactive training based on NIST SP 800-171, with mappings to NIST SP 800-53 and the Cybersecurity Maturity Model Certification (CMMC) and covers AWS services relevant to each NIST control family. This virtual instructor-led training is industry- and framework-specific for our U.S. Federal and DoD customers.
AWS Wickr allows businesses and public sector organizations to collaborate more securely, while retaining data to help meet requirements such as e-discovery and Freedom of Information Act (FOIA) requests. AWS Wickr is an end-to-end encrypted enterprise communications service that facilitates one-to-one chats, group messaging, voice and video calling, file sharing, screen sharing, and more.
We introduced the Post-Quantum Cryptography hub that aggregates resources and showcases AWS research and engineering efforts focused on providing cryptographic security for our customers, and how AWS interfaces with the global cryptographic community.
Watch on demand
Were you unable to join the event in person? See the following for on-demand sessions.
To learn about the latest innovations in cloud security from AWS and what you can do to foster a culture of security in your business, watch AWS Chief Information Security Officer CJ Moses’s leadership session with guest Deneen DeFiore, Chief Information Security Officer at United Airlines.
See how AWS, customers, and partners work together to raise their security posture with AWS infrastructure and services. Learn about trends in identity and access management, threat detection and incident response, network and infrastructure security, data protection and privacy, and governance, risk, and compliance.
Dive into our launches! Hear from security experts on recent announcements. Learn how new services and solutions can help you meet core security and compliance requirements.
Consider joining us for more in-person security learning opportunities by saving the date for AWS re:Inforce 2023, which will be held June 13-14 in Anaheim, California. We look forward to seeing you there!
If you’d like to discuss how these new announcements can help your organization improve its security posture, AWS is here to help. Contact your AWS account team today.
If you have feedback about this post, submit comments in the Comments section below. If you have questions about this post, contact AWS Support.
Want more AWS Security news? Follow us on Twitter.
Amazon Macie is a fully managed data security service that uses machine learning and pattern matching to help you discover and protect sensitive data in Amazon Simple Storage Service (Amazon S3). With Macie, you can analyze objects in your S3 buckets to detect occurrences of sensitive data, such as personally identifiable information (PII), financial information, personal health information, and access credentials.
In this post, we walk you through a solution to gain comprehensive and organization-wide visibility into which types of sensitive data are present in your S3 storage, where the data is located, and how much is present. Once enabled, Macie automatically starts discovering sensitive data in your S3 storage and builds a sensitive data profile for each bucket. The profiles are organized in a visual, interactive data map, and you can use the data map to run targeted sensitive data discovery jobs. Both automated data discovery and targeted jobs produce rich, detailed sensitive data discovery results. This solution uses Amazon Athena and Amazon QuickSight to deep-dive on the Macie results, and to help you analyze, visualize, and report on sensitive data discovered by Macie, even when the data is distributed across millions of objects, thousands of S3 buckets, and thousands of AWS accounts. Athena is an interactive query service that makes it simpler to analyze data directly in Amazon S3 using standard SQL. QuickSight is a cloud-scale business intelligence tool that connects to multiple data sources, including Athena databases and tables.
This solution is relevant to data security, data governance, and security operations engineering teams.
The challenge: how to summarize sensitive data discovered in your growing S3 storage
Macie issues findings when an object is found to contain sensitive data. In addition to findings, Macie keeps a record of each S3 object analyzed in a bucket of your choice for long-term storage. These records are known as sensitive data discovery results, and they include additional context about your data in Amazon S3. Due to the large size of the results file, Macie exports the sensitive data discovery results to an S3 bucket, so you need to take additional steps to query and visualize the results. We discuss the differences between findings and results in more detail later in this post.
With the increasing number of data privacy guidelines and compliance mandates, customers need to scale their monitoring to encompass thousands of S3 buckets across their organization. The growing volume of data to assess, and the growing list of findings from discovery jobs, can make it difficult to review and remediate issues in a timely manner. In addition to viewing individual findings for specific objects, customers need a way to comprehensively view, summarize, and monitor sensitive data discovered across their S3 buckets.
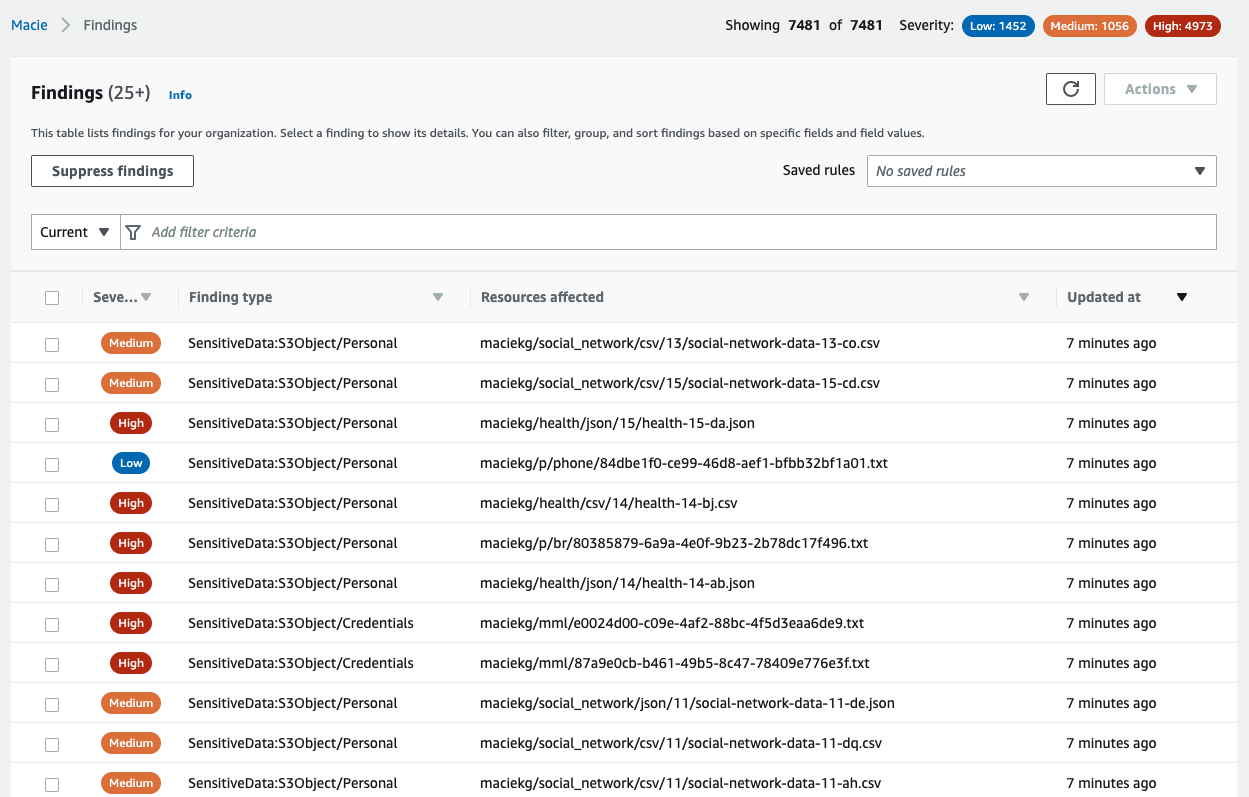
To illustrate this point, we ran a Macie sensitive data discovery job on a dataset created by AWS. The dataset contains about 7,500 files that have sensitive information, and Macie generated a finding for each sensitive file analyzed, as shown in Figure 1.
Figure 1: Macie findings from the dataset
Your security team could spend days, if not months, analyzing these individual findings manually. Instead, we outline how you can use Athena and QuickSight to query and visualize the Macie sensitive data discovery results to understand your data security posture.
The additional information in the sensitive data discovery results will help you gain comprehensive visibility into your data security posture. With this visibility, you can answer questions such as the following:
What are the top 5 most commonly occurring sensitive data types?
Which AWS accounts have the most findings?
How many S3 buckets are affected by each of the sensitive data types?
Your security team can write their own customized queries to answer questions such as the following:
Is there sensitive data in AWS accounts that are used for development purposes?
Is sensitive data present in S3 buckets that previously did not contain sensitive information?
Was there a change in configuration for S3 buckets containing the greatest amount of sensitive data?
Findings provide a report of potential policy violations with an S3 bucket, or the presence of sensitive data in a specific S3 object. Each finding provides a severity rating, information about the affected resource, and additional details, such as when Macie found the issue. Findings are published to the Macie console, AWS Security Hub, and Amazon EventBridge.
In contrast, results are a collection of records for each S3 object that a Macie job analyzed. These records contain information about objects that do and do not contain sensitive data, including up to 1,000 occurrences of each sensitive data type that Macie found in a given object, and whether Macie was unable to analyze an object because of issues such as permissions settings or use of an unsupported format. If an object contains sensitive data, the results record includes detailed information that isn’t available in the finding for the object.
One of the key benefits of querying results is to uncover gaps in your data protection initiatives—these gaps can occur when data in certain buckets can’t be analyzed because Macie was denied access to those buckets, or was unable to decrypt specific objects. The following table maps some of the key differences between findings and results.
Findings
Results
Enabled by default
Yes
No
Location of published results
Macie console, Security Hub, and EventBridge
S3 bucket
Details of S3 objects that couldn’t be scanned
No
Yes
Details of S3 objects in which no sensitive data was found
No
Yes
Identification of files inside compressed archives that contain sensitive data
No
Yes
Number of occurrences reported per object
Up to 15
Up to 1,000
Retention period
90 days in Macie console
Defined by customer
Architecture
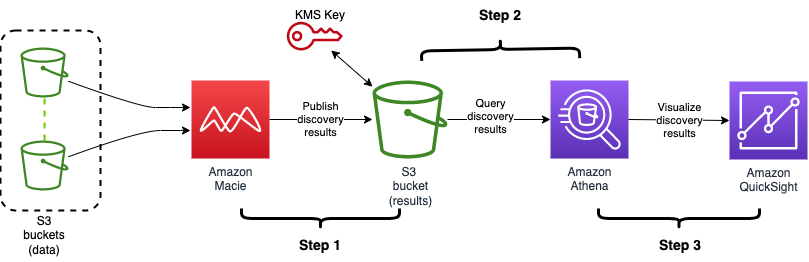
As shown in Figure 2, you can build out the solution in three steps:
Enable the results and publish them to an S3 bucket
Build out the Athena table to query the results by using SQL
Visualize the results with QuickSight
Figure 2: Architecture diagram showing the flow of the solution
Prerequisites
To implement the solution in this blog post, you must first complete the following prerequisites:
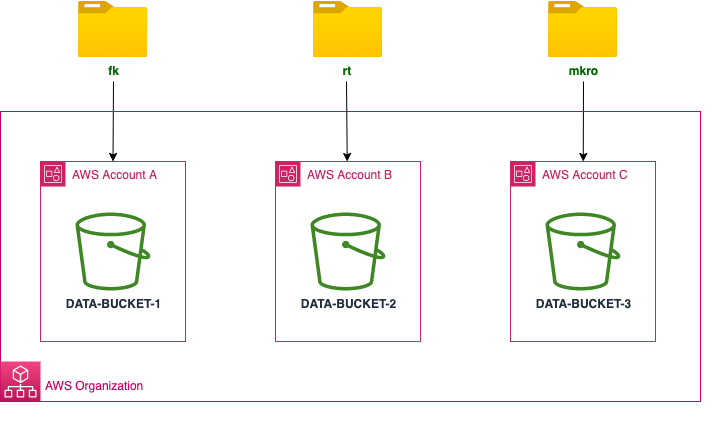
To follow along with the examples in this post, download the sample dataset. The dataset is a single .ZIP file that contains three directories (fk, rt, and mkro). For this post, we used three accounts in our organization, created an S3 bucket in each of them, and then copied each directory to an individual bucket, as shown in Figure 3.
Figure 3: Sample data loaded into three different AWS accounts
Note: All data in this blog post has been artificially created by AWS for demonstration purposes and has not been collected from any individual person. Similarly, such data does not, nor is it intended, to relate back to any individual person.
Step 1: Enable the results and publish them to an S3 bucket
Publication of the discovery results to Amazon S3 is not enabled by default. The setup requires that you specify an S3 bucket to store the results (we also refer to this as the discovery results bucket), and use an AWS Key Management Service (AWS KMS) key to encrypt the bucket.
If you are analyzing data across multiple accounts in your organization, then you need to enable the results in your delegated Macie administrator account. You do not need to enable results in individual member accounts. However, if you’re running Macie jobs in a standalone account, then you should enable the Macie results directly in that account.
Select the AWS Region from the upper right of the page.
From the left navigation pane, select Discovery results.
Select Configure now.
Select Create Bucket, and enter a unique bucket name. This will be the discovery results bucket name. Make note of this name because you will use it when you configure the Athena tables later in this post.
Under Encryption settings, select Create new key. This takes you to the AWS KMS console in a new browser tab.
In the AWS KMS console, do the following:
For Key type, choose symmetric, and for Key usage, choose Encrypt and Decrypt.
Enter a meaningful key alias (for example, macie-results-key) and description.
(Optional) For simplicity, set your current user or role as the Key Administrator.
Set your current user/role as a user of this key in the key usage permissions step. This will give you the right permissions to run the Athena queries later.
From the AWS KMS Key dropdown, select the new key.
To view KMS key policy statements that were automatically generated for your specific key, account, and Region, select View Policy. Copy these statements in their entirety to your clipboard.
Navigate back to the browser tab with the AWS KMS console and then do the following:
Select Customer managed keys.
Choose the KMS key that you created, choose Switch to policy view, and under Key policy, select Edit.
In the key policy, paste the statements that you copied. When you add the statements, do not delete any existing statements and make sure that the syntax is valid. Policies are in JSON format.
Review the inputs in the Settings page for Discovery results and then choose Save. Macie will perform a check to make sure that it has the right access to the KMS key, and then it will create a new S3 bucket with the required permissions.
If you haven’t run a Macie discovery job in the last 90 days, you will need to run a new discovery job to publish the results to the bucket.
In this step, you created a new S3 bucket and KMS key that you are using only for Macie. For instructions on how to enable and configure the results using existing resources, see Storing and retaining sensitive data discovery results with Amazon Macie. Make sure to review Macie pricing details before creating and running a sensitive data discovery job.
Step 2: Build out the Athena table to query the results using SQL
Now that you have enabled the discovery results, Macie will begin publishing them into your discovery results bucket in the form of jsonl.gz files. Depending on the amount of data, there could be thousands of individual files, with each file containing multiple records. To identify the top five most commonly occurring sensitive data types in your organization, you would need to query all of these files together.
In this step, you will configure Athena so that it can query the results using SQL syntax. Before you can run an Athena query, you must specify a query result bucket location in Amazon S3. This is different from the Macie discovery results bucket that you created in the previous step.
If you haven’t set up Athena previously, we recommend that you create a separate S3 bucket, and specify a query result location using the Athena console. After you’ve set up the query result location, you can configure Athena.
To create a new Athena database and table for the Macie results
Open the Athena console, and in the query editor, enter the following data definition language (DDL) statement. In the context of SQL, a DDL statement is a syntax for creating and modifying database objects, such as tables. For this example, we named our database macie_results.
CREATE DATABASE macie_results;
After running this step, you’ll see a new database in the Database dropdown. Make sure that the new macie_results database is selected for the next queries.
Figure 4: Create database in the Athena console
Create a table in the database by using the following DDL statement. Make sure to replace <RESULTS-BUCKET-NAME> with the name of the discovery results bucket that you created previously.
CREATE EXTERNAL TABLE maciedetail_all_jobs(
	accountid string,
	category string,
	classificationdetails struct<jobArn:string,result:struct<status:struct<code:string,reason:string>,sizeClassified:string,mimeType:string,sensitiveData:array<struct<category:string,totalCount:string,detections:array<struct<type:string,count:string,occurrences:struct<lineRanges:array<struct<start:string,`end`:string,`startColumn`:string>>,pages:array<struct<pageNumber:string>>,records:array<struct<recordIndex:string,jsonPath:string>>,cells:array<struct<row:string,`column`:string,`columnName`:string,cellReference:string>>>>>>>,customDataIdentifiers:struct<totalCount:string,detections:array<struct<arn:string,name:string,count:string,occurrences:struct<lineRanges:array<struct<start:string,`end`:string,`startColumn`:string>>,pages:array<string>,records:array<string>,cells:array<string>>>>>>,detailedResultsLocation:string,jobId:string>,
	createdat string,
	description string,
	id string,
	partition string,
	region string,
	resourcesaffected struct<s3Bucket:struct<arn:string,name:string,createdAt:string,owner:struct<displayName:string,id:string>,tags:array<string>,defaultServerSideEncryption:struct<encryptionType:string,kmsMasterKeyId:string>,publicAccess:struct<permissionConfiguration:struct<bucketLevelPermissions:struct<accessControlList:struct<allowsPublicReadAccess:boolean,allowsPublicWriteAccess:boolean>,bucketPolicy:struct<allowsPublicReadAccess:boolean,allowsPublicWriteAccess:boolean>,blockPublicAccess:struct<ignorePublicAcls:boolean,restrictPublicBuckets:boolean,blockPublicAcls:boolean,blockPublicPolicy:boolean>>,accountLevelPermissions:struct<blockPublicAccess:struct<ignorePublicAcls:boolean,restrictPublicBuckets:boolean,blockPublicAcls:boolean,blockPublicPolicy:boolean>>>,effectivePermission:string>>,s3Object:struct<bucketArn:string,key:string,path:string,extension:string,lastModified:string,eTag:string,serverSideEncryption:struct<encryptionType:string,kmsMasterKeyId:string>,size:string,storageClass:string,tags:array<string>,embeddedFileDetails:struct<filePath:string,fileExtension:string,fileSize:string,fileLastModified:string>,publicAccess:boolean>>,
	schemaversion string,
	severity struct<description:string,score:int>,
	title string,
	type string,
	updatedat string)
ROW FORMAT SERDE
	'org.openx.data.jsonserde.JsonSerDe'
WITH SERDEPROPERTIES (
	'paths'='accountId,category,classificationDetails,createdAt,description,id,partition,region,resourcesAffected,schemaVersion,severity,title,type,updatedAt')
STORED AS INPUTFORMAT
	'org.apache.hadoop.mapred.TextInputFormat'
OUTPUTFORMAT
	'org.apache.hadoop.hive.ql.io.HiveIgnoreKeyTextOutputFormat'
LOCATION
	's3://<RESULTS-BUCKET-NAME>/AWSLogs/'
After you complete this step, you will see a new table named maciedetail_all_jobs in the Tables section of the query editor.
Query the results to start gaining insights. For example, to identify the top five most common sensitive data types, run the following query:
select sensitive_data.category,
	detections_data.type,
	sum(cast(detections_data.count as INT)) total_detections
from maciedetail_all_jobs,
	unnest(classificationdetails.result.sensitiveData) as t(sensitive_data),
	unnest(sensitive_data.detections) as t(detections_data)
where classificationdetails.result.sensitiveData is not null
and resourcesaffected.s3object.embeddedfiledetails is null
group by sensitive_data.category, detections_data.type
order by total_detections desc
LIMIT 5
Running this query on the sample dataset gives the following output.
Figure 5: Results of a query showing the five most common sensitive data types in the dataset
(Optional) The previous query ran on all of the results available for Macie. You can further query which accounts have the greatest amount of sensitive data detected.
select accountid,
	sum(cast(detections_data.count as INT)) total_detections
from maciedetail_all_jobs,
	unnest(classificationdetails.result.sensitiveData) as t(sensitive_data),
	unnest(sensitive_data.detections) as t(detections_data)
where classificationdetails.result.sensitiveData is not null
and resourcesaffected.s3object.embeddedfiledetails is null
group by accountid
order by total_detections desc
To test this query, we distributed the synthetic dataset across three member accounts in our organization, ran the query, and received the following output. If you enable Macie in just a single account, then you will only receive results for that one account.
Figure 6: Query results for total number of sensitive data detections across all accounts in an organization
In the previous step, you used Athena to query your Macie discovery results. Although the queries were powerful, they only produced tabular data as their output. In this step, you will use QuickSight to visualize the results of your Macie jobs.
Before creating the visualizations, you first need to grant QuickSight the right permissions to access Athena, the results bucket, and the KMS key that you used to encrypt the results.
Paste the following statement in the key policy. When you add the statement, do not delete any existing statements, and make sure that the syntax is valid. Replace <QUICKSIGHT_SERVICE_ROLE_ARN> and <KMS_KEY_ARN> with your own information. Policies are in JSON format.
	{ "Sid": "Allow Quicksight Service Role to use the key",
		"Effect": "Allow",
		"Principal": {
			"AWS": <QUICKSIGHT_SERVICE_ROLE_ARN>
		},
		"Action": "kms:Decrypt",
		"Resource": <KMS_KEY_ARN>
	}
To allow QuickSight access to Athena and the discovery results S3 bucket
In QuickSight, in the upper right, choose your user icon to open the profile menu, and choose US East (N.Virginia). You can only modify permissions in this Region.
In the upper right, open the profile menu again, and select Manage QuickSight.
Select Security & permissions.
Under QuickSight access to AWS services, choose Manage.
Make sure that the S3 checkbox is selected, click on Select S3 buckets, and then do the following:
Choose the discovery results bucket.
You do not need to check the box under Write permissions for Athena workgroup. The write permissions are not required for this post.
Select Finish.
Make sure that the Amazon Athena checkbox is selected.
Review the selections and be careful that you don’t inadvertently disable AWS services and resources that other users might be using.
Select Save.
In QuickSight, in the upper right, open the profile menu, and choose the Region where your results bucket is located.
Now that you’ve granted QuickSight the right permissions, you can begin creating visualizations.
To create a new dataset referencing the Athena table
On the QuickSight start page, choose Datasets.
On the Datasets page, choose New dataset.
From the list of data sources, select Athena.
Enter a meaningful name for the data source (for example, macie_datasource) and choose Create data source.
Select the database that you created in Athena (for example, macie_results).
Select the table that you created in Athena (for example, maciedetail_all_jobs), and choose Select.
You can either import the data into SPICE or query the data directly. We recommend that you use SPICE for improved performance, but the visualizations will still work if you query the data directly.
To create an analysis using the data as-is, choose Visualize.
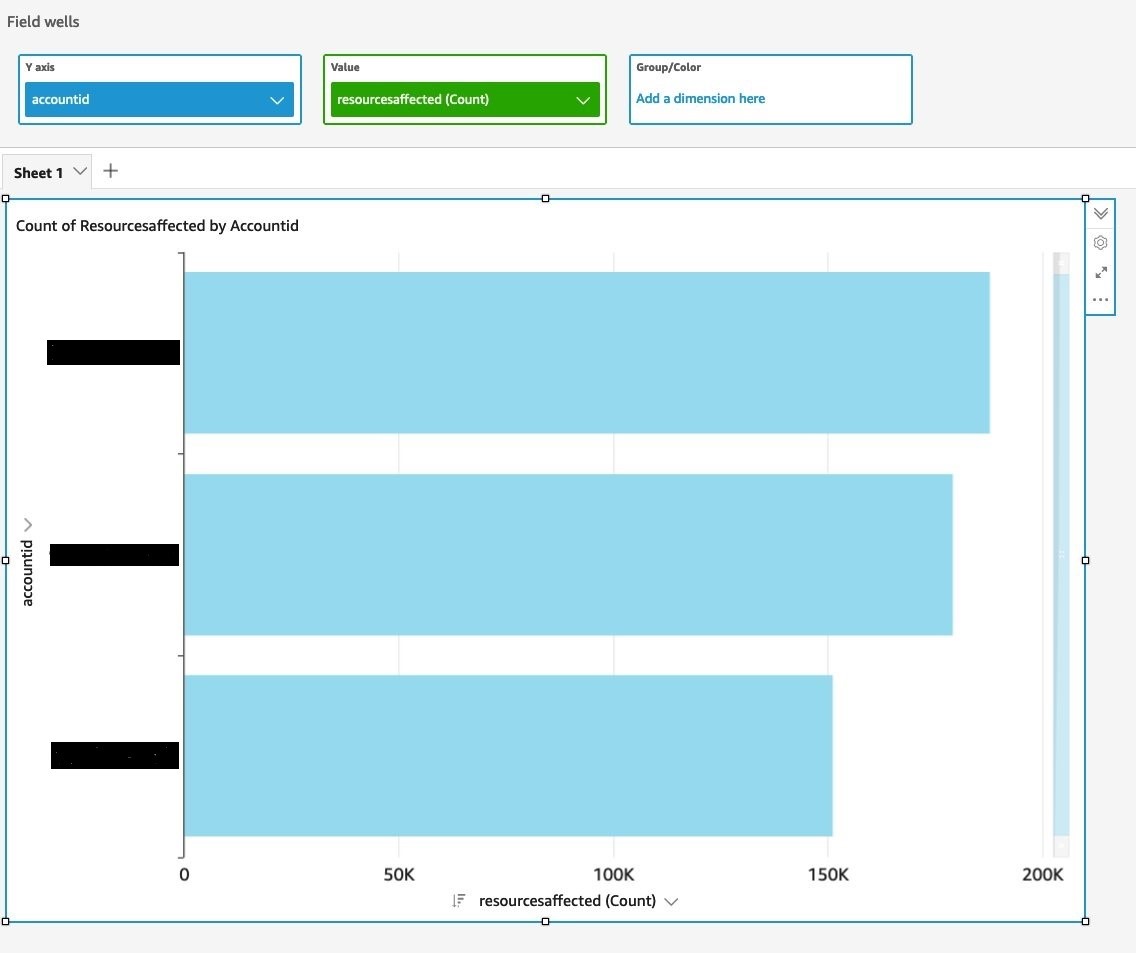
You can then visualize the Macie results in the QuickSight console. The following example shows a delegated Macie administrator account that is running a visualization, with account IDs on the y axis and the count of affected resources on the x axis.
Figure 7: Visualize query results to identify total number of sensitive data detections across accounts in an organization
You can also visualize the aggregated data in QuickSight. For example, you can view the number of findings for each sensitive data category in each S3 bucket. The Athena table doesn’t provide aggregated data necessary for visualization. Instead, you need to query the table and then visualize the output of the query.
To query the table and visualize the output in QuickSight
On the Amazon QuickSight start page, choose Datasets.
On the Datasets page, choose New dataset.
Select the data source that you created in Athena (for example, macie_datasource) and then choose Create Dataset.
Select the database that you created in Athena (for example, macie_results).
Choose Use Custom SQL, enter the following query below, and choose Confirm Query.
	select resourcesaffected.s3bucket.name as bucket_name,
		sensitive_data.category,
		detections_data.type,
		sum(cast(detections_data.count as INT)) total_detections
	from macie_results.maciedetail_all_jobs,
		unnest(classificationdetails.result.sensitiveData) as t(sensitive_data),unnest(sensitive_data.detections) as t(detections_data)
where classificationdetails.result.sensitiveData is not null
and resourcesaffected.s3object.embeddedfiledetails is null
group by resourcesaffected.s3bucket.name, sensitive_data.category, detections_data.type
order by total_detections desc
You can either import the data into SPICE or query the data directly.
To create an analysis using the data as-is, choose Visualize.
Now you can visualize the output of the query that aggregates data across your S3 buckets. For example, we used the name of the S3 bucket to group the results, and then we created a donut chart of the output, as shown in Figure 6.
Figure 8: Visualize query results for total number of sensitive data detections across each S3 bucket in an organization
From the visualizations, we can identify which buckets or accounts in our organizations contain the most sensitive data, for further action. Visualizations can also act as a dashboard to track remediation.
You can replicate the preceding steps by using the sample queries from the amazon-macie-results-analytics GitHub repo to view data that is aggregated across S3 buckets, AWS accounts, or individual Macie jobs. Using these queries with the results of your Macie results will help you get started with tracking the security posture of your data in Amazon S3.
Conclusion
In this post, you learned how to enable sensitive data discovery results for Macie, query those results with Athena, and visualize the results in QuickSight.
Because Macie sensitive data discovery results provide more granular data than the findings, you can pursue a more comprehensive incident response when sensitive data is discovered. The sample queries in this post provide answers to some generic questions that you might have. After you become familiar with the structure, you can run other interesting queries on the data.
We hope that you can use this solution to write your own queries to gain further insights into sensitive data discovered in S3 buckets, according to the business needs and regulatory requirements of your organization. You can consider using this solution to better understand and identify data security risks that need immediate attention. For example, you can use this solution to answer questions such as the following:
Is financial information present in an AWS account where it shouldn’t be?
Are S3 buckets that contain PII properly hardened with access controls and encryption?
You can also use this solution to understand gaps in your data security initiatives by tracking files that Macie couldn’t analyze due to encryption or permission issues. To further expand your knowledge of Macie capabilities and features, see the following resources:
If you have feedback about this post, submit comments in the Comments section below. If you have questions about this post, start a new thread on Amazon Macie re:Post.
Want more AWS Security news? Follow us on Twitter.
The AWS Security Incident Response Guide focuses on the fundamentals of responding to security incidents within a customer’s Amazon Web Services (AWS) Cloud environment. You can use the guide to help build and iterate on your AWS security incident response program.
Recently, we updated the AWS Security Incident Response Guide to more clearly explain what you should do before, during, and after a security event. In this post, we will highlight some of the changes and discuss how to use the new guide.
Update highlights
Based on customer feedback, new service and feature releases, and our experience helping customers, we’ve updated the majority of the guide with new content. Some highlights of the new version include:
New foundational content on the differences between AWS and on-premises incident response – Because customers have frequently asked the question “What’s different about incident response on AWS?” the new introduction includes a section on the Key differences of incident response on AWS, which enumerates six core differences between AWS and on-premises incident response.
Alignment to incident response industry standards – The new guide was re-structured to align with the incident response standards and best practices from the National Institute of Technology (NIST) Computer Security Incident Handling Guide SP 800-61 Rev. 2. This alignment helps clarify how AWS technologies apply to these concepts.
New Operations section – The guide contains a new section, Operations, which explains actions to take during a security event by following NIST’s phases of incident response: detection, analysis, containment, eradication, and recovery.
Clearer prescriptive guidance – The updated guide also contains prescriptive guidance to clarify the actions that a customer should take before, during, and after a security incident. The Preparation section contains a table in the conclusion that summarizes the actions that you can take before a security event. Similarly, the Operations section has a summary table with techniques and methodologies for active response. Lastly, the Post-incident activity section contains a framework for learning from incidents, which includes a list of questions to address after a security incident.
Using the new guide
We encourage you to read the entire guide before taking action and building a list of changes to implement. After you read the guide, assess your current status based on the preparation items and check off action items that you have already completed in the Preparation items table. This will help you assess the current state of your AWS incident response. Then, you should plan a short-term and long-term roadmap based on your gaps, desired state, resources, and business needs. Building a cloud incident response program often involves iteration, so you should prioritize key items and regularly revisit your backlog to keep up with technology changes and your business requirements.
We greatly value feedback and contributions from our community. To share your thoughts and insights about the AWS Security Incident Response Guide, your experience using it, and what you want to see in future versions, complete the feedback form.
Want more AWS Security news? Follow us on Twitter.
The Finnish Transport and Communications Agency (Traficom) Cyber Security Centre published PiTuKri, which consists of 52 criteria that provide guidance when assessing the security of cloud service providers. The criteria are organized into the following 11 subdivisions:
Framework conditions
Security management
Personnel security
Physical security
Communications security
Identity and access management
Information system security
Encryption
Operations security
Transferability and compatibility
Change management and system development
It is our pleasure to announce the addition of 16 new services and two new Regions to our PiTuKri attestation scope. A few examples of the new security services included are:
AWS CloudShell – A browser-based shell that makes it simple to manage, explore, and interact with your AWS resources. With CloudShell, you can quickly run scripts with the AWS Command Line Interface (AWS CLI), experiment with AWS service APIs by using the AWS SDKs, or use a range of other tools to be productive.
Amazon HealthLake – A HIPAA-eligible service that offers healthcare and life sciences companies a chronological view of individual or patient population health data for query and analytics at scale.
AWS IoT SiteWise – A managed service that simplifies collecting, organizing, and analyzing industrial equipment data.
Amazon DevOps Guru – A service that uses machine learning to detect abnormal operating patterns to help you identify operational issues before they impact your customers.
The latest report covers the period from October 1, 2021 to September 30, 2022. It was issued by an independent third-party audit firm to assure customers that the AWS control environment is appropriately designed and implemented in accordance with PiTuKri requirements. This attestation demonstrates the AWS commitment to meet security expectations for cloud service providers set by Traficom.
Customers can find the full PiTuKri ISAE 3000 report on AWS Artifact. To learn more about the complete list of certified services and Regions, customers can also refer to AWS Compliance Programs and AWS Services in Scope for PiTuKri.
AWS strives to continuously bring new services into scope of its compliance programs to help customers meet their architectural and regulatory needs. Please reach out to your AWS account team for any questions about the PiTuKri report.
If you have feedback about this post, please submit them in the Comments section below. Want more AWS Security news? Follow us on Twitter.
Amazon Web Services (AWS) is pleased to announce the third issuance of the Swiss Financial Market Supervisory Authority (FINMA) International Standard on Assurance Engagements (ISAE) 3000 Type II attestation report. The scope of the report covers a total of 154 services and 24 global AWS Regions.
The latest FINMA ISAE 3000 Type II report covers the period from October 1, 2021, to September 30, 2022. AWS continues to assure Swiss financial industry customers that our control environment is capable of effectively addressing key operational, outsourcing, and business continuity management risks.
FINMA circulars
The report covers the five core FINMA circulars regarding outsourcing arrangements to the cloud. FINMA circulars help Swiss-regulated financial institutions to understand the approaches FINMA takes when implementing due diligence, third-party management, and key technical and organizational controls for cloud outsourcing arrangements, particularly for material workloads.
The scope of the report covers the following requirements of the FINMA circulars:
2018/03 Outsourcing – Banks, insurance companies and selected financial institutions under FinIA
2008/21 Operational Risks – Banks – Appendix 3 Handling of Electronic Client Identifying Data (31.10.2019)
2013/03 Auditing – Information Technology (04.11.2020)
2008/10 Self-regulation as a minimum standard – Minimum Business Continuity Management (BCM) minimum standards proposed by the Swiss Insurance Association (01.06.2015) and Swiss Bankers Association (29.08.2013)
It is our pleasure to announce the addition of 16 services and two Regions to the FINMA ISAE 3000 Type II attestation scope. The following are a few examples of the additional security services in scope:
AWS CloudShell – A browser-based shell that makes it simple to manage, explore, and interact with your AWS resources. With CloudShell, you can quickly run scripts with the AWS Command Line Interface (AWS CLI), experiment with AWS service APIs by using the AWS SDKs, or use a range of other tools to be productive.
Amazon HealthLake – A HIPAA-eligible service that offers healthcare and life sciences companies a chronological view of individual or patient population health data for query and analytics at scale.
AWS IoT SiteWise – A managed service that simplifies collecting, organizing, and analyzing industrial equipment data.
Amazon DevOps Guru – A service that uses machine learning to detect abnormal operating patterns to help you identify operational issues before they impact your customers.
Customers can continue to reference the FINMA workbooks, which include detailed control mappings for each FINMA circular covered under this audit report, through AWS Artifact. Customers can also find the entire FINMA report on AWS Artifact. To learn more about the list of certified services and Regions, see AWS Compliance Programs and AWS Services in Scope for FINMA.
As always, AWS is committed to adding new services into our future FINMA program scope based on your architectural and regulatory needs. If you have questions about the FINMA report, contact your AWS account team.
If you have feedback about this post, please submit them in the Comments section below. Want more AWS Security news? Follow us on Twitter.
Over the past year, AWS CIRT has responded to hundreds of such security events, including the unauthorized use of AWS Identity and Access Management (IAM) credentials, ransomware and data deletion in an AWS account, and billing increases due to the creation of unauthorized resources to mine cryptocurrency.
We are excited to release five workshops that simulate these security events to help you learn the tools and procedures that AWS CIRT uses on a daily basis to detect, investigate, and respond to such security events. The workshops cover AWS services and tools, such as Amazon GuardDuty, Amazon CloudTrail, Amazon CloudWatch, Amazon Athena, and AWS WAF, as well as some open source tools written and published by AWS CIRT.
To access the workshops, you just need an AWS account, an internet connection, and the desire to learn more about incident response in the AWS Cloud! Choose the following links to access the workshops.
During this workshop, you will simulate the unauthorized use of IAM credentials by using a script invoked within AWS CloudShell. The script will perform reconnaissance and privilege escalation activities that have been commonly seen by AWS CIRT and that are typically performed during similar events of this nature. You will also learn some tools and processes that AWS CIRT uses, and how to use these tools to find evidence of unauthorized activity by using IAM credentials.
During this workshop, you will use an AWS CloudFormation template to replicate an environment with multiple IAM users and five Amazon Simple Storage Service (Amazon S3) buckets. AWS CloudShell will then run a bash script that simulates data exfiltration and data deletion events that replicate a ransomware-based security event. You will also learn the tools and processes that AWS CIRT uses to respond to similar events, and how to use these tools to find evidence of unauthorized S3 bucket and object deletions.
During this workshop, you will simulate a cryptomining security event by using a CloudFormation template to initialize three Amazon Elastic Compute Cloud (Amazon EC2) instances. These EC2 instances will mimic cryptomining activity by performing DNS requests to known cryptomining domains. You will also learn the tools and processes that AWS CIRT uses to respond to similar events, and how to use these tools to find evidence of unauthorized creation of EC2 instances and communication with known cryptomining domains.
During this workshop, you will simulate the unauthorized use of a web application that is hosted on an EC2 instance configured to use Instance Metadata Service Version 1 (IMDSv1) and vulnerable to server side request forgery (SSRF). You will learn how web application vulnerabilities, such as SSRF, can be used to obtain credentials from an EC2 instance. You will also learn the tools and processes that AWS CIRT uses to respond to this type of access, and how to use these tools to find evidence of the unauthorized use of EC2 instance credentials through web application vulnerabilities such as SSRF.
During this workshop, you will install and experiment with some common tools and utilities that AWS CIRT uses on a daily basis to detect security misconfigurations, respond to active events, and assist customers with protecting their infrastructure.
If you have feedback about this post, submit comments in the Comments section below. If you have questions about this post, contact AWS Support.
Want more AWS Security news? Follow us on Twitter.
AWS recently released a whitepaper on the Security Design of the AWS Nitro System. The Nitro System is a combination of purpose-built server designs, data processors, system management components, and specialized firmware that serves as the underlying virtualization technology that powers all Amazon Elastic Compute Cloud (Amazon EC2) instances launched since early 2018. With the Nitro System, AWS undertook an effort to reimagine the architecture of virtualization to deliver security, isolation, performance, cost savings, and a pace of innovation that our customers require.
This whitepaper is a detailed design document on the inner workings of the AWS Nitro System, and how we use it to help secure your most critical workloads. This is the first time that AWS has provided such a detailed design document on the Nitro System and how it offers a no-operator access design and strong tenant isolation. The whitepaper describes the security design of the Nitro System in detail to help you evaluate Amazon EC2 for your sensitive workloads.
Three key components of the Nitro System are used to implement this design:
Purpose-built Nitro Cards – Hardware devices designed by AWS that provide overall system control and I/O virtualization that is independent of the main system board with its CPUs and memory.
Nitro Security Chip – Enables a secure boot process for the overall system based on a hardware root of trust, the ability to offer bare metal instances, and defense-in-depth that offers protection to the server from unauthorized modification of system firmware.
Nitro Hypervisor – A deliberately minimized and firmware-like hypervisor designed to provide strong resource isolation, and performance that is nearly indistinguishable from a bare metal server.
The whitepaper describes the fundamental architectural change introduced by the Nitro System compared to previous approaches to virtualization. It discusses the three key components of the Nitro System, and provides a demonstration of how these components work together by walking through what happens when a new Amazon Elastic Block Store (Amazon EBS) volume is added to a running EC2 instance. The whitepaper also discusses how the Nitro System is designed to eliminate the possibility of administrator access to an EC2 server, the overall passive communications design of the Nitro System, and the Nitro System change management process. Finally, the paper surveys important aspects of the EC2 system design that provide mitigations against potential side-channel issues that can arise in compute environments.
The whitepaper dives deep into each of these considerations, offering a detailed picture of the Nitro System security design. For more information about cloud security at AWS, contact us.
If you have feedback about this post, submit comments in the Comments section below. If you have questions about this post, contact AWS Support.
Want more AWS Security news? Follow us on Twitter.
Currently, AWS Security Hub identifies controls and generates control findings in the context of security standards. Security Hub is aiming to release two new features in the first quarter of 2023 that will decouple controls from standards and streamline how you view and receive control findings.
The new features to be released are consolidated controls view and consolidated control findings. Consolidated controls view will provide you with a comprehensive view within the Security Hub console of your controls across security standards. This feature will also introduce a single unique identifier for each control across security standards.
Consolidated control findings will streamline your control findings. When this feature is turned on, Security Hub will produce a single finding for a security check even when a check is shared across multiple standards. This will reduce finding noise and help you focus on misconfigured resources in your AWS environment.
In this blog post, I’ll summarize the upcoming features, the benefit they bring to your organization, and how you can take advantage of them upon release.
Feature 1: Consolidated controls view
Currently, controls are identified, viewed, and managed in the context of individual security standards. In the Security Hub console, you first have to navigate to a specific standard to see a list of controls for that standard. Within the AWS Foundational Security Best Practices (FSBP) standard, Security Hub identifies controls by the impacted AWS service and a unique number (for example, IAM.1). For other standards, Security Hub includes the standard as part of the control identifier (for example, CIS 1.1 or PCI.AutoScaling.1).
After the release of consolidated controls view, you will be able to see a consolidated list of your controls from a new Controls page in the Security Hub console. Security Hub will also assign controls a consistent security control ID across standards. Following the current naming convention of the AWS FSBP standard, control IDs will include the relevant service and a unique number.
For example, the control AWS Config should be enabled is currently identified as Config.1 in the AWS FSBP standard, CIS 2.5 in the Center for Internet Security (CIS) AWS Foundations Benchmark v1.2.0, CIS 3.5 in the CIS AWS Foundations Benchmark v1.4.0, and PCI.Config.1 in the Payment Card Industry Data Security Standard (PCI DSS). After this release, this control will have a single identifier called Config.1 across standards. The single Controls page and consistent identifier will help you rapidly discover misconfigurations with minimal context-switching.
You’ll be able to enable a control for one or more enabled standards that include the control. You’ll also be able to disable a control for one or more enabled standards. As before, you can enable the standards that apply to your business case.
Changes to control finding fields and values after the release of consolidated controls view
After the release of consolidated controls view, note the following changes to control finding fields and values in the AWS Security Finding Format (ASFF).
ASFF field
What changes after consolidated controls view release
Example value before consolidated controls view release
Example value after consolidated controls view release
Compliance.SecurityControlId
A single control ID will apply across standards. ProductFields.ControlId will still provide the standards-based control ID.
Not applicable (new field)
EC2.2
Compliance.AssociatedStandards
Will show the standards that a control is enabled for.
Currently, multiple standards contain separate controls for the same security check. Security Hub generates a separate finding per standard for each related control that is evaluated by the same security check.
After release of the consolidated control findings feature, you’ll be able to unify control findings across standards and reduce finding noise. This, in turn, will help you more quickly investigate and remediate failed findings. When you turn on consolidated control findings, Security Hub will generate a single finding or finding update for each security check of a control, even if the check is shared across multiple standards.
For example, after you turn on the feature, you will receive a single finding for a security check of Config.1 even if you’ve enabled this control for the AWS FSBP standard, CIS AWS Foundations Benchmark v1.2.0, CIS AWS Foundations Benchmark v1.4.0, and PCI DSS. If you don’t turn on consolidated control findings, you will receive four separate findings for a security check of Config.1 if you’ve enabled this control for the AWS FSBP standard, CIS AWS Foundations Benchmark v1.2.0, CIS AWS Foundations Benchmark v1.4.0, and PCI DSS.
Changes to control finding fields and values after turning on consolidated control findings
If you turn on consolidated control findings, note the following changes to control finding fields and values in the ASFF. These changes are in addition to the changes previously described for consolidated controls view.
ASFF field
What changes after consolidated controls view release
Example value before consolidated controls view release
Example value after consolidated controls view release
New values for customer-provided finding fields after turning on consolidated control findings
When you turn on consolidated control findings, Security Hub will archive the existing findings and generate new findings. To view archived findings, you can visit the Findings page of the Security Hub console with the Record state filter set to ARCHIVED, or use the GetFindings API action. Updates you’ve made to the original finding fields in the Security Hub console or by using the BatchUpdateFindings API action will not be preserved in the new findings (if needed, you can recover this data by referring to the archived findings).
Note the following changes to customer-provided control finding fields when you turn on consolidated control findings.
Customer-provided ASFF field
Description of change after turning on consolidated control findings
Confidence
Will reset to empty state.
Criticality
Will reset to empty state.
Note
Will reset to empty state.
RelatedFindings
Will reset to empty state.
Severity
The default severity of the finding (matches the severity of the control).
Types
Will reset to standard-agnostic value.
UserDefinedFields
Will reset to empty state.
VerificationState
Will reset to empty state.
Workflow
New failed findings will have a default value of NEW. New passed findings will have a default value of RESOLVED.
How to turn consolidated control findings on and off
Follow these instructions to turn consolidated control findings on and off.
New accounts
If you enable Security Hub for an AWS account for the first time on or after the time when consolidated control findings is released, by default consolidated control findings will be turned on for your account. You can turn it off at any time. However, we recommend keeping it turned on to minimize finding noise.
If you use the Security Hub integration with AWS Organizations, consolidated control findings will be turned on for new member accounts if the administrator account has turned on the feature. If the administrator account has turned it off, it will be turned off for new subordinate AWS accounts (member accounts) as well.
Existing accounts
If your Security Hub account already existed before consolidated control findings is released, your account will have consolidated control findings turnedoff by default. You can turn it on at any time. We recommend turning it on to minimize finding noise. If you use AWS Organizations, consolidated control findings will be turned on or off for existing member accounts based on the settings of the administrator account.
To turn consolidated control findings on and off (Security Hub console)
In the navigation pane, choose Settings.
Choose the General tab.
For Controls, turn on Consolidated control findings. Turn it off to receive multiple findings for each standard.
Choose Save.
To turn consolidated control findings on and off (Security Hub API)
Run the UpdateSecurityHubConfiguration API action. Use the new ControlFindingGenerator attribute to change whether an account uses consolidated control findings:
To turn on consolidated control findings, set ControlFindingGenerator equal to SECURITY_CONTROL.
To turn it off, set ControlFindingGenerator equal to STANDARD_CONTROL.
To turn consolidated control findings on and off (AWS CLI)
In the AWS CLI, run the update-security-hub-configuration command. Use the new control-finding-generator attribute to change whether an account uses consolidated control findings:
To turn on consolidated control findings, set control-finding-generator equal to SECURITY_CONTROL.
To turn it off, set control-finding-generator equal to STANDARD_CONTROL.
API permissions for consolidated control findings
You’ll need AWS Identity and Access Management (IAM) permissions for the following new API operations in order for consolidated control findings to work as expected:
BatchGetSecurityControls – Returns account and Region-specific data about a batch of controls.
ListSecurityControlDefinitions – Returns information about controls that apply to a specified standard.
ListStandardsControlAssociations – Identifies whether a control is currently associated with or dissociated from each enabled standard.
BatchGetStandardsControlAssociations – For a batch of controls, identifies whether each control is currently associated with or dissociated from a specified standard.
BatchUpdateStandardsControlAssociations – Used to associate a control with enabled standards that include the control, or to dissociate a control from enabled standards. This is a batch substitute for the UpdateStandardsControl API action if an administrator doesn’t want to allow member accounts to associate or dissociate controls.
BatchGetControlEvaluations (private API) – Retrieves the enablement and compliance status of a control, the findings count for a control, and the overall security score for controls.
How to prepare for control finding field and value changes
If your workflows don’t rely on the specific format of any control finding fields, no action is required to prepare for the feature releases. We recommend that you immediately turn on consolidated control findings.
Consider waiting to turn on consolidated control findings if you currently rely on the Automated Security Response on AWS solution for predefined response and remediation actions. That solution does not yet support consolidated control findings. If you turn consolidated control findings on now, actions you deployed using the Automated Security Response solution will no longer work.
If you rely on the specific format of any control finding fields (for example, for custom automation), carefully review the upcoming finding field and value changes to ensure that your workflows will continue to function as intended. Note that the changes noted in the first table in this post might impact you if you rely on the specified control finding fields and values.
The changes noted in the second table and third table in this post will only impact you if you turn on consolidated control findings. For example, if you rely on ProductFields.ControlId, GeneratorId, or Title, you’ll be impacted if you turn on consolidated control findings. As another example, if you’ve created an Amazon CloudWatch Events rule that initiates an action for a specific control ID (such as invoking an AWS Lambda function if the control ID equals CIS 2.7), you’ll need to update the rule to use CloudTrail.2, the new Compliance.SecurityControlId field for that control.
If you’ve created custom insights by using the control finding fields or values that will change (see previous tables), we recommend updating those insights to use the new fields or values.
Conclusion
This post covered the control finding fields and values that will change in Security Hub after release of the consolidated controls view and consolidated control findings features. We recommend that you carefully review the changes and update your workflows to start using the new fields and values as soon as the features become available.
Starting in April of 2023 we will be making two changes to Amazon Simple Storage Service (Amazon S3) to put our latest best practices for bucket security into effect automatically. The changes will begin to go into effect in April and will be rolled out to all AWS Regions within weeks.
Once the changes are in effect for a target Region, all newly created buckets in the Region will by default have S3 Block Public Access enabled and access control lists (ACLs) disabled. Both of these options are already console defaults and have long been recommended as best practices. The options will become the default for buckets that are created using the S3 API, S3 CLI, the AWS SDKs, or AWS CloudFormation templates.
As a bit of history, S3 buckets and objects have always been private by default. We added Block Public Access in 2018 and the ability to disable ACLs in 2021 in order to give you more control, and have long been recommending the use of AWS Identity and Access Management (IAM) policies as a modern and more flexible alternative.
In light of this change, we recommend a deliberate and thoughtful approach to the creation of new buckets that rely on public buckets or ACLs, and believe that most applications do not need either one. If your application turns out be one that does, then you will need to make the changes that I outline below (be sure to review your code, scripts, AWS CloudFormation templates, and any other automation).
What’s Changing Let’s take a closer look at the changes that we are making:
S3 Block Public Access – All four of the bucket-level settings described in this post will be enabled for newly created buckets:
A subsequent attempt to set a bucket policy or an access point policy that grants public access will be rejected with a 403 Access Denied error. If you need public access for a new bucket you can create it as usual and then delete the public access block by calling DeletePublicAccessBlock (you will need s3:PutBucketPublicAccessBlock permission in order to call this function; read Block Public Access to learn more about the functions and the permissions).
ACLs Disabled – The Bucket owner enforced setting will be enabled for newly created buckets, making bucket ACLs and object ACLs ineffective, and ensuring that the bucket owner is the object owner no matter who uploads the object. If you want to enable ACLs for a bucket, you can set the ObjectOwnership parameter to ObjectWriter in your CreateBucket request or you can call DeleteBucketOwnershipControls after you create the bucket. You will need s3:PutBucketOwnershipControls permission in order to use the parameter or to call the function; read Controlling Ownership of Objects and Creating a Bucket to learn more.
Stay Tuned We will publish an initial What’s New post when we start to deploy this change and another one when the deployment has reached all AWS Regions. You can also run your own tests to detect the change in behavior.
To provide the best experiences, we use technologies like cookies to store and/or access device information. Consenting to these technologies will allow us to process data such as browsing behavior or unique IDs on this site. Not consenting or withdrawing consent, may adversely affect certain features and functions.
Functional
Always active
The technical storage or access is strictly necessary for the legitimate purpose of enabling the use of a specific service explicitly requested by the subscriber or user, or for the sole purpose of carrying out the transmission of a communication over an electronic communications network.
Preferences
The technical storage or access is necessary for the legitimate purpose of storing preferences that are not requested by the subscriber or user.
Statistics
The technical storage or access that is used exclusively for statistical purposes.The technical storage or access that is used exclusively for anonymous statistical purposes. Without a subpoena, voluntary compliance on the part of your Internet Service Provider, or additional records from a third party, information stored or retrieved for this purpose alone cannot usually be used to identify you.
Marketing
The technical storage or access is required to create user profiles to send advertising, or to track the user on a website or across several websites for similar marketing purposes.