Tag Archives: Security, Identity & Compliance

Approaches to meeting Australian Government gateway requirements on AWS

Post Syndicated from John Hildebrandt original https://aws.amazon.com/blogs/security/approaches-to-meeting-australian-government-gateway-requirements-on-aws/

Australian Commonwealth Government agencies are subject to specific requirements set by the Protective Security Policy Framework (PSPF) for securing connectivity between systems that are running sensitive workloads, and for accessing less trusted environments, such as the internet. These agencies have often met the requirements by using some form of approved gateway solution that provides network-based security controls.

This post examines the types of controls you need to provide a gateway that can meet Australian Government requirements defined in the Protective Security Policy Framework (PSPF) and the challenges of using traditional deployment models to support cloud-based solutions. PSPF requirements are mandatory for non-corporate Commonwealth entities, and represent better practice for corporate Commonwealth entities, wholly-owned Commonwealth companies, and state and territory agencies. We discuss the ability to deploy gateway-style solutions in the cloud, and show how you can meet the majority of gateway requirements by using standard cloud architectures plus services. We provide guidance on deploying gateway solutions in the AWS Cloud, and highlight services that can support such deployments. Finally, we provide an illustrative AWS web architecture pattern to show how to meet the majority of gateway requirements through Well-Architected use of services.

Australian Government gateway requirements

The Australian Government Protective Security Policy Framework (PSPF) highlights the requirement to use secure internet gateways (SIGs) and references the Australian Information Security Manual (ISM) control framework to guide agencies. The ISM has a chapter on gateways, which includes the following recommendations for gateway architecture and operations:

  • Provide a central control point for traffic in and out of the system.
  • Inspect and filter traffic.
  • Log and monitor traffic and gateway operation to a secure location. Use appropriate security event alerting.
  • Use secure administration practices, including multi-factor authentication (MFA) access control, minimum privilege, separation of roles, and network segregation.
  • Perform appropriate authentication and authorization of users, traffic, and equipment. Use MFA when possible.
  • Use demilitarized zone (DMZ) patterns to limit access to internal networks.
  • Test security controls regularly.
  • Set up firewalls between security domains and public network infrastructure.

Since the PSPF references the ISM, the agency should apply the overall ISM framework to meet ISM requirements such as governance and security patching for the environment. The ISM is a risk-based framework, and the risk posture of the workload and organization should inform how to assess the controls. For example, requirements for authentication of users might be relaxed for a public-facing website.

In traditional on-premises environments, some Australian Government agencies have mandated centrally assessed and managed gateway capabilities in order to drive economies of scale across multiple government agencies. However, the PSPF does provide the option for gateways used only by a single government agency to undertake their own risk-based assessment for the single agency gateway solution.

Other government agencies also have specific requirements to connect with cloud providers. For example, the U.S. Government Office of Management and Budget (OMB) mandates that U.S. government users access the cloud through a specific agency connection.

Connecting to the cloud through on-premises gateways

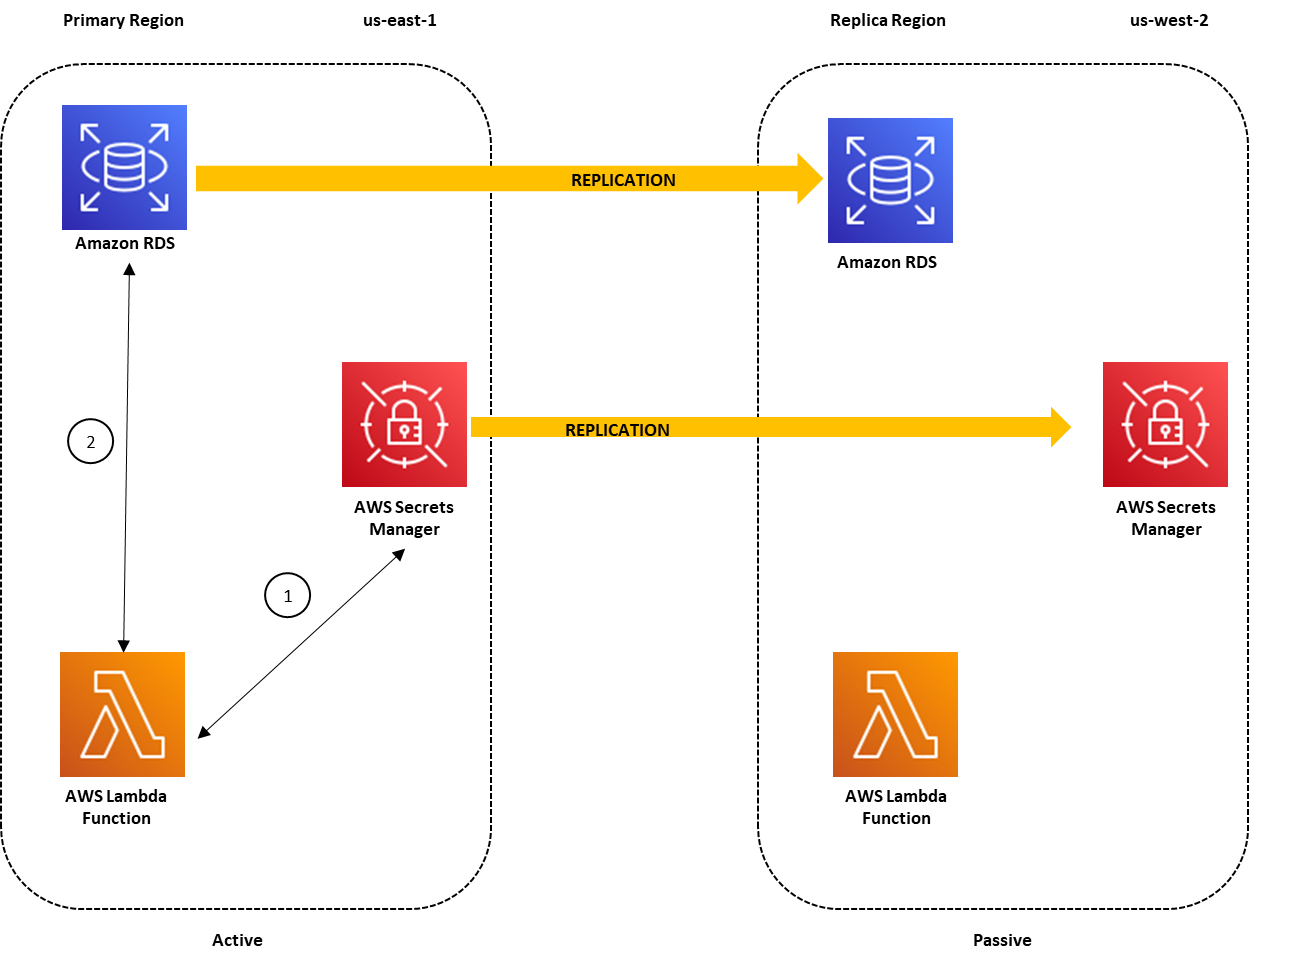
Given the existence of centrally managed off-cloud gateways, one approach by customers has been to continue to use these off-cloud gateways and then connect to AWS through the on-premises gateway environment by using AWS Direct Connect, as shown in Figure 1.
 

Figure 1: Connecting to the AWS Cloud through an agency gateway and then through AWS Direct Connect

Figure 1: Connecting to the AWS Cloud through an agency gateway and then through AWS Direct Connect

Although this approach does work, and makes use of existing gateway capability, it has a number of downsides:

  • A potential single point of failure: If the on-premises gateway capability is unavailable, the agency can lose connectivity to the cloud-based solution.
  • Bandwidth limitations: The agency is limited by the capacity of the gateway, which might not have been developed with dynamically scalable and bandwidth-intensive cloud-based workloads in mind.
  • Latency issues: The requirement to traverse multiple network hops, in addition to the gateway, will introduce additional latency. This can be particularly problematic with architectures that involve API communications being sent back and forth across the gateway environment.
  • Castle-and-moat thinking: Relying only on the gateway as the security boundary can discourage agencies from using and recognizing the cloud-based security controls that are available.

Some of these challenges are discussed in the context of US Trusted Internet Connection (TIC) programs in this whitepaper.

Moving gateways to the cloud

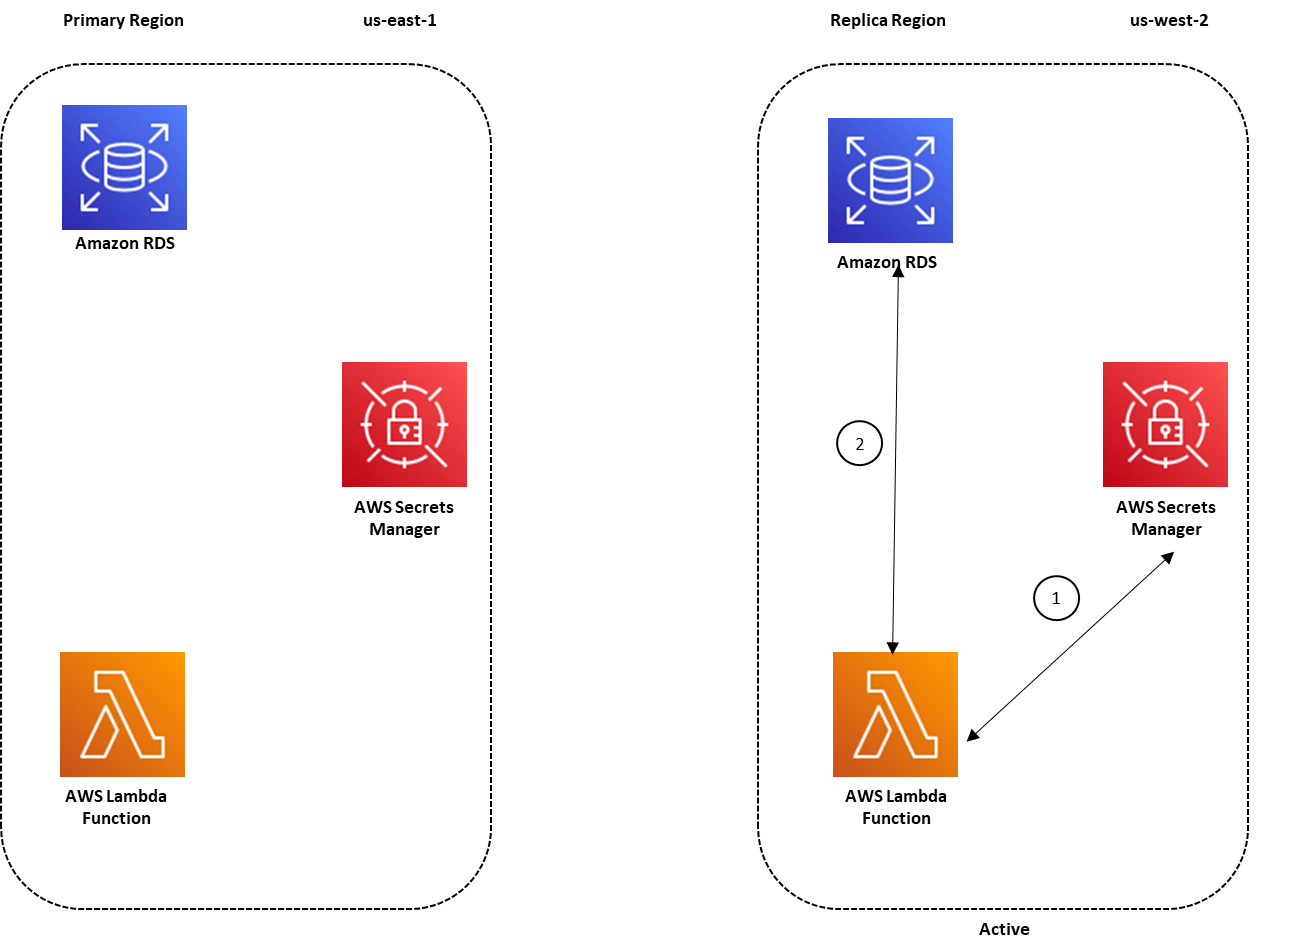
In response to the limitations discussed in the last section, both customers and AWS Partners have built gateway solutions on AWS to meet gateway requirements while remaining fully within the cloud environment. See this type of solution in Figure 2.
 

Figure 2: Moving the gateway to the AWS Cloud

Figure 2: Moving the gateway to the AWS Cloud

With this approach, you can fully leverage the scalable bandwidth that is available from the AWS environment, and you can also reduce latency issues, particularly when multiple hops to and from the gateway are required. This blog post describes a pilot program in the US that combines AWS services and AWS Marketplace technologies to provide a cloud-based gateway.

You can use AWS Transit Gateway (released after the referenced pilot program) to provide the option to centralize such a gateway capability within an organization. This makes it possible to utilize the gateway across multiple cloud solutions that are running in their own virtual private clouds (VPCs) and accounts. This approach also facilitates the principle of the gateway being the central control point for traffic flowing in and out. For more information on using AWS Transit Gateway with security appliances, see the Appliance VPC topic in the Amazon VPC documentation.

More recently, AWS has released additional services and features that can assist with delivering government gateway requirements.

Elastic Load Balancing Gateway Load Balancer provide the capability to deploy third-party network appliances in a scalable fashion. With this capability, you can leverage existing investment in licensing, use familiar tooling, reuse intellectual property (IP) such as rule sets, and reuse skills, because staff are already trained in configuring and managing the chosen device. You have one gateway for distributing traffic across multiple virtual appliances, while scaling the appliances up and down based on demand. This reduces the potential points of failure in your network and increases availability. Gateway Load Balancer is a straightforward way to use third-party network appliances from industry leaders in the cloud. You benefit from the features of these devices, while Gateway Load Balancer makes them automatically scalable and easier to deploy. You can find an AWS Partner with Gateway Load Balancer expertise on the AWS Marketplace. For more information on combining Transit Gateway and Gateway Load Balancer for a centralized inspection architecture, see this blog post. The post shows centralized architecture for East-West (VPC-to-VPC) and North-South (internet or on-premises bound) traffic inspection, plus processing.

To further simplify this area for customers, AWS has introduced the AWS Network Firewall service. Network Firewall is a managed service that you can use to deploy essential network protections for your VPCs. The service is simple to set up and scales automatically with your network traffic so you don’t have to worry about deploying and managing any infrastructure. You can combine Network Firewall with Transit Gateway to set up centralized inspection architecture models, such as those described in this blog post.

Reviewing a typical web architecture in the cloud

In the last section, you saw that SIG patterns can be created in the cloud. Now we can put that in context with the layered security controls that are implemented in a typical web application deployment. Consider a web application hosted on Amazon Elastic Compute Cloud (Amazon EC2) instances, as shown in Figure 3, within the context of other services that will support the architecture.
 

Figure 3: Security controls in a web application hosted on EC2

Figure 3: Security controls in a web application hosted on EC2

Although this example doesn’t include a traditional SIG-type infrastructure that inspects and controls traffic before it’s sent to the AWS Cloud, the architecture has many of the technical controls that are called for in SIG solutions as a result of using the AWS Well-Architected Framework. We’ll now step through some of these services to highlight the relevant security functionality that each provides.

Network control services

Amazon Virtual Private Cloud (Amazon VPC) is a service you can use to launch AWS resources in a logically isolated virtual network that you define. You have complete control over your virtual networking environment, including selection of your own IP address range, creation of subnets, and configuration of route tables and network gateways. Amazon VPC lets you use multiple layers of security, including security groups and network access control lists (network ACLs), to help control access to Amazon EC2 instances in each subnet. Security groups act as a firewall for associated EC2 instances, controlling both inbound and outbound traffic at the instance level. A network ACL is an optional layer of security for your VPC that acts as a firewall for controlling traffic in and out of one or more subnets. You might set up network ACLs with rules similar to your security groups to add an additional layer of security to your VPC. Read about the specific differences between security groups and network ACLs.

Having this level of control throughout the application architecture has advantages over relying only on a central, border-style gateway pattern, because security groups for each tier of the application architecture can be locked down to only those ports and sources required for that layer. For example, in the architecture shown in Figure 3, only the application load balancer security group would allow web traffic (ports 80, 443) from the internet. The web-tier-layer security group would only accept traffic from the load-balancer layer, and the database-layer security group would only accept traffic from the web tier.

If you need to provide a central point of control with this model, you can use AWS Firewall Manager, which simplifies the administration and maintenance of your VPC security groups across multiple accounts and resources. With Firewall Manager, you can configure and audit your security groups for your organization using a single, central administrator account. Firewall Manager automatically applies rules and protections across your accounts and resources, even as you add new resources. Firewall Manager is particularly useful when you want to protect your entire organization, or if you frequently add new resources that you want to protect via a central administrator account.

To support separation of management plan activities from data plane aspects in workloads, agencies can use multiple elastic network interface patterns on EC2 instances to provide a separate management network path.

Edge protection services

In the example in Figure 3, several services are used to provide edge-based protections in front of the web application. AWS Shield is a managed distributed denial of service (DDoS) protection service that safeguards applications that are running on AWS. AWS Shield provides always-on detection and automatic inline mitigations that minimize application downtime and latency, so there’s no need to engage AWS Support to benefit from DDoS protection. There are two tiers of AWS Shield: Standard and Advanced. When you use Shield Advanced, you can apply protections at both the Amazon CloudFront, Amazon EC2 and application load balancer layers. Shield Advanced also gives you 24/7 access to the AWS DDoS Response Team (DRT).

AWS WAF is a web application firewall that helps protect your web applications or APIs against common web exploits that can affect availability, compromise security, or consume excessive resources. AWS WAF gives you control over how traffic reaches your applications by enabling you to create security rules that block common attack patterns, such as SQL injection or cross-site scripting, and rules that filter out specific traffic patterns that you define. Again, you can apply this protection at both the Amazon CloudFront and application load balancer layers in our illustrated solution. Agencies can also use managed rules for WAF to benefit from rules developed and maintained by AWS Marketplace sellers.

Amazon CloudFront is a fast content delivery network (CDN) service. CloudFront seamlessly integrates with AWS ShieldAWS WAF, and Amazon Route 53 to help protect against multiple types of unauthorized access, including network and application layer DDoS attacks.

Logging and monitoring services

The example application in Figure 3 shows several services that provide logging and monitoring of network traffic, application activity, infrastructure, and AWS API usage.

At the VPC level, the VPC Flow Logs feature provides you with the ability to capture information about the IP traffic going to and from network interfaces in your VPC. Flow log data can be published to Amazon CloudWatch Logs or Amazon Simple Storage Service (Amazon S3). Traffic Mirroring is a feature that you can use in a VPC to capture traffic if needed for inspection. This allows agencies to implement full packet capture on a continuous basis, or in response to a specific event within the application.

Amazon CloudWatch provides a monitoring service with alarms and analytics. In the example application, AWS WAF can also be configured to log activity as described in the AWS WAF Developer Guide.

AWS Config provides a timeline view of the configuration of the environment. You can also define rules to provide alerts and remediation when the environment moves away from the desired configuration.

AWS CloudTrail is a service that you can use to handle governance, compliance, operational auditing, and risk auditing of your AWS account. With CloudTrail, you can log, continuously monitor, and retain account activity that is related to actions across your AWS infrastructure.

Amazon GuardDuty is a threat detection service that continuously monitors for malicious activity and unauthorized behavior to protect your AWS accounts. GuardDuty analyzes tens of billions of events across multiple AWS data sources, such as AWS CloudTrail event logs, Amazon VPC Flow Logs, and DNS logs. This blog post highlights a third-party assessment of GuardDuty that compares its performance to other intrusion detection systems (IDS).

Route 53 Resolver Query Logging lets you log the DNS queries that originate in your VPCs. With query logging turned on, you can see which domain names have been queried, the AWS resources from which the queries originated—including source IP and instance ID—and the responses that were received.

With Route 53 Resolver DNS Firewall, you can filter and regulate outbound DNS traffic for your VPCs. To do this, you create reusable collections of filtering rules in DNS Firewall rule groups, associate the rule groups to your VPC, and then monitor activity in DNS Firewall logs and metrics. Based on the activity, you can adjust the behavior of DNS Firewall accordingly.

Mapping services to control areas

Based on the above description of the use of additional services, we can summarize which services contribute to the control and recommendation areas in the gateway chapter in the Australian ISM framework.

Control and recommendation areas Contributing services
Inspect and filter traffic AWS WAF, VPC Traffic Mirroring
Central control point Infrastructure as code, AWS Firewall Manager
Authentication and authorization (MFA) AWS Identity and Access Management (IAM), solution and application IAM, VPC security groups
Logging and monitoring Amazon CloudWatch, AWS CloudTrail, AWS Config, Amazon VPC (flow logs and mirroring), load balancer logs, Amazon CloudFront logs, Amazon GuardDuty, Route 53 Resolver Query Logging
Secure administration (MFA) IAM, directory federation (if used)
DMZ patterns VPC subnet layout, security groups, network ACLs
Firewalls VPC security groups, network ACLs, AWS WAF, Route 53 Resolver DNS Firewall
Web proxy; site and content filtering and scanning AWS WAF, Firewall Manager

Note that the listed AWS service might not provide all relevant controls in each area, and it is part of the customer’s risk assessment and design to determine what additional controls might need to be implemented.

As you can see, many of the recommended practices and controls from the Australian Government gateway requirements are already encompassed in a typical Well-Architected solution. The implementing agency has the choice of two options: it can continue to place such a solution behind a gateway that runs either within or outside of AWS, leveraging the gateway controls that are inherent in the application architecture as additional layers of defense. Otherwise, the agency can conduct a risk assessment to understand which gateway controls can be supplied by means of the application architecture to reduce the gateway control requirements at any gateway layer in front of the application.

Summary

In this blog post, we’ve discussed the requirements for Australian Government gateways which provide network controls to secure workloads. We’ve outlined the downsides of using traditional on-premises solutions and illustrated how services such as AWS Transit Gateway, Elastic Load Balancing, Gateway Load Balancer, and AWS Network Firewall facilitate moving gateway solutions into the cloud. These are services you can evaluate against your network control requirements. Finally, we reviewed a typical web architecture running in the AWS Cloud with associated services to illustrate how many of the typical gateway controls can be met by using a standard Well-Architected approach.

If you have feedback about this post, submit comments in the Comments section below. If you have questions about this post, start a new thread on one of the AWS Security or Networking forums or contact AWS Support.

Want more AWS Security how-to content, news, and feature announcements? Follow us on Twitter.

Author photo

John Hildebrandt

John is a Principal Solutions Architect in the Australian National Security team at AWS in Canberra, Australia. He is passionate about facilitating cloud adoption for customers to enable innovation. John has been working with government customers at AWS for over 8 years, as the first employee for the ANZ Public Sector team.

Announcing the AWS Security and Privacy Knowledge Hub for Australia and New Zealand

Post Syndicated from Phil Rodrigues original https://aws.amazon.com/blogs/security/announcing-the-aws-security-and-privacy-knowledge-hub-for-australia-and-new-zealand/

Cloud technology provides organizations across Australia and New Zealand with the flexibility to adapt quickly and scale their digital presences up or down in response to consumer demand. In 2021 and beyond, we expect to see cloud adoption continue to accelerate as organizations of all sizes realize the agility, operational, and financial benefits of moving to the cloud.

To fully harness the benefits of the digital economy it’s important that you remain vigilant about the security of your technology resources in order to protect the confidentiality, integrity, and availability of your systems and data. Security is our top priority at AWS, and more than ever we believe it’s critical for everyone to understand the best practices to use cloud technology securely. Organizations of all sizes can benefit by implementing automated guardrails that allow you to innovate while maintaining the highest security standards. We want to help you move fast and innovate quickly while staying secure.

This is why we are excited to announce the new AWS Security and Privacy Knowledge Hub for Australia and New Zealand.

The new website offers many resources specific to Australia and New Zealand, including:

  • The latest local security and privacy updates from AWS security experts in Australia and New Zealand.
  • How customers can use AWS to help meet the requirements of local privacy laws, government security standards, and banking security guidance.
  • Local customer stories about Australian and New Zealand companies and agencies that focus on security, privacy, and compliance.
  • Details about AWS infrastructure in Australia and New Zealand, including the upcoming AWS Region in Melbourne.
  • General FAQs on security and privacy in the cloud.

AWS maintains the highest security and privacy practices, which is one reason we are trusted by governments and organizations around the world to deliver services to millions of individuals. In Australia and New Zealand, we have hundreds of thousands of active customers using AWS each month, with many building mission critical applications for their business. For example, the National Bank of Australia (NAB) provides banking platforms like NAB Connect that offer services to businesses of all sizes, built on AWS. The Australian Taxation Office (ATO) offers the flexibility and speed for all Australians to lodge their tax returns electronically on the MyTax application, built on AWS. The University of Auckland runs critical teaching and learning applications relied on by their 18,000 students around the world, built on AWS. AWS Partner Versent helps businesses like Transurban and government agencies like Service NSW operate in the cloud securely, built on AWS.

Security is a shared responsibility between AWS and our customers. You should review the security features that we provide with our services, and be familiar with how to implement your security requirements within your AWS environment. To help you with your responsibility, we offer security services and partner solutions that you can utilize to implement automated and effective security in the cloud. This allows you to focus on your business while keeping your content and applications secure.

We’re inspired by the rapid rate of innovation as customers of all sizes use the cloud to create new business models and work to improve our communities, now and into the future. We look forward to seeing what you will build next on AWS – with security as your top priority.

The AWS Security and Privacy Knowledge Hub for Australia and New Zealand launched today.

If you have feedback about this post, submit comments in the Comments section below.

Want more AWS Security how-to content, news, and feature announcements? Follow us on Twitter.

Author

Phil Rodrigues

Phil is the Head of the Security Team, Australia & New Zealand for AWS, based in Sydney. He and his team work with AWS’s largest customers to improve their security, risk and compliance in the cloud. Phil is a frequent speaker at AWS and cloud security events across Australia. Prior to AWS he worked for over 20 years in Information Security in the US, Europe, and Asia-Pacific.

Creating a notification workflow from sensitive data discover with Amazon Macie, Amazon EventBridge, AWS Lambda, and Slack

Post Syndicated from Bruno Silviera original https://aws.amazon.com/blogs/security/creating-a-notification-workflow-from-sensitive-data-discover-with-amazon-macie-amazon-eventbridge-aws-lambda-and-slack/

Following the example of the EU in implementing the General Data Protection Regulation (GDPR), many countries are implementing similar data protection laws. In response, many companies are forming teams that are responsible for data protection. Considering the volume of information that companies maintain, it’s essential that these teams are alerted when sensitive data is at risk.

This post shows how to deploy a solution that uses Amazon Macie to discover sensitive data. This solution enables you to set up automatic notification to your company’s designated data protection team via a Slack channel when sensitive data that needs to be protected is discovered by Amazon EventBridge and AWS Lambda.

The challenge

Let’s imagine that you’re part of a team that’s responsible for classifying your organization’s data but the data structure isn’t documented. Amazon Macie provides you the ability to run a scheduled classification job that examines your data, and you want to notify the data protection team when there’s new sensitive data to classify. Let’s build a solution to automatically notify the data protection team.

Solution overview

To be scalable and cost-effective, this solution uses serverless technologies and managed AWS services, including:

  • Macie – A fully managed data security and data privacy service that uses machine learning and pattern matching to discover and protect your sensitive data in Amazon Web Services (AWS).
  • EventBridge – A serverless event bus that connects application data from your apps, SaaS, and AWS services. EventBridge can respond to specific events or run according to a schedule. The solution presented in this post uses EventBridge to initiate a custom Lambda function in response to a specific event.
  • Lambda – Runs code in response to events such as changes in data, changes in application state, or user actions. In this solution, a Lambda function is initiated by EventBridge.

Solution architecture

The architecture workflow is shown in Figure 1 and includes the following steps:

  1. Macie runs a classification job and publishes its findings to EventBridge as a JSON object.
  2. The EventBridge rule captures the findings and invokes a Lambda function as a target.
  3. The Lambda function parses the JSON object. The function then sends a custom message to a Slack channel with the sensitive data finding for the data protection team to evaluate and respond to.


Figure 1: Solution architecture workflow

Figure 1: Solution architecture workflow

Set up Slack

For this solution, you need a Slack workspace and an incoming webhook. The workspace must be in place before you create the webhook.

Create a Slack workspace

If you already have a Slack workspace in your environment, you can skip forward, to creating the webhook.

If you don’t have a Slack workspace, follow the steps in Create a Slack Workspace to create one.

Create an incoming webhook in Slack API

  1. Go to your Slack API.
  2. Choose Start Building to create an app.
  3. Enter the following details for your app:
    • App Namemacie-to-slack.
    • Development Slack Workspace – Choose the Slack workspace—either an existing workspace or one you created for this solution—to receive the Macie findings.
  4. Choose the Create App button.
  5. In the left menu, choose Incoming Webhooks.
  6. At the Activate Incoming Webhooks screen, move the slider from OFF to ON.
  7. Scroll down and choose Add New Webhook to Workspace.
  8. In the screen asking where your app should post, enter the name of the Slack channel from your Workspace that you want to send notification to and choose Authorize.
  9. On the next screen, scroll down to the Webhook URL section. Make a note of the URL to use later.

Deploy the CloudFormation template with the solution

The deployment of the CloudFormation template automatically creates the following resources:

  • A Lambda function that begins with the name named macie-to-slack-lambdafindingsToSlack-.
  • An EventBridge rule named MacieFindingsToSlack.
  • An IAM role named MacieFindingsToSlackkRole.
  • A permission to invoke the Lambda function named LambdaInvokePermission.

Note: Before you proceed, make sure you’re deploying the template to the same Region that your production Macie is running.

To deploy the Cloudformation template

  1. Download the YAML template to your computer.

    Note: To save the template, you can right click the Raw button at the top of the code and then select Save link as if you’re using Chrome, or the equivalent in your browser. This file is used in Step 4.

  2. Open CloudFormation in the AWS Management Console.
  3. On the Welcome page, choose Create stack and then choose With new resources.
  4. On Step 1 — Specify template, choose Upload a template file, select Choose file and then select the file template.yaml (the file extension might be .YML), then choose Next.
  5. On Step 2 — Specify stack details:
    1. Enter macie-to-slack as the Stack name.
    2. At the Slack Incoming Web Hook URL, paste the webhook URL you copied earlier.
    3. At Slack channel, enter the name of the channel in your workspace that will receive the alerts and choose Next.
    Figure 2: Defining stack details

    Figure 2: Defining stack details

  6. On Step 3 – Configure Stack options, you can leave the default settings, or change them for your environment. Choose Next to continue.
  7. At the bottom of Step 4 – Review, select I acknowledge that AWS CloudFormation might create IAM resources, and choose Create stack.

    Figure 3: Confirmation before stack creation

    Figure 3: Confirmation before stack creation

  8. Wait for the stack to reach status CREATE_COMPLETE.

Running the solution

At this point, you’ve deployed the solution and your resources are created.

To test the solution, you can schedule a Macie job targeting a bucket that contains a file with sensitive information that Macie can detect.

Note: You can check the Amazon Macie documentation to see the list of supported managed data identifiers.

When the Macie job is complete, any findings are sent to the Slack channel.

Figure 4: Macie finding delivered to Slack channel

Figure 4: Macie finding delivered to Slack channel

Select the link in the message sent to the Slack channel to open that finding in the Macie console, as shown in Figure 5.

Figure 5: Finding details

Figure 5: Finding details

And you’re done!

Now your Macie finding results are delivered to your Slack channel where they can be easily monitored, reducing response time and risk exposure.

If you deployed this for testing purposes, or want to clean this up and move to your production account, you can delete the Cloudformation stack:

  1. Open the CloudFormation console.
  2. Select the stack and choose Delete.

Conclusion

In this blog post we walked through the steps to configure a notification workflow using Macie, Lambda, and EventBridge to send sensitive data findings to your data protection team via a Slack channel.

Your data protection team will appreciate the timely notifications of sensitive data findings, giving you the ability to focus on creating controls to improve data security and compliance with regulations related to protection and treatment of personal data.

For more information about data privacy on AWS, see Data Privacy FAQ.

If you have feedback about this post, submit comments in the Comments section below.

Want more AWS Security how-to content, news, and feature announcements? Follow us on Twitter.

Author

Bruno Silveira

Bruno is a Solutions Architect Manager in the Public Sector team with focus on educational institutions in Brazil. His previous career was in government, financial services, utilities, and nonprofit institutions. Bruno is an enthusiast of cloud security and an appreciator of good rock’n roll with a good beer.

Author

Julio Carvalho

Julio is a Principal Security Solutions Architect at AWS for the Latin American financial market. As a security specialist, he helps customers solve protection and compliance challenges on their cloud journey.

How to implement SaaS tenant isolation with ABAC and AWS IAM

Post Syndicated from Michael Pelts original https://aws.amazon.com/blogs/security/how-to-implement-saas-tenant-isolation-with-abac-and-aws-iam/

Multi-tenant applications must be architected so that the resources of each tenant are isolated and cannot be accessed by other tenants in the system. AWS Identity and Access Management (IAM) is often a key element in achieving this goal. One of the challenges with using IAM, however, is that the number and complexity of IAM policies you need to support your tenants can grow rapidly and impact the scale and manageability of your isolation model. The attribute-based access control (ABAC) mechanism of IAM provides developers with a way to address this challenge.

In this blog post, we describe and provide detailed examples of how you can use ABAC in IAM to implement tenant isolation in a multi-tenant environment.

Choose an IAM isolation method

IAM makes it possible to implement tenant isolation and scope down permissions in a way that is integrated with other AWS services. By relying on IAM, you can create strong isolation foundations in your system, and reduce the risk of developers unintentionally introducing code that leads to a violation of tenant boundaries. IAM provides an AWS native, non-invasive way for you to achieve isolation for those cases where IAM supports policies that align with your overall isolation model.

There are several methods in IAM that you can use for isolating tenants and restricting access to resources. Choosing the right method for your application depends on several parameters. The number of tenants and the number of role definitions are two important dimensions that you should take into account.

Most applications require multiple role definitions for different user functions. A role definition refers to a minimal set of privileges that users or programmatic components need in order to do their job. For example, business users and data analysts would typically have different set of permissions to allow minimum necessary access to resources that they use.

In software-as-a-service (SaaS) applications, in addition to functional boundaries, there are also boundaries between tenant resources. As a result, the entire set of role definitions exists for each individual tenant. In highly dynamic environments (e.g., collaboration scenarios with cross-tenant access), new role definitions can be added ad-hoc. In such a case, the number of role definitions and their complexity can grow significantly as the system evolves.

There are three main tenant isolation methods in IAM. Let’s briefly review them before focusing on the ABAC in the following sections.

Figure 1: IAM tenant isolation methods

Figure 1: IAM tenant isolation methods

RBAC – Each tenant has a dedicated IAM role or static set of IAM roles that it uses for access to tenant resources. The number of IAM roles in RBAC equals to the number of role definitions multiplied by the number of tenants. RBAC works well when you have a small number of tenants and relatively static policies. You may find it difficult to manage multiple IAM roles as the number of tenants and the complexity of the attached policies grows.

Dynamically generated IAM policies – This method dynamically generates an IAM policy for a tenant according to user identity. Choose this method in highly dynamic environments with changing or frequently added role definitions (e.g., tenant collaboration scenario). You may also choose dynamically generated policies if you have a preference for generating and managing IAM policies by using your code rather than relying on built-in IAM service features. You can find more details about this method in the blog post Isolating SaaS Tenants with Dynamically Generated IAM Policies.

ABAC – This method is suitable for a wide range of SaaS applications, unless your use case requires support for frequently changed or added role definitions, which are easier to manage with dynamically generated IAM policies. Unlike Dynamically generated IAM policies, where you manage and apply policies through a self-managed mechanism, ABAC lets you rely more directly on IAM.

ABAC for tenant isolation

ABAC is achieved by using parameters (attributes) to control tenant access to resources. Using ABAC for tenant isolation results in temporary access to resources, which is restricted according to the caller’s identity and attributes.

One of the key advantages of the ABAC model is that it scales to any number of tenants with a single role. This is achieved by using tags (such as the tenant ID) in IAM polices and a temporary session created specifically for accessing tenant data. The session encapsulates the attributes of the requesting entity (for example, a tenant user). At policy evaluation time, IAM replaces these tags with session attributes.

Another component of ABAC is the assignation of attributes to tenant resources by using special naming conventions or resource tags. The access to a resource is granted when session and resource attributes match (for example, a session with the TenantID: yellow attribute can access a resource that is tagged as TenantID: yellow).

For more information about ABAC in IAM, see What is ABAC for AWS?

ABAC in a typical SaaS architecture

To demonstrate how you can use ABAC in IAM for tenant isolation, we will walk you through an example of a typical microservices-based application. More specifically, we will focus on two microservices that implement a shipment tracking flow in a multi-tenant ecommerce application.

Our sample tenant, Yellow, which has many users in many roles, has exclusive access to shipment data that belongs to this particular tenant. To achieve this, all microservices in the call chain operate in a restricted context that prevents cross-tenant access.

Figure 2: Sample shipment tracking flow in a SaaS application

Figure 2: Sample shipment tracking flow in a SaaS application

Let’s take a closer look at the sequence of events and discuss the implementation in detail.

A shipment tracking request is initiated by an authenticated Tenant Yellow user. The authentication process is left out of the scope of this discussion for the sake of brevity. The user identity expressed in the JSON Web Token (JWT) includes custom claims, one of which is a TenantID. In this example, TenantID equals yellow.

The JWT is delivered from the user’s browser in the HTTP header of the Get Shipment request to the shipment service. The shipment service then authenticates the request and collects the required parameters for getting the shipment estimated time of arrival (ETA). The shipment service makes a GetShippingETA request using the parameters to the tracking service along with the JWT.

The tracking service manages shipment tracking data in a data repository. The repository stores data for all of the tenants, but each shipment record there has an attached TenantID resource tag, for instance yellow, as in our example.

An IAM role attached to the tracking service, called TrackingServiceRole in this example, determines the AWS resources that the microservice can access and the actions it can perform.

Note that TrackingServiceRole itself doesn’t have permissions to access tracking data in the data store. To get access to tracking records, the tracking service temporarily assumes another role called TrackingAccessRole. This role remains valid for a limited period of time, until credentials representing this temporary session expire.

To understand how this works, we need to talk first about the trust relationship between TrackingAccessRole and TrackingServiceRole. The following trust policy lists TrackingServiceRole as a trusted entity.

{
  "Version": "2012-10-17",
  "Statement": [
    {
      "Effect": "Allow",
      "Principal": {
        "AWS": "arn:aws:iam::<account-id>:role/TrackingServiceRole"
      },
      "Action": "sts:AssumeRole"
    },
    {
      "Effect": "Allow",
      "Principal": {
        "AWS": "arn:aws:iam::<account-id>:role/TrackingServiceRole"
      },
      "Action": "sts:TagSession",
      "Condition": {
        "StringLike": {
          "aws:RequestTag/TenantID": "*"
        }
      }
    }
  ]
}

This policy needs to be associated with TrackingAccessRole. You can do that on the Trust relationships tab of the Role Details page in the IAM console or via the AWS CLI update-assume-role-policy method. That association is what allows the tracking service with the attached TrackingServiceRole role to assume TrackingAccessRole. The policy also allows TrackingServiceRole to attach the TenantID session tag to the temporary sessions it creates.

Session tags are principal tags that you specify when you request a session. This is how you inject variables into the request context for API calls executed during the session. This is what allows IAM policies evaluated in subsequent API calls to reference TenantID with the aws:PrincipalTag context key.

Now let’s talk about TrackingAccessPolicy. It’s an identity policy attached to TrackingAccessRole. This policy makes use of the aws:PrincipalTag/TenantID key to dynamically scope access to a specific tenant.

Later in this post, you can see examples of such data access policies for three different data storage services.

Now the stage is set to see how the tracking service creates a temporary session and injects TenantID into the request context. The following Python function does that by using AWS SDK for Python (Boto3). The function gets the TenantID (extracted from the JWT) and the TrackingAccessRole Amazon Resource Name (ARN) as parameters and returns a scoped Boto3 session object.

import boto3

def create_temp_tenant_session(access_role_arn, session_name, tenant_id, duration_sec):
    """
    Create a temporary session
    :param access_role_arn: The ARN of the role that the caller is assuming
    :param session_name: An identifier for the assumed session
    :param tenant_id: The tenant identifier the session is created for
    :param duration_sec: The duration, in seconds, of the temporary session
    :return: The session object that allows you to create service clients and resources
    """
    sts = boto3.client('sts')
    assume_role_response = sts.assume_role(
        RoleArn=access_role_arn,
        DurationSeconds=duration_sec,
        RoleSessionName=session_name,
        Tags=[
            {
                'Key': 'TenantID',
                'Value': tenant_id
            }
        ]
    )
    session = boto3.Session(aws_access_key_id=assume_role_response['Credentials']['AccessKeyId'],
                    aws_secret_access_key=assume_role_response['Credentials']['SecretAccessKey'],
                    aws_session_token=assume_role_response['Credentials']['SessionToken'])
    return session

Use these parameters to create temporary sessions for a specific tenant with a duration that meets your needs.

access_role_arn – The assumed role with an attached templated policy. The IAM policy must include the aws:PrincipalTag/TenantID tag key.

session_name – The name of the session. Use the role session name to uniquely identify a session. The role session name is used in the ARN of the assumed role principal and included in the AWS CloudTrail logs.

tenant_id – The tenant identifier that describes which tenant the session is created for. For better compatibility with resource names in IAM policies, it’s recommended to generate non-guessable alphanumeric lowercase tenant identifiers.

duration_sec – The duration of your temporary session.

Note: The details of token management can be abstracted away from the application by extracting the token generation into a separate module, as described in the blog post Isolating SaaS Tenants with Dynamically Generated IAM Policies. In that post, the reusable application code for acquiring temporary session tokens is called a Token Vending Machine.

The returned session can be used to instantiate IAM-scoped objects such as a storage service. After the session is returned, any API call performed with the temporary session credentials contains the aws:PrincipalTag/TenantID key-value pair in the request context.

When the tracking service attempts to access tracking data, IAM completes several evaluation steps to determine whether to allow or deny the request. These include evaluation of the principal’s identity-based policy, which is, in this example, represented by TrackingAccessPolicy. It is at this stage that the aws:PrincipalTag/TenantID tag key is replaced with the actual value, policy conditions are resolved, and access is granted to the tenant data.

Common ABAC scenarios

Let’s take a look at some common scenarios with different data storage services. For each example, a diagram is included that illustrates the allowed access to tenant data and how the data is partitioned in the service.

These examples rely on the architecture described earlier and assume that the temporary session context contains a TenantID parameter. We will demonstrate different versions of TrackingAccessPolicy that are applicable to different services. The way aws:PrincipalTag/TenantID is used depends on service-specific IAM features, such as tagging support, policy conditions and ability to parameterize resource ARN with session tags. Examples below illustrate these techniques applied to different services.

Pooled storage isolation with DynamoDB

Many SaaS applications rely on a pooled data partitioning model where data from all tenants is combined into a single table. The tenant identifier is then introduced into each table to identify the items that are associated with each tenant. Figure 3 provides an example of this model.

Figure 3: DynamoDB index-based partitioning

Figure 3: DynamoDB index-based partitioning

In this example, we’ve used Amazon DynamoDB, storing each tenant identifier in the table’s partition key. Now, we can use ABAC and IAM fine-grained access control to implement tenant isolation for the items in this table.

The following TrackingAccessPolicy uses the dynamodb:LeadingKeys condition key to restrict permissions to only the items whose partition key matches the tenant’s identifier as passed in a session tag.

{
  "Version": "2012-10-17",
  "Statement": [
    {
      "Effect": "Allow",
      "Action": [
        "dynamodb:GetItem",
        "dynamodb:BatchGetItem",
        "dynamodb:Query"
      ],
      "Resource": [
        "arn:aws:dynamodb:<region>:<account-id>:table/TrackingData"
      ],
      "Condition": {
        "ForAllValues:StringEquals": {
          "dynamodb:LeadingKeys": [
            "${aws:PrincipalTag/TenantID}"
          ]
        }
      }
    }
  ]
}

This example uses the dynamodb:LeadingKeys condition key in the policy to describe how you can control access to tenant resources. You’ll notice that we haven’t bound this policy to any specific tenant. Instead, the policy relies on the aws:PrincipalTag tag to resolve the TenantID parameter at runtime.

This approach means that you can add new tenants without needing to create any new IAM constructs. This reduces the maintenance burden and limits your chances that any IAM quotas will be exceeded.

Siloed storage isolation with Amazon Elasticsearch Service

Let’s look at another example that illustrates how you might implement tenant isolation of Amazon Elasticsearch Service resources. Figure 4 illustrates a silo data partitioning model, where each tenant of your system has a separate Elasticsearch index for each tenant.

Figure 4: Elasticsearch index-per-tenant strategy

Figure 4: Elasticsearch index-per-tenant strategy

You can isolate these tenant resources by creating a parameterized identity policy with the principal TenantID tag as a variable (similar to the one we created for DynamoDB). In the following example, the principal tag is a part of the index name in the policy resource element. At access time, the principal tag is replaced with the tenant identifier from the request context, yielding the Elasticsearch index ARN as a result.

{
  "Version": "2012-10-17",
  "Statement": [
    {
      "Effect": "Allow",
      "Action": [
        "es:ESHttpGet",
        "es:ESHttpPut"
      ],
      "Resource": [
        "arn:aws:es:<region>:<account-id>:domain/test/${aws:PrincipalTag/TenantID}*/*"
      ]
    }
  ]
}

In the case where you have multiple indices that belong to the same tenant, you can allow access to them by using a wildcard. The preceding policy allows es:ESHttpGet and es:ESHttpPut actions to be taken on documents if the documents belong to an index with a name that matches the pattern.

Important: In order for this to work, the tenant identifier must follow the same naming restrictions as indices.

Although this approach scales the tenant isolation strategy, you need to keep in mind that this solution is constrained by the number of indices your Elasticsearch cluster can support.

Amazon S3 prefix-per-tenant strategy

Amazon Simple Storage Service (Amazon S3) buckets are commonly used as shared object stores with dedicated prefixes for different tenants. For enhanced security, you can optionally use a dedicated customer master key (CMK) per tenant. If you do so, attach a corresponding TenantID resource tag to a CMK.

By using ABAC and IAM, you can make sure that each tenant can only get and decrypt objects in a shared S3 bucket that have the prefixes that correspond to that tenant.

Figure 5: S3 prefix-per-tenant strategy

Figure 5: S3 prefix-per-tenant strategy

In the following policy, the first statement uses the TenantID principal tag in the resource element. The policy grants s3:GetObject permission, but only if the requested object key begins with the tenant’s prefix.

The second statement allows the kms:Decrypt operation on a KMS key that the requested object is encrypted with. The KMS key must have a TenantID resource tag attached to it with a corresponding tenant ID as a value.

{
  "Version": "2012-10-17",
  "Statement": [
    {
      "Effect": "Allow",
      "Action": "s3:GetObject",
      "Resource": "arn:aws:s3:::sample-bucket-12345678/${aws:PrincipalTag/TenantID}/*"
    },
    {
      "Effect": "Allow",
      "Action": "kms:Decrypt",
       "Resource": "arn:aws:kms:<region>:<account-id>:key/*",
       "Condition": {
           "StringEquals": {
           "aws:PrincipalTag/TenantID": "${aws:ResourceTag/TenantID}"
        }
      }
    }
  ]
}

Important: In order for this policy to work, the tenant identifier must follow the S3 object key name guidelines.

With the prefix-per-tenant approach, you can support any number of tenants. However, if you choose to use a dedicated customer managed KMS key per tenant, you will be bounded by the number of KMS keys per AWS Region.

Conclusion

The ABAC method combined with IAM provides teams who build SaaS platforms with a compelling model for implementing tenant isolation. By using this dynamic, attribute-driven model, you can scale your IAM isolation policies to any practical number of tenants. This approach also makes it possible for you to rely on IAM to manage, scale, and enforce isolation in a way that’s integrated into your overall tenant identity scheme. You can start experimenting with IAM ABAC by using either the examples in this blog post, or this resource: IAM Tutorial: Define permissions to access AWS resources based on tags.

If you have feedback about this post, submit comments in the Comments section below. If you have questions about this post, start a new thread on the AWS IAM forum or contact AWS Support.

Want more AWS Security how-to content, news, and feature announcements? Follow us on Twitter.

Author

Michael Pelts

As a Senior Solutions Architect at AWS, Michael works with large ISV customers, helping them create innovative solutions to address their cloud challenges. Michael is passionate about his work, enjoys the creativity that goes into building solutions in the cloud, and derives pleasure from passing on his knowledge.

Author

Oren Reuveni

Oren is a Principal Solutions Architect and member of the SaaS Factory team. He helps guide and assist AWS partners with building their SaaS products on AWS. Oren has over 15 years of experience in the modern IT and Cloud domains. He is passionate about shaping the right dynamics between technology and business.

How to implement a hybrid PKI solution on AWS

Post Syndicated from Max Farnga original https://aws.amazon.com/blogs/security/how-to-implement-a-hybrid-pki-solution-on-aws/

As customers migrate workloads into Amazon Web Services (AWS) they may be running a combination of on-premises and cloud infrastructure. When certificates are issued to this infrastructure, having a common root of trust to the certificate hierarchy allows for consistency and interoperability of the Public Key Infrastructure (PKI) solution.

In this blog post, I am going to show how you can plan and deploy a PKI that enables certificates to be issued across a hybrid (cloud & on-premises) environment with a common root. This solution will use Windows Server Certificate Authority (Windows CA), also known as Active Directory Certificate Services (ADCS) to distribute and manage x.509 certificates for Active Directory users, domain controllers, routers, workstations, web servers, mobile and other devices. And an AWS Certificate Manager Private Certificate Authority (ACM PCA) to manage certificates for AWS services, including API Gateway, CloudFront, Elastic Load Balancers, and other workloads.

The Windows CA also integrates with AWS Cloud HSM to securely store the private keys that sign the certificates issued by your CAs, and use the HSM to perform the cryptographic signing operations. In Figure 1, the diagram below shows how ACM PCA and Windows CA can be used together to issue certificates across a hybrid environment.

Figure 1: Hybrid PKI hierarchy

Figure 1: Hybrid PKI hierarchy

PKI is a framework that enables a safe and trustworthy digital environment through the use of a public and private key encryption mechanism. PKI maintains secure electronic transactions on the internet and in private networks. It also governs the verification, issuance, revocation, and validation of individual systems in a network.

There are two types of PKI:

This blog post focuses on the implementation of a private PKI, to issue and manage private certificates.

When implementing a PKI, there can be challenges from security, infrastructure, and operations standpoints, especially when dealing with workloads across multiple platforms. These challenges include managing isolated PKIs for individual networks across on-premises and AWS cloud, managing PKI with no Hardware Security Module (HSM) or on-premises HSM, and lack of automation to rapidly scale the PKI servers to meet demand.

Figure 2 shows how an internal PKI can be limited to a single network. In the following example, the root CA, issuing CAs, and certificate revocation list (CRL) distribution point are all in the same network, and issue cryptographic certificates only to users and devices in the same private network.

Figure 2: On-premises PKI hierarchy in a single network

Figure 2: On-premises PKI hierarchy in a single network

Planning for your PKI system deployment

It’s important to carefully consider your business requirements, encryption use cases, corporate network architecture, and the capabilities of your internal teams. You must also plan for how to manage the confidentiality, integrity, and availability of the cryptographic keys. These considerations should guide the design and implementation of your new PKI system.

In the below section, we outline the key services and components used to design and implement this hybrid PKI solution.

Key services and components for this hybrid PKI solution

Solution overview

This hybrid PKI can be used if you need a new private PKI, or want to upgrade from an existing legacy PKI with a cryptographic service provider (CSP) to a secure PKI with Windows Cryptography Next Generation (CNG). The hybrid PKI design allows you to seamlessly manage cryptographic keys throughout the IT infrastructure of your organization, from on-premises to multiple AWS networks.

Figure 3: Hybrid PKI solution architecture

Figure 3: Hybrid PKI solution architecture

The solution architecture is depicted in the preceding figure—Figure 3. The solution uses an offline root CA that can be operated on-premises or in an Amazon VPC, while the subordinate Windows CAs run on EC2 instances and are integrated with CloudHSM for key management and storage. To insulate the PKI from external access, the CloudHSM cluster are deployed in protected subnets, the EC2 instances are deployed in private subnets, and the host VPC has site-to-site network connectivity to the on-premises network. The Amazon EC2 volumes are encrypted with AWS KMS customer managed keys. Users and devices connect and enroll to the PKI interface through a Network Load Balancer.

This solution also includes a subordinate ACM private CA to issue certificates that will be installed on AWS services that are integrated with ACM. For example, ELB, CloudFront, and API Gateway. This is so that the certificates users see are always presented from your organization’s internal PKI.

Prerequisites for deploying this hybrid internal PKI in AWS

  • Experience with AWS Cloud, Windows Server, and AD CS is necessary to deploy and configure this solution.
  • An AWS account to deploy the cloud resources.
  • An offline root CA, running on Windows 2016 or newer, to sign the CloudHSM and the issuing CAs, including the private CA and Windows CAs. Here is an AWS Quick-Start article to deploy your Root CA in a VPC. We recommend installing the Windows Root CA in its own AWS account.
  • A VPC with at least four subnets. Two or more public subnets and two or more private subnets, across two or more AZs, with secure firewall rules, such as HTTPS to communicate with your PKI web servers through a load balancer, along with DNS, RDP and other port to communicate within your organization network. You can use this CloudFormation sample VPC template to help you get started with your PKI VPC provisioning.
  • Site-to-site AWS Direct Connect or VPN connection from your VPC to the on-premises network and other VPCs to securely manage multiple networks.
  • Windows 2016 EC2 instances for the subordinate CAs.
  • An Active Directory environment that has access to the VPC that hosts the PKI servers. This is required for a Windows Enterprise CA implementation.

Deploy the solution

The below CloudFormation Code and instructions will help you deploy and configure all the AWS components shown in the above architecture diagram. To implement the solution, you’ll deploy a series of CloudFormation templates through the AWS Management Console.

If you’re not familiar with CloudFormation, you can learn about it from Getting started with AWS CloudFormation. The templates for this solution can be deployed with the CloudFormation console, AWS Service Catalog, or a code pipeline.

Download and review the template bundle

To make it easier to deploy the components of this internal PKI solution, you download and deploy a template bundle. The bundle includes a set of CloudFormation templates, and a PowerShell script to complete the integration between CloudHSM and the Windows CA servers.

To download the template bundle

  1. Download or clone the solution source code repository from AWS GitHub.
  2. Review the descriptions in each template for more instructions.

Deploy the CloudFormation templates

Now that you have the templates downloaded, use the CouldFormation console to deploy them.

To deploy the VPC modification template

Deploy this template into an existing VPC to create the protected subnets to deploy a CloudHSM cluster.

  1. Navigate to the CloudFormation console.
  2. Select the appropriate AWS Region, and then choose Create Stack.
  3. Choose Upload a template file.
  4. Select 01_PKI_Automated-VPC_Modifications.yaml as the CloudFormation stack file, and then choose Next.
  5. On the Specify stack details page, enter a stack name and the parameters. Some parameters have a dropdown list that you can use to select existing values.

    Figure 4: Example of a <strong>Specify stack details</strong> page

    Figure 4: Example of a Specify stack details page

  6. Choose Next, Next, and Create Stack.

To deploy the PKI CDP S3 bucket template

This template creates an S3 bucket for the CRL and AIA distribution point, with initial bucket policies that allow access from the PKI VPC, and PKI users and devices from your on-premises network, based on your input. To grant access to additional AWS accounts, VPCs, and on-premises networks, please refer to the instructions in the template.

  1. Navigate to the CloudFormation console.
  2. Choose Upload a template file.
  3. Select 02_PKI_Automated-Central-PKI_CDP-S3bucket.yaml as the CloudFormation stack file, and then choose Next.
  4. On the Specify stack details page, enter a stack name and the parameters.
  5. Choose Next, Next, and Create Stack

To deploy the ACM Private CA subordinate template

This step provisions the ACM private CA, which is signed by an existing Windows root CA. Provisioning your private CA with CloudFormation makes it possible to sign the CA with a Windows root CA.

  1. Navigate to the CloudFormation console.
  2. Choose Upload a template file.
  3. Select 03_PKI_Automated-ACMPrivateCA-Provisioning.yaml as the CloudFormation stack file, and then choose Next.
  4. On the Specify stack details page, enter a stack name and the parameters. Some parameters have a dropdown list that you can use to select existing values.
  5. Choose Next, Next, and Create Stack.

Assign and configure certificates

After deploying the preceding templates, use the console to assign certificate renewal permissions to ACM and configure your certificates.

To assign renewal permissions

  1. In the ACM Private CA console, choose Private CAs.
  2. Select your private CA from the list.
  3. Choose the Permissions tab.
  4. Select Authorize ACM to use this CA for renewals.
  5. Choose Save.

To sign private CA certificates with an external CA (console)

  1. In the ACM Private CA console, select your private CA from the list.
  2. From the Actions menu, choose Import CA certificate. The ACM Private CA console returns the certificate signing request (CSR).
  3. Choose Export CSR to a file and save it locally.
  4. Choose Next.
    1. Use your existing Windows root CA.
    2. Copy the CSR to the root CA and sign it.
    3. Export the signed CSR in base64 format.
    4. Export the <RootCA>.crt certificate in base64 format.
  5. On the Upload the certificates page, upload the signed CSR and the RootCA certificates.
  6. Choose Confirm and Import to import the private CA certificate.

To request a private certificate using the ACM console

Note: Make a note of IDs of the certificate you configure in this section to use when you deploy the HTTPS listener CloudFormation templates.

  1. Sign in to the console and open the ACM console.
  2. Choose Request a certificate.
  3. On the Request a certificate page, choose Request a private certificate and Request a certificate to continue.
  4. On the Select a certificate authority (CA) page, choose Select a CA to view the list of available private CAs.
  5. Choose Next.
  6. On the Add domain names page, enter your domain name. You can use a fully qualified domain name, such as www.example.com, or a bare—also called apex—domain name such as example.com. You can also use an asterisk (*) as a wild card in the leftmost position to include all subdomains in the same root domain. For example, you can use *.example.com to include all subdomains of the root domain example.com.
  7. To add another domain name, choose Add another name to this certificate and enter the name in the text box.
  8. (Optional) On the Add tags page, tag your certificate.
  9. When you finish adding tags, choose Review and request.
  10. If the Review and request page contains the correct information about your request, choose Confirm and request.

Note: You can learn more at Requesting a Private Certificate.

To share the private CA with other accounts or with your organization

You can use ACM Private CA to share a single private CA with multiple AWS accounts. To share your private CA with multiple accounts, follow the instructions in How to use AWS RAM to share your ACM Private CA cross-account.

Continue deploying the CloudFormation templates

With the certificates assigned and configured, you can complete the deployment of the CloudFormation templates for this solution.

To deploy the Network Load Balancer template

In this step, you provision a Network Load Balancer.

  1. Navigate to the CloudFormation console.
  2. Choose Upload a template file.
  3. Select 05_PKI_Automated-LoadBalancer-Provisioning.yaml as the CloudFormation stack file, and then choose Next.
  4. On the Specify stack details page, enter a stack name and the parameters. Some parameters are filled in automatically or have a dropdown list that you can use to select existing values.
  5. Choose Next, Next, and Create Stack.

To deploy the HTTPS listener configuration template

The following steps create the HTTPS listener with an initial configuration for the load balancer.

  1. Navigate to the CloudFormation console:
  2. Choose Upload a template file.
  3. Select 06_PKI_Automated-HTTPS-Listener.yaml as the CloudFormation stack file, and then choose Next.
  4. On the Specify stack details page, enter the stack name and the parameters. Some parameters are filled in automatically or have a dropdown list that you can use to select existing values.
  5. Choose Next, Next, and Create Stack.

To deploy the AWS KMS CMK template

In this step, you create an AWS KMS CMK to encrypt EC2 EBS volumes and other resources. This is required for the EC2 instances in this solution.

  1. Open the CloudFormation console.
  2. Choose Upload a template file.
  3. Select 04_PKI_Automated-KMS_CMK-Creation.yaml as the CloudFormation stack file, and then choose Next.
  4. On the Specify stack details page, enter a stack name and the parameters.
  5. Choose Next, Next, and Create Stack.

To deploy the Windows EC2 instances provisioning template

This template provisions a purpose-built Windows EC2 instance within an existing VPC. It will provision an EC2 instance for the Windows CA, with KMS to encrypt the EBS volume, an IAM instance profile and automatically installs SSM agent on your instance.

It also has optional features and flexibilities. For example, the template can automatically create new target group, or add instance to existing target group. It can also configure listener rules, create Route 53 records and automatically join an Active Directory domain.

Note: The AWS KMS CMK and the IAM role are required to provision the EC2, while the target group, listener rules, and domain join features are optional.

  1. Navigate to the CloudFormation console.
  2. Choose Upload a template file.
  3. Select 07_PKI_Automated-EC2-Servers-Provisioning.yaml as the CloudFormation stack file, and then choose Next.
  4. On the Specify stack details page, enter the stack name and the parameters. Some parameters are filled in automatically or have a dropdown list that you can use to select existing values.

    Note: The Optional properties section at the end of the parameters list isn’t required if you’re not joining the EC2 instance to an Active Directory domain.

  5. Choose Next, Next, and Create Stack.

Create and initialize a CloudHSM cluster

In this section, you create and configure CloudHSM within the VPC subnets provisioned in previous steps. After the CloudHSM cluster is completed and signed by the Windows root CA, it will be integrated with the EC2 Windows servers provisioned in previous sections.

To create a CloudHSM cluster

  1. Log in to the AWS account, open the console, and navigate to the CloudHSM.
  2. Choose Create cluster.
  3. In the Cluster configuration section:
    1. Select the VPC you created.
    2. Select the three private subnets you created across the Availability Zones in previous steps.
  4. Choose Next: Review.
  5. Review your cluster configuration, and then choose Create cluster.

To create an HSM

  1. Open the console and go to the CloudHSM cluster you created in the preceding step.
  2. Choose Initialize.
  3. Select an AZ for the HSM that you’re creating, and then choose Create.

To download and sign a CSR

Before you can initialize the cluster, you must download and sign a CSR generated by the first HSM of the cluster.

  1. Open the CloudHSM console.
  2. Choose Initialize next to the cluster that you created previously.
  3. When the CSR is ready, select Cluster CSR to download it.

    Figure 5: Download CSR

    Figure 5: Download CSR

To initialize the cluster

  1. Open the CloudHSM console.
  2. Choose Initialize next to the cluster that you created previously.
  3. On the Download certificate signing request page, choose Next. If Next is not available, choose one of the CSR or certificate links, and then choose Next.
  4. On the Sign certificate signing request (CSR) page, choose Next.
  5. Use your existing Windows root CA.
    1. Copy the CSR to the root CA and sign it.
    2. Export the signed CSR in base64 format.
    3. Also export the <RootCA>.crt certificate in base64 format.
  6. On the Upload the certificates page, upload the signed CSR and the root CA certificates.
  7. Choose Upload and initialize.

Integrate CloudHSM cluster to Windows Server AD CS

In this section you use a script that provides step-by-step instructions to help you successfully integrate your Windows Server CA with AWS CloudHSM.

To integrate CloudHSM cluster to Windows Server AD CS

Open the script 09_PKI_AWS_CloudHSM-Windows_CA-Integration-Playbook.txt and follow the instructions to complete the CloudHSM integration with the Windows servers.

Install and configure Windows CA with CloudHSM

When the CloudHSM integration is complete, install and configure your Windows Server CA with the CloudHSM key storage provider and select RSA#Cavium Key Storage Provider as your cryptographic provider.

Conclusion

By deploying the hybrid solution in this post, you’ve implemented a PKI to manage security across all workloads in your AWS accounts and in your on-premises network.

With this solution, you can use a private CA to issue Transport Layer Security (TLS) certificates to your Application Load Balancers, Network Load Balancers, CloudFront, and other AWS workloads across multiple accounts and VPCs. The Windows CA lets you enhance your internal security by binding your internal users, digital devices, and applications to appropriate private keys. You can use this solution with TLS, Internet Protocol Security (IPsec), digital signatures, VPNs, wireless network authentication, and more.

Additional resources

If you have feedback about this post, submit comments in the Comments section below. If you have questions about this post, start a new thread on the AWS Certificate Manager forum or CloudHSM forum or contact AWS Support.

Want more AWS Security how-to content, news, and feature announcements? Follow us on Twitter.

Author

Max Farnga

Max is a Security Transformation Consultant with AWS Professional Services – Security, Risk and Compliance team. He has a diverse technical background in infrastructure, security, and cloud computing. He helps AWS customers implement secure and innovative solutions on the AWS cloud.

How to import AWS IoT Device Defender audit findings into Security Hub

Post Syndicated from Joaquin Manuel Rinaudo original https://aws.amazon.com/blogs/security/how-to-import-aws-iot-device-defender-audit-findings-into-security-hub/

AWS Security Hub provides a comprehensive view of the security alerts and security posture in your accounts. In this blog post, we show how you can import AWS IoT Device Defender audit findings into Security Hub. You can then view and organize Internet of Things (IoT) security findings in Security Hub together with findings from other integrated AWS services, such as Amazon GuardDuty, Amazon Inspector, Amazon Macie, AWS Identity and Access Management (IAM) Access Analyzer, AWS Systems Manager, and more. You will gain a centralized security view across both enterprise and IoT types of workloads, and have an aggregated view of AWS IoT Device Defender audit findings. This solution can support AWS Accounts managed by AWS Organizations.

In this post, you’ll learn how the integration of IoT security findings into Security Hub works, and you can download AWS CloudFormation templates to implement the solution. After you deploy the solution, every failed audit check will be recorded as a Security Hub finding. The findings within Security Hub provides an AWS IoT Device Defender finding severity level and direct link to the AWS IoT Device Defender console so that you can take possible remediation actions. If you address the underlying findings or suppress the findings by using the AWS IoT Device Defender console, the solution function will automatically archive any related findings in Security Hub when a new audit occurs.

Solution scope

For this solution, we assume that you are familiar with how to set up an IoT environment and set up AWS IoT Device Defender. To learn more how to set up your environment, see the AWS tutorials, such as Getting started with AWS IoT Greengrass and Setting up AWS IoT Device Defender

The solution is intended for AWS accounts with fewer than 10,000 findings per scan. If AWS IoT Device Defender has more than 10,000 findings, the limit of 15 minutes for the duration of the serverless AWS Lambda function might be exceeded, depending on the network delay, and the function will fail.

The solution is designed for AWS Regions where AWS IoT Device Defender, serverless Lambda functionality and Security Hub are available; for more information, see AWS Regional Services. The China (Beijing) and China (Ningxia) Regions and the AWS GovCloud (US) Regions are excluded from the solution scope.

Solution overview

The templates that we provide here will provision an Amazon Simple Notification Service (Amazon SNS) topic notifying you when the AWS IoT Device Defender report is ready, and a Lambda function that imports the findings from the report into Security Hub. Figure 1 shows the solution architecture.
 

Figure 1: Solution architecture

Figure 1: Solution architecture

The solution workflow is as follows:

  1. AWS IoT Device Defender performs an audit of your environment. You should set up a regular audit as described in Audit guide: Enable audit checks.
  2. AWS IoT Device Defender sends an SNS notification with a summary of the audit report.
  3. A Lambda function named import-iot-defender-findings-to-security-hub is triggered by the SNS topic.
  4. The Lambda function gets the details of the findings from AWS IoT Device Defender.
  5. The Lambda function imports the new findings to Security Hub and archives the previous report findings. An example of findings in Security Hub is shown in Figure 2.
     
    Figure 2: Security Hub findings example

    Figure 2: Security Hub findings example

Prerequisites

  • You must have Security Hub turned on in the Region where you’re deploying the solution.
  • You must also have your IoT environment set, see step by step tutorial at Getting started with AWS IoT Greengrass
  • You must also have AWS IoT Device Defender audit checks turned on. Learn how to configure recurring audit checks across all your IoT devices by using this tutorial.

Deploy the solution

You will need to deploy the solution once in each AWS Region where you want to integrate IoT security findings into Security Hub.

To deploy the solution

  1. Choose Launch Stack to launch the AWS CloudFormation console with the prepopulated CloudFormation demo template.

    Select the Launch Stack button to launch the template

    Additionally, you can download the latest solution code from GitHub.

  2. (Optional) In the CloudFormation console, you are presented with the template parameters before you deploy the stack. You can customize these parameters or keep the defaults:
    • S3 bucket with sources: This bucket contains all the solution sources, such as the Lambda function and templates. You can keep the default text if you’re not customizing the sources.
    • Prefix for S3 bucket with sources: The prefix for all the solution sources. You can keep the default if you’re not customizing the sources.
  3. Go to the AWS IoT Core console and set up an SNS alert notification parameter for the audit report. To do this, in the left navigation pane of the console, under Defend, choose Settings, and then choose Edit to edit the SNS alert. The SNS topic is created by the solution stack and named iot-defender-report-notification.
     
    Figure 3: SNS alert settings for AWS IoT Device Defender

    Figure 3: SNS alert settings for AWS IoT Device Defender

Test the solution

To test the solution, you can simulate an “AWS IoT policies are overly permissive” finding by creating an insecure policy.

To create an insecure policy

  1. Go to the AWS IoT Core console. In the left navigation pane, under Secure, choose Policies.
  2. Choose Create. For Name, enter InsecureIoTPolicy.
  3. For Action, select iot:*. For Resources, enter *. Choose Allow statement, and then choose Create.

Next, run a new IoT security audit by choosing IoT Core > Defend > Audit > Results > Create and selecting the option Run audit now (Once).

After the audit is finished, you’ll see audit reports in the AWS IoT Core console, similar to the ones shown in Figure 4. One of the reports shows that the IoT policies are overly permissive. The same findings are also imported into Security Hub as shown in Figure 2.
 

Figure 4: AWS IoT Device Defender report

Figure 4: AWS IoT Device Defender report

Troubleshooting

To troubleshoot the solution, use the Amazon CloudWatch Logs of the Lambda function import-iot-defender-findings-to-security-hub. The solution can fail if:

  • Security Hub isn’t turned on in your Region
  • Service control policies (SCPs) are preventing access to AWS IoT Device Defender audit reports
  • The wrong SNS topic is configured in the AWS IoT Device Defender settings
  • The Lambda function times out because there are more than 10,000 findings

To find these issues, go to the CloudWatch console, choose Log Group, and then choose /aws/lambda/import-iot-defender-findings-to-security-hub.

Conclusion

In this post, you’ve learned how to integrate AWS IoT Device Defender audit findings with Security Hub to gain a centralized view of security findings across both your enterprise and IoT workloads. If you have more questions about IoT, you can reach out to the AWS IoT forum, and if you have questions about Security Hub, visit the AWS Security Hub forum. If you need AWS experts to help you plan, build, or optimize your infrastructure, contact AWS Professional Services.

If you have feedback about this post, submit comments in the Comments section below.

Want more AWS Security how-to content, news, and feature announcements? Follow us on Twitter.

Author

Joaquin Manuel Rinaudo

Joaquin is a Senior Security Architect with AWS Professional Services. He is passionate about building solutions that help developers improve their software quality. Prior to AWS, he worked across multiple domains in the security industry, from mobile security to cloud and compliance related topics. In his free time, Joaquin enjoys spending time with family and reading science-fiction novels.

Author

Vesselin Tzvetkov

Vesselin is a Senior Security Architect at AWS Professional Services and is passionate about security architecture and engineering innovative solutions. Outside of technology, he likes classical music, philosophy, and sports. He holds a Ph.D. in security from TU-Darmstadt and a M.S. in electrical engineering from Bochum University in Germany.

Building fine-grained authorization using Amazon Cognito, API Gateway, and IAM

Post Syndicated from Artem Lovan original https://aws.amazon.com/blogs/security/building-fine-grained-authorization-using-amazon-cognito-api-gateway-and-iam/

June 5, 2021: We’ve updated Figure 1: User request flow.


Authorizing functionality of an application based on group membership is a best practice. If you’re building APIs with Amazon API Gateway and you need fine-grained access control for your users, you can use Amazon Cognito. Amazon Cognito allows you to use groups to create a collection of users, which is often done to set the permissions for those users. In this post, I show you how to build fine-grained authorization to protect your APIs using Amazon Cognito, API Gateway, and AWS Identity and Access Management (IAM).

As a developer, you’re building a customer-facing application where your users are going to log into your web or mobile application, and as such you will be exposing your APIs through API Gateway with upstream services. The APIs could be deployed on Amazon Elastic Container Service (Amazon ECS), Amazon Elastic Kubernetes Service (Amazon EKS), AWS Lambda, or Elastic Load Balancing where each of these options will forward the request to your Amazon Elastic Compute Cloud (Amazon EC2) instances. Additionally, you can use on-premises services that are connected to your Amazon Web Services (AWS) environment over an AWS VPN or AWS Direct Connect. It’s important to have fine-grained controls for each API endpoint and HTTP method. For instance, the user should be allowed to make a GET request to an endpoint, but should not be allowed to make a POST request to the same endpoint. As a best practice, you should assign users to groups and use group membership to allow or deny access to your API services.

Solution overview

In this blog post, you learn how to use an Amazon Cognito user pool as a user directory and let users authenticate and acquire the JSON Web Token (JWT) to pass to the API Gateway. The JWT is used to identify what group the user belongs to, as mapping a group to an IAM policy will display the access rights the group is granted.

Note: The solution works similarly if Amazon Cognito would be federating users with an external identity provider (IdP)—such as Ping, Active Directory, or Okta—instead of being an IdP itself. To learn more, see Adding User Pool Sign-in Through a Third Party. Additionally, if you want to use groups from an external IdP to grant access, Role-based access control using Amazon Cognito and an external identity provider outlines how to do so.

The following figure shows the basic architecture and information flow for user requests.

Figure 1: User request flow

Figure 1: User request flow

Let’s go through the request flow to understand what happens at each step, as shown in Figure 1:

  1. A user logs in and acquires an Amazon Cognito JWT ID token, access token, and refresh token. To learn more about each token, see using tokens with user pools.
  2. A RestAPI request is made and a bearer token—in this solution, an access token—is passed in the headers.
  3. API Gateway forwards the request to a Lambda authorizer—also known as a custom authorizer.
  4. The Lambda authorizer verifies the Amazon Cognito JWT using the Amazon Cognito public key. On initial Lambda invocation, the public key is downloaded from Amazon Cognito and cached. Subsequent invocations will use the public key from the cache.
  5. The Lambda authorizer looks up the Amazon Cognito group that the user belongs to in the JWT and does a lookup in Amazon DynamoDB to get the policy that’s mapped to the group.
  6. Lambda returns the policy and—optionally—context to API Gateway. The context is a map containing key-value pairs that you can pass to the upstream service. It can be additional information about the user, the service, or anything that provides additional information to the upstream service.
  7. The API Gateway policy engine evaluates the policy.

    Note: Lambda isn’t responsible for understanding and evaluating the policy. That responsibility falls on the native capabilities of API Gateway.

  8. The request is forwarded to the service.

Note: To further optimize Lambda authorizer, the authorization policy can be cached or disabled, depending on your needs. By enabling cache, you could improve the performance as the authorization policy will be returned from the cache whenever there is a cache key match. To learn more, see Configure a Lambda authorizer using the API Gateway console.

Let’s have a closer look at the following example policy that is stored as part of an item in DynamoDB.

{
   "Version":"2012-10-17",
   "Statement":[
      {
         "Sid":"PetStore-API",
         "Effect":"Allow",
         "Action":"execute-api:Invoke",
         "Resource":[
            "arn:aws:execute-api:*:*:*/*/*/petstore/v1/*",
            "arn:aws:execute-api:*:*:*/*/GET/petstore/v2/status"
         ],
         "Condition":{
            "IpAddress":{
               "aws:SourceIp":[
                  "192.0.2.0/24",
                  "198.51.100.0/24"
               ]
            }
         }
      }
   ]
}

Based on this example policy, the user is allowed to make calls to the petstore API. For version v1, the user can make requests to any verb and any path, which is expressed by an asterisk (*). For v2, the user is only allowed to make a GET request for path /status. To learn more about how the policies work, see Output from an Amazon API Gateway Lambda authorizer.

Getting started

For this solution, you need the following prerequisites:

  • The AWS Command Line Interface (CLI) installed and configured for use.
  • Python 3.6 or later, to package Python code for Lambda

    Note: We recommend that you use a virtual environment or virtualenvwrapper to isolate the solution from the rest of your Python environment.

  • An IAM role or user with enough permissions to create Amazon Cognito User Pool, IAM Role, Lambda, IAM Policy, API Gateway and DynamoDB table.
  • The GitHub repository for the solution. You can download it, or you can use the following Git command to download it from your terminal.

    Note: This sample code should be used to test out the solution and is not intended to be used in production account.

     $ git clone https://github.com/aws-samples/amazon-cognito-api-gateway.git
     $ cd amazon-cognito-api-gateway
    

    Use the following command to package the Python code for deployment to Lambda.

     $ bash ./helper.sh package-lambda-functions
     …
     Successfully completed packaging files.
    

To implement this reference architecture, you will be utilizing the following services:

Note: This solution was tested in the us-east-1, us-east-2, us-west-2, ap-southeast-1, and ap-southeast-2 Regions. Before selecting a Region, verify that the necessary services—Amazon Cognito, API Gateway, and Lambda—are available in those Regions.

Let’s review each service, and how those will be used, before creating the resources for this solution.

Amazon Cognito user pool

A user pool is a user directory in Amazon Cognito. With a user pool, your users can log in to your web or mobile app through Amazon Cognito. You use the Amazon Cognito user directory directly, as this sample solution creates an Amazon Cognito user. However, your users can also log in through social IdPs, OpenID Connect (OIDC), and SAML IdPs.

Lambda as backing API service

Initially, you create a Lambda function that serves your APIs. API Gateway forwards all requests to the Lambda function to serve up the requests.

An API Gateway instance and integration with Lambda

Next, you create an API Gateway instance and integrate it with the Lambda function you created. This API Gateway instance serves as an entry point for the upstream service. The following bash command below creates an Amazon Cognito user pool, a Lambda function, and an API Gateway instance. The command then configures proxy integration with Lambda and deploys an API Gateway stage.

Deploy the sample solution

From within the directory where you downloaded the sample code from GitHub, run the following command to generate a random Amazon Cognito user password and create the resources described in the previous section.

 $ bash ./helper.sh cf-create-stack-gen-password
 ...
 Successfully created CloudFormation stack.

When the command is complete, it returns a message confirming successful stack creation.

Validate Amazon Cognito user creation

To validate that an Amazon Cognito user has been created successfully, run the following command to open the Amazon Cognito UI in your browser and then log in with your credentials.

Note: When you run this command, it returns the user name and password that you should use to log in.

 $ bash ./helper.sh open-cognito-ui
  Opening Cognito UI. Please use following credentials to login:
  Username: cognitouser
  Password: xxxxxxxx

Alternatively, you can open the CloudFormation stack and get the Amazon Cognito hosted UI URL from the stack outputs. The URL is the value assigned to the CognitoHostedUiUrl variable.

Figure 2: CloudFormation Outputs - CognitoHostedUiUrl

Figure 2: CloudFormation Outputs – CognitoHostedUiUrl

Validate Amazon Cognito JWT upon login

Since we haven’t installed a web application that would respond to the redirect request, Amazon Cognito will redirect to localhost, which might look like an error. The key aspect is that after a successful log in, there is a URL similar to the following in the navigation bar of your browser:

http://localhost/#id_token=eyJraWQiOiJicVhMYWFlaTl4aUhzTnY3W...

Test the API configuration

Before you protect the API with Amazon Cognito so that only authorized users can access it, let’s verify that the configuration is correct and the API is served by API Gateway. The following command makes a curl request to API Gateway to retrieve data from the API service.

 $ bash ./helper.sh curl-api
{"pets":[{"id":1,"name":"Birds"},{"id":2,"name":"Cats"},{"id":3,"name":"Dogs"},{"id":4,"name":"Fish"}]}

The expected result is that the response will be a list of pets. In this case, the setup is correct: API Gateway is serving the API.

Protect the API

To protect your API, the following is required:

  1. DynamoDB to store the policy that will be evaluated by the API Gateway to make an authorization decision.
  2. A Lambda function to verify the user’s access token and look up the policy in DynamoDB.

Let’s review all the services before creating the resources.

Lambda authorizer

A Lambda authorizer is an API Gateway feature that uses a Lambda function to control access to an API. You use a Lambda authorizer to implement a custom authorization scheme that uses a bearer token authentication strategy. When a client makes a request to one of the API operations, the API Gateway calls the Lambda authorizer. The Lambda authorizer takes the identity of the caller as input and returns an IAM policy as the output. The output is the policy that is returned in DynamoDB and evaluated by the API Gateway. If there is no policy mapped to the caller identity, Lambda will generate a deny policy and request will be denied.

DynamoDB table

DynamoDB is a key-value and document database that delivers single-digit millisecond performance at any scale. This is ideal for this use case to ensure that the Lambda authorizer can quickly process the bearer token, look up the policy, and return it to API Gateway. To learn more, see Control access for invoking an API.

The final step is to create the DynamoDB table for the Lambda authorizer to look up the policy, which is mapped to an Amazon Cognito group.

Figure 3 illustrates an item in DynamoDB. Key attributes are:

  • Group, which is used to look up the policy.
  • Policy, which is returned to API Gateway to evaluate the policy.


Figure 3: DynamoDB item

Figure 3: DynamoDB item

Based on this policy, the user that is part of the Amazon Cognito group pet-veterinarian is allowed to make API requests to endpoints https://<domain>/<api-gateway-stage>/petstore/v1/* and https://<domain>/<api-gateway-stage>/petstore/v2/status for GET requests only.

Update and create resources

Run the following command to update existing resources and create a Lambda authorizer and DynamoDB table.

 $ bash ./helper.sh cf-update-stack
Successfully updated CloudFormation stack.

Test the custom authorizer setup

Begin your testing with the following request, which doesn’t include an access token.

$ bash ./helper.sh curl-api
{"message":"Unauthorized"}

The request is denied with the message Unauthorized. At this point, the Amazon API Gateway expects a header named Authorization (case sensitive) in the request. If there’s no authorization header, the request is denied before it reaches the lambda authorizer. This is a way to filter out requests that don’t include required information.

Use the following command for the next test. In this test, you pass the required header but the token is invalid because it wasn’t issued by Amazon Cognito but is a simple JWT-format token stored in ./helper.sh. To learn more about how to decode and validate a JWT, see decode and verify an Amazon Cognito JSON token.

$ bash ./helper.sh curl-api-invalid-token
{"Message":"User is not authorized to access this resource"}

This time the message is different. The Lambda authorizer received the request and identified the token as invalid and responded with the message User is not authorized to access this resource.

To make a successful request to the protected API, your code will need to perform the following steps:

  1. Use a user name and password to authenticate against your Amazon Cognito user pool.
  2. Acquire the tokens (id token, access token, and refresh token).
  3. Make an HTTPS (TLS) request to API Gateway and pass the access token in the headers.

Before the request is forwarded to the API service, API Gateway receives the request and passes it to the Lambda authorizer. The authorizer performs the following steps. If any of the steps fail, the request is denied.

  1. Retrieve the public keys from Amazon Cognito.
  2. Cache the public keys so the Lambda authorizer doesn’t have to make additional calls to Amazon Cognito as long as the Lambda execution environment isn’t shut down.
  3. Use public keys to verify the access token.
  4. Look up the policy in DynamoDB.
  5. Return the policy to API Gateway.

The access token has claims such as Amazon Cognito assigned groups, user name, token use, and others, as shown in the following example (some fields removed).

{
    "sub": "00000000-0000-0000-0000-0000000000000000",
    "cognito:groups": [
        "pet-veterinarian"
    ],
...
    "token_use": "access",
    "scope": "openid email",
    "username": "cognitouser"
}

Finally, let’s programmatically log in to Amazon Cognito UI, acquire a valid access token, and make a request to API Gateway. Run the following command to call the protected API.

$ bash ./helper.sh curl-protected-api
{"pets":[{"id":1,"name":"Birds"},{"id":2,"name":"Cats"},{"id":3,"name":"Dogs"},{"id":4,"name":"Fish"}]}

This time, you receive a response with data from the API service. Let’s examine the steps that the example code performed:

  1. Lambda authorizer validates the access token.
  2. Lambda authorizer looks up the policy in DynamoDB based on the group name that was retrieved from the access token.
  3. Lambda authorizer passes the IAM policy back to API Gateway.
  4. API Gateway evaluates the IAM policy and the final effect is an allow.
  5. API Gateway forwards the request to Lambda.
  6. Lambda returns the response.

Let’s continue to test our policy from Figure 3. In the policy document, arn:aws:execute-api:*:*:*/*/GET/petstore/v2/status is the only endpoint for version V2, which means requests to endpoint /GET/petstore/v2/pets should be denied. Run the following command to test this.

 $ bash ./helper.sh curl-protected-api-not-allowed-endpoint
{"Message":"User is not authorized to access this resource"}

Note: Now that you understand fine grained access control using Cognito user pool, API Gateway and lambda function, and you have finished testing it out, you can run the following command to clean up all the resources associated with this solution:

 $ bash ./helper.sh cf-delete-stack

Advanced IAM policies to further control your API

With IAM, you can create advanced policies to further refine access to your APIs. You can learn more about condition keys that can be used in API Gateway, their use in an IAM policy with conditions, and how policy evaluation logic determines whether to allow or deny a request.

Summary

In this post, you learned how IAM and Amazon Cognito can be used to provide fine-grained access control for your API behind API Gateway. You can use this approach to transparently apply fine-grained control to your API, without having to modify the code in your API, and create advanced policies by using IAM condition keys.

If you have feedback about this post, submit comments in the Comments section below. If you have questions about this post, start a new thread on the Amazon Cognito forum or contact AWS Support.

Want more AWS Security how-to content, news, and feature announcements? Follow us on Twitter.

Author

Artem Lovan

Artem is a Senior Solutions Architect based in New York. He helps customers architect and optimize applications on AWS. He has been involved in IT at many levels, including infrastructure, networking, security, DevOps, and software development.

AWS Shield threat landscape review: 2020 year-in-review

Post Syndicated from Mario Pinho original https://aws.amazon.com/blogs/security/aws-shield-threat-landscape-review-2020-year-in-review/

AWS Shield is a managed service that protects applications that are running on Amazon Web Services (AWS) against external threats, such as bots and distributed denial of service (DDoS) attacks. Shield detects network and web application-layer volumetric events that may indicate a DDoS attack, web content scraping, or other unauthorized non-human traffic that is interacting with AWS resources.

In this blog post, I’ll show you some of the volumetric event trends from network traffic and web request patterns that we observed in 2020 as more workloads moved to the cloud. It includes insights that are broadly applicable to cloud applications and insights that are specific to gaming applications. I will also share tips and best practices that you can follow to protect the availability of the applications that you run on AWS.

DDoS trends as more developers rely on the cloud

In 2020, we saw an increase in developers building applications on AWS and protecting their availability with AWS Shield Advanced, which includes AWS WAF at no additional cost. The DDoS threat vectors we observed were similar to the ones that were observed in 2019, but they occurred with greater frequency. Between February 2020 and April 2020, we observed a 72% increase in the monthly number of events that were detected by Shield.

TCP SYN floods and UDP reflection attacks, which attempt to reflect and amplify packets off legitimate services running on the internet, were among the most common infrastructure-layer events detected by AWS Shield in 2020. (In this blog post, we’ll use the term infrastructure layer to refer to Layers 3 and 4 of the OSI model.) These tactics attempt to affect the availability of an application by overwhelming its ability to process packets or establish new connections on behalf of legitimate users. One of the oldest UDP reflection vectors, DNS reflection, remains the most common, at 15.5% of all infrastructure-layer events detected by Shield. TCP SYN floods were the second most common at 13.8%. This is unsurprising, because web applications commonly rely upon both DNS and TCP traffic. Bad actors can find a consistent supply of systems on the internet that can be used as reflectors, due to the properties of these protocols, or system misconfiguration.

Bad actors may use application-layer requests, in isolation or together with infrastructure-layer attacks, in their attempt to affect the availability of an application. The most common application-layer attack observed by Shield in 2020 was the web request flood, an observation that is consistent with prior years. This vector gives a bad actor more leverage, meaning that they can have a greater effect with less traffic and effort. Instead of having to exhaust the capacity of a network path, device, or other lower-level component, they only need to send more web requests than the application is able to handle. This attack vector was a significant cause of increased volumetric events detected by Shield in the first half of 2020. For more information about events detected by Shield during 2020, see Figure 1.
 

Figure 1: Monthly number of volumetric events detected by AWS Shield in 2020

Figure 1: Monthly number of volumetric events detected by AWS Shield in 2020

A closer look at web application-layer attacks

The request volume of web application-layer events that are detected by AWS Shield has increased, an indication that bad actors are making greater investments in tactics that are more challenging to detect and mitigate than infrastructure-layer events. Shield continuously monitors DDoS activity and alerts customers if there is an elevated threat at any point in time. In 2020, Shield reported elevated threats on 53 days, 33 of which were caused by high-volume web request floods. There were 55 events with a volume of greater than 500,000 requests per second (RPS), some of which reached millions of RPS. The RPS of the 99th percentile (P99) of the volume of web request floods detected by Shield nearly doubled between the first and second halves of the year. (The 99th percentile is the request volume in RPS, below which 99% of request floods were observed.). For more information about the volume of web request floods detected by Shield in 2020, see Figure 2.
 

Figure 2: Quarterly P90 and P99 volume of web request floods detected by AWS Shield in 2020

Figure 2: Quarterly P90 and P99 volume of web request floods detected by AWS Shield in 2020

It’s important to protect web applications against DDoS attacks of any size. The more common request floods are relatively small, but smaller attacks can affect an application if it isn’t architected for DDoS resiliency. You can follow these best practices to help protect your web application against request floods and other DDoS attacks:

  • Protect internet-facing resources with AWS Shield Advanced. You can use AWS Shield Advanced to protect your applications that are running on AWS against most common, frequently occurring network and transport layer DDoS attacks. When you add protected resources in AWS Shield Advanced, network volumetric attacks against those resources are detected and mitigated more quickly. You also receive visibility into security events by using the AWS Shield console, API, or Amazon CloudWatch metrics. If you need assistance during an active event, you can quickly engage with AWS Shield experts or escalate to the AWS Shield Response Team (SRT).
  • Access greater network and request capacity with Amazon CloudFront and Amazon Route 53. You can use these services to serve static and dynamic web content, as well as DNS answers, by using the global network of AWS edge locations. This provides you with greater capacity to help mitigate large volumetric attacks. Applications that are fronted by Amazon CloudFront and Amazon Route 53 also benefit from inline mitigation that continually inspects all traffic and mitigates most infrastructure-layer DDoS attempts in less than one second. CloudFront and the AWS Shield DDoS mitigation systems use SYN cookies to verify new connections, which protects against SYN floods and other traffic floods that aren’t valid for the application. (A SYN cookie is a technique by which the Shield infrastructure encodes connection setup information into the SYN response (SYN-ACK packet) in such a way that the TCP connection resources are only consumed for legitimate clients who complete the TCP handshake.)
  • Use AWS WAF and rate-based rules to mitigate application-layer attacks. AWS Shield Advanced provides you with protection against infrastructure-layer attacks that can be mitigated with network-based DDoS mitigation systems. When you add Shield Advanced protection to CloudFront or Application Load Balancer (ALB) for serving web content, you receive AWS WAF at no additional cost. AWS Managed Rules for AWS WAF makes it easy to select and apply pre-configured rules, depending on your specific requirements. You also receive web request flood detection and can mitigate security events by configuring rate-based rules to match and temporarily block IP addresses that are sending traffic above a rate that you define. For larger applications, or applications that span multiple AWS accounts, you can use AWS Firewall Manager to deploy and manage rules across all of your resources.

Considerations unique to gaming use cases

On AWS, you can build and protect any kind of application. Internet-facing applications are more likely to receive DDoS attacks, particularly if a bad actor is motivated to disrupt the normal function of the application. We looked across AWS Shield data and found that one type of application stood out as the most likely to be targeted by DDoS attacks: gaming servers. Gaming servers host matches between players on their personal computers or gaming consoles. 16% of infrastructure-layer events detected by Shield in 2020 targeted gaming applications. The application might be targeted simply out of malice, or to gain an advantage in the game. Between Q1 2020 and Q2 2020, we observed a 46% increase in the frequency of events that were detected on behalf of gaming applications. This increase aligns with the increased use of residential internet networks during the same time.

There are unique considerations for protecting a gaming application against DDoS attacks. Many gaming applications rely upon UDP traffic, which makes it infeasible to block UDP as a countermeasure against the most common DDoS attacks, like UDP reflection attacks or UDP floods. You can nevertheless protect your gaming application and the experience of your players by using Elastic IP addresses and protecting these resources with AWS Shield Advanced. Shield Advanced has the ability to perform deep packet inspection of all traffic, even at extremely high PPS rates. Using that powerful tool, the AWS Shield Response Team (SRT) can work with you to understand your application and build a custom mitigation that allows only valid player traffic.

Reacting to extortion attempts

From August 2020 through November 2020, we saw a revival of DDoS extortion attempts, a tactic that is now more than six years old. Each extortion attempt reported by customers to the AWS SRT had familiar characteristics. A malicious actor would target an application that wasn’t running on AWS as a proof of concept and then threaten a larger, follow-on attack if a ransom wasn’t paid. Although it’s very uncommon for the follow-on attack to actually occur, application owners take these threats seriously and use the opportunity to assess their own protection and operational readiness. In approximately 90% of AWS support cases related to these attempts, the SRT assisted the application owners directly with their preparation. We also assisted Shield Advanced customers who weren’t directly targeted by extortion attempts but were aware of other extortion campaigns.

One question that we frequently hear is how AWS can help developers monitor their applications and take quick action if a possible DDoS attack is detected. When you protect your resources with AWS Shield Advanced, you have the option to associate an Amazon Route 53 health check. The status of the health check is used to improve the decisions that are made by the Shield detection system. If you have Shield Advanced proactive engagement enabled, the SRT is automatically engaged any time a Shield event corresponds to an unhealthy Route 53 health check that is associated to your protected resource. Based on the contact information provided in the Shield console, an SRT engineer will contact you to coordinate a response to the detected event. If you’re running a web application, you can choose to delegate access to your Shield Advanced and AWS WAF APIs to the SRT and provide the team with copies of your AWS WAF logs. During an escalation, an SRT engineer will evaluate your logs for DDoS signatures and robotic patterns and assist in building effective mitigations.

Summary

In this blog post, I shared some of the trends that were observed by AWS Shield in 2020, as well as steps that you can take to protect the availability of your applications against DDoS attacks. If you’d like to learn more about DDoS protection on AWS and configuring AWS Shield Advanced, check out the following resources:

If you have feedback about this post, submit comments in the Comments section below. If you have questions about this post, start a new thread on the AWS Shield forum or contact AWS Support.

Want more AWS Security how-to content, news, and feature announcements? Follow us on Twitter.

Author

Mário Pinho

Mário is a Security Engineer at AWS. He has a background in network engineering and consulting, and feels at his best when breaking apart complex topics and processes into their simpler components. In his free time, he pretends to be an artist by playing piano and doing landscape photography.

AWS Verified episode 5: A conversation with Eric Rosenbach of Harvard University’s Belfer Center

Post Syndicated from Stephen Schmidt original https://aws.amazon.com/blogs/security/aws-verified-episode-5-a-conversation-with-eric-rosenbach-of-harvard-universitys-belfer-center/

I am pleased to share the latest episode of AWS Verified, where we bring you conversations with global cybersecurity leaders about important issues, such as how to create a culture of security, cyber resiliency, Zero Trust, and other emerging security trends.

Recently, I got the opportunity to experience distance learning when I took the AWS Verified series back to school. I got a taste of life as a Harvard grad student, meeting (virtually) with Eric Rosenbach, Co-Director of the Belfer Center of Science and International Affairs at Harvard University’s John F. Kennedy School of Government. I call it, “Verified meets Veritas.” Harvard’s motto may never be the same again.

In this video, Eric shared with me the Belfer Center’s focus as the hub of the Harvard Kennedy School’s research, teaching, and training at the intersection of cutting edge and interdisciplinary topics, such as international security, environmental and resource issues, and science and technology policy. In recognition of the Belfer Center’s consistently stellar work and its six consecutive years ranked as the world’s #1 university-affiliated think tank, in 2021 it was named a center of excellence by the University of Pennsylvania’s Think Tanks and Civil Societies Program.

Eric’s deep connection to the students reflects the Belfer Center’s mission to prepare future generations of leaders to address critical areas in practical ways. Eric says, “I’m a graduate of the school, and now that I’ve been out in the real world as a policy practitioner, I love going into the classroom, teaching students about the way things work, both with cyber policy and with cybersecurity/cyber risk mitigation.”

In the interview, I talked with Eric about his varied professional background. Prior to the Belfer Center, he was the Chief of Staff to US Secretary of Defense, Ash Carter. Eric was also the Assistant Secretary of Defense for Homeland Defense and Global Security, where he was known around the US government as the Pentagon’s cyber czar. He has served as an officer in the US Army, written two books, been the Chief Security Officer for the European ISP Tiscali, and was a professional committee staff member in the US Senate.

I asked Eric to share his opinion on what the private sector and government can learn from each other. I’m excited to share Eric’s answer to this with you as well as his thoughts on other topics, because the work that Eric and his Belfer Center colleagues are doing is important for technology leaders.

Watch my interview with Eric Rosenbach, and visit the AWS Verified webpage for previous episodes, including interviews with security leaders from Netflix, Vodafone, Comcast, and Lockheed Martin. If you have an idea or a topic you’d like covered in this series, please leave a comment below.

Want more AWS Security how-to content, news, and feature announcements? Follow us on Twitter.

Author

Steve Schmidt

Steve is Vice President and Chief Information Security Officer for AWS. His duties include leading product design, management, and engineering development efforts focused on bringing the competitive, economic, and security benefits of cloud computing to business and government customers. Prior to AWS, he had an extensive career at the Federal Bureau of Investigation, where he served as a senior executive and section chief. He currently holds 11 patents in the field of cloud security architecture. Follow Steve on Twitter.

How to replicate secrets in AWS Secrets Manager to multiple Regions

Post Syndicated from Fatima Ahmed original https://aws.amazon.com/blogs/security/how-to-replicate-secrets-aws-secrets-manager-multiple-regions/

On March 3, 2021, we launched a new feature for AWS Secrets Manager that makes it possible for you to replicate secrets across multiple AWS Regions. You can give your multi-Region applications access to replicated secrets in the required Regions and rely on Secrets Manager to keep the replicas in sync with the primary secret. In scenarios such as disaster recovery, you can read replicated secrets from your recovery Regions, even if your primary Region is unavailable. In this blog post, I show you how to automatically replicate a secret and access it from the recovery Region to support a disaster recovery plan.

With Secrets Manager, you can store, retrieve, manage, and rotate your secrets, including database credentials, API keys, and other secrets. When you create a secret using Secrets Manager, it’s created and managed in a Region of your choosing. Although scoping secrets to a Region is a security best practice, there are scenarios such as disaster recovery and cross-Regional redundancy that require replication of secrets across Regions. Secrets Manager now makes it possible for you to easily replicate your secrets to one or more Regions to support these scenarios.

With this new feature, you can create Regional read replicas for your secrets. When you create a new secret or edit an existing secret, you can specify the Regions where your secrets need to be replicated. Secrets Manager will securely create the read replicas for each secret and its associated metadata, eliminating the need to maintain a complex solution for this functionality. Any update made to the primary secret, such as a secret value updated through automatic rotation, will be automatically propagated by Secrets Manager to the replica secrets, making it easier to manage the life cycle of multi-Region secrets.

Note: Each replica secret is billed as a separate secret. For more details on pricing, see the AWS Secrets Manager pricing page.

Architecture overview

Suppose that your organization has a requirement to set up a disaster recovery plan. In this example, us-east-1 is the designated primary Region, where you have an application running on a simple AWS Lambda function (for the example in this blog post, I’m using Python 3). You also have an Amazon Relational Database Service (Amazon RDS) – MySQL DB instance running in the us-east-1 Region, and you’re using Secrets Manager to store the database credentials as a secret. Your application retrieves the secret from Secrets Manager to access the database. As part of the disaster recovery strategy, you set up us-west-2 as the designated recovery Region, where you’ve replicated your application, the DB instance, and the database secret.

To elaborate, the solution architecture consists of:

  • A primary Region for creating the secret, in this case us-east-1 (N. Virginia).
  • A replica Region for replicating the secret, in this case us-west-2 (Oregon).
  • An Amazon RDS – MySQL DB instance that is running in the primary Region and configured for replication to the replica Region. To set up read replicas or cross-Region replicas for Amazon RDS, see Working with read replicas.
  • A secret created in Secrets Manager and configured for replication for the replica Region.
  • AWS Lambda functions (running on Python 3) deployed in the primary and replica Regions acting as clients to the MySQL DBs.

This architecture is illustrated in Figure 1.

Figure 1: Architecture overview for a multi-Region secret replication with the primary Region active

Figure 1: Architecture overview for a multi-Region secret replication with the primary Region active

In the primary region us-east-1, the Lambda function uses the credentials stored in the secret to access the database, as indicated by the following steps in Figure 1:

  1. The Lambda function sends a request to Secrets Manager to retrieve the secret value by using the GetSecretValue API call. Secrets Manager retrieves the secret value for the Lambda function.
  2. The Lambda function uses the secret value to connect to the database in order to read/write data.

The replicated secret in us-west-2 points to the primary DB instance in us-east-1. This is because when Secrets Manager replicates the secret, it replicates the secret value and all the associated metadata, such as the database endpoint. The database endpoint details are stored within the secret because Secrets Manager uses this information to connect to the database and rotate the secret if it is configured for automatic rotation. The Lambda function can also use the database endpoint details in the secret to connect to the database.

To simplify database failover during disaster recovery, as I’ll cover later in the post, you can configure an Amazon Route 53 CNAME record for the database endpoint in the primary Region. The database host associated with the secret is configured with the database CNAME record. When the primary Region is operating normally, the CNAME record points to the database endpoint in the primary Region. The requests to the database CNAME are routed to the DB instance in the primary Region, as shown in Figure 1.

During disaster recovery, you can failover to the replica Region, us-west-2, to make it possible for your application running in this Region to access the Amazon RDS read replica in us-west-2 by using the secret stored in the same Region. As part of your failover script, the database CNAME record should also be updated to point to the database endpoint in us-west-2. Because the database CNAME is used to point to the database endpoint within the secret, your application in us-west-2 can now use the replicated secret to access the database read replica in this Region. Figure 2 illustrates this disaster recovery scenario.

Figure 2: Architecture overview for a multi-Region secret replication with the replica Region active

Figure 2: Architecture overview for a multi-Region secret replication with the replica Region active

Prerequisites

The procedure described in this blog post requires that you complete the following steps before starting the procedure:

  1. Configure an Amazon RDS DB instance in the primary Region, with replication configured in the replica Region.
  2. Configure a Route 53 CNAME record for the database endpoint in the primary Region.
  3. Configure the Lambda function to connect with the Amazon RDS database and Secrets Manager by following the procedure in this blog post.
  4. Sign in to the AWS Management Console using a role that has SecretsManagerReadWrite permissions in the primary and replica Regions.

Enable replication for secrets stored in Secrets Manager

In this section, I walk you through the process of enabling replication in Secrets Manager for:

  1. A new secret that is created for your Amazon RDS database credentials
  2. An existing secret that is not configured for replication

For the first scenario, I show you the steps to create a secret in Secrets Manager in the primary Region (us-east-1) and enable replication for the replica Region (us-west-2).

To create a secret with replication enabled

  1. In the AWS Management Console, navigate to the Secrets Manager console in the primary Region (N. Virginia).
  2. Choose Store a new secret.
  3. On the Store a new secret screen, enter the Amazon RDS database credentials that will be used to connect with the Amazon RDS DB instance. Select the encryption key and the Amazon RDS DB instance, and then choose Next.
  4. Enter the secret name of your choice, and then enter a description. You can also optionally add tags and resource permissions to the secret.
  5. Under Replicate Secret – optional, choose Replicate secret to other regions.

    Figure 3: Replicate a secret to other Regions

    Figure 3: Replicate a secret to other Regions

  6. For AWS Region, choose the replica Region, US West (Oregon) us-west-2. For Encryption Key, choose Default to store your secret in the replica Region. Then choose Next.

    Figure 4: Configure secret replication

    Figure 4: Configure secret replication

  7. In the Configure Rotation section, you can choose whether to enable rotation. For this example, I chose not to enable rotation, so I selected Disable automatic rotation. However, if you want to enable rotation, you can do so by following the steps in Enabling rotation for an Amazon RDS database secret in the Secrets Manager User Guide. When you enable rotation in the primary Region, any changes to the secret from the rotation process are also replicated to the replica Region. After you’ve configured the rotation settings, choose Next.
  8. On the Review screen, you can see the summary of the secret configuration, including the secret replication configuration.

    Figure 5: Review the secret before storing

    Figure 5: Review the secret before storing

  9. At the bottom of the screen, choose Store.
  10. At the top of the next screen, you’ll see two banners that provide status on:
    • The creation of the secret in the primary Region
    • The replication of the secret in the Secondary Region

    After the creation and replication of the secret is successful, the banners will provide you with confirmation details.

At this point, you’ve created a secret in the primary Region (us-east-1) and enabled replication in a replica Region (us-west-2). You can now use this secret in the replica Region as well as the primary Region.

Now suppose that you have a secret created in the primary Region (us-east-1) that hasn’t been configured for replication. You can also configure replication for this existing secret by using the following procedure.

To enable multi-Region replication for existing secrets

  1. In the Secrets Manager console, choose the secret name. At the top of the screen, choose Replicate secret to other regions.
    Figure 6: Enable replication for existing secrets

    Figure 6: Enable replication for existing secrets

    This opens a pop-up screen where you can configure the replica Region and the encryption key for encrypting the secret in the replica Region.

  2. Choose the AWS Region and encryption key for the replica Region, and then choose Complete adding region(s).
    Figure 7: Configure replication for existing secrets

    Figure 7: Configure replication for existing secrets

    This starts the process of replicating the secret from the primary Region to the replica Region.

  3. Scroll down to the Replicate Secret section. You can see that the replication to the us-west-2 Region is in progress.
    Figure 8: Review progress for secret replication

    Figure 8: Review progress for secret replication

    After the replication is successful, you can look under Replication status to review the replication details that you’ve configured for your secret. You can also choose to replicate your secret to more Regions by choosing Add more regions.

    Figure 9: Successful secret replication to a replica Region

    Figure 9: Successful secret replication to a replica Region

Update the secret with the CNAME record

Next, you can update the host value in your secret to the CNAME record of the DB instance endpoint. This will make it possible for you to use the secret in the replica Region without making changes to the replica secret. In the event of a failover to the replica Region, you can simply update the CNAME record to the DB instance endpoint in the replica Region as a part of your failover script

To update the secret with the CNAME record

  1. Navigate to the Secrets Manager console, and choose the secret that you have set up for replication
  2. In the Secret value section, choose Retrieve secret value, and then choose Edit.
  3. Update the secret value for the host with the CNAME record, and then choose Save.

    Figure 10: Edit the secret value

    Figure 10: Edit the secret value

  4. After you choose Save, you’ll see a banner at the top of the screen with a message that indicates that the secret was successfully edited.Because the secret is set up for replication, you can also review the status of the synchronization of your secret to the replica Region after you updated the secret. To do so, scroll down to the Replicate Secret section and look under Region Replication Status.


    Figure 11: Successful secret replication for a modified secret

    Figure 11: Successful secret replication for a modified secret

Access replicated secrets from the replica Region

Now that you’ve configured the secret for replication in the primary Region, you can access the secret from the replica Region. Here I demonstrate how to access a replicated secret from a simple Lambda function that is deployed in the replica Region (us-west-2).

To access the secret from the replica Region

  1. From the AWS Management Console, navigate to the Secrets Manager console in the replica Region (Oregon) and view the secret that you configured for replication in the primary Region (N. Virginia).

    Figure 12: View secrets that are configured for replication in the replica Region

    Figure 12: View secrets that are configured for replication in the replica Region

  2. Choose the secret name and review the details that were replicated from the primary Region. A secret that is configured for replication will display a banner at the top of the screen stating the replication details.

    Figure 13: The replication status banner

    Figure 13: The replication status banner

  3. Under Secret Details, you can see the secret’s ARN. You can use the secret’s ARN to retrieve the secret value from the Lambda function or application that is deployed in your replica Region (Oregon). Make a note of the ARN.

    Figure 14: View secret details

    Figure 14: View secret details

During a disaster recovery scenario when the primary Region isn’t available, you can update the CNAME record to point to the DB instance endpoint in us-west-2 as part of your failover script. For this example, my application that is deployed in the replica Region is configured to use the replicated secret’s ARN.

Let’s suppose your sample Lambda function defines the secret name and the Region in the environment variables. The REGION_NAME environment variable contains the name of the replica Region; in this example, us-west-2. The SECRET_NAME environment variable is the ARN of your replicated secret in the replica Region, which you noted earlier.

Figure 15: Environment variables for the Lambda function

Figure 15: Environment variables for the Lambda function

In the replica Region, you can now refer to the secret’s ARN and Region in your Lambda function code to retrieve the secret value for connecting to the database. The following sample Lambda function code snippet uses the secret_name and region_name variables to retrieve the secret’s ARN and the replica Region values stored in the environment variables.

secret_name = os.environ['SECRET_NAME']
region_name = os.environ['REGION_NAME']

def openConnection():
    # Create a Secrets Manager client
    session = boto3.session.Session()
    client = session.client(
        service_name='secretsmanager',
        region_name=region_name
    )
    try:
        get_secret_value_response = 
client.get_secret_value(
            SecretId=secret_name
        )
    except ClientError as e:
        if e.response['Error']['Code'] == 
'DecryptionFailureException':

Alternately, you can simply use the Python 3 sample code for the replicated secret to retrieve the secret value from the Lambda function in the replica Region. You can review the provided sample codes by navigating to the secret details in the console, as shown in Figure 16.

Figure 16: Python 3 sample code for the replicated secret

Figure 16: Python 3 sample code for the replicated secret

Summary

When you plan for disaster recovery, you can configure replication of your secrets in Secrets Manager to provide redundancy for your secrets. This feature reduces the overhead of deploying and maintaining additional configuration for secret replication and retrieval across AWS Regions. In this post, I showed you how to create a secret and configure it for multi-Region replication. I also demonstrated how you can configure replication for existing secrets across multiple Regions.

I showed you how to use secrets from the replica Region and configure a sample Lambda function to retrieve a secret value. When replication is configured for secrets, you can use this technique to retrieve the secrets in the replica Region in a similar way as you would in the primary Region.

You can start using this feature through the AWS Secrets Manager console, AWS Command Line Interface (AWS CLI), AWS SDK, or AWS CloudFormation. To learn more about this feature, see the AWS Secrets Manager documentation. If you have feedback about this blog post, submit comments in the Comments section below. If you have questions about this blog post, start a new thread on the AWS Secrets Manager forum.

Want more AWS Security how-to content, news, and feature announcements? Follow us on Twitter.

Author

Fatima Ahmed

Fatima is a Security Global Practice Lead at AWS. She is passionate about cybersecurity and helping customers build secure solutions in the AWS Cloud. When she is not working, she enjoys time with her cat or solving cryptic puzzles.

How to delegate management of identity in AWS Single Sign-On

Post Syndicated from Louay Shaat original https://aws.amazon.com/blogs/security/how-to-delegate-management-of-identity-in-aws-single-sign-on/

In this blog post, I show how you can use AWS Single Sign-On (AWS SSO) to delegate administration of user identities. Delegation is the process of providing your teams permissions to manage accounts and identities associated with their teams. You can achieve this by using the existing integration that AWS SSO has with AWS Organizations, and by using tags and conditions in AWS Identity and Access Management (IAM).

AWS SSO makes it easy to centrally manage access to multiple Amazon Web Services (AWS) accounts and business applications, and to provide users with single sign-on access to all their assigned accounts and applications from one place.

AWS SSO uses permission sets—a collection of administrator-defined policies—to determine a user’s effective permissions to access a given AWS account. Permission sets can contain either AWS managed policies or custom policies that are stored in AWS SSO. Policies are documents that act as containers for one or more permission statements. These statements represent individual access controls (allow or deny) for various tasks, which determine what tasks users can or cannot perform within the AWS account. Permission sets are provisioned as IAM roles in your organizational accounts, and are managed centrally using AWS SSO.

AWS SSO is tightly integrated with AWS Organizations, and runs in your AWS Organizations management account. This integration enables AWS SSO to retrieve and manage permission sets across your AWS Organizations configuration.

As you continue to build more of your workloads on AWS, managing access to AWS accounts and services becomes more time consuming for team members that manage identities. With a centralized identity approach that uses AWS SSO, there’s an increased need to delegate control of permission sets and accounts to domain and application owners. Although this is a valid use case, access to the management account in Organizations should be tightly guarded as a security best practice. As an administrator in the management account of an organization, you can control how teams and users access your AWS accounts and applications.

This post shows how you can build comprehensive delegation models in AWS SSO to securely and effectively delegate control of identities to various teams.

Solution overview

Suppose you’ve implemented AWS SSO in Organizations to manage identity across your entire AWS environment. Your organization is growing and the number of accounts and teams that need access to your AWS environment is also growing. You have a small Identity team that is constantly adding, updating, or deleting users or groups and permission sets to enable your teams to gain access to their required services and accounts.

Note: You can learn how to enable AWS SSO from the Introducing AWS Single Sign-On blog post.

As the number of teams grows, you want to start using a delegation model to enable account and application owners to manage access to their resources, in order to reduce the heavy lifting that is done by teams that manage identities.

Figure 1 shows a simple organizational structure that your organization implemented.
 

Figure 1: AWS SSO with AWS Organizations

Figure 1: AWS SSO with AWS Organizations

In this scenario, you’ve already built a collection of organizational-approved permission sets that are used across your organization. You have a tagging strategy for permission sets, and you’ve implemented two tags across all your permission sets:

  • Environment: The values for this tag are Production or Development. You only apply Production permission sets to Production accounts.
  • OU: This tag identifies the organizational unit (OU) that the permission set belongs to.

A value of All can be assigned to either tag to identify organization-wide use of the permission set.

You identified three models of delegation that you want to enable based on the setup just described, and your Identity team has identified three use cases that they want to implement:

  • A simple delegation model for a team to manage all permission sets for a set of accounts.
  • A delegation model for support teams to apply read-only permission sets to all accounts.
  • A delegation model based on AWS Organizations, where a team can manage only the permission sets intended for a specific OU.

The AWS SSO delegation model enables three key conditions for restricting user access:

  • Permission sets.
  • Accounts
  • Tags that use the condition aws:ResourceTag, to ensure that tags are present on your permission sets as part of your delegation model.

In the rest of this blog post, I show you how AWS SSO administrators can use these conditions to implement the use cases highlighted here to build a delegation model.

See Delegating permission set administration and Actions, resources, and condition keys for AWS SSO for more information.

Important: The use cases that follow are examples that can be adopted by your organization. The permission sets in these use cases show only what is needed to delegate the components discussed. You need to add additional policies to give users and groups access to AWS SSO.

Some examples:

Identify your permission set and AWS SSO instance IDs

You can use either the AWS Command Line Interface (AWS CLI) v2 or the AWS Management Console to identify your permission set and AWS SSO instance IDs.

Use the AWS CLI

To use the AWS CLI to identify the Amazon resource names (ARNs) of the AWS SSO instance and permission set, make sure you have AWS CLI v2 installed.

To list the AWS SSO instance ID ARN

Run the following command:

aws sso-admin list-instances

To list the permission set ARN

Run the following command:

aws sso-admin list-permission-sets --instance-arn <instance arn from above>

Use the console

You can also use the console to identify your permission sets and AWS SSO instance IDs.

To list the AWS SSO Instance ID ARN

  1. Navigate to the AWS SSO in your Region. Choose the Dashboard and then choose Choose your identity source.
  2. Copy the AWS SSO ARN ID.
Figure 2: AWS SSO ID ARN

Figure 2: AWS SSO ID ARN

To list the permission set ARN

  1. Navigate to the AWS SSO Service in your Region. Choose AWS Accounts and then Permission Sets.
  2. Select the permission set you want to use.
  3. Copy the ARN of the permission set.
Figure 3: Permission set ARN

Figure 3: Permission set ARN

Use case 1: Accounts-based delegation model

In this use case, you create a single policy to allow administrators to assign any permission set to a specific set of accounts.

First, you need to create a custom permission set to use with the following example policy.

The example policy is as follows.

            "Sid": "DelegatedAdminsAccounts",
            "Effect": "Allow",
            "Action": [
                "sso:ProvisionPermissionSet",
                "sso:CreateAccountAssignment",
                "sso:DeleteInlinePolicyFromPermissionSet",
                "sso:UpdateInstanceAccessControlAttributeConfiguration",
                "sso:PutInlinePolicyToPermissionSet",
                "sso:DeleteAccountAssignment",
                "sso:DetachManagedPolicyFromPermissionSet",
                "sso:DeletePermissionSet",
                "sso:AttachManagedPolicyToPermissionSet",
                "sso:CreatePermissionSet",
                "sso:UpdatePermissionSet",
                "sso:CreateInstanceAccessControlAttributeConfiguration",
                "sso:DeleteInstanceAccessControlAttributeConfiguration"
            ],
            "Resource": [
                "arn:aws:sso:::account/112233445566",
                "arn:aws:sso:::account/223344556677",
                "arn:aws:sso:::account/334455667788"
            ]
        }

This policy specifies that delegated admins are allowed to provision any permission set to the three accounts listed in the policy.

Note: To apply this permission set to your environment, replace the account numbers following Resource with your account numbers.

Use case 2: Permission-based delegation model

In this use case, you create a single policy to allow administrators to assign a specific permission set to any account. The policy is as follows.

{
                    "Sid": "DelegatedPermissionsAdmin",
                    "Effect": "Allow",
                    "Action": [
                        "sso:ProvisionPermissionSet",
                        "sso:CreateAccountAssignment",
                        "sso:DeleteInlinePolicyFromPermissionSet",
                        "sso:UpdateInstanceAccessControlAttributeConfiguration",
                        "sso:PutInlinePolicyToPermissionSet",
                        "sso:DeleteAccountAssignment",
                        "sso:DetachManagedPolicyFromPermissionSet",
                        "sso:DeletePermissionSet",
                        "sso:AttachManagedPolicyToPermissionSet",
                        "sso:CreatePermissionSet",
                        "sso:UpdatePermissionSet",
                        "sso:CreateInstanceAccessControlAttributeConfiguration",
                        "sso:DeleteInstanceAccessControlAttributeConfiguration",
                        "sso:ProvisionApplicationInstanceForAWSAccount"
                    ],
                    "Resource": [
                        "arn:aws:sso:::instance/ssoins-1111111111",
                        "arn:aws:sso:::account/*",
                        "arn:aws:sso:::permissionSet/ssoins-1111111111/ps-112233abcdef123"

            ]


        },          

This policy specifies that delegated admins are allowed to provision only the specific permission set listed in the policy to any account.

Note:

Use case 3: OU-based delegation model

In this use case, the Identity team wants to delegate the management of the Development permission sets (identified by the tag key Environment) to the Test OU (identified by the tag key OU). You use the Environment and OU tags on permission sets to restrict access to only the permission sets that contain both tags.

To build this permission set for delegation, you need to create two policies in the same permission set:

  • A policy that filters the permission sets based on both tags—Environment and OU.
  • A policy that filters the accounts belonging to the Development OU.

The policies are as follows.

{
                    "Sid": "DelegatedOUAdmin",
                    "Effect": "Allow",
                    "Action": [
                        "sso:ProvisionPermissionSet",
                        "sso:CreateAccountAssignment",
                        "sso:DeleteInlinePolicyFromPermissionSet",
                        "sso:UpdateInstanceAccessControlAttributeConfiguration",
                        "sso:PutInlinePolicyToPermissionSet",
                        "sso:DeleteAccountAssignment",
                        "sso:DetachManagedPolicyFromPermissionSet",
                        "sso:DeletePermissionSet",
                        "sso:AttachManagedPolicyToPermissionSet",
                        "sso:CreatePermissionSet",
                        "sso:UpdatePermissionSet",
                        "sso:CreateInstanceAccessControlAttributeConfiguration",
                        "sso:DeleteInstanceAccessControlAttributeConfiguration",
                        "sso:ProvisionApplicationInstanceForAWSAccount"
                    ],
                    "Resource": "arn:aws:sso:::permissionSet/*/*",
                    "Condition": {
                        "StringEquals": {
                            "aws:ResourceTag/Environment": "Development",
                            "aws:ResourceTag/OU": "Test"
                        }
                    }
        },
        {
            "Sid": "Instance",
            "Effect": "Allow",
            "Action": [
                "sso:ProvisionPermissionSet",
                "sso:CreateAccountAssignment",
                "sso:DeleteInlinePolicyFromPermissionSet",
                "sso:UpdateInstanceAccessControlAttributeConfiguration",
                "sso:PutInlinePolicyToPermissionSet",
                "sso:DeleteAccountAssignment",
                "sso:DetachManagedPolicyFromPermissionSet",
                "sso:DeletePermissionSet",
                "sso:AttachManagedPolicyToPermissionSet",
                "sso:CreatePermissionSet",
                "sso:UpdatePermissionSet",
                "sso:CreateInstanceAccessControlAttributeConfiguration",
                "sso:DeleteInstanceAccessControlAttributeConfiguration",
                "sso:ProvisionApplicationInstanceForAWSAccount"
            ],
            "Resource": [
                "arn:aws:sso:::instance/ssoins-82593a6ed92c8920",
                "arn:aws:sso:::account/112233445566",
                "arn:aws:sso:::account/223344556677",
                "arn:aws:sso:::account/334455667788"

            ]
        }

In the delegated policy, the user or group is only allowed to provision permission sets that have both tags, OU and Environment, set to “Development” and only to accounts in the Development OU.

Note: In the example above arn:aws:sso:::instance/ssoins-11112222233333 is the ARN for the AWS SSO Instance ID. To get your AWS SSO Instance ID, refer to Identify your permission set and AWS SSO Instance IDs.

Create a delegated admin profile in AWS SSO

Now that you know what’s required to delegate permissions, you can create a delegated profile and deploy that to your users and groups.

To create a delegated AWS SSO profile

  1. In the AWS SSO console, sign in to your management account and browse to the Region where AWS SSO is provisioned.
  2. Navigate to AWS Accounts and choose Permission sets, and then choose Create permission set.
     
    Figure 4: AWS SSO permission sets menu

    Figure 4: AWS SSO permission sets menu

  3. Choose Create a custom permission set.
     
    Figure 5: Create a new permission set

    Figure 5: Create a new permission set

  4. Give a name to your permission set based on your naming standards and select a session duration from your organizational policies.
  5. For Relay state, enter the following URL:
    https://<region>.console.aws.amazon.com/singlesignon/home?region=<region>#/accounts/organization 
    

    where <region> is the AWS Region in which you deployed AWS SSO.

    The relay state will automatically redirect the user to the Accounts section in the AWS SSO console, for simplicity.
     

    Figure 6: Custom permission set

    Figure 6: Custom permission set

  6. Choose Create new permission set. Here is where you can decide the level of delegation required for your application or domain administrators.
     
    Figure 7: Assign users

    Figure 7: Assign users

    See some of the examples in the earlier sections of this post for the permission set.

  7. If you’re using AWS SSO with AWS Directory Service for Microsoft Active Directory, you’ll need to provide access to AWS Directory Service in order for your administrator to assign permission sets to users and groups.

    To provide this access, navigate to the AWS Accounts screen in the AWS SSO console, and select your management account. Assign the required users or groups, and select the permission set that you created earlier. Then choose Finish.

  8. To test this delegation, sign in to AWS SSO. You’ll see the newly created permission set.
     
    Figure 8: AWS SSO sign-on page

    Figure 8: AWS SSO sign-on page

  9. Next to developer-delegated-admin, choose Management console. This should automatically redirect you to AWS SSO in the AWS Accounts submenu.

If you try to provision access by assigning or creating new permission sets to accounts or permission sets you are not explicitly allowed, according to the policies you specified earlier, you will receive the following error.
 

Figure 9: Error based on lack of permissions

Figure 9: Error based on lack of permissions

Otherwise, the provisioning will be successful.

Summary

You’ve seen that by using conditions and tags on permission sets, application and account owners can use delegation models to manage the deployment of permission sets across the accounts they manage, providing them and their teams with secure access to AWS accounts and services.

Additionally, because AWS SSO supports attribute-based access control (ABAC), you can create a more dynamic delegation model based on attributes from your identity provider, to match the tags on the permission set.

If you have feedback about this blog post, submit comments in the Comments section below. If you have questions about this post, start a new thread on the AWS Single Sign-On forum.

Want more AWS Security how-to content, news, and feature announcements? Follow us on Twitter.

Author

Louay Shaat

Louay is a Security Solutions Architect with AWS. He spends his days working with customers, from startups to the largest of enterprises, helping them build cool new capabilities and accelerating their cloud journey. He has a strong focus on security and automation to help customers improve their security, risk, and compliance in the cloud.

C5 Type 2 attestation report now available with one new Region and 123 services in scope

Post Syndicated from Mercy Kanengoni original https://aws.amazon.com/blogs/security/c5-type-2-attestation-report-available-one-new-region-123-services-in-scope/

Amazon Web Services (AWS) is pleased to announce the issuance of the 2020 Cloud Computing Compliance Controls Catalogue (C5) Type 2 attestation report. We added one new AWS Region (Europe-Milan) and 21 additional services and service features to the scope of the 2020 report.

Germany’s national cybersecurity authority, Bundesamt für Sicherheit in der Informationstechnik (BSI), established C5 to define a reference standard for German cloud security requirements. Customers in Germany and other European countries can use AWS’s attestation report to help them meet local security requirements of the C5 framework.

The C5 Type 2 report covers the time period October 1, 2019, through September 30, 2020. It was issued by an independent third-party attestation organization and assesses the design and the operational effectiveness of AWS’s controls against C5’s basic and additional criteria. This attestation demonstrates our commitment to meet the security expectations for cloud service providers set by the BSI in Germany.

We continue to add new Regions and services to the C5 compliance scope so that you have more services to choose from that meet regulatory and compliance requirements. AWS has added the Europe (Milan) Region and the following 21 services and service features to this year’s C5 scope:

You can see a current list of the services in scope for C5 on the AWS Services in Scope by Compliance Program page. The C5 report and Continuing Operations Letter is available to AWS customers through AWS Artifact. For more information, see Cloud Computing Compliance Controls Catalogue (C5).

If you have feedback about this post, submit comments in the Comments section below.

Want more AWS Security how-to content, news, and feature announcements? Follow us on Twitter.

Author

Mercy Kanengoni

Mercy is a Security Audit Program Manager at AWS. She leads security audits across Europe, and she has previously worked in security assurance and technology risk management.

How AWS SSO Active Directory sync enhances AWS application experiences

Post Syndicated from Sharanya Ramakrishnan original https://aws.amazon.com/blogs/security/how-aws-sso-active-directory-sync-enhances-aws-application-experiences/

Identity management is easiest when you can manage identities in a centralized location and use these identities across various accounts and applications. You also want to be able to use these identities for other purposes within applications, like searching through groups, finding members of a certain group, and sharing projects with other users or groups. For example, when you use AWS Systems Manager Change Manager, you might want to search for groups or distinguish a user from a list of users with the same name based on their email address. You expect that the user and group details you see are consistent with the details that appear in a different application.

AWS Single Sign-On (AWS SSO) streamlines identity management by enabling you to connect an identity provider (IdP), such as the AWS internal directory or a range of partners and use the IdP identity information for access and collaboration within applications. Now you can get the same benefits when you connect your Microsoft Active Directory (AD) as your AWS SSO identity source. With the release of AWS SSO AD sync, you’ll be able to access AD groups, along with AD users, from AWS SSO-integrated applications, and use these groups and users for collaborative experiences. AD sync automatically brings identity information from your Active Directory into AWS SSO and makes this information available to you within applications. It makes sure that the user and group details you access in Amazon Web Services (AWS) stay consistent with information in Active Directory through periodic synchronizations.

In this post, I’ll walk you through key use cases that highlight how applications use the user and group information that is synchronized from Active Directory and how the AD synchronization capability works to make this possible.

Access control

Your ability to manage who can access which parts of an application or who has the necessary permissions to drive certain tasks within an application relies on the application’s ability to retrieve user and group information. It’s also important that any access that you configure is updated dynamically when there are any changes at the source. For example, if you define approval access to a group in an application and a member leaves the group when they change roles within the company, their group-based access within the application should be revoked. With AD sync, AWS SSO-integrated applications can utilize user and group information that is periodically updated, and therefore stays current.

Suppose you’ve set up an approval template in Systems Manager Change Manager for patching instances and want to require that all members of the IT Security Operations team approve any change requests created with this template. AD sync enhances this process by giving you the option to define approvers at the AD group level. If you have an IT Security Operations group in Active Directory and the group has permissions set up to access AWS SSO, this group will be available to you in Change Manager to select as an approver in your template. If a member of the IT Security Operations group switches roles and leaves the team, AD sync helps to ensure that the member’s access to approve patching-related change requests is revoked, by dynamically updating the IT Security Operations group in Change Manager once the member is removed from the group in Active Directory.

It’s common for teams at companies to work on cross-functional initiatives that involve sharing projects, reports, or dashboards with members of different teams for their review and feedback, or for collaboration. In such cases, you want to be able to easily search for users and groups within the application and share out relevant artifacts. AD sync makes it possible to access users and groups within AWS SSO-integrated applications, and you can then use this information for searching and sharing.

For example, if you use an AWS SSO-integrated application like AWS IoT SiteWise to create and share dashboards for metrics reviews with leadership or to collaborate with other teams in your organization, you’ll now be able to see all users with access to AWS. AD sync makes it possible for AWS IoT SiteWise to access all users, rather than only the users who signed in to AWS at least once.

Administrative efficiency

If you’re a platform admin or cloud admin who manages access to AWS SSO in your company, assigning users and groups with access to AWS accounts and resources is a routine task that requires administrative effort. Because AD sync periodically syncs AD groups into AWS SSO, you only need to pre-define access to resources for an AD group once. After that point, any new member, such as a new employee, who is added to the AD group in Active Directory will gain access to resources tied to the AD group. The new employee will also be added to AWS SSO through AD sync, and their information will stay current through periodic syncs. Therefore, the administrative effort involved on your end for managing users is reduced.

Similarly, if an employee leaves the company, you will no longer have to worry about deleting their information in AWS, because AD sync automatically deletes user and group objects that you delete in Active Directory. This simplifies your user lifecycle management and reduces the manual effort involved in the process.

How Active Directory sync works in the background

This new AD sync feature is for customers who want to use their AD identities with AWS SSO, without setting up a separate IdP, such as AD Federation Service or Azure AD. To use this capability, you must connect AWS SSO to your Active Directory by using AWS SSO with either AWS Directory Service for Microsoft Active Directory (AWS Managed Microsoft AD) or AD Connector. Learn more about using AWS Managed Microsoft AD and AD Connector.

AD sync brings in user and group information from your Active Directory and stores it in the AWS SSO identity store. Once this information is synchronized, AWS SSO-integrated applications can use the user and group information to deliver collaborative experiences, such as sharing a dashboard with other users.

AD sync obtains a list of users and groups to be synchronized from Active Directory based on the assignments that you make to AWS accounts and applications. It then syncs those users and groups (including the group members) into the AWS identity store, keeping the information updated through periodic syncs, as shown in Figure 1.

Figure 1: Active Directory synchronization of users and groups

Figure 1: Active Directory synchronization of users and groups

If a user has assignments based on attribute-based access-control (ABAC) and changes departments, attributes will automatically update at the next sync. If a user happens to sign in before the next sync, the attributes will be updated at sign-in to maintain consistency. The user will now see their assignments updated based on their new department.

AD sync also syncs in all members of a group, including sub-groups or nested groups. It flattens members of the nested groups, that is, it adds them to the parent group in the AWS SSO identity store. For example, if Group B is a member or nested group of Group A in Active Directory, then members of Group B are also synced into AWS SSO and added directly to Group A, as shown in Figure 2. So, only Group A can be used in AWS SSO accounts and applications.

Figure 2: Members of nested Group B flattened and added to parent Group A

Figure 2: Members of nested Group B flattened and added to parent Group A

If you delete a user or group in Active Directory, AD sync automatically deletes the user or group from the AWS SSO identity store. You won’t see the deleted identity appear in AWS SSO-integrated applications, either. However, if you only delete the assignments for a user or group, the user or group will remain in AWS SSO and won’t be automatically deleted.

Summary

In this blog post, I explained how user and group synchronization can help deliver better application experiences with less administrative effort. I also covered how the AWS SSO AD sync capability delivers this benefit for applications such as AWS Systems Manager and AWS IoT SiteWise. AD sync capability is available to you at no additional cost in all AWS Regions supported by AWS SSO. If you want to get started with AWS SSO or learn more about AD sync, see the AWS SSO User Guide.

If you have feedback about this post, submit comments in the Comments section below. If you have questions about this post, start a new thread on the AWS SSO forum or contact AWS Support.

Want more AWS Security how-to content, news, and feature announcements? Follow us on Twitter.

Author

Sharanya Ramakrishnan

Sharanya is a Senior Technical Product Manager in the AWS Identity team. She enjoys solving customer problems through meaningful products, particularly in the dynamic security and identity space. Outside of work, Sharanya likes to travel and enjoys hiking and reading.

Essential security for everyone: Building a secure AWS foundation

Post Syndicated from Byron Pogson original https://aws.amazon.com/blogs/security/essential-security-for-everyone-building-a-secure-aws-foundation/

In this post, I will show you how teams of all sizes can gain access to world-class security in the cloud without a dedicated security person in your organization. I look at how small teams can build securely on Amazon Web Services (AWS) in a way that’s cost effective and time efficient. I show you the key elements to create a foundation with good security controls, and how you can then use that foundation as a base to build a secure workload upon. In this post, I will also share a lab guide to get you started today. It may look like a lot of work but I ran this as a day-long workshop across Australia in 2019 reaching many start-ups and small businesses. The majority of them implemented the guide by mid-afternoon.

Many large organizations run their regulated workloads on AWS and customers of all sizes have the same security controls available to them. These large organizations have gone through a rigorous process to ensure that the right security controls are available to them. If you go to the AWS Startups Blog, you can read the story of two Australian customers and their journeys to set up a secure foundation on AWS: Tic:Toc, an Australian scaleup in the financial services industry and FYI, a start-up with their document and process management system for accounting practices.

The Well-Architected Framework has been developed to help cloud architects build secure, high performance, resilient, and efficient infrastructure for their applications. Based on five pillars—operational excellence, security, reliability, performance efficiency, and cost optimization—the Framework provides a consistent approach for customers and partners to evaluate architectures and implement designs that will scale over time. In this post, I will discuss the key areas from the security pillar to help you build a secure foundation. These areas are:

  • Security foundations. You can use an AWS account as a coarse boundary for isolating resources and use cross-account roles to share common infrastructure. Protect your AWS accounts and use tools like AWS Control Tower to help you get started quickly.
  • Identity and access management. Be deliberate about who has access to what.
  • Detection. Start with the implementation of baseline logging and monitoring. Do this in a way that’s implemented automatically so it is scalable. When incidents occur, this will help to ensure that basic log data is in place to aid your investigations. Configure alerts for key events and define your response plan so you are prepared to take action.
  • Infrastructure and data protection. Apply defense in depth, starting with the features that AWS provides you, to help build a secure application.
  • Incidence response. Ensure your team is prepared to respond to incidents by educating your team, creating a response plan, simulating scenarios so your team knows what to do before it happens and iterating to improve your plan.

Small teams want to move fast and deliver value. To support that, you want to build a secure foundation. This post focuses on the key initial steps to help you achieve that. To help guide you through the content in this post and implement your foundation faster, we have a Quick Steps to Security Success quest in our Well-Architected Labs.

Security Foundations

With a strong foundation in place to support your workload, you can look at how to build securely on top of it. Security is part of every feature, not a separate feature to be implemented later. Teams need to be comfortable with the idea that a feature isn’t complete just when it’s tested and in production. Adjust your culture to think of complete as meaning tested and secure in production.

An AWS account is a boundary within which resources are deployed. You can open multiple AWS accounts for different purposes. For example, to separate different applications you operate by splitting different workloads across multiple environments in different accounts, to provide developer sandbox accounts or to isolated resources such as a security account. A workload is a collection of systems and applications to meet a specific business objective and could be a useful guide for determining what needs to be deployed into separate accounts. From a security point of view, being able to use an AWS account as a boundary helps isolate different parts of your workloads. The account boundary acts as a coarse isolation boundary and you have to be deliberate about how you allow access to resources in it. For human access, this can form a basis for providing least privilege access – an IAM best practice for ensuring that users only have permissions required to fulfil their tasks.

A best practice is to keep users away from data – least privilege could start with not providing access to the production environment. One way to achieve this is to create a separate account for your production workload and ensure that all regular operations are performed at a distance through tools such as pipelines or ticketing systems. Where human access is essential, only grant temporary human access for a fixed period of time. In addition to limited IAM policies, you can give people access only to AWS accounts containing the workload they need access to. For machine-to-machine access you can apply the same concepts and use cross-account access.

At a minimum, it’s a best practice to have a separate organizational management account that’s only used to establish controls across your set of accounts and for configuring identity and access management within your organization. The same identity configuration is then used across accounts. Also, set up a dedicated account for logging to more securely store data such as audit logs. To increase security, create an audit account that has read-only access to the logs and other accounts used by your security team. Then create different accounts for different environments and workloads.

The easiest way to get started creating and organizing accounts is to use AWS Control Tower, which will set up a separated logging and audit account, an AWS Single Sign-On (AWS SSO) directory—which supports identity federation with SAML 2.0—as well as a few basic guardrails. AWS SSO can also give users a single view of all the accounts and roles within those accounts that they have access to. AWS Control Tower also includes a basic account-creation tool—the Account Factory—that you can use to create additional accounts within your AWS account structure.

Guardrails are an important mechanism that customers can implement to help maintain security in the cloud. AWS Control Tower provides two types of guardrails: preventive and detective.

Preventive guardrails are designed to prevent users from performing certain actions; for example, preventing a user from disabling security logging. You can implement preventative guardrails through AWS Control Tower, which provides a feature of AWS Organizations called Service Control Policies (SCP) that you can use to set the maximum boundary for what is allowed in an account. These guardrails are either enforced or disabled.

Detective guardrails look at the state of resources in an account using AWS Config rules and indicate if resources are compliant to those rules or not. For example, looking for Amazon Simple Storage Service (Amazon S3) buckets that are publicly accessible. If you need to have data publicly available, be deliberate about how you do it.

AWS Control Tower has a number of mandatory guardrails that are necessary for the operation of AWS Control Tower as well as a number of strongly recommended and elective guardrails. The strongly recommended and elective guardrails help to ensure that you’re building a strong security posture as soon as you enable them.

There is no additional charge to use AWS Control Tower. However, when you set up AWS Control Tower, you will begin to incur costs for AWS services configured to set up your landing zone and mandatory guardrails. For further details see the AWS Control Tower pricing.

Identity and access management

Identity forms the basis of validating that users are who they say they are and how you give them permission to operate in your environment.

When you sign up for an AWS account, the first login you receive is the root user credentials. The root user credentials are very powerful and allows full access to all resources in the account. It’s critical that you protect your root account from unauthorized access, starting with multi-factor authentication. Multi-factor authentication uses a password (something you know) plus something you have (such as a one-time key or a hardware token) to create a more secure login. After you set up multi-factor authentication, both factors are required to access the root account. After that, use the root account only in emergencies, not in day-to-day operations. Moving from using the root account to using centralized identities allows you to manage your identities centrally and tie every action taken in your environment back an individual. The most effective way to enable connecting all actions to individual users is through federation.

Federation lets you reuse your existing identities, such as those you have in your organization’s identity directory. When a user joins your organization, the first thing you’re likely to do is to give them an identity (so they can do things like access your email systems) and when they leave, you would remove that identity and therefore the access. By federating your AWS accounts with your existing identity directory, you can use the same mechanisms that are tied to your business processes to provide AWS access. Using tools like AWS Single Sign-On (AWS SSO) enables you to quickly federate access for your users and maintain a mapping of the AWS IAM roles (an identity with specific permissions that can be assigned to or assumed by other identities) they have access to across accounts in your organization. If you don’t have an existing identity store you can still achieve a central identity store by using the built-in provider in AWS SSO. When you are assigning permissions, be deliberate with what access you give different users. Ensure that you’re creating and assigning roles based on least privilege—giving only as much access as users need to perform their tasks.

IAM is a feature of your AWS account provided at no additional charge and AWS SSO is offered at no extra charge. Implementing SSO is a low effort way to build a strong identity foundation. If you’ve been operating for a while on AWS, you should perform an audit of your existing AWS Identity and Access Management (IAM) users with a goal to move to a centralized model. An audit of your IAM resources (and centralized identities) will help you to understand who has access to your AWS environment, clear unused credentials, and check that users are assigned permissions that are relevant for their role. IAM access advisor will allow you to see when services were last accessed. Tools such as the IAM Access Analyzer will help you identify the resources in your organization and accounts, such as Amazon S3 buckets or IAM roles, that are shared with an external entity. At the same time, make sure that your account contacts are up to date so that you don’t miss any important information from AWS. You can update these details under AWS billing and management in the console.

Detection

After some baseline controls are in place, you need to add controls to ensure that you are aware of what is happening in the environment and that actions are logged. To help you with governance, compliance and auditing your AWS environment you can configure AWS CloudTrail. A CloudTrail log shows you who attempted to take what actions against resources in your AWS account and if the action was allowed or denied. Having a secure store of these logs provides you with an audit history of who did what in your environment. AWS Control Tower configures a secure log store for you in the logging account.

Amazon GuardDuty is a security service that uses intelligent threat detection to alert you to unusual activity in your environment. GuardDuty uses CloudTrail logs to alert you to malicious activity and unauthorized behavior in addition to DNS logs and VPC Flow Logs—which are similar to network flow logs—to analyze the behavior of your workload. GuardDuty builds a baseline over time of activity in your account and alerts you when behavior that strays from the baseline is detected. For example, GuardDuty sends an alert when a user tries to escalate their privilege. These events can be configured in Amazon CloudWatch Events for alerting and triggering automatic actions—for example by triggering an AWS Lambda function to disable the user trying to escalate their privilege until you can contact them.

Implementing manual dashboards though Amazon CloudWatch or those provided with detective tools such as Amazon GuardDuty can give you a clear idea of what’s happening in your environment, but you should also configure alerting for key events. An initial, temporary way of achieving this could be by creating an Amazon CloudWatch Rule with an Amazon SNS topic as the destination and have your team subscribe their email to the SNS topic. As part of setting up alerts, ensure that there’s a remediation process defined for each alert that includes what action to take when an alert is triggered. In the longer term, as your cloud skills mature, you can evolve this to filter out alerts appropriately and iterate your response and remediation processes.

Having a single view of what’s happening in your infrastructure across all accounts and relevant regions gives you a clear picture of the overall state of your environment. Consider using AWS Security Hub to bring together alerts from GuardDuty, other AWS services such as AWS Inspector (for network availability and common vulnerabilities and exposures analysis), and partner products. Security Hub lets you consolidate findings from multiple sources and normalize them so they are comparable. This allows you to have a single view of where you need to take action and what high priority actions are required. Security Hub also allows you to enable compliance checks on your AWS infrastructure to help you adhere to best practices. A great starting point is AWS Foundational Security Best Practices standard.

Both GuardDuty and Security Hub include a free trial period and scale with usage after you turn them on. You can use the trial period to estimate what they will cost to use in all your AWS accounts.

Infrastructure and data protection

Build protection in layers and be aware of what features are available in the services that you’re using. Many AWS services include a specific section on security as part of their developer documentation. Before you add an AWS service, read the security section of the documentation and understand what options are available to you. Make sure that you are understand the cloud-native AWS security services that integrate with the services you use. AWS Key Management Service integrates with many AWS services to enable encryption at rest. For example, you can enable default encryption for all EBS volumes in a region. AWS Certificate Manager provides public certificates which integrate with Elastic Load Balancing and Amazon CloudFront to encrypt data in transit. Public SSL/TLS certificates provisioned through AWS Certificate Manager are free. You pay only for the AWS resources you create to run your application. You can implement AWS WAF (web application firewall) and AWS Shield to protect your HTTPS endpoints. Where implement services that manage resources, such as Amazon RDS, AWS Lambda, and Amazon ECS, to reduce your security maintenance tasks as part of the shared responsibility model.

Incident response

Once you have your baseline security controls in place your team needs to be prepared to respond effectively during an incident. This includes designing your incident response goals, educating your team and preparing to respond. Simulating events helps the team to learn your processes and tools. Always iterate to improve the process for the future. As a start, consider using the GuardDuty finding types as the basis for what you should be able to respond to. Have a look through the finding types, identify which findings are most applicable and write a runbook outlining the steps on how you would respond. For each finding type, test your response process. In doing so your team will ensure they have the right tools available, the right emergency access, and know who they need to escalate to and collaborate with. By simulating your response process, your team becomes practiced in how to respond and will reduce the time to recovery if an incident should occur.

When comfortable with the process, automate it. For example, create a Lambda function to perform remediation without you having to wake up in the middle of the night to take action. This can be built up over time as you build a baseline of events. Spending some time thinking through priority events for your environment will help you develop a playbook to respond to them. When you’re comfortable with what incident responses you need, you can automate those responses so remediation is triggered when an event occurs, though you may also want a human to verify before triggering a potentially impactful response.

For example, one of the GuardDuty finding types identifies when an EC2 instance is querying an IP address that is associated with cryptocurrency-related activity. The suggested remediation is to investigate the instance, create a snapshot, consider stopping and starting a new instance and raise a support case. Your runbook could outline how to do each of those steps or you could use CloudWatch to trigger a Lambda function which will place the instance in an isolated security group with no internet access for investigation later. Further examples of automation can be found in the Getting Hands on with Amazon GuardDuty labs.

Conclusion

In this post, I’ve shown you some of the techniques and services that can be used to build a secure foundation. Build a strong security foundation and have a multi-account strategy that allows you to isolate different workloads within your organization. A strong identity foundation ensures that you know who is doing what in your environment. Logging and monitoring ensures that you are ready to take action. Building security in layers and using the service features available as you build ensures that you’re using the security controls available to all customers on the platform. Be prepared to respond to incidents and regularly practice your response process so your team is ready if an incident should occur.

A secure foundation is just the start. Remember that security is not a separate feature and new features are not complete until they’re tested and securely in production. Build a security culture of continuous improvement, and take action to ensure that you remain secure as you build out your workloads. Iterate to continue to reduce risk. Use the AWS Well-Architected Tool which allows you and your team to review your workload against best practices which can be paired with the Well-Architected labs for hands on learning. As mentioned above, a lab to help you implement the content in this blog post yourself can be found in the Quick Steps to Security Success lab. Don’t forget that you can also read stories from two AWS customers—Tic:Toc and FYI—on the AWS Startups Blog.

If you have feedback about this post, submit comments in the Comments section below. If you have questions about this post, start a new thread on one of the AWS Security, Identity, and Compliance forums or contact AWS Support.

Want more AWS Security how-to content, news, and feature announcements? Follow us on Twitter.

Author

Byron Pogson

Byron helps organizations use technology to solve their biggest problems. With Amazon Web Services he works with teams across West and South Australia to help refine their technology strategies in this fast-changing environment. You can often find him talking about security best practices to help organizations of all sizes to move fast and stay secure.

Automate Amazon EC2 instance isolation by using tags

Post Syndicated from Jose Obando original https://aws.amazon.com/blogs/security/automate-amazon-ec2-instance-isolation-by-using-tags/

Containment is a crucial part of an overall Incident Response Strategy, as this practice allows time for responders to perform forensics, eradication and recovery during an Incident. There are many different approaches to containment. In this post, we will be focusing on isolation—the ability to keep multiple targets separated so that each target only sees and affects itself—as a containment strategy.

I’ll show you how to automate isolation of an Amazon Elastic Compute Cloud (Amazon EC2) instance by using an AWS Lambda function that’s triggered by tag changes on the instance, as reported by Amazon CloudWatch Events.

CloudWatch Event Rules deliver a near real-time stream of system events that describe changes in Amazon Web Services (AWS) resources. See also Amazon EventBridge.

Preparing for an incident is important as outlined in the Security Pillar of the AWS Well-Architected Framework.

Out of the 7 Design Principles for Security in the Cloud, as per the Well-Architected Framework, this solution will cover the following:

  • Enable traceability: Monitor, alert, and audit actions and changes to your environment in real time. Integrate log and metric collection with systems to automatically investigate and take action.
  • Automate security best practices: Automated software-based security mechanisms can improve your ability to securely scale more rapidly and cost-effectively. Create secure architectures, including through the implementation of controls that can be defined and managed by AWS as code in version-controlled templates.
  • Prepare for security events: Prepare for an incident by implementing incident management and investigation policy and processes that align to your organizational requirements. Run incident response simulations and use tools with automation to help increase your speed for detection, investigation, and recovery.

After detecting an event in the Detection phase and analyzing in the Analysis phase, you can automate the process of logically isolating an instance from a Virtual Private Cloud (VPC) in Amazon Web Services (AWS).

In this blog post, I describe how to automate EC2 instance isolation by using the tagging feature that a responder can use to identify instances that need to be isolated. A Lambda function then uses AWS API calls to isolate the instances by performing the actions described in the following sections.

Use cases

Your organization can use automated EC2 instance isolation for scenarios like these:

  • A security analyst wants to automate EC2 instance isolation in order to respond to security events in a timely manner.
  • A security manager wants to provide their first responders with a way to quickly react to security incidents without providing too much access to higher security features.

High-level architecture and design

The example solution in this blog post uses a CloudWatch Events rule to trigger a Lambda function. The CloudWatch Events rule is triggered when a tag is applied to an EC2 instance. The Lambda code triggers further actions based on the contents of the event. Note that the CloudFormation template includes the appropriate permissions to run the function.

The event flow is shown in Figure 1 and works as follows:

  1. The EC2 instance is tagged.
  2. The CloudWatch Events rule filters the event.
  3. The Lambda function is invoked.
  4. If the criteria are met, the isolation workflow begins.

When the Lambda function is invoked and the criteria are met, these actions are performed:

  1. Checks for IAM instance profile associations.
  2. If the instance is associated to a role, the Lambda function disassociates that role.
  3. Applies the isolation role that you defined during CloudFormation stack creation.
  4. Checks the VPC where the EC2 instance resides.
    • If there is no isolation security group in the VPC (if the VPC is new, for example), the function creates one.
  5. Applies the isolation security group.

Note: If you had a security group with an open (0.0.0.0/0) outbound rule, and you apply this Isolation security group, your existing SSH connections to the instance are immediately dropped. On the other hand, if you have a narrower inbound rule that initially allows the SSH connection, the existing connection will not be broken by changing the group. This is known as Connection Tracking.

Figure 1: High-level diagram showing event flow

Figure 1: High-level diagram showing event flow

For the deployment method, we will be using an AWS CloudFormation Template. AWS CloudFormation gives you an easy way to model a collection of related AWS and third-party resources, provision them quickly and consistently, and manage them throughout their lifecycles, by treating infrastructure as code.

The AWS CloudFormation template that I provide here deploys the following resources:

  • An EC2 instance role for isolation – this is attached to the EC2 Instance to prevent further communication with other AWS Services thus limiting the attack surface to your overall infrastructure.
  • An Amazon CloudWatch Events rule – this is used to detect changes to an AWS EC2 resource, in this case a “tag change event”. We will use this as a trigger to our Lambda function.
  • An AWS Identity and Access Management (IAM) role for Lambda functions – this is what the Lambda function will use to execute the workflow.
  • A Lambda function for automation – this function is where all the decision logic sits, once triggered it will follow a set of steps described in the following section.
  • Lambda function permissions – this is used by the Lambda function to execute.
  • An IAM instance profile – this is a container for an IAM role that you can use to pass role information to an EC2 instance.

Supporting functions within the Lambda function

Let’s dive deeper into each supporting function inside the Lambda code.

The following function identifies the virtual private cloud (VPC) ID for a given instance. This is needed to identify which security groups are present in the VPC.

def identifyInstanceVpcId(instanceId):
    instanceReservations = ec2Client.describe_instances(InstanceIds=[instanceId])['Reservations']
    for instanceReservation in instanceReservations:
        instancesDescription = instanceReservation['Instances']
        for instance in instancesDescription:
            return instance['VpcId']

The following function modifies the security group of an EC2 instance.

def modifyInstanceAttribute(instanceId,securityGroupId):
    response = ec2Client.modify_instance_attribute(
        Groups=[securityGroupId],
        InstanceId=instanceId)

The following function creates a security group on a VPC that blocks all egress access to the security group.

def createSecurityGroup(groupName, descriptionString, vpcId):
    resource = boto3.resource('ec2')
    securityGroupId = resource.create_security_group(GroupName=groupName, Description=descriptionString, VpcId=vpcId)
    securityGroupId.revoke_egress(IpPermissions= [{'IpProtocol': '-1','IpRanges': [{'CidrIp': '0.0.0.0/0'}],'Ipv6Ranges': [],'PrefixListIds': [],'UserIdGroupPairs': []}])
    return securityGroupId.

Deploy the solution

To deploy the solution provided in this blog post, first download the CloudFormation template, and then set up a CloudFormation stack that specifies the tags that are used to trigger the automated process.

Download the CloudFormation template

To get started, download the CloudFormation template from Amazon S3. Alternatively, you can launch the CloudFormation template by selecting the following Launch Stack button:

Select the Launch Stack button to launch the template

Deploy the CloudFormation stack

Start by uploading the CloudFormation template to your AWS account.

To upload the template

  1. From the AWS Management Console, open the CloudFormation console.
  2. Choose Create Stack.
  3. Choose With new resources (standard).
  4. Choose Upload a template file.
  5. Select Choose File, and then select the YAML file that you just downloaded.
Figure 2: CloudFormation stack creation

Figure 2: CloudFormation stack creation

Specify stack details

You can leave the default values for the stack as long as there aren’t any resources provisioned already with the same name, such as an IAM role. For example, if left with default values an IAM role named “SecurityIsolation-IAMRole” will be created. Otherwise, the naming convention is fully customizable from this screen and you can enter your choice of name for the CloudFormation stack, and modify the parameters as you see fit. Figure 3 shows the parameters that you can set.

The Evaluation Parameters section defines the tag key and value that will initiate the automated response. Keep in mind that these values are case-sensitive.

Figure 3: CloudFormation stack parameters

Figure 3: CloudFormation stack parameters

Choose Next until you reach the final screen, shown in Figure 4, where you acknowledge that an IAM role is created and you trust the source of this template. Select the check box next to the statement I acknowledge that AWS CloudFormation might create IAM resources with custom names, and then choose Create Stack.

Figure 4: CloudFormation IAM notification

Figure 4: CloudFormation IAM notification

After you complete these steps, the following resources will be provisioned, as shown in Figure 5:

  • EC2IsolationRole
  • EC2TagChangeEvent
  • IAMRoleForLambdaFunction
  • IsolationLambdaFunction
  • IsolationLambdaFunctionInvokePermissions
  • RootInstanceProfile
Figure 5: CloudFormation created resources

Figure 5: CloudFormation created resources

Testing

To start your automation, tag an EC2 instance using the tag defined during the CloudFormation setup. If you’re using the Amazon EC2 console, you can apply tags to resources by using the Tags tab on the relevant resource screen, or you can use the Tags screen, the AWS CLI or an AWS SDK. A detailed walkthrough for each approach can be found in the Amazon EC2 Documentation page.

Reverting Changes

If you need to remove the restrictions applied by this workflow, complete the following steps.

  1. From the EC2 dashboard, in the Instances section, check the box next to the instance you want to modify.

    Figure 6: Select the instance to modify

    Figure 6: Select the instance to modify

  2. In the top right, select Actions, choose Instance settings, and then choose Modify IAM role.

    Figure 7: Choose Actions > Instance settings > Modify IAM role

    Figure 7: Choose Actions > Instance settings > Modify IAM role

  3. Under IAM role, choose the IAM role to attach to your instance, and then select Save.

    Figure 8: Choose the IAM role to attach

    Figure 8: Choose the IAM role to attach

  4. Select Actions, choose Networking, and then choose Change security groups.

    Figure 9: Choose Actions > Networking > Change security groups

    Figure 9: Choose Actions > Networking > Change security groups

  5. Under Associated security groups, select Remove and add a different security group with the access you want to grant to this instance.

Summary

Using the CloudFormation template provided in this blog post, a Security Operations Center analyst could have only tagging privileges and isolate an EC2 instance based on this tag. Or a security service such as Amazon GuardDuty could trigger a lambda to apply the tag as part of a workflow. This means the Security Operations Center analyst wouldn’t need administrative privileges over the EC2 service.

This solution creates an isolation security group for any new VPCs that don’t have one already. The security group would still follow the naming convention defined during the CloudFormation stack launch, but won’t be part of the provisioned resources. If you decide to delete the stack, manual cleanup would be required to remove these security groups.

This solution terminates established inbound Secure Shell (SSH) sessions that are associated to the instance, and isolates the instance from new connections either inbound or outbound. For outbound connections that are already established (for example, reverse shell), you either need to shut down the network interface card (NIC) at the operating system (OS) level, restart the instance network stack at the OS level, terminate the established connections, or apply a network access control list (network ACL).

For more information, see the following documentation:

If you have feedback about this post, submit comments in the Comments section below.

Want more AWS Security how-to content, news, and feature announcements? Follow us on Twitter.

Author

Jose Obando

Jose is a Security Consultant on the Global Financial Services team. He helps the world’s top financial institutions improve their security posture in the cloud. He has a background in network security and cloud architecture. In his free time, you can find him playing guitar or training in Muay Thai.

TLS 1.2 will be required for all AWS FIPS endpoints beginning March 31, 2021

Post Syndicated from Janelle Hopper original https://aws.amazon.com/blogs/security/tls-1-2-required-for-aws-fips-endpoints/

To help you meet your compliance needs, we’re updating all AWS Federal Information Processing Standard (FIPS) endpoints to a minimum of Transport Layer Security (TLS) 1.2. We have already updated over 40 services to require TLS 1.2, removing support for TLS 1.0 and TLS 1.1. Beginning March 31, 2021, if your client application cannot support TLS 1.2, it will result in connection failures. In order to avoid an interruption in service, we encourage you to act now to ensure that you connect to AWS FIPS endpoints at TLS version 1.2. This change does not affect non-FIPS AWS endpoints.

Amazon Web Services (AWS) continues to notify impacted customers directly via their Personal Health Dashboard and email. However, if you’re connecting anonymously to AWS shared resources, such as through a public Amazon Simple Storage Service (Amazon S3) bucket, then you would not have received a notification, as we cannot identify anonymous connections.

Why are you removing TLS 1.0 and TLS 1.1 support from FIPS endpoints?

At AWS, we’re continually expanding the scope of our compliance programs to meet the needs of customers who want to use our services for sensitive and regulated workloads. Compliance programs, including FedRAMP, require a minimum level of TLS 1.2. To help you meet compliance requirements, we’re updating all AWS FIPS endpoints to a minimum of TLS version 1.2 across all AWS Regions. Following this update, you will not be able to use TLS 1.0 and TLS 1.1 for connections to FIPS endpoints.

How can I detect if I am using TLS 1.0 or TLS 1.1?

To detect the use of TLS 1.0 or 1.1, we recommend that you perform code, network, or log analysis. If you are using an AWS Software Developer Kit (AWS SDK) or Command Line Interface (CLI), we have provided hyperlinks to detailed guidance in our previous TLS blog post about how to examine your client application code and properly configure the TLS version used.

When the application source code is unavailable, you can use a network tool, such as TCPDump (Linux) or Wireshark (Linux or Windows), to analyze your network traffic to find the TLS versions you’re using when connecting to AWS endpoints. For a detailed example of using these tools, see the example, below.

If you’re using Amazon S3, you can also use your access logs to view the TLS connection information for these services and identify client connections that are not at TLS 1.2.

What is the most common use of TLS 1.0 or TLS 1.1?

The most common client applications that use TLS 1.0 or 1.1 are Microsoft .NET Framework versions earlier than 4.6.2. If you use the .NET Framework, please confirm you are using version 4.6.2 or later. For information on how to update and configure .NET Framework to support TLS 1.2, see How to enable TLS 1.2 on clients.

How do I know if I am using an AWS FIPS endpoint?

All AWS services offer TLS 1.2 encrypted endpoints that you can use for all API calls. Some AWS services also offer FIPS 140-2 endpoints for customers who need to use FIPS-validated cryptographic libraries to connect to AWS services. You can check our list of all AWS FIPS endpoints and compare the list to your application code, configuration repositories, DNS logs, or other network logs.

EXAMPLE: TLS version detection using a packet capture

To capture the packets, multiple online sources, such as this article, provide guidance for setting up TCPDump on a Linux operating system. On a Windows operating system, the Wireshark tool provides packet analysis capabilities and can be used to analyze packets captured with TCPDump or it can also directly capture packets.

In this example, we assume there is a client application with the local IP address 10.25.35.243 that is making API calls to the CloudWatch FIPS API endpoint in the AWS GovCloud (US-West) Region. To analyze the traffic, first we look up the endpoint URL in the AWS FIPS endpoint list. In our example, the endpoint URL is monitoring.us-gov-west-1.amazonaws.com. Then we use NSLookup to find the IP addresses used by this FIPS endpoint.

Figure 1: Use NSLookup to find the IP addresses used by this FIPS endpoint

Figure 1: Use NSLookup to find the IP addresses used by this FIPS endpoint

Wireshark is then used to open the captured packets, and filter to just the packets with the relevant IP address. This can be done automatically by selecting one of the packets in the upper section, and then right-clicking to use the Conversation filter/IPv4 option.

After the results are filtered to only the relevant IP addresses, the next step is to find the packet whose description in the Info column is Client Hello. In the lower packet details area, expand the Transport Layer Security section to find the version, which in this example is set to TLS 1.0 (0x0301). This indicates that the client only supports TLS 1.0 and must be modified to support a TLS 1.2 connection.

Figure 2: After the conversation filter has been applied, select the Client Hello packet in the top pane. Expand the Transport Layer Security section in the lower pane to view the packet details and the TLS version.

Figure 2: After the conversation filter has been applied, select the Client Hello packet in the top pane. Expand the Transport Layer Security section in the lower pane to view the packet details and the TLS version.

Figure 3 shows what it looks like after the client has been updated to support TLS 1.2. This second packet capture confirms we are sending TLS 1.2 (0x0303) in the Client Hello packet.

Figure 3: The client TLS has been updated to support TLS 1.2

Figure 3: The client TLS has been updated to support TLS 1.2

Is there more assistance available?

If you have any questions or issues, you can start a new thread on one of the AWS forums, or contact AWS Support or your technical account manager (TAM). The AWS support tiers cover development and production issues for AWS products and services, along with other key stack components. AWS Support doesn’t include code development for client applications.

Additionally, you can use AWS IQ to find, securely collaborate with, and pay AWS-certified third-party experts for on-demand assistance to update your TLS client components. Visit the AWS IQ page for information about how to submit a request, get responses from experts, and choose the expert with the right skills and experience. Log in to your console and select Get Started with AWS IQ to start a request.

If you have feedback about this post, submit comments in the Comments section below.

Want more AWS Security how-to content, news, and feature announcements? Follow us on Twitter.

Author

Janelle Hopper

Janelle is a Senior Technical Program Manager in AWS Security with over 15 years of experience in the IT security field. She works with AWS services, infrastructure, and administrative teams to identify and drive innovative solutions that improve AWS’ security posture.

Author

Daniel Salzedo

Daniel is a Senior Specialist Technical Account Manager – Security. He has over 25 years of professional experience in IT in industries as diverse as video game development, manufacturing, banking and used car sales. He loves working with our wonderful AWS customers to help them solve their complex security challenges at scale.

How to protect sensitive data for its entire lifecycle in AWS

Post Syndicated from Raj Jain original https://aws.amazon.com/blogs/security/how-to-protect-sensitive-data-for-its-entire-lifecycle-in-aws/

Many Amazon Web Services (AWS) customer workflows require ingesting sensitive and regulated data such as Payments Card Industry (PCI) data, personally identifiable information (PII), and protected health information (PHI). In this post, I’ll show you a method designed to protect sensitive data for its entire lifecycle in AWS. This method can help enhance your data security posture and be useful for fulfilling the data privacy regulatory requirements applicable to your organization for data protection at-rest, in-transit, and in-use.

An existing method for sensitive data protection in AWS is to use the field-level encryption feature offered by Amazon CloudFront. This CloudFront feature protects sensitive data fields in requests at the AWS network edge. The chosen fields are protected upon ingestion and remain protected throughout the entire application stack. The notion of protecting sensitive data early in its lifecycle in AWS is a highly desirable security architecture. However, CloudFront can protect a maximum of 10 fields and only within HTTP(S) POST requests that carry HTML form encoded payloads.

If your requirements exceed CloudFront’s native field-level encryption feature, such as a need to handle diverse application payload formats, different HTTP methods, and more than 10 sensitive fields, you can implement field-level encryption yourself using the Lambda@Edge feature in CloudFront. In terms of choosing an appropriate encryption scheme, this problem calls for an asymmetric cryptographic system that will allow public keys to be openly distributed to the CloudFront network edges while keeping the corresponding private keys stored securely within the network core. One such popular asymmetric cryptographic system is RSA. Accordingly, we’ll implement a Lambda@Edge function that uses asymmetric encryption using the RSA cryptosystem to protect an arbitrary number of fields in any HTTP(S) request. We will discuss the solution using an example JSON payload, although this approach can be applied to any payload format.

A complex part of any encryption solution is key management. To address that, I use AWS Key Management Service (AWS KMS). AWS KMS simplifies the solution and offers improved security posture and operational benefits, detailed later.

Solution overview

You can protect data in-transit over individual communications channels using transport layer security (TLS), and at-rest in individual storage silos using volume encryption, object encryption or database table encryption. However, if you have sensitive workloads, you might need additional protection that can follow the data as it moves through the application stack. Fine-grained data protection techniques such as field-level encryption allow for the protection of sensitive data fields in larger application payloads while leaving non-sensitive fields in plaintext. This approach lets an application perform business functions on non-sensitive fields without the overhead of encryption, and allows fine-grained control over what fields can be accessed by what parts of the application.

A best practice for protecting sensitive data is to reduce its exposure in the clear throughout its lifecycle. This means protecting data as early as possible on ingestion and ensuring that only authorized users and applications can access the data only when and as needed. CloudFront, when combined with the flexibility provided by Lambda@Edge, provides an appropriate environment at the edge of the AWS network to protect sensitive data upon ingestion in AWS.

Since the downstream systems don’t have access to sensitive data, data exposure is reduced, which helps to minimize your compliance footprint for auditing purposes.

The number of sensitive data elements that may need field-level encryption depends on your requirements. For example:

  • For healthcare applications, HIPAA regulates 18 personal data elements.
  • In California, the California Consumer Privacy Act (CCPA) regulates at least 11 categories of personal information—each with its own set of data elements.

The idea behind field-level encryption is to protect sensitive data fields individually, while retaining the structure of the application payload. The alternative is full payload encryption, where the entire application payload is encrypted as a binary blob, which makes it unusable until the entirety of it is decrypted. With field-level encryption, the non-sensitive data left in plaintext remains usable for ordinary business functions. When retrofitting data protection in existing applications, this approach can reduce the risk of application malfunction since the data format is maintained.

The following figure shows how PII data fields in a JSON construction that are deemed sensitive by an application can be transformed from plaintext to ciphertext with a field-level encryption mechanism.

Figure 1: Example of field-level encryption

Figure 1: Example of field-level encryption

You can change plaintext to ciphertext as depicted in Figure 1 by using a Lambda@Edge function to perform field-level encryption. I discuss the encryption and decryption processes separately in the following sections.

Field-level encryption process

Let’s discuss the individual steps involved in the encryption process as shown in Figure 2.

Figure 2: Field-level encryption process

Figure 2: Field-level encryption process

Figure 2 shows CloudFront invoking a Lambda@Edge function while processing a client request. CloudFront offers multiple integration points for invoking Lambda@Edge functions. Since you are processing a client request and your encryption behavior is related to requests being forwarded to an origin server, you want your function to run upon the origin request event in CloudFront. The origin request event represents an internal state transition in CloudFront that happens immediately before CloudFront forwards a request to the downstream origin server.

You can associate your Lambda@Edge with CloudFront as described in Adding Triggers by Using the CloudFront Console. A screenshot of the CloudFront console is shown in Figure 3. The selected event type is Origin Request and the Include Body check box is selected so that the request body is conveyed to Lambda@Edge.

Figure 3: Configuration of Lambda@Edge in CloudFront

Figure 3: Configuration of Lambda@Edge in CloudFront

The Lambda@Edge function acts as a programmable hook in the CloudFront request processing flow. You can use the function to replace the incoming request body with a request body with the sensitive data fields encrypted.

The process includes the following steps:

Step 1 – RSA key generation and inclusion in Lambda@Edge

You can generate an RSA customer managed key (CMK) in AWS KMS as described in Creating asymmetric CMKs. This is done at system configuration time.

Note: You can use your existing RSA key pairs or generate new ones externally by using OpenSSL commands, especially if you need to perform RSA decryption and key management independently of AWS KMS. Your choice won’t affect the fundamental encryption design pattern presented here.

The RSA key creation in AWS KMS requires two inputs: key length and type of usage. In this example, I created a 2048-bit key and assigned its use for encryption and decryption. The cryptographic configuration of an RSA CMK created in AWS KMS is shown in Figure 4.

Figure 4: Cryptographic properties of an RSA key managed by AWS KMS

Figure 4: Cryptographic properties of an RSA key managed by AWS KMS

Of the two encryption algorithms shown in Figure 4— RSAES_OAEP_SHA_256 and RSAES_OAEP_SHA_1, this example uses RSAES_OAEP_SHA_256. The combination of a 2048-bit key and the RSAES_OAEP_SHA_256 algorithm lets you encrypt a maximum of 190 bytes of data, which is enough for most PII fields. You can choose a different key length and encryption algorithm depending on your security and performance requirements. How to choose your CMK configuration includes information about RSA key specs for encryption and decryption.

Using AWS KMS for RSA key management versus managing the keys yourself eliminates that complexity and can help you:

  • Enforce IAM and key policies that describe administrative and usage permissions for keys.
  • Manage cross-account access for keys.
  • Monitor and alarm on key operations through Amazon CloudWatch.
  • Audit AWS KMS API invocations through AWS CloudTrail.
  • Record configuration changes to keys and enforce key specification compliance through AWS Config.
  • Generate high-entropy keys in an AWS KMS hardware security module (HSM) as required by NIST.
  • Store RSA private keys securely, without the ability to export.
  • Perform RSA decryption within AWS KMS without exposing private keys to application code.
  • Categorize and report on keys with key tags for cost allocation.
  • Disable keys and schedule their deletion.

You need to extract the RSA public key from AWS KMS so you can include it in the AWS Lambda deployment package. You can do this from the AWS Management Console, through the AWS KMS SDK, or by using the get-public-key command in the AWS Command Line Interface (AWS CLI). Figure 5 shows Copy and Download options for a public key in the Public key tab of the AWS KMS console.

Figure 5: RSA public key available for copy or download in the console

Figure 5: RSA public key available for copy or download in the console

Note: As we will see in the sample code in step 3, we embed the public key in the Lambda@Edge deployment package. This is a permissible practice because public keys in asymmetric cryptography systems aren’t a secret and can be freely distributed to entities that need to perform encryption. Alternatively, you can use Lambda@Edge to query AWS KMS for the public key at runtime. However, this introduces latency, increases the load against your KMS account quota, and increases your AWS costs. General patterns for using external data in Lambda@Edge are described in Leveraging external data in Lambda@Edge.

Step 2 – HTTP API request handling by CloudFront

CloudFront receives an HTTP(S) request from a client. CloudFront then invokes Lambda@Edge during origin-request processing and includes the HTTP request body in the invocation.

Step 3 – Lambda@Edge processing

The Lambda@Edge function processes the HTTP request body. The function extracts sensitive data fields and performs RSA encryption over their values.

The following code is sample source code for the Lambda@Edge function implemented in Python 3.7:

import Crypto
import base64
import json
from Crypto.Cipher import PKCS1_OAEP
from Crypto.PublicKey import RSA

# PEM-formatted RSA public key copied over from AWS KMS or your own public key.
RSA_PUBLIC_KEY = "-----BEGIN PUBLIC KEY-----<your key>-----END PUBLIC KEY-----"
RSA_PUBLIC_KEY_OBJ = RSA.importKey(RSA_PUBLIC_KEY)
RSA_CIPHER_OBJ = PKCS1_OAEP.new(RSA_PUBLIC_KEY_OBJ, Crypto.Hash.SHA256)

# Example sensitive data field names in a JSON object. 
PII_SENSITIVE_FIELD_NAMES = ["fname", "lname", "email", "ssn", "dob", "phone"]

CIPHERTEXT_PREFIX = "#01#"
CIPHERTEXT_SUFFIX = "#10#"

def lambda_handler(event, context):
    # Extract HTTP request and its body as per documentation:
    # https://docs.aws.amazon.com/AmazonCloudFront/latest/DeveloperGuide/lambda-event-structure.html
    http_request = event['Records'][0]['cf']['request']
    body = http_request['body']
    org_body = base64.b64decode(body['data'])
    mod_body = protect_sensitive_fields_json(org_body)
    body['action'] = 'replace'
    body['encoding'] = 'text'
    body['data'] = mod_body
    return http_request


def protect_sensitive_fields_json(body):
    # Encrypts sensitive fields in sample JSON payload shown earlier in this post.
    # [{"fname": "Alejandro", "lname": "Rosalez", … }]
    person_list = json.loads(body.decode("utf-8"))
    for person_data in person_list:
        for field_name in PII_SENSITIVE_FIELD_NAMES:
            if field_name not in person_data:
                continue
            plaintext = person_data[field_name]
            ciphertext = RSA_CIPHER_OBJ.encrypt(bytes(plaintext, 'utf-8'))
            ciphertext_b64 = base64.b64encode(ciphertext).decode()
            # Optionally, add unique prefix/suffix patterns to ciphertext
            person_data[field_name] = CIPHERTEXT_PREFIX + ciphertext_b64 + CIPHERTEXT_SUFFIX 
    return json.dumps(person_list)

The event structure passed into the Lambda@Edge function is described in Lambda@Edge Event Structure. Following the event structure, you can extract the HTTP request body. In this example, the assumption is that the HTTP payload carries a JSON document based on a particular schema defined as part of the API contract. The input JSON document is parsed by the function, converting it into a Python dictionary. The Python native dictionary operators are then used to extract the sensitive field values.

Note: If you don’t know your API payload structure ahead of time or you’re dealing with unstructured payloads, you can use techniques such as regular expression pattern searches and checksums to look for patterns of sensitive data and target them accordingly. For example, credit card primary account numbers include a Luhn checksum that can be programmatically detected. Additionally, services such as Amazon Comprehend and Amazon Macie can be leveraged for detecting sensitive data such as PII in application payloads.

While iterating over the sensitive fields, individual field values are encrypted using the standard RSA encryption implementation available in the Python Cryptography Toolkit (PyCrypto). The PyCrypto module is included within the Lambda@Edge zip archive as described in Lambda@Edge deployment package.

The example uses the standard optimal asymmetric encryption padding (OAEP) and SHA-256 encryption algorithm properties. These properties are supported by AWS KMS and will allow RSA ciphertext produced here to be decrypted by AWS KMS later.

Note: You may have noticed in the code above that we’re bracketing the ciphertexts with predefined prefix and suffix strings:

person_data[field_name] = CIPHERTEXT_PREFIX + ciphertext_b64 + CIPHERTEXT_SUFFIX

This is an optional measure and is being implemented to simplify the decryption process.

The prefix and suffix strings help demarcate ciphertext embedded in unstructured data in downstream processing and also act as embedded metadata. Unique prefix and suffix strings allow you to extract ciphertext through string or regular expression (regex) searches during the decryption process without having to know the data body format or schema, or the field names that were encrypted.

Distinct strings can also serve as indirect identifiers of RSA key pair identifiers. This can enable key rotation and allow separate keys to be used for separate fields depending on the data security requirements for individual fields.

You can ensure that the prefix and suffix strings can’t collide with the ciphertext by bracketing them with characters that don’t appear in cyphertext. For example, a hash (#) character cannot be part of a base64 encoded ciphertext string.

Deploying a Lambda function as a Lambda@Edge function requires specific IAM permissions and an IAM execution role. Follow the Lambda@Edge deployment instructions in Setting IAM Permissions and Roles for Lambda@Edge.

Step 4 – Lambda@Edge response

The Lambda@Edge function returns the modified HTTP body back to CloudFront and instructs it to replace the original HTTP body with the modified one by setting the following flag:

http_request['body']['action'] = 'replace'

Step 5 – Forward the request to the origin server

CloudFront forwards the modified request body provided by Lambda@Edge to the origin server. In this example, the origin server writes the data body to persistent storage for later processing.

Field-level decryption process

An application that’s authorized to access sensitive data for a business function can decrypt that data. An example decryption process is shown in Figure 6. The figure shows a Lambda function as an example compute environment for invoking AWS KMS for decryption. This functionality isn’t dependent on Lambda and can be performed in any compute environment that has access to AWS KMS.

Figure 6: Field-level decryption process

Figure 6: Field-level decryption process

The steps of the process shown in Figure 6 are described below.

Step 1 – Application retrieves the field-level encrypted data

The example application retrieves the field-level encrypted data from persistent storage that had been previously written during the data ingestion process.

Step 2 – Application invokes the decryption Lambda function

The application invokes a Lambda function responsible for performing field-level decryption, sending the retrieved data to Lambda.

Step 3 – Lambda calls the AWS KMS decryption API

The Lambda function uses AWS KMS for RSA decryption. The example calls the KMS decryption API that inputs ciphertext and returns plaintext. The actual decryption happens in KMS; the RSA private key is never exposed to the application, which is a highly desirable characteristic for building secure applications.

Note: If you choose to use an external key pair, then you can securely store the RSA private key in AWS services like AWS Systems Manager Parameter Store or AWS Secrets Manager and control access to the key through IAM and resource policies. You can fetch the key from relevant vault using the vault’s API, then decrypt using the standard RSA implementation available in your programming language. For example, the cryptography toolkit in Python or javax.crypto in Java.

The Lambda function Python code for decryption is shown below.

import base64
import boto3
import re

kms_client = boto3.client('kms')
CIPHERTEXT_PREFIX = "#01#"
CIPHERTEXT_SUFFIX = "#10#"

# This lambda function extracts event body, searches for and decrypts ciphertext 
# fields surrounded by provided prefix and suffix strings in arbitrary text bodies 
# and substitutes plaintext fields in-place.  
def lambda_handler(event, context):    
    org_data = event["body"]
    mod_data = unprotect_fields(org_data, CIPHERTEXT_PREFIX, CIPHERTEXT_SUFFIX)
    return mod_data

# Helper function that performs non-greedy regex search for ciphertext strings on
# input data and performs RSA decryption of them using AWS KMS 
def unprotect_fields(org_data, prefix, suffix):
    regex_pattern = prefix + "(.*?)" + suffix
    mod_data_parts = []
    cursor = 0

    # Search ciphertexts iteratively using python regular expression module
    for match in re.finditer(regex_pattern, org_data):
        mod_data_parts.append(org_data[cursor: match.start()])
        try:
            # Ciphertext was stored as Base64 encoded in our example. Decode it.
            ciphertext = base64.b64decode(match.group(1))

            # Decrypt ciphertext using AWS KMS  
            decrypt_rsp = kms_client.decrypt(
                EncryptionAlgorithm="RSAES_OAEP_SHA_256",
                KeyId="<Your-Key-ID>",
                CiphertextBlob=ciphertext)
            decrypted_val = decrypt_rsp["Plaintext"].decode("utf-8")
            mod_data_parts.append(decrypted_val)
        except Exception as e:
            print ("Exception: " + str(e))
            return None
        cursor = match.end()

    mod_data_parts.append(org_data[cursor:])
    return "".join(mod_data_parts)

The function performs a regular expression search in the input data body looking for ciphertext strings bracketed in predefined prefix and suffix strings that were added during encryption.

While iterating over ciphertext strings one-by-one, the function calls the AWS KMS decrypt() API. The example function uses the same RSA encryption algorithm properties—OAEP and SHA-256—and the Key ID of the public key that was used during encryption in Lambda@Edge.

Note that the Key ID itself is not a secret. Any application can be configured with it, but that doesn’t mean any application will be able to perform decryption. The security control here is that the AWS KMS key policy must allow the caller to use the Key ID to perform the decryption. An additional security control is provided by Lambda execution role that should allow calling the KMS decrypt() API.

Step 4 – AWS KMS decrypts ciphertext and returns plaintext

To ensure that only authorized users can perform decrypt operation, the KMS is configured as described in Using key policies in AWS KMS. In addition, the Lambda IAM execution role is configured as described in AWS Lambda execution role to allow it to access KMS. If both the key policy and IAM policy conditions are met, KMS returns the decrypted plaintext. Lambda substitutes the plaintext in place of ciphertext in the encapsulating data body.

Steps three and four are repeated for each ciphertext string.

Step 5 – Lambda returns decrypted data body

Once all the ciphertext has been converted to plaintext and substituted in the larger data body, the Lambda function returns the modified data body to the client application.

Conclusion

In this post, I demonstrated how you can implement field-level encryption integrated with AWS KMS to help protect sensitive data workloads for their entire lifecycle in AWS. Since your Lambda@Edge is designed to protect data at the network edge, data remains protected throughout the application execution stack. In addition to improving your data security posture, this protection can help you comply with data privacy regulations applicable to your organization.

Since you author your own Lambda@Edge function to perform standard RSA encryption, you have flexibility in terms of payload formats and the number of fields that you consider to be sensitive. The integration with AWS KMS for RSA key management and decryption provides significant simplicity, higher key security, and rich integration with other AWS security services enabling an overall strong security solution.

By using encrypted fields with identifiers as described in this post, you can create fine-grained controls for data accessibility to meet the security principle of least privilege. Instead of granting either complete access or no access to data fields, you can ensure least privileges where a given part of an application can only access the fields that it needs, when it needs to, all the way down to controlling access field by field. Field by field access can be enabled by using different keys for different fields and controlling their respective policies.

In addition to protecting sensitive data workloads to meet regulatory and security best practices, this solution can be used to build de-identified data lakes in AWS. Sensitive data fields remain protected throughout their lifecycle, while non-sensitive data fields remain in the clear. This approach can allow analytics or other business functions to operate on data without exposing sensitive data.

If you have feedback about this post, submit comments in the Comments section below.

Want more AWS Security how-to content, news, and feature announcements? Follow us on Twitter.

Author

Raj Jain

Raj is a Senior Cloud Architect at AWS. He is passionate about helping customers build well-architected applications in AWS. Raj is a published author in Bell Labs Technical Journal, has authored 3 IETF standards, and holds 12 patents in internet telephony and applied cryptography. In his spare time, Raj enjoys outdoors, cooking, reading, and travel.

Fall 2020 PCI DSS report now available with eight additional services in scope

Post Syndicated from Michael Oyeniya original https://aws.amazon.com/blogs/security/fall-2020-pci-dss-report-now-available-with-eight-additional-services-in-scope/

We continue to expand the scope of our assurance programs and are pleased to announce that eight additional services have been added to the scope of our Payment Card Industry Data Security Standard (PCI DSS) certification. This gives our customers more options to process and store their payment card data and architect their cardholder data environment (CDE) securely in Amazon Web Services (AWS).

You can see the full list on Services in Scope by Compliance Program. The eight additional services are:

  1. Amazon Augmented AI (Amazon A2I) (excluding public workforce and vendor workforce)
  2. Amazon Kendra
  3. Amazon Keyspaces (for Apache Cassandra)
  4. Amazon Timestream
  5. AWS App Mesh
  6. AWS Cloud Map
  7. AWS Glue DataBrew
  8. AWS Ground Station

Private AWS Local Zones and AWS Wavelength sites were newly assessed as additional infrastructure deployments as part of the fall 2020 PCI assessment.

We were evaluated by Coalfire, a third-party Qualified Security Assessor (QSA). The Attestation of Compliance (AOC) evidencing AWS PCI compliance status is available through AWS Artifact.

To learn more about our PCI program and other compliance and security programs, see AWS Compliance Programs. As always, we value your feedback and questions. You can contact the compliance team through the Contact Us page.

If you have feedback about this post, submit comments in the Comments section below.

Want more AWS Security how-to content, news, and feature announcements? Follow us on Twitter.

Author

Michael Oyeniya

Michael is a Compliance Program Manager at AWS. He has over 15 years of experience managing information technology risk and control for Fortune 500 companies covering security compliance, auditing, and control framework implementation. He has a bachelor’s degree in Finance, master’s degree in Business Administration, and industry certifications including CISA and ISSPCS. Outside of work, he loves singing and reading.

How to set up a recurring Security Hub summary email

Post Syndicated from Justin Criswell original https://aws.amazon.com/blogs/security/how-to-set-up-a-recurring-security-hub-summary-email/

AWS Security Hub provides a comprehensive view of your security posture in Amazon Web Services (AWS) and helps you check your environment against security standards and best practices. In this post, we’ll show you how to set up weekly email notifications using Security Hub to provide account owners with a summary of the existing security findings to prioritize, new findings, and links to the Security Hub console for more information.

When you enable Security Hub, it collects and consolidates findings from AWS security services that you’re using, such as intrusion detection findings from Amazon GuardDuty, vulnerability scans from Amazon Inspector, Amazon Simple Storage Service (Amazon S3) bucket policy findings from Amazon Macie, publicly accessible and cross-account resources from IAM Access Analyzer, and resources lacking AWS WAF coverage from AWS Firewall Manager. Security Hub also consolidates findings from integrated AWS Partner Network (APN) security solutions.

Cloud security processes can differ from traditional on-premises security in that security is often decentralized in the cloud. With traditional on-premises security operations, security alerts are typically routed to centralized security teams operating out of security operations centers (SOCs). With cloud security operations, it’s often the application builders or DevOps engineers who are best situated to triage, investigate, and remediate the security alerts. This integration of security into DevOps processes is referred to as DevSecOps, and as part of this approach, centralized security teams look for additional ways to proactively engage application account owners in improving the security posture of AWS accounts.

This solution uses Security Hub custom insights, AWS Lambda, and the Security Hub API. A custom insight is a collection of findings that are aggregated by a grouping attribute, such as severity or status. Insights help you identify common security issues that might require remediation action. Security Hub includes several managed insights, or you can create your own custom insights. Amazon SNS topic subscribers will receive an email, similar to the one shown in Figure 1, that summarizes the results of the Security Hub custom insights.

Figure 1: Example email with a summary of security findings for an account

Figure 1: Example email with a summary of security findings for an account

Solution overview

This solution assumes that Security Hub is enabled in your AWS account. If it isn’t enabled, set up the service so that you can start seeing a comprehensive view of security findings across your AWS accounts.

A recurring Security Hub summary email provides recipients with a proactive communication that summarizes the security posture and any recent improvements within their AWS accounts. The email message contains the following sections:

Here’s how the solution works:

  1. Seven Security Hub custom insights are created when you first deploy the solution.
  2. An Amazon CloudWatch time-based event invokes a Lambda function for processing.
  3. The Lambda function gets the results of the custom insights from Security Hub, formats the results for email, and sends a message to Amazon SNS.
  4. Amazon SNS sends the email notification to the address you provided during deployment.
  5. The email includes the summary and links to the Security Hub UI so that the recipient can follow the remediation workflow.

Figure 2 shows the solution workflow.

Figure 2: Solution overview, deployed through AWS CloudFormation

Figure 2: Solution overview, deployed through AWS CloudFormation

Security Hub custom insight

The finding results presented in the email are summarized by Security Hub custom insights. A Security Hub insight is a collection of related findings. Each insight is defined by a group by statement and optional filters. The group by statement indicates how to group the matching findings, and identifies the type of item that the insight applies to. For example, if an insight is grouped by resource identifier, then the insight produces a list of resource identifiers. The optional filters narrow down the matching findings for the insight. For example, you might want to see only the findings from specific providers or findings associated with specific types of resources. Figure 3 shows the seven custom insights that are created as part of deploying this solution.

Figure 3: Custom insights created by the solution

Figure 3: Custom insights created by the solution

Sample custom insight

Security Hub offers several built-in managed (default) insights. You can’t modify or delete managed insights. You can view the custom insights created as part of this solution in the Security Hub console under Insights, by selecting the Custom Insights filter. From the email, follow the link for “Summary Email – 02 – Failed AWS Foundational Security Best Practices” to see the summarized finding counts, as well as graphs with related data, as shown in Figure 4.

Figure 4: Detail view of the email titled “Summary Email – 02 – Failed AWS Foundational Security Best Practices”

Figure 4: Detail view of the email titled “Summary Email – 02 – Failed AWS Foundational Security Best Practices”

Let’s evaluate the filters that create this custom insight:

Filter setting Filter results
Type is “Software and Configuration Checks/Industry and Regulatory Standards/AWS-Foundational-Security-Best-Practices” Captures all current and future findings created by the security standard AWS Foundational Security Best Practices.
Status is FAILED Captures findings where the compliance status of the resource doesn’t pass the assessment.
Workflow Status is not SUPPRESSED Captures findings where Security Hub users haven’t updated the finding to the SUPPRESSED status.
Record State is ACTIVE Captures findings that represent the latest assessment of the resource. Security Hub automatically archives control-based findings if the associated resource is deleted, the resource does not exist, or the control is disabled.
Group by SeverityLabel Creates the insight and populates the counts.

Solution artifacts

The solution provided with this blog post consists of two files:

  1. An AWS CloudFormation template named security-hub-email-summary-cf-template.json.
  2. A zip file named sec-hub-email.zip for the Lambda function that generates the Security Hub summary email.

In addition to the Security Hub custom insights as discussed in the previous section, the solution also deploys the following artifacts:

  1. An Amazon Simple Notification Service (Amazon SNS) topic named SecurityHubRecurringSummary and an email subscription to the topic.
    Figure 5: SNS topic created by the solution

    Figure 5: SNS topic created by the solution

    The email address that subscribes to the topic is captured through a CloudFormation template input parameter. The subscriber is notified by email to confirm the subscription, and after confirmation, the subscription to the SNS topic is created.

    Figure 6: SNS email subscription

    Figure 6: SNS email subscription

  2. Two Lambda functions:
    1. A Lambda function named *-CustomInsightsFunction-* is used only by the CloudFormation template to create the custom Insights.
    2. A Lambda function named SendSecurityHubSummaryEmail queries the custom insights from the Security Hub API and uses the insights’ data to create the summary email message. The function then sends the email message to the SNS topic.

      Figure 7: Example of Lambda functions created by the solution

      Figure 7: Example of Lambda functions created by the solution

  3. Two IAM roles for the Lambda functions provide the following rights, respectively:
    1. The minimum rights required to create insights and to create CloudWatch log groups and logs.
      {
          "Version": "2012-10-17",
          "Statement": [
              {
                  "Action": [
                      "logs:CreateLogGroup",
                      "logs:CreateLogStream",
                      "logs:PutLogEvents"
                  ],
                  "Resource": "arn:aws:logs:*:*:*",
                  "Effect": "Allow"
              },
              {
                  "Action": [
                      "securityhub:CreateInsight"
                  ],
                  "Resource": "*",
                  "Effect": "Allow"
              }
          ]
      }
      

    2. The minimum rights required to query Security Hub insights and to send email messages to the SNS topic named SecurityHubRecurringSummary.
      {
          "Version": "2012-10-17",
          "Statement": [
              {
                  "Action": "sns:Publish",
                  "Resource": "arn:aws:sns:[REGION]:[ACCOUNT-ID]:SecurityHubRecurringSummary",
                  "Effect": "Allow"
              }
          ]
      } ,
      {
          "Version": "2012-10-17",
          "Statement": [
              {
                  "Effect": "Allow",
                  "Action": [
                      "securityhub:Get*",
                      "securityhub:List*",
                      "securityhub:Describe*"
                  ],
                  "Resource": "*"
              }
          ]
      }             
      

  4. A CloudWatch scheduled event named SecurityHubSummaryEmailSchedule for invoking the Lambda function that generates the summary email. The default schedule is every Monday at 8:00 AM GMT. This schedule can be overwritten by using a CloudFormation input parameter. Learn more about creating Cron expressions.

    Figure 8: Example of CloudWatch schedule created by the solution

    Figure 8: Example of CloudWatch schedule created by the solution

Deploy the solution

The following steps demonstrate the deployment of this solution in a single AWS account and Region. Repeat these steps in each of the AWS accounts that are active with Security Hub, so that the respective application owners can receive the relevant data from their accounts.

To deploy the solution

  1. Download the CloudFormation template security-hub-email-summary-cf-template.json and the .zip file sec-hub-email.zip from https://github.com/aws-samples/aws-security-hub-summary-email.
  2. Copy security-hub-email-summary-cf-template.json and sec-hub-email.zip to an S3 bucket within your target AWS account and Region. Copy the object URL for the CloudFormation template .json file.
  3. On the AWS Management Console, open the service CloudFormation. Choose Create Stack with new resources.

    Figure 9: Create stack with new resources

    Figure 9: Create stack with new resources

  4. Under Specify template, in the Amazon S3 URL textbox, enter the S3 object URL for the file security-hub-email-summary-cf-template.json that you uploaded in step 1.

    Figure 10: Specify S3 URL for CloudFormation template

    Figure 10: Specify S3 URL for CloudFormation template

  5. Choose Next. On the next page, under Stack name, enter a name for the stack.

    Figure 11: Enter stack name

    Figure 11: Enter stack name

  6. On the same page, enter values for the input parameters. These are the input parameters that are required for this CloudFormation template:
    1. S3 Bucket Name: The S3 bucket where the .zip file for the Lambda function (sec-hub-email.zip) is stored.
    2. S3 key name (with prefixes): The S3 key name (with prefixes) for the .zip file for the Lambda function.
    3. Email address: The email address of the subscriber to the Security Hub summary email.
    4. CloudWatch Cron Expression: The Cron expression for scheduling the Security Hub summary email. The default is every Monday 8:00 AM GMT. Learn more about creating Cron expressions.
    5. Additional Footer Text: Text that will appear at the bottom of the email message. This can be useful to guide the recipient on next steps or provide internal resource links. This is an optional parameter; leave it blank for no text.
    Figure 12: Enter CloudFormation parameters

    Figure 12: Enter CloudFormation parameters

  7. Choose Next.
  8. Keep all defaults in the screens that follow, and choose Next.
  9. Select the check box I acknowledge that AWS CloudFormation might create IAM resources, and then choose Create stack.

Test the solution

You can send a test email after the deployment is complete. To do this, navigate to the Lambda console and locate the Lambda function named SendSecurityHubSummaryEmail. Perform a manual invocation with any event payload to receive an email within a few minutes. You can repeat this procedure as many times as you wish.

Conclusion

We’ve outlined an approach for rapidly building a solution for sending a weekly summary of the security posture of your AWS account as evaluated by Security Hub. This solution makes it easier for you to be diligent in reviewing any outstanding findings and to remediate findings in a timely way based on their severity. You can extend the solution in many ways, including:

  1. Add links in the footer text to the remediation workflows, such as creating a ticket for ServiceNow or any Security Information and Event Management (SIEM) that you use.
  2. Add links to internal wikis for workflows like organizational exceptions to vulnerabilities or other internal processes.
  3. Extend the solution by modifying the custom insights content, email content, and delivery frequency.

To learn more about how to set up and customize Security Hub, see these additional blog posts.

If you have feedback about this post, submit comments in the Comments section below. If you have any questions about this post, start a thread on the AWS Security Hub forum.

Want more AWS Security how-to content, news, and feature announcements? Follow us on Twitter.

Author

Justin Criswell

Justin is a Senior Security Specialist Solutions Architect at AWS. His background is in cloud security and customer success. Today, he is focused on helping enterprise AWS customers adopt and operationalize AWS Security Services to increase visibility and reduce risk.

Author

Kavita Mahajan

Kavita is a Senior Partner Solutions Architect at AWS. She has a background in building software systems for the financial sector, specifically insurance and banking. Currently, she is focused on helping AWS partners develop capabilities, grow their practices, and innovate on the AWS platform to deliver the best possible customer experience.

Updated whitepaper available: Encrypting File Data with Amazon Elastic File System

Post Syndicated from Joe Travaglini original https://aws.amazon.com/blogs/security/updated-whitepaper-available-encrypting-file-data-with-amazon-elastic-file-system/

We’re sharing an update to the Encrypting File Data with Amazon Elastic File System whitepaper to provide customers with guidance on enforcing encryption of data at rest and in transit in Amazon Elastic File System (Amazon EFS). Amazon EFS provides simple, scalable, highly available, and highly durable shared file systems in the cloud. The file systems you create by using Amazon EFS are elastic, which allows them to grow and shrink automatically as you add and remove data. They can grow to petabytes in size, distributing data across an unconstrained number of storage servers in multiple Availability Zones.

Read the updated whitepaper to learn about best practices for encrypting Amazon EFS. Learn how to enforce encryption at rest while you create an Amazon EFS file system in the AWS Management Console and in the AWS Command Line Interface (AWS CLI), and how to enforce encryption of data in transit at the client connection layer by using AWS Identity and Access Management (IAM).

Download and read the updated whitepaper.

If you have questions or want to learn more, contact your account executive or contact AWS Support. If you have feedback about this post, submit comments in the Comments section below.

Want more AWS Security how-to content, news, and feature announcements? Follow us on Twitter.

Author

Joseph Travaglini

For over four years, Joe has been a product manager on the Amazon Elastic File System team, responsible for the Amazon EFS security and compliance roadmap, and a product lead for the launch of EFS Infrequent Access. Prior to joining the Amazon EFS team, Joe was Director of Products at Sqrrl, a cybersecurity analytics startup acquired by AWS in 2018.

Author

Peter Buonora

Pete is a Principal Solutions Architect for AWS, with a focus on enterprise cloud strategy and information security. Pete has worked with the largest customers of AWS to accelerate their cloud adoption and improve their overall security posture.

Author

Siva Rajamani

Siva is a Boston-based Enterprise Solutions Architect for AWS. He enjoys working closely with customers and supporting their digital transformation and AWS adoption journey. His core areas of focus are security, serverless computing, and application integration.