Tag Archives: AWS Lambda

Simplifying developer experience with variables and JSONata in AWS Step Functions

Post Syndicated from Chris McPeek original https://aws.amazon.com/blogs/compute/simplifying-developer-experience-with-variables-and-jsonata-in-aws-step-functions/

This post is written by Uma Ramadoss, Principal Specialist SA, Serverless and Dhiraj Mahapatro, Principal Specialist SA, Amazon Bedrock

AWS Step Functions is introducing variables and JSONata data transformations. Variables allow developers to assign data in one state and reference it in any subsequent steps, simplifying state payload management without the need to pass data through multiple intermediate states. With JSONata, an open source query and transformation language, you now perform advanced data manipulation and transformation, such as date and time formatting and mathematical operations.

This blog post explores the powerful capabilities of these new features, delving deep into simplifying data sharing across states using variables and reducing data manipulation complexity through advanced JSONata expressions.

Overview

Customers choose Step Functions to build complex workflows that involve multiple services such as AWS Lambda, AWS Fargate, Amazon Bedrock, and HTTP API integrations. Within these workflows, you build states to interface with these various services, passing input data and receiving responses as output. While you can use Lambda functions for date, time, and number manipulations beyond Step Functions’ intrinsic capabilities, these methods struggle with increasing complexity, leading to payload restrictions, data conversion burdens, and more state changes. This affects the overall cost of the solution. You use variables and JSONata to address this.

To illustrate these new features, consider the same business use case from the JSONPath blog, a customer onboarding process in the insurance industry. A potential customer provides basic information, including names, addresses, and insurance interests, while signing up. This Know-Your-Customer (KYC) process starts a Step Functions workflow with a payload containing these details. The workflow decides the customer’s approval or denial, followed by sending a notification.

{
  "data": {
    "firstname": "Jane",
    "lastname": "Doe",
    "identity": {
      "email": "[email protected]",
      "ssn": "123-45-6789"
    },
    "address": {
      "street": "123 Main St",
      "city": "Columbus",
      "state": "OH",
      "zip": "43219"
    },
    "interests": [
      {"category": "home", "type": "own", "yearBuilt": 2004, "estimatedValue": 800000},
      {"category": "auto", "type": "car", "yearBuilt": 2012, "estimatedValue": 8000},
      {"category": "boat", "type": "snowmobile", "yearBuilt": 2020, "estimatedValue": 15000},
      {"category": "auto", "type": "motorcycle", "yearBuilt": 2018, "estimatedValue": 25000},
      {"category": "auto", "type": "RV", "yearBuilt": 2015, "estimatedValue": 102000},
      {"category": "home", "type": "business", "yearBuilt": 2009, "estimatedValue": 500000}
    ]
  }
}

The original workflow diagram illustrates the workflow without new features, while the new workflow diagram shows the workflow built by applying variables and JSONata. Access the workflows in the GitHub repository from the main (original workflow) and jsonata-variables (new workflow) branches.

Image of Original Workflow.

Figure 1: Original Workflow

Image of New Workflow.

Figure 2: New Workflow

Setup

Follow the steps in the README to create this state machine and cleanup once testing is complete.

Simplifying data sharing with variables

Variables allow you to instantiate or assign state results to a variable that is referenced in future states. In a single state, you assign multiple variables with different values, including static data, results of a state, JSONPath or JSONata expressions, and intrinsic functions. The following diagram illustrates how variables are assigned and used inside a state machine:

Image of Variable assignment and scope.

Figure 3: Variable assignment and scope

Variable scope

In Step Functions, variables have a scope similar to programming languages. You define variables at different levels, with inner scope and outer scope. Inner scope variables are defined inside map, parallel, or nested workflows and these variables are only accessible within their specific scope. Alternatively, you set outer scope variables at the top level. Once assigned, these variables can be accessed from any downstream state irrespective of their order of execution in the future. However, as of the release of this blog, distributed map state cannot reference variables in outer scopes. The user guide on variable scope elaborates on these edge cases.

Variable assignment and usage
To set a variable’s value, use the special field Assign. The JSONata part of this blog post further down explains the purpose of {%%}.

"Assign": {
  "inputPayload": "{% $states.context.Execution.Input %}",
  "isCustomerValid": "{% $states.result.isIdentityValid and $states.result.isAddressValid %}"
} 

Use a variable by writing a dollar sign ($) before its name.

{
  "TableName": "AccountTable",
  "Item": {
    "email": {
      "S": "{% $inputPayload.data.email %}"
    },
    "firstname": {
      "S": "{% $inputPayload.data.firstname %}"
    },....
} 

Simplifying data manipulations with JSONata

JSONata is a lightweight query and transformation language for Json data. JSONata offers more capabilities compared to JSONPath within Step Functions.

Setting QueryLanguage to “JSONata” and using {%%} tags for JSONata expressions allows you to leverage JSONata within a state machine. Apply this configuration at the top level of the state machine or at each task level. JSONata at the task level gives you fine-grained control of choosing JSONata vs JSONPath. This approach is valuable for complex workflows where you want to simplify a subset of states with JSONata and continue to use JSONPath for the rest. JSONata provides you with more functions and operators than JSONPath and intrinsic functions in Step Functions. Activating the QueryLanguage attribute as JSONata at the state machine level disables JSONPath, therefore, restricting the use of InputPath, Parameters,  ResultPath, ResultSelector, and OutputPath. Instead of these JSONPath parameters, JSONata uses Arguments and Output.

Optimizing simple states

One of the first things to notice in the new state machine is that the Verification process does not use Lambda functions anymore as seen in the following comparison:

Image of Lambda functions replaced with Pass states.

Figure 4: Lambda functions replaced with Pass states

In the previous approach, a Lambda function is used to validate email and SSN using regular expressions:

const ssnRegex = /^\d{3}-?\d{2}-?\d{4}$/;
const emailRegex = /^[a-zA-Z0-9._-]+@[a-zA-Z0-9.-]+\.[a-zA-Z]{2,4}$/;

exports.lambdaHandler = async event => {
  const { ssn, email } = event;
  const approved = ssnRegex.test(ssn) && emailRegex.test(email);

  return {
    statusCode: 200,
    body: JSON.stringify({ 
      approved,
      message: `identity validation ${approved ? 'passed' : 'failed'}`
    })
  }
};

With JSONata, you define regular expressions directly in the state machine’s Amazon States Language (ASL). You use a Pass state and $match() from JSONata to validate the email and the SSN.

{
  "StartAt": "Check Identity",
   "States": {
    "Check Identity": {
      "Type": "Pass",
      "QueryLanguage": "JSONata",
      "End": true,
      "Output": {
        "isIdentityValid": "{% $match($states.input.data.identity.email, /^[a-zA-Z0-9._%+-]+@[a-zA-Z0-9.-]+\\.[a-zA-Z]{2,}$/) and $match($states.input.data.identity.ssn, /^(\\d{3}-?\\d{2}-?\\d{4}|XXX-XX-XXXX)$/) %}"
      }
    }
   }
}

The same applies to validate the address inside a Pass state using sophisticated JSONata string functions like $length, $trim, $each, and $not from JSONata:

{
  "StartAt": "Check Address",
  "States": {
    "Check Address": {
      "Type": "Pass",
      "QueryLanguage": "JSONata",
      "End": true,
      "Output": {
        "isAddressValid": "{% $not(null in $each($states.input.data.address, function($v) { $length($trim($v)) > 0 ? $v : null })) %}"
      }
    }
  }
}

When using JSONata, $states becomes a reserved variable.

Result aggregation

Previously with JSONPath, using an expression outside of a Choice state was not available. That is not the case anymore with JSONata. The parallel state, in the example, gathers identity and address verification results from each sub-step. You merge the results into a boolean variable isCustomerValid.

"Verification": {
  "Type": "Parallel",
  "QueryLanguage": "JSONata",
  ...
  "Assign": {
    "inputPayload": "{% $states.context.Execution.Input %}",
    "isCustomerValid": "{% $states.result.isIdentityValid and $states.result.isAddressValid %}"
  },
  "Next": "Approve or Deny?"
}

The crucial part to note here is the access to results via $states.result and use of AND boolean-operator inside {%%}. This ultimately makes the downstream Choice state, which uses this variable, simpler. Operators in JSONata give you flexibility to write expressions like these wherever possible, which reduces the need of a compute layer to process simple data transformations.

Additionally, the Choice state becomes simpler to use with flexible JSONata operators and expressions, as long as the expressions within {%%} result in a true or false value.

"Approve or Deny?": {
  "Type": "Choice",
  "QueryLanguage": "JSONata",
  "Choices": [
    {
      "Next": "Add Account",
      "Condition": "{% $isCustomerValid %}"
    }
  ],
  "Default": "Deny Message"
}

Intrinsic functions as JSONata functions

Step Functions provides built-in JSONata functions to enable parity with Step Functions’ intrinsic functions. The DynamoDB putItem step shows how you use $uuid() that has the same functionality as States.UUID() intrinsic function. You also get JSONata specific functions on date and time. The following state shows the use of $now() to get the current timestamp as ISO-8601 as a string before inserting this item to the DynamoDB table.

"Add Account": {
  "Type": "Task",
  "QueryLanguage": "JSONata",
  "Resource": "arn:aws:states:::dynamodb:putItem",
  "Arguments": {
    "TableName": "AccountTable",
    "Item": {
      "PK": {
        "S": "{% $uuid() %}"
      },
      "email": {
        "S": "{% $inputPayload.data.identity.email %}"
      },
      "name": {
        "S": "{% $inputPayload.data.firstname & ' ' & $inputPayload.data.lastname  %}"
      },
      "address": {
        "S": "{% $join($each($inputPayload.data.address, function($v) { $v }), ', ') %}"
      },
      "timestamp": {
        "S": "{% $now() %}"
      }
    }
  },
  "Next": "Interests"
}

Notice that you don’t apply the .$ notation in S.$ anymore as JSONata expressions reduces developer pain while building state machine ASL. Explore the additional JSONata functions accessible within Step Functions.

Advanced JSONata

JSONata’s flexibility stems from its pre-built functions, higher-order functions support, and functional programming constructs. With JSONPath, you used the advanced expressions "InputPath": "$..interests[?(@.category==home)]" to filter Home insurance related interests from the interests array. JSONata does much more than filtering. For example, you look for home insurance interests, totalAssetValue of the category type as home, and refer to existing fields like name and email as JSONata variables:

(
    $e := data.identity.email;
    $n := data.firstname & ' ' & data.lastname;
    
    data.interests[category = 'home']{
      'customer': $n,
      'email': $e,
      'totalAssetValue': $sum(estimatedValue),
      category: {type: yearBuilt}
    }
)

The result JSON will be:

{
  "customer": "Jane Doe",
  "email": "[email protected]",
  "totalAssetValue": 1400000,
  "home": {
    "own": 2004,
    "business": 2009
  }
}

By following these steps, you ascend one level by collecting all of the insurance interests and their aggregated results. Notice that the category filter is no longer present.

(
    $e := data.identity.email;
    $n := data.firstname & ' ' & data.lastname;
    
    data.interests{
      'customer': $n,
      'email': $e,
      'totalAssetValue': $sum(estimatedValue),
      category: {type: yearBuilt}
    }
)

which results in:

{
  "customer": "Jane Doe",
  "email": "[email protected]",
  "totalAssetValue": 1549000,
  "home": {
    "own": 2004,
    "business": 2009
  },
  "auto": {
    "car": 2012,
    "motorcycle": 2018,
    "RV": 2015
  },
  "boat": {
    "snowmobile": 2020
  }
}

Discovering complex expressions

Use the JSONata playground with your sample data to discover detailed and complex expressions that fit your requirements. The following is an example of using the JSONata playground:

Image of JSONata playground.

Figure 5: JSONata playground

Considerations

Variable Size

The maximum size of a single variable is 256Kib. This limit helps you bypass the Step Functions payload size restriction by letting you store state outputs in separate variables. While each individual variable can be up to 256Kib in size, the total size of all variables within a single Assign field cannot exceed 256Kib. Use Pass states to workaround this limitation, however, the total size of all stored variables cannot exceed 10MiB per execution.

Variable visibility

Variables are a powerful mechanism to simplify the data sharing across states. Prefer them over ResultPath, OutputPath or JSONata’s Output fields because of their ease of use and flexibility. There are two situations where you might still use Output. First, you can’t access inner-scoped variables in the outer scope. In these cases, fields in Output can help share data between different workflow levels. Second, when sending a response from the final state of the workflow, you may need to use fields in Output fields. The following transition diagram from JSONPath to JSONata provides additional details:

Image of Transition from JSONPath to JSONata.

Figure 6: Transition from JSONPath to JSONata

Additionally, variables assigned to a specific state are not accessible in that same state:

"Assign Variables": {
  "Type": "Pass",
  "Next": "Reassign Variables",
  "Assign": {
    "x": 1,
    "y": 2
  }
},
"Reassign Variables": {
  "Type": "Pass",
  "Assign": {
    "x": 5,
    "y": 10,
      ## The assignment will fail unless you define x and y in a prior state.
      ## otherwise, the value of z will be 3 instead of 15.
    "z": "{% $x+$y %}"
  },
  "Next": "Pass"
}

Best practices

Step Functions’ validation API provides semantic checks for workflows, allowing for early problem identification. To ensure safe workflow updates, it’s best to combine the validation API with versioning and aliases for incremental deployment.

Multi-line expressions in JSONata are not valid JSON. Therefore, use a single line as string delimited by a semicolon “;” where the last line returns the expression.

Mutually exclusive

Use of QueryLanguage type is mutually exclusive. Do not mix JSONPath/intrinsic functions and JSONata during variable assignments. For example, the below task fails because the variable b uses JSONata, whereas c uses an intrinsic function.

"Store Inputs": {
  "Type": "Pass",
  "QueryLanguage": "JSONata"
  "Assign": {
    "inputs": {
      "a": 123,
      "b": "{% $states.input.randomInput %}",
      "c.$": "States.MathRandom($.start, $.end)"
    }
  },
  "Next": "Average"
}

To use variables with JSONPath, set the QueryLanguage to JSONPath or remove this attribute from the task definition.

Conclusion

With variables and JSONata, AWS Step Functions now elevates the developer’s experience to write elegant workflows with simpler code in Amazon States Language (ASL) that matches with the normal programming paradigm. Developers can now build faster and write cleaner code by cutting out extra data transformation steps. These capabilities can be used in both new and existing workflows, giving you the flexibility to upgrade from JSONPath to JSONata and variables.

Variables and JSONata are available at no additional cost to customers in all the AWS regions where AWS Step Functions is available. For more information, refer to the user guide for JSONata and variables, as well as the sample application in the jsonata-variables branch.

To expand your serverless knowledge, visit Serverless Land.

Introducing new Event Source Mapping (ESM) metrics for AWS Lambda

Post Syndicated from Chris McPeek original https://aws.amazon.com/blogs/compute/introducing-new-event-source-mapping-esm-metrics-for-aws-lambda/

This post is written by Tarun Rai Madan, Principal Product Manager –  Serverless, and Rajesh Kumar Pandey, Principal Software Engineer, Serverless

Today, AWS is announcing new opt-in Amazon CloudWatch metrics for AWS Lambda Event Source Mappings that subscribe to Amazon Simple Queue Service (Amazon SQS), Amazon Kinesis, and Amazon DynamoDB event sources. These metrics include PolledEventCount, InvokedEventCount, FilteredOutEventCount, FailedInvokeEventCount, DeletedEventCount, DroppedEventCount, and OnFailureDestinationDeliveredEventCount. The new metrics enable customers to monitor the processing state of events read by Event Source Mappings (ESMs), and helps them diagnose processing issues.

Previously, customers found it challenging to monitor the processing state of events read by an ESM. An ESM is a resource that polls events from an event source and invokes a Lambda function. With the new metrics for ESMs, you can count events by their processing state, which includes events that were polled, invoked, filtered out, deleted, dropped, failed, or sent to on-failure destination.

Overview

Customers building modern event-driven applications use services like SQS, Kinesis, and DynamoDB as fundamental building blocks for developing decoupled architectures, and use a Lambda function as a consumer to benefit from its simplicity, auto-scaling and cost effectiveness. To subscribe to an event source, customers configure a Lambda Event Source Mapping (ESM). An ESM is a fully-managed Lambda resource that runs an event poller which polls, processes (e.g., filters and batches), and delivers the events to a Lambda function. Due to the processing that happens on an ESM, for example, filtering, batching, and delivery to on-failure destinations, events can end up in varying terminal states. As a result, some polled events may not invoke a Lambda function. Previously, the count of polled, filtered, invoked, deleted or dropped events was not visible to customers. This made it challenging for customers to diagnose processing issues with their ESM, resulting from faulty permissions, misconfiguration, or function errors.

What’s new

With today’s announcement, customers can opt-in to CloudWatch metrics to monitor the processing state of events that are read by an ESM configured with SQS, Kinesis and DynamoDB as event sources.

PolledEventCount metric counts the number of events read by an ESM from the event source.

InvokedEventCount metric counts the number of events that invoked your Lambda function. For an event that experiences function errors, this metric may increase the count multiple times for the same polled event, due to retries.

FilteredOutEventCount metric counts the number of events filtered out by your ESM, based on the Filter Criteria defined by you.

FailedInvokeEventCount metric counts the number of events that attempted to invoke a Lambda function, but encountered partial or complete failure.

DeletedEventCount metric counts the events that have been deleted from the SQS queue by Lambda upon successful processing.

DroppedEventCount metric counts the number of events dropped due to event expiry or exhaustion of retry attempts, for Kinesis and DynamoDB ESMs configured with MaximumRecordAgeInSeconds or MaximumRetryAttempts.

OnFailureDestinationDeliveredEventCount metric counts the events sent to an on-failure destination upon reaching the MaximumRecordAgeInSeconds or MaximumRetryAttempts, for ESMs configured with DestinationConfig.

How to use the new ESM metrics

Once an ESM is created and reaches enabled state, it continuously polls the event source for new events. You can monitor the PolledEventCount metric to catch issues with polling due to misconfigured or deleted event source, misconfigured or deleted Lambda function execution role, incorrect permissions, or throttles from the event source. This metric typically increases when there is an increase in traffic in the event source. You can observe the InvokedEventCount metric to catch issues with the Lambda function, and whether the events are properly invoking your Lambda function. In case of Lambda function errors, InvokedEventCount could be more than PolledEventCount due to retries. This metric would also increase when there is an increase in events processed by an ESM. For ESMs that have filter criteria configured, you can monitor the FilteredOutEventCount to count events that were not sent to a Lambda function because they were filtered out per the defined filter criteria.

You can monitor the FailedInvokeEventCount metric to observe the number of events that failed processing when Lambda service tried to invoke your Lambda function. Invocations can fail due to network configuration issues, incorrect permissions, or a deleted Lambda function, version, or alias. If your event source mapping has partial batch responses enabled, this metric includes any event with a non-empty BatchItemFailures in the response. If all events in a batch are successfully processed by your Lambda function, Lambda service emits a 0 value for this metric. You can use the DeletedEventCount metric to ensure that processed events have been successfully deleted from your SQS queue after being processed by the Lambda function. You can use the DroppedEventCount metric to identify issues with message backlogs or misconfigured event expiry rules. You can use the OnFailureDestinationDeliveredEventCount metric to monitor issues such as failed events caused by Lambda function invocation errors.

The classification for available Lambda ESM metrics by event source is presented below:

CloudWatch metric SQS DynamoDB Kinesis Data Stream
PolledEventCount √ √ √
InvokedEventCount √ √ √
FilteredOutEventCount √ √ √
FailedInvokeEventCount √ √ √
DeletedEventCount √
DroppedEventCount √ √
OnFailureDestinationDeliveredEventCount √ √

Activating and testing the new ESM metrics

You can enable the new ESM metrics using AWS Lambda Console, AWS Command Line Interface (CLI), Lambda ESM API, AWS SDK, AWS CloudFormation, and AWS Serverless Application Model (SAM). The metrics will be published under the AWS/Lambda namespace and EventSourceMappingUUID dimension in the CloudWatch console. To learn more, see CloudWatch metrics for Lambda.

Using AWS CLI

To turn on the new metrics using AWS CLI, use the –metrics-config parameter.

aws lambda create-event-source-mapping \
    --region <region-name> \
    --function-name <function-name> \
    --event-source-arn <event-source-arn> \
    --metrics-config '{"Metrics": ["EventCount"]}'

Using AWS Lambda Console

To turn on the new metrics using AWS Lambda Console, click on “Enable metrics” while adding the trigger for your function.

Enabling ESM metrics in AWS Console.

Figure 1: Enabling ESM metrics in AWS Console

A typical scenario where the new ESM metrics can help with better observability is an ESM that uses event filtering. To test the ESM metrics, you can deploy a sample Lambda application with Kinesis as an event source using this serverless pattern, which uses event filtering with a certain criteria to control which events are sent to Lambda. Use this pattern for both the example scenarios; please follow the setup guidelines for this pattern and continue with testing for the scenarios. Running this sample project in your account may incur charges. See AWS Lambda pricing and Amazon Kinesis pricing.

Configuring Lambda function with Kinesis event source.

Figure 2: Configuring Lambda function with Kinesis event source

Example scenario 1: ESM metrics with event filtering configured

The following diagram shows the results for the test scenario with Kinesis ESM, where the total polled events, filtered events, invoked events, and failed events are represented by PolledEventCount, FilteredOutEventCount, InvokedEventCount and FailedInvokeEventCount.

Image of ESM metrics for scenario 1.

Figure 3: ESM metrics for scenario 1

Example Scenario 2: ESM metrics with event filtering and On-Failure Destination configured

Another common scenario is where you want to have visibility around the number of events delivered to Lambda function, events filtered, and additionally, the count of events routed to on-failure destination upon failure. To test this scenario, follow a setup similar to the one in scenario 1. Create or update the ESM with an on-failure destination, and set MaximumRetryCount to 1, as shown below.

aws lambda update-event-source-mapping \
    --uuid <event-source-mapping-uuid> \
    --maximum-retry-attempts 1 \
    --filter-criteria '{"Filters": [{"Pattern": "{\"data\": { \"tire_pressure\": [ { \"numeric\": [ \"<\", 32 ] } ] } }"}]}' \
    --destination-config '{"OnFailure": {"Destination": "<your_SQS_queue_ARN>"}}' \
    --function-name <lambda-function-name>

Publish a sample payload which matches the FilterCriteria defined above. Also generate sample data with different “tire_pressure” < 32 to match the event and invoke the Lambda function.

Sample Data:

{
    "time": "2021-11-09 13:32:04",
    "fleet_id": "fleet-452",
    "vehicle_id": "a42bb15c-43eb-11ec-81d3-0242ac130003",
    "lat": 47.616226213162406,
    "lon": -122.33989110734133,
    "speed": 43,
    "odometer": 43519,
    "tire_pressure": [41, 40, 31, 41],
    "weather_temp": 76,
    "weather_pressure": 1013,
    "weather_humidity": 66,
    "weather_wind_speed": 8,
    "weather_wind_dir": "ne"
}

Once you have published these records to the stream, you should be able to see the CloudWatch metrics under AWS/Lambda namespace with the EventSourceMappingUUID dimension, as shown below. Note that if an event experiences a function error, InvokedEventCount may increase multiple times for the same polled event due to automatic retries.

Image of ESM metrics for scenario 2.

Figure 4: ESM metrics for scenario 2

Available Now

The new ESM metrics are generally available in all commercial regions that Lambda service is available in. Support is also available through AWS Lambda partners like Datadog, Elastic, and Lumigo. The Lambda service sends these new metrics to CloudWatch at no additional cost to you. However, charges apply for CloudWatch metrics at standard CloudWatch metrics pricing for these opt-in metrics, in addition to your AWS Lambda pricing and event source pricing.

Conclusion

With these new CloudWatch metrics, you can gain visibility into the processing state of your events that are polled by Lambda Event Source Mapping (ESM) for queue-based or stream-based applications. The blog explains the new metrics PolledEventCount, InvokedEventCount, FilteredOutEventCount, FailedInvokeEventCount, DeletedEventCount, DroppedEventCount, and OnFailureDestinationDeliveredEventCount, and how to use them to troubleshoot event processing issues for Lambda functions. These metrics help you track the invocation requests sent to Lambda via an ESM, monitor any delays or issues in processing, and take corrective actions if required. To learn more about these metrics, visit Lambda developer guide.

For more serverless learning resources, visit Serverless Land.

Node.js 22 runtime now available in AWS Lambda

Post Syndicated from Julian Wood original https://aws.amazon.com/blogs/compute/node-js-22-runtime-now-available-in-aws-lambda/

This post is written by Julian Wood, Principal Developer Advocate, and Andrea Amorosi, Senior SA Engineer.

You can now develop AWS Lambda functions using the Node.js 22 runtime, which is in active LTS status and ready for production use. Node.js 22 includes a number of additions to the language, including require()ing ES modules, as well as changes to the runtime implementation and the standard library. With this release, Node.js developers can take advantage of these new features and enhancements when creating serverless applications on Lambda.

You can develop Node.js 22 Lambda functions using the AWS Management Console, AWS Command Line Interface (AWS CLI), AWS SDK for JavaScript, AWS Serverless Application Model (AWS SAM), AWS Cloud Development Kit (AWS CDK), and other infrastructure as code tools.

To use this new version, specify a runtime parameter value of nodejs22.x when creating or updating functions or by using the appropriate container base image.

You can use Node.js 22 with Powertools for AWS Lambda (TypeScript), a developer toolkit to implement serverless best practices and increase developer velocity. Powertools for AWS Lambda includes libraries to support common tasks such as observability, AWS Systems Manager Parameter Store integration, idempotency, batch processing, and more. You can also use Node.js 22 with Lambda@Edge to customize low-latency content delivered through Amazon CloudFront.

This blog post highlights important changes to the Node.js runtime, notable Node.js language updates, and how you can use the new Node.js 22 runtime in your serverless applications.

Node.js 22 language updates

Node.js 22 introduces several language updates and features that enhance developer productivity and improve application performance.

This release adds support for loading ECMAScript modules (ESM) using require(). You can enable this feature using the --experimental-require-module flag by configuring the NODE_OPTIONS environment variable. require() support for synchronous ESM graphs bridges the gap between CommonJS and ESM, providing more flexibility in module loading. It is important to note that this feature is currently experimental and may change in future releases.

WebSocket support which was previously available behind the --experimental-websocket flag is now enabled by default in Node.js 22. This brings a browser-compatible WebSocket client implementation to Node.js with no need for external dependencies. Native support simplifies building real-time applications and enhances the overall WebSocket experience in Node.js environments.

The new runtime also includes performance improvements to AbortSignal creation. This makes network operations faster and more efficient for the Fetch API and test runner. The Fetch API is also now considered stable in Node.js 22.

For TypeScript users, Node.js 22 introduces experimental support for transforming TypeScript-only syntax into JavaScript code. By using the --experimental-transform-types flag, you can enable this feature to support TypeScript syntax such as Enum and namespace directly. While you can enable the feature in Lambda, your function entrypoint (i.e. index.mjs or app.cjs) cannot currently be written using TypeScript as the runtime expects a file with a JavaScript extension. You can use TypeScript for any other module imported within your codebase.

For a detailed overview of Node.js 22 language features, see the Node.js 22 release blog post and the Node.js 22 changelog.

Experimental features that are unavailable

Node.js 22 includes an experimental feature to detect the module syntax automatically (CommonJS or ES Modules). This feature must be enabled when the Node.js runtime is compiled. Since the Lambda-provided Node.js 22 runtime is intended for production workloads, this experimental feature is not enabled in the Lambda build and cannot be enabled via an execution-time flag. To use this feature in Lambda, you need to deploy your own Node.js runtime using a custom runtime or container image with experimental module syntax detection enabled.

Performance considerations

At launch, new Lambda runtimes receive less usage than existing established runtimes. This can result in longer cold start times due to reduced cache residency within internal Lambda sub-systems. Cold start times typically improve in the weeks following launch as usage increases. As a result, AWS recommends not drawing conclusions from side-by-side performance comparisons with other Lambda runtimes until the performance has stabilized. Since performance is highly dependent on workload, customers with performance-sensitive workloads should conduct their own testing, instead of relying on generic test benchmarks.

Builders should continue to measure and test function performance and optimize function code and configuration for any impact. To learn more about how to optimize Node.js performance in Lambda, see Performance optimization in the Lambda Operator Guide, and our blog post Optimizing Node.js dependencies in AWS Lambda.

Migration from earlier Node.js runtimes

AWS SDK for JavaScript

Up until Node.js 16, Lambda’s Node.js runtimes included the AWS SDK for JavaScript version 2. This has since been superseded by the AWS SDK for JavaScript version 3, which was released in December 2022. Starting with Node.js 18, and continuing with Node.js 22, the Lambda Node.js runtimes include version 3. When upgrading from Node.js 16 or earlier runtimes and using the included version 2, you must upgrade your code to use the v3 SDK.

For optimal performance, and to have full control over your code dependencies, we recommend bundling and minifying the AWS SDK in your deployment package, rather than using the SDK included in the runtime. For more information, see Optimizing Node.js dependencies in AWS Lambda.

Amazon Linux 2023

The Node.js 22 runtime is based on the provided.al2023 runtime, which is based on the Amazon Linux 2023 minimal container image. The Amazon Linux 2023 minimal image uses microdnf as a package manager, symlinked as dnf. This replaces the yum package manager used in Node.js 18 and earlier AL2-based images. If you deploy your Lambda function as a container image, you must update your Dockerfile to use dnf instead of yum when upgrading to the Node.js 22 base image from Node.js 18 or earlier.

Additionally AL2 includes curl and gnupg2 as their minimal versions curl-minimal and gnupg2-minimal.

Learn more about the provided.al2023 runtime in the blog post Introducing the Amazon Linux 2023 runtime for AWS Lambda and the Amazon Linux 2023 launch blog post.

Using the Node.js 22 runtime in AWS Lambda

AWS Management Console

To use the Node.js 22 runtime to develop your Lambda functions, specify a runtime parameter value Node.js 22.x when creating or updating a function. The Node.js 22 runtime version is now available in the Runtime dropdown on the Create function page in the AWS Lambda console:

Creating Node.js function in AWS Management Console

Creating Node.js function in AWS Management Console

To update an existing Lambda function to Node.js 22, navigate to the function in the Lambda console, then choose Node.js 22.x in the Runtime settings panel. The new version of Node.js is available in the Runtime dropdown:

Changing a function to Node.js 22

Changing a function to Node.js 22

AWS Lambda container image

Change the Node.js base image version by modifying the FROM statement in your Dockerfile.

FROM public.ecr.aws/lambda/nodejs:22
# Copy function code
COPY lambda_handler.xx ${LAMBDA_TASK_ROOT}

AWS Serverless Application Model (AWS SAM)

In AWS SAM, set the Runtime attribute to node22.x to use this version:

AWSTemplateFormatVersion: "2210-09-09"
Transform: AWS::Serverless-2216-10-31

Resources:
  MyFunction:
    Type: AWS::Serverless::Function
    Properties:
      Handler: lambda_function.lambda_handler
      Runtime: nodejs22.x
      CodeUri: my_function/.
      Description: My Node.js Lambda Function

When you add function code directly in an AWS SAM or AWS CloudFormation template as an inline function, it is seen as common.js.

AWS SAM supports generating this template with Node.js 22 for new serverless applications using the sam init command. Refer to the AWS SAM documentation.

AWS Cloud Development Kit (AWS CDK)

In AWS CDK, set the runtime attribute to Runtime.NODEJS_22_X to use this version.

import * as cdk from "aws-cdk-lib";
import * as lambda from "aws-cdk-lib/aws-lambda";
import * as path from "path";
import { Construct } from "constructs";

export class CdkStack extends cdk.Stack {
  constructor(scope: Construct, id: string, props?: cdk.StackProps) {
    super(scope, id, props);

    // The code that defines your stack goes here

    // The Node.js 22 enabled Lambda Function
    const lambdaFunction = new lambda.Function(this, "node22LambdaFunction", {
      runtime: lambda.Runtime.NODEJS_22_X,
      code: lambda.Code.fromAsset(path.join(__dirname, "/../lambda")),
      handler: "index.handler",
    });
  }
}


Conclusion

Lambda now supports Node.js 22 as a managed language runtime. This release uses the Amazon Linux 2023 OS as well as other improvements detailed in this blog post.

You can build and deploy functions using Node.js 22 using the AWS Management Console, AWS CLI, AWS SDK, AWS SAM, AWS CDK, or your choice of infrastructure as code tool. You can also use the Node.js 22 container base image if you prefer to build and deploy your functions using container images.

The Node.js 22 runtime helps developers build more efficient, powerful, and scalable serverless applications. Read about the Node.js programming model in the Lambda documentation to learn more about writing functions in Node.js 22. Try the Node.js runtime in Lambda today.

For more serverless learning resources, visit Serverless Land.
Track performance of serverless applications built using AWS Lambda with Application Signals

Post Syndicated from Veliswa Boya original https://aws.amazon.com/blogs/aws/track-performance-of-serverless-applications-built-using-aws-lambda-with-application-signals/

In November 2023, we announced Amazon CloudWatch Application Signals, an AWS built-in application performance monitoring (APM) solution, to solve the complexity associated with monitoring performance of distributed systems for applications hosted on Amazon EKS, Amazon ECS, and Amazon EC2. Application Signals automatically correlates telemetry across metrics, traces, and logs, to speed up troubleshooting and reduce application disruption. By providing an integrated experience for analyzing performance in the context of your applications, Application Signals gives you improved productivity focusing on the applications that support your most critical business functions.

Today we’re announcing the availability of Application Signals for AWS Lambda to eliminate the complexities of manual setup and performance issues required to assess application health for Lambda functions. With CloudWatch Application Signals for Lambda, you can now collect application golden metrics (the incoming and outgoing volume of requests, latency, faults, and errors).

AWS Lambda abstracts away the complexity of the underlying infrastructure, enabling you to focus on building your application without having to monitor server health. This allows you to shift your focus toward monitoring the performance and health of your applications, which is necessary to operate your applications at peak performance and availability. This requires deep visibility into performance insights such as volume of transactions, latency spikes, availability drops, and errors for your critical business operations and application programming interfaces (APIs).

Previously, you had to spend significant time correlating disjointed logs, metrics, and traces across multiple tools to establish the root cause of anomalies, increasing mean time to recovery (MTTR) and operational costs. Additionally, building your own APM solutions with custom code or manual instrumentation using open source (OSS) libraries was time-consuming, complex, operationally expensive, and often resulted in increased cold start times and deployment challenges when managing large fleets of Lambda functions. Now, you can use Application Signals to seamlessly monitor and troubleshoot health and performance issues in serverless applications, without requiring any manual instrumentation or code changes from your application developers.

How it works
Using the pre-built, standardized dashboards of Application Signals, you can identify the root cause of performance anomalies in just a few clicks by drilling down into performance metrics for critical business operations and APIs. This helps you visualize application topology which shows interactions between the function and its dependencies. In addition, you can define Service Level Objectives (SLOs) on your applications to monitor specific operations that matter most to you. An example of an SLO could be to set a goal that a webpage should render within 2000 ms 99.9 percent of the time in a rolling 28-day interval.

Application Signals auto-instruments your Lambda function using enhanced AWS Distro for OpenTelemetry (ADOT) libraries. This delivers better performance such as lower cold start latency,
memory consumption, and function invocation duration, so you can quickly monitor your applications.

I have an existing Lambda function appsignals1 and I will configure Application Signals in the Lambda Console to collect various telemetry on this application.

In the Configuration tab of the function I select Monitoring and operations tools to enable both the Application signals and the Lambda service traces.

I have an application myAppSignalsApp that has this Lambda function attached as a resource. I’ve defined an SLO for my application to monitor specific operations that matter most to me. I’ve defined a goal that states that the application executes within 10 ms 99.9 percent of the time in a rolling 1-day interval.

It can take 5-10 minutes for Application Signals to discover the function after it’s been invoked. As a result you’ll need to refresh the Services page before you can see the service.

Now I’m in the Services page and I can see a list of all my Lambda functions that have been discovered by Application Signals. Any telemetry that is emitted will be displayed here.

I can then visualize the complete application topology from the Service Map and quickly spot anomalies across my service’s individual operations and dependencies, using the newly collected metrics of volume of requests, latency, faults, and errors. To troubleshoot, I can click into any point in time for any application metric graph to discover correlated traces and logs related to that metric, to quickly identify if issues impacting end users are isolated to an individual task or deployment.

Available now
Amazon CloudWatch Application Signals for Lambda is now generally available and you can start using it today in all AWS Regions where Lambda and Application Signals are available. Today, Application Signals is available for Lambda functions that use Python and Node.js managed runtimes. We’ll continue to add support for other Lambda runtimes in near future.

To learn more, visit the AWS Lambda developer guide and Application Signals developer guide. You can submit your questions to AWS re:Post for Amazon CloudWatch, or through your usual AWS Support contacts.

– Veliswa.

Implementing custom domain names for private endpoints with Amazon API Gateway

Post Syndicated from Chris McPeek original https://aws.amazon.com/blogs/compute/implementing-custom-domain-names-for-private-endpoints-with-amazon-api-gateway/

This post is written by Heeki Park, Principal Solutions Architect

Amazon API Gateway is introducing custom domain name support for private REST API endpoints. Customers choose private REST API endpoints when they want endpoints that are only callable from within their Amazon VPC. Custom domain names are simpler and more intuitive URLs that you can use with your applications and were previously only supported with public REST API endpoints. Now you can use custom domain names to map to private REST APIs and share those custom domain names across accounts using AWS Resource Access Manager (AWS RAM).

Overview of API Gateway connectivity

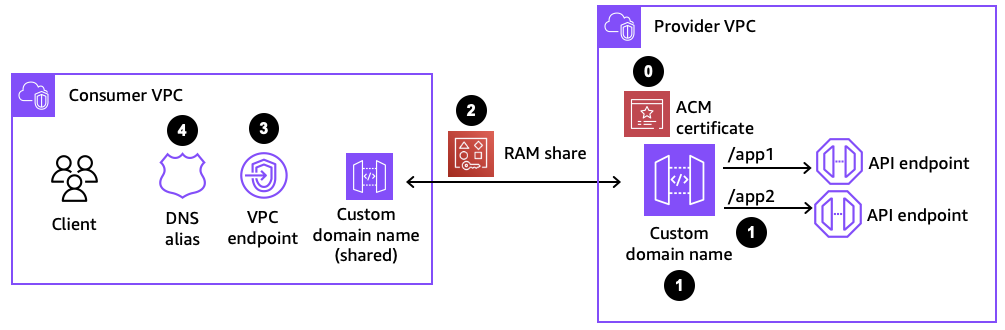
When considering network connectivity with API Gateway, two aspects are important to keep in mind: the integration type and the connectivity type. The following diagram shows examples of those considerations.

Overall architecture diagram showing custom domains for private endpoints.

Figure 1: Overall architecture

The first aspect is the distinction between frontend integrations and backend integrations. Frontend integrations are how API clients like mobile devices, web browsers, or client applications connect to the API endpoint. Backend integrations are the API services to which your API Gateway endpoint proxies requests, like applications running on Amazon Elastic Compute Cloud (EC2) instances, Amazon Elastic Kubernetes Service (EKS) or Amazon Elastic Container Service (ECS) containers, or as AWS Lambda functions. The second aspect is whether that connectivity is via the public internet or via your private VPC.

Calling private REST API endpoints

In order to send requests to a private REST API endpoint, clients must operate within a VPC that is configured with a VPC endpoint. Once a VPC endpoint is configured, a client has three different options within the VPC for connecting to the API endpoint, depending on how the VPC and the VPC endpoint are configured.

If the VPC endpoint has private DNS enabled, the client can send requests to the standard endpoint URL: https://{api-id}.execute-api.{region}.amazonaws.com/{stage}. These requests resolve to the VPC endpoint, which then get routed to the appropriate API Gateway endpoint.

VPC endpoint configured with private DNS names enabled.

Figure 2: VPC endpoint configured with private DNS names enabled

Alternatively, if the VPC endpoint has private DNS disabled, the client can send requests to the VPC endpoint URL: https://{vpce-id}.execute-api.{region}.amazonaws.com/{stage}. One of the following headers also needs to be sent along with that request.

Host: {api-id}.execute-api.us-east-1.amazonaws.com
x-apigw-api-id: {api-id}

Finally, if the VPC endpoint has private DNS disabled and the private REST API endpoint is associated with the VPC endpoint, the client can send requests to the following URL: https://{api-id}-{vpce-id}.execute-api.{region}.amazonaws.com/{stage}. To associate a VPC endpoint with a private API, the following property configures that association.

      EndpointConfiguration:
        Type: PRIVATE
        VPCEndpointIds:
          - !Ref vpcEndpointId

You can see that configuration in the console, as follows.

Optional VPC endpoint configuration with private REST API endpoints.

Figure 3: Optional VPC endpoint configuration with private REST API endpoints

To simplify access to your private REST API endpoints, you can now also configure custom domain names, which functions as a stable vanity URL for your private APIs.

Implementing custom domain names for private endpoints

Before setting up a custom domain name for your private REST API endpoints, a VPC endpoint for API Gateway, an AWS Certificate Manager (ACM) certificate, an Amazon Route 53 private hosted zone, and one or more private REST API endpoints need to be configured.

Once those pre-requisites are set up, a custom domain name can be setup with the following steps:

  1. In the API provider account, create a custom domain name and base path mapping.
  2. In the provider account, use AWS RAM to create a resource share for the custom domain name. In the consumer account, accept the resource share request. This step is only required if the provider and consumer are in different AWS accounts.
  3. In the consumer account, associate the custom domain name to a VPC endpoint.
  4. In the consumer account, create a Route 53 alias to map the custom domain to the VPC endpoint.

Components for configuring a custom domain name.

Figure 4: Components for configuring a custom domain name

Step 1: Creating a private custom domain name

When configuring a custom domain name, two policies are used to manage permissions to the private custom domain name resource. Management policies specify which principals are allowed to associate a private custom domain name to a VPC endpoint. Resource-based policies specify which API consumers are allowed to invoke your private custom domain name.

Creating a private custom domain name.
Figure 5: Creating a private custom domain name

This is an example CloudFormation definition for a private custom domain name.

  DomainName:
    DependsOn: Certificate
    Type: AWS::ApiGateway::DomainNameV2
    Properties:
      CertificateArn: !Ref certificateArn
      DomainName: api.internal.example.com
      EndpointConfiguration:
        Types:
          - PRIVATE
      ManagementPolicy:
        Fn::ToJsonString:
          Statement:
            - Effect: Allow
              Principal:
                AWS:
                  - '123456789012'
              Action: apigateway:CreateAccessAssociation
              Resource: 'arn:aws:apigateway:us-east-1::/domainnames/*'
      Policy:
        Fn::ToJsonString:
          Statement:
            - Effect: Deny
              Principal: '*'
              Action: execute-api:Inovke
              Resource:
                - execute-api:/*
              Condition:
                StringNotEquals:
                  aws:SourceVpce: !Ref vpceEndpointId
            - Effect: Allow
              Principal:
                AWS:
                  - '123456789012'
              Action: execute-api:Invoke
              Resource:
                - execute-api:/*
      SecurityPolicy: TLS_1_2

In this example, the management policy specifies that the account 123456789012 is allowed to associate a private custom domain name with a VPC endpoint. The resource-based policy then denies any request that does not come from a particular VPC endpoint and only allows invoke requests that come from that same account 123456789012.

The private custom domain name then needs to be mapped to a private REST API.

  Mapping:
    DependsOn: DomainName
    Type: AWS::ApiGateway::BasePathMappingV2
    Properties:
      BasePath: app1
      DomainName: api.internal.example.com
      DomainNameId: abcde12345
      RestApiId: !Ref apiId
      Stage: !Ref stageName

In this example, the BasePath is set to app1. If the Stage is set as dev, then the private endpoint can be accessed via https://api.internal.example.com/app1/dev. The domain id is the identifier for the private custom domain name.

Note that with public custom domain names, the domain name has to be unique in the region, since they are resolved publicly. With private custom domain names, since they are resolved within a VPC, a private custom domain name with the same name can be created in different accounts. The private custom domain name is then resolved to the VPC endpoint in that account’s VPC.

Step 2: Sharing the private custom domain name using AWS RAM

In order for API consumers to access the private custom domain name from another account, the custom domain name needs to be shared with the consumer accounts using RAM. If the API provider and API consumer are in the same account, this step with RAM can be skipped.

Sharing the private custom domain name.
Figure 6: Sharing the private custom domain name

The following CloudFormation definition creates a resource share in the provider account.

  Share:
    Type: AWS::RAM::ResourceShare
    Properties:
      Name: private-custom-domain-name
      Principals: 
        - '123456789012'
      ResourceArns: 
        - 'arn:aws:apigateway:us-east-1::/domainnames/api.internal.example.com+abcde12345'

The allowed Principals for the resource share specifies the consumer account ids. The ResourceArns specify the ARN of the private custom domain name.

In the consumer account, an administrator receives a notification to accept the resource share. This request must be accepted to allow the consumer account to see the private custom domain name. This handshake acts as a mutual agreement between the accounts to allow the private custom domain name to be exposed from the provider account to the consumer account. If the provider and consumer accounts are in the same AWS Organization, the share is automatically accepted on behalf of consumers.

Step 3: Associating the private custom domain name to a VPC endpoint

The private custom domain name is now visible in the consumer account. Next, associate the private custom domain name with a VPC endpoint in the consumer account and in the VPC where the client applications reside.

Associating the private custom domain name to a VPC endpoint.
Figure 7: Associating the private custom domain name to a VPC endpoint

  Association:
    DependsOn: DomainName
    Type: AWS::ApiGateway::DomainNameAccessAssociation
    Properties:
      AccessAssociationSource: vpce-abcdefgh123456789
      AccessAssociationSourceType: VPCE
      DomainNameArn: 'arn:aws:apigateway:us-east-1::/domainnames/api.internal.example.com+abcde12345'

The AccessAssociationSource is the VPC endpoint id, and the DomainNameArn is the same ARN that is used in the RAM resource share.

Step 4: Creating a Route 53 alias for the custom domain name

The final step before being able to test the custom domain name in the consumer account is setting up a Route 53 alias. That alias is configured in a private hosted zone that is associated with the VPC where the VPC endpoint and client applications reside. The alias resolves the fully qualified domain name (FQDN) to the VPC endpoint DNS name.

Creating a Route 53 alias.
Figure 8: Creating a Route 53 alias

The following CloudFormation definition creates that alias.

  Alias:
    Type: AWS::Route53::RecordSet
    Properties:
      HostedZoneId: !Ref privateZoneId
      Name: api.internal.example.com
      ResourceRecords:
        - vpce-abcdefgh123456789-abcd1234.execute-api.us-east-1.vpce.amazonaws.com
      TTL: 300
      Type: CNAME

The ResourceRecords point to the FQDN of the VPC endpoint to which our private custom domain name is associated. Once this alias is created, your client applications can test if it can successfully send requests to the private custom domain name.

Optional: Cleaning up the resources

If you’ve configured a test environment with these resources, you can clean up the deployment by following the steps in reverse order.

  1. In the consumer account, delete the Route 53 alias.
  2. In the consumer account, delete the association.
  3. In both the consumer and provider account, remove the RAM resource share.
  4. In the provider account, delete the custom domain name and base path mapping.

Conclusion

In this post, you learned about how clients can connect to private REST API endpoints with API Gateway. With custom domain names, your applications connect to stable URLs that can forward requests to many different private API backends. Furthermore, your application teams can deploy resources in separate line of business AWS accounts and access the private custom domain name as a central shared resource, using AWS RAM resource sharing. This allows your application teams to build secure, private API applications and expose them to API consumers securely and across multiple AWS accounts.

For more details, refer to the API Gateway documentation and check out patterns with API Gateway on Serverless Land.

Proactively validate your AWS CloudFormation templates with AWS Lambda

Post Syndicated from Kirankumar Chandrashekar original https://aws.amazon.com/blogs/devops/proactively-validate-your-aws-cloudformation-templates-with-aws-lambda/

AWS CloudFormation is a service that allows you to define, manage, and provision your AWS cloud infrastructure using code. To enhance this process and ensure your infrastructure meets your organization’s standards, AWS offers CloudFormation Hooks. These Hooks are extension points that allow you to invoke custom logic at specific points during CloudFormation stack operations, enabling you to perform validations, make modifications, or trigger additional processes. Among these, the Lambda hook is a powerful option provided by AWS. This managed hook allows you to use Lambda functions to validate your CloudFormation templates before deployment. By using a Lambda hook, you can invoke custom logic to check infrastructure configurations on create or update or delete CloudFormation resources or stacks or change sets, as well as create or update operations for AWS Cloud Control API (CCAPI) resources. This enables you to enforce defined policies for your infrastructure-as-code (IaC), preventing the deployment of non-compliant resources or emitting warnings for potential issues. In this blog post, you will explore how to use a Lambda hook to validate your CloudFormation templates before deployment, ensuring your infrastructure is compliant and secure from the start.

Introducing Lambda Hook

The Lambda hook is an AWS-provided managed hook with the type AWS::Hooks::LambdaHook. It simplifies the integration of custom logic into CloudFormation stacks. This powerful feature allows you to focus on building and testing your custom logic as a Lambda function, without the complexity of creating a hook from scratch.

By using the Lambda hook, you can activate a pre-built hook and deploy your custom logic into a Lambda function using familiar tools like AWS CLI or AWS Serverless Application Model (SAM) or AWS Cloud Development Kit (CDK). This approach reduces the number of components you need to manage in your workflow, allowing for more streamlined operations. The Lambda hook also offers flexible evaluation capabilities, enabling you to respond to specific template properties or configurations as needed.

One of the key advantages of the Lambda hook is the enhanced control it provides. You can benefit from features such as VPC integration, local logging, and granular resource management, all while leveraging the power of AWS Lambda functions. To get started with the Lambda hook, you’ll need to activate it in your AWS account. This activation process eliminates the need for authoring, testing, packaging, and deploying a custom hook using the AWS CloudFormation Command Line Interface (CFN-CLI), significantly simplifying your workflow.

Example Use Case: S3 Bucket Versioning Validation

This blog post demonstrates using the Lambda hook to validate S3 Bucket versioning before deployment. While focused on S3 buckets, this approach can be applied to other resource types, properties, stack, and change set operations.

By leveraging the Lambda hook, you’ll streamline custom logic integration into your CloudFormation stacks. The process involves:

  1. Activating Lambda hook of type AWS::Hooks::LambdaHook in your account
  2. Writing a Lambda function for validation
  3. Providing the Lambda ARN as input to the hook

This example showcases how to enhance your infrastructure-as-code practices, ensuring compliant and secure deployments from the start.

Architecture

This section shows you how the Lambda hook and Lambda function work together to enhance your CloudFormation deployments.

Lambda hook and Lambda function

First, you need to create a Lambda function with the business logic to respond to the hook. Then, you need to create an IAM execution role with the necessary permissions to invoke the Lambda Function. Once you have the Lambda function and the IAM execution role, you can activate the AWS provided Lambda hook. Follow the steps in the documentation to activate a Lambda hook from the AWS console. Alternatively, you can activate it using the AWS Command Line Interface (AWS CLI) by using the activate-type and set-type-configuration commands. Lastly, you can also use AWS::CloudFormation::LambdaHook as a CloudFormation resource to activate and configure Lambda hook from a CloudFormation template. You can share this resource across your other accounts and regions using AWS CloudFormation StackSets by following this blog.

Lambda hook in action

The following diagram and explanation illustrate the step-by-step workflow of how Lambda hook integrates with your CloudFormation operations, providing a visual representation of the process from template creation to resource deployment or modification.

Lambda Hooks Architecture and its working in action

Diagram 1: Lambda hooks in action

The architecture diagram illustrates the step-by-step flow of how the Lambda hook is used during a CloudFormation stack operation.

  1. Author a template: Author a CloudFormation template, including the necessary resources to configure.
  2. Create the stack: The CloudFormation stack creation process has started, but the process of creating the defined resources in the template has not yet begun.
  3. Request is received by CloudFormation service: When a resource creation, update, or deletion is requested, the CloudFormation service receives the request.
  4. Invoke the Hook: The CloudFormation service then invokes the Lambda hook.
  5. The hook invokes your the Lambda Function: The Lambda hook, in turn, triggers the execution of the Lambda function that was defined in the hook activation.
  6. The Lambda function processes the request and responds back to the Hook: The Lambda function processes the request, performing validation, or additional tasks as required. The Lambda function then responds back to the Lambda hook.
  7. The stack workflow progresses further in either continuing the resource creation/update/deletion with/without a warning or fails: Based on the Lambda function’s output, the Lambda hook either allows the stack operation to proceed with the resource operation (for example, creation of the resource), or deny the resource operation causing a rollback of the stack.

This workflow demonstrates how Lambda hook seamlessly integrates into the CloudFormation stack deployment process, allowing you to implement custom validations, enforce policies, and extend the capabilities of your infrastructure-as-code deployments through the power of Lambda functions. By leveraging the Lambda hook and the custom Lambda function, customers can extend the capabilities of their CloudFormation deployments, enabling advanced use cases such as resource validation, or additional task execution.

Sample Deployment

This section shows you how to enable the Lambda hook, which is of type AWS::Hooks::LambdaHook, and add the business logic in the Lambda function to validate the versioning configuration of an S3 bucket. The sample solution shown in this blog post demonstrates the hook triggering for the resource type AWS::S3::Bucket, and if you want to trigger this for every resource type, then you can use the Resource filter within Hook filters configuration that can take wildcard "AWS::*::*" as a value or multiple targets of resource types for example "AWS::S3::Bucket", "AWS::DynamoDB::Table", and you’ll also want to make sure that the Lambda Function has the logic to handle the additional resource type. You can also add additional Hook targets , for example to validate your STACK or CHANGE_SET.

In the example used in this blog post, you will configure the hook and activate on create and update operations operations. For more information about TargetFilters, see Hook configuration schema and for more information about Lambda hook see here. With these modifications, you need to consider two important points: First, you will need to handle the business logic to deal with different resource types in your Lambda function code. Second, additional pricing may apply based on your resource usage, for more details see the Lambda pricing page.

Creating the Lambda Function

You can create a Lambda function in several ways – on the AWS Console, using CloudFormation, using AWS CLI, or by directly invoking the API via SDK. In this section, we will cover creating a Lambda function with a few clicks on the AWS console. See Using Lambda with infrastructure as code (IaC) for deploying Lambda Function using SAM CLI, CDK or CloudFormation.

Create the Lambda function on the AWS console by following create a Lambda function with the console instructions and use the following sample Python code.

"""Example Lambda function called by AWS::Hooks::LambdaHook."""


import logging


HOOK_INVOCATION_POINTS = [
    "CREATE_PRE_PROVISION",
    "UPDATE_PRE_PROVISION",
    "DELETE_PRE_PROVISION",
]

TARGET_NAMES = [
    "AWS::S3::Bucket",
]

LOGGER = logging.getLogger()

LOGGER.setLevel("INFO")


def lambda_handler(event, context):
  """Define the entry point of the function."""
  try:
    request = event
    
    LOGGER.info(f"Request: {request}")

    invocation_point = request["actionInvocationPoint"]
    LOGGER.info(f"Invocation point: {invocation_point}")

    target_name = request["requestData"]["targetName"]
    LOGGER.info(f"Target name: {target_name}")
    
    clientRequestToken = request["clientRequestToken"]

    if (
      invocation_point not in HOOK_INVOCATION_POINTS
      or target_name not in TARGET_NAMES
    ):
      message = (
        f"Skipping {target_name} evaluation for {invocation_point}."
      )
      LOGGER.info(message)
      payload = {
        "clientRequestToken": clientRequestToken,
        "hookStatus": "SUCCESS",
        "errorCode": None,
        "message": message,
        "callbackContext": None,
        "callbackDelaySeconds": 0,
      }
      LOGGER.debug(payload)
      return payload

    target_model = request["requestData"]["targetModel"]

    resource_properties = (
      target_model.get("resourceProperties")
      if target_model and target_model.get("resourceProperties")
      else None
    )
    LOGGER.debug(f"Resource properties: {resource_properties}")

    versioning_configuration = (
      resource_properties.get("VersioningConfiguration")
      if resource_properties
      and resource_properties.get("VersioningConfiguration")
      else None
    )
    versioning_configuration_status = (
      versioning_configuration.get("Status")
      if versioning_configuration
      and versioning_configuration.get("Status")
      else None
    )
    if (
      not resource_properties
      or not versioning_configuration
      or not versioning_configuration_status
      or not versioning_configuration_status == "Enabled"
    ):
      message = "Versioning not set or not enabled for the S3 bucket."
      LOGGER.error(message)
      payload = {
        "clientRequestToken": clientRequestToken,
        "hookStatus": "FAILED",
        "errorCode": "NonCompliant",
        "message": message,
      }
    else:
      message = "Versioning is enabled for the S3 bucket."
      LOGGER.info(message)
      payload = {
        "clientRequestToken": clientRequestToken,
        "hookStatus": "SUCCESS",
        "errorCode": None,
        "message": message,
      }

    LOGGER.debug(payload)
    return payload
  except Exception as exception:
    message = str(exception)
    payload = {
      "clientRequestToken":  event["clientRequestToken"],
      "hookStatus": "FAILED",
      "errorCode": "InternalFailure",
      "message": message,
      "callbackContext": None,
      "callbackDelaySeconds": 0,
    }
    LOGGER.error(message)
    return payload

Example event sent to Lambda by the hook

{
  "clientRequestToken": "XXXXXXXXXXXX-XXXX-XXXX-XXXX-XXXXXXXXXXXX",
  "awsAccountId": "111111111111",
  "stackId": "arn:aws:cloudformation:<AWS-Region>:111111111111:stack/example-stack/xxxxxxxx-xxxx-xxxx-xxxx-xxxxxxxxxxxx",
  "changeSetId": "None",
  "hookTypeName": "AWS::Hooks::LambdaHook",
  "hookTypeVersion": "00000001",
  "hookModel":
    {
      "LambdaFunction": "example-hook-function-name",
    },
  "actionInvocationPoint": "CREATE_PRE_PROVISION",
  "requestData":
    {
      "targetName": "AWS::S3::Bucket",
      "targetType": "AWS::S3::Bucket",
      "targetLogicalId": "Bucket",
      "callerCredentials": "None",
      "providerCredentials": "None",
      "providerLogGroupName": "None",
      "hookEncryptionKeyArn": "None",
      "hookEncryptionKeyRole": "None",
      "targetModel":
        {
          "resourceProperties":
            {
              "PublicAccessBlockConfiguration":
                { "RestrictPublicBuckets": true, "IgnorePublicAcls": true },
              "BucketName": "XXXXXXXXXXXXXXXXXXXXXXXXXXX",
              "VersioningConfiguration": { "Status": "Enabled" },
            },
          "previousResourceProperties": "None",
        },
    },
  "requestContext": { "invocation": 1, "callbackContext": "None" },
}

Explanation of the Lambda Function code

The Lambda Function code is designed to process the event received from the Lambda hook and validate the versioning configuration of the target S3 bucket resource. Here’s a detailed explanation of the code:

  1. The function first extracts the relevant information from the event, including the invocation point and the target resource type.
  2. It then checks if the current invocation point is in the configured HOOK_INVOCATION_POINTS list and if the target resource type is AWS::S3::Bucket. If not, the function returns a success response, skipping the validation for this particular invocation.

Note: this code that skips the validation is put here as a fallback logic in the event the user has not chosen to use TargetFilters. As this is a wildcard hook, without TargetFilters the hook will always be invoked for any AWS resource type described in the template, and since the hook targets preCreate, preUpdate, and preDelete by default, the hook will be invoked for these invocation points by default. To narrow the scope and reduce costs by avoiding to invoke the hook for all AWS resource type targets and invocation points, use TargetFilters.

  1. Next, the function retrieves the resource properties from the event, specifically looking for the VersioningConfiguration property and its Status.
  2. If the VersioningConfiguration property is not present or its Status is not set to Enabled, the function returns a failure response, indicating that the versioning is not enabled for the S3 bucket.
  3. If the versioning is enabled, the function returns a success response.
  4. The function also includes a fallback mechanism to return a failure response in case of any other exceptions. By evaluating this sample code, you can validate the versioning configuration of the S3 bucket during the CloudFormation stack creation and update processes, with your infrastructure-as-code policies.

Enabling Lambda Hook in your AWS Account/Region

  1. Navigate to the AWS CloudFormation service on the AWS Console, then choose “Create Hook” → “with Lambda” from the main Hooks page:

Lambda Hooks Creation

Diagram 2: Create a Hook with Lambda console page

You will see the page explaining how the Lambda function work as a hook.

Lambda hooks provide lambda

Diagram 3: Provide a Lambda function to Hook Console page

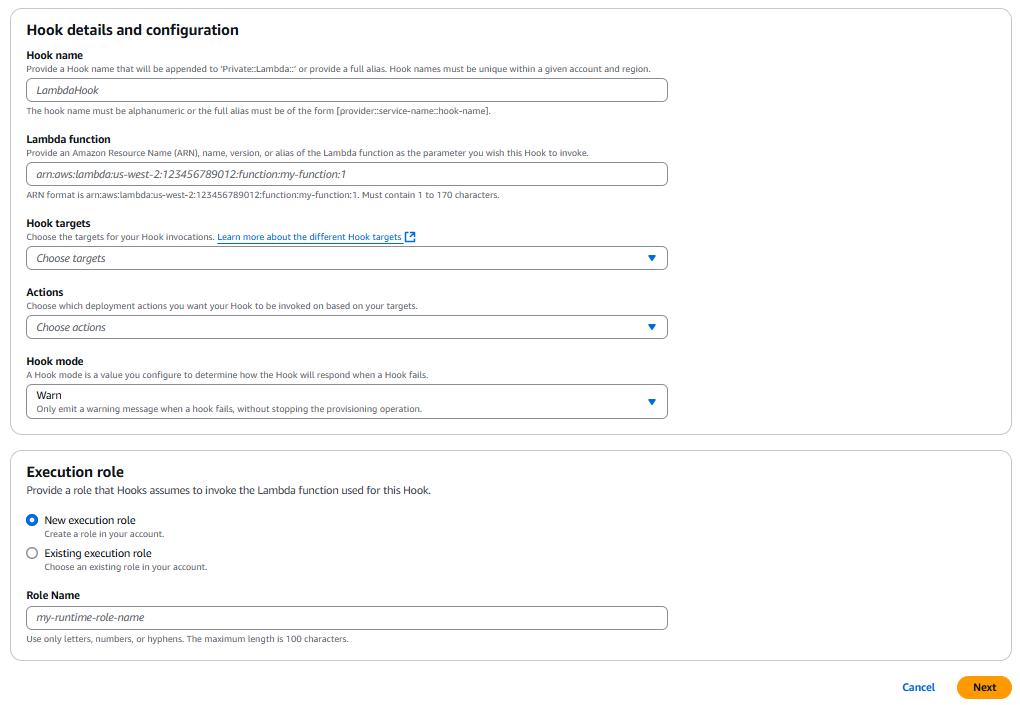
  1. Provide the Hooks details: the name, the Lambda function it should take, the type, and the mode. You can also create your execution role directly from the console by choosing “New execution role”.
Lambdas Hooks Details Config

Diagram 3: Provide a Lambda function to Hook Console page

You can review the Lambda hook and activate it from the next page.

Lambda Hooks details and configuration

Diagram 4: Review Lambda hook Console page

Test a sample

In this section, you will test the hook and the Lambda Function that you activated for a S3 bucket resource.

Create an S3 Bucket without versioning

AWSTemplateFormatVersion: "2010-09-09"

Description: This CloudFormation template provisions an S3 Bucket without versioning enabled

Resources:
  S3Bucket:
    DeletionPolicy: Delete
    Type: AWS::S3::Bucket
    Properties:
      BucketName: !Sub test-bucket-versioning-1-${AWS::Region}-${AWS::AccountId}

You will see the hook invoking Lambda function and the Lambda Function responding back with a failure message since the Versioning is not enabled.

When you create or update a stack with the template above, the Lambda hook will be invoked, and the Lambda Function will respond with a failure message since bucket versioning is not enabled. The Lambda Function code will extract the resourceProperties from the event, check the VersioningConfiguration property, and find that the Status is not set to Enabled. As a result, if you use the example template above where you describe the S3 bucket without versioning enabled, the Lambda Function will send a failure response back to the hook, causing the CloudFormation stack operation to fail as shown in the following screenshot.

Lambda Hooks Failure stack

Diagram 5: Lambda Hook failure Stack

Create an S3 Bucket with versioning enabled You can try creating an S3 Bucket with versioning enabled to see how Hooks assessment succeeded.

AWSTemplateFormatVersion: "2010-09-09"

Description: This CloudFormation template provisions an S3 Bucket with Versioning enabled

Resources:
  S3Bucket:
    DeletionPolicy: Delete
    Type: AWS::S3::Bucket
    Properties:
      BucketName: !Sub test-bucket-versioning-2-${AWS::Region}-${AWS::AccountId}
      VersioningConfiguration:
        Status: Enabled

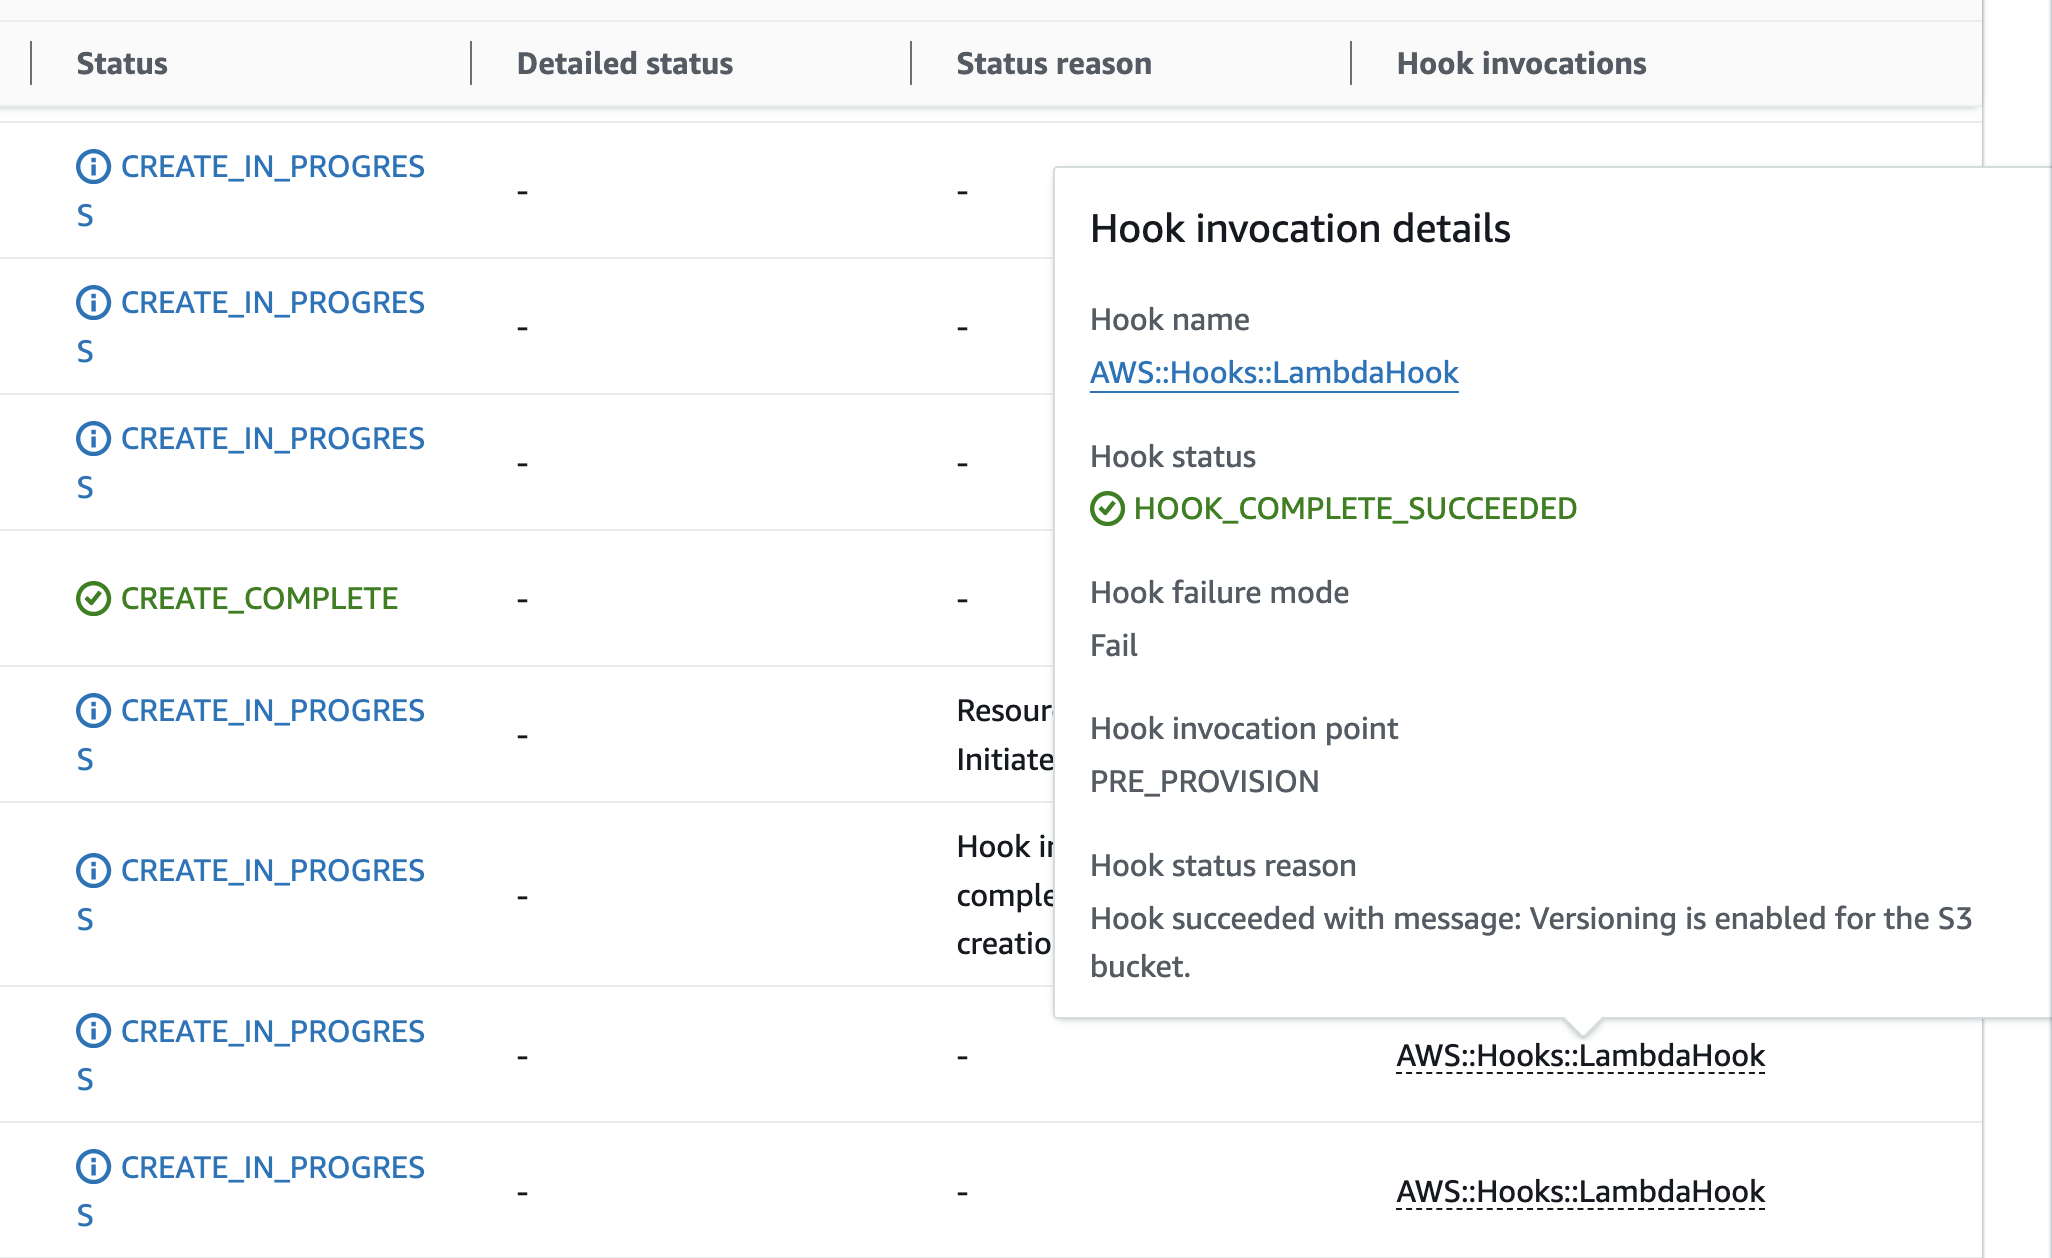
In this case, you will see the hook invoking the Lambda function and getting a success message since the Versioning is enabled

When you create a stack with this CloudFormation template, the Lambda hook will be invoked, and the Lambda Function will respond with a success message since the versioning is enabled. The Lambda Function code will extract the resourceProperties from the event, check the VersioningConfiguration property, and find that the Status is set to Enabled. As a result, the Lambda Function will send a success response back to the hook, allowing the CloudFormation stack operation to proceed as shown in the following screenshot.

Lambda Hooks Success stack

Diagram 6: Lambda Hook success Stack

By testing these two scenarios, you can verify that the Lambda hook and the associated Lambda Function are working as expected, enforcing the S3 bucket versioning policy during CloudFormation stack operations.

Clean up

To clean up, refer to the following documentation to delete CloudFormation Stacks: Deleting a stack on the AWS CloudFormation console or Deleting a stack using AWS CLI. Refer to documentation to deactivate the hook.

Conclusion

In this blog post, you explored the capabilities of CloudFormation Hooks and how they can be leveraged to extend the functionality of your infrastructure-as-code deployments. Specifically, you learned about the Lambda hook, a pre-built hook that simplifies the process of integrating custom logic into your CloudFormation stacks.

By activating the Lambda hook, and deploying a custom Lambda Function, you were able to validate the versioning configuration of an S3 bucket during the CloudFormation stack creation and update processes. This approach allows you to enforce infrastructure-as-code policies and ensure compliance at the point of deployment, rather than relying on post-deployment checks or indirect governance mechanisms. The ability to leverage familiar tools and workflows, such as the AWS CLI, AWS SAM, CI/CD pipelines, or the AWS CDK, makes it easier to incorporate custom logic into your CloudFormation deployments. This reduces the overhead and complexity associated with traditional hook orchestration and packaging, empowering you to streamline your infrastructure-as-code practices.

As you continue to build and deploy your cloud infrastructure, consider exploring the various CloudFormation Hooks available, for example, see aws-cloudformation/aws-cloudformation-samples and aws-cloudformation/community-registry-extensions GitHub repositories. The approach demonstrated in this blog post can be applied to other resource types supported by CloudFormation, allowing you to validate and enforce policies for a wide range of infrastructure components, from EC2 instances and VPCs to databases and application services.

About the Author

kirankumar.jpeg

Kirankumar Chandrashekar is a Sr. Solutions Architect for Strategic Accounts at AWS. He focuses on leading customers in architecting DevOps, modernization using serverless, containers and container orchestration technologies like Docker, ECS, EKS to name a few. Kirankumar is passionate about DevOps, Infrastructure as Code, modernization and solving complex customer issues. He enjoys music, as well as cooking and traveling.

stella.jpegStella Hie is a Sr. Product Manager Technical for AWS Infrastructure as Code. She focuses on proactive control and governance space, working on delivering the best experience for customers to use AWS solutions safely. Outside of work, she enjoys hiking, playing piano, and watching live shows.

The serverless attendee’s guide to AWS re:Invent 2024

Post Syndicated from Julian Wood original https://aws.amazon.com/blogs/compute/the-serverless-attendees-guide-to-aws-reinvent-2024/

AWS re:Invent 2024 offers an extensive selection of serverless and application integration content.

AWS re:Invent Banner

AWS re:Invent Banner

For detailed descriptions and schedule, visit the AWS re:Invent Session Catalog.

Join AWS serverless experts and community members at the AWS Modern Apps and Open Source Zone in the AWS Expo Village. This serves as a hub for serverless discussions at re:Invent. While you are there, enjoy a free coffee and learn about serverless architectures at the Serverlesspresso booth. There are two this year, another one at the Certificate Lounge. The AWS Expo Village also includes Serverless and Serverless Containers booths.

Don’t have a ticket yet? Join us in Las Vegas from November 28-December 2, 2022 by registering for re:Invent 2024.

This guide organizes the sessions into categories to help you find the content this is most relevant to you.

Session Types

  • Breakout Sessions are lecture-style presentations covering architecture, best practices, and deep dives into AWS services.
  • Workshops are 2-hour hands-on sessions where you work through tasks in AWS accounts using AWS services. Laptops are required and AWS credits are provided.
  • Chalk Talks are highly interactive 60-minute sessions with smaller audiences, focused on technical deep dives with whiteboards for architectural discussions.
  • Builders’ Sessions are 60-minute small-group sessions led by an AWS expert who guides you through a technical problem using AWS services.
  • Code Talks are 60-minute live coding sessions where AWS experts show how to build solutions using AWS services.

Leadership session: Nick Coult, Usman Khalid, Kathleen deValk

  • SVS211: Celebrating 10 years of pioneering serverless and containers – Breakout.
    • Explore how serverless has evolved to help organizations drive the highest performance, availability, and security at low costs.

Getting started sessions

Are you new to serverless or taking your first steps? Hear from AWS experts and customers on best practices and strategies for building serverless workloads. Get hands-on with services by attending a workshop or builders session. Create the next great “to do” app or add a new customer experience for a theme park.

  • SVS202: Thinking serverless – Chalk Talk
    • Learn how to approach building solutions with a serverless mindset by breaking down business problems into serverless building blocks.
  • SVS205: Building a serverless web application for a theme park – Workshop
    • Learn how to build a complete serverless web application for a theme park called Innovator Island.
  • SVS201: Getting started with serverless patterns – Workshop
    • Learn how to recognize and apply common serverless patterns by building production-ready code for a serverless application.
  • SVS204: Write less code: Building applications with a serverless mindset – Builders Session
    • Get more value by using built-in integrations between AWS services through configuration rather than writing glue code.
  • SVS207: Effectively model costs for your serverless applications – Chalk Talk
    • Gain insights into modeling the cost of serverless applications on AWS by considering request loads, payload sizes, and service pricing.
  • API201: The AWS Step Functions workshop – Workshop
    • Learn about the features of AWS Step Functions through hands-on interactive modules.
  • API204: Building event-driven architectures – Workshop
    • Learn about the basics of event-driven design using examples involving Amazon SNS, Amazon SQS, AWS Lambda, Amazon EventBridge, and more.
  • API205: Unlock the power of an exceptional serverless developer experience – Code Talk
    • Learn how to accelerate your serverless development with AWS tools, including Amazon Q Developer integrated into IDEs.
  • SEG209: Getting started building serverless SaaS architectures
    • Discover how to build your first serverless application, and learn how to handle multi-tenant architectures for SaaS applications.

Understanding serverless architectures

  • SVS208: Balance consistency and developer freedom with platform engineering – Breakout
    • Learn how platform teams can provide opinionated security, cost, observability, reliability, and sustainability patterns while maintaining developer flexibility.
  • SVS209: Containers or serverless functions: A path for cloud-native success – Breakout
    • Explore the fundamental differences between containers and serverless functions through real-world scenarios and insights into choosing the right approach.
  • OPN301: Level up your serverless applications with Powertools for AWS Lambda – Workshop
    • Learn why Powertools for AWS Lambda can be the developer toolkit of choice for serverless workloads.
  • DEV341: From single to multi-tenant: Scaling a mission-critical serverless app
    • Explore how to transition a mission-critical application from a single-tenant to a multi-tenant architecture
  • DEV337: Zero to production serverless in 8 weeks
    • Hear about a real-world project journey, from concept to production in only eight weeks. Expect practical insights, mistakes, tips, and how using the right technologies and development process can deliver results fast.

Building event-driven applications

  • API204: Building event-driven architectures – Workshop
    • Learn about the basics of event-driven design using examples involving Amazon SNS, Amazon SQS, AWS Lambda, Amazon EventBridge, and more.
  • API206: How event-driven architectures can go wrong and how to fix them – Chalk Talk
    • Explore common event-driven pitfalls including YOLO events, god events, observability soup, event loops, and surprise bills.
  • DEV321: Choosing the right serverless compute services
    • Learn when to use AWS serverless compute services like AWS Lambda and Amazon ECS on AWS Fargate and how to integrate them into your application architectures.
  • API307: Event-driven architectures at scale: Manage millions of events – Breakout
    • Discover proven patterns for building high-scale event-driven systems that can be effectively managed across a distributed organization with Amazon EventBridge.
  • SVS206: Building an event sourcing system using AWS serverless technologies – Chalk Talk
    • Explore strategies for building effective event sourcing architectures using AWS serverless technologies to store application state as an append-only event log.
  • COP408: Coding for serverless observability
    • Join this code talk to learn best practices for collecting signals from your serverless applications. Dive deep into techniques to effectively instrument your applications to provide you with optimal observability.

Incorporating orchestration

  • API201: The AWS Step Functions workshop – Workshop
    • Learn about the features of AWS Step Functions through hands-on interactive modules.
  • API203: Building common orchestrated workflows with AWS Step Functions – Builders Session
    • Build three orchestrated workflows, including streamlined data processing with Distributed Map state, external system integration using callback, and implementing the saga pattern.
  • API207: Optimize data processing with built-in AWS Step Functions features – Chalk Talk
    • Learn to optimize your serverless data processing workflows at scale using AWS Step Functions features, including intrinsic functions and Distributed Map state.
  • API402: Building advanced workflows with AWS Step Functions – Breakout
    • Learn how you can use generative AI to generate state machines automatically from textual descriptions and chat with your workflow to optimize it.

Understanding integration patterns

  • API208: Building an integration strategy for the future – Breakout
    • Boost productivity and create better customer experiences by building a modern integration strategy using AWS application, data, and file integration services.
  • API306: Integration patterns for distributed systems – Breakout
    • Learn about common design trade-offs for distributed systems and how to navigate them with design patterns, illustrated with real-world examples.
  • API311: Application integration for platform builders – Breakout
    • Explore the implementation of application integration using serverless components in enterprise environments.

Building APIs and frontends

  • SVS203: Create your first API from scratch with OpenAPI and Amazon API Gateway – Builders Session
    • Learn how to design and provision complete APIs using infrastructure as code following the OpenAPI specification.
  • API303: Building modern API architectures: Which front door should I use? – Chalk Talk
    • Explore options for building modern APIs including REST, GraphQL, and real-time APIs along with their benefits and drawbacks.
  • API304: Building rate-limited solutions on AWS – Chalk Talk
    • Learn some of the best ways to build rate limiting into your systems for improved reliability.
  • API305: Asynchronous frontends: Building seamless event-driven experiences – Breakout
    • Explore patterns to enable asynchronous, event-driven integrations with the frontend designed for architects and frontend, backend, and full-stack engineers.

Diving deep into advanced topics

  • SVS401: Best practices for serverless developers – Breakout
    • Discover architectural best practices, optimizations, and useful shortcuts for building production-ready serverless workloads.
  • SVS403: From serverful to serverless Java – Workshop
    • Learn how to bring your traditional Java Spring application to AWS Lambda with minimal effort and iteratively apply optimizations.
  • SVS406: Scale streaming workloads with AWS Lambda – Chalk Talk
    • Learn how to implement parallel processing techniques for ordered and unordered use cases to address throughput limitations in streaming data processing.

Processing data

  • SVS404: Building serverless distributed data processing workloads – Workshop
    • Learn how serverless technologies like AWS Step Functions and AWS Lambda can help you simplify management and scaling of distributed data processing.
  • API401: Multi-tenant Amazon SQS queues: Mitigating noisy neighbors – Chalk Talk
    • Explore advanced strategies for managing multi-tenant Amazon SQS queues and effective mitigation techniques, including shuffle sharding and overflow queues.
  • SVS321: AWS Lambda and Apache Kafka for real-time data processing applications – Breakout
    • Gain practical insights into building scalable, serverless data processing applications by integrating AWS Lambda with Apache Kafka.

Incorporating generative AI

  • API209: Generative AI at scale: Serverless workflows for enterprise-ready apps – Workshop
    • Learn to build enterprise-ready, scalable generative AI applications that can scale from serving 100 to 100,000 users.
  • API310: Build a meeting summarization solution with generative AI & serverless – Code Talk
    • See live coding of a serverless application for producing meeting summaries with generative AI using Amazon Transcribe and Amazon Bedrock, orchestrated with AWS Step Functions.
  • SVS319: Unlock the power of generative AI with AWS Serverless – Breakout
    • Learn to harness AWS Serverless to build robust, cost-effective generative AI applications. Explore using AWS Step Functions to orchestrate complex AI workflows.
  • SVS325: Secure access to enterprise generative AI with serverless AI gateway – Chalk Talk
    • Explore how to architect a serverless AI gateway on AWS to securely integrate and consume large language models from multiple providers.

Additional resources

For social activities see the Unofficial list of AWS re:Invent Conference and Vendor Parties.

If you are attending re:Invent, connect at our AWS Modern Apps and Open Source Zone in the AWS Expo Village. The AWS Expo Village also includes Serverless and Serverless Containers booths.

If you can not join us in-person, breakout sessions will be available via our YouTube channel after the event.

We look forward to seeing you at re:Invent 2024! For more serverless learning resources, visit Serverless Land.
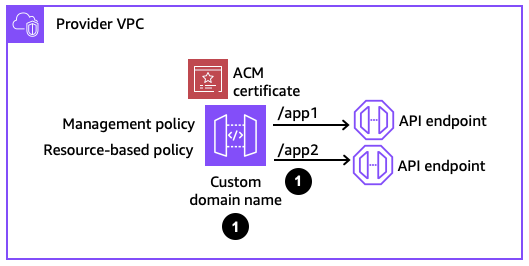
Integrate custom applications with AWS Lake Formation – Part 1

Post Syndicated from Stefano Sandona original https://aws.amazon.com/blogs/big-data/integrate-custom-applications-with-aws-lake-formation-part-1/

AWS Lake Formation makes it straightforward to centrally govern, secure, and globally share data for analytics and machine learning (ML).

With Lake Formation, you can centralize data security and governance using the AWS Glue Data Catalog, letting you manage metadata and data permissions in one place with familiar database-style features. It also delivers fine-grained data access control, so you can make sure users have access to the right data down to the row and column level.

Lake Formation also makes it straightforward to share data internally across your organization and externally, which lets you create a data mesh or meet other data sharing needs with no data movement.

Additionally, because Lake Formation tracks data interactions by role and user, it provides comprehensive data access auditing to verify the right data was accessed by the right users at the right time.

In this two-part series, we show how to integrate custom applications or data processing engines with Lake Formation using the third-party services integration feature.

In this post, we dive deep into the required Lake Formation and AWS Glue APIs. We walk through the steps to enforce Lake Formation policies within custom data applications. As an example, we present a sample Lake Formation integrated application implemented using AWS Lambda.

The second part of the series introduces a sample web application built with AWS Amplify. This web application showcases how to use the custom data processing engine implemented in the first post.

By the end of this series, you will have a comprehensive understanding of how to extend the capabilities of Lake Formation by building and integrating your own custom data processing components.

Integrate an external application

The process of integrating a third-party application with Lake Formation is described in detail in How Lake Formation application integration works.

In this section, we dive deeper into the steps required to establish trust between Lake Formation and an external application, the API operations that are involved, and the AWS Identity and Access Management (IAM) permissions that must be set up to enable the integration.

Lake Formation application integration external data filtering

In Lake Formation, it’s possible to control which third-party engines or applications are allowed to read and filter data in Amazon Simple Storage Service (Amazon S3) locations registered with Lake Formation.

To do so, you can navigate to the Application integration settings page on the Lake Formation console and enable Allow external engines to filter data in Amazon S3 locations registered with Lake Formation, specifying the AWS account IDs from where third-party engines are allowed to access locations registered with Lake Formation. In addition, you have to specify the allowed session tag values to identify trusted requests. We discuss in later sections how these tags are used.

LakeFormation Application integration

Lake Formation application integration involved AWS APIs

The following is a list of the main AWS APIs needed to integrate an application with Lake Formation:

  • sts:AssumeRole – Returns a set of temporary security credentials that you can use to access AWS resources.
  • glue:GetUnfilteredTableMetadata – Allows a third-party analytical engine to retrieve unfiltered table metadata from the Data Catalog.
  • glue:GetUnfilteredPartitionsMetadata – Retrieves partition metadata from the Data Catalog that contains unfiltered metadata.
  • lakeformation:GetTemporaryGlueTableCredentials – Allows a caller in a secure environment to assume a role with permission to access Amazon S3. To vend such credentials, Lake Formation assumes the role associated with a registered location, for example an S3 bucket, with a scope down policy that restricts the access to a single prefix.
  • lakeformation:GetTemporaryGluePartitionCredentials – This API is identical to GetTemporaryTableCredentials except that it’s used when the target Data Catalog resource is of type Partition. Lake Formation restricts the permission of the vended credentials with the same scope down policy that restricts access to a single Amazon S3 prefix.

Later in this post, we present a sample architecture illustrating how you can use these APIs.

External application and IAM roles to access data

For an external application to access resources in an Lake Formation environment, it needs to run under an IAM principal (user or role) with the appropriate credentials. Let’s consider a scenario where the external application runs under the IAM role MyApplicationRole that is part of the AWS account 123456789012.

In Lake Formation, you have granted access to various tables and databases to two specific IAM roles:

  • AccessRole1
  • AccessRole2

To enable MyApplicationRole to access the resources that have been granted to AccessRole1 and AccessRole2, you need to configure the trust relationships for these access roles. Specifically, you need to configure the following:

  • Allow MyApplicationRole to assume each of the access roles (AccessRole1 and AccessRole2) using the sts:AssumeRole
  • Allow MyApplicationRole to tag the assumed session with a specific tag, which is required by Lake Formation. The tag key should be LakeFormationAuthorizedCaller, and the value should match one of the session tag values specified in the Application integration settings page on the Lake Formation console (for example, “application1“).

The following code is an example of the trust relationships configuration for an access role (AccessRole1 or AccessRole2):

[
    {
        "Effect": "Allow",
        "Principal": {
            "AWS": "arn:aws:iam::123456789012:role/MyApplicationRole"
        },
        "Action": "sts:AssumeRole"
    },
    {
        "Effect": "Allow",
        "Principal": {
            "AWS": "arn:aws:iam::123456789012:role/MyApplicationRole"
        },
        "Action": "sts:TagSession",
        "Condition": {
            "StringEquals": {
                "aws:RequestTag/LakeFormationAuthorizedCaller": "application1"
            }
        }
    }
]

Additionally, the data access IAM roles (AccessRole1 and AccessRole2) must have the following IAM permissions assigned in order to read Lake Formation protected tables:

{
    "Version": "2012-10-17",
    "Statement": {
        "Sid": "LakeFormationManagedAccess",
        "Effect": "Allow",
        "Action": [
            "lakeformation:GetDataAccess",
            "glue:GetTable",
            "glue:GetTables",
            "glue:GetDatabase",
            "glue:GetDatabases",
            "glue:GetPartition",
            "glue:GetPartitions"
        ],
        "Resource": "*"
    }
}

Solution overview

For our solution, Lambda serves as our external trusted engine and application integrated with Lake Formation. This example is provided in order to understand and see in action the access flow and the Lake Formation API responses. Because it’s based on a single Lambda function, it’s not meant to be used in production settings or with high volumes of data.

Moreover, the Lambda based engine has been configured to support a limited set of data files (CSV, Parquet, and JSON), a limited set of table configurations (no nested data), and a limited set of table operations (SELECT only). Due to these limitations, the application should not be used for arbitrary tests.

In this post, we provide instructions on how to deploy a sample API application integrated with Lake Formation that implements the solution architecture. The core of the API is implemented with a Python Lambda function. We also show how to test the function with Lambda tests. In the second post in this series, we provide instructions on how to deploy a web frontend application that integrates with this Lambda function.

Access flow for unpartitioned tables

The following diagram summarizes the access flow when accessing unpartitioned tables.

Solution Architecture - Unpartitioned tables

The workflow consists of the following steps:

  1. User A (authenticated with Amazon Cognito or other equivalent systems) sends a request to the application API endpoint, requesting access to a specific table inside a specific database.
  2. The API endpoint, created with AWS AppSync, handles the request, invoking a Lambda function.
  3. The function checks which IAM data access role the user is mapped to. For simplicity, the example uses a static hardcoded mapping (mappings={ "user1": "lf-app-access-role-1", "user2": "lf-app-access-role-2"}).
  4. The function invokes the sts:AssumeRole API to assume the user-related IAM data access role (lf-app-access-role-1AccessRole1). The AssumeRole operation is performed with the tag LakeFormationAuthorizedCaller, having as its value one of the session tag values specified when configuring the application integration settings in Lake Formation (for example, {'Key': 'LakeFormationAuthorizedCaller','Value': 'application1'}). The API returns a set of temporary credentials, which we refer to as StsCredentials1.
  5. Using StsCredentials1, the function invokes the glue:GetUnfilteredTableMetadata API, passing the requested database and table name. The API returns information like table location, a list of authorized columns, and data filters, if defined.
  6. Using StsCredentials1, the function invokes the lakeformation:GetTemporaryGlueTableCredentials API, passing the requested database and table name, the type of requested access (SELECT), and CELL_FILTER_PERMISSION as the supported permission types (because the Lambda function implements logic to apply row-level filters). The API returns a set of temporary Amazon S3 credentials, which we refer to as S3Credentials1.
  7. Using S3Credentials1, the function lists the S3 files stored in the table location S3 prefix and downloads them.
  8. The retrieved Amazon S3 data is filtered to remove those columns and rows that the user is not allowed access to (authorized columns and row filters were retrieved in Step 5) and authorized data is returned to the user.

Access flow for partitioned tables

The following diagram summarizes the access flow when accessing partitioned tables.

Solution Architecture - Partitioned tables

The steps involved are almost identical to the ones presented for partitioned tables, with the following changes:

  • After invoking the glue:GetUnfilteredTableMetadata API (Step 5) and identifying the table as partitioned, the Lambda function invokes the glue:GetUnfilteredPartitionsMetadata API using StsCredentials1 (Step 6). The API returns, in addition to other information, the list of partition values and locations.
  • For each partition, the function performs the following actions:
    • Invokes the lakeformation:GetTemporaryGluePartitionCredentials API (Step 7), passing the requested database and table name, the partition value, the type of requested access (SELECT), and CELL_FILTER_PERMISSION as the supported permissions type (because the Lambda function implements logic to apply row-level filters). The API returns a set of temporary Amazon S3 credentials, which we refer to as S3CredentialsPartitionX.
    • Uses S3CredentialsPartitionX to list the partition location S3 files and download them (Step 8).
  • The function appends the retrieved data.
  • Before the Lambda function returns the results to the user (Step 9), the retrieved Amazon S3 data is filtered to remove those columns and rows that the user is not allowed access to (authorized columns and row filters were retrieved in Step 5).

Prerequisites

The following prerequisites are needed to deploy and test the solution:

  • Lake Formation should be enabled in the AWS Region where the sample application will be deployed
  • The steps must be run with an IAM principal with sufficient permissions to create the needed resources, including Lake Formation databases and tables

Deploy solution resources with AWS CloudFormation

We create the solution resources using AWS CloudFormation. The provided CloudFormation template creates the following resources:

  • One S3 bucket to store table data (lf-app-data-<account-id>)
  • Two IAM roles, which will be mapped to client users and their associated Lake Formation permission policies (lf-app-access-role-1 and lf-app-access-role-2)
  • Two IAM roles used for the two created Lambda functions (lf-app-lambda-datalake-population-role and lf-app-lambda-role)
  • One AWS Glue database (lf-app-entities) with two AWS Glue tables, one unpartitioned (users_tbl) and one partitioned (users_partitioned_tbl)
  • One Lambda function used to populate the data lake data (lf-app-lambda-datalake-population)
  • One Lambda function used for the Lake Formation integrated application (lf-app-lambda-engine)
  • One IAM role used by Lake Formation to access the table data and perform credentials vending (lf-app-datalake-location-role)
  • One Lake Formation data lake location (s3://lf-app-data-<account-id>/datasets) associated with the IAM role created for credentials vending (lf-app-datalake-location-role)
  • One Lake Formation data filter (lf-app-filter-1)
  • One Lake Formation tag (key: sensitive, values: true or false)
  • Tag associations to tag the created unpartitioned AWS Glue table (users_tbl) columns with the created tag

To launch the stack and provision your resources, complete the following steps:

  1. Download the code zip bundle for the Lambda function used for the Lake Formation integrated application (lf-integrated-app.zip).
  2. Download the code zip bundle for the Lambda function used to populate the data lake data (datalake-population-function.zip).
  3. Upload the zip bundles to an existing S3 bucket location (for example, s3://mybucket/myfolder1/myfolder2/lf-integrated-app.zip and s3://mybucket/myfolder1/myfolder2/datalake-population-function.zip)
  4. Choose Launch Stack.

This automatically launches AWS CloudFormation in your AWS account with a template. Make sure that you create the stack in your intended Region.

  1. Choose Next to move to the Specify stack details section
  2. For Parameters, provide the following parameters:
    1. For powertoolsLogLevel, specify how verbose the Lambda function logger should be, from the most verbose to the least verbose (no logs). For this post, we choose DEBUG.
    2. For s3DeploymentBucketName, enter the name of the S3 bucket containing the Lambda functions’ code zip bundles. For this post, we use mybucket.
    3. For s3KeyLambdaDataPopulationCode, enter the Amazon S3 location containing the code zip bundle for the Lambda function used to populate the data lake data (datalake-population-function.zip). For example, myfolder1/myfolder2/datalake-population-function.zip.
    4. For s3KeyLambdaEngineCode, enter the Amazon S3 location containing the code zip bundle for the Lambda function used for the Lake Formation integrated application (lf-integrated-app.zip). For example, myfolder1/myfolder2/lf-integrated-app.zip.
  3. Choose Next.

Cloudformation Create Stack with properties

  1. Add additional AWS tags if required.
  2. Choose Next.
  3. Acknowledge the final requirements.
  4. Choose Create stack.

Enable the Lake Formation application integration

Complete the following steps to enable the Lake Formation application integration:

  1. On the Lake Formation console, choose Application integration settings in the navigation pane.
  2. Enable Allow external engines to filter data in Amazon S3 locations registered with Lake Formation.
  3. For Session tag values, choose application1.
  4. For AWS account IDs, enter the current AWS account ID.
  5. Choose Save.

LakeFormation Application integration

Enforce Lake Formation permissions

The CloudFormation stack created one database named lf-app-entities with two tables named users_tbl and users_partitioned_tbl.

To be sure you’re using Lake Formation permissions, you should confirm that you don’t have any grants set up on those tables for the principal IAMAllowedPrincipals. The IAMAllowedPrincipals group includes any IAM users and roles that are allowed access to your Data Catalog resources by your IAM policies, and it’s used to maintain backward compatibility with AWS Glue.

To confirm Lake Formations permissions are enforced, navigate to the Lake Formation console and choose Data lake permissions in the navigation pane. Filter permissions by Database=lf-app-entities and remove all the permissions given to the principal IAMAllowedPrincipals.

For more details on IAMAllowedPrincipals and backward compatibility with AWS Glue, refer to Changing the default security settings for your data lake.

Check the created Lake Formation resources and permissions

The CloudFormation stack created two IAM roles—lf-app-access-role-1 and lf-app-access-role-2—and assigned them different permissions on the users_tbl (unpartitioned) and users_partitioned_tbl (partitioned) tables. The specific Lake Formation grants are summarized in the following table.

IAM Roles
lf-app-entities (Database)
  users _tbl (Table) _tbl _partitioned_tbl (Table)
lf-app-access-role-1 No access Read access on columns uid, state, and city for all the records. Read access to all columns except for address only on rows with value state=united kingdom.
lf-app-access-role-2 Read access on columns with the tag sensitive = false Read access to all columns and rows.

To better understand the full permissions setup, you should review the CloudFormation created Lake Formation resources and permissions. On the Lake Formation console, complete the following steps:

  1. Review the data filters:
    1. Choose Data filters in the navigation pane.
    2. Inspect the lf-app-filter-1
  2. Review the tags:
    1. Choose LF-Tags and permissions in the navigation pane.
    2. Inspect the sensitive
  3. Review the tag associations:
    1. Choose Tables in the navigation pane.
    2. Choose the users_tbl
    3. Inspect the LF-Tags associated to the different columns in the Schema
  4. Review the Lake Formation permissions:
    1. Choose Data lake permissions in the navigation pane.
    2. Filter by Principal = lf-app-access-role-1 and inspect the assigned permissions.
    3. Filter by Principal = lf-app-access-role-2 and inspect the assigned permissions.

Test the Lambda function

The Lambda function created by the CloudFormation template accepts JSON objects as input events. The JSON events have the following structure:

 {
  "identity": {
    "username": "XXX"
  },
  "fieldName": "YYY",
  "arguments": {
    "AA": "BB",
    ...
  }
}

Although the identity field is always needed in order to identify the called identity, depending on the requested operation (fieldName), different arguments should be provided. The following table lists these arguments.

Operation Description Needed Arguments Output
getDbs List databases No arguments needed List of databases the user has access to
getTablesByDb List tables db: <db_name> List of tables inside a database the user has access to
getUnfilteredTableMetadata Return the table metadata

db: <db_name>

table: <table_name>

Returns the output of the glue:GetUnfilteredTableMetadata API
getUnfilteredPartitionsMetadata Return the table partitions metadata

db: <db_name>

table: <table_name>

Returns the output of the glue:GetUnfilteredPartitionsMetadata API
getTableData Get table data

db: <db_name>

table: <table_name>

noOfRecs: N (number of records to pull)

nonNullRowsOnly: true/false (true to filter out records with all null values)

location: Table location

authorizedData: records of the table the user has access to

allColumns: All the columns of the table (returned only for demonstration and comparison purposes)

allData: All the records of the table without any filtering (returned only for demonstration and comparison purposes)

cellFilters: Lake Formation filters (applied to allData to return authorizedData)

authorizedColumns: Columns to which the user has access to (projection applied to allData to return authorizedData)

To test the Lambda function, you can create some sample Lambda test events. Complete the following steps:

  1. On the Lambda console, choose Functions on the navigation pane.
  2. Choose the lf-app-lambda-engine
  3. On the Test tab, select Create new event.
  4. For Event JSON, enter a valid JSON (we provide some sample JSON events).
  5. Choose Test.

Creata Lambda Test

  1. Check the test results (JSON response).

Lambda Test Result

The following are some sample test events you can try to see how different identities can access different sets of information.

user1 user2
{ 
  "identity": {
    "username": "user1"
  },
  "fieldName": "getDbs"
}

{ 
  "identity": {
    "username": "user2"
  },
  "fieldName": "getDbs"
}

{
  "identity": {
    "username": "user1"
  },
  "fieldName": "getTablesByDb",
  "arguments": {
    "db": "lf-app-entities"
  }
}

{
  "identity": {
    "username": "user2"
  },
  "fieldName": "getTablesByDb",
  "arguments": {
    "db": "lf-app-entities"
  }
}

{
  "identity": {
    "username": "user1"
  },
  "fieldName": "getUnfilteredTableMetadata",
  "arguments": {
    "db": "lf-app-entities",
    "table": "users_tbl" 
  }
}

{
  "identity": {
    "username": "user2"
  },
  "fieldName": "getUnfilteredTableMetadata",
  "arguments": {
    "db": "lf-app-entities",
    "table": "users_tbl" 
  }
}

{
  "identity": {
    "username": "user1"
  },
  "fieldName": "getUnfilteredTableMetadata",
  "arguments": {
    "db": "lf-app-entities",
    "table": "users_partitioned_tbl" 
  }
}

{
  "identity": {
    "username": "user2"
  },
  "fieldName": "getUnfilteredTableMetadata",
  "arguments": {
    "db": "lf-app-entities",
    "table": "users_partitioned_tbl" 
  }
}

{
  "identity": {
    "username": "user1"
  },
  "fieldName": "getUnfilteredPartitionsMetadata",
  "arguments": {
    "db": "lf-app-entities",
    "table": "users_tbl" 
  }
}

{
  "identity": {
    "username": "user2"
  },
  "fieldName": "getUnfilteredPartitionsMetadata",
  "arguments": {
    "db": "lf-app-entities",
    "table": "users_tbl" 
  }
}

{
  "identity": {
    "username": "user1"
  },
  "fieldName": "getUnfilteredPartitionsMetadata",
  "arguments": {
    "db": "lf-app-entities",
    "table": "users_partitioned_tbl" 
  }
}

{
  "identity": {
    "username": "user2"
  },
  "fieldName": "getUnfilteredPartitionsMetadata",
  "arguments": {
    "db": "lf-app-entities",
    "table": "users_partitioned_tbl" 
  }
}

{
  "identity": {
    "username": "user1"
  },
  "fieldName": "getTableData",
  "arguments": {
    "db": "lf-app-entities",
    "table": "users_tbl",
    "noOfRecs": 10,
    "nonNullRowsOnly": true
  }
}

{
  "identity": {
    "username": "user2"
  },
  "fieldName": "getTableData",
  "arguments": {
    "db": "lf-app-entities",
    "table": "users_tbl",
    "noOfRecs": 10,
    "nonNullRowsOnly": true
  }
}

{
  "identity": {
    "username": "user1"
  },
  "fieldName": "getTableData",
  "arguments": {
    "db": "lf-app-entities",
    "table": "users_partitioned_tbl",
    "noOfRecs": 10,
    "nonNullRowsOnly": true
  }
}

{
  "identity": {
    "username": "user2"
  },
  "fieldName": "getTableData",
  "arguments": {
    "db": "lf-app-entities",
    "table": "users_partitioned_tbl",
    "noOfRecs": 10,
    "nonNullRowsOnly": true
  }
}

As an example, in the following test, we request users_partitioned_tbl table data in the context of user1:

{
  "identity": {
    "username": "user1"
  },
  "fieldName": "getTableData",
  "arguments": {
    "db": "lf-app-entities",
    "table": "users_partitioned_tbl",
    "noOfRecs": 10,
    "nonNullRowsOnly": true
  }
}

The following is the related API response:

{
  "database": "lf-app-entities",
  "name": "users_partitioned_tbl",
  "location": "s3://lf-app-data-123456789012/datasets/lf-app-entities/users_partitioned/",
  "authorizedColumns": [
    {
      "Name": "born_year",
      "Type": "string"
    },
    {
      "Name": "city",
      "Type": "string"
    },
    {
      "Name": "name",
      "Type": "string"
    },
    {
      "Name": "state",
      "Type": "string"
    },
    {
      "Name": "surname",
      "Type": "string"
    },
    {
      "Name": "uid",
      "Type": "int"
    }
  ],
  "authorizedData": [
    [
      "1980",
      "bristol",
      "emily",
      "united kingdom",
      "brown",
      4
    ],
    [
      "1980",
      "vancouver",
      "<FILTEREDCELL>",
      "canada",
      "<FILTEREDCELL>",
      5
    ],
    [
      "1980",
      "madrid",
      "<FILTEREDCELL>",
      "spain",
      "<FILTEREDCELL>",
      6
    ],
    [
      "1980",
      "mexico city",
      "<FILTEREDCELL>",
      "mexico",
      "<FILTEREDCELL>",
      10
    ],
    [
      "1980",
      "zurich",
      "<FILTEREDCELL>",
      "switzerland",
      "<FILTEREDCELL>",
      11
    ],
    [
      "1980",
      "buenos aires",
      "<FILTEREDCELL>",
      "argentina",
      "<FILTEREDCELL>",
      12
    ],
    [
      "1990",
      "london",
      "john",
      "united kingdom",
      "pike",
      1
    ],
    [
      "1990",
      "milan",
      "<FILTEREDCELL>",
      "italy",
      "<FILTEREDCELL>",
      2
    ],
    [
      "1990",
      "berlin",
      "<FILTEREDCELL>",
      "germany",
      "<FILTEREDCELL>",
      3
    ],
    [
      "1990",
      "munich",
      "<FILTEREDCELL>",
      "germany",
      "<FILTEREDCELL>",
      7
    ]
  ],
  "allColumns": [
    {
      "Name": "address",
      "Type": "string"
    },
    {
      "Name": "born_year",
      "Type": "string"
    },
    {
      "Name": "city",
      "Type": "string"
    },
    {
      "Name": "name",
      "Type": "string"
    },
    {
      "Name": "state",
      "Type": "string"
    },
    {
      "Name": "surname",
      "Type": "string"
    },
    {
      "Name": "uid",
      "Type": "int"
    }
  ],
  "allData": [
    [
      "beautiful avenue 123",
      "1980",
      "bristol",
      "emily",
      "united kingdom",
      "brown",
      4
    ],
    [
      "lake street 45",
      "1980",
      "vancouver",
      "david",
      "canada",
      "lee",
      5
    ],
    [
      "plaza principal 6",
      "1980",
      "madrid",
      "sophia",
      "spain",
      "luz",
      6
    ],
    [
      "avenida de arboles 40",
      "1980",
      "mexico city",
      "olivia",
      "mexico",
      "garcia",
      10
    ],
    [
      "pflanzenstrasse 34",
      "1980",
      "zurich",
      "lucas",
      "switzerland",
      "fischer",
      11
    ],
    [
      "avenida de luces 456",
      "1980",
      "buenos aires",
      "isabella",
      "argentina",
      "afortunado",
      12
    ],
    [
      "hidden road 78",
      "1990",
      "london",
      "john",
      "united kingdom",
      "pike",
      1
    ],
    [
      "via degli alberi 56A",
      "1990",
      "milan",
      "mario",
      "italy",
      "rossi",
      2
    ],
    [
      "green road 90",
      "1990",
      "berlin",
      "july",
      "germany",
      "finn",
      3
    ],
    [
      "parkstrasse 789",
      "1990",
      "munich",
      "oliver",
      "germany",
      "schmidt",
      7
    ]
  ],
  "filteredCellPh": "<FILTEREDCELL>",
  "cellFilters": [
    {
      "ColumnName": "born_year",
      "RowFilterExpression": "TRUE"
    },
    {
      "ColumnName": "city",
      "RowFilterExpression": "TRUE"
    },
    {
      "ColumnName": "name",
      "RowFilterExpression": "state='united kingdom'"
    },
    {
      "ColumnName": "state",
      "RowFilterExpression": "TRUE"
    },
    {
      "ColumnName": "surname",
      "RowFilterExpression": "state='united kingdom'"
    },
    {
      "ColumnName": "uid",
      "RowFilterExpression": "TRUE"
    }
  ]
}

To troubleshoot the Lambda function, you can navigate to the Monitoring tab, choose View CloudWatch logs, and inspect the latest log stream.

Clean up

If you plan to explore Part 2 of this series, you can skip this part, because you will need the resources created here. You can refer to this section at the end of your testing.

Complete the following steps to remove the resources you created following this post and avoid incurring additional costs:

  1. On the AWS CloudFormation console, choose Stacks in the navigation pane.
  2. Choose the stack you created and choose Delete.

Additional considerations

In the proposed architecture, Lake Formation permissions were granted to specific IAM data access roles that requesting users (for example, the identity field) were mapped to. Another possibility is to assign permissions in Lake Formation to SAML users and groups and then work with the AssumeDecoratedRoleWithSAML API.

Conclusion

In the first part of this series, we explored how to integrate custom applications and data processing engines with Lake Formation. We delved into the required configuration, APIs, and steps to enforce Lake Formation policies within custom data applications. As an example, we presented a sample Lake Formation integrated application built on Lambda.

The information provided in this post can serve as a foundation for developing your own custom applications or data processing engines that need to operate on an Lake Formation protected data lake.

Refer to the second part of this series to see how to build a sample web application that uses the Lambda based Lake Formation application.


About the Authors

Stefano Sandona Picture Stefano Sandonà is a Senior Big Data Specialist Solution Architect at AWS. Passionate about data, distributed systems, and security, he helps customers worldwide architect high-performance, efficient, and secure data platforms.

Francesco Marelli PictureFrancesco Marelli is a Principal Solutions Architect at AWS. He specializes in the design, implementation, and optimization of large-scale data platforms. Francesco leads the AWS Solution Architect (SA) analytics team in Italy. He loves sharing his professional knowledge and is a frequent speaker at AWS events. Francesco is also passionate about music.

Integrate custom applications with AWS Lake Formation – Part 2

Post Syndicated from Stefano Sandona original https://aws.amazon.com/blogs/big-data/integrate-custom-applications-with-aws-lake-formation-part-2/

In the first part of this series, we demonstrated how to implement an engine that uses the capabilities of AWS Lake Formation to integrate third-party applications. This engine was built using an AWS Lambda Python function.

In this post, we explore how to deploy a fully functional web client application, built with JavaScript/React through AWS Amplify (Gen 1), that uses the same Lambda function as the backend. The provisioned web application provides a user-friendly and intuitive way to view the Lake Formation policies that have been enforced.

For the purposes of this post, we use a local machine based on MacOS and Visual Studio Code as our integrated development environment (IDE), but you could use your preferred development environment and IDE.

Solution overview

AWS AppSync creates serverless GraphQL and pub/sub APIs that simplify application development through a single endpoint to securely query, update, or publish data.

GraphQL is a data language to enable client apps to fetch, change, and subscribe to data from servers. In a GraphQL query, the client specifies how the data is to be structured when it’s returned by the server. This makes it possible for the client to query only for the data it needs, in the format that it needs it in.

Amplify streamlines full-stack app development. With its libraries, CLI, and services, you can connect your frontend to the cloud for authentication, storage, APIs, and more. Amplify provides libraries for popular web and mobile frameworks, like JavaScript, Flutter, Swift, and React.

Prerequisites

The web application that we deploy depends on the Lambda function that was deployed in the first post of this series. Make sure the function is already deployed and working in your account.

Install and configure the AWS CLI

The AWS Command Line Interface (AWS CLI) is an open source tool that enables you to interact with AWS services using commands in your command line shell. To install and configure the AWS CLI, see Getting started with the AWS CLI.

Install and configure the Amplify CLI

To install and configure the Amplify CLI, see Set up Amplify CLI. Your development machine must have the following installed:

  • Node.js v14.x or later
  • npm v6.14.4 or later
  • git v2.14.1 or later

Create the application

We create a JavaScript application using the React framework.

  1. In the terminal, enter the following command:
npm create vite@latest
  1. Enter a name for your project (we use lfappblog), choose React for the framework, and choose JavaScript for the variant.

You can now run the next steps, ignore any warning messages. Don’t run the npm run dev command yet.

  1. Enter the following command:
cd lfappblog && npm install

You should now see the directory structure shown in the following screenshot.

  1. You can now test the newly created application by running the following command:
npm run dev

By default, the application is available on port 5173 on your local machine.

The base application is shown in the workspace browser.

You can close the browser window and then the test web server by entering the following in the terminal: q + enter

Set up and configure Amplify for the application

To set up Amplify for the application, complete the following steps:

  1. Run the following command in the application directory to initialize Amplify:
amplify init
  1. Refer to the following screenshot for all the options required. Make sure to change the value of Distribution Directory Path to dist. The command creates and runs the required AWS CloudFormation template to create the backend environment in your AWS account.

amplify init command and output - animated

amplify init command and output

  1. Install the node modules required by the application with the following command:
npm install aws-amplify \
@aws-amplify/ui-react \
ace-builds \
file-loader \
@cloudscape-design/components @cloudscape-design/global-styles

npm install for required packages command and output

The output of this command will vary depending on the packages already installed on your development machine.

Add Amplify authentication

Amplify can implement authentication with Amazon Cognito user pools. You run this step before adding the function and the Amplify API capabilities so that the user pool created can be set as the authentication mechanism for the API, otherwise it would default to the API key and further modifications would be required.

Run the following command and accept all the defaults:

amplify add auth

amplify add auth command and output - animated

amplify add auth command and output

Add the Amplify API

The application backend is based on a GraphQL API with resolvers implemented as a Python Lambda function. The API feature of Amplify can create the required resources for GraphQL APIs based on AWS AppSync (default) or REST APIs based on Amazon API Gateway.

  1. Run the following command to add and initialize the GraphQL API:
amplify add api
  1. Make sure to set Blank Schema as the schema template (a full schema is provided as part of this post; further instructions are provided in the next sections).
  2. Make sure to select Authorization modes and then Amazon Cognito User Pool.

amplify add api command and output - animated

amplify add api command and output

Add Amplify hosting

Amplify can host applications using either the Amplify console or Amazon CloudFront and Amazon Simple Storage Service (Amazon S3) with the option to have manual or continuous deployment. For simplicity, we use the Hosting with Amplify Console and Manual Deployment options.

Run the following command:

amplify add hosting

amplify add hosting command and output - animated

amplify add hosting command and output

Copy and configure the GraphQL API schema

You’re now ready to copy and configure the GraphQL schema file and update it with the current Lambda function name.

Run the following commands:

export PROJ_NAME=lfappblog
aws s3 cp s3://aws-blogs-artifacts-public/BDB-3934/schema.graphql \
~/${PROJ_NAME}/amplify/backend/api/${PROJ_NAME}/schema.graphql

In the schema.graphql file, you can see that the lf-app-lambda-engine function is set as the data source for the GraphQL queries.

schema.graphql file content

Copy and configure the AWS AppSync resolver template

AWS AppSync uses templates to preprocess the request payload from the client before it’s sent to the backend and postprocess the response payload from the backend before it’s sent to the client. The application requires a modified template to correctly process custom backend error messages.

Run the following commands:

export PROJ_NAME=lfappblog
aws s3 cp s3://aws-blogs-artifacts-public/BDB-3934/InvokeLfAppLambdaEngineLambdaDataSource.res.vtl \
~/${PROJ_NAME}/amplify/backend/api/${PROJ_NAME}/resolvers/

In the InvokeLfAppLambdaEngineLambdaDataSource.res.vtl file, you can inspect the .vtl resolver definition.

InvokeLfAppLambdaEngineLambdaDataSource.res.vtl file content

Copy the application client code

As last step, copy the application client code:

export PROJ_NAME=lfappblog
aws s3 cp s3://aws-blogs-artifacts-public/BDB-3934/App.jsx \
~/${PROJ_NAME}/src/App.jsx

You can now open App.jsx to inspect it.

Publish the full application

From the project directory, run the following command to verify all resources are ready to be created on AWS:

amplify status

amplify status command and output

Run the following command to publish the full application:

amplify publish

This will take several minutes to complete. Accept all defaults apart from Enter maximum statement depth [increase from default if your schema is deeply nested], which must be set to 5.

amplify publish command and output - animated

amplify publish command and output

All the resources are now deployed on AWS and ready for use.

Use the application

You can start using the application from the Amplify hosted domain.

  1. Run the following command to retrieve the application URL:
amplify status

amplify status command and output

At first access, the application shows the Amazon Cognito login page.

  1. Choose Create Account and create a user with user name user1 (this is mapped in the application to the role lf-app-access-role-1 for which we created Lake Formation permissions in the first post).

  1. Enter the confirmation code that you received through email and choose Sign In.

When you’re logged in, you can start interacting with the application.

Application starting screen

Controls

The application offers several controls:

  • Database – You can select a database registered with Lake Formation with the Describe permission.

Application database control

  • Table – You can choose a table with Select permission.

Application Table and Number of Records controls

  • Number of records – This indicates the number of records (between 5–40) to display on the Data Because this is a sample application, no pagination was implemented in the backend.
  • Row type – Enable this option to display only rows that have at least one cell with authorized data. If all cells in a row are unauthorized and checkbox is selected, the row is not displayed.

Outputs

The application has four outputs, organized in tabs.

Unfiltered Table Metadata

This tab displays the response of the AWS Glue API GetUnfilteredTableMetadata policies for the selected table. The following is an example of the content:

{
  "Table": {
    "Name": "users_tbl",
    "DatabaseName": "lf-app-entities",
    "CreateTime": "2024-07-10T10:00:26+00:00",
    "UpdateTime": "2024-07-10T11:41:36+00:00",
    "Retention": 0,
    "StorageDescriptor": {
      "Columns": [
        {
          "Name": "uid",
          "Type": "int"
        },
        {
          "Name": "name",
          "Type": "string"
        },
        {
          "Name": "surname",
          "Type": "string"
        },
        {
          "Name": "state",
          "Type": "string"
        },
        {
          "Name": "city",
          "Type": "string"
        },
        {
          "Name": "address",
          "Type": "string"
        }
      ],
      "Location": "s3://lf-app-data-123456789012/datasets/lf-app-entities/users/",
      "InputFormat": "org.apache.hadoop.mapred.TextInputFormat",
      "OutputFormat": "org.apache.hadoop.hive.ql.io.HiveIgnoreKeyTextOutputFormat",
      "Compressed": false,
      "NumberOfBuckets": 0,
      "SerdeInfo": {
        "SerializationLibrary": "org.apache.hadoop.hive.serde2.lazy.LazySimpleSerDe",
        "Parameters": {
          "field.delim": ","
        }
      },
      "SortColumns": [],
      "StoredAsSubDirectories": false
    },
    "PartitionKeys": [],
    "TableType": "EXTERNAL_TABLE",
    "Parameters": {
      "classification": "csv"
    },
    "CreatedBy": "arn:aws:sts::123456789012:assumed-role/Admin/fmarelli",
    "IsRegisteredWithLakeFormation": true,
    "CatalogId": "123456789012",
    "VersionId": "1"
  },
  "AuthorizedColumns": [
    "city",
    "state",
    "uid"
  ],
  "IsRegisteredWithLakeFormation": true,
  "CellFilters": [
    {
      "ColumnName": "city",
      "RowFilterExpression": "TRUE"
    },
    {
      "ColumnName": "state",
      "RowFilterExpression": "TRUE"
    },
    {
      "ColumnName": "uid",
      "RowFilterExpression": "TRUE"
    }
  ],
  "ResourceArn": "arn:aws:glue:us-east-1:123456789012:table/lf-app-entities/users"
}

Unfiltered Partitions Metadata

This tab displays the response of the AWS Glue API GetUnfileteredPartitionsMetadata policies for the selected table. The following is an example of the content:

{
  "UnfilteredPartitions": [
    {
      "Partition": {
        "Values": [
          "1991"
        ],
        "DatabaseName": "lf-app-entities",
        "TableName": "users_partitioned_tbl",
        "CreationTime": "2024-07-10T11:34:32+00:00",
        "LastAccessTime": "1970-01-01T00:00:00+00:00",
        "StorageDescriptor": {
          "Columns": [
            {
              "Name": "uid",
              "Type": "int"
            },
            {
              "Name": "name",
              "Type": "string"
            },
            {
              "Name": "surname",
              "Type": "string"
            },
            {
              "Name": "state",
              "Type": "string"
            },
            {
              "Name": "city",
              "Type": "string"
            },
            {
              "Name": "address",
              "Type": "string"
            }
          ],
          "Location": "s3://lf-app-data-123456789012/datasets/lf-app-entities/users_partitioned/born_year=1991",
          "InputFormat": "org.apache.hadoop.mapred.TextInputFormat",
          "OutputFormat": "org.apache.hadoop.hive.ql.io.HiveIgnoreKeyTextOutputFormat",
          "Compressed": false,
          "NumberOfBuckets": 0,
          "SerdeInfo": {
            "SerializationLibrary": "org.apache.hadoop.hive.serde2.lazy.LazySimpleSerDe",
            "Parameters": {
              "field.delim": ","
            }
          },
          "BucketColumns": [],
          "SortColumns": [],
          "Parameters": {},
          "StoredAsSubDirectories": false
        },
        "CatalogId": "123456789012"
      },
      "AuthorizedColumns": [
        "address",
        "city",
        "name",
        "state",
        "surname",
        "uid"
      ],
      "IsRegisteredWithLakeFormation": true
    },
    {
      "Partition": {
        "Values": [
          "1990"
        ],
        "DatabaseName": "lf-app-entities",
        "TableName": "users_partitioned_tbl",
        "CreationTime": "2024-07-10T11:34:32+00:00",
        "LastAccessTime": "1970-01-01T00:00:00+00:00",
        "StorageDescriptor": {
          "Columns": [
            {
              "Name": "uid",
              "Type": "int"
            },
            {
              "Name": "name",
              "Type": "string"
            },
            {
              "Name": "surname",
              "Type": "string"
            },
            {
              "Name": "state",
              "Type": "string"
            },
            {
              "Name": "city",
              "Type": "string"
            },
            {
              "Name": "address",
              "Type": "string"
            }
          ],
          "Location": "s3://lf-app-data-123456789012/datasets/lf-app-entities/users_partitioned/born_year=1990",
          "InputFormat": "org.apache.hadoop.mapred.TextInputFormat",
          "OutputFormat": "org.apache.hadoop.hive.ql.io.HiveIgnoreKeyTextOutputFormat",
          "Compressed": false,
          "NumberOfBuckets": 0,
          "SerdeInfo": {
            "SerializationLibrary": "org.apache.hadoop.hive.serde2.lazy.LazySimpleSerDe",
            "Parameters": {
              "field.delim": ","
            }
          },
          "BucketColumns": [],
          "SortColumns": [],
          "Parameters": {},
          "StoredAsSubDirectories": false
        },
        "CatalogId": "123456789012"
      },
      "AuthorizedColumns": [
        "address",
        "city",
        "name",
        "state",
        "surname",
        "uid"
      ],
      "IsRegisteredWithLakeFormation": true
    }
  ]
}

Authorized Data

This tab displays a table that shows the columns, rows, and cells that the user is authorized to access.

Application Authorized Data tab

A cell is marked as Unauthorized if the user has no permissions to access its contents, according to the cell filter definition. You can choose the unauthorized cell to view the relevant cell filter condition.

Application Authorized Data tab cell pop up example

In this example, the user can’t access the value of column surname in the first row because for the row, state is canada, but the cell can only be accessed when state=’united kingdom’.

If the Only rows with authorized data control is unchecked, rows with all cells set to Unauthorized are also displayed.

All Data

This tab contains a table that contains all the rows and columns in the table (the unfiltered data). This is useful for comparison with authorized data to understand how cell filters are applied to the unfiltered data.

Application All Data tab

Test Lake Formation permissions

Log out of the application and go to the Amazon Cognito login form, choose Create Account, and create a new user with called user2 (this is mapped in the application to the role lf-app-access-role-2 that we created Lake Formation permissions for in the first post). Get table data and metadata for this user to see how Lake Formation permissions are enforced and so the two users can see different data (on the Authorized Data tab).

The following screenshot shows that the Lake Formation permissions we created grant access to the following data (all rows, all columns) of table users_partitioned_tbl to user2 (mapped to lf-app-access-role-2).

Application Authorized Data tab for user2 on table users_partitioned_tbl

The following screenshot shows that the Lake Formation permissions we created grant access to the following data (all rows, but only city, state, and uid columns) of table users_tbl to user2 (mapped to lf-app-access-role-2).

Application Authorized Data tab for user2 on table users_partitioned

Considerations for the GraphQL API

You can use the AWS AppSync GraphQL API deployed in this post for other applications; the responses of the GetUnfilteredTableMetadata and GetUnfileteredPartitionsMetadata AWS Glue APIs were fully mapped in the GraphQL schema. You can use the Queries page on the AWS AppSync console to run the queries; this is based on GraphiQL.

AWS AppSync Queries page

You can use the following object to define the query variables:

{ 
  "db": "lf-app-entities",
  "table": "users_partitioned_tbl",
  "noOfRecs": 30,
  "nonNullRowsOnly": true
} 

The following code shows the queries available with input parameters and all fields defined in the schema as output:

  query GetDbs {
    getDbs {
      catalogId
      name
      description
    }
  }

  query GetTablesByDb($db: String!) {
    getTablesByDb(db: $db) {
      Name
      DatabaseName
      Location
      IsPartitioned
    }
  }
  
  query GetTableData(
    $db: String!
    $table: String!
    $noOfRecs: Int
    $nonNullRowsOnly: Boolean!
  ) {
    getTableData(
      db: $db
      table: $table
      noOfRecs: $noOfRecs
      nonNullRowsOnly: $nonNullRowsOnly
    ) {
      database
      name
      location
      authorizedColumns {
        Name
        Type
      }
      authorizedData
      allColumns {
        Name
        Type
      }
      allData
      filteredCellPh
      cellFilters {
        ColumnName
        RowFilterExpression
      }
    }
  }

  query GetUnfilteredTableMetadata($db: String!, $table: String!) {
    getUnfilteredTableMetadata(db: $db, table: $table) {
      JsonResp
      ApiResp {
        Table {
          Name
          DatabaseName
          Description
          Owner
          CreateTime
          UpdateTime
          LastAccessTime
          LastAnalyzedTime
          Retention
          StorageDescriptor {
            Columns {
              Name
              Type
              Comment
            }
            Location
            AdditionalLocations
            InputFormat
            OutputFormat
            Compressed
            NumberOfBuckets
            SerdeInfo {
              Name
              SerializationLibrary
            }
            BucketColumns
            SortColumns {
              Column
              SortOrder
            }
            Parameters {
              Name
              Value
            }
            SkewedInfo {
              SkewedColumnNames
              SkewedColumnValues
            }
            StoredAsSubDirectories
            SchemaReference {
              SchemaVersionId
              SchemaVersionNumber
            }
          }
          PartitionKeys {
            Name
            Type
            Comment
            Parameters {
              Name
              Value
            }
          }
          ViewOriginalText
          ViewExpandedText
          TableType
          Parameters {
            Name
            Value
          }
          CreatedBy
          IsRegisteredWithLakeFormation
          TargetTable {
            CatalogId
            DatabaseName
            Name
            Region
          }
          CatalogId
          VersionId
          FederatedTable {
            Identifier
            DatabaseIdentifier
            ConnectionName
          }
          ViewDefinition {
            IsProtected
            Definer
            SubObjects
            Representations {
              Dialect
              DialectVersion
              ViewOriginalText
              ViewExpandedText
              ValidationConnection
              IsStale
            }
          }
          IsMultiDialectView
        }
        AuthorizedColumns
        IsRegisteredWithLakeFormation
        CellFilters {
          ColumnName
          RowFilterExpression
        }
        QueryAuthorizationId
        IsMultiDialectView
        ResourceArn
        IsProtected
        Permissions
        RowFilter
      }
    }
  }

  query GetUnfilteredPartitionsMetadata($db: String!, $table: String!) {
    getUnfilteredPartitionsMetadata(db: $db, table: $table) {
      JsonResp
      ApiResp {
        Partition {
          Values
          DatabaseName
          TableName
          CreationTime
          LastAccessTime
          StorageDescriptor {
            Columns {
              Name
              Type
              Comment
            }
            Location
            AdditionalLocations
            InputFormat
            OutputFormat
            Compressed
            NumberOfBuckets
            SerdeInfo {
              Name
              SerializationLibrary
            }
            BucketColumns
            SortColumns {
              Column
              SortOrder
            }
            Parameters {
              Name
              Value
            }
            SkewedInfo {
              SkewedColumnNames
              SkewedColumnValues
            }
            StoredAsSubDirectories
            SchemaReference {
              SchemaVersionId
              SchemaVersionNumber
            }
          }
          Parameters {
            Name
            Value
          }
          LastAnalyzedTime
          CatalogId
        }
        AuthorizedColumns
        IsRegisteredWithLakeFormation
      }
    }
  }

Clean up

To remove the resources created in this post, run the following command:

amplify delete

amplify delete command and output

Refer to Part 1 to clean up the resources created in the first part of this series.

Conclusion

In this post, we showed how to implement a web application that uses a GraphQL API implemented with AWS AppSync and Lambda as the backend for a web application integrated with Lake Formation. You should now have a comprehensive understanding of how to extend the capabilities of Lake Formation by building and integrating your own custom data processing applications.

Try out this solution for yourself, and share your feedback and questions in the comments.


About the Authors

Stefano Sandona Picture Stefano Sandonà is a Senior Big Data Specialist Solution Architect at AWS. Passionate about data, distributed systems, and security, he helps customers worldwide architect high-performance, efficient, and secure data platforms.

Francesco Marelli PictureFrancesco Marelli is a Principal Solutions Architect at AWS. He specializes in the design, implementation, and optimization of large-scale data platforms. Francesco leads the AWS Solution Architect (SA) analytics team in Italy. He loves sharing his professional knowledge and is a frequent speaker at AWS events. Francesco is also passionate about music.

AWS Lambda SnapStart for Python and .NET functions is now generally available

Post Syndicated from Channy Yun (윤석찬) original https://aws.amazon.com/blogs/aws/aws-lambda-snapstart-for-python-and-net-functions-is-now-generally-available/

Today, we’re announcing the general availability of AWS Lambda SnapStart for Python and .NET functions that delivers faster function startup performance, from several seconds to as low as sub-second, typically with minimal or no code changes in Python, C#, F#, and Powershell.

In November 28, 2022, we introduced Lambda SnapStart for Java functions to improve startup performance by up to 10 times. With Lambda SnapStart, you can reduce outlier latencies that come from initializing functions, without having to provision resources or spend time implementing complex performance optimizations.

Lambda SnapStart works by caching and reusing the snapshotted memory and disk state of any one-time initialization code, or code that runs only the first time a Lambda function is invoked. Lambda takes a Firecracker microVM snapshot of the memory and disk state of the initialized execution environment, encrypts the snapshot, and caches it for low-latency access.

When you invoke the function version for the first time, and as the invocations scale up, Lambda resumes new execution environments from the cached snapshot instead of initializing them from scratch, improving startup latency. Lambda SnapStart makes it easy to build highly scalable and responsive applications in Python and .NET using AWS Lambda.

For Python functions, startup latency from initialization code can be several seconds long. Some scenarios where this can occur are – loading dependencies (such as LangChain, Numpy, Pandas, and DuckDB) or using frameworks (such as Flask or Django). Many functions also perform machine learning (ML) inference using Lambda, and need to load ML models during initialization – a process that can take tens of seconds depending on the size of the model used. Using Lambda SnapStart can reduce startup latency from several seconds to as low as sub-second for these scenarios.

For .NET functions, we expect most use cases to benefit because .NET just-in-time (JIT) compilation takes up to several seconds. Latency variability associated with initialization of Lambda functions has been a long-standing barrier for customers to use .NET for AWS Lambda. SnapStart enables functions to resume quickly by caching a snapshot of their memory and disk state. Therefore, most .NET functions will experience significant improvement in latency variability with Lambda SnapStart.

Getting started with Lambda SnapStart for Python and .NET
To get started, you can use the AWS Management Console, AWS Command Line Interface (AWS CLI) or AWS SDKs to activate, update, and delete SnapStart for Python and .NET functions.

On the AWS Lambda console, go to the Functions page and choose your function to use Lambda SnapStart. Select Configuration, choose General configuration, and then choose Edit. You can see SnapStart settings on the Edit basic settings page.

You can activate Lambda functions using Python 3.12 and higher, and .NET 8 and higher managed runtimes. Choose Published versions and then choose Save.

When you publish a new version of your function, Lambda initializes your code, creates a snapshot of the initialized execution environment, and then caches the snapshot for low-latency access. You can invoke the function to confirm activation of SnapStart.

Here is an AWS CLI command to update the function configuration by running the update-function-configuration command with the --snap-start option.

aws lambda update-function-configuration \
  --function-name lambda-python-snapstart-test \
  --snap-start ApplyOn=PublishedVersions

Publish a function version with the publish-version command.

aws lambda publish-version \
  --function-name lambda-python-snapstart-test

Confirm that SnapStart is activated for the function version by running the get-function-configuration command and specifying the version number.

aws lambda get-function-configuration \
  --function-name lambda-python-snapstart-test:1

If the response shows that OptimizationStatus is On and State is Active, then SnapStart is activated, and a snapshot is available for the specified function version.

"SnapStart": { 
    "ApplyOn": "PublishedVersions",
    "OptimizationStatus": "On"
 },
 "State": "Active",

To learn more about activating, updating, and deleting a snapshot with AWS SDKs, AWS CloudFormation, AWS Serverless Application Model (AWS SAM), and AWS Cloud Development Kit (AWS CDK), visit Activating and managing Lambda SnapStart in the AWS Lambda Developer Guide.

Runtime hooks
You can use runtime hooks to run code executed before Lambda creates a snapshot or after Lambda resumes a function from a snapshot. Runtime hooks are useful to perform cleanup or resource release operations, dynamically update configuration or other metadata, integrate with external services or systems, such as sending notifications or updating external state or to fine-tune your function’s startup sequence, such as by preloading dependencies.

Python runtime hooks are available as part of the open source Snapshot Restore for Python library, which is included in Python managed runtime. This library provides two decorators @register_before_snapshot to run before Lambda creates a snapshot and @register_after_restore to run when Lambda resumes a function from a snapshot. To learn more, visit Lambda SnapStart runtime hooks for Python in the AWS Lambda Developer Guide.

Here is an example Python handler to show how to run code before checkpointing and after restoring:

from snapshot_restore_py import register_before_snapshot, register_after_restore

def lambda_handler(event, context):
    # handler code

@register_before_snapshot
def before_checkpoint():
    # Logic to be executed before taking snapshots

@register_after_restore
def after_restore():
    # Logic to be executed after restore

You can also use .NET runtime hooks available as part of the Amazon.Lambda.Core package (version 2.5 or later) from NuGet. This library provides two methods RegisterBeforeSnapshot() to run before snapshot creation and RegisterAfterRestore() to run after resuming a function from a snapshot. To learn more, visit Lambda SnapStart runtime hooks for .NET in the AWS Lambda Developer Guide.

Here is an example C# handler to show how to run code before checkpointing and after restoring:

public class SampleClass
{
    public SampleClass()
    { 
        Amazon.Lambda.Core.SnapshotRestore.RegisterBeforeSnapshot(BeforeCheckpoint); 
        Amazon.Lambda.Core.SnapshotRestore.RegisterAfterRestore(AfterRestore);
    }
    
    private ValueTask BeforeCheckpoint()
    {
        // Add logic to be executed before taking the snapshot
        return ValueTask.CompletedTask;
    }

    private ValueTask AfterRestore()
    {
        // Add logic to be executed after restoring the snapshot
        return ValueTask.CompletedTask;
    }

    public APIGatewayProxyResponse FunctionHandler(APIGatewayProxyRequest request, ILambdaContext context)
    {
        // INSERT business logic
        return new APIGatewayProxyResponse
        {
            StatusCode = 200
        };
    }
}

To learn how to implement runtime hooks for your preferred runtime, visit Implement code before or after Lambda function snapshots in the AWS Lambda Developer Guide.

Things to know
Here are some things that you should know about Lambda SnapStart:

  • Handling uniqueness – If your initialization code generates unique content that is included in the snapshot, then the content will not be unique when it’s reused across execution environments. To maintain uniqueness when using SnapStart, you must generate unique content after initialization, such as if your code uses custom random number generation that doesn’t rely on built-in-libraries or caches any information such as DNS entries that might expire during initialization. To learn how to restore uniqueness, visit Handling uniqueness with Lambda SnapStart in the AWS Lambda Developer Guide.
  • Performance tuning – To maximize the performance, we recommend that you preload dependencies and initialize resources that contribute to startup latency in your initialization code instead of in the function handler. This moves the latency associated with heavy class loading out of the invocation path, optimizing startup performance with SnapStart.
  • Networking best practices –The state of connections that your function establishes during the initialization phase isn’t guaranteed when Lambda resumes your function from a snapshot. In most cases, network connections that an AWS SDK establishes automatically resume. For other connections, review the Maximize Lambda SnapStart performance in the AWS Lambda Developer Guide.
  • Monitoring functions – You can monitor your SnapStart functions using Amazon CloudWatch log stream, AWS X-Ray active tracing, and accessing real-time telemetry data for extensions using the Telemetry API, Amazon API Gateway and function URL metrics. To learn more about differences for SnapStart functions, visit Monitoring for Lambda SnapStart in the AWS Lambda Developer Guide.

Now available
AWS Lambda SnapStart for Python and .NET functions are available today in US East (N. Virginia), US East (Ohio), US West (Oregon), Asia Pacific (Singapore), Asia Pacific (Sydney), Asia Pacific (Tokyo), Europe (Frankfurt), Europe (Ireland), and Europe (Stockholm) AWS Regions.

With the Python and .NET managed runtimes, there are two types of SnapStart charges: the cost of caching a snapshot per function version that you publish with SnapStart enabled, and the cost of restoration each time a function instance is restored from a snapshot. So, delete unused function versions to reduce your SnapStart cache costs. To learn more, visit the AWS Lambda pricing page.

Give Lambda SnapStart for Python and .NET a try in the AWS Lambda console. To learn more, visit Lambda SnapStart page and send feedback through AWS re:Post for AWS Lambda or your usual AWS Support contacts.

— Channy

AWS Lambda turns ten – looking back and looking ahead

Post Syndicated from Jeff Barr original https://aws.amazon.com/blogs/aws/aws-lambda-turns-ten-the-first-decade-of-serverless-innovation/

I have a very vague memory of a 2013-era meeting with my then-colleague Tim Wagner. The term serverless did not exist, but we chatted about various ways to allow developers to focus on code instead of on infrastructure. At some I recall throwing my arms skyward and indicating that it would be cool to simply toss the code into the air and have the cloud grab, store, and run it. After many more such meetings, Tim wrote a PRFAQ proposing that we build a platform that did just that, and in 2014 I was able to announce AWS Lambda – Run Code in the Cloud.

From Startup to Enterprise
It is often the case that startups, with no installed base to worry about and the need to innovate, are the first to take a chance on something new such as Lambda. While that certainly did happen, I was pleasantly surprised to find that established companies—up to and including enterprises—were just as quick to jump in. After a bit of experimentation, they quickly found ways to build event-driven applications that supported critical internal use cases. I took this as an early indicator that Lambda would be a success. It was easy to see how quickly our customers felt a new sense of empowerment: they could move from idea to implementation, and from there to realizing business value, more quickly than ever, while still building their systems in a scalable and composable way.

Today, over 1.5 million Lambda users collectively make tens of trillion function invocations per month. These customers use Lambda for file processing, stream processing (in conjunction with Amazon Kinesis and/or Amazon MSK), web applications, IoT backends, mobile backends (often using Amazon API Gateway and AWS Amplify as well) and to support and power many other use cases.

The First Decade of Serverless Innovation
Let’s roll back the calendar and take a look at a few of the more significant Lambda launches of the past decade:

2014 – The preview launch of AWS Lambda ahead of AWS re:Invent 2014 with support for Node.js and the ability to respond to event triggers from S3 buckets, DynamoDB tables, and Kinesis streams.

2015 – General availability, use of Amazon Simple Notification Service (Amazon SNS) notifications as triggers, and support for Lambda functions written in Java.

2016 – Support for DynamoDB Streams, Support for Python, and an increase in the function duration to 5 minutes (this was later raised to 15 minutes). Access to resources in a VPC, the power to call Lambda functions from Amazon Aurora stored procedures, environment variables, and the Serverless Application Model. This year also saw the introduction of Step Functions, which gave you the power to compose multiple Lambda functions to build more complex applications.

2017 – Support for AWS X-Ray, launches of AWS SAM Local and the Serverless Application Repository.

2018 – Support for Amazon SQS as an event trigger, the power to Extend AWS CloudFormation with Lambda-powered macros, and the ability to write your Lambda functions in any programming language.

2019 – Support for provisioned concurrency to give you additional control over performance.

2020 – Access to Savings Plans to save up to 17%, the ability for Lambda functions to access a shared file system, support for AWS PrivateLink to access your functions over a private network, code signing, billing at 1 ms granularity, functions that can use up to 10 MB of memory and 6 vCPUs, and support for container images.

2021 – Amazon S3 Object Lambda to let you process data as it is being retrieved from S3, AWS Lambda Extensions, support for running Lambda functions on Graviton processors.

2022 – Support for up to 10 GB of ephemeral storage per function invocation, HTTPS endpoints for Lambda functions, and Lambda SnapStart to make function invocation faster and more predictable.

2023 – Amazon S3 Object Lambda support for CloudFront, response streaming, and 12x faster function scaling when handling an unpredictable volume of requests.

2024 -New controls to make it easier to capture and search your Lambda function logs, SnapStart support for Java functions that use the ARM64 architecture, recursive loop detection, a new console editor based on VS Code, and an enhanced local IDE experience. The last two launches were designed to improve the developer experience by making it easier to build, test, debug, and deploy Lambda functions.

Again, this is just a subset of what we have launched. If you want to find even more launches, check out the Lambda category tag and search the What’s New for Lambda.

The Next Decade of Serverless
From the start, the vision for severless has been about helping developers to move from idea to business value more quickly. With that in mind, here are a couple of trends that seem clear to me as I look at Lambda’s direction over the first decade:

Default Choice – The serverless model is definitely here to stay, and will likely become the default operating model over time.

Continued Shift Toward Composability – Over time I can see that serverless applications will continue to make increasing use of reusable, prebuilt components. Aided by AI-powered development tools, a lot of new code will focus on connecting exiting components together in new and powerful ways. This will also boost consistency and reliability across applications.

Automated, AI-Optimized Infrastructure Management– We have already seen that Lambda reduces the amount of time and effort needed for managing infrastructure. Going forward, I can see that Machine Learning and other forms of AI will help to optimize costs and performance by allocating resources optimally with minimal human intervention. Applications will run on infrastructure that is automated, self-healing, and fault tolerant.

Extensibility and Integration – As a consequence of the two previous items, applications should be able to grow and adapt to changing conditions more easily than ever.

Security – Automated infrastructure management, real-time monitoring and other forms of threat detection, and AI-assisted remediation will work together to make serverless applications even more secure.

Some Lambda Resources
If you are already using Lambda to build serverless apps, great! If you are ready to get started, here are some resources to help out:

Serverless Training – Enroll in the free Serverless Learning Plan to learn about serverless concepts, common patterns, and best practices. Read the Serverless Ramp-Up Guide, and look at our extensive (in both topic and language) selection of digital training courses and in-person classroom training:

Case Studies – Review the AWS Serverless Customer Success stories to learn how AWS customers are building and innovating with Lambda and other serverless technologies.

re:Invent 2024 Sessions -Browse the re:Invent 2024 Session Catalog to find nearly 200 sessions focused on Serverless Compute & Containers:

Podcast – Listen to Episode 137 (AWS Lambda: A Decade of Transformation) of the AWS Developers Podcast to hear Marc Brooker and Julian Wood discuss the origins, evolution, and impact of Lambda.

New Books – Take a peek at some of the newest books on serverless development and architecture:

I hope that you have enjoyed this not-so-brief look at the past, present, and future of AWS Lambda. Leave me a comment and let me know what you think!

— Jeff;

Python 3.13 runtime now available in AWS Lambda

Post Syndicated from Julian Wood original https://aws.amazon.com/blogs/compute/python-3-13-runtime-now-available-in-aws-lambda/

This post is written by Julian Wood, Principal Developer Advocate, and Leandro Cavalcante Damascena, Senior Solutions Architect Engineer.

AWS Lambda now supports Python 3.13 as both a managed runtime and container base image. Python is a popular language for building serverless applications. The Python 3.13 release includes a number of changes to the language, the implementation, and the standard library. With this release, Python developers can now take advantage of these new features and enhancements when creating serverless applications on Lambda. Python 3.13 also includes experimental support for a number of features, which are not available in Lambda.

You can develop Lambda functions in Python 3.13 using the AWS Management Console, AWS Command Line Interface (AWS CLI), AWS SDK for Python (Boto3), AWS Serverless Application Model (AWS SAM), AWS Cloud Development Kit (AWS CDK), and other infrastructure as code tools.

The Python 3.13 runtime allows you to implement serverless best practices using Powertools for AWS Lambda (Python). This is a developer toolkit that includes observability, batch processing, AWS Systems Manager Parameter Store integration, idempotency, feature flags, Amazon CloudWatch Metrics, structured logging, and more.

Lambda@Edge allows you to use Python 3.13 to customize low-latency content delivered through Amazon CloudFront.

Lambda runtime changes

Amazon Linux 2023

As with the Python 3.12 runtime, the Python 3.13 runtime is based on the provided.al2023 runtime, which is based on the Amazon Linux 2023 minimal container image. The Amazon Linux 2023 minimal image uses microdnf as a package manager, symlinked as dnf. This replaces the yum package manager used in Python 3.11 and earlier AL2-based images. If you deploy your Lambda functions as container images, you must update your Dockerfiles to use dnf instead of yum when upgrading to the Python 3.13 base image from Python 3.11 or earlier base images.

Learn more about the provided.al2023 runtime in the blog post Introducing the Amazon Linux 2023 runtime for AWS Lambda and the Amazon Linux 2023 launch blog post.

New Python features

Data model improvements

There are improvements to the Python data model. __static_attributes__ stores the names of attributes accessed through self.X in any function in a class body.

Typing changes

With the implementation of PEP 702, you can now use the new warnings.deprecated() decorator to mark deprecations in the type system and at runtime.

Python 3.13 also adds PEP 696, which introduces default values for type parameters. This enhancement allows developers to specify default types for TypeVar, ParamSpec, and TypeVarTuple when omitting type arguments.

Standard library

The standard library includes improvements for a new PythonFinalizationError exception, raised when an operation is blocked during finalization.

The new functions base64.z85encode() and base64.z85decode() support encoding and decoding Z85 data.

The copy module now has a copy.replace() function, with support for many built-in types and any class defining the __replace__() method.

The os module has a suite of new functions for working with Linux’s timer notification file descriptors.

There is a change to the defined mutation semantics for locals().

Experimental features that are unavailable

Python 3.13 includes a number of experimental features which are not enabled for the Lambda managed runtime or base images. These features must be enabled when the Python runtime is compiled. Since the Lambda-provided Python 3.13 runtime is intended for production workloads, these features are not enabled in the Lambda build of Python 3.13 and cannot be enabled via an execution-time flag. To use these features in Lambda, you can deploy your own Python runtime using a custom runtime or container image with these features enabled.

Free-threaded CPython

You can not enable the experimental support for running Python in a free-threaded mode, with the global interpreter lock (GIL) disabled.

Just-in-time (JIT) compiler

You can also not enable the experimental JIT compiler within the Lambda managed runtime or base image.

Performance considerations

At launch, new Lambda runtimes receive less usage than existing established runtimes. This can result in longer cold start times due to reduced cache residency within internal Lambda sub-systems. Cold start times typically improve in the weeks following launch as usage increases. As a result, AWS recommends not drawing conclusions from side-by-side performance comparisons with other Lambda runtimes until the performance has stabilized. Since performance is highly dependent on workload, customers with performance-sensitive workloads should conduct their own testing, instead of relying on generic test benchmarks.

Using Python 3.13 in Lambda

AWS Management Console

To use the Python 3.13 runtime to develop your Lambda functions, specify a runtime parameter value Python 3.13 when creating or updating a function. The Python 3.13 version is available in the Runtime dropdown in the Create Function page:

Creating Python function in AWS Management Console

Creating Python function in AWS Management Console

To update an existing Lambda function to Python 3.13, navigate to the function in the Lambda console and choose Edit in the Runtime settings panel. The new version of Python is available in the Runtime dropdown.

Changing a function to Python 3.13

Changing a function to Python 3.13

You may need to check your code and dependencies for compatibility with Python 3.13, and update as necessary.

AWS Lambda container image

Change the Python base image version by modifying the FROM statement in your Dockerfile

FROM public.ecr.aws/lambda/python:3.13
# Copy function code
COPY lambda_handler.py ${LAMBDA_TASK_ROOT}

AWS Serverless Application Model (AWS SAM)

In AWS SAM set the Runtime attribute to python3.13 to use this version.

AWSTemplateFormatVersion: '2010-09-09'
Transform: AWS::Serverless-2016-10-31
Description: Simple Lambda Function
  MyFunction:
    Type: AWS::Serverless::Function
    Properties:
      Description: My Python Lambda Function
      CodeUri: my_function/
      Handler: lambda_function.lambda_handler
      Runtime: python3.13

AWS SAM supports generating this template with Python 3.13 for new serverless applications using the sam init command. Refer to the AWS SAM documentation.

AWS Cloud Development Kit (AWS CDK)

In AWS CDK, set the runtime attribute to Runtime.PYTHON_3_13 to use this version. In Python CDK:

from constructs import Construct 
from aws_cdk import ( App, Stack, aws_lambda as _lambda )

class SampleLambdaStack(Stack):
    def __init__(self, scope: Construct, id: str, **kwargs) -> None:
        super().__init__(scope, id, **kwargs)
        
        base_lambda = _lambda.Function(self, 'python313LambdaFunction', 
                                       handler='lambda_handler.handler', 
                                    runtime=_lambda.Runtime.PYTHON_3_13, 
                                 code=_lambda.Code.from_asset('lambda'))

In TypeScript CDK:

import * as cdk from 'aws-cdk-lib';
import * as lambda from 'aws-cdk-lib/aws-lambda'
import * as path from 'path';
import { Construct } from 'constructs';

export class SampleLambdaStack extends cdk.Stack {
  constructor(scope: Construct, id: string, props?: cdk.StackProps) {
    super(scope, id, props);

    // The code that defines your stack goes here

    // The python3.13 enabled Lambda Function
    const lambdaFunction = new lambda.Function(this, 'python313LambdaFunction', {
      runtime: lambda.Runtime.PYTHON_3_13,
      memorySize: 512,
      code: lambda.Code.fromAsset(path.join(__dirname, '/../lambda')),
      handler: 'lambda_handler.handler'
    })
  }
}

Conclusion

Lambda now supports Python 3.13 as a managed language runtime. This release uses the Amazon Linux 2023 OS and includes Python 3.13 language additions including data model improvements, typing changes, and updates to the standard library. This release does not support the experimental option to disable the global interpreter lock or the experimental JIT compiler.

You can build and deploy functions using Python 3.13 using the AWS Management Console, AWS CLI, AWS SDK, AWS SAM, AWS CDK, or your choice of infrastructure as code tool. You can also use the Python 3.13 container base image if you prefer to build and deploy your functions using container images.

Python 3.13 runtime support helps developers to build more efficient, powerful, and scalable serverless applications. Try the Python 3.13 runtime in Lambda today and experience the benefits of this updated language version.

For more serverless learning resources, visit Serverless Land.
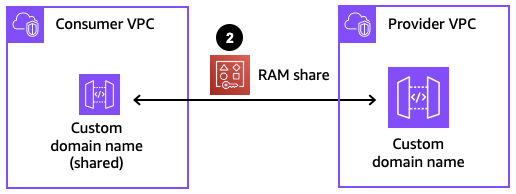
How an insurance company implements disaster recovery of 3-tier applications

Post Syndicated from Amit Narang original https://aws.amazon.com/blogs/architecture/how-an-insurance-company-implements-disaster-recovery-of-3-tier-applications/

A good strategy for resilience will include operating with high availability and planning for business continuity. It also accounts for the incidence of natural disasters, such as earthquakes or floods and technical failures, such as power failure or network connectivity. AWS recommends a multi-AZ strategy for high availability and a multi-Region strategy for disaster recovery. In this post, we explore how one of our customers, a US-based insurance company, uses cloud-native services to implement the disaster recovery of 3-tier applications.

At this insurance company, a relevant number of critical applications are 3-tier Java or .Net applications. These applications require access to IBM DB2, Oracle, or Microsoft SQLServer databases that run on Amazon EC2 instances. The requirement was to create a disaster recovery strategy that implements a Pilot Light or Warm/Standby scenario. This design needs to keep costs at a minimum, and it needs to allow for failure detection and manual failover of resources. Furthermore, it needs to keep the Recovery Time Objective (RTO) and the Recovery Point Objective (RPO) under 15 minutes. Finally, the solution could not use any public resources.

The solution

Amazon Route53 Application Recovery Controller (Route53 ARC) helps manage and orchestrate application failover and recovery across multiple AWS Regions or on-premises environments. It is specifically focused on managing DNS routing and traffic management during failover and recovery operation; however, some customers decide to implement their own strategies for application recovery. In this blog, we are going to focus on how one of our financial services customer implements it.

The Well-Architected framework explains that a good disaster recovery plan needs to manage configuration drift. A good practice is to use the delivery pipeline to deploy to both Regions and to regularly test the recovery pattern. There are customers that go a step further and even choose to operate in the secondary Region for a period of time.

The solution chosen by one of our leading insurance customers encompasses two distinct scenarios: a failover and a failback scenario. The failover scenario covers a list of steps to failover applications from the primary Region to the secondary Region. The failback process is the return of the operations to the primary Region.

Failover

Our customer decided to test the Pilot Light scenario. This scenario considers an application and a database deployed both in the primary and secondary Regions. As a requirement to achieve the 15-minute RPO, an application deployed in the primary Region needs to replicate data to the secondary Region. This async replication is implemented for each of the company’s database engines (DB2, SQLServer, Oracle) using native tooling. Leveraging native tooling was an existing practice and going with it would help minimize any operational impact.

It is important to notice that the detection and failover mechanisms is created in the secondary Region. This ensures these components will remain available when the primary Region becomes unavailable. Another important aspect is to establish connectivity between the two networks. This is needed to allow for the database replication.

The Pilot Light scenario for a 3-tier application that has application servers and a database deployed in two Regions

Figure 1. The Pilot Light scenario for a 3-tier application that has application servers and a database deployed in two Regions

The failover procedure uses the following steps for detection and failover:

  1. An Amazon EventBridge scheduler runs the AWS Lambda function every 60 seconds.
  2. The Lambda function tests the application endpoint and adds a custom metric to Amazon CloudWatch. If the application is unavailable, a CloudWatch Alarm will start the Lambda Function that initiates the failover.
  3. A Lambda function initiates the failover by starting a Jenkins pipeline. The pipeline will failover the application and the database to the secondary Region. The Jenkins pipeline starts with a manual approval step, ensuring that the failover process does not start automatically.
  4. Once approvers validate the necessity of the failover, they approve the workflow, and the pipeline moves to the next stage.
  5. The pipeline failovers the database, promoting the database in the secondary Region to the primary state and enables write operations.
  6. Next, start or scale out application servers that run on EC2 instances or containers. This is important to assure they will support the increased load in the secondary Region once failover is complete.
  7. At this point, database and application servers are ready to receive load. Next, the Application Load Balancer (ALB) needs to failover to the secondary Region. Route53 failover routing policy automatically failovers between Regions, but this customer wanted to manually control this step using a health check. To implement a manual failover of the ALB, the pipeline creates a file in a designated S3 bucket. A Lambda function regularly checks if this file exists in the expected location. If so, it triggers a CloudWatch Alarm and the Route53 health check will fail. At this point, Route 53 will redirect traffic to the ALB in the secondary Region, becoming the new active endpoint.

Failback

The failback scenario starts when all the required services become online in the primary Region. AWS recommends using AWS Personal Health Dashboard to check for service health. Figure 2 illustrates the failback process in detail. It shows the step-by-step flow from initiating the failback procedure to the final DNS switchover, highlighting the key components and interactions involved in each stage. This visual representation helps to clarify the complex process of returning operations to the primary Region.

Diagram of the failback process

Figure 2. Diagram of the failback process

The failback procedure is implemented in six steps:

  1. A cloud operator or Site Reliability Engineer (SRE) initiates the failback procedure by submitting a form on an HTML page. A Lambda function starts a Jenkins pipeline.
  2. The pipeline initiates the delta sync replication of the database. This ensures that data changes made in the secondary Region are replicated to the primary Region.
  3. The next stage is a manual approval to recover back to the primary Region, where the SRE verifies that the databases are in sync and all services needed are online in the primary Region.
  4. Upon approval, the pipeline starts the application servers in the primary Region.
  5. Next, the database in the primary Region is promoted for write operations. The database endpoint in the secondary Region is updated to point to the primary Region’s database.
  6. As explained in the failover section, the DNS switchover depends on a file existing in S3. Since this file was created for our failover event, the pipeline will now remove this file. The Lambda function identifies the change and updates the state of the CloudWatch Alarm, then the Route53 Healthcheck will change the state. At this point, the ALB in the primary Region becomes active and failback completes successfully.

Benefits

This customer identified the following benefits in implementing this design:

  • Customizable solution that aligns with the company’s internal processes, operating model, and technologies in use
  • Standardized pattern applicable across the organization for applications with different technologies, including databases, Windows and Linux applications running on EC2
  • Recovery Point Objective (RPO) and Recovery Time Objective (RTO) of less than 15 minutes
  • A cost optimized solution that uses cloud native services to implement the detection and failover scenarios

Conclusion

The solution for the disaster recovery of 3-tier applications demonstrates this financial services customer’s commitment to ensuring business continuity and resilience. This design showcases the company’s ability to tailor their architecture to their specific requirements. Achieving an RPO and RTO of less than 15 minutes for critical applications is a remarkable feat. It ensures minimal disruption to business operations during regional outages.

Furthermore, this solution leverages existing technologies and processes within the company, allowing for seamless integration and adoption across the organization. The ability to standardize this pattern for applications with different technologies helps simplifying the operating model.

If you’re an enterprise seeking to enhance the resilience of your critical applications, this disaster recovery solution from one of our enterprise customers serves as an inspiring example. To further explore the disaster recovery strategies and best practices on AWS, we recommend the following resources:

How to build custom nodes workflow with ComfyUI on Amazon EKS

Post Syndicated from Wang Rui original https://aws.amazon.com/blogs/architecture/how-to-build-custom-nodes-workflow-with-comfyui-on-amazon-eks/

ComfyUI is an open-source node-based workflow solution for Stable Diffusion and increasingly being used by many creators. We previously published a blog and solution about how to deploy ComfyUI on AWS.

Typically, ComfyUI users use various custom nodes, which extend the capabilities of ComfyUI, to build their own workflows, often using ComfyUI-Manager to conveniently install and manage their custom nodes.

Following our blog post, we received numerous customer requests to integrate ComfyUI custom nodes into our solution. This post will guide you through the process of integrating custom nodes within ComfyUI-on-EKS.

Architecture overview

Architecture diagram showing the ComfyUI integration with Amazon EKS

Figure 1. Architecture diagram showing the ComfyUI integration with Amazon EKS

To integrate custom nodes within ComfyUI-on-EKS solution, we need to prepare custom nodes codes and environment, as well as needed models:

  • Code and Environment: Custom node code is placed in $HOME/ComfyUI/custom_nodes, and the environment is prepared by running pip install -r on all requirements.txt files in the custom node directories (any dependency conflicts between custom nodes need to be handled separately). Additionally, any system packages required by the custom nodes also should be installed. All these operations are performed through the Dockerfile, building an image containing the required custom nodes.
  • Models: Models used by custom nodes are placed in different directories under s3://comfyui-models-{account_id}-{region}. This triggers a Lambda function to send commands to all GPU nodes to synchronize the newly uploaded models to local instance store.

We’ll use the Stable Video Diffusion (SVD) – Image to video generation with high FPS workflow as an example to illustrate how to integrate custom nodes (you can also use your own workflow).

Build docker image

When loading this workflow, it will display the missing custom nodes. Next, we will build the missing custom nodes into the docker image.

Error message showing the missing node types

Figure 2. Error message showing the missing node types

There are two ways to build the image:

  • Build from GitHub: In the Dockerfile, download the code for each custom node and set up the environment and dependencies separately.
  • Build locally: Copy all the custom nodes from your local Dev environment into the image and set up the environment and dependencies.

Before building the image, please switch to the corresponding branch

git clone https://github.com/aws-samples/comfyui-on-eks ~/comfyui-on-eks
cd ~/comfyui-on-eks && git checkout custom_nodes_demo

Build from GitHub

Install custom nodes and dependencies with RUN command in the Dockerfile. You’ll need to find the GitHub URLs for all missing custom nodes.

...
RUN apt-get update && apt-get install -y \
    git \
    python3.10 \
    python3-pip \
    # needed by custom node ComfyUI-VideoHelperSuite
    libsm6 \
    libgl1 \
    libglib2.0-0
...
# Custom nodes demo of https://comfyworkflows.com/workflows/bf3b455d-ba13-4063-9ab7-ff1de0c9fa75

## custom node ComfyUI-Stable-Video-Diffusion
RUN cd /app/ComfyUI/custom_nodes && git clone https://github.com/thecooltechguy/ComfyUI-Stable-Video-Diffusion.git && cd ComfyUI-Stable-Video-Diffusion/ && python3 install.py
## custom node ComfyUI-VideoHelperSuite
RUN cd /app/ComfyUI/custom_nodes && git clone https://github.com/Kosinkadink/ComfyUI-VideoHelperSuite.git && pip3 install -r ComfyUI-VideoHelperSuite/requirements.txt
## custom node ComfyUI-Frame-Interpolation
RUN cd /app/ComfyUI/custom_nodes && git clone https://github.com/Fannovel16/ComfyUI-Frame-Interpolation.git && cd ComfyUI-Frame-Interpolation/ && python3 install.py
...

Refer to comfyui-on-eks/comfyui_image/Dockerfile.github for the complete Dockerfile.

Run following command to build and push Docker image

region="us-west-2" # Modify the region to your current region.
cd ~/comfyui-on-eks/comfyui_image/ && bash build_and_push.sh $region Dockerfile.github

Building from GitHub provides a clear understanding of the installation method, version, and environmental dependencies for each custom node, providing better control over the entire ComfyUI environment.

However, when there are too many custom nodes, installation and management can be time-consuming, and you need to find the URL for each custom node yourself (on the other hand, this can also be seen as a pro, as it makes you more familiar with the entire ComfyUI environment).

Build locally

Often, we use ComfyUI-Manager to install missing custom nodes. ComfyUI-Manager hides the installation details, and we cannot clearly know which custom nodes have been installed. In this case, we can build the image by COPY the entire ComfyUI directory (except the input, output, models, and other directories) into the Dockerfile.

The prerequisite for building the image locally is that you already have a working ComfyUI environment with custom nodes. In the same directory as ComfyUI, create a .dockerignore file and add the following content to ignore these directories when building the Docker image

ComfyUI/models
ComfyUI/input
ComfyUI/output
ComfyUI/custom_nodes/ComfyUI-Manager

Copy the two files comfyui-on-eks/comfyui_image/Dockerfile.local and comfyui-on-eks/comfyui_image/build_and_push.sh to the same directory as your local ComfyUI, like this:

ubuntu@comfyui:~$ ll
-rwxrwxr-x  1 ubuntu ubuntu       792 Jul 16 10:27 build_and_push.sh*
drwxrwxr-x 19 ubuntu ubuntu      4096 Jul 15 08:10 ComfyUI/
-rw-rw-r--  1 ubuntu ubuntu       784 Jul 16 10:41 Dockerfile.local
-rw-rw-r--  1 ubuntu ubuntu        81 Jul 16 10:45 .dockerignore
...

The Dockerfile.local builds the image by COPY the directory

...
# Python Evn
RUN pip3 install torch torchvision torchaudio --extra-index-url https://download.pytorch.org/whl/cu121
COPY ComfyUI /app/ComfyUI
RUN pip3 install -r /app/ComfyUI/requirements.txt

# Custom Nodes Env, may encounter some conflicts
RUN find /app/ComfyUI/custom_nodes -maxdepth 2 -name "requirements.txt"|xargs -I {} pip install -r {}
...

Refer to comfyui-on-eks/comfyui_image/Dockerfile.local for the complete Dockerfile.

Run the following command to build and upload the Docker image

region="us-west-2" # Modify the region to your current region.
bash build_and_push.sh $region Dockerfile.local

With this method, you can easily and quickly build your local Dev environment into an image for deployment, without paying attention to the installation, version, and dependency details of custom nodes when there are many of them.

However, not paying attention to the deployment environment of custom nodes may cause conflicts or missing dependencies, which need to be manually tested and resolved.

Upload models

Upload all the models needed for the workflow to the s3://comfyui-models-{account_id}-{region} corresponding directory using your preferred method. The GPU nodes will automatically sync from Amazon S3 (triggered by Lambda). If the models are large and numerous, you might need to wait. You can log into the GPU nodes using the aws ssm start-session --target ${instance_id} command and use the ps command to check the progress of the aws s3 sync process.

To set up this demo, you need to download the following models to s3://comfyui-models-{account_id}-{region}/svd/:

Test the Docker image locally (optional)

Since there are many types of custom nodes with different dependencies and versions, the runtime environment is quite complex. We recommend testing the Docker image locally after building it to ensure it runs correctly.

Refer to the code in comfyui-on-eks/comfyui_image/test_docker_image_locally.sh. Prepare the models and input directories (assuming the models and input images are stored in /home/ubuntu/ComfyUI/models and /home/ubuntu/ComfyUI/input respectively), and run the script to test the Docker image:

bash comfyui-on-eks/comfyui_image/test_docker_image_locally.sh

Rolling update K8S pods

Use your preferred method to perform a rolling update of the image for the online K8S pods, and then test the service.

Note, to run this demo, you need to:

  • use g5.2xlarge GPU node
  • set lower num_frames in Load Stable Video Diffusion Model (for example to 6)
  • set lower decoding_t in Stable Video Diffusion Decoder node (for example to 1)
Screenshot showing the rolling update demo

Figure 3. Screenshot showing the rolling update demo

Conclusion

Custom nodes empower creators to unleash the full potential of ComfyUI by seamlessly integrating a wide range of capabilities into their own workflows.

This article demonstrate how to build custom nodes into ComfyUI-on-EKS solution, you can build your own ComfyUI CI/CD pipeline following the instructions.

AWS Weekly Roundup: AWS Lambda, Amazon Bedrock, Amazon Redshift, Amazon CloudWatch, and more (Nov 4, 2024)

Post Syndicated from Matheus Guimaraes original https://aws.amazon.com/blogs/aws/aws-weekly-roundup-aws-lambda-amazon-bedrock-amazon-redshift-amazon-cloudwatch-and-more-nov-4-2024/

The spooky season has come and gone now. While there aren’t any Halloween-themed releases, AWS has celebrated it in big style by having a plethora of exciting releases last week! I think it’s safe to say that we have truly entered the ‘pre’ re:Invent stage as more and more interesting things are being released every week on the countdown to AWS re:Invent 2024.

There is a lot to cover, so let me put my wizard hat on, open the big bag of treats, and dive into last week’s goodies!

Something for developers
There was no shortage of treats from AWS for developers this Halloween!

AWS enhances the Lambda application building experience with VS Code IDE and AWS Toolkit — AWS has enhanced AWS Lambda development with the AWS Toolkit for Visual Studio Code, providing a guided setup for coding, testing, and deploying Lambda applications directly within the IDE. It includes sample walkthroughs and one-click deployment, simplifying the development process. Now, building apps with Lambda is as intuitive as crafting a spell in a wizard’s workshop!

AWS Amplify integration with Amazon S3 for static website hosting — AWS Amplify Hosting now integrates with Amazon S3 for seamless static website hosting, with global CDN support via Amazon CloudFront. This simplifies set up, offering secure, high-performance delivery with custom domains and SSL certificates. Hosting your site is now easier than spotting a jack-o’-lantern on Halloween night!

AWS Lambda now supports AWS Fault Injection Service (FIS) actions — AWS Lambda now supports AWS Fault Injection Simulator (FIS) actions, enabling developers to test resilience by injecting controlled faults like latency and execution errors. This helps simulate real-world failures without code changes, improving monitoring and operational readiness. Great for testing that old candy dispenser!

AWS CodeBuild now supports retrying builds automatically — AWS CodeBuild now offers automatic build retries, allowing developers to set a retry limit for failed builds. This reduces manual intervention by automatically retrying builds up to the specified limit, tackling those pesky, intermittent failures like a ghostbuster clearing a haunted pipeline!

Amazon Virtual Private Cloud launches new security group sharing features — Amazon VPC now supports sharing security groups across multiple VPCs within the same account and with participant accounts in shared VPCs. This streamlines security management and ensures consistent traffic filtering across your organization. Now, keeping your network secure is as seamless as warding off digital goblins!

Amazon DataZone expands data access with tools like Tableau, Power BI, and more — Amazon DataZone now supports the Amazon Athena JDBC Driver, allowing seamless access to data lake assets from BI tools, like Tableau and Power BI. This lets analysts connect and analyze data with ease. Now, accessing data is as effortless as a witch flying on her broomstick!

Generative AI
Amazon Q and Amazon Bedrock continue to make generative AI seem like magic. Here are some releases from last week.

Amazon Q Developer inline chat — Amazon Q Developer has introduced inline chat support, allowing developers to engage directly within their code editor for actions like optimization, commenting, and test generation. Real-time inline diffs make it simple to review changes, available in Visual Studio Code and JetBrains IDEs. It’s practically code magic – no witch’s cauldron needed!

Meta’s Llama 3.1 8B and 70B models are now available for fine-tuning in Amazon Bedrock — Amazon Bedrock now supports fine-tuning for Meta’s Llama 3.1 8B and 70B models, allowing developers to customize these AI models with their own data. With a 128K context length, Llama 3.1 processes large text volumes efficiently, making it perfect for domain-specific applications. Now, your AI won’t be scared of handling monstrous amounts of data—even on a dark, stormy night!

Fine-tuning for Anthropic’s Claude 3 Haiku in Amazon Bedrock is now generally available — Fine-tuning for the Claude 3 Haiku model in Amazon Bedrock is now generally available, enabling customization with your data for better accuracy. Make your AI as unique as your Halloween costume!

Cost Planning, Saving, and Tracking
Here are some new releases that can help you stay on top of your budget and keep an eye on the amount of candy that you buy.

AWS now accepts partial card payments — AWS now supports partial payments with credit or debit cards, letting users split monthly bills across multiple cards. This flexibility makes managing your budget as smooth as a ghost gliding through a haunted house!

Amazon Bedrock now supports cost allocation tags on inference profiles — Amazon Bedrock now supports cost allocation tags for inference profiles, allowing customers to track and manage generative AI costs by department or application. This makes financial management a treat, not a trick!

AWS Deadline Cloud now adds budget-related events — AWS Deadline Cloud, a service used for rendering and managing visual effects and animation workloads, now sends budget-related events via Amazon EventBridge, enabling real-time spending updates and automated notifications. This helps keep project costs under control without any unexpected scares!

And the busiest team of the week award goes to…Amazon Redshift!
Clearly, the Amazon Redshift team loves Halloween and decided to celebrate in big style with many releases! Here are the highlights:

Amazon Redshift integration with Amazon Bedrock for generative AI — Amazon Redshift now integrates with Amazon Bedrock for generative AI tasks using SQL, adding AI capabilities like text generation directly in your data warehouse. Now, you can conjure up rich insights without the need for complicated spells!

Announcing general availability of auto-copy for Amazon Redshift — Auto-copy for continuous data ingestion from Amazon S3 into Amazon Redshift is now generally available. This streamlines workflows, making data integration as smooth as carving a soft pumpkin!

Amazon Redshift now supports incremental refresh on Materialized Views (MVs) for data lake tables — Amazon Redshift now supports incremental refresh for materialized views on data lake tables, updating only changed data to boost efficiency. This keeps your data fresh without any haunting overhead!

Announcing Amazon Redshift Serverless with AI-driven scaling and optimization — Amazon Redshift Serverless now offers AI-driven scaling, adjusting resources automatically based on workload. This ensures smooth performance without any chilling surprises!

CSV result format support for Amazon Redshift Data API — Amazon Redshift Data API now supports CSV output for SQL query results, enhancing data processing flexibility. This makes handling data as smooth as a ghost’s whisper!

Halloween week contest runner-up…Amazon CloudWatch!
The Amazon CloudWatch team has also been busy giving out candy this Halloween! Let’s check it out.

Amazon CloudWatch now monitors EBS volumes exceeding provisioned performance — Amazon CloudWatch now provides metrics to check if Amazon EBS volumes exceed their IOPS or throughput limits. This helps quickly spot and resolve performance issues before they turn into a haunting problem!

New Amazon CloudWatch metrics for monitoring I/O latency of Amazon EBS volumes — Amazon CloudWatch now offers metrics for average read and write I/O latency of Amazon EBS volumes, aiding in identifying performance issues. These insights are available per minute at no extra cost. This should help you prevent latency from sneaking up on you like a Halloween ghost!

Amazon ElastiCache for Valkey adds new CloudWatch metrics to monitor server-side response time — Amazon ElastiCache now includes metrics for read and write request latency, helping monitor server response times. This aids in quickly spotting and resolving performance issues before they become a frightful surprise!

Conclusion
And that’s a wrap on Halloween 2024. I don’t know about you, but this is my favorite time of the year, followed by News Year’s. Both carry an element of unpredictability that I very much enjoy. With Halloween, you can get excited about what costume you’re going to wear, whereas New Year’s is all about new possibilities and conquering new horizons.

Luckily, you don’t have to wait for the new year to unlock new frontiers with AWS as we bring excitement and innovation throughout the year. And what better way to see this in action than at AWS re:Invent 2024!

I wonder what kinds of spells and surprises we’ll be conjuring up come Halloween 2025. Until next time, keep your eyes on the horizon—and your broomsticks at the ready!

Build a Two-Way Email-to-SMS Service with Amazon SES and Amazon End User Messaging

Post Syndicated from Cheng Wang original https://aws.amazon.com/blogs/messaging-and-targeting/build-a-two-way-email-to-sms-service-with-amazon-ses-and-amazon-end-user-messaging/

Introduction

Businesses and organizations today struggle to effectively communicate with their customers, employees, or other stakeholders across the diverse range of digital channels they now use. One common problem arises when the requirement to exchange information quickly and reliably extends beyond traditional email. This issue challenges organizations where recipients lack immediate access to email. This applies to field workers, remote teams, or customers who prefer to communicate via text messages. It is vital to bridge this gap between email and SMS communication for timely updates, urgent notifications, and seamless collaboration. However, separate management of these disparate channels independently proves cumbersome and leads to inefficiencies.

To address this challenge, one approach is to leverage Amazon Simple Email Service (SES) and Amazon End User Messaging services to create a robust, scalable, and cost-effective messaging system. This system seamlessly bridges the gap between email and SMS, enhances the reach and delivery of your messages and streamlines your communication workflows. Ultimately, this approach delivers a superior experience for your audience, ensuring that critical information reaches recipients through their preferred channels in a timely and efficient manner.

This blog post will delve into the step-by-step process of building a solution that enables both Email-to-SMS and SMS-to-Email communication. This solution allows you to send SMS messages using email and receive any SMS replies on the same email address you used to send the original message. Furthermore, you can continue the conversation by replying to the email you receive in response. By the end, you’ll have the knowledge and tools necessary to revolutionize your communication strategy and deliver a superior experience to your audience.

Here are some of the use cases for this solution:

  • Real estate agents can use this solution to send listing updates to clients via SMS, and then receive client inquiries and responses as emails.
  • Customer service team can leverage the Email to SMS functionality to proactively reach out to customers with important notifications. Customers are able to respond directly via SMS.
  • Retailers can use this solution to send order confirmations, shipping updates, and promotional offers to customers via SMS. Customers are able to respond with inquiries or feedback that are then received as emails.
  • Medical practices and hospitals can leverage the Email to SMS functionality to quickly notify patients of appointment reminders, prescription refills, or other time-sensitive information. Patients can then respond via SMS, which gets converted to an email that the healthcare staff can access.

Solution Overview

The following figure shows the high level architecture for this solution.

Figure 1: Two-Way Email-To-SMS architecture

  1. Email Users send an email to the email address formatted as “mobile-number@verified-domain”. Amazon SES email receiving receives the email and triggers a receipt rule.
  2. The email is published to Amazon Simple Notification Service (SNS) topic (EmailToSMS) based on the receipt rule action, which triggers an AWS Lambda function (ConvertEmailToSMS). The ConvertEmailToSMS Lambda function performs the following actions:
    1. Receives the event from SNS and constructs a text message using the email body content.
    2. The constructed message is then sent to the “mobile-number” in the destination email address using the “SendTextMessage” API from AWS End User Messaging SMS. This is achieved by using a phone number in AWS End User Messaging SMS as the origination identity.
    3. The SMS message ID and source email address are stored as items in the Amazon DynamoDB table (MessageTrackingTable). This tracks email addresses for replies from SMS users.
  3. Mobile Users receive the SMS, and they have the option to reply to the phone number with two-way SMS messaging
  4. AWS End User Messaging receives the incoming SMS message from the Mobile Users. It then publishes this message to a SNS topic (SMSToEmail) for two-way SMS integration, which triggers a Lambda function (ConvertSMSToEmail). The ConvertSMSToEmail Lambda function performs the following actions:
    1. Retrieves the item from “MessageTrackingTable” using “previousPublishedMessageId” (SMS message ID) from the SNS event, and locate the corresponding email address.
    2. Sends the SMS message body to the Email Users using SES. This step uses “mobile-number@verified-domain” as the source email address, and the email address retrieved from the previous step as the destination.
  5. Email Users receive the email, and they have the option to reply to the email to continue the conversation. Mobile Users will receive the latest reply from Email Users.

Walkthrough

This section will dive into the step-by step process for the deployment. There are 4 steps to deploy this solution:

  1. Configure SES verified identity for email receiving and sending.
  2. Deploy the CloudFormation stack for the Email to SMS functionality.
  3. Deploy the CloudFormation stack for the SMS to Email functionality.
  4. Set up two-way SMS messaging in AWS End User Messaging SMS.

Note: the Lambda code for this solution is developed based on phone numbers and long code as the supported origination identity in Australia. You need to adjust the Lambda code (“format_phone_number” function) accordingly for this to work in your country.

Refer to this GitHub repository for the solution source code.

Prerequisites

Prerequisites for this walkthrough:

  1. Administrator-level access to an AWS account
  2. A domain or subdomain that you own to create SES verified identity
  3. An origination identity that supports two-way messaging, following Choosing an origination identity for two-way messaging use cases. Simulator phone numbers are available if you are in the US
  4. A mobile phone to send and receive SMS
  5. An email address to send and receive emails

Step 1: Configure SES Verified Identity

Follow the steps outlined in Creating a domain identity to create a verified identity for your domain in your AWS account. Confirm your domain identity is in the “Verified” status before proceeding to the next step:

Figure 2: Verified Identity

Step 2: Deploy Email to SMS functionality

The following steps create a CloudFormation stack to deploy the required components for Email to SMS functionality:

  1. Sign in to your AWS account.
  2. Download the email-to-sms.yaml for creating the stack.
  3. Navigate to the AWS CloudFormation page.
  4. Choose Create stack, and then choose With new resources (standard).
  5. Choose Upload a template file and upload the CloudFormation template that you downloaded earlier: email-to-sms.yaml. Then choose Next.
  6. Enter the stack name Email-To-SMS.
  7. Enter the following values for the parameters:
    • RuleName: The name of your SES Rule Set and receipt rule.
    • Recipient1: Domain name used for recipient condition in the SES Rule Set.
    • Recipient2: Domain name used for recipient condition in the SES Rule Set if you need additional recipients.
    • PhoneNumberId: Phone number ID of the phone number to send SMS messages.
  8. Choose Next, and then optionally enter tags and choose Submit. Wait for the stack creation to finish.

Now you have the required components to convert email to text, and sending it as SMS to a phone number using AWS End User Messaging SMS.

Note: if required, modify the following code in email-to-sms.yaml to format your phone numbers accordingly:

def format_phone_number(email_address):

    # Extract the local part of the email address (before @)

    local_part = email_address.split('@')[0]   

    # Remove the leading '0' and add '+61' for phone number (Australia)

    if local_part.startswith('0'):

        formatted_number = '+61' + local_part[1:]

    return formatted_number

Step 3: Deploy SMS to Email functionality

The following steps create a CloudFormation stack to deploy the required components for SMS to Email functionality:

  1. Sign in to your AWS account.
  2. Download the sms-to-email.yaml for creating the stack.
  3. Navigate to the AWS CloudFormation page.
  4. Choose Create stack, and then choose With new resources (standard).
  5. Choose Upload a template file and upload the CloudFormation template that you downloaded earlier: sms-to-email.yaml. Then choose Next.
  6. Enter the stack name SMS-To-Email.
  7. Enter the following values for the parameters:
    • EmailDomain: The email domain to use for the SMS-to-Email function
  8. Choose Next, and then optionally enter tags and choose Submit. Wait for the stack creation to finish.

Note: if required, modify the following code in sms-to-email.yaml to format your phone numbers accordingly:

def format_phone_number(phone_number):

    # Replace the '+61' with '0' from the phone number (Australia)

    formatted_number = f"0{mobile_number[3:]}"

    return formatted_number

Step 4: Set up Two-Way Messaging in AWS End User Messaging SMS

Follow the steps 1 – 5 outlined in Set up two-way SMS messaging for a phone number in AWS End User Messaging SMS.

For step 6:

  • For Destination type, choose Amazon SNS.
  • Choose Existing SNS standard topic.
  • For Incoming messages destination, choose the SNS topic created from Step 3 (default topic name is SMSToEmailTopic).
  • For Two-way channel role, choose Use SNS topic policies.
  • Choose Save changes.

This allows your origination identity (phone number) to receive incoming messages, which is then published to an SNS topic and converted into emails by Lambda.

Testing

To test the solution, send an email with the destination address of “mobile-number@verified-domain”. You should receive a SMS on your mobile with the following information:

Note: AWS End User Messaging SMS has character limit for SMS messages depending on the type of characters the message contains. This solution takes the first 160 characters of the email body by default, you can adjust the EmailToSMS Lambda function as required.

Reply directly to the SMS, you should receive an email at the same email address that sent the original email, with the following information:

  • Subject: Re:mobile-number
  • Body: SMS message content
  • Source email address: mobile-number@verified-domain

If you are not receiving the email or SMS, check the Lambda CloudWatch logs for troubleshooting.

Cleaning up

To remove unneeded resources after testing the solution, follow these steps:

  1. In the CloudFormation console, delete the Email-To-SMS stack
  2. In the CloudFormation console, delete the SMS-To-Email stack
  3. If applicable, in Amazon SES, delete the verified identities
  4. If applicable, in AWS End User Messaging, release the unused phone numbers

Additional Consideration

Conclusion

This blog has explored how organizations can leverage AWS services to build a flexible, two-way communication solution bridging the gap between email and SMS channels. By integrating Amazon SES and Amazon End User Messaging, businesses can reach their audience through multiple channels, ensuring timely and effective delivery of critical messages.

The detailed guide provided the knowledge to create a scalable, cost-effective system tailored to evolving communication needs – whether facilitating email-to-SMS or SMS-to-email exchanges. This unified approach to email and SMS capabilities empowers companies to address the common challenge of managing disparate communication platforms, streamlining workflows and enhancing responsiveness.

If you run into issues or want to submit a feature request, use the New issue button under the issues tab in the GitHub repository.

Introducing an enhanced local IDE experience for AWS Lambda developers

Post Syndicated from Julian Wood original https://aws.amazon.com/blogs/compute/introducing-an-enhanced-local-ide-experience-for-aws-lambda-developers/

AWS Lambda is introducing an enhanced local IDE experience to simplify Lambda-based application development. The new features help developers to author, build, debug, test, and deploy Lambda applications more efficiently in their local IDE when using Visual Studio Code (VS Code).

Overview

The IDE experience is part of the AWS Toolkit for Visual Studio Code. A new guided walkthrough helps developers set up their local environment and install required tools. The toolkit includes a set of sample applications which show you how to iterate on your code locally and in the cloud. You can configure and save build settings to speed up application builds. Generate a configuration file to set up the debugging environment for VS Code to attach and launch the step-through debugger. Iterate faster by choosing to sync local application changes quickly to the cloud or perform a full application deploy. Test functions locally and in the cloud and create and share test events to speed up local and cloud testing. There are quick action buttons for build, deploy to cloud, and local or remote invoke. The toolkit integrates with AWS Infrastructure Composer, providing a visual application building experience directly from the IDE.

Using the new features

Installing the extension

To use the updated IDE experience, ensure you have the AWS Toolkit minimum version 3.31.0 installed as a VS Code Extension.

The AWS Toolkit now includes an additional section called Application Builder within the AWS extension side-bar. This allows you to view template resources and create, build, debug, and test serverless applications.

Using Application Builder for existing applications

You can open an existing local application template using Open Folder.

Lambda’s enhanced in-console editing experience allows you to download existing function code and an AWS Serverless Application Model (AWS SAM) template. This allows you to start in the console and more easily move to using infrastructure as code, which is a serverless best practice.

Using the guided walkthrough

The guided walkthrough helps you install dependencies, select an application template, and explains how to use Application Builder to iterate locally and deploy to the cloud.

  1. Choose Open Walkthrough which opens the walkthrough.
  2. Complete installation takes you through a wizard to install required dependencies and select application templates.
  3. The wizard provides download links to install the three dependencies:

    If you have installed the dependencies, selecting the links recognizes the installations.

  4. Select Choose your application template, which allows you to create example applications in VS Code.
  5. The Iterate locally tile provides guidance on how to use Application Builder to build and invoke the function, and how to view the results.
  6. Deploy to the cloud provides a link to Configure credentials and explains how to deploy your function to the cloud, remote invoke from your IDE, and view the results.

Creating an application from the samples

The following steps show how to create a function locally from an included template. You build the code artifact, locally test and debug, deploy, and remotely invoke and view results and logs, all without leaving your IDE.

  1. Navigate back to Choose your application template.
  2. New template with visual builder allows you to use Infrastructure Composer to create a new application using a visual canvas.
  3. See more application examples provides additional sample applications across a number of managed runtimes.

There are also two specific example applications to explore Lambda functionality.

  • Rest API: Learn how to build a synchronous Lambda function behind an API.
  • File processing.: Learn how to build an asynchronous Amazon S3 file processing application.

Building a synchronous Rest API application

  1. Select Rest API and chose Initialize your project.
  2. Select a language runtime. Select Python for this example.
  3. Open the file explorer, create a folder to download the example application and choose Create Project.
  4. Application Builder downloads the application. This includes the function code hello_world\app.py, with dependencies in requirements.txt, an AWS SAM template, template.yaml file, and an example event trigger, event.json. A README.md file explains the application structure and provides build and deploy instructions.

    The Application Builder section populates with the template resources.

  5. The icons provide shortcuts to view, build, and deploy the application.
  6. You can also use the Command Pallete to initiate the AWS SAM commands.
  7. Selecting the Open Template File icon opens the AWS SAM template in Infrastructure Composer.
  8. View the application resources and select Details to edit the template using the visual canvas.
  9. Navigate to the function resource and select Open Function Handler to show the function code.

Building the application

The build step helps you build artifacts from the files in your application project directory.

  1. Select the Build SAM template icon.
  2. Specify build flags allows you to configure AWS SAM builds settings.
  3. Select build settings particular to your configuration. Cached and parallel are useful to speed up future builds. Use container builds your function in a Lambda-like container. This allows you to build applications without having the language runtime and build tools installed locally.
  4. Save parameters adds the default build options in samconfig.toml.
  5. version = 0.1
    [default.build.parameters]
    template_file = "c:\\Code\\lambda-dx\\Rest-API\\template.yaml"
    cached = true
    parallel = true
    use_container = true

    AWS SAM builds the application. It downloads the build container image, installs the dependencies, and copies the function code.

  6. Press any key to close the additional terminal.

Iterate locally: invoke and debug

You can locally invoke and debug your serverless application before uploading it to the cloud. This helps you to test the logic of your function faster. Step-through debugging allows you to identify and fix issues in your application one instruction at a time in your local environment.

Local invoke

  1. In the Application Builder section, navigate to the function and select Local Invoke and Debug Configuration.
  2. Initiating Local Invoke and Debug Configuration

    Initiating Local Invoke and Debug Configuration

  3. This brings up another window which allows you to configure how to invoke the function locally and set up a debug configuration.
  4. Viewing Local Invoke and Debug Configuration Options

    Viewing Local Invoke and Debug Configuration Options

  5. You can create sample event payloads to test your function. Select an event provides a list of common trigger event payloads you can use and customize.
  6. Selecting an example event template

    Selecting an example event template

    This example application has an included sample event.

  7. Select Local file and choose the events\event.json file.
  8. Select the Invoke button.
  9. This builds the application and locally invokes the function within a Lambda emulation environment, using the event input file.

  10. View the function output within the IDE Output pane.
Viewing function output

Viewing function output

Local debugging

You can also debug the function locally using VS Code’s built-in debugger.

  1. Add a breakpoint to the function code.
  2. Adding a breakpoint to the function code

    Adding a breakpoint to the function code

  3. Select the Invoke button again.
  4. This locally invokes the function and attaches a debugger to the Lambda emulation environment.

  5. The debugger stops at the breakpoint and you can view the function variables and call stack.
  6. Viewing step through debugging

    Viewing step through debugging

  7. Use the VS Code debugger icons to step through the code.
  8. Using VS Code debugger icons to step through the code.

    Using VS Code debugger icons to step through the code.

  9. In the Local Invoke and Debug Configuration panel. Chose Save Debug Config.
  10. Choose Add Local Invoke and Debug Configuration.
  11. Saving debug configuration

    Saving debug configuration

  12. Enter a debug configuration name which creates a launch.json file and adds the debug configuration.
  13. Naming debug configuration

    Naming debug configuration

    You can create and save multiple debug configurations for different scenarios. See the AWS SAM documentation for more launch.json configuration options.

  14. Once you save the debug configuration, you can use VS Code’s Run and Debug panel and select which debug configuration to run.
Using the Run and Debug panel

Using the Run and Debug panel

Deploying the application

  1. Navigate to the Application Builder section and chose the Deploy SAM Application icon.
  2. Selecting Deploy SAM Application icon

    Selecting Deploy SAM Application icon

    AWS SAM provides two deployment options:

    • Sync uses AWS SAM sync to perform an initial CloudFormation deploy and then allows for quick syncing of your application code, which allows for rapid prototyping. Use this for development environments only, as it doesn’t do a full CloudFormation deploy on code changes.
    • Deploy does a full CloudFormation deploy, which is preferred for non-quick development environments.
    Viewing AWS SAM deployment options

    Viewing AWS SAM deployment options

  3. Select Sync.
  4. Select Specify required parameters and save as defaults.
  5. Specifying SAM sync parameters

    Specifying SAM sync parameters

  6. Select a Region to deploy the stack and enter a stack name. It is good practice to specify that this is a dev stack to avoid confusion when using the Deploy option.
  7. Entering dev stack name

    Entering dev stack name

  8. Select an existing S3 bucket to store the artifacts, or create a new one.
  9. Selecting S3 bucket

    Selecting S3 bucket

  10. Specify the Sync parameters. Ensure you select Watch as this automatically watches for code changes and quickly syncs code changes to the Lambda service
  11. Setting sync parameters

    Setting sync parameters

  12. AWS SAM sync does an initial CloudFormation deploy to build the resources and then waits for code changes.
  13. Make a change to the handler file code and save the file,
  14. Amending code

    Amending code

  15. This performs a quick sync which reduces the time to test in the cloud.
  16. Quickly syncing code

    Quickly syncing code

  17. You can use the Deploy option to deploy a non-quick sync test version, amending the stack name to differentiate it from the dev stack.
Naming test version stack

Naming test version stack

Remote invoke

You can invoke the function in the cloud from your IDE. This allows you to test functionality without having to mock security, external services, or other environment variables.

Once the application is deployed, Application Builder detects changes to samconfig.toml and template.yaml, it updates the resources list with the cloud resources.

Viewing cloud resources

Viewing cloud resources

  1. You can browse directly to the CloudFormation stack to view resources.
  2. Browsing to CloudFormation stack

    Browsing to CloudFormation stack

  3. Selecting the function provides quick link functionality, which includes function details and a link directly to the Lambda console for the function.
  4. Viewing function quick link options

    Viewing function quick link options

  5. Select Invoke in cloud.
  6. Select the same local event file for the local invoke.
  7. Selecting local file for remote invoke

    Selecting local file for remote invoke

  8. Choose Remote Invoke.
  9. The function invokes in the cloud using the local test event and displays the remote invoke results in the local IDE Output pane.

    Viewing remote invoke results

    Viewing remote invoke results

  10. Name and save the local event file as a remote event which becomes available in the Lambda console.
Saving remote test event

Saving remote test event

Viewing logs

You can fetch the Amazon CloudWatch Log streams generated by your Lambda function in the IDE.

  1. Select the Search Logs icon.
  2. Selecting Search Logs icon

    Selecting Search Logs icon

  3. You can optionally filter the results.
Optionally filtering log results

Optionally filtering log results

Conclusion

Lambda is introducing an enhanced local IDE experience to simplify the development of Lambda-based applications using the VS Code IDE and AWS Toolkit. This streamlines the code-test-deploy-debug cycle. A guided walkthrough helps set up your local development environment and provides sample applications to explore Lambda functionality. You can then build, debug, test, and deploy Lambda applications using icon shortcuts and the Command Pallette. This allows you to more easily iterate on your Lambda-based applications without switching between multiple interfaces.

For more serverless learning resources, visit Serverless Land.

Modernize your legacy databases with AWS data lakes, Part 2: Build a data lake using AWS DMS data on Apache Iceberg

Post Syndicated from Shaheer Mansoor original https://aws.amazon.com/blogs/big-data/modernize-your-legacy-databases-with-aws-data-lakes-part-2-build-a-data-lake-using-aws-dms-data-on-apache-iceberg/

This is part two of a three-part series where we show how to build a data lake on AWS using a modern data architecture. This post shows how to load data from a legacy database (SQL Server) into a transactional data lake (Apache Iceberg) using AWS Glue. We show how to build data pipelines using AWS Glue jobs, optimize them for both cost and performance, and implement schema evolution to automate manual tasks. To review the first part of the series, where we load SQL Server data into Amazon Simple Storage Service (Amazon S3) using AWS Database Migration Service (AWS DMS), see Modernize your legacy databases with AWS data lakes, Part 1: Migrate SQL Server using AWS DMS.

Solution overview

In this post, we go over the process of building a data lake, providing the rationale behind the different decisions, and share best practices when building such a solution.

The following diagram illustrates the different layers of the data lake.

Overall Architecture

To load data into the data lake, AWS Step Functions can define a workflow, Amazon Simple Queue Service (Amazon SQS) can track the order of incoming files, and AWS Glue jobs and the Data Catalog can be used create the data lake silver layer. AWS DMS produces files and writes these files to the bronze bucket (as we explained in Part 1).

We can turn on Amazon S3 notifications and push the new arriving file names to an SQS first-in-first-out (FIFO) queue. A Step Functions state machine can consume messages from this queue to process the files in the order they arrive.

For processing the files, we need to create two types of AWS Glue jobs:

  • Full load – This job loads the entire table data dump into an Iceberg table. Data types from the source are mapped to an Iceberg data type. After the data is loaded, the job updates the Data Catalog with the table schemas.
  • CDC – This job loads the change data capture (CDC) files into the respective Iceberg tables. The AWS Glue job implements the schema evolution feature of Iceberg to handle schema changes such as addition or deletion of columns.

As in Part 1, the AWS DMS jobs will place the full load and CDC data from the source database (SQL Server) in the raw S3 bucket. Now we process this data using AWS Glue and save it to the silver bucket in Iceberg format. AWS Glue has a plugin for Iceberg; for details, see Using the Iceberg framework in AWS Glue.

Along with moving data from the bronze to the silver bucket, we also create and update the Data Catalog for further processing the data for the gold bucket.

The following diagram illustrates how the full load and CDC jobs are defined inside the Step Functions workflow.

Step Functions for loading data into the lake

In this post, we discuss the AWS Glue jobs for defining the workflow. We recommend using AWS Step Functions Workflow Studio, and setting up Amazon S3 event notifications and an SNS FIFO queue to receive the filename as messages.

Prerequisites

To follow the solution, you need the following prerequisites set up as well as certain access rights and AWS Identity and Access Management (IAM) privileges:

  • An IAM role to run Glue jobs
  • IAM privileges to create AWS DMS resources (this role was created in Part 1 of this series; you can use the same role here)
  • The AWS DMS job from Part 1 working and producing files for the source database on Amazon S3.

Create an AWS Glue connection for the source database

We need to create a connection between AWS Glue and the source SQL Server database so the AWS Glue job can query the source for the latest schema while loading the data files. To create the connection, follow these steps:

  1. On the AWS Glue console, choose Connections in the navigation pane.
  2. Choose Create custom connector.
  3. Give the connection a name and choose JDBC as the connection type.
  4. In the JDBC URL section, enter the following string and replace the name of your source database endpoint and database that was set up in Part 1: jdbc:sqlserver://{Your RDS End Point Name}:1433/{Your Database Name}.
  5. Select Require SSL connection, then choose Create connector.

Clue Connections

Create and configure the full load AWS Glue job

Complete the following steps to create the full load job:

  1. On the AWS Glue console, choose ETL jobs in the navigation pane.
  2. Choose Script editor and select Spark.
  3. Choose Start fresh and select Create script.
  4. Enter a name for the full load job and choose the IAM role (mentioned in the prerequisites) for running the job.
  5. Finish creating the job.
  6. On the Job details tab, expand Advanced properties.
  7. In the Connections section, add the connection you created.
  8. Under Job parameters, pass the following arguments to the job:
    1. target_s3_bucket – The silver S3 bucket name.
    2. source_s3_bucket – The raw S3 bucket name.
    3. secret_id – The ID of the AWS Secrets Manager secret for the source database credentials.
    4. dbname – The source database name.
    5. datalake-formats – This sets the data format to iceberg.

Glue Job Parameters

The full load AWS Glue job starts after the AWS DMS task reaches 100%. The job loops over the files located in the raw S3 bucket and processes them one at time. For each file, the job infers the table name from the file name and gets the source table schema, including column names and primary keys.

If the table has one or more primary keys, the job creates an equivalent Iceberg table. If the job has no primary key, the file is not processed. In our use case, all the tables have primary keys, so we enforce this check. Depending on your data, you might need to handle this scenario differently.

You can use the following code to process the full load files. To start the job, choose Run.

import sys, boto3, json
import boto3
import json
from awsglue.utils import getResolvedOptions
from pyspark.context import SparkContext
from awsglue.context import GlueContext
from awsglue.job import Job
from pyspark.sql import SparkSession

#Get the arguments passed to the script
args = getResolvedOptions(sys.argv, ['JOB_NAME',
                           'target_s3_bucket',
                           'secret_id',
                           'source_s3_bucket'])
dbname = "AdventureWorks"
schema = "HumanResources"

#Initialize parameters
target_s3_bucket = args['target_s3_bucket']
source_s3_bucket = args['source_s3_bucket']
secret_id = args['secret_id']
unprocessed_tables = []
drop_column_list = ['db', 'table_name', 'schema_name', 'Op', 'last_update_time']  # DMS added columns

#Helper Function: Get Credentials from Secrets Manager
def get_db_credentials(secret_id):
    secretsmanager = boto3.client('secretsmanager')
    response = secretsmanager.get_secret_value(SecretId=secret_id)
    secrets = json.loads(response['SecretString'])
    return secrets['host'], int(secrets['port']), secrets['username'], secrets['password']

#Helper Function: Load Iceberg table with Primary key(s)
def load_table(full_load_data_df, dbname, table_name):

    try:
        full_load_data_df = full_load_data_df.drop(*drop_column_list)
        full_load_data_df.createOrReplaceTempView('full_data')

        query = """
        CREATE TABLE IF NOT EXISTS glue_catalog.{0}.{1}
        USING iceberg
        LOCATION "s3://{2}/{0}/{1}"
        AS SELECT * FROM full_data
        """.format(dbname, table_name, target_s3_bucket)
        spark.sql(query)
        
        #Update Table property to accept Schema Changes
        spark.sql("""ALTER TABLE glue_catalog.{0}.{1} SET TBLPROPERTIES (
                      'write.spark.accept-any-schema'='true'
                    )""".format(dbname, table_name))
        
    except Exception as ex:
        print(ex)
        failed_table = {"table_name": table_name, "Reason": ex}
        unprocessed_tables.append(failed_table)
        
def get_table_key(host, port, username, password, dbname):
    
    jdbc_url = "jdbc:sqlserver://{0}:{1};databaseName={2}".format(host, port, dbname)
    
    connectionProperties = {
      "user" : username,
      "password" : password
    }
    
    spark.read.jdbc(url=jdbc_url, table='INFORMATION_SCHEMA.TABLE_CONSTRAINTS', properties=connectionProperties).createOrReplaceTempView("TABLE_CONSTRAINTS")
    spark.read.jdbc(url=jdbc_url, table='INFORMATION_SCHEMA.CONSTRAINT_COLUMN_USAGE', properties=connectionProperties).createOrReplaceTempView("CONSTRAINT_COLUMN_USAGE")
    df_table_pkeys = spark.sql("select c.TABLE_NAME, C.COLUMN_NAME as primary_key FROM TABLE_CONSTRAINTS T JOIN CONSTRAINT_COLUMN_USAGE C ON C.CONSTRAINT_NAME=T.CONSTRAINT_NAME WHERE T.CONSTRAINT_TYPE='PRIMARY KEY'")
    return df_table_pkeys


#Setup Spark configuration for reading and writing Iceberg tables
spark = (
    SparkSession.builder
    .config("spark.sql.extensions", "org.apache.iceberg.spark.extensions.IcebergSparkSessionExtensions")
    .config("spark.sql.catalog.glue_catalog", "org.apache.iceberg.spark.SparkCatalog")
    .config("spark.sql.catalog.glue_catalog.warehouse", "s3://{0}".format(dbname))
    .config("spark.sql.catalog.glue_catalog.catalog-impl", "org.apache.iceberg.aws.glue.GlueCatalog")
    .config("spark.sql.catalog.glue_catalog.io-impl", "org.apache.iceberg.aws.s3.S3FileIO")
    .getOrCreate()
)


#Initialize MSSQL credentials
host, port, username, password = get_db_credentials(secret_id)

#Initialize primary keys for all tables
df_table_pkeys = get_table_key(host, port, username, password, dbname)

#Read Full load csv files from s3
s3 = boto3.client('s3')
full_load_tables = s3.list_objects_v2(Bucket=source_s3_bucket, Prefix="raw/{0}/{1}".format(args['dbname'], args['schema']))

#Loop over files
for item in full_load_tables['Contents']:
    pkey_list = []
    table_name = item["Key"].split("/")[3].lower()
    print("Table name {0}".format(table_name))
    current_table_df = df_table_pkeys.where(df_table_pkeys.TABLE_NAME == table_name)

    # Only Process tables with at least 1 Primary key
    if not current_table_df.isEmpty():
        for i in current_table_df.collect():
            pkey_list.append(i["primary_key"])
    else:
        failed_table = {"table_name": table_name, "Reason": "No primary key"}
        unprocessed_tables.append(failed_table)
        # ToDo Handle these cases

    full_data_path = "s3://{0}/{1}".format(source_s3_bucket, item['Key'])
    full_load_data_df = (spark
                        .read
                        .option("header", True)
                        .option("inferSchema", True)
                        .option("recursiveFileLookup", "true")
                        .csv(full_data_path)
                        )

    primary_key = ",".join(pkey_list)

    if table_name not in unprocessed_tables:
        load_table(full_load_data_df, dbname, table_name)

When the job is complete, it creates the database and tables in the Data Catalog, as shown in the following screenshot.

Data lake silver layer data

Create and configure the CDC AWS Glue job

The CDC AWS Glue job is created similar to the full load job. As with the full load AWS Glue job, you need to use the source database connection and pass the job parameters with one additional parameter, cdc_file, which contains the location of the CDC file to be processed. Because a CDC file can contain data for multiple tables, the job loops over the tables in a file and loads the table metadata from the source table ( RDS column names).

If the CDC operation is DELETE, the job deletes the records from the Iceberg table. If the CDC operation is INSERT or UPDATE, the job merges the data into the Iceberg table.

You can use the following code to process the CDC files. To start the job, choose Run

import sys
import boto3
import json
from awsglue.utils import getResolvedOptions
from pyspark.context import SparkContext
from awsglue.context import GlueContext
from awsglue.job import Job
from pyspark.sql import SparkSession

# Get the arguments passed to the script
args = getResolvedOptions(sys.argv, ['JOB_NAME',
                           'target_s3_bucket',
                           'secret_id',
                           'source_s3_bucket',
                           'cdc_file'])
dbname = "AdventureWorks"
schema = "HumanResources"
target_s3_bucket = args['target_s3_bucket']
source_s3_bucket = args['source_s3_bucket']
secret_id = args['secret_id']
cdc_file = args['cdc_file']
unprocessed_tables = []
drop_column_list = ['db', 'table_name', 'schema_name', 'Op', 'last_update_time']  # DMS added columns
source_s3_cdc_file_key = "raw/AdventureWorks/cdc/" + cdc_file


# Helper Function: Get Credentials from Secrets Manager
def get_db_credentials(secret_id):
    secretsmanager = boto3.client('secretsmanager')
    response = secretsmanager.get_secret_value(SecretId=secret_id)
    secrets = json.loads(response['SecretString'])
    return secrets['host'], int(secrets['port']), secrets['username'], secrets['password']

# Helper Function: Column names from RDS
def get_table_colums(table, host, port, username, password, dbname):

    jdbc_url = "jdbc:sqlserver://{0}:{1};databaseName={2}".format(host, port, dbname)
    
    connectionProperties = {
      "user" : username,
      "password" : password
    }
    
    spark.read.jdbc(url=jdbc_url, table='INFORMATION_SCHEMA.COLUMNS', properties= connectionProperties).createOrReplaceTempView("TABLE_COLUMNS")
    columns = list((row.COLUMN_NAME) for (index, row) in spark.sql("select TABLE_NAME, TABLE_CATALOG, COLUMN_NAME from TABLE_COLUMNS where TABLE_NAME = '{0}' and TABLE_CATALOG = '{1}'".format(table, dbname)).select("COLUMN_NAME").toPandas().iterrows())
    return columns

# Helper Function: Get Colum names and datatypes from RDS
def get_table_colum_datatypes(table, host, port, username, password, dbname):

    jdbc_url = "jdbc:sqlserver://{0}:{1};databaseName={2}".format(host, port, dbname)
    
    connectionProperties = {
      "user" : username,
      "password" : password
    }
    
    spark.read.jdbc(url=jdbc_url, table='INFORMATION_SCHEMA.COLUMNS', properties= connectionProperties).createOrReplaceTempView("TABLE_COLUMNS")
    return spark.sql("select TABLE_NAME, COLUMN_NAME, DATA_TYPE from TABLE_COLUMNS WHERE TABLE_NAME ='{0}'".format(table))

# Helper Function: Setup the primary key condition
def get_iceberg_table_condition(database, tablename):
    
    jdbc_url = "jdbc:sqlserver://{0}:{1};databaseName={2}".format(host, port, database)
    
    connectionProperties = {
      "user" : username,
      "password" : password
    }
    
    spark.read.jdbc(url=jdbc_url, table='INFORMATION_SCHEMA.TABLE_CONSTRAINTS', properties=connectionProperties).createOrReplaceTempView("TABLE_CONSTRAINTS")
    spark.read.jdbc(url=jdbc_url, table='INFORMATION_SCHEMA.CONSTRAINT_COLUMN_USAGE', properties=connectionProperties).createOrReplaceTempView("CONSTRAINT_COLUMN_USAGE")
    
    condition = ''
    
    for key in spark.sql("select C.COLUMN_NAME FROM TABLE_CONSTRAINTS T JOIN CONSTRAINT_COLUMN_USAGE C ON C.CONSTRAINT_NAME=T.CONSTRAINT_NAME WHERE T.CONSTRAINT_TYPE='PRIMARY KEY' AND c.TABLE_NAME = '{0}'".format(table)).collect():
        condition += "target.{0} = source.{0} and".format(key.COLUMN_NAME)
    return condition[:-4]

    
# Read incoming data from Amazon S3
def read_cdc_S3(source_s3_bucket, source_s3_cdc_file_key):
    
    inputDf = (spark
                    .read
                    .option("header", False)
                    .option("inferSchema", True)
                    .option("recursiveFileLookup", "true")
                    .csv("s3://" + source_s3_bucket + "/" + source_s3_cdc_file_key)
                    )
    return inputDf

# Setup Spark configuration for reading and writing Iceberg tables
spark = (
    SparkSession.builder
    .config("spark.sql.extensions", "org.apache.iceberg.spark.extensions.IcebergSparkSessionExtensions")
    .config("spark.sql.catalog.glue_catalog", "org.apache.iceberg.spark.SparkCatalog")
    .config("spark.sql.catalog.glue_catalog.warehouse", "s3://{0}".format(target_s3_bucket))
    .config("spark.sql.catalog.glue_catalog.catalog-impl", "org.apache.iceberg.aws.glue.GlueCatalog")
    .config("spark.sql.catalog.glue_catalog.io-impl", "org.apache.iceberg.aws.s3.S3FileIO")
    .getOrCreate()
)

#Initialize MSSQL credentials
host, port, username, password = get_db_credentials(secret_id)

#Read the cdc file 
cdc_df = read_cdc_S3(source_s3_bucket, source_s3_cdc_file_key)

tables = cdc_df.toPandas()._c1.unique().tolist()

#Loop over tables in the cdc file
for table in tables:
    #Create dataframes for delets and for inserts and updates
    table_df_deletes = cdc_df.where((cdc_df._c1 == table) & (cdc_df._c0 == "D")).drop(cdc_df.columns[0], cdc_df.columns[1], cdc_df.columns[2], cdc_df.columns[3])
    table_df_upserts = cdc_df.where((cdc_df._c1 == table) & ((cdc_df._c0 == "I") | (cdc_df._c0 == "U"))).drop(cdc_df.columns[0], cdc_df.columns[1], cdc_df.columns[2], cdc_df.columns[3])
    
    #Update column names for the dataframes
    columns = get_table_colums(table, host, port, username, password, dbname) 
    selectExpr = [] 

    for column in columns: 
        selectExpr.append(cdc_df.where((cdc_df._c1 == table)).drop(cdc_df.columns[0], cdc_df.columns[1], cdc_df.columns[2], cdc_df.columns[3]).columns[columns.index(column)] + " as " + column)

    table_df_deletes = table_df_deletes.selectExpr(selectExpr) 
    table_df_upserts = table_df_upserts.selectExpr(selectExpr)
    
    #Process Deletes
    if table_df_deletes.count() > 0:
        
        print("Delete Triggered")
        table_df_deletes.createOrReplaceTempView('deleted_rows')
        
        sql_string = """MERGE INTO glue_catalog.{0}.{1} target
                        USING (SELECT * FROM deleted_rows) source
                        ON {2}
                        WHEN MATCHED 
                        THEN DELETE""".format(database, table.lower(), get_iceberg_table_condition(database, table.lower()))
        spark.sql(sql_string)
    
    if table_df_upserts.count() > 0:
        print("Upsert triggered")

        #Upsert Records when there are Schema Changes
        if len(table_df_upserts.columns) != len(columns):

            #Handle column deletes
            if len(table_df_upserts.columns) < len(columns):

                drop_columns = list(set(columns) - set(table_df_upserts.columns))

                for drop_column in drop_columns:
                    sql_string = """
                                    ALTER TABLE glue_catalog.{0}.{1}
                                    DROP COLUMN {2}""".format(dbname.lower(), table.lower(), drop_column)
                    spark.sql(sql_string)

            #Handle column additions
            elif len(table_df_upserts.columns) > len(columns):

                column_datatype_df = get_table_colum_datatypes(table, host, port, username, password, dbname)
                add_columns = list(set(table_df_upserts.columns) - set(columns))

                for add_column in add_columns:

                    #Set Iceberg data type
                    data_type = list((row.DATA_TYPE) for (index, row) in column_datatype_df.filter("COLUMN_NAME='{0}'".format(add_column)).select("DATA_TYPE").toPandas().iterrows())[0]

                    # Convert MSSQL Datatypes to Iceberg supported datatypes
                    if data_type.lower() in ["varchar", "char"]:
                        data_type = "string"

                    if data_type.lower() in ["bigint"]:
                        data_type = "long"

                    if data_type.lower() in ["array"]:
                        data_type = "list"

                    sql_string = """
                                    ALTER TABLE glue_catalog.{0}.{1}
                                    ADD COLUMN {2} {3}""".format(dbname.lower(), table.lower(), add_column, data_type)
                    spark.sql(sql_string)
                    
            #Create statement to update columns
            update_table_column_list = ""
            insert_column_list = ""
            columns = get_table_colums(table, host, port, username, password, dbname)             

            for column in columns:

                update_table_column_list+="""target.{0}=source.{0},""".format(column)
                insert_column_list+="""source.{0},""".format(column)

            table_df_upserts.createOrReplaceTempView('updated_rows')

            sql_string = """MERGE INTO glue_catalog.{0}.{1} target
                            USING (SELECT * FROM updated_rows) source
                            ON {2}
                            WHEN MATCHED 
                            THEN UPDATE SET {3} 
                            WHEN NOT MATCHED THEN INSERT ({4}) VALUES ({5})""".format(dbname.lower(), 
                                                                                      table.lower(), 
                                                                                      get_iceberg_table_condition(dbname.lower(), table.lower()), 
                                                                                      update_table_column_list.rstrip(","), 
                                                                                      ",".join(columns), 
                                                                                      insert_column_list.rstrip(","))

            spark.sql(sql_string)

    
print("CDC job complete")

The Iceberg MERGE INTO syntax can handle cases where a new column is added. For more details on this feature, see the Iceberg MERGE INTO syntax documentation. If the CDC job needs to process many tables in the CDC file, the job can be multi-threaded to process the file in parallel.


Configure EventBridge notifications, SQS queue, and Step Functions state machine

You can use EventBridge notifications to send notifications to EventBridge when certain events occur on S3 buckets, such as when new objects are created and deleted. For this post, we’re interested in the events when new CDC files from AWS DMS arrive in the bronze S3 bucket. You can create event notifications for new objects and insert the file names into an SQS queue. A Lambda function within Step Functions would consume from the queue, extract the file name, start a CDC Glue job, and pass the file name as a parameter to the job.

AWS DMS CDC files contain database insert, update, and delete statements. We need to process these in order, so we use an SQS FIFO queue, which preserves the order of messages in which they arrive. You can also configure Amazon SQS to set a time to live (TTL); this parameter defines how long a message stays in the queue before it expires.

Another important parameter to consider when configuring an SQS queue is the message visibility timeout value. While a message is being processed, it disappears from the queue to make sure that the message isn’t consumed by multiple consumers (AWS Glue jobs in our case). If the message is consumed successfully, it should be deleted from the queue before the visibility timeout. However, if the visibility timeout expires and the message isn’t deleted, the message reappears in the queue. In our solution, this timeout must be greater than the time it takes for the CDC job to process a file.

Lastly, we recommend using Step Functions to define a workflow for handling the full load and CDC files. Step Functions has built-in integrations to other AWS services like Amazon SQS, AWS Glue, and Lambda, which makes it a good candidate for this use case.

The Step Functions state machine starts with checking the status of the AWS DMS task. The AWS DMS tasks can be queried to check the status of the full load, and we check the value of the parameter FullLoadProgressPercent. When this value gets to 100%, we can start processing the full load files. After the AWS Glue job processes the full load files, we start polling the SQS queue to check the size of the queue. If the queue size is greater than 0, this means new CDC files have arrived and we can start the AWS Glue CDC job to process these files. The AWS Glue jobs processes the CDC files and deletes the messages from the queue. When the queue size reaches 0, the AWS Glue job exits and we loop in the Step Functions workflow to check the SQS queue size.

Because the Step Functions state machine is supposed to run indefinitely, it’s good to keep in mind that there will be service limits you need to adhere to. Namely, the maximum runtime, which is 1 year, and maximum run history size, i.e., state transitions or events for a state machine which is 25,000. We recommend adding an additional step at the end to check if either of these conditions are being met to stop the current state machine run and start a new one.

The following diagram illustrates how you can use Step Functions state machine history size to monitor and start a new Step Functions state machine run.

Step Functions Workflow

Configure the pipeline

The pipeline needs to be configured to address cost, performance, and resilience goals. You might want a pipeline that can load fresh data into the data lake and make it available quickly, and you might also want to optimize costs by loading large chunks of data into the data lake. At the same time, you should make the pipeline resilient and be able to recover in case of failures. In this section, we cover the different parameters and recommended settings to achieve these goals.

Step Functions is designed to process incoming AWS DMS CDC files by running AWS Glue jobs. AWS Glue jobs can take a couple of minutes to boot up, and when they’re running, it’s efficient to process large chunks of data. You can configure AWS DMS to write CSV files to Amazon S3 by configuring the following AWS DMS task parameters:

  • CdcMaxBatchInterval – Defines the maximum time limit AWS DMS will wait before writing a batch to Amazon S3
  • CdcMinFileSize – Defines the minimum file size AWS DMS will write to Amazon S3

Whichever condition is met first will invoke the write operation. If you want to prioritize data freshness, you should have a short CdcMaxBatchInterval value (10 seconds) and a small CdcMinFileSize value (1–5 MB). This will result in many small CSV files being written to Amazon S3 and will invoke a lot of AWS Glue jobs to process the data, making the extract, transform, and load (ETL) process faster. If you want to optimize costs, you should have a moderate CdcMaxBatchInterval (minutes) and a large CdcMinFileSize value (100–500 MB). In this scenario, we start a few AWS Glue jobs that will process large chunks of data, making the ETL flow more efficient. In a real-world use case, the required values for these parameters might fall somewhere that’s a good compromise between throughput and cost. You can configure these parameters when creating a target endpoint using the AWS DMS console, or by using the create-endpoint command in the AWS Command Line Interface (AWS CLI).

For the full list of parameters, see Using Amazon S3 as a target for AWS Database Migration Service.

Choosing the right AWS Glue worker types for the full load and CDC jobs is also crucial for performance and cost optimization. The AWS Glue (Spark) workers range from G1X to G8X, which have an increasing number of data processing units (DPUs). Full load files are usually much larger in size compared to CDC files, and therefore it’s more cost- and performance-effective to select a larger worker. For CDC files, it would be more cost-effective to select a smaller worker because files sizes are smaller.

You should design the Step Functions state machine in such a way that if anything fails, the pipeline can be redeployed after repair and resume processing from where it left off. One important parameter here is TTL for the messages in the SQS queue. This parameter defines how long a message stays in the queue before expiring. In case of failures, we want this parameter to be long enough for us to deploy a fix. Amazon SQS has a maximum of 14 days for a message’s TTL. We recommend setting this to a large enough value to minimize messages being expired in case of pipeline failures.

Clean up

Complete the following steps to clean up the resources you created in this post:

  1. Delete the AWS Glue jobs:
    1. On the AWS Glue console, choose ETL jobs in the navigation pane.
    2. Select the full load and CDC jobs and on the Actions menu, choose Delete.
    3. Choose Delete to confirm.
  2. Delete the Iceberg tables:
    1. On the AWS Glue console, under Data Catalog in the navigation pane, choose Databases.
    2. Choose the database in which the Iceberg tables reside.
    3. Select the tables to delete, choose Delete, and confirm the deletion.
  3. Delete the S3 bucket:
    1. On the Amazon S3 console, choose Buckets in the navigation pane.
    2. Choose the silver bucket and empty the files in the bucket.
    3. Delete the bucket.

Conclusion

In this post, we showed how to use AWS Glue jobs to load AWS DMS files into a transactional data lake framework such as Iceberg. In our setup, AWS Glue provided highly scalable and simple-to-maintain ETL jobs. Furthermore, we share a proposed solution using Step Functions to create an ETL pipeline workflow, with Amazon S3 notifications and an SQS queue to capture newly arriving files. We shared how to design this system to be resilient towards failures and to automate one of the most time-consuming tasks in maintaining a data lake: schema evolution.

In Part 3, we will share how to process the data lake to create data marts.


About the Authors

Shaheer Mansoor is a Senior Machine Learning Engineer at AWS, where he specializes in developing cutting-edge machine learning platforms. His expertise lies in creating scalable infrastructure to support advanced AI solutions. His focus areas are MLOps, feature stores, data lakes, model hosting, and generative AI.

Anoop Kumar K M is a Data Architect at AWS with focus in the data and analytics area. He helps customers in building scalable data platforms and in their enterprise data strategy. His areas of interest are data platforms, data analytics, security, file systems and operating systems. Anoop loves to travel and enjoys reading books in the crime fiction and financial domains.

Sreenivas Nettem is a Lead Database Consultant at AWS Professional Services. He has experience working with Microsoft technologies with a specialization in SQL Server. He works closely with customers to help migrate and modernize their databases to AWS.

AWS Weekly Roundup: New code editor in AWS Lambda console, Amazon Q Business analytics, Claude 3.5 upgrades, and more (October 28, 2024)

Post Syndicated from Donnie Prakoso original https://aws.amazon.com/blogs/aws/aws-weekly-roundup-new-code-editor-in-aws-lambda-console-amazon-q-business-analytics-claude-3-5-upgrades-and-more-october-28-2024/

Two weeks ago, I had the wonderful opportunity to host subject matter experts from across Asia Pacific in the global 24 Hours of Amazon Q live stream event. This continuous 24-hour stream offered insights from AWS experts on Amazon Q Developer and Amazon Q Business, featuring use cases, product demos, and Q&A sessions.

The highlight for me was that I learned a lot from them. Since then, I’ve tried to integrate Amazon Q Business into my workflow. If you’re curious about what Amazon Q can do for you, check out the on-demand replay on Twitch.

Last week’s launches
Here’s a recap of AWS launches that caught my attention last week:

AWS Lambda console now features a new code editor based on Code-OSS (VS Code – Open Source) — AWS Lambda introduces a new code editing experience in the AWS console based on the popular Code-OSS, Visual Studio Code Open Source code editor. You can use your preferred coding environment and tools in the Lambda console.

Amazon Bedrock Custom Model Import now generally available — Amazon Bedrock now allows customers to import and use their customized models alongside existing foundation models through a single, unified API. This feature supports leveraging fine-tuned models or developing proprietary models based on popular open-source architectures without managing infrastructure or model lifecycle tasks.

EC2 Image Builder now supports building and testing macOS images — EC2 Image Builder adds support for creating and managing machine images for macOS workloads, in addition to existing Windows and Linux support. It streamlines image management processes and reduces the operational overhead of maintaining macOS images.

Upgraded Claude 3.5 Sonnet from Anthropic (available now), computer use (public beta), and Claude 3.5 Haiku (coming soon) in Amazon Bedrock — Anthropic’s Claude 3.5 model family in Amazon Bedrock receives significant upgrades, including improved intelligence for Claude 3.5 Sonnet and new computer use capabilities in public beta. These enhancements support building more advanced AI applications, automating complex tasks, and leveraging improved reasoning capabilities for various use cases.

Amazon Connect now offers screen sharing — Amazon Connect introduces screen sharing capabilities for agents. This feature is available in multiple regions and can be easily integrated into existing voice and video calling setups. This feature gives you opportunity to personalize and improve customer experiences.

Amazon Aurora launches Global Database writer endpoint — Amazon Aurora now supports a highly available and fully managed Global Database writer endpoint. This feature simplifies routing for applications and eliminates the need for application code changes after initiating cross-region Global Database Switchover or Failover operations.

Gain deeper insights into Amazon Q Business with new analytics and conversation insights — Amazon Q Business now offers an analytics dashboard and integration with Amazon CloudWatch Logs. You now have comprehensive insights into the usage of Amazon Q Business application environments and Amazon Q Apps, facilitating monitoring, analysis, and optimization of usage.

Announcing the new Resiliency widget on myApplications — AWS introduces a new Resiliency widget on myApplications, offering enhanced visibility and control over application resilience. You can start a resilience assessment directly from the myApplications dashboard and gain actionable insights.

From community.aws
Here’s my top 5 personal favorites posts from community.aws:

Upcoming AWS events
Check your calendars and sign up for upcoming AWS and community events:

AWS GenAI Lofts – Gain deep insights, get your questions answered, and learn all you need to know to start building your next innovation at AWS GenAI Lofts: Seoul (October 30–November 6), São Paulo (through November 20), and Paris (through November 25).

AWS Community Days – Join community-led conferences that feature technical discussions, workshops, and hands-on labs. Upcoming AWS Community Days are in: Malta (November 8), Malaysia, Chile (November 9), Indonesia (November 23), Kochi, India (December 14).

AWS re:Invent – Registration is now open for the annual tech extravaganza, taking place December 2–6 in Las Vegas. Learn about new product launches, watch demos, and get behind-the-scenes insights during five headline-making keynotes.

You can browse all upcoming in-person and virtual events.

That’s all for this week. Check back next Monday for another Weekly Roundup!

— Donnie

This post is part of our Weekly Roundup series. Check back each week for a quick roundup of interesting news and announcements from AWS!

Introducing the new Amazon Q Developer experience in AWS Lambda

Post Syndicated from Brian Beach original https://aws.amazon.com/blogs/devops/introducing-the-new-amazon-q-developer-experience-in-aws-lambda/

AWS Lambda recently announced a new code editor based on Code-OSS. Like the previous version, the new editor includes Amazon Q Developer. Amazon Q Developer is a generative AI-powered assistant for software development that can help you build and debug Lambda functions more quickly. In this post, I provide an overview of Amazon Q Developer’s integration into the new built-in code editor.

Introduction

AWS Lambda first supported Amazon Q Developer in 2022 (previously known as Amazon CodeWhisperer). While Q Developer has added many features since 2022, the experience in the Lambda editor has remained mostly unchanged until recently. For example, the quality and length of recommendations has increased significantly over the past two years. The original blog post announcing support for Q Developer in the Lambda editor (then called CodeWhisperer) used a series of prompts such as “upload a file to an S3 bucket” or “send a notification using SNS” to incrementally build a Lambda function. While that was impressive at the time, Q Developer can now accept much longer and more complex prompts. For example, I asked Q Developer to create an image moderation function with the following comment. This comment will result in about seventy lines of Python code, including whitespace.

This function moderates images uploaded to S3. It is invoked by an S3 event notification when a new image is uploaded. First, it calls Rekognition image moderation. It also uses Rekognition to extract text from the image, and uses Comprehend to check for toxic content. Finally, it sends a message to the SQS queue identified in the env var QUEUE_URL if the image was moderated or if it contained toxic content. The env var MIN_SCORE allows configuration of the confidence score used as the threshold for both moderation and toxicity.

While I can use this comment in both the old and new editor, the experience in the new editor has significantly improved. Note that in the following image of the old editor, I can only see the first eight lines of the suggestion in a popup. I have to scroll to review the remaining 62 lines of code. The old editor experience did not anticipate that Q Developer would someday return 70 lines, or more, in a single response.

Screenshot of the AWS Lambda code editor showing a Python function for image moderation. The code includes comments describing the function's purpose and a popup with initial import statements and AWS service client initializations.

The experience in the new editor is much improved as shown in the following image. I can preview the entire suggestion in-line with my code, up to the size of my screen. This makes it much easier to evaluate the suggestion before deciding to accept or decline it.

Screenshot of the AWS Lambda code editor showing a Python function for image moderation. The code includes comments describing the function's purpose and a popup with initial import statements and AWS service client initializations.

Now that you have seen the new editor in action, let’s discuss how to configure and use it.

Inline completions in Lambda

Q Developer can provide you with code recommendations in real time. As you write code, Q Developer automatically generates suggestions based on your existing code and comments. Before I can use Q Developer in the Lambda console, I must first configure it as described in Using Amazon Q Developer with AWS Lambda. With that done, I am ready to start with a simple example.

While I love Python, I often find myself working with a dictionary object without knowledge of its structure. As a result, I waste time reading the documentation searching for the names of various keys. In Lambda, the event object is passed as a dictionary. In addition, each event type has a different structure. Q Developer can save me countless hours of reading documentation to find the structure of each event.

As an example, imagine that I have created a function that can be triggered by Amazon API Gateway, Application Load Balancer, and AWS AppSync. I need to get the IP address of the client that invoked my function. While this is available in the X-Forwarded-For header, the location and format of the header in the dictionary is subtly different in each event type. Q Developer can save me a trip to the documentation.

In the example below, Q Developer is making the correct suggestion for API Gateway based on the contextual clues in my file. Specifically, the comments on lines one and three. When I hit enter at the end of line three, Q Developer uses the context to recommend the code on line four. Note that it correctly recommends X-Forwarded-For with capitals for an API Gateway event.

Screenshot of the AWS Lambda code editor showing a Python function. Q is suggesting code to extract the x-forwarded-for header.

However, in the next example, the comment on line one now mentions an Application Load Balancer. Note that Q Developer correctly recommends x-forwarded-for in lower-case for an Application Load Balancer event.

Screenshot of the AWS Lambda code editor showing a Python function. Q is suggesting code to extract the x-forwarded-for header.

That trivial example just saved me a trip to the documentation that would have taken three to five minutes. If I can do that a few times every hour, it has a huge impact on my productivity and focus due to less context switching.

While the in-line completion experience is greatly improved in the new editor, Q Developer supports other capabilities in the Lambda console that I do not want to overlook. Let’s take a moment to review chat and troubleshooting, which are unchanged with the release of the new editor.

Chat in the Lambda console

Q Developer supports chat in the Lambda console. I can use this to ask questions rather than reading through the documentation. Returning to my original example, the image moderation function, remember that my function expects two environment variables, QUEUE_URL andMIN_SCORE.Imagine that I do not know how to configure an environment variable in the Lambda console. In the following example, I chat with Q Developer to ask for help.

Screenshot of the AWS Lambda code showing the chat pane. Q is providing instructoins for creating an env var in Lambda.

Note that the response is aware of my position in the console. Q Developer says “It looks like you’re already in the function design.” Q Developer not only saves me a trip to the documentation, but it tailors the suggestion to my current position so I do not have to read unnecessary instructions. I will follow Q Developer’s instructions to configure the two required environment variables as shown below.

Screenshot of the AWS Lambda env var with the two variables created.

You can see how chat is able to help keep me on task and in a state of flow. Next, I will show you how Q Developer can help you troubleshoot issues in the console.

Troubleshooting in the Lambda console

With the environment variables configured, I am ready to test my function. However, when I run a test, I get an error message as shown in the following image. Note the “Diagnose with Amazon Q” button. Q Developer noticed that I am having issues, and is offering to help.

A Lambda error with the “Diagnose with Amazon Q” button shown

If I select the “Diagnose with Amazon Q” button, Q Developer will analyze the error. In the example below, you can see that it has identified that “the Lambda function is unable to access an object in S3.” Of course! I never granted the Lambda function permission to access the Amazon Simple Storage Service (Amazon S3) bucket.

Amazon Q troubleshooting providing Analysis and resolution of the issue.

I could go back to the chat pane I used earlier and ask Q Developer how to add permissions. However, notice that it already provides set-by-step instructions to fix the issue. So, I don’t even need to use the chat. Once I fix the permissions, my function is working as expected. Q Developer has saved me time and made me much more productive.

Cleanup

If you have been following along and deployed a Lambda function, please remember to delete it.

Conclusion

The new AWS Lambda built-in editor experience greatly improves the Q Developer inline suggestion experience for Lamba. This new editor, combined with the existing chat and troubleshooting capabilities can significantly improve your productivity. To learn more read Getting started with Amazon Q Developer and Using Amazon Q Developer with AWS Lambda.