As cloud environments—and security risks associated with them—become more complex, it becomes increasingly critical to understand your cloud security posture so that you can quickly and efficiently mitigate security gaps. AWS Security Hub offers close to 300 automated controls that continuously check whether the configuration of your cloud resources aligns with the best practices identified by Amazon Web Services (AWS) security experts and with industry standards. Furthermore, you can manage your cloud security posture at scale by using a single action to enable Security Hub across your organization with the default settings, and by aggregating findings across your organization accounts and Regions to a single account and Region of your choice.
With the release of the new central configuration feature of Security Hub, the setup and management of control and policy configurations is simplified and centralized to the same account you have already been using to aggregate findings. In this blog post, we will explain the benefits of the new feature and describe how you can quickly onboard to it.
Central configuration overview
With the release of the new central configuration capabilities in Security Hub, you are now able to use your delegated administrator (DA) account (an AWS Organizations account designated to manage Security Hub throughout your organization) to centrally manage Security Hub controls and standards and to view your Security Hub configuration throughout your organization from a single place. To facilitate this functionality, central configuration allows you to set up policies that specify whether or not Security Hub should be enabled and which standards and controls should be turned on. You can then choose to associate your policies with your entire organization or with specific accounts or organizational units (OUs), with your policies applying automatically across linked Regions. Policies applied to specific OUs (or to the entire organization) are inherited by child accounts. This not only applies to existing accounts, but also to new accounts added to those OUs (or to the entire organization) after you created the policy. Furthermore, when you add a new linked Region to Security Hub, your existing policies will be applied to that Region immediately. This allows you to stop maintaining manual lists of accounts and Regions to which you’d like to apply your custom configurations; instead, you can maintain several policies for your organization, with each one being associated to a different set of accounts in your organization. As a result, by using the central configuration capabilities, you can significantly reduce the time spent on configuring Security Hub and switch your focus to remediating its findings.
After applying your policies, Security Hub also provides you with a view of your organization that shows the policy status per OU and account while also preventing drift. This means that after you set up your organization by using central configuration, account owners will not be able to deviate from your chosen settings—your policies will serve as the source of truth for your organizational configuration, and you can use them to understand how Security Hub is configured for your organization.
The use of the new central configuration feature is now the recommended approach to configuring Security Hub, and its standards and controls, across some or all AWS accounts in your AWS Organizations structure.
Prerequisites
To get started with central configuration, you need to complete three prerequisites:
Enable AWS Config in the accounts and Regions where you plan to enable Security Hub. (For more information on how to optimize AWS Config configuration for Security Hub usage, see this blog post.)
Turn on Security Hub in your AWS Organizations management account at least in one Region where you plan to use Security Hub.
Use your Organizations management account to delegate an administrator account for Security Hub.
If you are new to Security Hub, simply navigate to it in the AWS Management Console from your organization management account, and the console will walk you through setting the last two prerequisites listed here. If you already use Security Hub, these can be configured from the Settings page in Security Hub. In both cases, upon completing these three prerequisites, you can proceed with the central configuration setup from the account you set as the DA.
Recommended setup
To begin the setup, open the Security Hub console from your AWS Organizations management account or from your Security Hub delegated administrator account. In the left navigation menu, choose Configuration to open the new Configuration page, shown in Figure 1. Choose Start central configuration.
Figure 1: The new Configuration page, where you can see your current organizational configuration and start using the new capabilities
If you signed in to Security Hub using the AWS Organizations management account, you will be brought to step 1, Designate delegated administrator, where you will be able to designate a new delegated administrator or confirm your existing selection before continuing the setup. If you signed in to Security Hub using your existing delegated administrator account, you will be brought directly to step 2, Centralize organization, which is shown in Figure 2. In step 2, you are first asked to choose your home Region, which is the AWS Region you will use to create your configuration policies. By default, the current Region is selected as your home Region, unless you already use cross-Region finding aggregation — in which case, your existing aggregation Region is pre-selected as your home Region.
You are then prompted to select your linked Regions, which are the Regions you will configure by using central configuration. Regions that were already linked as part of your cross-Region aggregation settings will be pre-selected. You will also be able to add additional Regions or choose to include all AWS Regions, including future Regions. If your selection includes opt-in Regions, note that Security Hub will not be enabled in them until you enable those Regions directly.
Figure 2: The Centralize organization page
Step 3, Configure organization, is shown in Figure 3. You will see a recommendation that you use the AWS recommended Security Hub configuration policy (SHCP) across your entire organization. This includes enabling the AWS Foundational Security Best Practices (FSBP) v1.0.0 standard and enabling new and existing FSBP controls in accounts in your AWS Organizations structure. This is the recommended configuration for most customers, because the AWS FSBP have been carefully curated by AWS security experts and represent trusted security practices for customers to build on.
Alternatively, if you already have a custom configuration in Security Hub and would like to import it into the new capabilities, choose Customize my Security Hub configuration and then choose Pre-populate configuration.
Figure 3: Step 3 – creating your first policy
Step 4, Review and apply, is where you can review the policy you just created. Until you complete this step, your organization’s configuration will not be changed. This step will override previous account configurations and create and apply your new policy. After you choose Create policy and apply, you will be taken to the new Configuration page, which was previously shown in Figure 1. The user interface will now be updated to include three tabs — Organization, Policies, and Invitation account — where you can do the following:
On the Organization tab, which serves as a single pane of glass for your organization configuration in Security Hub, you can see the policy status for each account and OU and verify that your desired configuration is in effect.
On the Policies tab, you can view your policies, update them, and create new ones.
On the Invitation accounts tab, you can view and update findings for invitation accounts, which do not belong to your AWS Organizations structure. These accounts cannot be configured using the new central configuration capabilities.
Together, those tabs serve as a single pane of glass for your organization configuration in Security Hub. To that end, the organization chart you now see shows which of your accounts have already been affected by the policy you just created and which are still pending. Normally, an account will show as pending only for a few minutes after you create new policies or update existing ones. However, an account can stay in pending status for up to 24 hours. During this time, Security Hub will try to configure the account with your chosen policy settings.
If Security Hub determines that a policy cannot be successfully propagated to an account, it will show its status as failed (see Figure 4). This is most likely to happen when you missed completing the prerequisites in the account where the failure is showing. For example, if AWS Config is not yet enabled in an account, the policy will have a failed status. When you hover your pointer over the word “Failed”, Security Hub will show an error message with details about the issue. After you fix the error, you can try again to apply the policy by selecting the failed account and choosing the Re-apply policy button.
Figure 4: The Organization tab on the Configuration page shows all your organization accounts, if they are being managed by a policy, and the policy status for each account and OU
Flexibility in onboarding to central configuration
As mentioned earlier, central configuration makes it significantly more accessible for you to centrally manage Security Hub and its controls and standards. This feature also gives you the granularity to choose the specific accounts to which your chosen settings will be applied. Even though we recommend to use central configuration to configure all your accounts, one advantage of the feature is that you can initially create a test configuration and then apply it across your organization. This is especially useful when you have already configured Security Hub using previously available methods and you would like to check that you have successfully imported your existing configuration.
When you onboard to central configuration, accounts in the organization are self-managed by default, which means that they still maintain their previous configuration until you apply a policy to them, to one of their parent OUs, or to the entire organization. This gives you the option to create a test policy when you onboard, apply it only to a test account or OU, and check that you achieved your desired outcome before applying it to other accounts in the organization.
Configure and deploy different policies per OU
Although we recommend that you use the policy recommended by Security Hub whenever possible, every customer has a different environment and some customization might be required. Central configuration does not require you to use the recommended policy, and you can instead create your own custom policies that specify how Security Hub is used across organization accounts and Regions. You can create one configuration policy for your entire organization, or multiple policies to customize Security Hub settings in different accounts.
In addition, you might need to implement different policies per OU. For example, you might need to do that when you have a finance account or OU in which you want to use Payment Card Industry Data Security Standard (PCI DSS) v3.2.1. In this case, you can go to the Policies tab, choose Create policy, specify the configuration you’d like to have, and apply it to those specific OUs or accounts, as shown in Figure 5. Note that each policy must be complete — which means that it must contain the full configuration settings you would like to apply to the chosen set of accounts or OUs. In particular, an account cannot inherit part of its settings from a policy associated with a parent OU, and the other part from its own policy. The benefit of this requirement is that each policy serves as the source of truth for the configuration of the accounts it is applied to. For more information on this behavior or on how to create new policies, see the Security Hub documentation.
Figure 5: Creation of a new policy with the FSBP and the PCI DSS standards
You might find it necessary to exempt accounts from being centrally configured. You have the option to set an account or OU to self-managed status. Then only the account owner can configure the settings for that account. This is useful if your organization has teams that need to be able to set their own security coverage. Unless you disassociate self-managed accounts from your Security Hub organization, you will still see findings from self-managed accounts, giving you organization-wide visibility into your security posture. However, you won’t be able to view the configuration of those accounts, because they are not centrally managed.
Understand and manage where controls are applied
In addition to being able to centrally create and view your policies, you can use the control details page to define, review, and apply how policies are configured at a control level. To access the control details page, go to the left navigation menu in Security Hub, choose Controls, and then choose any individual control.
The control details page allows you to review the findings of a control in accounts where it is already enabled. Then, if you decide that these findings are not relevant to specific accounts and OUs, or if you decide that you want to use the control in additional accounts where it is not currently enabled, you can choose Configure, view the policies to which the control currently applies, and update the configuration accordingly as shown in Figure 6.
Figure 6: Configuring a control from the control details page
Organizational visibility
As you might already have noticed in the earlier screenshot of the Organization view (Figure 4), the new central configuration capability gives you a new view of the policies applied (and by extension, the controls and standards deployed) to each account and OU. If you need to customize this configuration, you can modify an existing policy or create a new policy to quickly apply to all or a subset of your accounts. At a glance, you can also see which accounts are self-managed or don’t have Security Hub turned on.
Conclusion
Security Hub central configuration helps you to seamlessly configure Security Hub and its controls and standards across your accounts and Regions so that your organization’s accounts have the level of security controls coverage that you want. AWS recommends that you use this feature when configuring, deploying, and managing controls in Security Hub across your organization’s accounts and Regions. Central configuration is now available in all commercial AWS Regions. Try it out today by visiting the new Configuration page in Security Hub from your DA. You can benefit from the Security Hub 30-day free trial even if you use central configuration, and the trial offer will be automatically applied to organization accounts in which you didn’t use Security Hub before.
If you have feedback about this post, submit comments in the Comments section below. If you have questions about this post, contact AWS Support.
Want more AWS Security news? Follow us on Twitter.
Sometimes you want to configure an AWS service to access your resource in another service. For example, you can configure AWS CloudTrail, a service that monitors account activity across your AWS infrastructure, to write log data to your bucket in Amazon Simple Storage Service (Amazon S3). When you do this, you want assurance that the service will only access your resource on your behalf—you don’t want an untrusted entity to be able to use the service to access your resource. Before today, you could achieve this by using the two AWS Identity and Access Management (IAM) condition keys, aws:SourceAccount and aws:SourceArn. You can use these condition keys to help make sure that a service accesses your resource only on behalf of specific accounts or resources that you trust. However, because these condition keys require you to specify individual accounts and resources, they can be difficult to manage at scale, especially in larger organizations.
Recently, IAM launched two new condition keys that can help you achieve this in a more scalable way that is simpler to manage within your organization:
aws:SourceOrgID — use this condition key to make sure that an AWS service can access your resources only when the request originates from a particular organization ID in AWS Organizations.
aws:SourceOrgPaths — use this condition key to make sure that an AWS service can access your resources only when the request originates from one or more organizational units (OUs) in your organization.
In this blog post, we describe how you can use the four available condition keys, including the two new ones, to help you control how AWS services access your resources.
Background
Imagine a scenario where you configure an AWS service to access your resource in another service. Let’s say you’re using Amazon CloudWatch to observe resources in your AWS environment, and you create an alarm that activates when certain conditions occur. When the alarm activates, you want it to publish messages to a topic that you create in Amazon Simple Notification Service (Amazon SNS) to generate notifications.
Figure 1 depicts this process.
Figure 1: Amazon CloudWatch publishing messages to an SNS topic
In this scenario, there’s a resource-based policy controlling access to your SNS topic. For CloudWatch to publish messages to it, you must configure the policy to allow access by CloudWatch. When you do this, you identify CloudWatch using an AWS service principal, in this case cloudwatch.amazonaws.com.
Cross-service access
This is an example of a common pattern known as cross-service access. With cross-service access, a calling service accesses your resource in a called service, and a resource-based policy attached to your resource grants access to the calling service. The calling service is identified using an AWS service principal in the form <SERVICE-NAME>.amazonaws.com, and it accesses your resource on behalf of an originating resource, such as a CloudWatch alarm.
Figure 2 shows cross-service access.
Figure 2: Cross-service access
When you configure cross-service access, you want to make sure that the calling service will access your resource only on your behalf. That means you want the originating resource to be controlled by someone whom you trust. If an untrusted entity creates their own CloudWatch alarm in their AWS environment, for example, then their alarm should not be able to publish messages to your SNS topic.
If an untrusted entity could use a calling service to access your resource on their behalf, it would be an example of what’s known as the confused deputy problem. The confused deputy problem is a security issue in which an entity that doesn’t have permission to perform an action coerces a more privileged entity (in this case, a calling service) to perform the action instead.
Use condition keys to help prevent cross-service confused deputy issues
AWS provides global condition keys to help you prevent cross-service confused deputy issues. You can use these condition keys to control how AWS services access your resources.
Before today, you could use the aws:SourceAccount or aws:SourceArn condition keys to make sure that a calling service accesses your resource only when the request originates from a specific account (with aws:SourceAccount) or a specific originating resource (with aws:SourceArn). However, there are situations where you might want to allow multiple resources or accounts to use a calling service to access your resource. For example, you might want to create many VPC flow logs in an organization that publish to a central S3 bucket. To achieve this using the aws:SourceAccount or aws:SourceArn condition keys, you must enumerate all the originating accounts or resources individually in your resource-based policies. This can be difficult to manage, especially in large organizations, and can potentially cause your resource-based policy documents to reach size limits.
Now, you can use the new aws:SourceOrgID or aws:SourceOrgPaths condition keys to make sure that a calling service accesses your resource only when the request originates from a specific organization (with aws:SourceOrgID) or a specific organizational unit (with aws:SourceOrgPaths). This helps avoid the need to update policies when accounts are added or removed, reduces the size of policy documents, and makes it simpler to create and review policy statements.
The following table summarizes the four condition keys that you can use to help prevent cross-service confused deputy issues. These keys work in a similar way, but with different levels of granularity.
Use case
Condition key
Value
Allowed operators
Single/multi valued
Example value
Allow a calling service to access your resource only on behalf of an organization that you trust.
Note: Only use these condition keys in resource-based policies that allow access by an AWS service. Don’t use them in other use cases, including identity-based policies and service control policies (SCPs), where these condition keys won’t be populated.
Use condition keys for defense in depth
AWS services use a variety of mechanisms to help prevent cross-service confused deputy issues, and the details vary by service. For example, where a calling service accesses an S3 bucket, some services use S3 prefixes to help prevent confused deputy issues. For more information, see the relevant service documentation.
Where supported by the service, AWS recommends that you use the condition keys we describe in this post regardless of whether the service has another mechanism in place to help prevent cross-service confused deputy issues. This helps to make your intentions explicit, provide defense in depth, and guard against misconfigurations.
Example use cases
Let’s walk through some example use cases to learn how to use these condition keys in practice.
First, imagine you’re using Amazon Virtual Private Cloud (Amazon VPC) to manage logically isolated virtual networks. In Amazon VPC, you can configure flow logs, which capture information about your network traffic. Let’s say you want a flow log to write data into an S3 bucket for later analysis. This process is depicted in Figure 3.
Figure 3: Amazon VPC writing flow logs to an S3 bucket
This constitutes another cross-service access scenario. In this case, Amazon VPC is the calling service, Amazon S3 is the called service, the VPC flow log is the originating resource, and the S3 bucket is your resource in the called service.
To allow access, the resource-based policy for your S3 bucket (known as a bucket policy) must allow Amazon VPC to put objects there. The Principal element in this policy specifies the AWS service principal of the service that will access the resource, which for VPC flow logs is delivery.logs.amazonaws.com.
Initial policy without confused deputy prevention
The following is an initial version of the bucket policy that allows Amazon VPC to put objects in the bucket but doesn’t yet provide confused deputy prevention. We’re showing this policy for illustration purposes; don’t use it in its current form.
Note: For simplicity, we only show one of the policy statements that you need to allow VPC flow logs to write to a bucket. In a real-life bucket policy for flow logs, you need two policy statements: one allowing actions on the bucket, and one allowing actions on the bucket contents. These are described in Publish flow logs to Amazon S3. Both policy statements work in the same way with respect to confused deputy prevention.
This policy statement allows Amazon VPC to put objects in the bucket. However, it allows Amazon VPC to do that on behalf of any flow log in any account. There’s nothing in the policy to tell Amazon VPC that it should access this bucket only if the flow log belongs to a specific organization, OU, account, or resource that you trust.
Let’s now update the policy to help prevent cross-service confused deputy issues. For the rest of this post, the remaining policy samples provide confused deputy protection, but at different levels of granularity.
Specify a trusted organization
Continuing with the previous example, imagine that you now have an organization in AWS Organizations, and you want to create VPC flow logs in various accounts within your organization that publish to a central S3 bucket. You want Amazon VPC to put objects in the bucket only if the request originates from a flow log that resides in your organization.
You can achieve this by using the new aws:SourceOrgID condition key. In a cross-service access scenario, this condition key evaluates to the ID of the organization that the request came from. You can use this condition key in the Condition element of a resource-based policy to allow actions only if aws:SourceOrgID matches the ID of a specific organization, as shown in the following example. In your own policy, make sure to replace <DOC-EXAMPLE-BUCKET> and <MY-ORGANIZATION-ID> with your own information.
The revised policy states that Amazon VPC can put objects in the bucket only if the request originates from a flow log in your organization. Now, if someone creates a flow log outside your organization and configures it to access your bucket, they will get an access denied error.
You can use aws:SourceOrgID in this way to allow a calling service to access your resource only if the request originates from a specific organization, as shown in Figure 4.
Figure 4: Specify a trusted organization using aws:SourceOrgID
Specify a trusted OU
What if you don’t want to trust your entire organization, but only part of it? Let’s consider a different scenario. Imagine that you want to send messages from Amazon SNS into a queue in Amazon Simple Queue Service (Amazon SQS) so they can be processed by consumers. This is depicted in Figure 5.
Figure 5: Amazon SNS sending messages to an SQS queue
Now imagine that you want your SQS queue to receive messages only if they originate from an SNS topic that resides in a specific organizational unit (OU) in your organization. For example, you might want to allow messages only if they originate from a production OU that is subject to change control.
You can achieve this by using the new aws:SourceOrgPaths condition key. As before, you use this condition key in a resource-based policy attached to your resource. In a cross-service access scenario, this condition key evaluates to the AWS Organizations entity path that the request came from. An entity path is a text representation of an entity within an organization.
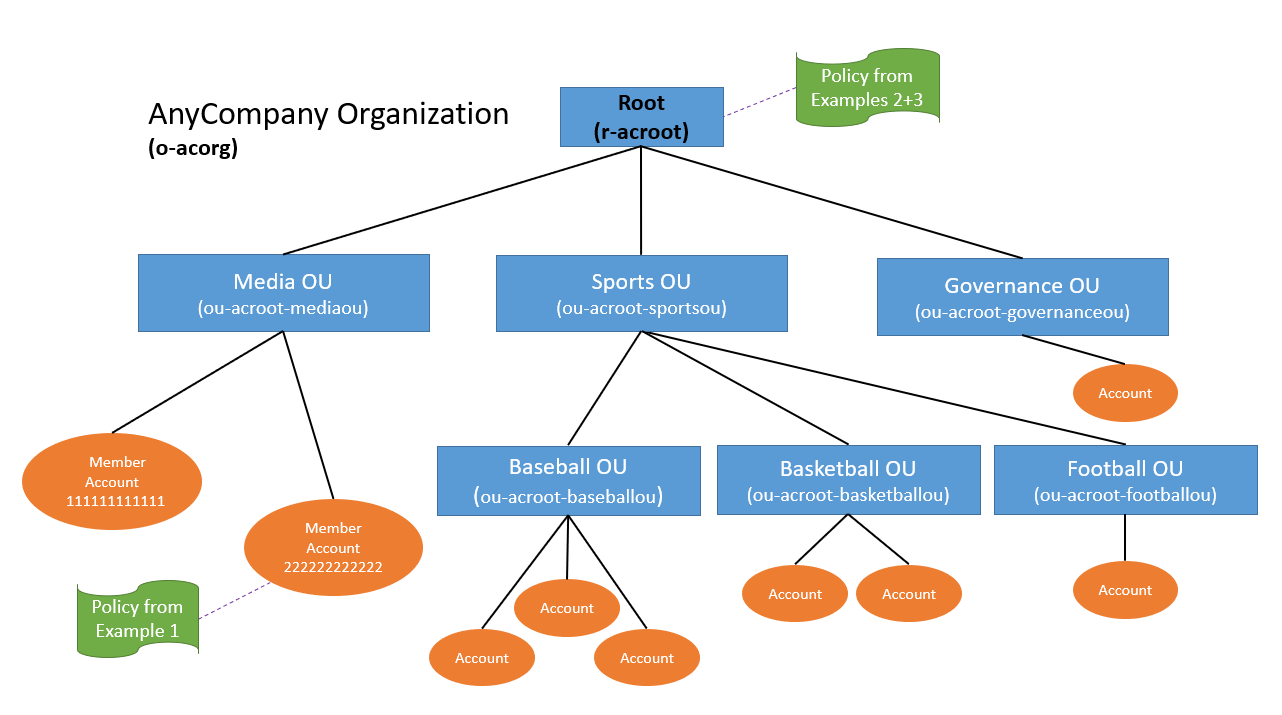
You build an entity path for an OU by using the IDs of the organization, root, and all OUs in the path down to and including the OU. For example, consider the organizational structure shown in Figure 6.
Figure 6: Example organization structure
In this example, you can specify the Prod OU by using the following entity path:
Let’s now match the aws:SourceOrgPaths condition key against a specific entity path in the Condition element of a resource-based policy for an SQS queue. In your own policy, make sure to replace <MY-QUEUE-ARN> and <MY-ENTITY-PATH> with your own information.
Note:aws:SourceOrgPaths is a multivalued condition key, which means it’s capable of having multiple values in the request context. At the time of writing, it contains a single entity path if the request originates from an account in an organization, and a null value if the request originates from an account that’s not in an organization. Because this key is multivalued, you need to use both a set operator and a string operator to compare values.
In this policy, there are two conditions in the Condition block. The first uses the Null condition operator and compares with a false value to confirm that the condition key’s value is not null. The second uses set operator ForAllValues, which returns true if every condition key value in the request matches at least one value in your policy condition, and string operator StringEquals, which requires an exact match with a value specified in your policy condition.
Note: The reason for the null check is that set operator ForAllValuesreturns true when a condition key resolves to null. With an Allow effect and the null check in place, access is denied if the request originates from an account that’s not in an organization.
With this policy applied to your SQS queue, Amazon SNS can send messages to your queue only if the message came from an SNS topic in a specific OU.
You can use aws:SourceOrgPaths in this way to allow a calling service to access your resource only if the request originates from a specific organizational unit, as shown in Figure 7.
Figure 7: Specify a trusted OU using aws:SourceOrgPaths
Specify a trusted OU and its children
In the previous example, we specified a trusted OU, but that didn’t include its child OUs. What if you want to include its children as well?
You can achieve this by replacing the string operator StringEquals with StringLike. This allows you to use wildcards in the entity path. Using the organization structure from the previous example, the following Condition evaluates to true only if the condition key value is not null and the request originates from the Prod OU or any of its child OUs.
If you want to be more granular, you can allow a service to access your resource only if the request originates from a specific account. You can achieve this by using the aws:SourceAccount condition key. In a cross-service access scenario, this condition key evaluates to the ID of the account that the request came from.
The following Condition evaluates to true only if the request originates from the account that you specify in the policy. In your own policy, make sure to replace <MY-ACCOUNT-ID> with your own information.
You can use this condition element within a resource-based policy to allow a calling service to access your resource only if the request originates from a specific account, as shown in Figure 8.
Figure 8: Specify a trusted account using aws:SourceAccount
Specify a trusted resource
If you want to be even more granular, you can allow a service to access your resource only if the request originates from a specific resource. For example, you can allow Amazon SNS to send messages to your SQS queue only if the request originates from a specific topic within Amazon SNS.
You can achieve this by using the aws:SourceArn condition key. In a cross-service access scenario, this condition key evaluates to the Amazon Resource Name (ARN) of the originating resource. This provides the most granular form of cross-service confused deputy prevention.
The following Condition evaluates to true only if the request originates from the resource that you specify in the policy. In your own policy, make sure to replace <MY-RESOURCE-ARN> with your own information.
Note: AWS recommends that you use an ARN operator rather than a string operator when comparing ARNs. This example uses ArnEquals to match the condition key value against the ARN specified in the policy.
You can use this condition element within a resource-based policy to allow a calling service to access your resource only if the request comes from a specific originating resource, as shown in Figure 9.
Figure 9: Specify a trusted resource using aws:SourceArn
Specify multiple trusted resources, accounts, OUs, or organizations
The four condition keys allow you to specify multiple trusted entities by matching against an array of values. This allows you to specify multiple trusted resources, accounts, OUs, or organizations in your policies.
Conclusion
In this post, you learned about cross-service access, in which an AWS service communicates with another AWS service to access your resource. You saw that it’s important to make sure that such services access your resources only on your behalf in order to help avoid cross-service confused deputy issues.
We showed you how to help prevent cross-service confused deputy issues by using two new condition keys aws:SourceOrgID and aws:SourceOrgPaths, as well as the other available condition keys aws:SourceAccount and aws:SourceArn. You learned that you should use these condition keys in any resource-based policy statements that allow access by an AWS service, if the condition key is supported by the service. This helps make sure that a calling service can access your resource only when the request originates from a specific organization, OU, account, or resource that you trust.
If you have feedback about this post, submit comments in the Comments section below. If you have questions about this post, start a new thread on AWS IAM re:Post or contact AWS Support.
Want more AWS Security news? Follow us on Twitter.
In this post, we demonstrate automating deployment of Amazon Managed Workflows for Apache Airflow (Amazon MWAA) using customer-managed endpoints in a VPC, providing compatibility with shared, or otherwise restricted, VPCs.
Data scientists and engineers have made Apache Airflow a leading open source tool to create data pipelines due to its active open source community, familiar Python development as Directed Acyclic Graph (DAG) workflows, and extensive library of pre-built integrations. Amazon MWAA is a managed service for Airflow that makes it easy to run Airflow on AWS without the operational burden of having to manage the underlying infrastructure. For each Airflow environment, Amazon MWAA creates a single-tenant service VPC, which hosts the metadatabase that stores states and the web server that provides the user interface. Amazon MWAA further manages Airflow scheduler and worker instances in a customer-owned and managed VPC, in order to schedule and run tasks that interact with customer resources. Those Airflow containers in the customer VPC access resources in the service VPC via a VPC endpoint.
Many organizations choose to centrally manage their VPC using AWS Organizations, allowing a VPC in an owner account to be shared with resources in a different participant account. However, because creating a new route outside of a VPC is considered a privileged operation, participant accounts can’t create endpoints in owner VPCs. Furthermore, many customers don’t want to extend the security privileges required to create VPC endpoints to all users provisioning Amazon MWAA environments. In addition to VPC endpoints, customers also wish to restrict data egress via Amazon Simple Queue Service (Amazon SQS) queues, and Amazon SQS access is a requirement in the Amazon MWAA architecture.
Shared VPC support for Amazon MWAA adds the ability for you to manage your own endpoints within your VPCs, adding compatibility to shared and otherwise restricted VPCs. Specifying customer-managed endpoints also provides the ability to meet strict security policies by explicitly restricting VPC resource access to just those needed by your Amazon MWAA environments. This post demonstrates how customer-managed endpoints work with Amazon MWAA and provides examples of how to automate the provisioning of those endpoints.
Solution overview
Shared VPC support for Amazon MWAA allows multiple AWS accounts to create their Airflow environments into shared, centrally managed VPCs. The account that owns the VPC (owner) shares the two private subnets required by Amazon MWAA with other accounts (participants) that belong to the same organization from AWS Organizations. After the subnets are shared, the participants can view, create, modify, and delete Amazon MWAA environments in the subnets shared with them.
When users specify the need for a shared, or otherwise policy-restricted, VPC during environment creation, Amazon MWAA will first create the service VPC resources, then enter a pending state for up to 72 hours, with an Amazon EventBridge notification of the change in state. This allows owners to create the required endpoints on behalf of participants based on endpoint service information from the Amazon MWAA console or API, or programmatically via an AWS Lambda function and EventBridge rule, as in the example in this post.
After those endpoints are created on the owner account, the endpoint service in the single-tenant Amazon MWAA VPC will detect the endpoint connection event and resume environment creation. Should there be an issue, you can cancel environment creation by deleting the environment during this pending state.
This feature also allows you to remove the create, modify, and delete VPCE privileges from the AWS Identity and Access Management (IAM) principal creating Amazon MWAA environments, even when not using a shared VPC, because that permission will instead be imposed on the IAM principal creating the endpoint (the Lambda function in our example). Furthermore, the Amazon MWAA environment will provide the SQS queue Amazon Resource Name (ARN) used by the Airflow Celery Executor to queue tasks (the Celery Executor Queue), allowing you to explicitly enter those resources into your network policy rather than having to provide a more open and generalized permission.
In this example, we create the VPC and Amazon MWAA environment in the same account. For shared VPCs across accounts, the EventBridge rule and Lambda function would exist in the owner account, and the Amazon MWAA environment would be created in the participant account. See Sending and receiving Amazon EventBridge events between AWS accounts for more information.
Prerequisites
You should have the following prerequisites:
An AWS account
An AWS user in that account, with permissions to create VPCs, VPC endpoints, and Amazon MWAA environments
We begin by creating a restrictive VPC using an AWS CloudFormation template, in order to simulate creating the necessary VPC endpoint and modifying the SQS endpoint policy. If you want to use an existing VPC, you can proceed to the next section.
On the AWS CloudFormation console, choose Create stack and choose With new resources (standard).
Under Specify template, choose Upload a template file.
Now we edit our CloudFormation template to restrict access to Amazon SQS. In cfn-vpc-private-bjs.yml, edit the SqsVpcEndoint section to appear as follows:
This additional policy document entry prevents Amazon SQS egress to any resource not explicitly listed.
Now we can create our CloudFormation stack.
On the AWS CloudFormation console, choose Create stack.
Select Upload a template file.
Choose Choose file.
Browse to the file you modified.
Choose Next.
For Stack name, enter MWAA-Environment-VPC.
Choose Next until you reach the review page.
Choose Submit.
Create the Lambda function
We have two options for self-managing our endpoints: manual and automated. In this example, we create a Lambda function that responds to the Amazon MWAA EventBridge notification. You could also use the EventBridge notification to send an Amazon Simple Notification Service (Amazon SNS) message, such as an email, to someone with permission to create the VPC endpoint manually.
First, we create a Lambda function to respond to the EventBridge event that Amazon MWAA will emit.
On the Lambda console, choose Create function.
For Name, enter mwaa-create-lambda.
For Runtime, choose Python 3.11.
Choose Create function.
For Code, in the Code source section, for lambda_function, enter the following code:
import boto3
import json
import logging

logger = logging.getLogger()
logger.setLevel(logging.INFO)

def lambda_handler(event, context):
    if event['detail']['status']=="PENDING":
        detail=event['detail']
        name=detail['name']
        celeryExecutorQueue=detail['celeryExecutorQueue']
        subnetIds=detail['networkConfiguration']['subnetIds']
        securityGroupIds=detail['networkConfiguration']['securityGroupIds']
        databaseVpcEndpointService=detail['databaseVpcEndpointService']

        # MWAA does not need to store the VPC ID, but we can get it from the subnets
        client = boto3.client('ec2')
        response = client.describe_subnets(SubnetIds=subnetIds)
        logger.info(response['Subnets'][0]['VpcId'])
        vpcId=response['Subnets'][0]['VpcId']
        logger.info("vpcId: " + vpcId)

        webserverVpcEndpointService=None
        if detail['webserverAccessMode']=="PRIVATE_ONLY":
            webserverVpcEndpointService=event['detail']['webserverVpcEndpointService']

        response = client.describe_vpc_endpoints(
            VpcEndpointIds=[],
            Filters=[
                {"Name": "vpc-id", "Values": [vpcId]},
                {"Name": "service-name", "Values": ["*.sqs"]},
                ],
            MaxResults=1000
        )
        sqsVpcEndpoint=None
        for r in response['VpcEndpoints']:
            if subnetIds[0] in r['SubnetIds'] or subnetIds[0] in r['SubnetIds']:
                # We are filtering describe by service name, so this must be SQS
                sqsVpcEndpoint=r
                break

        if sqsVpcEndpoint:
            logger.info("Found SQS endpoint: " + sqsVpcEndpoint['VpcEndpointId'])

            logger.info(sqsVpcEndpoint)
            pd = json.loads(sqsVpcEndpoint['PolicyDocument'])
            for s in pd['Statement']:
                if s['Effect']=='Allow':
                    resource = s['Resource']
                    logger.info(resource)
                    if '*' in resource:
                        logger.info("'*' already allowed")
                    elif celeryExecutorQueue in resource:
                        logger.info("'"+celeryExecutorQueue+"' already allowed")
                    else:
                        s['Resource'].append(celeryExecutorQueue)
                        logger.info("Updating SQS policy to " + str(pd))

                        client.modify_vpc_endpoint(
                            VpcEndpointId=sqsVpcEndpoint['VpcEndpointId'],
                            PolicyDocument=json.dumps(pd)
                            )
                    break

        # create MWAA database endpoint
        logger.info("creating endpoint to " + databaseVpcEndpointService)
        endpointName=name+"-database"
        response = client.create_vpc_endpoint(
            VpcEndpointType='Interface',
            VpcId=vpcId,
            ServiceName=databaseVpcEndpointService,
            SubnetIds=subnetIds,
            SecurityGroupIds=securityGroupIds,
            TagSpecifications=[
                {
                    "ResourceType": "vpc-endpoint",
                    "Tags": [
                        {
                            "Key": "Name",
                            "Value": endpointName
                        },
                    ]
                },
            ],
        )
        logger.info("created VPCE: " + response['VpcEndpoint']['VpcEndpointId'])

        # create MWAA web server endpoint (if private)
        if webserverVpcEndpointService:
            endpointName=name+"-webserver"
            logger.info("creating endpoint to " + webserverVpcEndpointService)
            response = client.create_vpc_endpoint(
                VpcEndpointType='Interface',
                VpcId=vpcId,
                ServiceName=webserverVpcEndpointService,
                SubnetIds=subnetIds,
                SecurityGroupIds=securityGroupIds,
                TagSpecifications=[
                    {
                        "ResourceType": "vpc-endpoint",
                        "Tags": [
                            {
                                "Key": "Name",
                                "Value": endpointName
                            },
                        ]
                    },
                ],
            )
            logger.info("created VPCE: " + response['VpcEndpoint']['VpcEndpointId'])

    return {
        'statusCode': 200,
        'body': json.dumps(event['detail']['status'])
    }
Choose Deploy.
On the Configuration tab of the Lambda function, in the General configuration section, choose Edit.
For Timeout, increate to 5 minutes, 0 seconds.
Choose Save.
In the Permissions section, under Execution role, choose the role name to edit the permissions of this function.
For Permission policies, choose the link under Policy name.
Choose Edit and add a comma and the following statement:
Next, we configure EventBridge to send the Amazon MWAA notifications to our Lambda function.
On the EventBridge console, choose Create rule.
For Name, enter mwaa-create.
Select Rule with an event pattern.
Choose Next.
For Creation method, choose User pattern form.
Choose Edit pattern.
For Event pattern, enter the following:
{
  "source": ["aws.airflow"],
  "detail-type": ["MWAA Environment Status Change"]
}
Choose Next.
For Select a target, choose Lambda function.
You may also specify an SNS notification in order to receive a message when the environment state changes.
For Function, choose mwaa-create-lambda.
Choose Next until you reach the final section, then choose Create rule.
Create an Amazon MWAA environment
Finally, we create an Amazon MWAA environment with customer-managed endpoints.
On the Amazon MWAA console, choose Create environment.
For Name, enter a unique name for your environment.
For Airflow version, choose the latest Airflow version.
For S3 bucket, choose Browse S3 and choose your S3 bucket, or enter the Amazon S3 URI.
For DAGs folder, choose Browse S3 and choose the dags/ folder in your S3 bucket, or enter the Amazon S3 URI.
Choose Next.
For Virtual Private Cloud, choose the VPC you created earlier.
For Web server access, choose Public network (Internet accessible).
For Security groups, deselect Create new security group.
Choose the shared VPC security group created by the CloudFormation template.
Because the security groups of the AWS PrivateLink endpoints from the earlier step are self-referencing, you must choose the same security group for your Amazon MWAA environment.
For Endpoint management, choose Customer managed endpoints.
Keep the remaining settings as default and choose Next.
Choose Create environment.
When your environment is available, you can access it via the Open Airflow UI link on the Amazon MWAA console.
Clean up
Cleaning up resources that are not actively being used reduces costs and is a best practice. If you don’t delete your resources, you can incur additional charges. To clean up your resources, complete the following steps:
After the above resources have completed deletion, delete the CloudFormation stack to ensure that you have removed all of the remaining resources.
Summary
This post described how to automate environment creation with shared VPC support in Amazon MWAA. This gives you the ability to manage your own endpoints within your VPC, adding compatibility to shared, or otherwise restricted, VPCs. Specifying customer-managed endpoints also provides the ability to meet strict security policies by explicitly restricting VPC resource access to just those needed by their Amazon MWAA environments. To learn more about Amazon MWAA, refer to the Amazon MWAA User Guide. For more posts about Amazon MWAA, visit the Amazon MWAA resources page.
About the author
John Jackson has over 25 years of software experience as a developer, systems architect, and product manager in both startups and large corporations and is the AWS Principal Product Manager responsible for Amazon MWAA.
The Amazon Elastic Compute Cloud (Amazon EC2) Instance Metadata Service (IMDS) helps customers build secure and scalable applications. IMDS solves a security challenge for cloud users by providing access to temporary and frequently-rotated credentials, and by removing the need to hardcode or distribute sensitive credentials to instances manually or programmatically. The Instance Metadata Service Version 2 (IMDSv2) adds protections; specifically, IMDSv2 uses session-oriented authentication with the following enhancements:
IMDSv2 requires the creation of a secret token in a simple HTTP PUT request to start the session, which must be used to retrieve information in IMDSv2 calls.
The IMDSv2 session token must be used as a header in subsequent IMDSv2 requests to retrieve information from IMDS. Unlike a static token or fixed header, a session and its token are destroyed when the process using the token terminates. IMDSv2 sessions can last up to six hours.
A session token can only be used directly from the EC2 instance where that session began.
You can reuse a token or create a new token with every request.
Session token PUT requests are blocked if they contain an X-forwarded-for header.
In a previous blog post, we explained how these new protections add defense-in-depth for third-party and external application vulnerabilities that could be used to try to access the IMDS.
You won’t be able to get the full benefits of IMDSv2 until you disable IMDSv1. While IMDS is provided by the instance itself, the calls to IMDS are from your software. This means your software must support IMDSv2 before you can disable IMDSv1. In addition to AWS SDKs, CLIs, and tools like the SSM agents supporting IMDSv2, you can also use the IMDS Packet Analyzer to pinpoint exactly what you need to update to get your instances ready to use only IMDSv2. These tools make it simpler to transition to IMDSv2 as well as launch new infrastructure with IMDSv1 disabled. All instances launched with AL2023 set the instance to provide only IMDSv2 (IMDSv1 is disabled) by default, with AL2023 also not making IMDSv1 calls.
AWS customers who want to get the benefits of IMDSv2 have told us they want to use IMDSv2 across both new and existing, long-running AWS infrastructure. This blog post shows you scalable solutions to identify existing infrastructure that is providing IMDSv1, how to transition to IMDSv2 on your infrastructure, and how to completely disable IMDSv1. After reviewing this blog, you will be able to set new Amazon EC2 launches to IMDSv2. You will also learn how to identify existing software making IMDSv1 calls, so you can take action to update your software and then require IMDSv2 on existing EC2 infrastructure.
Identifying IMDSv1-enabled EC2 instances
The first step in transitioning to IMDSv2 is to identify all existing IMDSv1-enabled EC2 instances. You can do this in various ways.
Using the console
You can identify IMDSv1-enabled instances using the IMDSv2attribute column in the Amazon EC2 page in the AWS Management Console.
To view the IMDSv2 attribute column:
Open the Amazon EC2 console and go to Instances.
Choose the settings icon in the top right.
Scroll down to IMDSv2, turn on the slider.
Choose Confirm.
This gives you the IMDS status of your instances. A status of optional means that IMDSv1 is enabled on the instance and required means that IMDSv1 is disabled.
Figure 1: Example of IMDS versions for EC2 instances in the console
Using the AWS CLI
You can identify IMDSv1-enabled instances using the AWS Command Line Interface (AWS CLI) by running the aws ec2 describe-instances command and checking the value of HttpTokens. The HttpTokens value determines what version of IMDS is enabled, with optional enabling IMDSv1 and IMDSv2 and required means IMDSv2 is required. Similar to using the console, the optional status indicates that IMDSv1 is enabled on the instance and required indicates that IMDSv1 is disabled.
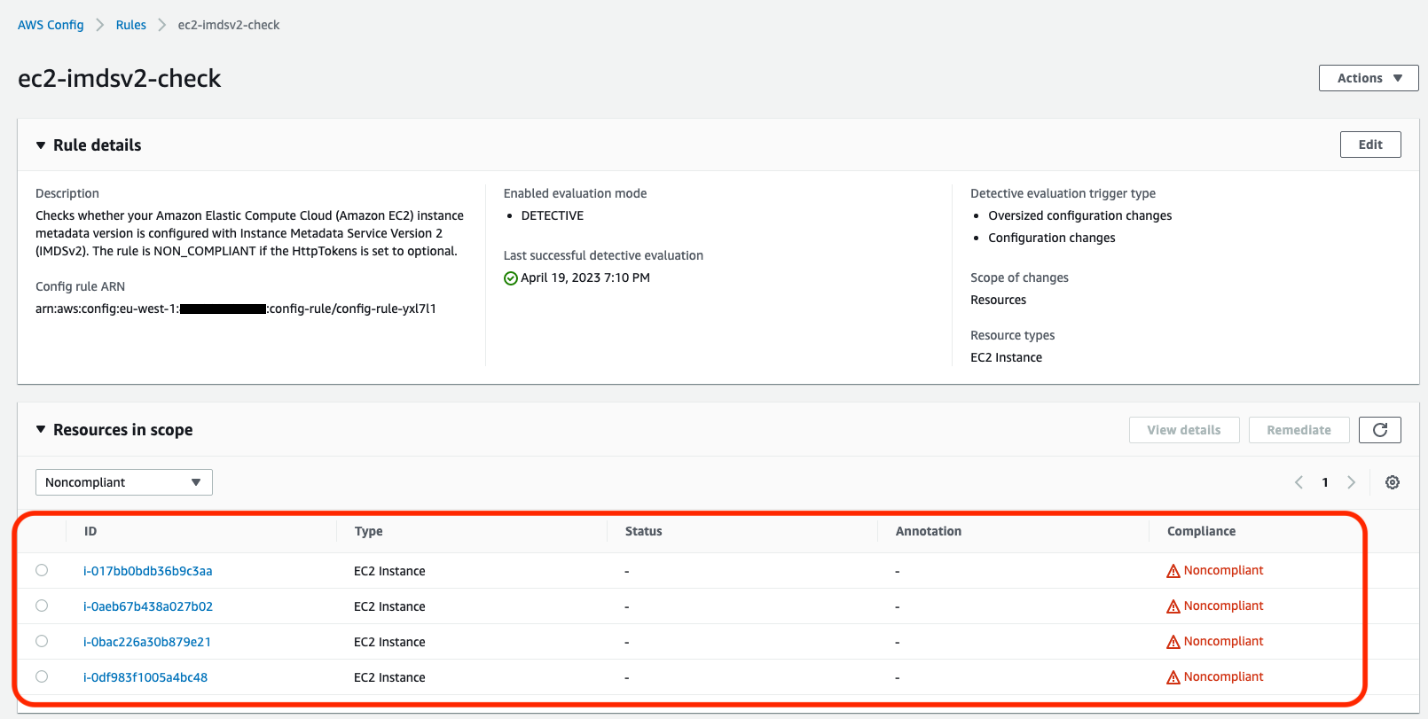
AWS Config continually assesses, audits, and evaluates the configurations and relationships of your resources on AWS, on premises, and on other clouds. The AWS Config rule ec2-imdsv2-check checks whether your Amazon EC2 instance metadata version is configured with IMDSv2. The rule is NON_COMPLIANT if the HttpTokens is set to optional, which means the EC2 instance has IMDSv1 enabled.
Figure 2: Example of noncompliant EC2 instances in the AWS Config console
Identifying if EC2 instances are making IMDSv1 calls
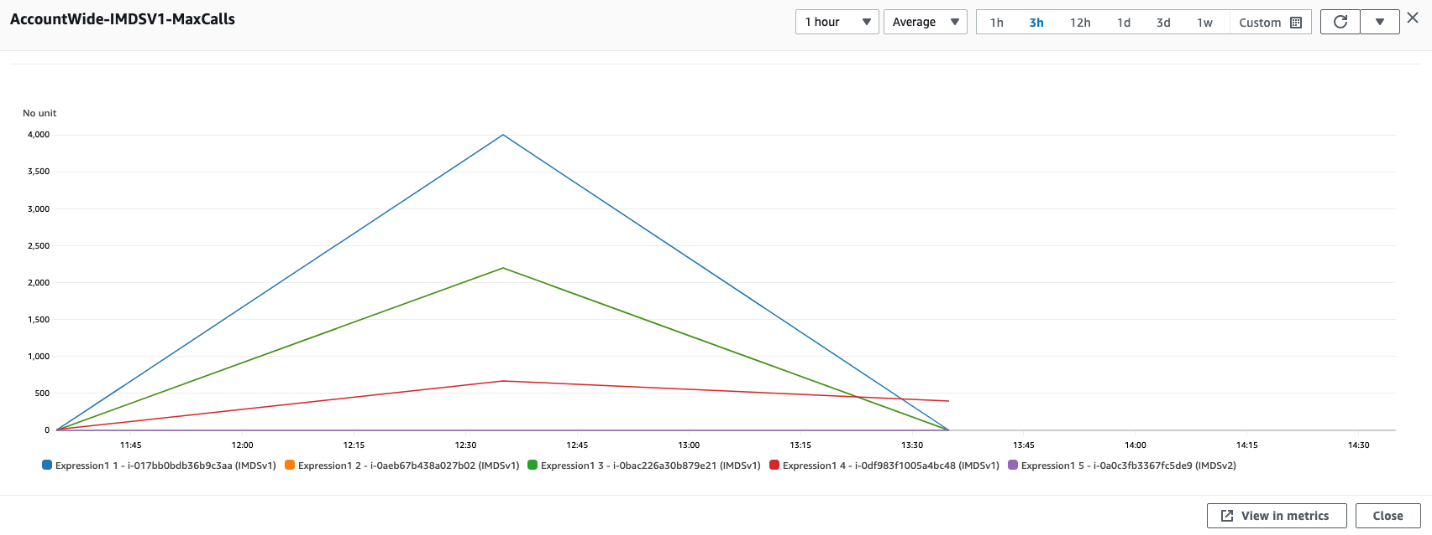
Not all of your software will be making IMDSv1 calls; your dependent libraries and tools might already be compatible with IMDSv2. However, to mitigate against compatibility issues in requiring IMDSv2 and disabling IMDSv1 entirely, you must check for remaining IMDSv1 calls from your software. After you’ve identified that there are instances with IMDSv1 enabled, investigate if your software is making IMDSv1 calls. Most applications make IMDSv1 calls at instance launch and shutdown. For long running instances, we recommend monitoring IMDSv1 calls during a launch or a stop and restart cycle.
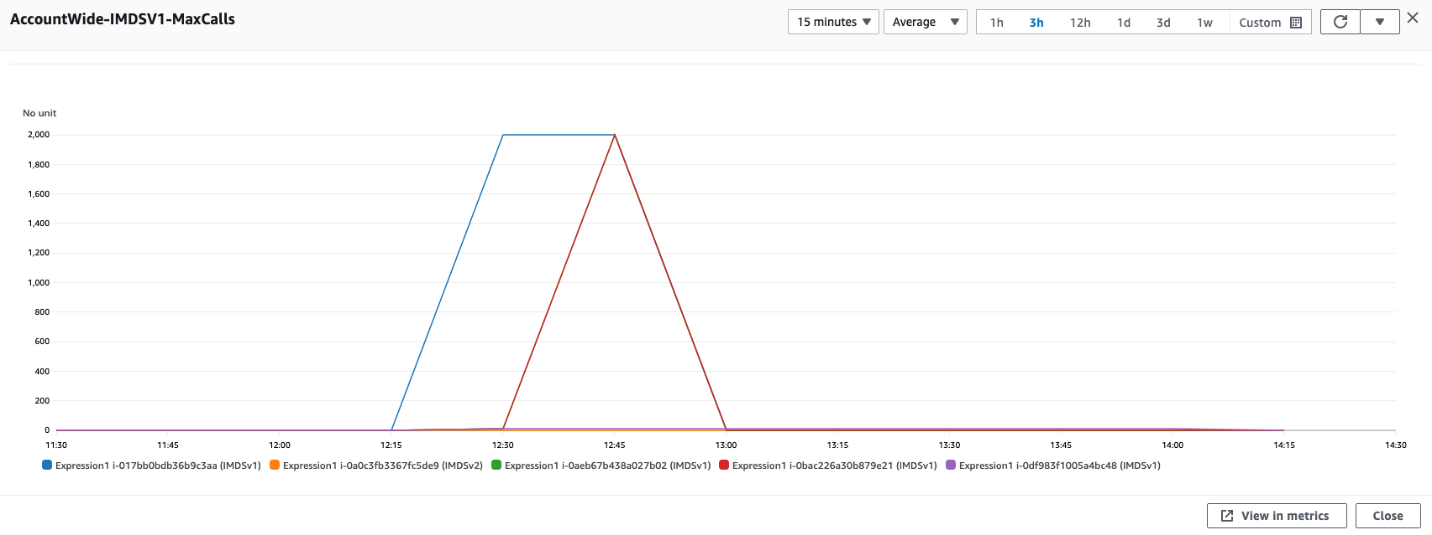
Figure 6: Another example of using CloudWatch expressions to view account wide metrics
If you have multiple AWS accounts or use AWS Organizations, you can set up a centralized monitoring account using CloudWatch cross account observability.
IMDS Packet Analyzer
The IMDS Packet Analyzer is an open source tool that identifies and logs IMDSv1 calls from your software, including software start-up on your instance. This tool can assist in identifying the software making IMDSv1 calls on EC2 instances, allowing you to pinpoint exactly what you need to update to get your software ready to use IMDSv2. You can run the IMDS Packet Analyzer from a command line or install it as a service. For more information, see IMDS Packet Analyzer on GitHub.
Disabling IMDSv1 and maintaining only IMDSv2 instances
After you’ve monitored and verified that the software on your EC2 instances isn’t making IMDSv1 calls, you can disable IMDSv1 on those instances. For all compatible workloads, we recommend using Amazon Linux 2023, which offers several improvements (see launch announcement), including requiring IMDSv2 (disabling IMDSv1) by default.
You can also create and modify AMIs and EC2 instances to disable IMDSv1. Configure the AMI provides guidance on how to register a new AMI or change an existing AMI by setting the imds-support parameter to v2.0. If you’re using container services (such as ECS or EKS), you might need a bigger hop limit to help avoid falling back to IMDSv1. You can use the modify-instance-metadata-options launch parameter to make the change. We recommend testing with a hop limit of three in container environments.
To create a new instance
For new instances, you can disable IMDSv1 and enable IMDSv2 by specifying the metadata-options parameter using the run-instance CLI command.
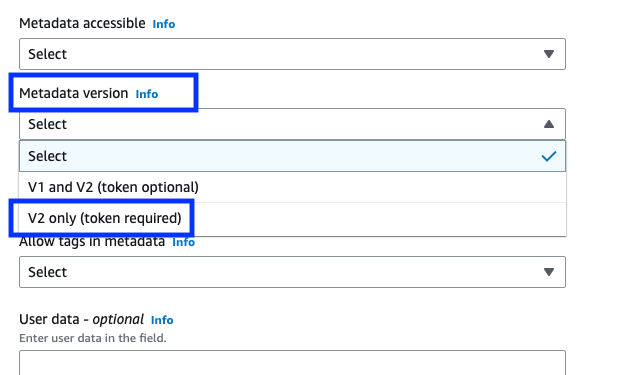
If you’re using the console to launch instances, after selecting Launch Instance from AWS Console, choose the Advanced details tab, scroll down to Metadata version and select V2 only (token required).
Figure 7: Modifying IMDS version using the console
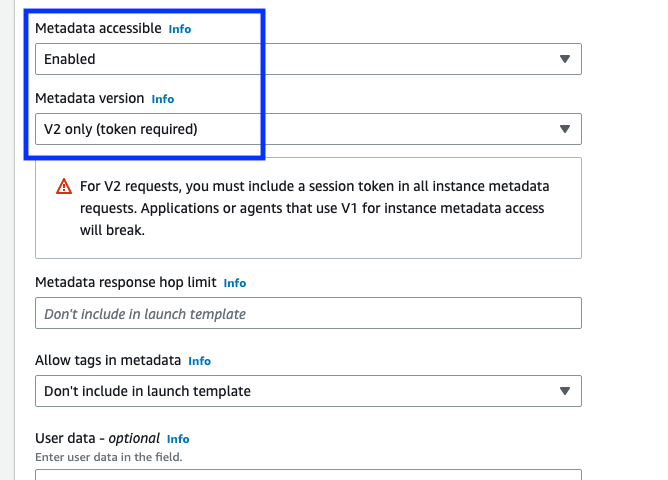
Using EC2 launch templates
You can use an EC2 launch template as an instance configuration template that an Amazon Auto Scaling group can use to launch EC2 instances. When creating the launch template using the console, you can specify the Metadata version and select V2 only (token required).
Figure 8: Modifying the IMDS version in the EC2 launch templates
In this state, retrieving the AWS Identity and Access Management (IAM) role credentials always returns IMDSv2 credentials; IMDSv1 credentials are not available.
On the Owned by Amazon tab, for Automation document, enter EnforceEC2InstanceIMDSv2, and then press Enter.
Choose EnforceEC2InstanceIMDSv2 document, and then choose Next.
For Execute automation document, choose Simple execution.
Note: If you need to run the automation on multiple targets, then choose Rate Control.
For Input parameters, enter the ID of EC2 instance under InstanceId
For AutomationAssumeRole, select a role.
Note: To change the target EC2 instance, the AutomationAssumeRole must have ec2:ModifyInstanceMetadataOptions and ec2:DescribeInstances permissions. For more information about creating the assume role for Systems Manager Automation, see Create a service role for Automation.
To maintain only IMDSv2 instances, you can implement service control policies and IAM policies that verify that users and software on your EC2 instances can only use instance metadata using IMDSv2. This policy specifies that RunInstance API calls require the EC2 instance use only IMDSv2. We recommend implementing this policy after all of the instances in associated accounts are free of IMDSv1 calls and you have migrated all of the instances to use only IMDSv2.
You can find more details on applicable service control policies (SCPs) and IAM policies in the EC2 User Guide.
Restricting credential usage using condition keys
As an additional layer of defence, you can restrict the use of your Amazon EC2 role credentials to work only when used in the EC2 instance to which they are issued. This control is complementary to IMDSv2 since both can work together. The AWS global condition context keys for EC2 credential control properties (aws:EC2InstanceSourceVPC and aws:EC2InstanceSourcePrivateIPv4) restrict the VPC endpoints and private IPs that can use your EC2 instance credentials, and you can use these keys in service control policies (SCPs) or IAM policies. Examples of these policies are in this blog post.
Conclusion
You won’t be able to get the full benefits of IMDSv2 until you disable IMDSv1. In this blog post, we showed you how to identify IMDSv1-enabled EC2 instances and how to determine if and when your software is making IMDSv1 calls. We also showed you how to disable IMDSv1 on new and existing EC2 infrastructure after your software is no longer making IMDSv1 calls. You can use these tools to transition your existing EC2 instances, and set your new EC2 launches, to use only IMDSv2.
If you have feedback about this post, submit comments in the Comments section below. If you have questions about this post, start a new thread on the AWS Compute re:Post or contact AWS Support.
Want more AWS Security news? Follow us on Twitter.
You can use AWS Resource Access Manager (AWS RAM) to securely, simply, and consistently share supported resource types within your organization or organizational units (OUs) and across AWS accounts. This means you can provision your resources once and use AWS RAM to share them with accounts. With AWS RAM, the accounts that receive the shared resources can list those resources alongside the resources they own.
When you share your resources by using AWS RAM, you can specify the actions that an account can perform and the access conditions on the shared resource. AWS RAM provides AWS managed permissions, which are created and maintained by AWS and which grant permissions for common customer scenarios. Now, you can further tailor resource access by authoring and applying fine-grained customer managed permissions in AWS RAM. A customer managed permission is a managed permission that you create to precisely specify who can do what under which conditions for the resource types included in your resource share.
This blog post walks you through how to use customer managed permissions to tailor your resource access to meet your business and security needs. Customer managed permissions help you follow the best practice of least privilege for your resources that are shared using AWS RAM.
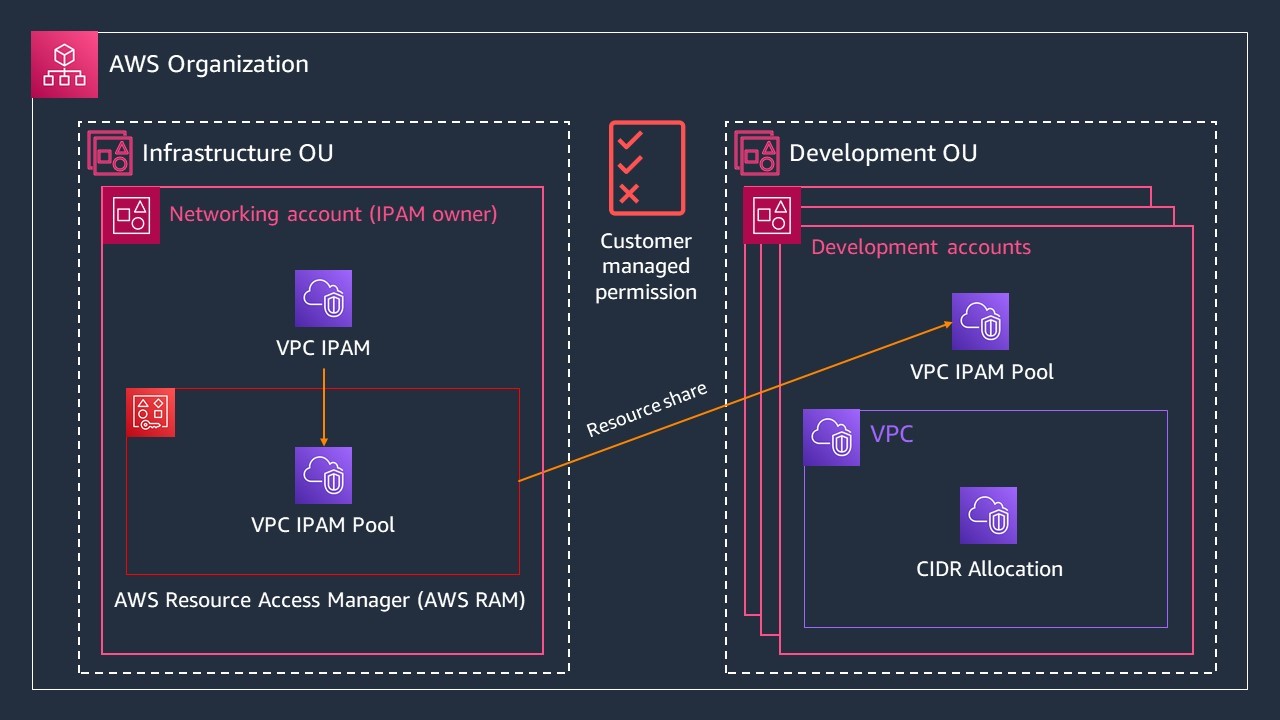
Many AWS customers share infrastructure services to accounts in an organization from a centralized infrastructure OU. The networking account in the infrastructure OU follows the best practice of least privilege and grants only the permissions that accounts receiving these resources, such as development accounts, require to perform a specific task. The solution in this post demonstrates how you can share an Amazon Virtual Private Cloud (Amazon VPC) IP Address Manager (IPAM) pool with the accounts in a Development OU. IPAM makes it simpler for you to plan, track, and monitor IP addresses for your AWS workloads.
You’ll use a networking account that owns an IPAM pool to share the pool with the accounts in a Development OU. You’ll do this by creating a resource share and a customer managed permission through AWS RAM. In this example, shown in Figure 1, both the networking account and the Development OU are in the same organization. The accounts in the Development OU only need the permissions that are required to allocate a classless inter-domain routing (CIDR) range and not to view the IPAM pool details. You’ll further refine access to the shared IPAM pool so that only AWS Identity and Access Management (IAM) users or roles tagged with team = networking can perform actions on the IPAM pool that’s shared using AWS RAM.
Figure 1: Multi-account diagram for sharing your IPAM pool from a networking account in the Infrastructure OU to accounts in the Development OU
Prerequisites
For this walkthrough, you must have the following prerequisites:
An AWS account (the networking account) with an IPAM pool already provisioned. For this example, create an IPAM pool in a networking account named ipam-vpc-pool-use1-dev. Because you share resources across accounts in the same AWS Region using AWS RAM, provision the IPAM pool in the same Region where your development accounts will access the pool.
An AWS OU with the associated development accounts to share the IPAM pool with. In this example, these accounts are in your Development OU.
An IAM role or user with permissions to perform IPAM and AWS RAM operations in the networking account and the development accounts.
Share your IPAM pool with your Development OU with least privilege permissions
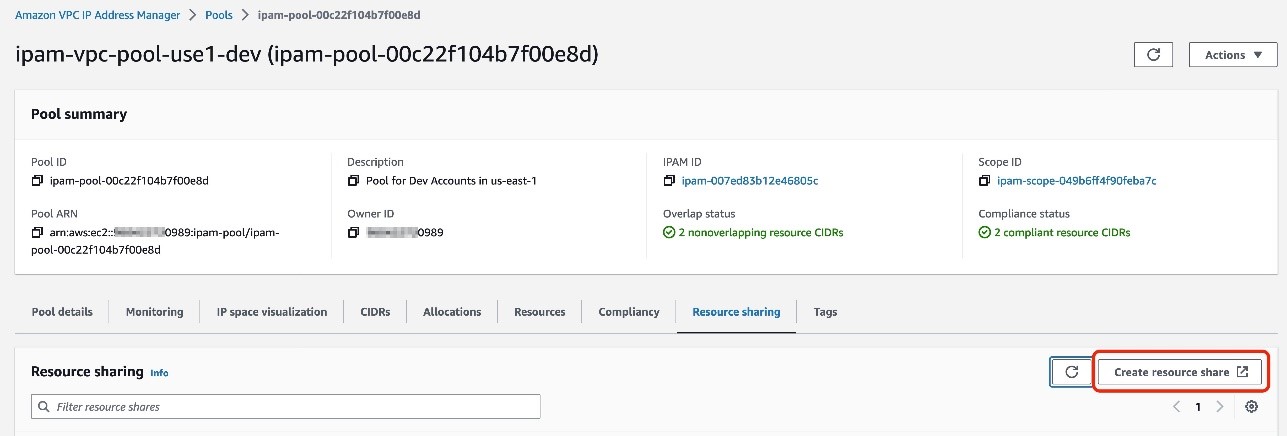
In this section, you share an IPAM pool from your networking account to the accounts in your Development OU and grant least-privilege permissions. To do that, you create a resource share that contains your IPAM pool, your customer managed permission for the IPAM pool, and the OU principal you want to share the IPAM pool with. A resource share contains resources you want to share, the principals you want to share the resources with, and the managed permissions that grant resource access to the account receiving the resources. You can add the IPAM pool to an existing resource share, or you can create a new resource share. Depending on your workflow, you can start creating a resource share either in the Amazon VPC IPAM or in the AWS RAM console.
To initiate a new resource share from the Amazon VPC IPAM console
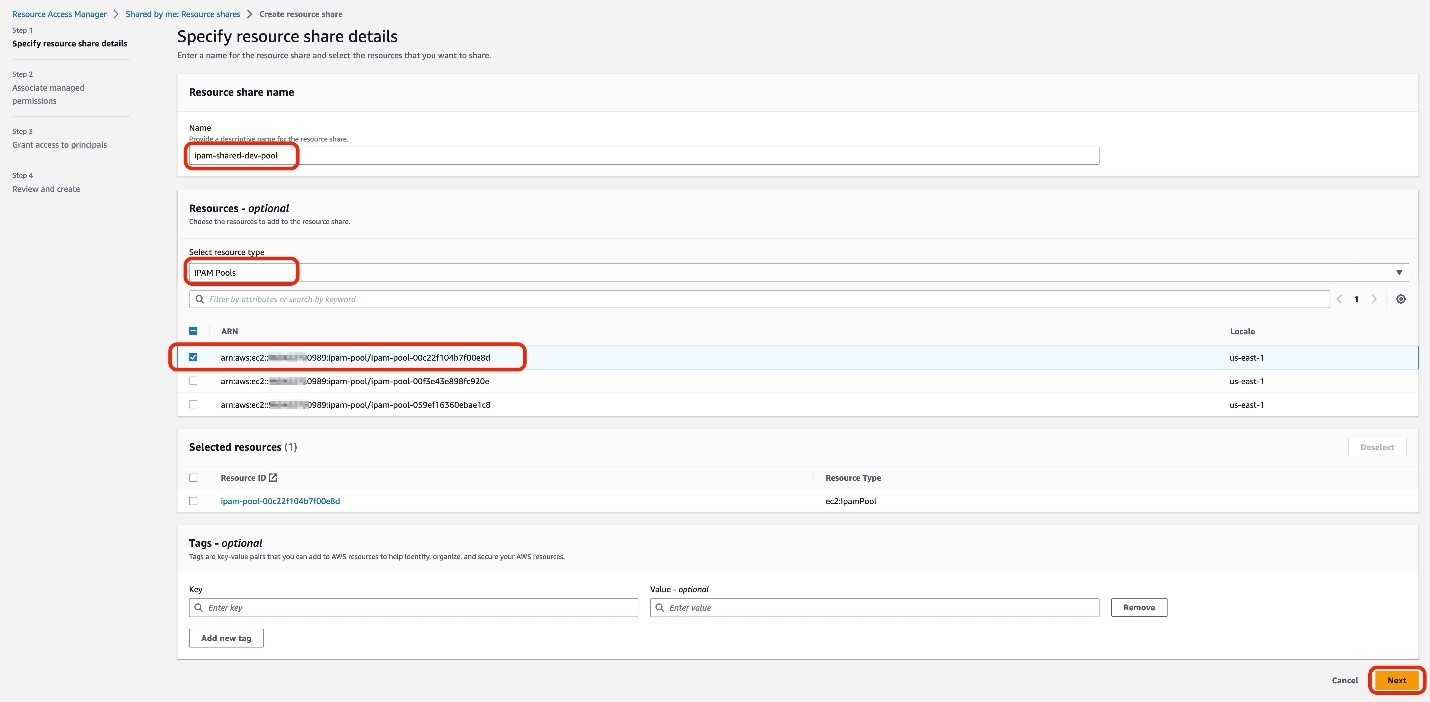
Next, specify the resource share details, including the name, the resource type, and the specific resource you want to share. Note that the steps of the resource share creation process are located on the left side of the AWS RAM console.
To specify the resource share details
For Name, enter ipam-shared-dev-pool.
For Select resource type, choose IPAM pools.
For Resources, select the Amazon Resource Name (ARN) of the IPAM pool you want to share from a list of the IPAM pool ARNs you own.
Choose Next.
Figure 3: Specify the resources to share in your resource share
Configure customer managed permissions
In this example, the accounts in the Development OU need the permissions required to allocate a CIDR range, but not the permissions to view the IPAM pool details. The existing AWS managed permission grants both read and write permissions. Therefore, you need to create a customer managed permission to refine the resource access permissions for your accounts in the Development OU. With a customer managed permission, you can select and tailor the actions that the development accounts can perform on the IPAM pool, such as write-only actions.
In this section, you create a customer managed permission, configure the managed permission name, select the resource type, and choose the actions that are allowed with the shared resource.
To create and author a customer managed permission
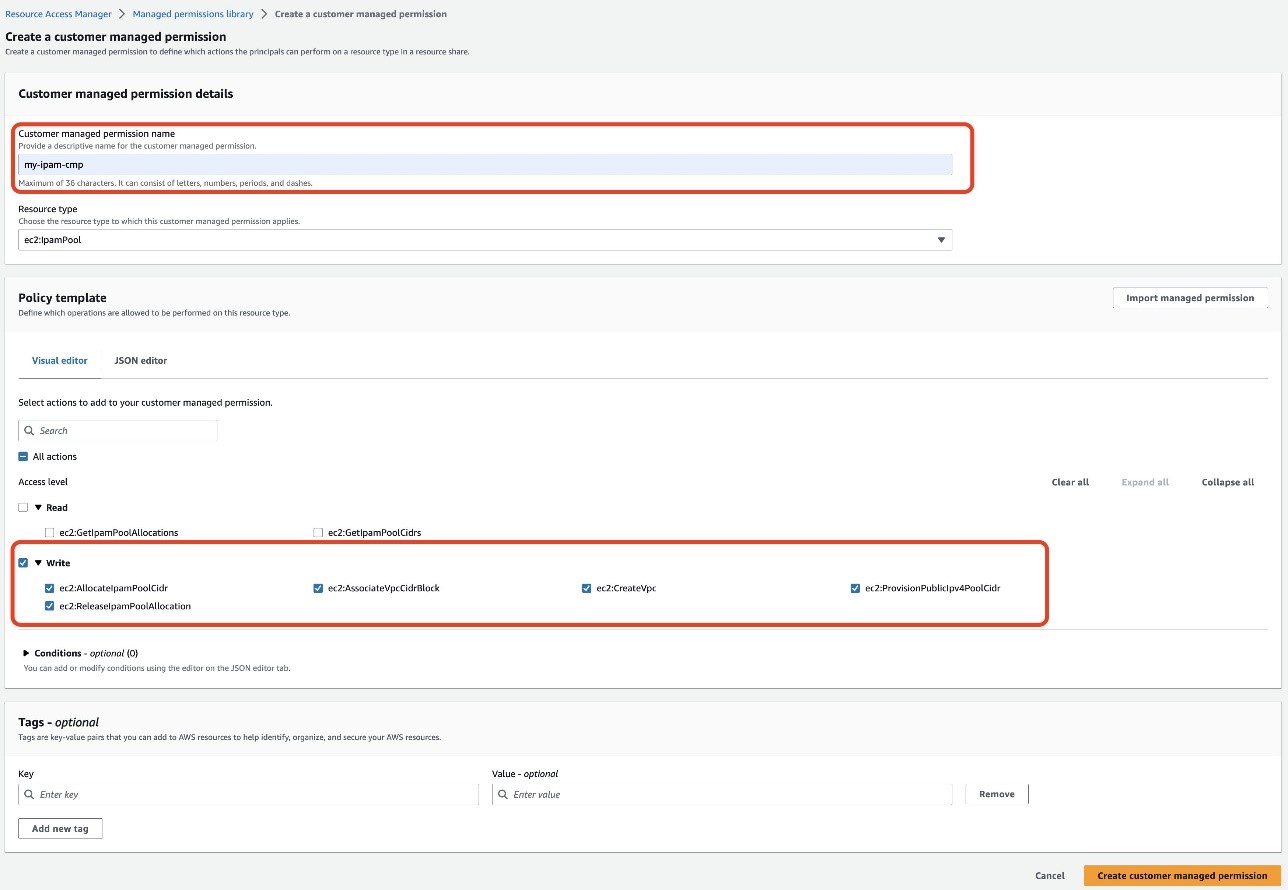
On the Associate managed permissions page, choose Create customer managed permission. This will bring up a new browser tab with a Create a customer managed permission page.
On the Create a customer managed permission page, enter my-ipam-cmp for the Customer managed permission name.
Confirm the Resource type as ec2:IpamPool.
On the Visual editor tab of the Policy template section, select the Write checkbox only. This will automatically check all the available write actions.
Choose Create customer managed permission.
Figure 4: Create a customer managed permission with only write actions
Now that you’ve created your customer managed permission, you must associate it to your resource share.
To associate your customer managed permission
Go back to the previous Associate managed permissions page. This is most likely located in a separate browser tab.
Choose the refresh icon .
Select my-ipam-cmp from the dropdown menu.
Review the policy template, and then choose Next.
Next, select the IAM roles, IAM users, AWS accounts, AWS OUs, or organization you want to share your IPAM pool with. In this example, you share the IPAM pool with an OU in your account.
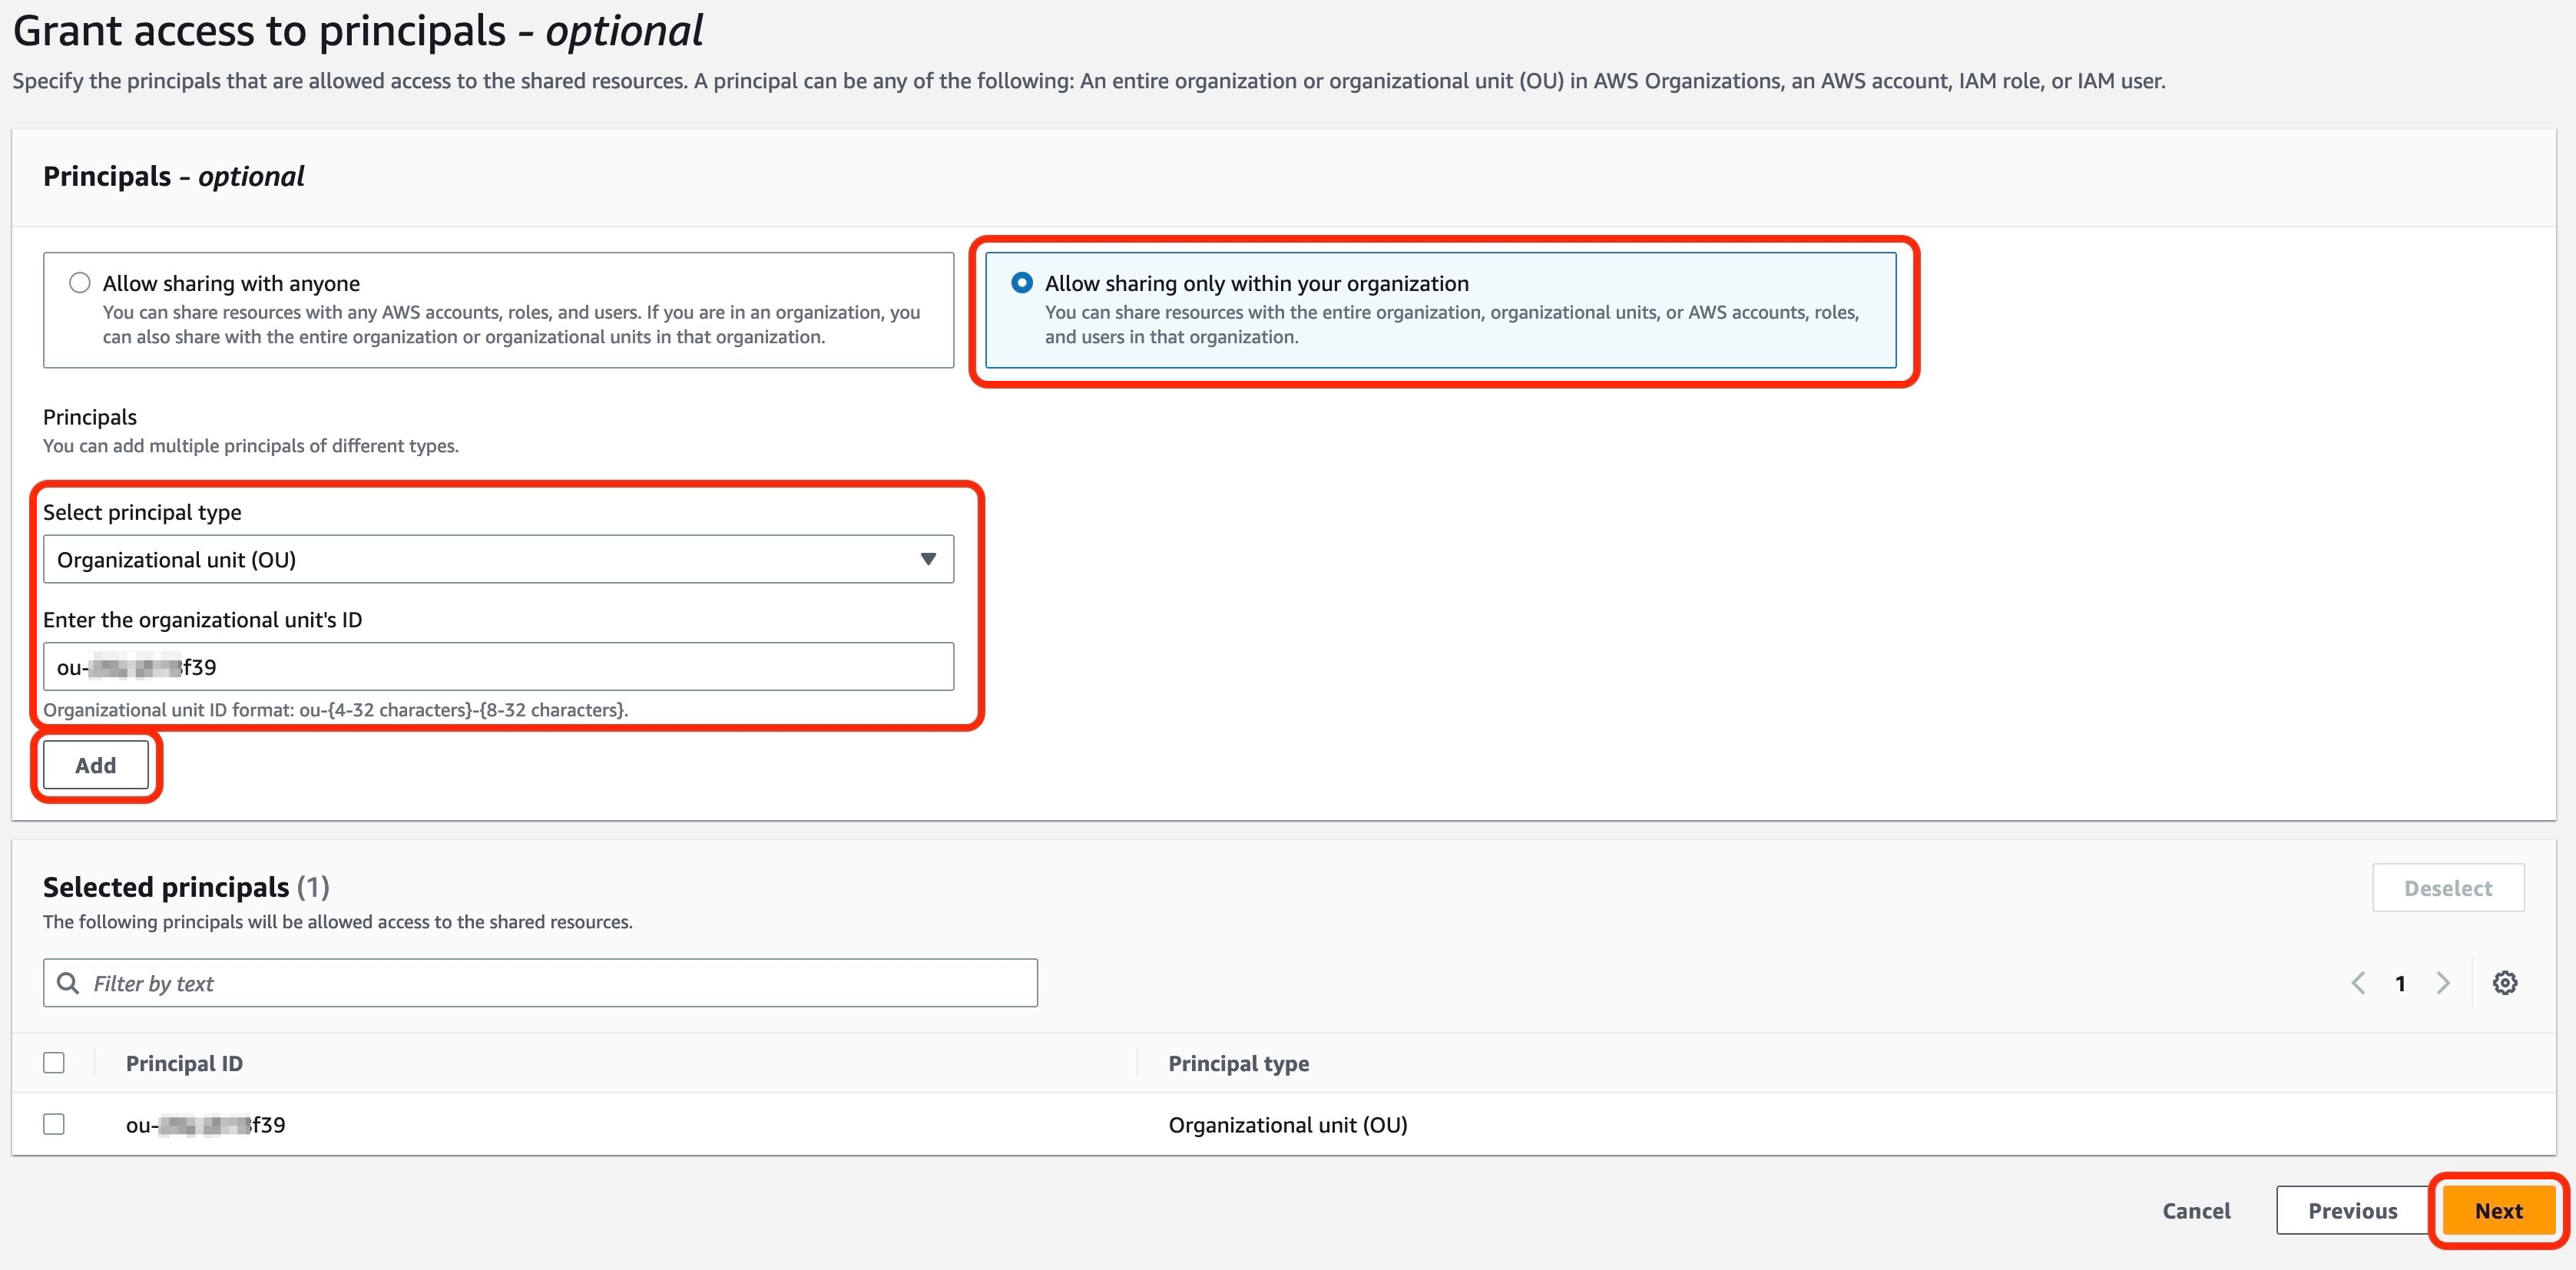
To grant access to principals
On the Grant access to principals page, select Allow sharing only with your organization.
For Select principal type, choose Organizational unit (OU).
Enter the Development OU’s ID.
Select Add, and then choose Next.
Choose Create resource share to complete creation of your resource share.
Figure 5: Grant access to principals in your resource share
Verify the customer managed permissions
Now let’s verify that the customer managed permission is working as expected. In this section, you verify that the development account cannot view the details of the IPAM pool and that you can use that same account to create a VPC with the IPAM pool.
To verify that an account in your Development OU can’t view the IPAM pool details
Select ipam-shared-dev-pool. You won’t be able to view the IPAM pool details.
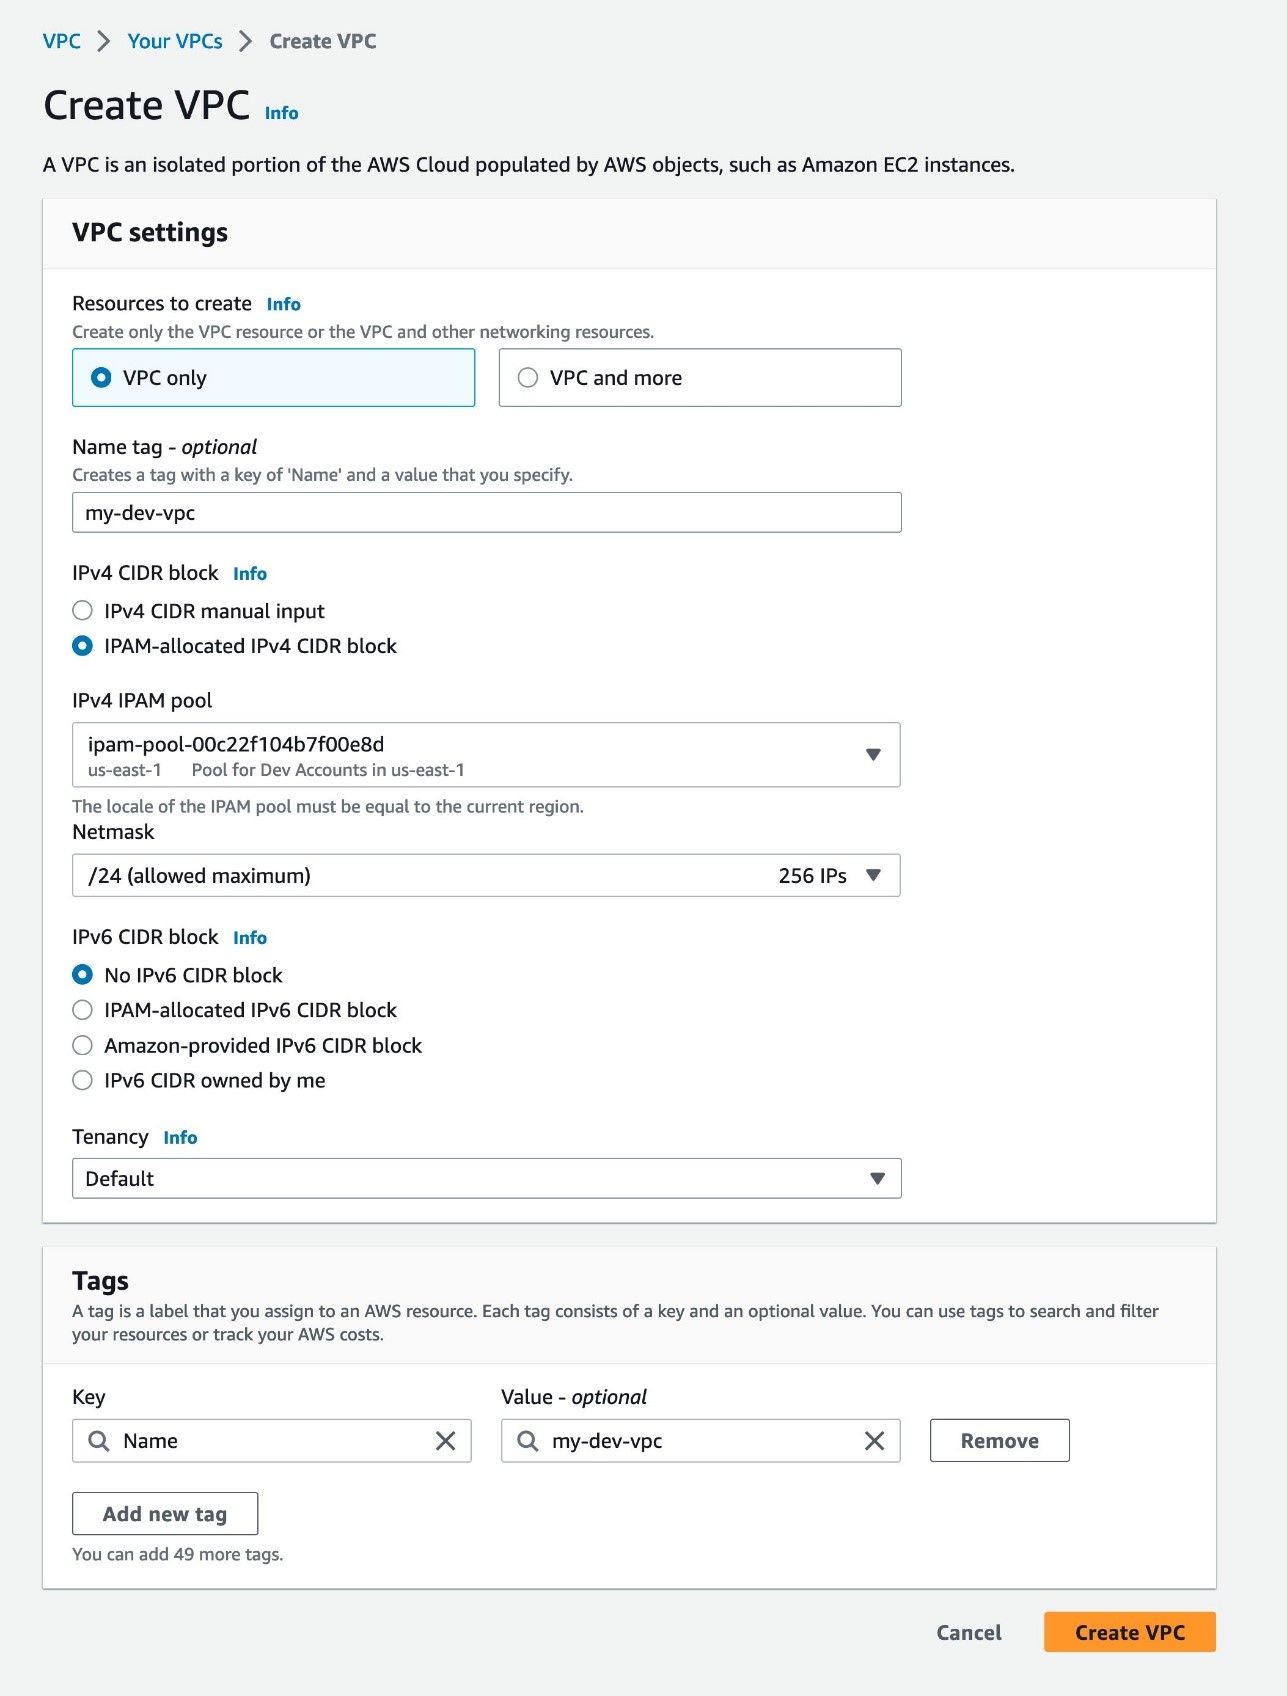
To verify that an account in your Development OU can create a new VPC with the IPAM pool
Sign in to the AWS Management Console as an account in your Development OU. For Services, select VPC console.
On the VPC dashboard, choose Create VPC.
On the Create VPC page, select VPC only.
For name, enter my-dev-vpc.
Select IPAM-allocated IPv4 CIDR block.
Choose the ARN of the IPAM pool that’s shared with your development account.
For Netmask, select /24 256 IPs.
Choose Create VPC. You’ve successfully created a VPC with the IPAM pool shared with your account in your Development OU.
Figure 6: Create a VPC
Update customer managed permissions
You can create a new version of your customer managed permission to rescope and update the access granularity of your resources that are shared using AWS RAM. For example, you can add a condition in your customer managed permissions so that only IAM users or roles tagged with a particular principal tag can access and perform the actions allowed on resources shared using AWS RAM. If you need to update your customer managed permission — for example, after testing or as your business and security needs evolve — you can create and save a new version of the same customer managed permission rather than creating an entirely new customer management permission. For example, you might want to adjust your access configurations to read-only actions for your development accounts and to rescope to read-write actions for your testing accounts. The new version of the permission won’t apply automatically to your existing resource shares, and you must explicitly apply it to those shares for it to take effect.
To create a version of your customer managed permission
In the left navigation pane, choose Managed permissions library.
For Filter by text, enter my-ipam-cmp andselect my-ipam-cmp. You can also select the Any type dropdown menu and then select Customer managed to narrow the list of managed permissions to only your customer managed permissions.
On the my-ipam-cmp page, choose Create version.
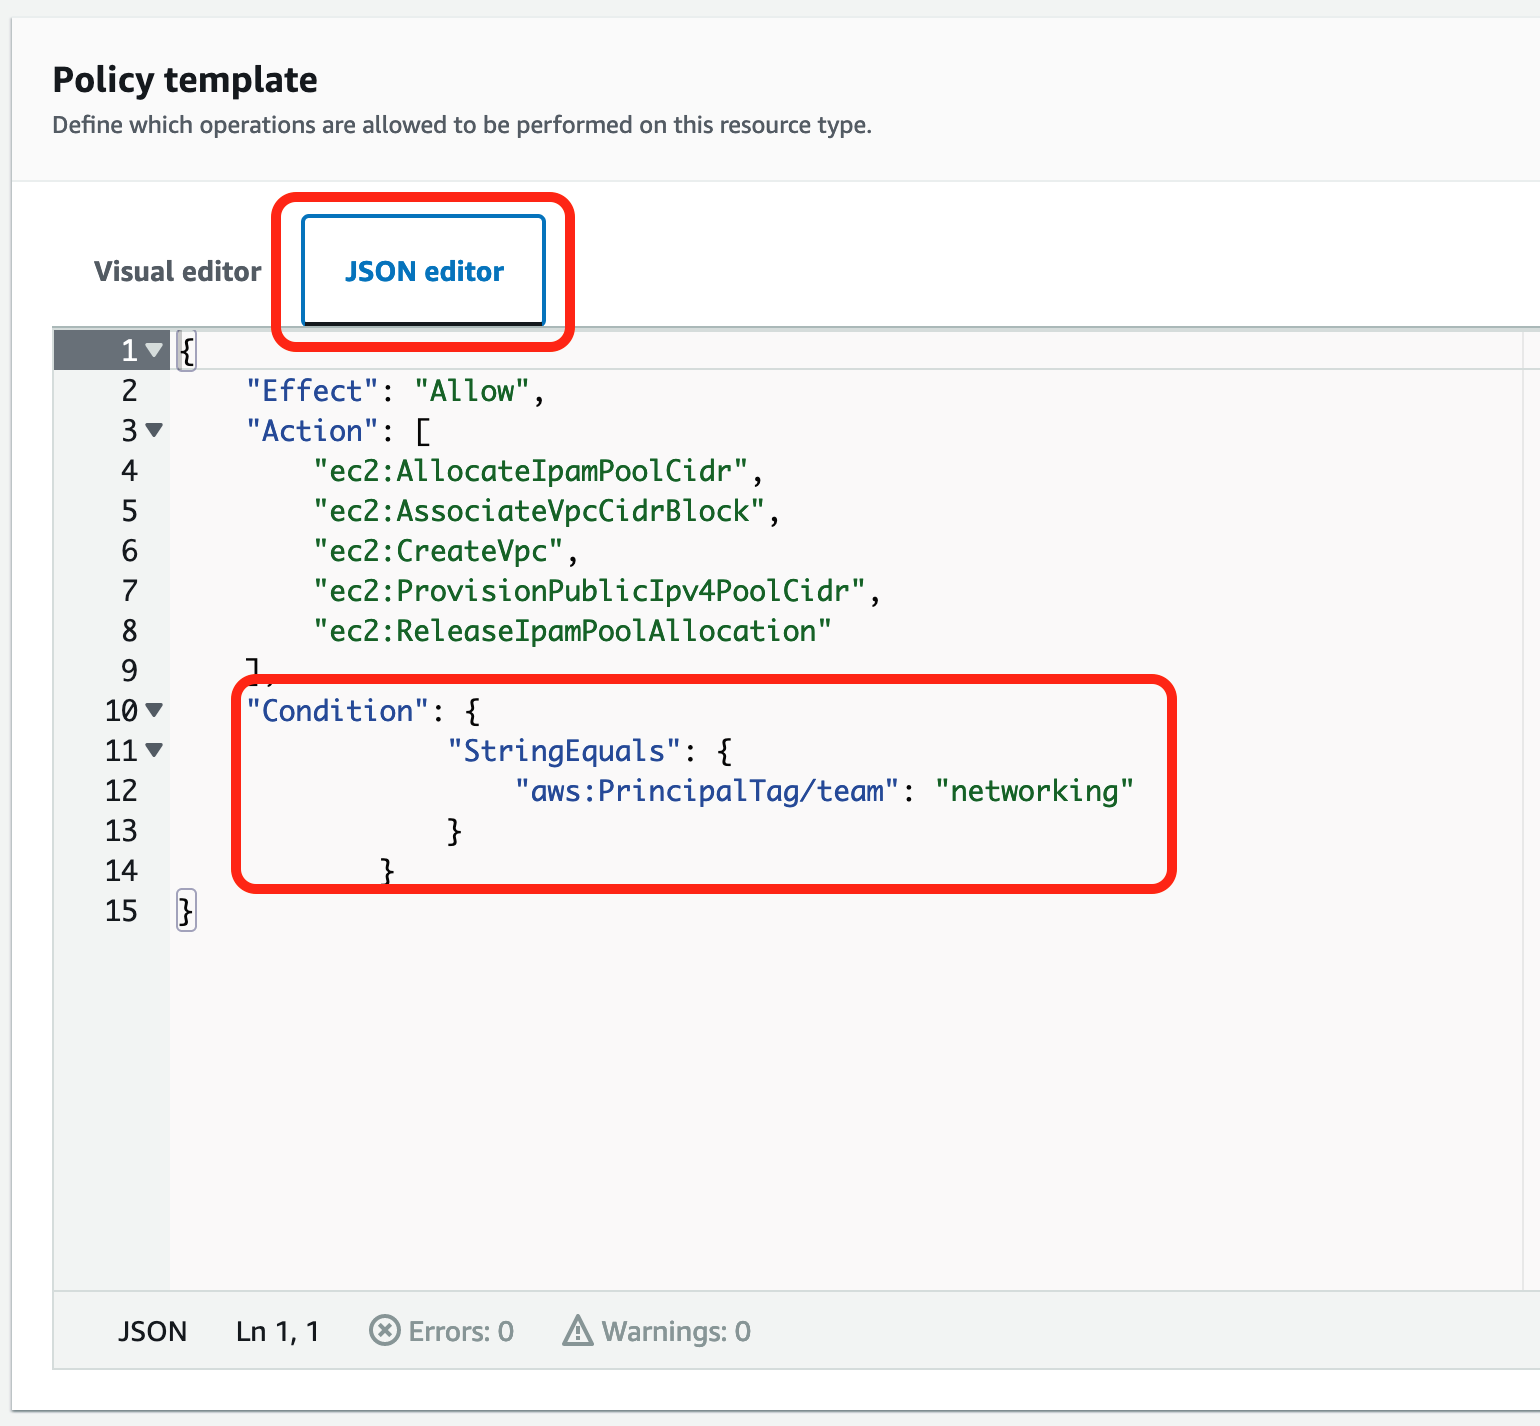
You can make the customer managed permission more fine-grained by adding a condition. On the Create a customer managed permission for my-ipam-cmp page, under the Policy template section, choose JSON editor.
Add a condition with aws:PrincipalTag that allows only the users or roles tagged with team = networking to access the shared IPAM pool.
Choose Create version. This new version will be automatically set as the default version of your customer managed permission. As a result, new resource shares that use the customer managed permission will use the new version.
Figure 7: Update your customer managed permissions and add a condition statement with aws:PrincipalTag
Note: Now that you have the new version of your customer managed permission, you must explicitly apply it to your existing resource shares for it to take effect.
To apply the new version of the customer managed permission to existing resource shares
On the my-ipam-cmp page, under the Managed permission versions, select Version 1.
Choose the Associated resource shares tab.
Find ipam-shared-dev-pool and next to the current version number, select Update to default version. This will update your ipam-shared-dev-pool resource share with the new version of your my-ipam-cmp customer managed permission.
To verify your updated customer managed permission, see the Verify the customer managed permissions section earlier in this post. Make sure that you sign in with an IAM role or user tagged with team = networking, and then repeat the steps of that section to verify your updated customer managed permission. If you use an IAM role or user that is not tagged with team = networking, you won’t be able to allocate a CIDR from the IPAM pool and you won’t be able to create the VPC.
Cleanup
To remove the resources created by the preceding example:
Delete the resource share from the AWS RAM console.
Deprovision the CIDR from the IPAM pool.
Delete the IPAM pool you created.
Summary
This blog post presented an example of using customer managed permissions in AWS RAM. AWS RAM brings simplicity, consistency, and confidence when sharing your resources across accounts. In the example, you used AWS RAM to share an IPAM pool to accounts in a Development OU, configured fine-grained resource access controls, and followed the best practice of least privilege by granting only the permissions required for the accounts in the Development OU to perform a specific task with the shared IPAM pool. In the example, you also created a new version of your customer managed permission to rescope the access granularity of your resources that are shared using AWS RAM.
The threat detection and incident response track showcased how AWS customers can get the visibility they need to help improve their security posture, identify issues before they impact business, and investigate and respond quickly to security incidents across their environment.
With dozens of service and feature announcements—and innumerable best practices shared by AWS experts, customers, and partners—distilling highlights is a challenge. From an incident response perspective, three key themes emerged.
Proactively detect, contextualize, and visualize security events
When it comes to effectively responding to security events, rapid detection is key. Among the launches announced during the keynote was the expansion of Amazon Detective finding groups to include Amazon Inspector findings in addition to Amazon GuardDuty findings.
Detective, GuardDuty, and Inspector are part of a broad set of fully managed AWS security services that help you identify potential security risks, so that you can respond quickly and confidently.
Using machine learning, Detective finding groups can help you conduct faster investigations, identify the root cause of events, and map to the MITRE ATT&CK framework to quickly run security issues to ground. The finding group visualization panel shown in the following figure displays findings and entities involved in a finding group. This interactive visualization can help you analyze, understand, and triage the impact of finding groups.
Figure 1: Detective finding groups visualization panel
With the expanded threat and vulnerability findings announced at re:Inforce, you can prioritize where to focus your time by answering questions such as “was this EC2 instance compromised because of a software vulnerability?” or “did this GuardDuty finding occur because of unintended network exposure?”
In the session Streamline security analysis with Amazon Detective, AWS Principal Product Manager Rich Vorwaller, AWS Senior Security Engineer Rima Tanash, and AWS Program Manager Jordan Kramer demonstrated how to use graph analysis techniques and machine learning in Detective to identify related findings and resources, and investigate them together to accelerate incident analysis.
In addition to Detective, you can also use Amazon Security Lake to contextualize and visualize security events. Security Lake became generally available on May 30, 2023, and several re:Inforce sessions focused on how you can use this new service to assist with investigations and incident response.
As detailed in the following figure, Security Lake automatically centralizes security data from AWS environments, SaaS providers, on-premises environments, and cloud sources into a purpose-built data lake stored in your account. Security Lake makes it simpler to analyze security data, gain a more comprehensive understanding of security across an entire organization, and improve the protection of workloads, applications, and data. Security Lake automates the collection and management of security data from multiple accounts and AWS Regions, so you can use your preferred analytics tools while retaining complete control and ownership over your security data. Security Lake has adopted the Open Cybersecurity Schema Framework (OCSF), an open standard. With OCSF support, the service normalizes and combines security data from AWS and a broad range of enterprise security data sources.
Figure 2: How Security Lake works
To date, 57 AWS security partners have announced integrations with Security Lake, and we now have more than 70 third-party sources, 16 analytics subscribers, and 13 service partners.
In Gaining insights from Amazon Security Lake, AWS Principal Solutions Architect Mark Keating and AWS Security Engineering Manager Keith Gilbert detailed how to get the most out of Security Lake. Addressing questions such as, “How do I get access to the data?” and “What tools can I use?,” they demonstrated how analytics services and security information and event management (SIEM) solutions can connect to and use data stored within Security Lake to investigate security events and identify trends across an organization. They emphasized how bringing together logs in multiple formats and normalizing them into a single format empowers security teams to gain valuable context from security data, and more effectively respond to events. Data can be queried with Amazon Athena, or pulled by Amazon OpenSearch Service or your SIEM system directly from Security Lake.
Build your security data lake with Amazon Security Lake featured AWS Product Manager Jonathan Garzon, AWS Product Solutions Architect Ross Warren, and Global CISO of Interpublic Group (IPG) Troy Wilkinson demonstrating how Security Lake helps address common challenges associated with analyzing enterprise security data, and detailing how IPG is using the service. Wilkinson noted that IPG’s objective is to bring security data together in one place, improve searches, and gain insights from their data that they haven’t been able to before.
“With Security Lake, we found that it was super simple to bring data in. Not just the third-party data and Amazon data, but also our on-premises data from custom apps that we built.” — Troy Wilkinson, global CISO, Interpublic Group
Use automation and machine learning to reduce mean time to response
Incident response automation can help free security analysts from repetitive tasks, so they can spend their time identifying and addressing high-priority security issues.
LLA operates in over 20 countries across Latin America and the Caribbean. After completing multiple acquisitions, LLA needed a centralized security operations team to handle incidents and notify the teams responsible for each AWS account. They used GuardDuty, Security Hub, and Systems Manager Incident Manager to automate and streamline detection and response, and they configured the services to initiate alerts whenever there was an issue requiring attention.
Speaking alongside AWS Principal Solutions Architect Jesus Federico and AWS Principal Product Manager Sarah Holberg, LLA Senior Manager of Cloud Services Joaquin Cameselle noted that when GuardDuty identifies a critical issue, it generates a new finding in Security Hub. This finding is then forwarded to Systems Manager Incident Manager through an Amazon EventBridge rule. This configuration helps ensure the involvement of the appropriate individuals associated with each account.
“We have deployed a security framework in Liberty Latin America to identify security issues and streamline incident response across over 180 AWS accounts. The framework that leverages AWS Systems Manager Incident Manager, Amazon GuardDuty, and AWS Security Hub enabled us to detect and respond to incidents with greater efficiency. As a result, we have reduced our reaction time by 90%, ensuring prompt engagement of the appropriate teams for each AWS account and facilitating visibility of issues for the central security team.” — Joaquin Cameselle, senior manager, cloud services, Liberty Latin America
After describing the four phases of the incident response process — preparation and prevention; detection and analysis; containment, eradication, and recovery; and post-incident activity—AWS ProServe Global Financial Services Senior Engagement Manager Harikumar Subramonion noted that, to fully benefit from the cloud, you need to embrace automation. Automation benefits the third phase of the incident response process by speeding up containment, and reducing mean time to response.
Citibank Head of Cloud Security Operations Elvis Velez and Vice President of Cloud Security Damien Burks described how Citi built the Cloud Containment Automation Framework (CCAF) from the ground up by using AWS Step Functions and AWS Lambda, enabling them to respond to events 24/7 without human error, and reduce the time it takes to contain resources from 4 hours to 15 minutes. Velez described how Citi uses adversary emulation exercises that use the MITRE ATT&CK Cloud Matrix to simulate realistic attacks on AWS environments, and continuously validate their ability to effectively contain incidents.
Innovate and do more with less
Security operations teams are often understaffed, making it difficult to keep up with alerts. According to data from CyberSeek, there are currently 69 workers available for every 100 cybersecurity job openings.
Effectively evaluating security and compliance posture is critical, despite resource constraints. In Centralizing security at scale with Security Hub and Intuit’s experience, AWS Senior Solutions Architect Craig Simon, AWS Senior Security Hub Product Manager Dora Karali, and Intuit Principal Software Engineer Matt Gravlin discussed how to ease security management with Security Hub. Fortune 500 financial software provider Intuit has approximately 2,000 AWS accounts, 10 million AWS resources, and receives 20 million findings a day from AWS services through Security Hub. Gravlin detailed Intuit’s Automated Compliance Platform (ACP), which combines Security Hub and AWS Config with an internal compliance solution to help Intuit reduce audit timelines, effectively manage remediation, and make compliance more consistent.
“By using Security Hub, we leveraged AWS expertise with their regulatory controls and best practice controls. It helped us keep up to date as new controls are released on a regular basis. We like Security Hub’s aggregation features that consolidate findings from other AWS services and third-party providers. I personally call it the super aggregator. A key component is the Security Hub to Amazon EventBridge integration. This allowed us to stream millions of findings on a daily basis to be inserted into our ACP database.” — Matt Gravlin, principal software engineer, Intuit
At AWS re:Inforce, we launched a new Security Hub capability for automating actions to update findings. You can now use rules to automatically update various fields in findings that match defined criteria. This allows you to automatically suppress findings, update the severity of findings according to organizational policies, change the workflow status of findings, and add notes. With automation rules, Security Hub provides you a simplified way to build automations directly from the Security Hub console and API. This reduces repetitive work for cloud security and DevOps engineers and can reduce mean time to response.
In Continuous innovation in AWS detection and response services, AWS Worldwide Security Specialist Senior Manager Himanshu Verma and GuardDuty Senior Manager Ryan Holland highlighted new features that can help you gain actionable insights that you can use to enhance your overall security posture. After mapping AWS security capabilities to the core functions of the NIST Cybersecurity Framework, Verma and Holland provided an overview of AWS threat detection and response services that included a technical demonstration.
Bolstering incident response with AWS Wickr enterprise integrations highlighted how incident responders can collaborate securely during a security event, even on a compromised network. AWS Senior Security Specialist Solutions Architect Wes Wood demonstrated an innovative approach to incident response communications by detailing how you can integrate the end-to-end encrypted collaboration service AWS Wickr Enterprise with GuardDuty and AWS WAF. Using Wickr Bots, you can build integrated workflows that incorporate GuardDuty and third-party findings into a more secure, out-of-band communication channel for dedicated teams.
This blog post is written by Abeer Naffa’, Sr. Solutions Architect, Solutions Builder AWS, David Filiatrault, Principal Security Consultant, and Jared Thompson Hybrid Edge SA Specialist.
In this post, we discuss how you can leverage AWS Control Tower landing zone and AWS Organizations custom policies – guardrails – at the root level, known as Service Control Policies (SCPS) to enable certain data residency requirements on AWS Local Zones. Using the suggested controls lets you limit the ability to store data, process data outside a geographic location, and keep your data within specific Local Zone(s).
Data residency is a critical consideration for organizations that collect and store sensitive information, such as Personal Identifiable Information (PII), financial data, and healthcare data. With the rise of cloud computing and the global nature of the Internet, it can be challenging for organizations to make sure that their data is being stored and processed in compliance with local laws and regulations.
One potential solution for addressing data residency challenges with AWS is utilizing Local Zones, which places AWS infrastructure in large metro areas. This enables organizations to store and process data in specific geographic locations. By using Local Zones, organizations can architect their environment to meet data residency requirements when an AWS Region is unavailable within the same legal jurisdiction. Local Zones can be configured to utilize landing zone to further adhere to data residency requirements.
A landing zone is a well-architected, multi-account AWS environment that is scalable and secure. This is a starting point from which your organization can quickly launch and deploy workloads and applications with confidence in your security and infrastructure environment.
When leveraging a Local Zone to meet data residency requirements, you must have control over the in-scope data movement from the Local Zones to the AWS Region. This can be accomplished by implementing landing zone best practices and the suggested guardrails. The main focus of this post is the custom policies that restrict data snapshots, prohibit data creation within the Region, and limit data transfer to the Region. Furthermore, this post covers which prerequisites organizations should consider before implementing these guardrails.
Prerequisites
Landing zones best practices and custom guardrails can help when data must remain in a specific locality where the Local Zone is also located. This can be completed by defining and enforcing policies for data storage and usage within the landing zone organization that you set up. The following prerequisites should be considered before implementing the suggested guardrails:
You can start using available AWS services on the designated Local Zone directly from the console. Moreover, you can manage the Local Zone using the same tools and interfaces that you use in AWS Region.
2. AWS Control Tower landing zone
AWS Control Tower is a managed service that provides a pre-packaged set of best-practice blueprints for setting up and governing multi-account AWS environments. You must have Control Tower fully implemented in your environment before you can deploy custom guardrails.
Control Tower launches a key resource associated with your account, called a landing zone, which serves as a home for your organizations and their accounts.
Note that Control Tower relies on Organizations to create and manage multi-account structures.
Set up the data residency guardrails
Using Organizations, you must make sure that the Local Zone is enabled within a workload account in the landing zones.
Figure 1: Landing Zones Accelerator – Local Zones workload on AWS high level Architecture
Utilizing Local Zones for regulated components
The availability of Local Zones provides an excellent opportunity to meet data residency requirements and comply with local regulations that restrict the use of the Region outside of your required geo-political boundary. By leveraging Local Zones, organizations can maintain compliance while utilizing AWS services to support their business needs. AWS owns and manages the infrastructure, including hardware, software, and networking for Local Zones. However, as part of the shared responsibility model, customers are responsible for the security of their applications and data, including access control, data encryption, etc.
You must also comply with all applicable regulations and security standards, such as HIPAA, PCI DSS, and GDPR. You should conduct regular security assessments and implement appropriate security controls to protect their applications and data.
In this post, we consider a scenario where there is a single Local Zones location in a metro. However, you must analyze the specific requirements of your workloads and the relevant regulations that apply to determine the most appropriate high availability configurations for your case.
Local Zones workload data residency guardrails
Organizations provides central governance and management for multiple accounts. Central security administrators use SCPs with Organizations to establish controls to which all AWS Identity and Access Management (IAM) principals (users and roles) adhere.
Now you can use SCPs to set permission guardrails. The suggested preventative controls that leverage the implementation of SCPs for data residency on Local Zones are shown in the next paragraph. SCPs let you set permission guardrails by defining the maximum available permissions for IAM entities in an account and all accounts within the Organization root or Organizational Unit (OU). If an SCP denies an action for an account, then none of the entities in any member account, including the member account’s root user, can take that action, even if their IAM permissions let them. The guardrails set in SCPs apply to all IAM entities in the account, which include all users, roles, and the account root user.
Upon finalizing these prerequisites, you can create the guardrails for the chosen OU.
Note that although the following guidelines serve as helpful guardrails – SCPs – for data residency, you should consult internally with legal and security teams for specific organizational requirements.
To exercise better control over the workload in Local Zones and prevent data transfer from Local Zones or data storage outside of the Local Zones, consider implementing the following guardrails:
When your data residency requirements require restricting data transfer/saving to the Region, consider the following guardrails:
As the available services in Local Zones can vary based on location, you must review the services available in the chosen Local Zone and Adjust the SCPs accordingly.
If your data residency requirements mandate restrictions on data storage in the Region, then consider implementing this guardrail to prevent the use of Amazon S3 in the Region.
c. If your data residency requirements mandate restrictions on data storage in the Region, then consider implementing “DenyDirectTransferToRegion”
If your data residency requirements require limitations on data storage in the Region, then consider implementing this guardrail “DenyAllSnapshots” to restrict the use of snapshots in the Region.
Note that the following guardrail restricts the creation of snapshots on AWS Outposts as well. If you’re using Outposts in the same AWS account, then you may need to customize this guardrail to make sure that it aligns with your organization’s specific needs and requirements. For more information on data residency considerations for Outposts, please refer to Architecting for data residency with AWS Outposts rack and landing zone guardrails.
This guardrail helps prevent the launch of EC2 instances or the creation of network interfaces by subnet as opposed to Local Zones You should keep data residency workloads within the Local Zones rather than the Region to make sure of better control over regulated workloads. This approach can help your organization achieve better control over data residency workloads and improve governance over your Organization.
Make sure to update the Local Zones subnets < localzones_subnet_arns>.
When implementing data residency guardrails on Local Zones, consider backup and disaster recovery strategies to make sure that your data is protected in the event of an outage or other unexpected events. This may include creating regular backups of your data, implementing disaster recovery plans and procedures, and using redundancy and failover systems to minimize the impact of any potential disruptions. Additionally, you should make sure that your backup and disaster recovery systems are compliant with any relevant data residency regulations and requirements. You should also test your backup and disaster recovery systems regularly to make sure that they are functioning as intended.
Additionally, the provided SCPs for Local Zones in the above example do not block the “logs:PutLogEvents”. Therefore, even if you implemented data residency guardrails on Local Zones, the application may log data to Amazon CloudWatch Logs in the Region.
Highlights
By default, application-level logs on Local Zones are not automatically sent to CloudWatch Logs in the Region. You can configure CloudWatch Logs agent on Local Zones to collect and send your application-level logs to CloudWatch Logs.
logs:PutLogEvents does transmit data to the Region, but it is not blocked by the provided SCPs, as it’s expected that most use cases still want to be able to use this logging API. However, if blocking is desired, then add the action to the first recommended guardrail. If you want specific roles to be allowed, then combine with the ArnNotLike condition example referenced in the Customization Guide.
Conclusion
The combined use of Local Zones and the suggested guardrails via Organizations policies enables you to exercise better control over the movement of the data. By creating a landing zone for your organization, you can apply SCPs to your Local Zones that will help make sure that your data remains within a specific geographic location, as required by the data residency regulations.
Note that, although custom guardrails can help you manage data residency on Local Zones, it’s critical to thoroughly review your policies, procedures, and configurations. This lets you make sure that they are compliant with all relevant data residency regulations and requirements. Regularly testing and monitoring your systems can help make sure that your data is protected and your organization stays compliant.
This blog post was written by Abeer Naffa’, Sr. Solutions Architect, Solutions Builder AWS, David Filiatrault, Principal Security Consultant, AWS and Jared Thompson, Hybrid Edge SA Specialist, AWS.
In this post, we will explore how organizations can use AWS Control Tower landing zone and AWS Organizations custom guardrails to enable compliance with data residency requirements on AWS Outposts rack. We will discuss how custom guardrails can be leveraged to limit the ability to store, process, and access data and remain isolated in specific geographic locations, how they can be used to enforce security and compliance controls, as well as, which prerequisites organizations should consider before implementing these guardrails.
Data residency is a critical consideration for organizations that collect and store sensitive information, such as Personal Identifiable Information (PII), financial, and healthcare data. With the rise of cloud computing and the global nature of the internet, it can be challenging for organizations to make sure that their data is being stored and processed in compliance with local laws and regulations.
One potential solution for addressing data residency challenges with AWS is to use Outposts rack, which allows organizations to run AWS infrastructure on premises and in their own data centers. This lets organizations store and process data in a location of their choosing. An Outpost is seamlessly connected to an AWS Region where it has access to the full suite of AWS services managed from a single plane of glass, the AWS Management Console or the AWS Command Line Interface (AWS CLI). Outposts rack can be configured to utilize landing zone to further adhere to data residency requirements.
The landing zones are a set of tools and best practices that help organizations establish a secure and compliant multi-account structure within a cloud provider. A landing zone can also include Organizations to set policies – guardrails – at the root level, known as Service Control Policies (SCPs) across all member accounts. This can be configured to enforce certain data residency requirements.
When leveraging Outposts rack to meet data residency requirements, it is crucial to have control over the in-scope data movement from the Outposts. This can be accomplished by implementing landing zone best practices and the suggested guardrails. The main focus of this blog post is on the custom policies that restrict data snapshots, prohibit data creation within the Region, and limit data transfer to the Region.
Prerequisites
Landing zone best practices and custom guardrails can help when data needs to remain in a specific locality where the Outposts rack is also located. This can be completed by defining and enforcing policies for data storage and usage within the landing zone organization that you set up. The following prerequisites should be considered before implementing the suggested guardrails:
1. AWS Outposts rack
AWS has installed your Outpost and handed off to you. An Outpost may comprise of one or more racks connected together at the site. This means that you can start using AWS services on the Outpost, and you can manage the Outposts rack using the same tools and interfaces that you use in AWS Regions.
2. Landing Zone Accelerator on AWS
We recommend using Landing Zone Accelerator on AWS (LZA) to deploy a landing zone for your organization. Make sure that the accelerator is configured for the appropriate Region and industry. To do this, you must meet the following prerequisites:
A clear understanding of your organization’s compliance requirements, including the specific Region and industry rules in which you operate.
Knowledge of the different LZAs available and their capabilities, such as the compliance frameworks with which you align.
Have the necessary permissions to deploy the LZAs and configure it for your organization’s specific requirements.
Note that LZAs are designed to help organizations quickly set up a secure, compliant multi-account environment. However, it’s not a one-size-fits-all solution, and you must align it with your organization’s specific requirements.
3. Set up the data residency guardrails
Using Organizations, you must make sure that the Outpost is ordered within a workload account in the landing zone.
Figure 1: Landing Zone Accelerator – Outposts workload on AWS high level Architecture
Utilizing Outposts rack for regulated components
When local regulations require regulated workloads to stay within a specific boundary, or when an AWS Region or AWS Local Zone isn’t available in your jurisdiction, you can still choose to host your regulated workloads on Outposts rack for a consistent cloud experience. When opting for Outposts rack, note that, as part of the shared responsibility model, customers are responsible for attesting to physical security, access controls, and compliance validation regarding the Outposts, as well as, environmental requirements for the facility, networking, and power. Utilizing Outposts rack requires that you procure and manage the data center within the city, state, province, or country boundary for your applications’ regulated components, as required by local regulations.
Procuring two or more racks in the diverse data centers can help with the high availability for your workloads. This is because it provides redundancy in case of a single rack or server failure. Additionally, having redundant network paths between Outposts rack and the parent Region can help make sure that your application remains connected and continue to operate even if one network path fails.
However, for regulated workloads with strict service level agreements (SLA), you may choose to spread Outposts racks across two or more isolated data centers within regulated boundaries. This helps make sure that your data remains within the designated geographical location and meets local data residency requirements.
In this post, we consider a scenario with one data center, but consider the specific requirements of your workloads and the regulations that apply to determine the most appropriate high availability configurations for your case.
Outposts rack workload data residency guardrails
Organizations provide central governance and management for multiple accounts. Central security administrators use SCPs with Organizations to establish controls to which all AWS Identity and Access Management (IAM) principals (users and roles) adhere.
Now, you can use SCPs to set permission guardrails. A suggested preventative controls for data residency on Outposts rack that leverage the implementation of SCPs are shown as follows. SCPs enable you to set permission guardrails by defining the maximum available permissions for IAM entities in an account. If an SCP denies an action for an account, then none of the entities in the account can take that action, even if their IAM permissions let them. The guardrails set in SCPs apply to all IAM entities in the account, which include all users, roles, and the account root user.
Upon finalizing these prerequisites, you can create the guardrails for the Outposts Organization Unit (OU).
Note that while the following guidelines serve as helpful guardrails – SCPs – for data residency, you should consult internally with legal and security teams for specific organizational requirements.
To exercise better control over workloads in the Outposts rack and prevent data transfer from Outposts to the Region or data storage outside the Outposts, consider implementing the following guardrails. Additionally, local regulations may dictate that you set up these additional guardrails.
When your data residency requirements require restricting data transfer/saving to the Region, consider the following guardrails:
If your data residency requirements mandate restrictions on data storage in the Region, consider implementing this guardrail to prevent the use of S3 in the Region.
c. If your data residency requirements mandate restrictions on data storage in the Region, consider implementing “DenyDirectTransferToRegion” guardrail.
Out of Scope is metadata such as tags, or operational data such as KMS keys.
If your data residency requirements require limitations on data storage in the Region, consider implementing this guardrail “DenySnapshotsToRegion” and “DenySnapshotsNotOutposts” to restrict the use of snapshots in the Region.
a. Deny creating snapshots of your Outpost data in the Region “DenySnapshotsToRegion”
Make sure to update the Outposts “<outpost_arn_pattern>”.
b. Deny copying or modifying Outposts Snapshots “DenySnapshotsNotOutposts”
Make sure to update the Outposts “<outpost_arn_pattern>”.
Note: “<outpost_arn_pattern>” default is arn:aws:outposts:*:*:outpost/*
This guardrail helps to prevent the launch of Amazon EC2 instances or creation of network interfaces in non-Outposts subnets. It is advisable to keep data residency workloads within the Outposts rather than the Region to ensure better control over regulated workloads. This approach can help your organization achieve better control over data residency workloads and improve governance over your AWS Organization.
Make sure to update the Outposts subnets “<outpost_subnet_arns>”.
When implementing data residency guardrails on Outposts rack, consider backup and disaster recovery strategies to make sure that your data is protected in the event of an outage or other unexpected events. This may include creating regular backups of your data, implementing disaster recovery plans and procedures, and using redundancy and failover systems to minimize the impact of any potential disruptions. Additionally, you should make sure that your backup and disaster recovery systems are compliant with any relevant data residency regulations and requirements. You should also test your backup and disaster recovery systems regularly to make sure that they are functioning as intended.
Additionally, the provided SCPs for Outposts rack in the above example do not block the “logs:PutLogEvents”. Therefore, even if you implemented data residency guardrails on Outpost, the application may log data to CloudWatch logs in the Region.
Highlights
By default, application-level logs on Outposts rack are not automatically sent to Amazon CloudWatch Logs in the Region. You can configure CloudWatch logs agent on Outposts rack to collect and send your application-level logs to CloudWatch logs.
logs: PutLogEvents does transmit data to the Region, but it is not blocked by the provided SCPs, as it’s expected that most use cases will still want to be able to use this logging API. However, if blocking is desired, then add the action to the first recommended guardrail. If you want specific roles to be allowed, then combine with the ArnNotLike condition example referenced in the previous highlight.
Conclusion
The combined use of Outposts rack and the suggested guardrails via AWS Organizations policies enables you to exercise better control over the movement of the data. By creating a landing zone for your organization, you can apply SCPs to your Outposts racks that will help make sure that your data remains within a specific geographic location, as required by the data residency regulations.
Note that, while custom guardrails can help you manage data residency on Outposts rack, it’s critical to thoroughly review your policies, procedures, and configurations to make sure that they are compliant with all relevant data residency regulations and requirements. Regularly testing and monitoring your systems can help make sure that your data is protected and your organization stays compliant.
As we kick off 2023, I wanted to take a moment to highlight the top posts from 2022. Without further ado, here are the top 10 AWS DevOps Blog posts of 2022.
Sylvia Qi, Senior DevOps Architect, and Sebastian Carreras, Senior Cloud Application Architect, guide us through utilizing infrastructure as code (IaC) to automate GitLab Runner deployment on Amazon EC2.
Lerna Ekmekcioglu, Senior Solutions Architect, and Jack Iu, Global Solutions Architect, demonstrate best practices for multi-Region deployments using HashiCorp Terraform, AWS CodeBuild, and AWS CodePipeline.
Praveen Kumar Jeyarajan, Senior DevOps Consultant, and Vaidyanathan Ganesa Sankaran, Sr Modernization Architect, discuss unit testing Python-based AWS Glue Jobs in AWS CodePipeline.
James Bland, APN Global Tech Lead for DevOps, and Welly Siauw, Sr. Partner solutions architect, discuss the challenges of architecting Jenkins for scale and high availability (HA).
Harish Vaswani, Senior Cloud Application Architect, and Rafael Ramos, Solutions Architect, explain how you can configure and use tfdevops to easily enable Amazon DevOps Guru for your existing AWS resources created by Terraform.
Arun Donti, Senior Software Engineer with Twitch, demonstrates how to integrate cdk-nag into an AWS Cloud Development Kit (AWS CDK) application to provide continual feedback and help align your applications with best practices.
Adam Thomas, Senior Software Development Engineer, demonstrate how you can use Smithy to define services and SDKs and deploy them to AWS Lambda using a generated client.
A big thank you to all our readers! Your feedback and collaboration are appreciated and help us produce better content.
AWS recently announced that AWS Organizations now supports AWS CloudFormation. This feature allows you to create and update AWS accounts, organizational units (OUs), and policies within your organization by using CloudFormation templates. With this latest integration, you can efficiently codify and automate the deployment of your resources in AWS Organizations.
You can now manage your AWS organization resources using infrastructure as code (iaC) and make changes in a central place. This can help reduce the time required to build a new organization, expand or modify the existing organization, replicate your organization infrastructure, or apply and update policies across multiple accounts and OUs. You can also delete organization resources by deleting the stacks.
In this blog post, we will show you how to create various AWS Organizations resources for a multi-account organization by using a CloudFormation template.
How does it work?
A CloudFormation template describes your desired resources and their dependencies so that you can launch and configure them together as a stack. You can use a template to create, update, and delete an entire stack as a single unit instead of managing resources individually.
With CloudFormation support for AWS Organizations, you can now do the following:
Create, delete, or update an organizational unit (OU). An OU is a container for accounts that allows you to organize your accounts to apply policies according to your needs.
Create accounts in your organization, add tags, and attach them to OUs.
Add or remove a tag on an OU.
Create, delete, or update a service control policy (SCP), backup policy, tag policy and artificial intelligence (AI) services opt-out policy.
Add or remove a tag on an SCP, backup policy, tag policy, and AI services opt-out policy.
Attach or detach an SCP, backup policy, tag policy, and AI services opt-out policy to a target (root, OU, or account).
To create AWS Organizations resources using CloudFormation, you will need to use your organization’s management account. As of this writing, the new resource types may only be deployed from the organization’s management account or delegated administration account.
Overview of the new resource types
The following are the three new resource types available for the implementation and management of an account, OU, and organizations policy in CloudFormation:
AWS::Organizations::Account – Creates an account that is automatically a member of the organization whose credentials made the request.
AWS::Organizations::Policy – Creates a policy of a specified type that you can attach to a root, OU, or individual account.
Prerequisites
This blog post assumes that you have AWS Organizations enabled in your management account. You also need the tag policy and service control policy types enabled in your management account. For instructions on how to create an organization, see Create your organization.
You should also review the following important points for creating resources in AWS Organizations:
AWS Organizations supports the creation of a single account at a time. If you include multiple accounts in a single CloudFormation template, you should use the DependsOn attribute so that your accounts are created sequentially.
Before you can create a policy of a given type, you must first enable that policy type in your organization.
The number of levels deep that you can nest OUs depends on the policy types that you have enabled for the root. For SCPs, the limit is five.
To modify the AccountName, Email, and RoleName for the account resource parameters, you must sign in to the AWS Management Console as the AWS account root user.
Since the CloudFormation template in this blog deploys Account and Organization Unit resources, you must deploy it in your organization’s management account.
Use a CloudFormation template with the new AWS Organizations resources
In this section, we will walk you through a sample CloudFormation template that incorporates the newly supported AWS Organizations resources. CloudFormation provisions and configures the resources for you, so that you don’t have to individually create and configure them and determine resource dependencies.
The template will create the following resources and structure.
Three organizational units
Infrastructure – Within the organizational root
Production – Within the Infrastructure OU
Security – Within the organizational root
One account
AccountA – Within the Production child OU
Two service control policies
PreventLeavingOrganization – Attached to the organizational root
PreventCloudTrailDisablement – Attached to the Security OU
Note: The above OU and account layout is only an example for the purpose of this blog post. Please refer to Organizing Your AWS Environment Using Multiple Accounts whitepaper for more information on multi-account strategy best practices & recommendations.
In this section, you will create a stack by using the CloudFormation template that you downloaded.
To create the stack
Create the AWS Organizations resources outlined in the template by creating an IAM role for CloudFormation using the following IAM permissions policy and trust policy.
Sign in to the management account for your organization, navigate to the CloudFormation console, and choose Create stack.
Choose With new resources (standard), upload the template file, and choose Next.
Figure 1: CloudFormation console showing creation of stack
Enter a name for the stack (for example, CloudFormationForAWSOrganizations). For OrganizationRoot, enter your organizations root ID. You can find the root ID in the AWS Organizations console.
Choose Create stack.
On the Configure stack options page, in the Permissions section, choose the IAM role that you granted permissions to previously, as shown in Figure 2. Then choose Next.
Figure 2: Set IAM role permissions for CloudFormation
You will see a screen showing stack creation in progress.
Figure 3: CloudFormation console showing stack creation in progress
When the stack has been created, choose the Resources tab to see the resources created.
Figure 4: CloudFormation console showing stack resources created
Confirm and visualize the resources created by using the console
In this section, you will use the console to confirm and visualize the resources created.
In the left navigation pane, choose AWS accounts to see the OUs and account that were created.
Figure 5: AWS Organizations console showing the organization structure
Confirm the service control policy created and attached to the organization’s root
In this section, you will confirm that the SCP was created and attached to the organization’s root.
Note: When you enable SCPs on an organization, an AWS full access policy is attached by default at each level (root, OU, and account) of your organization. Because you can attach policies to multiple levels of the organization, accounts can inherit multiple policies with an effect of deny. For more details, see inheritance for service control policies.
To confirm the SCP was created and attached to the root
To view the service control policy, choose Root, and then in the section Applied policies, review the list of policies. The PreventLeavingOrganization SCP prevents the use of the LeaveOrganization API so that member accounts can’t remove their accounts from the organization.
Figure 6: AWS Organizations console showing the organization’s root
To confirm that the DoNotDelete tag was attached to the PreventLeavingOrganization SCP, choose the policy name and then choose the Tags tab.
Figure 7: SCP with tags attached to it in Organizations
Confirm the service control policy created and attached to the Security OU
In this section, you will confirm that the PreventCloudTrailDisablement SCP was created and attached to the Security OU, thus preventing users or roles in the accounts in the security OU from disabling an AWS CloudTrail log.
To confirm that the SCP was created and attached to the Security OU
From the left navigation pane, choose AWS accounts, and then choose Security.
On the Security page, choose the Policies tab to see a list of policies.
To review and confirm the contents of the policy, choose PreventCloudTrailDisablement.
Figure 8: SCP attached to the Security OU in Organizations
Confirm the account and tag policy created and attached to the Production OU
In this step, you will confirm that the account and tag policy were created and attached to the Production OU.
To confirm creation of the account and tag policy in the Production OU
On the Production page, choose the Children tab to confirm that the account named AccountA was created.
Figure 9: The Production OU and account A in Organizations
To confirm that the DefineTagKeyCase tag policy was attached to the Production OU, do the following:
From the left navigation pane, choose AWS accounts, and then choose Production.
Choose the Policies tab to see the list of policies.
In the Tag policies section, under Applied policies, choose DefineTagKeyCase to confirm the contents of the policy. This policy defines the tag key and the capitalization that you want accounts in the production OU to standardize on.
Figure 10: SCP and tag policy attached to the Production OU in Organizations
Conclusion
In this blog post, you learned how to create AWS Organizations resources, including organizational units, accounts, service control policies, and tag policies by using CloudFormation. You can use this new feature to model the state of your infrastructure as code and to help deploy your AWS resources in a safe, repeatable manner at scale.
A new week starts, and the News Blog team is getting ready for AWS re:Invent! Many of us will be there next week and it would be great to meet in person. If you’re coming, do you know about PeerTalk? It’s an onsite networking program for re:Invent attendees available through the AWS Events mobile app (which you can get on Google Play or Apple App Store) to help facilitate connections among the re:Invent community.
Amazon EventBridge – With these additional filtering capabilities, you can now filter events by suffix, ignore case, and match if at least one condition is true. This makes it easier to write complex rules when building event-driven applications.
AWS Controllers for Kubernetes (ACK) – The ACK for Amazon Elastic Compute Cloud (Amazon EC2) is now generally available and lets you provision and manage EC2 networking resources, such as VPCs, security groups and internet gateways using the Kubernetes API. Also, the ACK for Amazon EMR on EKS is now generally available to allow you to declaratively define and manage EMR on EKS resources such as virtual clusters and job runs as Kubernetes custom resources. Learn more about ACK for Amazon EMR on EKS in this blog post.
Amazon HealthLake – New analytics capabilities make it easier to query, visualize, and build machine learning (ML) models. Now HealthLake transforms customer data into an analytics-ready format in near real-time so that you can query, and use the resulting data to build visualizations or ML models. Also new is Amazon HealthLake Imaging (preview), a new HIPAA-eligible capability that enables you to easily store, access, and analyze medical images at any scale. More on HealthLake Imaging can be found in this blog post.
Amazon RDS – You can now transfer files betweenAmazon Relational Database Service (RDS) for Oracle and an Amazon Elastic File System (Amazon EFS) file system. You can use this integration to stage files like Oracle Data Pump export files when you import them. You can also use EFS to share a file system between an application and one or more RDS Oracle DB instances to address specific application needs.
AWS Fargate – Adds the ability to monitor the utilization of the ephemeral storage attached to an Amazon ECS task. You can track the storage utilization with Amazon CloudWatch Container Insights and ECS Task Metadata endpoint.
Amazon ElastiCache – You can now use IAM authentication to access Redis clusters. With this new capability, IAM users and roles can be associated with ElastiCache for Redis users to manage their cluster access.
Amazon CloudWatch RUM – You can now send custom events (in addition to predefined events) for better troubleshooting and application specific monitoring. In this way, you can monitor specific functions of your application and troubleshoot end user impacting issues unique to the application components.
AWS AppSync – You can now define GraphQL API resolvers using JavaScript. You can also mix functions written in JavaScript and Velocity Template Language (VTL) inside a single pipeline resolver. To simplify local development of resolvers, AppSync released two new NPM libraries and a new API command. More info can be found in this blog post.
AWS Console – With the new Applications widget on the Console home, you have one-click access to applications in AWS Systems Manager Application Manager and their resources, code, and related data. From Application Manager, you can view the resources that power your application and your costs using AWS Cost Explorer.
Other AWS News A few more stuff you might have missed:
Introducing our final AWS Heroes of the year – As the end of 2022 approaches, we are recognizing individuals whose enthusiasm for knowledge-sharing has a real impact with the AWS community. Please meet them here!
The Distributed Computing Manifesto – Werner Vogles, VP & CTO at Amazon.com, shared the Distributed Computing Manifesto, a canonical document from the early days of Amazon that transformed the way we built architectures and highlights the challenges faced at the end of the 20th century.
AWS re:Post – To make this community more accessible globally, we expanded the user experience to support five additional languages. You can now interact with AWS re:Post also using Traditional Chinese, Simplified Chinese, French, Japanese, and Korean.
For AWS open-source news and updates, here’s the latest newsletter curated by Ricardo to bring you the most recent updates on open-source projects, posts, events, and more.
Upcoming AWS Events As usual, there are many opportunities to meet:
That’s all from me for this week. Next week we’ll focus on re:Invent, and then we’ll take a short break. We’ll be back with the next Week in Review on December 12!
When building serverless applications using AWS Lambda, there are a number of considerations regarding security, governance, and compliance. This post highlights how Lambda, as a serverless service, simplifies cloud security and compliance so you can concentrate on your business logic. It covers controls that you can implement for your Lambda workloads to ensure that your applications conform to your organizational requirements.
The Shared Responsibility Model
The AWS Shared Responsibility Model distinguishes between what AWS is responsible for and what customers are responsible for with cloud workloads. AWS is responsible for “Security of the Cloud” where AWS protects the infrastructure that runs all the services offered in the AWS Cloud. Customers are responsible for “Security in the Cloud”, managing and securing their workloads. When building traditional applications, you take on responsibility for many infrastructure services, including operating systems and network configuration.
Traditional application shared responsibility
One major benefit when building serverless applications is shifting more responsibility to AWS so you can concentrate on your business applications. AWS handles managing and patching the underlying servers, operating systems, and networking as part of running the services.
Serverless application shared responsibility
For Lambda, AWS manages the application platform where your code runs, which includes patching and updating the managed language runtimes. This reduces the attack surface while making cloud security simpler. You are responsible for the security of your code and AWS Identity and Access Management (IAM) to the Lambda service and within your function.
Lambda functions run in separate isolated AWS accounts that are dedicated to the Lambda service. Lambda invokes your code in a secure and isolated runtime environment within the Lambda service account. A runtime environment is a collection of resources running in a dedicated hardware-virtualized Micro Virtual Machines (MVM) on a Lambda worker node.
Lambda workers are bare metalEC2 Nitro instances, which are managed and patched by the Lambda service team. They have a maximum lease lifetime of 14 hours to keep the underlying infrastructure secure and fresh. MVMs are created by Firecracker, an open source virtual machine monitor (VMM) that uses Linux’s Kernel-based Virtual Machine (KVM) to create and manage MVMs securely at scale.
MVMs maintain a strong separation between runtime environments at the virtual machine hardware level, which increases security. Runtime environments are never reused across functions, function versions, or AWS accounts.
Isolation model for AWS Lambda workers
Network security
Lambda functions always run inside secure Amazon Virtual Private Cloud (Amazon VPCs) owned by the Lambda service. This gives the Lambda function access to AWS services and the public internet. There is no direct network inbound access to Lambda workers, runtime environments, or Lambda functions. All inbound access to a Lambda function only comes via the Lambda Invoke API, which sends the event object to the function handler.
You can configure a Lambda function to connect to private subnets in a VPC in your account if necessary, which you can control with IAM condition keys . The Lambda function still runs inside the Lambda service VPC but sends all network traffic through your VPC. Function outbound traffic comes from your own network address space.
AWS Lambda service VPC with VPC-to-VPC NAT to customer VPC
To give your VPC-connected function access to the internet, route outbound traffic to a NAT gateway in a public subnet. Connecting a function to a public subnet doesn’t give it internet access or a public IP address, as the function is still running in the Lambda service VPC and then routing network traffic into your VPC.
All internal AWS traffic uses the AWS Global Backbone rather than traversing the internet. You do not need to connect your functions to a VPC to avoid connectivity to AWS services over the internet. VPC connected functions allow you to control and audit outbound network access.
You can use security groups to control outbound traffic for VPC-connected functions and network ACLs to block access to CIDR IP ranges or ports. VPC endpoints allow you to enable private communications with supported AWS services without internet access.
You can use VPC Flow Logs to audit traffic going to and from network interfaces in your VPC.
Runtime environment re-use
Each runtime environment processes a single request at a time. After Lambda finishes processing the request, the runtime environment is ready to process an additional request for the same function version. For more information on how Lambda manages runtime environments, see Understanding AWS Lambda scaling and throughput.
Data can persist in the local temporary filesystem path, in globally scoped variables, and in environment variables across subsequent invocations of the same function version. Ensure that you only handle sensitive information within individual invocations of the function by processing it in the function handler, or using local variables. Do not re-use files in the local temporary filesystem to process unencrypted sensitive data. Do not put sensitive or confidential information into Lambda environment variables, tags, or other freeform fields such as Name fields.
AWS recommends using multiple accounts to isolate your resources because they provide natural boundaries for security, access, and billing. Use AWS Organizations to manage and govern individual member accounts centrally. You can use AWS Control Tower to automate many of the account build steps and apply managed guardrails to govern your environment. These include preventative guardrails to limit actions and detective guardrails to detect and alert on non-compliance resources for remediation.
Lambda access controls
Lambda permissions define what a Lambda function can do, and who or what can invoke the function. Consider the following areas when applying access controls to your Lambda functions to ensure least privilege:
Execution role
Lambda functions have permission to access other AWS resources using execution roles. This is an AWS principal that the Lambda service assumes which grants permissions using identity policy statements assigned to the role. The Lambda service uses this role to fetch and cache temporary security credentials, which are then available as environment variables during a function’s invocation. It may re-use them across different runtime environments that use the same execution role.
Ensure that each function has its own unique role with the minimum set of permissions..
Identity/user policies
IAM identity policies are attached to IAM users, groups, or roles. These policies allow users or callers to perform operations on Lambda functions. You can restrict who can create functions, or control what functions particular users can manage.
Resource policies
Resource policies define what identities have fine-grained inbound access to managed services. For example, you can restrict which Lambda function versions can add events to a specific Amazon EventBridge event bus. You can use resource-based policies on Lambda resources to control what AWS IAM identities and event sources can invoke a specific version or alias of your function. You also use a resource-based policy to allow an AWS service to invoke your function on your behalf. To see which services support resource-based policies, see “AWS services that work with IAM”.
Attribute-based access control (ABAC)
With attribute-based access control (ABAC), you can use tags to control access to your Lambda functions. With ABAC, you can scale an access control strategy by setting granular permissions with tags without requiring permissions updates for every new user or resource as your organization scales. You can also use tag policies with AWS Organizations to standardize tags across resources.
Permissions boundaries
Permissions boundaries are a way to delegate permission management safely. The boundary places a limit on the maximum permissions that a policy can grant. For example, you can use boundary permissions to limit the scope of the execution role to allow only read access to databases. A builder with permission to manage a function or with write access to the applications code repository cannot escalate the permissions beyond the boundary to allow write access.
Service control policies
When using AWS Organizations, you can use Service control policies (SCPs) to manage permissions in your organization. These provide guardrails for what actions IAM users and roles within the organization root or OUs can do. For more information, see the AWS Organizations documentation, which includes example service control policies.
Code signing
As you are responsible for the code that runs in your Lambda functions, you can ensure that only trusted code runs by using code signing with the AWS Signer service. AWS Signer digitally signs your code packages and Lambda validates the code package before accepting the deployment, which can be part of your automated software deployment process.
Auditing Lambda configuration, permissions and access
You should audit access and permissions regularly to ensure that your workloads are secure. Use the IAM console to view when an IAM role was last used.
IAM last used
IAM access advisor
Use IAM access advisor on the Access Advisor tab in the IAM console to review when was the last time an AWS service was used from a specific IAM user or role. You can use this to remove IAM policies and access from your IAM roles.
You can validate policies using IAM Access Analyzer, which provides over 100 policy checks with security warnings for overly permissive policies. To learn more about policy checks provided by IAM Access Analyzer, see “IAM Access Analyzer policy validation”.
You can also generate IAM policies based on access activity from CloudTrail logs, which contain the permissions that the role used in your specified date range.
IAM Access Analyzer
AWS Config
AWS Config provides you with a record of the configuration history of your AWS resources. AWS Config monitors the resource configuration and includes rules to alert when they fall into a non-compliant state.
For Lambda, you can track and alert on changes to your function configuration, along with the IAM execution role. This allows you to gather Lambda function lifecycle data for potential audit and compliance requirements. For more information, see the Lambda Operators Guide.
Lambda makes cloud security simpler by taking on more responsibility using the AWS Shared Responsibility Model. Lambda implements strict workload security at scale to isolate your code and prevent network intrusion to your functions. This post provides guidance on assessing and implementing best practices and tools for Lambda to improve your security, governance, and compliance controls. These include permissions, access controls, multiple accounts, and code security. Learn how to audit your function permissions, configuration, and access to ensure that your applications conform to your organizational requirements.
For more serverless learning resources, visit Serverless Land.
United States Automobile Association (USAA) is a San Antonio-based insurance, financial services, banking, and FinTech company supporting millions of military members and their families. USAA has partnered with Amazon Web Services (AWS) to digitally transform and build multiple USAA solutions that help keep members safe and save members’ money and time.
Why build an AWS account metadata solution?
The USAA Cloud Program developed a centralized solution for collecting all AWS account metadata to facilitate core enterprise functions, such as financial management, remediation of vulnerable and insecure configurations, and change release processes for critical application and infrastructure changes.
Companies without centralized metadata solutions may have distributed documents and wikis that contain account metadata, which has to be updated manually. Manually inputting/updating information generally leads to outdated or incorrect metadata and, in addition, requires individuals to reach out to multiple resources and teams to collect specific information.
Solution overview
USAA utilizes AWS Organizations and a series of GitLab projects to create, manage, and baseline all AWS accounts and infrastructure within the organization, including identity and access management, security, and networking components. Within their GitLab projects, each deployment uses a GitLab baseline version that determines what version of the project was provisioned within the AWS account.
During the creation and onboarding of new AWS accounts, which are created for each application team and use-case, there is specific data that is used for tracking and governance purposes, and applied across the enterprise. USAA’s Public Cloud Security team took an opportunity within a hackathon event to develop the solution depicted in Figure 1.
AWS account is created conforming to a naming convention and added to AWS Organizations.
Step Functions invoke an AWS Lambda function to pull AWS account metadata and load into a centralized Amazon DynamoDB table with Streams enabled to support automation.
A private Amazon API Gateway is exposed to USAA’s internal network, which queries the DynamoDB table and provides AWS account metadata.
Figure 1. Overview of USAA architecture automation workflow to manage AWS account metadata
After the solution was deployed, USAA teams leveraged the data in multiple ways:
User interface: a front-end user-interface querying the API Gateway to allow internal users on the USAA network to filter and view metadata for any AWS accounts within AWS Organizations.
Event-driven automation: DynamoDB streams for any changes in the table that would invoke a Lambda function, which would check the most recent version from GitLab and the GitLab baseline version in the AWS account. For any outdated deployments, the Lambda function invokes the CI/CD pipeline for that AWS account to deploy a standardized set of IAM, infrastructure, and security resources and configurations.
Incident response: the Cyber Threat Response team reduces mean-time-to-respond by developing automation to query the API Gateway to append points-of-contact, environment, and AWS account name for custom detections as well as Security Hub and Amazon GuardDuty findings.
Financial management: Internal teams have integrated workflows to their applications to query the API Gateway to return cost center, LOB, and application ID to assist with financial reporting and tracking purposes. This replaces manually reviewing the AWS account metadata from an internal and manually updated wiki page.
Compliance and vulnerability management: automated notification systems were developed to send consolidated reports to points-of-contact listed in the AWS account from the API Gateway to remediate non-compliant resources and configurations.
Conclusion
In this post, we reviewed how USAA enabled core enterprise functions and teams to collect, store, and distribute AWS account metadata by developing a secure and highly scalable serverless application natively in AWS. The solution has been leveraged for multiple use-cases, including internal application teams in USAA’s production AWS environment.
In this blog post, we present a lifecycle that helps you build, validate, and improve your own AWS Well-Architected Custom Lens, in order to roll it out across your whole organization. The AWS Well-Architected Custom Lens is a new feature of the AWS Well-Architected Tool that lets you bring your own best practices to complement the existing Well-Architected Framework.
The Custom Lens lifecycle: how a Custom Lens can benefit your organization
Figure 1. The AWS Well-Architected Custom Lens lifecycle
Each organization has its own requirements, processes, best practices, and tools, but the information can be spread over many systems and knowledge bases. A Custom Lens can capture the specifics of a working environment and let coworkers access this information in a single place—from the AWS console—without the need to go to a separate tool. A Custom Lens can be created in a central management account and securely shared with other accounts.
A Custom Lens can be updated periodically as either a major or minor version. If it is a minor version, the change is automatically applied to all accounts that the lens has been shared with. If it is a major version, the user has to accept the updated Custom Lens and a summary of the changes is displayed to the user. Accepting the changes then applies the update for existing workload reviews, and prompts the user to review the workload. Thus, updating a Custom Lens is an effective mechanism to continuously inform teams about new best practices.
In addition, maintaining and improving a Custom Lens continuously helps to identify gaps in organization-wide tooling, guidance, or documentation. You can aggregate feedback and metrics from reviews that have been performed and use it to drive the improvement process of the content. More importantly, the gathered metrics help measure the overall adherence to best practices and requirements in your organization. If you focus on creating clear, concise, and actionable content for your Custom Lens, the time needed to identify and implement improvements is reduced. As teams realize the value of the Custom Lens, more reviews will be performed, and you will receive more data to construct a comprehensive view.
1. Plan
The Plan phase identifies the benefits that a Custom Lens can provide your organization by identifying current gaps. You also define the scope of your Custom Lens, which is the type of content that supports your desired business outcomes. Depending on the scope, you need to identify the appropriate stakeholders and gain support for the initiative.
2. Implement
In the Implement phase, content is created for the Custom Lens with a working group. While doing this, you can identify missing supplementary artefacts, like documentation or tooling. If that is the case, you can create these artefacts and link to them from the Custom Lens Improvement Plan.
As part of the implementation, the Custom Lens is created by uploading a JSON file in the appropriate format to a central management account, then, sharing the lens with the organization’s AWS accounts. You can share the Custom Lens with IAM Principals, such as users, roles, and AWS accounts. For broader and more efficient sharing, you now have the ability to scale by sharing your Custom Lens with individual organizational units or the entire AWS Organizations. This feature reduces management overhead and removes the need for a custom automation.
3. Measure
The Measure phase aggregates feedback and metrics from reviews that have been performed with your Custom Lens; this information is used to drive the improvement process.
The Well-Architected Tool offers a way to share workload reviews, and you can use this to share all reviews with a central AWS account. You can then analyze the reviews in the central account by extracting the data and analyzing it, for example, by building a dashboard. The Well-Architected Lab for building custom reports provides a solution that can be implemented.
4. Improve
In the Improve phase, the gathered metrics and feedback are used to identify areas for future improvement. For example, you might find common gaps among the performed workload reviews, where the same best practices are not fulfilled. When you investigate the root cause, you can learn that the existing content lacks clarity or that the suggested tools are difficult to use.
In addition, improvements, such as content gaps that were not addressed during the first iteration of the Custom Lens, can be added to the backlog before you repeat the cycle.
To roll out changes of your Custom Lens in an automated and repeatable fashion, you can implement the architecture depicted in Figure 2.
Figure 2. Combining AWS CodeCommit with AWS Lambda to update your Custom Lens whenever a file change is pushed to the code repository
This architecture enables automated releases of new versions of your Custom Lens whenever you commit an updated JSON file to the code repository. In detail, the steps are:
The JSON file of your Custom Lens is stored in an AWS CodeCommit repository. An author pushes an updated version of the file to the repository.
The CodeCommit repository is configured with a trigger action that invokes an AWS Lambda function on each commit.
The Lambda function downloads the updated file by using the GetFile API of CodeCommit. Then, the Lambda function imports the updated Custom Lens and publishes it as a new version by using ImportLens and CreateLensVersion APIs of the AWS Well-Architected Tool, then shares the Custom Lens using CreateLensShare.
The updated Custom Lens is available in all accounts that the lens has been shared with.
Reviewers can create new workload reviews with the Custom Lens or upgrade to the newest version for existing workload reviews.
Conclusion
In this blog post, we walked you through the Custom Lens lifecycle, a process to create and continuously improve a Custom Lens for your organization. If you have a special software development lifecycle, a customized security and compliance framework, or other highly specific requirements or best practices that you want disseminated and measurable, learn more about how to create a Custom Lens in the Well-Architected Tool.
AWS Well-Architected is a set of guiding design principles developed by AWS to help organizations build secure, high-performing, resilient, and efficient infrastructure for a variety of applications and workloads. Use the AWS Well-Architected Tool to review your workloads periodically to address important design considerations and ensure that they follow the best practices and guidance of the AWS Well-Architected Framework. For follow up questions or comments, join our growing community on AWS re:Post.
In Part 1 of this two-part series, we shared an overview of some of the most important 2021 Amazon Web Services (AWS) Security service and feature launches. In this follow-up, we’ll dive deep into additional launches that are important for security professionals to be aware of and understand across all AWS services. There have already been plenty in the first half of 2022, so we’ll highlight those soon, as well.
AWS Identity
You can use AWS Identity Services to build Zero Trust architectures, help secure your environments with a robust data perimeter, and work toward the security best practice of granting least privilege. In 2021, AWS expanded the identity source options, AWS Region availability, and support for AWS services. There is also added visibility and power in the permission management system. New features offer new integrations, additional policy checks, and secure resource sharing across AWS accounts.
AWS Single Sign-On
For identity management, AWS Single Sign-On (AWS SSO) is where you create, or connect, your workforce identities in AWS once and manage access centrally across your AWS accounts in AWS Organizations. In 2021, AWS SSO announced new integrations for JumpCloud and CyberArk users. This adds to the list of providers that you can use to connect your users and groups, which also includes Microsoft Active Directory Domain Services, Okta Universal Directory, Azure AD, OneLogin, and Ping Identity.
For access management, there have been a range of feature launches with AWS Identity and Access Management (IAM) that have added up to more power and visibility in the permissions management system. Here are some key examples.
IAM made it simpler to relate a user’s IAM role activity to their corporate identity. By setting the new source identity attribute, which persists through role assumption chains and gets logged in AWS CloudTrail, you can find out who is responsible for actions that IAM roles performed.
IAM added support for policy conditions, to help manage permissions for AWS services that access your resources. This important feature launch of service principal conditions helps you to distinguish between API calls being made on your behalf by a service principal, and those being made by a principal inside your account. You can choose to allow or deny the calls depending on your needs. As a security professional, you might find this especially useful in conjunction with the aws:CalledVia condition key, which allows you to scope permissions down to specify that this account principal can only call this API if they are calling it using a particular AWS service that’s acting on their behalf. For example, your account principal can’t generally access a particular Amazon Simple Storage Service (Amazon S3) bucket, but if they are accessing it by using Amazon Athena, they can do so. These conditions can also be used in service control policies (SCPs) to give account principals broader scope across an account, organizational unit, or organization; they need not be added to individual principal policies or resource policies.
Another very handy new IAM feature launch is additional information about the reason for an access denied error message. With this additional information, you can now see which of the relevant access control policies (for example, IAM, resource, SCP, or VPC endpoint) was the cause of the denial. As of now, this new IAM feature is supported by more than 50% of all AWS services in the AWS SDK and AWS Command Line Interface, and a fast-growing number in the AWS Management Console. We will continue to add support for this capability across services, as well as add more features that are designed to make the journey to least privilege simpler.
IAM Access Analyzer also launched the ability to generate fine-grained policies based on analyzing past AWS CloudTrail activity. This feature provides a great new capability for DevOps teams or central security teams to scope down policies to just the permissions needed, making it simpler to implement least privilege permissions. IAM Access Analyzer launched further enhancements to expand policy checks, and the ability to generate a sample least-privilege policy from past activity was expanded beyond the account level to include an analysis of principal behavior within the entire organization by analyzing log activity stored in AWS CloudTrail.
AWS Resource Access Manager
AWS Resource Access Manager (AWS RAM) helps you securely share your resources across unrelated AWS accounts within your organization or organizational units (OUs) in AWS Organizations. Now you can also share your resources with IAM roles and IAM users for supported resource types. This update enables more granular access using managed permissions that you can use to define access to shared resources. In addition to the default managed permission defined for each shareable resource type, you now have more flexibility to choose which permissions to grant to whom for resource types that support additional managed permissions. Additionally, AWS RAM added support for global resource types, enabling you to provision a global resource once, and share that resource across your accounts. A global resource is one that can be used in multiple AWS Regions; the first example of a global resource is found in AWS Cloud WAN, currently in preview as of this publication. AWS RAM helps you more securely share an AWS Cloud WAN core network, which is a managed network containing AWS and on-premises networks. With AWS RAM global resource sharing, you can use the Cloud WAN core network to centrally operate a unified global network across Regions and accounts.
AWS Directory Service
AWS Directory Service for Microsoft Active Directory, also known as AWS Managed Microsoft Active Directory (AD), was updated to automatically provide domain controller and directory utilization metrics in Amazon CloudWatch for new and existing directories. Analyzing these utilization metrics helps you quantify your average and peak load times to identify the need for additional domain controllers. With this, you can define the number of domain controllers to meet your performance, resilience, and cost requirements.
Amazon Cognito
Amazon Cognitoidentity pools (federated identities) was updated to enable you to use attributes from social and corporate identity providers to make access control decisions and simplify permissions management in AWS resources. In Amazon Cognito, you can choose predefined attribute-tag mappings, or you can create custom mappings using the attributes from social and corporate providers’ access and ID tokens, or SAML assertions. You can then reference the tags in an IAM permissions policy to implement attribute-based access control (ABAC) and manage access to your AWS resources. Amazon Cognito also launched a new console experience for user pools and now supports targeted sign out through refresh token revocation.
Governance, control, and logging services
There were a number of important releases in 2021 in the areas of governance, control, and logging services.
This approach provides a powerful new middle ground between the older security models of prevention (which provide developers only an access denied message, and often can’t distinguish between an acceptable and an unacceptable use of the same API) and a detect and react model (when undesired states have already gone live). The Cfn-Guard 2.0 model gives builders the freedom to build with IaC, while allowing central teams to have the ability to reject infrastructure configurations or changes that don’t conform to central policies—and to do so with completely custom error messages that invite dialog between the builder team and the central team, in case the rule is unnuanced and needs to be refined, or if a specific exception needs to be created.
For example, a builder team might be allowed to provision and attach an internet gateway to a VPC, but the team can do this only if the routes to the internet gateway are limited to a certain pre-defined set of CIDR ranges, such as the public addresses of the organization’s branch offices. It’s not possible to write an IAM policy that takes into account the CIDR values of a VPC route table update, but you can write a Cfn-Guard 2.0 rule that allows the creation and use of an internet gateway, but only with a defined and limited set of IP addresses.
AWS Systems Manager Incident Manager
An important launch that security professionals should know about is AWS Systems Manager Incident Manager. Incident Manager provides a number of powerful capabilities for managing incidents of any kind, including operational and availability issues but also security issues. With Incident Manager, you can automatically take action when a critical issue is detected by an Amazon CloudWatch alarm or Amazon EventBridge event. Incident Manager runs pre-configured response plans to engage responders by using SMS and phone calls, can enable chat commands and notifications using AWS Chatbot, and runs automation workflows with AWS Systems Manager Automation runbooks. The Incident Manager console integrates with AWS Systems Manager OpsCenter to help you track incidents and post-incident action items from a central place that also synchronizes with third-party management tools such as Jira Service Desk and ServiceNow. Incident Manager enables cross-account sharing of incidents using AWS RAM, and provides cross-Region replication of incidents to achieve higher availability.
Amazon Simple Storage Service (Amazon S3) is one of the most important services at AWS, and its steady addition of security-related enhancements is always big news. Here are the 2021 highlights.
Access Points aliases
Amazon S3 introduced a new feature, Amazon S3 Access Points aliases. With Amazon S3 Access Points aliases, you can make the access points backwards-compatible with a large amount of existing code that is programmed to interact with S3 buckets rather than access points.
To understand the importance of this launch, we have to go back to 2019 to the launch of Amazon S3 Access Points. Access points are a powerful mechanism for managing S3 bucket access. They provide a great simplification for managing and controlling access to shared datasets in S3 buckets. You can create up to 1,000 access points per Region within each of your AWS accounts. Although bucket access policies remain fully enforced, you can delegate access control from the bucket to its access points, allowing for distributed and granular control. Each access point enforces a customizable policy that can be managed by a particular workgroup, while also avoiding the problem of bucket policies needing to grow beyond their maximum size. Finally, you can also bind an access point to a particular VPC for its lifetime, to prevent access directly from the internet.
With the 2021 launch of Access Points aliases, Amazon S3 now generates a unique DNS name, or alias, for each access point. The Access Points aliases look and acts just like an S3 bucket to existing code. This means that you don’t need to make changes to older code to use Amazon S3 Access Points; just substitute an Access Points aliases wherever you previously used a bucket name. As a security team, it’s important to know that this flexible and powerful administrative feature is backwards-compatible and can be treated as a drop-in replacement in your various code bases that use Amazon S3 but haven’t been updated to use access point APIs. In addition, using Access Points aliases adds a number of powerful security-related controls, such as permanent binding of S3 access to a particular VPC.
S3 Bucket Keys were launched at the end of 2020, another great launch that security professionals should know about, so here is an overview in case you missed it. S3 Bucket Keys are data keys generated by AWS KMS to provide another layer of envelope encryption in which the outer layer (the S3 Bucket Key) is cached by S3 for a short period of time. This extra key layer increases performance and reduces the cost of requests to AWS KMS. It achieves this by decreasing the request traffic from Amazon S3 to AWS KMS from a one-to-one model—one request to AWS KMS for each object written to or read from Amazon S3—to a one-to-many model using the cached S3 Bucket Key. The S3 Bucket Key is never stored persistently in an unencrypted state outside AWS KMS, and so Amazon S3 ultimately must always return to AWS KMS to encrypt and decrypt the S3 Bucket Key, and thus, the data. As a result, you still retain control of the key hierarchy and resulting encrypted data through AWS KMS, and are still able to audit Amazon S3 returning periodically to AWS KMS to refresh the S3 Bucket Keys, as logged in CloudTrail.
Returning to our review of 2021, S3 Bucket Keys gained the ability to use Amazon S3 Inventory and Amazon S3 Batch Operations automatically to migrate objects from the higher cost, slightly lower-performance SSE-KMS model to the lower-cost, higher-performance S3 Bucket Keys model.
To understand this launch, we need to go in time to the origins of Amazon S3, which is one of the oldest services in AWS, created even before IAM was launched in 2011. In those pre-IAM days, a storage system like Amazon S3 needed to have some kind of access control model, so Amazon S3 invented its own: Amazon S3 access control lists (ACLs). Using ACLs, you could add access permissions down to the object level, but only with regard to access by other AWS account principals (the only kind of identity that was available at the time), or public access (read-only or read-write) to an object. And in this model, objects were always owned by the creator of the object, not the bucket owner.
After IAM was introduced, Amazon S3 added the bucket policy feature, a type of resource policy that provides the rich features of IAM, including full support for all IAM principals (users and roles), time-of-day conditions, source IP conditions, ability to require encryption, and more. For many years, Amazon S3 access decisions have been made by combining IAM policy permissions and ACL permissions, which has served customers well. But the object-writer-is-owner issue has often caused friction. The good news for security professionals has been that a deny by either type of access control type overrides an allow by the other, so there were no security issues with this bi-modal approach. The challenge was that it could be administratively difficult to manage both resource policies—which exist at the bucket and access point level—and ownership and ACLs—which exist at the object level. Ownership and ACLs might potentially impact the behavior of only a handful of objects, in a bucket full of millions or billions of objects.
With the features released in 2021, Amazon S3 has removed these points of friction, and now provides the features needed to reduce ownership issues and to make IAM-based policies the only access control system for a specified bucket. The first step came in 2020 with the ability to make object ownership track bucket ownership, regardless of writer. But that feature applied only to newly-written objects. The final step is the 2021 launch we’re highlighting here: the ability to disable at the bucket level the evaluation of all existing ACLs—including ownership and permissions—effectively nullifying all object ACLs. From this point forward, you have the mechanisms you need to govern Amazon S3 access with a combination of S3 bucket policies, S3 access point policies, and (within the same account) IAM principal policies, without worrying about legacy models of ACLs and per-object ownership.
Additional database and storage service features
AWS Backup Vault Lock
AWS Backup added an important new additional layer for backup protection with the availability of AWS Backup Vault Lock. A vault lock feature in AWS is the ability to configure a storage policy such that even the most powerful AWS principals (such as an account or Org root principal) can only delete data if the deletion conforms to the preset data retention policy. Even if the credentials of a powerful administrator are compromised, the data stored in the vault remains safe. Vault lock features are extremely valuable in guarding against a wide range of security and resiliency risks (including accidental deletion), notably in an era when ransomware represents a rising threat to data.
ACM Private CA achieved FedRAMP authorization for six additional AWS Regions in the US.
Additional certificate customization now allows administrators to tailor the contents of certificates for new use cases, such as identity and smart card certificates; or to securely add information to certificates instead of relying only on the information present in the certificate request.
Additional capabilities were added for sharing CAs across accounts by using AWS RAM to help administrators issue fully-customized certificates, or revoke them, from a shared CA.
Integration with Kubernetes provides a more secure certificate authority solution for Kubernetes containers.
Online Certificate Status Protocol (OCSP) provides a fully-managed solution for notifying endpoints that certificates have been revoked, without the need for you to manage or operate infrastructure yourself.
Network and application protection
We saw a lot of enhancements in network and application protection in 2021 that will help you to enforce fine-grained security policies at important network control points across your organization. The services and new capabilities offer flexible solutions for inspecting and filtering traffic to help prevent unauthorized resource access.
AWS WAF
AWS WAF launched AWS WAF Bot Control, which gives you visibility and control over common and pervasive bots that consume excess resources, skew metrics, cause downtime, or perform other undesired activities. The Bot Control managed rule group helps you monitor, block, or rate-limit pervasive bots, such as scrapers, scanners, and crawlers. You can also allow common bots that you consider acceptable, such as status monitors and search engines. AWS WAF also added support for custom responses, managed rule group versioning, in-line regular expressions, and Captcha. The Captcha feature has been popular with customers, removing another small example of “undifferentiated work” for customers.
AWS Shield Advanced
AWS Shield Advanced now automatically protects web applications by blocking application layer (L7) DDoS events with no manual intervention needed by you or the AWS Shield Response Team (SRT). When you protect your resources with AWS Shield Advanced and enable automatic application layer DDoS mitigation, Shield Advanced identifies patterns associated with L7 DDoS events and isolates this anomalous traffic by automatically creating AWS WAF rules in your web access control lists (ACLs).
Amazon CloudFront
In other edge networking news, Amazon CloudFront added support for response headers policies. This means that you can now add cross-origin resource sharing (CORS), security, and custom headers to HTTP responses returned by your CloudFront distributions. You no longer need to configure your origins or use custom Lambda@Edge or CloudFront Functions to insert these headers.
Following Route 53 Resolver’s much-anticipated launch of DNS logging in 2020, the big news for 2021 was the launch of its DNS Firewall capability. Route 53 Resolver DNS Firewall lets you create “blocklists” for domains you don’t want your VPC resources to communicate with, or you can take a stricter, “walled-garden” approach by creating “allowlists” that permit outbound DNS queries only to domains that you specify. You can also create alerts for when outbound DNS queries match certain firewall rules, allowing you to test your rules before deploying for production traffic. Route 53 Resolver DNS Firewall launched with two managed domain lists—malware domains and botnet command and control domains—enabling you to get started quickly with managed protections against common threats. It also integrated with Firewall Manager (see the following section) for easier centralized administration.
AWS Network Firewall and Firewall Manager
Speaking of AWS Network Firewall and Firewall Manager, 2021 was a big year for both. Network Firewall added support for AWS Managed Rules, which are groups of rules based on threat intelligence data, to enable you to stay up to date on the latest security threats without writing and maintaining your own rules. AWS Network Firewall features a flexible rules engine enabling you to define firewall rules that give you fine-grained control over network traffic. As of the launch in late 2021, you can enable managed domain list rules to block HTTP and HTTPS traffic to domains identified as low-reputation, or that are known or suspected to be associated with malware or botnets. Prior to that, another important launch was new configuration options for rule ordering and default drop, making it simpler to write and process rules to monitor your VPC traffic. Also in 2021, Network Firewall announced a major regional expansion following its initial launch in 2020, and a range of compliance achievements and eligibility including HIPAA, PCI DSS, SOC, and ISO.
Elastic Load Balancing now supports forwarding traffic directly from Network Load Balancer (NLB) to Application Load Balancer (ALB). With this important new integration, you can take advantage of many critical NLB features such as support for AWS PrivateLink and exposing static IP addresses for applications that still require ALB.
The AWS Networking team also made Amazon VPC private NAT gateways available in both AWS GovCloud (US) Regions. The expansion into the AWS GovCloud (US) Regions enables US government agencies and contractors to move more sensitive workloads into the cloud by helping them to address certain regulatory and compliance requirements.
Compute
Security professionals should also be aware of some interesting enhancements in AWS compute services that can help improve their organization’s experience in building and operating a secure environment.
Amazon Elastic Compute Cloud (Amazon EC2) launched the Global View on the console to provide visibility to all your resources across Regions. Global View helps you monitor resource counts, notice abnormalities sooner, and find stray resources. A few days into 2022, another simple but extremely useful EC2 launch was the new ability to obtain instance tags from the Instance Metadata Service (IMDS). Many customers run code on Amazon EC2 that needs to introspect about the EC2 tags associated with the instance and then change its behavior depending on the content of the tags. Prior to this launch, you had to associate an EC2 role and call the EC2 API to get this information. That required access to API endpoints, either through a NAT gateway or a VPC endpoint for Amazon EC2. Now, that information can be obtained directly from the IMDS, greatly simplifying a common use case.
Amazon EC2 launched sharing of Amazon Machine Images (AMIs) with AWS Organizations and Organizational Units (OUs). Previously, you could share AMIs only with specific AWS account IDs. To share AMIs within AWS Organizations, you had to explicitly manage sharing of AMIs on an account-by-account basis, as they were added to or removed from AWS Organizations. With this new feature, you no longer have to update your AMI permissions because of organizational changes. AMI sharing is automatically synchronized when organizational changes occur. This feature greatly helps both security professionals and governance teams to centrally manage and govern AMIs as you grow and scale your AWS accounts. As previously noted, this feature was also added to EC2 Image Builder. Finally, Amazon Data Lifecycle Manager, the tool that manages all your EBS volumes and AMIs in a policy-driven way, now supports automatic deprecation of AMIs. As a security professional, you will find this helpful as you can set a timeline on your AMIs so that, if the AMIs haven’t been updated for a specified period of time, they will no longer be considered valid or usable by development teams.
Looking ahead
In 2022, AWS continues to deliver experiences that meet administrators where they govern, developers where they code, and applications where they run. We will continue to summarize important launches in future blog posts. If you’re interested in learning more about AWS services, join us for AWS re:Inforce, the AWS conference focused on cloud security, identity, privacy, and compliance. AWS re:Inforce 2022 will take place July 26–27 in Boston, MA. Registration is now open. Register now with discount code SALxUsxEFCw to get $150 off your full conference pass to AWS re:Inforce. For a limited time only and while supplies last. We look forward to seeing you there!
To stay up to date on the latest product and feature launches and security use cases, be sure to read the What’s New with AWS announcements (or subscribe to the RSS feed) and the AWS Security Blog.
If you have feedback about this post, submit comments in the Comments section below. If you have questions about this post, contact AWS Support.
Want more AWS Security news? Follow us on Twitter.
Many of our customers use AWS Organizations to manage multiple Amazon Web Services (AWS) accounts. There are many benefits to using multiple accounts in your organization, such as grouping workloads with a common business purpose, complying with regulatory frameworks, and establishing strong isolation barriers between applications based on ownership. Customers are even using distinct accounts for development, testing, and production. As these accounts proliferate, customers need a way to centrally set guardrails and controls.
In this blog post, we will walk you through different techniques that you can use to get more out of AWS Organizations service control policies (SCPs) in a multi-account environment. We focus on policy evaluation logic and how SCPs fit into it, show an overview of SCP inheritance, and describe methods for writing compact SCPs. We cover the following five techniques:
Consider the number of policies per entity
Use policy inheritance
Segment by workload type
Combine policies together
Compact your policies
AWS Organizations provides a mechanism to set distinct logical boundaries by using organizational units (OUs). This is useful when you have similar workloads across different AWS accounts that require common guardrails. SCPs are a type of organization policy that you can use to manage permissions in your organization. SCPs offer central control over the maximum available permissions for all accounts in your organization. SCPs help you make sure that your accounts stay within your organization’s access control guidelines. A key distinction of SCPs is that they are useful to set broad guardrails across your environment. You can think of guardrails as a way to enforce specific governance policies at varying levels of your environment, which we will discuss in this post.
Policy evaluation logic and how SCPs fit in
Before we dig into the details, let’s first look at how SCPs work from an overall policy perspective, along with the evaluation logic. An explicit Deny statement in any policy trumps an Allow statement. Organization SCPs that apply to any AWS account that is part of an organization in AWS Organizations require an Allow statement before proceeding in the policy evaluation flow.
For an in-depth look at how policies are evaluated, see Policy evaluation logic in the documentation.
Now, let’s walk through five recommended techniques that can help you get more out of SCPs.
1. Consider the number of policies per entity
An organization is a collection of AWS accounts that you manage together. You can use OUs to group accounts within an organization and administer them as a single unit. This greatly simplifies the management of your accounts. It’s possible to create multiple OUs within a single organization, and you can create OUs within other OUs, otherwise known as nested OUs. You have the flexibility to attach multiple policies to the root of the organization, to an OU, or to an account. For example, in an organization that has the root, one OU, and one account, attaching five SCPs to each of them would produce a total of 15 SCPs (five SCPs at the root, five SCPs at the OU, and five SCPs on the one account).
The number of SCPs that you can apply is limited, and being close to or at the quota could restrict your ability to add more policies in the future. The current published quotas are as follows:
Maximum number of SCPs attached to the root: 5
Maximum number of SCPs attached to each OU: 5
OU maximum nesting in a root: 5 levels of OUs under a root
Maximum number of SCPs attached to each account: 5
Consider the following sample organization structure to understand how you can apply multiple SCPs at different levels in an organization.
Figure 1: A sample organization showing the maximum number of SCPs applicable at each level (root, OU, account)
2. Use policy inheritance
Policy inheritance refers to the inheritance of policies that are attached to the organization’s root or to an OU. All accounts that are members of the organization root or OU where a policy is attached are affected by that policy, but inheritance works differently for Allow and Deny statements. For a permission to be allowed for a specified account, every SCP from the root through each OU in the direct path to the account, and even attached to the account itself, must allow that permission. In other words, a statement that allows access needs to exist at every level of a hierarchy; it’s not inherited. However, a Deny statement is inherited and evaluated at each level.
At this point, you should start thinking about the policies from a broader controls perspective: Controls that you want to implement on the whole organization should go into your organization’s root-level SCP. Controls should be more granular as you move down the hierarchy in AWS Organizations.
For example, when a Deny policy is attached to the organization’s root, all accounts in the organization are affected by that policy. When you attach a Deny policy to a specific OU, accounts that are directly under that OU or nested OUs under it are affected by that policy. Because you can attach policies to multiple levels in the organization, accounts might have multiple applicable policy documents, as shown in Figure 2.
By default, AWS Organizations attaches an AWS managed SCP named FullAWSAccess to every root and OU when it’s created. This policy allows all services and actions.
Note: Adding an SCP with full AWS access doesn’t give all the principals in an account access to everything. SCPs don’t grant permissions; they are used to filter permissions. Principals still need a policy within the account that grants them access.
Additionally, the policies that are applied to an OU only affect the accounts or the child OUs under it and don’t affect other OUs created under the root. For example, a policy applied to the Sandbox OU doesn’t affect the Workloads OU.
The two tables that follow show examples of the policies that result from inheritance. As discussed previously, if an Allow isn’t present at all levels (root, OU, and account) the account won’t have access to any service. Consider the last example in the Sandbox OU table with a “Deny S3 access” SCP at the root, which limits access to Amazon Simple Storage Service (Amazon S3). Although there is “Allow S3 access” applied to the Sandbox OU and “Full AWS access” at the account level, the resultant policy on account A is “No service access” because there is no policy with an effect of “Allow” in the SCP at the root level.
The following table shows the inheritance of policies in the Sandbox OU.
A key feature of AWS Organizations is the ability to create distinct workload boundaries by using organizational units (OUs). You can think of OUs as a logical boundary where you can directly apply SCPs. You can also nest OUs up to five levels deep and apply different policies at each level. By using OUs, you can segment your workload types and create purpose-driven guardrails to match your security and compliance requirements.
To illustrate this, let’s take an example where there are three distinct workload types divided into three separate OUs: Infrastructure, Sandbox, and Workload, as shown in Figure 3. A best practice would be to tailor your SCPs to each specific OU type. Your security organization wouldn’t want to allow private workloads to be reachable from the internet. However, workloads that serve your external customers would require external network connectivity. To support innovation and experimentation, you can establish a Sandbox OU that has fewer policy restrictions but might limit connectivity back to your corporate data center.
For additional information on how to organize your OUs, see Recommended OUs.
Figure 3: Example organization showing different workloads
4. Combine policies together
Similar to AWS Identity and Access Management (IAM) policies, you can have multiple statements within a service control policy. You can combine statements in a single policy to avoid hitting the quota limit of five policies per account, OU, or root. An AWS full access policy is attached by default when you enable SCPs on an organization. You can combine the full access policy with additional controls and combine statements, as shown in the following example policy. Each SCP that you apply can have a policy size of 5,120 bytes. When combining statements, make sure that the resultant statement doesn’t alter your original intent. You can combine the Action elements in an SCP if the policy has the same values for Effect, Resource, and Condition.
One difference between IAM policies and SCPs is that whitespace counts against the size quota in SCPs. Compacting related actions in a policy can help you shorten the policy. Following are four methods to compact your policy:
Remove whitespace. If you use the AWS Management Console, whitespace is automatically removed. However, if you don’t want to manually update policies by using the console every time, you can incorporate a script that removes the whitespace. (Method four later in this list provides an example of this type of script.)
Use wildcards and prefixes to combine multiple actions. For example, the following policy denies access to disable configuration in AWS Security Hub.
Important: When you combine actions together as in this example, be aware that there could be a potential impact if new actions are released in the future that start with the Disable keyword, because these actions will be covered by the wildcard and denied.
SCPs can be configured to work as either deny lists or allow lists. For additional details on allow lists and deny lists, see Strategies for using SCPs. We recommend that you use deny lists where possible, because they are more flexible and can help simplify your policies, which will result in less maintenance. To expand on this strategy, deny statements support conditions (as shown in the following example), and for specific resources to be specified. For example, when AWS adds a new service, you don’t have to go back and update your policy if you’ve used a deny statement. To support this, AWS Organizations attaches an AWS managed SCP named FullAWSAccess to every root and OU when it’s created. This policy allows all services and actions. Additionally, deny statements coupled with NotAction statements can help you write shorter policies.
Consider the following scenario: Your security organization requires that application teams use specific AWS Regions. The recommended approach is to create a deny list that blocks everything except what is in the NotAction block. Following is an example where the SCP denies any operation outside of specified Regions that your organization has authorized for use.
Note: The list includes AWS global services that cannot be allowlisted based on a Region.
Shorten the Sid value in your policy: The Sid (statement ID) is an optional identifier that you provide for the policy statement. Remove it completely from your policy if it serves no purpose for you. We also have customers who find it effective to maintain a list of SID values and details on corresponding policies in an index file locally.
The following sample Python code can compress a provided policy by removing whitespace and Sid values.
You can export the compressed policy in the file named Compressed_Policy.json or show the output on the terminal by removing # from the following code.
import json
def compress_json(policy):
    statement = policy["Statement"]
    if not isinstance(statement, list):
        statement = [statement]
    for s in statement:
        s.pop("Sid", None)

    # json.dumps removes whitespace around separators in a JSON and converts it to a JSON formatted string.
    # To get the most compact representation, specify separators=(item_separator, key_separator)
    policy_without_whitespace = json.dumps(policy, separators=(',', ':'))

    return policy_without_whitespace

if __name__ == '__main__':
  path = input("Enter the path to policy file like: \n  /Users/swara/Desktop/policy.json or ./policy.json  \n >  ")
  with open(path) as f:
    policy = json.load(f)

original_len = len(str(policy))
mini_policy = compress_json(policy)
#To print the output on the screen
print(mini_policy)
compressed_len = len(str(mini_policy))
print("\n \t original length: {} -> compressed length: {} \n".format(original_len, compressed_len))
#To write output to a file named Compressed_Policy.json
with open("Compressed_Policy.json", "w") as Output_file:
     print(mini_policy, file=Output_file)
Example output on screen:
{"Version":"2012-10-17","Statement":[{"Action":["iam:AttachRolePolicy","iam:DeleteRole","iam:DeleteRolePermissionsBoundary","iam:DeleteRolePolicy","iam:DetachRolePolicy","iam:PutRolePermissionsBoundary","iam:PutRolePolicy","iam:UpdateAssumeRolePolicy","iam:UpdateRole","iam:UpdateRoleDescription"],"Resource":["arn:aws:iam::*:role/role-to-deny"],"Effect":"Deny"}]}

original length: 433 -> compressed length: 364
To download the sample python code and the example policy shown above, download the files compress-policy.py and policy.json.
Conclusion
In this post, we walked you through different techniques that you can use to get more out of service control policies in a multi-account environment. By using these techniques, you can establish a well-considered strategy for how your organization can adopt SCPs in a multi-account environment. You also learned about how SCPs fit into the overall policy landscape for AWS. SCPs are a powerful tool to help customers establish guardrails. As you evaluate your IAM strategy, consider what you’re trying to achieve. If you’re trying to establish broad guardrails for multiple accounts, then we suggest looking at SCPs first.
If you have feedback about this post, submit comments in the Comments section below. If you have questions about this post, contact AWS Support.
Want more AWS Security news? Follow us on Twitter.
Organizations building enterprise-scale systems require the setup of a secure and governed landing zone to deploy and operate their systems. A landing zone is a starting point from which your organization can quickly launch and deploy workloads and applications with confidence in your security and infrastructure environment as described in What is a landing zone?. Nationwide Building Society (Nationwide) is the world’s largest building society. It is owned by its 16 million members and exists to serve their needs. The Society is one of the UK’s largest providers for mortgages, savings and current accounts, as well as being a major provider of ISAs, credit cards, personal loans, insurance, and investments.
For one of its business initiatives, Nationwide utilizes AWS Control Tower to build and operate their landing zone which provides a well-established pattern to set up and govern a secure, multi-account AWS environment. Nationwide operates in a highly regulated industry and our governance assurance requires adequate control of any privileged access to production line-of-business data or to resources which have access to them. We chose for this specific business initiative to deploy our landing zone using AWS Organizations, to benefit from ongoing account management and governance as aligned with AWS implementation best practices. We also utilized AWS Single Sign-On (AWS SSO) to create our workforce identities in AWS once and manage access centrally across our AWS Organization. In this blog, we describe the integrations required across AWS Control Tower and AWS SSO to implement a break-glass mechanism that makes access reporting publishable to system operators as well as to internal audit systems and processes. We will outline how we used AWS SSO for our setup as well as the three architecture options we considered, and why we went with the chosen solution.
Sourcing AWS SSO access data for near real-time monitoring
In our setup, we have multiple AWS Accounts and multiple trails on each of these accounts. Users will regularly navigate across multiple accounts as they operate our infrastructure, and their journeys are marked across these multiple trails. Typically, AWS CloudTrail would be our chosen resource to clearly and unambiguously identify account or data access. The key challenge in this scenario was to design an efficient and cost-effective solution to scan these trails to help identify and report on break-glass user access to account and production data. To address this challenge, we developed the following two architecture design options.
Option 1: A decentralized approach that uses AWS CloudFormation StackSets, Amazon EventBridge and AWS Lambda
Our solution entailed a decentralized approach by deploying a CloudFormation StackSet to create, update, or delete stacks across multiple accounts and AWS Regions with a single operation. The Stackset created Amazon EventBridge rules and target AWS Lambda functions. These functions post to EventBridge in our audit account. Our audit account has a set of Lambda functions running off EventBridge to initiate specific events, format the event message and post to Slack, our centralized communication platform for this implementation. Figure 1 depicts the overall architecture for this option.
Figure 1. De-centralized logging using Amazon EventBridge and AWS Lambda
Option 2: Use an organization trail in the Organization Management account
This option uses the centralized organization trail in the Organization Management account to source audit data. Details of how to create an organization trail can be found in the AWS CloudTrail User Guide. CloudTrail was configured to send log events to CloudWatch Logs. These events are then sent via Lambda functions to Slack using webhooks. We used a public terraform module in this GitHub repository to build this Lambda Slack integration. Figure 2 depicts the overall architecture for this option.
Figure 2. Centralized logging pattern using Amazon CloudWatch
This was our preferred option and is the one we finally implemented.
We also evaluated a third option which was to use centralized logging and auditing feature enabled by Control Tower. Users authenticate and federate to target accounts from a central location so it seemed possible to source this info from the centralized logs. These log events arrive as .gz compressed json objects, which meant having to expand these archives repeatedly for inspection. We therefore decided against this option.
A centralized, economic, extensible solution to alert of SSO break-glass
Our requirement was to identify break-glass access across any of the access mechanisms supported by AWS, including CLI and User Portal access. To ensure we have comprehensive coverage across all access mechanisms, we identified all the events initiated for each access mechanism:
User Portal/AWS Console access events
Authenticate
ListApplications
ListApplicationProfiles
Federate – this event contains the role that the user is federating into
CLI access events
CreateToken
ListAccounts
ListAccountRoles
GetRoleCredentials – this event contains the role that the user is federating into
EventBridge is able to initiate actions after events only when the event is trying to perform changes (when the “readOnly” attribute on the event record body equals “false”).
The AWS support team was aware of this attribute and recommended that we, change the data flow we were using to one able to initiate actions after any kind of event, regardless of the value on its readOnly attribute. The solution in our case was to send the CloudTrail logs to CloudWatch Logs. This then and initiates the Lambda function through a filter subscription that detects the desired event names on the log content.
Due to the query size in the CloudWatch Log queries we had to remove the subscription filters and do the parsing of the content of the log lines inside the lambda function. In order to determine what accounts would initiate the notifications, we sent the list of accounts and roles to it as an environment variable at runtime.
Considerations with cross-account SSO access
With direct federation users get an access token. This is most obvious in AWS single sign on at the chiclet page as “Command line or programmatic access”. SSO tokens have a limited lifetime (we use the default 1-hour). A user does not have to get a new token to access a target resource until the one they are using is expired. This means that a user may repeatedly access a target account using the same token during its lifetime. Although the token is made available at the chiclet page, the GetRoleCredentials event does not occur until it is used to authenticate an API call to the target AWS account.
Conclusion
In this blog, we discussed how AWS Control Tower and AWS Single Sign-on enabled Nationwide to build and govern a secure, multi-account AWS environment for one of their business initiatives and centralize access management across our implementation. The integration was important for us to accurately and comprehensively identify and audit break-glass access for our implementation. As a result, we were able to satisfy our security and compliance audit requirements for privileged access to our AWS accounts.
Recently, AWS launched the ability to delegate administration of AWS Single Sign-On (AWS SSO) in your AWS Organizations organization to a member account (an account other than the management account). This post will show you a practical approach to using this new feature. For the documentation for this feature, see Delegated administration in the AWS Single Sign-On User Guide.
With AWS Organizations, your enterprise organization can manage your accounts more securely and at scale. One of the benefits of Organizations is that it integrates with many other AWS services, so you can centrally manage accounts and how the services in those accounts can be used.
AWS SSO is where you can create, or connect, your workforce identities in AWS just once, and then manage access centrally across your AWS organization. You can create user identities directly in AWS SSO, or you can bring them from your Microsoft Active Directory or a standards-based identity provider, such as Okta Universal Directory or Azure AD. With AWS SSO, you get a unified administration experience to define, customize, and assign fine-grained access.
By default, the management account in an AWS organization has the power and authority to manage member accounts in the organization. Because of these additional permissions, it is important to exercise least privilege and tightly control access to the management account. AWS recommends that enterprises create one or more accounts specifically designated for security of the organization, with proper controls and access management policies in place. AWS provides a method in which many services can be administered for the organization from a member account; this is usually referred to as a delegated administrator account. These accounts can reside in a security organizational unit (OU), where administrators can enforce organizational policies. Figure 1 is an example of a recommended set of OUs in Organizations.
Figure 1: Recommended AWS Organizations OUs
Many AWS services support this delegated administrator model, including Amazon GuardDuty, AWS Security Hub, and Amazon Macie. For an up-to-date complete list, see AWS services that you can use with AWS Organizations. AWS SSO is now the most recent addition to the list of services in which you can delegate administration of your users, groups, and permissions, including third-party applications, to a member account of your organization.
How to configure a delegated administrator account
In this scenario, your enterprise AnyCompany has an organization consisting of a management account, an account for managing security, as well as a few member accounts. You have enabled AWS SSO in the organization, but you want to enable the security team to manage permissions for accounts and roles in the organization. AnyCompany doesn’t want you to give the security team access to the management account, and they also want to make sure the security team can’t delete the AWS SSO configuration or manage access to that account, so you decide to delegate the administration of AWS SSO to the security account.
Note: There are a few things to consider when making this change, which you should review before you enable delegated administration. These items are covered in the console during the process, and are described in the section Considerations when delegating AWS SSO administration in this post.
To delegate AWS SSO administration to a security account
In the AWS SSO console, navigate to the Region in which AWS SSO is enabled.
Choose Settings on the left navigation pane, and then choose the Management tab on the right side.
Under Delegated administrator, choose Register account, as shown in Figure 2.
Figure 2: The Register account button in AWS SSO
Consider the implications of designating a delegated administrator account (as described in the section Considerations when delegating AWS SSO administration). Select the account you want to be able to manage AWS SSO, and then choose Register account, as shown in Figure 3.
Figure 3: Choosing a delegated administrator account in AWS SSO
You should see a success message to indicate that the AWS SSO delegated administrator account is now setup.
To remove delegated AWS SSO administration from an account
In the AWS SSO console, navigate to the Region in which AWS SSO is enabled.
Choose Settings on the left navigation pane, and then choose the Management tab on the right side.
Under Delegated administrator, select Deregister account, as shown in Figure 4.
Figure 4: The Deregister account button in AWS SSO
Consider the implications of removing a delegated administrator account (as described in the section Considerations when delegating AWS SSO administration), then enter the account name that is currently administering AWS SSO, and choose Deregister account, as shown in Figure 5.
Figure 5: Considerations of deregistering a delegated administrator in AWS SSO
There are a few considerations you should keep in mind when you delegate AWS SSO administration. The first consideration is that the delegated administrator account will not be able to perform the following actions:
Delete the AWS SSO configuration.
Delegate (to other accounts) administration of AWS SSO.
Manage user or group access to the management account.
Manage permission sets that are provisioned (have a user or group assigned) in the organization management account.
For examples of those last two actions, consider the following scenarios:
In the first scenario, you are managing AWS SSO from the delegated administrator account. You would like to give your colleague Saanvi access to all the accounts in the organization, including the management account. This action would not be allowed, since the delegated administrator account cannot manage access to the management account. You would need to log in to the management account (with a user or role that has proper permissions) to provision that access.
In a second scenario, you would like to change the permissions Paulo has in the management account by modifying the policy attached to a ManagementAccountAdmin permission set, which Paulo currently has access to. In this scenario, you would also have to do this from inside the management account, since the delegated administrator account does not have permissions to modify the permission set, because it is provisioned to a user in the management account.
With those caveats in mind, users with proper access in the delegated administrator account will be able to control permissions and assignments for users and groups throughout the AWS organization. For more information about limiting that control, see Allow a user to administer AWS SSO for specific accounts in the AWS Single Sign-On User Guide.
Deregistering an AWS SSO delegated administrator account will not affect any permissions or assignments in AWS SSO, but it will remove the ability for users in the delegated account to manage AWS SSO from that account.
Additional considerations if you use Microsoft Active Directory
There are additional considerations for you to keep in mind if you use Microsoft Active Directory (AD) as an identity provider, specifically if you use AWS SSO configurable AD sync, and which AWS account the directory resides in. In order to use AWS SSO delegated administration when the identity source is set to Active Directory, AWS SSO configurable AD sync must be enabled for the directory. Your organization’s administrators must synchronize Active Directory users and groups you want to grant access to into an AWS SSO identity store. When you enable AWS SSO configurable AD sync, a new feature that launched in April, Active Directory administrators can choose which users and groups get synced into AWS SSO, similar to how other external identity providers work today when using the System for Cross-domain Identity Management (SCIM) v2.0 protocol. This way, AWS SSO knows about users and groups even before they are granted access to specific accounts or roles, and AWS SSO administrators don’t have to manually search for them.
Another thing to consider when delegating AWS SSO administration when using AD as an identity source is where your directory resides, that is which AWS account owns the directory. If you decide to change the AWS SSO identity source from any other source to Active Directory, or change it from Active Directory to any other source, then the directory must reside in (be owned by) the account that the change is being performed in. For example, if you are currently signed in to the management account, you can only change the identity source to or from directories that reside in (are owned by) the management account. For more information, see Manage your identity source in the AWS Single Sign-On User Guide.
Best practices for managing AWS SSO with delegated administration
AWS recommends the following best practices when using delegated administration for AWS SSO:
Maintain separate permission sets for use in the organization management account (versus the rest of the accounts). This way, permissions can be kept separate and managed from within the management account without causing confusion among the delegated administrators.
When granting access to the organization management account, grant the access to groups (and permission sets) specifically for access in that account. This helps enable the principal of least privilege for this important account, and helps ensure that AWS SSO delegated administrators are able to manage the rest of the organization as efficiently as possible (by reducing the number of users, groups, and permission sets that are off limits to them).
If you plan on using one of the AWS Directory Services for Microsoft Active Directory (AWS Managed Microsoft AD or AD Connector) as your AWS SSO identity source, locate the directory and the AWS SSO delegated administrator account in the same AWS account.
Conclusion
In this post, you learned about a helpful new feature of AWS SSO, the ability to delegate administration of your users and permissions to a member account of your organization. AWS recommends as a best practice that the management account of an AWS organization be secured by a least privilege access model, in which as few people as possible have access to the account. You can enable delegated administration for supported AWS services, including AWS SSO, as a useful tool to help your organization minimize access to the management account by moving that control into an AWS account designated specifically for security or identity services. We encourage you to consider AWS SSO delegated administration for administrating access in AWS. To learn more about the new feature, see Delegated administration in the AWS Single Sign-On User Guide.
If you have feedback about this post, submit comments in the Comments section below. If you have questions about this post, start a new thread on the AWS IAM forum or contact AWS Support.
Want more AWS Security how-to content, news, and feature announcements? Follow us on Twitter.
AWS Identity and Access Management (IAM) recently launched new condition keys to make it simpler to control access to your resources along your Amazon Web Services (AWS) organizational boundaries. AWS recommends that you set up multiple accounts as your workloads grow, and you can use multiple AWS accounts to isolate workloads or applications that have specific security requirements. By using the new conditions, aws:ResourceOrgID, aws:ResourceOrgPaths, and aws:ResourceAccount, you can define access controls based on an AWS resource’s organization, organizational unit (OU), or account. These conditions make it simpler to require that your principals (users and roles) can only access resources inside a specific boundary within your organization. You can combine the new conditions with other IAM capabilities to restrict access to and from AWS accounts that are not part of your organization.
This post will help you get started using the new condition keys. We’ll show the details of the new condition keys and walk through a detailed example based on the following scenario. We’ll also provide references and links to help you learn more about how to establish access control perimeters around your AWS accounts.
Consider a common scenario where you would like to prevent principals in your AWS organization from adding objects to Amazon Simple Storage Service (Amazon S3) buckets that don’t belong to your organization. To accomplish this, you can configure an IAM policy to deny access to S3 actions unless aws:ResourceOrgID matches your unique AWS organization ID. Because the policy references your entire organization, rather than individual S3 resources, you have a convenient way to maintain this security posture across any number of resources you control. The new conditions give you the tools to create a security baseline for your IAM principals and help you prevent unintended access to resources in accounts that you don’t control. You can attach this policy to an IAM principal to apply this rule to a single user or role, or use service control policies (SCPs) in AWS Organizations to apply the rule broadly across your AWS accounts. IAM principals that are subject to this policy will only be able to perform S3 actions on buckets and objects within your organization, regardless of their other permissions granted through IAM policies or S3 bucket policies.
New condition key details
You can use the aws:ResourceOrgID, aws:ResourceOrgPaths, and aws:ResourceAccount condition keys in IAM policies to place controls on the resources that your principals can access. The following table explains the new condition keys and what values these keys can take.
Condition key
Description
Operator
Single/multi value
Value
aws:ResourceOrgID
AWS organization ID of the resource being accessed
Note: Of the three keys, only aws:ResourceOrgPaths is a multi-value condition key, while aws:ResourceAccount and aws:ResourceOrgID are single-value keys. For information on how to use multi-value keys, see Creating a condition with multiple keys or values in the IAM documentation.
Resource owner keys compared to principal owner keys
The new IAM condition keys complement the existing principal condition keys aws:PrincipalAccount, aws:PrincipalOrgPaths, and aws:PrincipalOrgID. The principal condition keys help you define which AWS accounts, organizational units (OUs), and organizations are allowed to access your resources. For more information on the principal conditions, see Use IAM to share your AWS resources with groups of AWS accounts in AWS Organizations on the AWS Security Blog.
Using the principal and resource keys together helps you establish permission guardrails around your AWS principals and resources, and makes it simpler to keep your data inside the organization boundaries you define as you continue to scale. For example, you can define identity-based policies that prevent your IAM principals from accessing resources outside your organization (by using the aws:ResourceOrgID condition). Next, you can define resource-based policies that prevent IAM principals outside your organization from accessing resources that are inside your organization boundary (by using the aws:PrincipalOrgID condition). The combination of both policies prevents any access to and from AWS accounts that are not part of your organization. In the next sections, we’ll walk through an example of how to configure the identity-based policy in your organization. For the resource-based policy, you can follow along with the example in An easier way to control access to AWS resources by using the AWS organization of IAM principals on the AWS Security blog.
Setup for the examples
In the following sections, we’ll show an example IAM policy for each of the new conditions. To follow along with Example 1, which uses aws:ResourceAccount, you’ll just need an AWS account.
To follow along with Examples 2 and 3 that use aws:ResourceOrgPaths and aws:ResourceOrgID respectively, you’ll need to have an organization in AWS Organizations and at least one OU created. This blog post assumes that you have some familiarity with the basic concepts in IAM and AWS Organizations. If you need help creating an organization or want to learn more about AWS Organizations, visit Getting Started with AWS Organizations in the AWS documentation.
Which IAM policy type should I use?
You can implement the following examples as identity-based policies, or in SCPs that are managed in AWS Organizations. If you want to establish a boundary for some of your IAM principals, we recommend that you use identity-based policies. If you want to establish a boundary for an entire AWS account or for your organization, we recommend that you use SCPs. Because SCPs apply to an entire AWS account, you should take care when you apply the following policies to your organization, and account for any exceptions to these rules that might be necessary for some AWS services to function properly.
Example 1: Restrict access to AWS resources within a specific AWS account
Let’s look at an example IAM policy that restricts access along the boundary of a single AWS account. For this example, say that you have an IAM principal in account 222222222222, and you want to prevent the principal from accessing S3 objects outside of this account. To create this effect, you could attach the following IAM policy.
Note: This policy is not meant to replace your existing IAM access controls, because it does not grant any access. Instead, this policy can act as an additional guardrail for your other IAM permissions. You can use a policy like this to prevent your principals from access to any AWS accounts that you don’t know or control, regardless of the permissions granted through other IAM policies.
This policy uses a Deny effect to block access to S3 actions unless the S3 resource being accessed is in account 222222222222. This policy prevents S3 access to accounts outside of the boundary of a single AWS account. You can use a policy like this one to limit your IAM principals to access only the resources that are inside your trusted AWS accounts. To implement a policy like this example yourself, replace account ID 222222222222 in the policy with your own AWS account ID. For a policy you can apply to multiple accounts while still maintaining this restriction, you could alternatively replace the account ID with the aws:PrincipalAccount condition key, to require that the principal and resource must be in the same account (see example #3 in this post for more details how to accomplish this).
Organization setup: Welcome to AnyCompany
For the next two examples, we’ll use an example organization called AnyCompany that we created in AWS Organizations. You can create a similar organization to follow along directly with these examples, or adapt the sample policies to fit your own organization. Figure 1 shows the organization structure for AnyCompany.
Figure 1: Organization structure for AnyCompany
Like all organizations, AnyCompany has an organization root. Under the root are three OUs: Media, Sports, and Governance. Under the Sports OU, there are three more OUs: Baseball, Basketball, and Football. AWS accounts in this organization are spread across all the OUs based on their business purpose. In total, there are six OUs in this organization.
Example 2: Restrict access to AWS resources within my organizational unit
Now that you’ve seen what the AnyCompany organization looks like, let’s walk through another example IAM policy that you can use to restrict access to a specific part of your organization. For this example, let’s say you want to restrict S3 object access within the following OUs in the AnyCompany organization:
Media
Sports
Baseball
Basketball
Football
To define a boundary around these OUs, you don’t need to list all of them in your IAM policy. Instead, you can use the organization structure to your advantage. The Baseball, Basketball, and Football OUs share a parent, the Sports OU. You can use the new aws:ResourceOrgPaths key to prevent access outside of the Media OU, the Sports OU, and any OUs under it. Here’s the IAM policy that achieves this effect.
Note: Like the earlier example, this policy does not grant any access. Instead, this policy provides a backstop for your other IAM permissions, preventing your principals from accessing S3 objects outside an OU-defined boundary. If you want to require that your IAM principals consistently follow this rule, we recommend that you apply this policy as an SCP. In this example, we attached this policy to the root of our organization, applying it to all principals across all accounts in the AnyCompany organization.
The policy denies access to S3 actions unless the S3 resource being accessed is in a specific set of OUs in the AnyCompany organization. This policy is identical to Example 1, except for the condition block: The condition requires that aws:ResourceOrgPaths contains any of the listed OU paths. Because aws:ResourceOrgPaths is a multi-value condition, the policy uses the ForAllValues:StringNotLike operator to compare the values of aws:ResourceOrgPaths to the list of OUs in the policy.
The first OU path in the list is for the Media OU. The second OU path is the Sports OU, but it also adds the wildcard character * to the end of the path. The wildcard * matches any combination of characters, and so this condition matches both the Sports OU and any other OU further down its path. Using wildcards in the OU path allows you to implicitly reference other OUs inside the Sports OU, without having to list them explicitly in the policy. For more information about wildcards, refer to Using wildcards in resource ARNs in the IAM documentation.
Example 3: Restrict access to AWS resources within my organization
Finally, we’ll look at a very simple example of a boundary that is defined at the level of an entire organization. This is the same use case as the preceding two examples (restrict access to S3 object access), but scoped to an organization instead of an account or collection of OUs.
Note: Like the earlier examples, this policy does not grant any access. Instead, this policy provides a backstop for your other IAM permissions, preventing your principals from accessing S3 objects outside your organization regardless of their other access permissions. If you want to require that your IAM principals consistently follow this rule, we recommend that you apply this policy as an SCP. As in the previous example, we attached this policy to the root of our organization, applying it to all accounts in the AnyCompany organization.
The policy denies access to S3 actions unless the S3 resource being accessed is in the same organization as the IAM principal that is accessing it. This policy is identical to Example 1, except for the condition block: The condition requires that aws:ResourceOrgID and aws:PrincipalOrgID must be equal to each other. With this requirement, the principal making the request and the resource being accessed must be in the same organization. This policy also applies to S3 resources that are created after the policy is put into effect, so it is simple to maintain the same security posture across all your resources.
In this post, we explored the new conditions, and walked through a few examples to show you how to restrict access to S3 objects across the boundary of an account, OU, or organization. These tools work for more than just S3, though: You can use the new conditions to help you protect a wide variety of AWS services and actions. Here are a few links that you may want to look at:
Whitepaper: Building an AWS Perimeter provides an in-depth overview of how to use these keys as part of a broader strategy to secure your AWS resources.
If you have any questions, comments, or concerns, contact AWS Support or start a new thread on the AWS Identity and Access Management forum. Thanks for reading about this new feature. If you have feedback about this post, submit comments in the Comments section below.
Want more AWS Security news? Follow us on Twitter.
The Availability and Beyond whitepaper discusses the concept of static stability for improving resilience. What does static stability mean with regard to a multi-Region disaster recovery (DR) plan? What if the very tools that we rely on for failover are themselves impacted by a DR event?
In this post, you’ll learn how to reduce dependencies in your DR plan and manually control failover even if critical AWS services are disrupted. As a bonus, you’ll see how to use service control policies (SCPs) to help simulate a Regional outage, so that you can test failover scenarios more realistically.
Failover plan dependencies and considerations
Let’s dig into the DR scenario in more detail. Using Amazon Route 53 for Regional failover routing is a common pattern for DR events. In the simplest case, we’ve deployed an application in a primary Region and a backup Region. We have a Route 53 DNS record set with records for both Regions, and all traffic goes to the primary Region. In an event that triggers our DR plan, we manually or automatically switch the DNS records to direct all traffic to the backup Region.
Relying on an automated health check to control Regional failover can be tricky. A health check might not be perfectly reliable if a Region is experiencing some type of degradation. Often, we prefer to initiate our DR plan manually, which then initiates with automation.
What are the dependencies that we’ve baked into this failover plan? First, Route 53, our DNS service, has to be available. It must continue to serve DNS queries, and we have to be able to change DNS records manually. Second, if we do not have a full set of resources already deployed in the backup Region, we must be able to deploy resources into it.
Both dependencies might violate static stability, because we are relying on resources in our DR plan that might be affected by the outage we’re seeing. Ideally, we don’t want to depend on other services running so we can failover and continue to serve our own traffic. How do we reduce additional dependencies?
Static stability
Let’s look at our first dependency on Route 53 – control planes and data planes. Briefly, a control plane is used to configure resources, and the data plane delivers services (see Understanding Availability Needs for a more complete definition.)
The Route 53 data plane, which responds to DNS queries, is highly resilient across Regions. We can safely rely on it during the failure of any single Region. But let’s assume that for some reason we are not able to call on the Route 53 control plane.
Amazon Route 53 Application Recovery Controller (Route 53 ARC) was built to handle this scenario. It provisions a Route 53 health check that we can manually control with a Route 53 ARC routing control, and is a data plane operation. The Route 53 ARC data plane is highly resilient, using a cluster of five Regional endpoints. You can revise the health check if three of the five Regions are available.
The second dependency, being able to deploy resources into the second Region, is not a concern if we run a fully scaled-out set of resources. We must make sure that our deployment mechanism doesn’t rely only on the primary Region. Most AWS services have Regional control planes, so this isn’t an issue.
The AWS Identity and Access Management (IAM) data plane is highly available in each Region, so you can authorize the creation of new resources as long as you’ve already defined the roles. Note: If you use federated authentication through an identity provider, you should test that the IdP does not itself have a dependency on another Region.
Testing your disaster recovery plan
Once we’ve identified our dependencies, we need to decide how to simulate a disaster scenario. Two mechanisms you can use for this are network access control lists (NACLs) and SCPs. The first one enables us to restrict network traffic to our service endpoints. However, the second allows defining policies that specify the maximum permissions for the target accounts. It also allows us to simulate a Route 53 or IAM control plane outage by restricting access to the service.
For the end-to-end DR simulation, we’ve published an AWS samples repository on GitHub that you can use to deploy. This evaluates Route 53 ARC capabilities if both Route 53 and IAM control planes aren’t accessible.
By deploying test applications across us-east-1 and us-west-1 AWS Regions, we can simulate a real-world scenario that determines the business continuity impact, failover timing, and procedures required for successful failover with unavailable control planes.
Figure 2. Simulating Regional failover using service control policies
Before you conduct the test outlined in our scenario, we strongly recommend that you create a dedicated AWS testing environment with an AWS Organizations setup. Make sure that you don’t attach SCPs to your organization’s root but instead create a dedicated organization unit (OU). You can use this pattern to test SCPs and ensure that you don’t inadvertently lock out users from key services.
Chaos engineering
Chaos engineering is the discipline of experimenting on a system to build confidence in its capability to withstand turbulent production conditions. Chaos engineering and its principles are important tools when you plan for disaster recovery. Even a simple distributed system may be too complex to operate reliably. It can be hard or impossible to plan for every failure scenario in non-trivial distributed systems, because of the number of failure permutations. Chaos experiments test these unknowns by injecting failures (for example, shutting down EC2 instances) or transient anomalies (for example, unusually high network latency.)
In the context of multi-Region DR, these techniques can help challenge assumptions and expose vulnerabilities. For example, what happens if a health check passes but the system itself is unhealthy, or vice versa? What will you do if your entire monitoring system is offline in your primary Region, or too slow to be useful? Are there control plane operations that you rely on that themselves depend on a single AWS Region’s health, such as Amazon Route 53? How does your workload respond when 25% of network packets are lost? Does your application set reasonable timeouts or does it hang indefinitely when it experiences large network latencies?
Questions like these can feel overwhelming, so start with a few, then test and iterate. You might learn that your system can run acceptably in a degraded mode. Alternatively, you might find out that you need to be able to failover quickly. Regardless of the results, the exercise of performing chaos experiments and challenging assumptions is critical when developing a robust multi-Region DR plan.
Conclusion
In this blog, you learned about reducing dependencies in your DR plan. We showed how you can use Amazon Route 53 Application Recovery Controller to reduce a dependency on the Route 53 control plane, and how to simulate a Regional failure using SCPs. As you evaluate your own DR plan, be sure to take advantage of chaos engineering practices. Formulate questions and test your static stability assumptions. And of course, you can incorporate these questions into a custom lens when you run a Well-Architected review using the AWS Well-Architected Tool.
The collective thoughts of the interwebz
Manage Consent
To provide the best experiences, we use technologies like cookies to store and/or access device information. Consenting to these technologies will allow us to process data such as browsing behavior or unique IDs on this site. Not consenting or withdrawing consent, may adversely affect certain features and functions.
Functional
Always active
The technical storage or access is strictly necessary for the legitimate purpose of enabling the use of a specific service explicitly requested by the subscriber or user, or for the sole purpose of carrying out the transmission of a communication over an electronic communications network.
Preferences
The technical storage or access is necessary for the legitimate purpose of storing preferences that are not requested by the subscriber or user.
Statistics
The technical storage or access that is used exclusively for statistical purposes.The technical storage or access that is used exclusively for anonymous statistical purposes. Without a subpoena, voluntary compliance on the part of your Internet Service Provider, or additional records from a third party, information stored or retrieved for this purpose alone cannot usually be used to identify you.
Marketing
The technical storage or access is required to create user profiles to send advertising, or to track the user on a website or across several websites for similar marketing purposes.
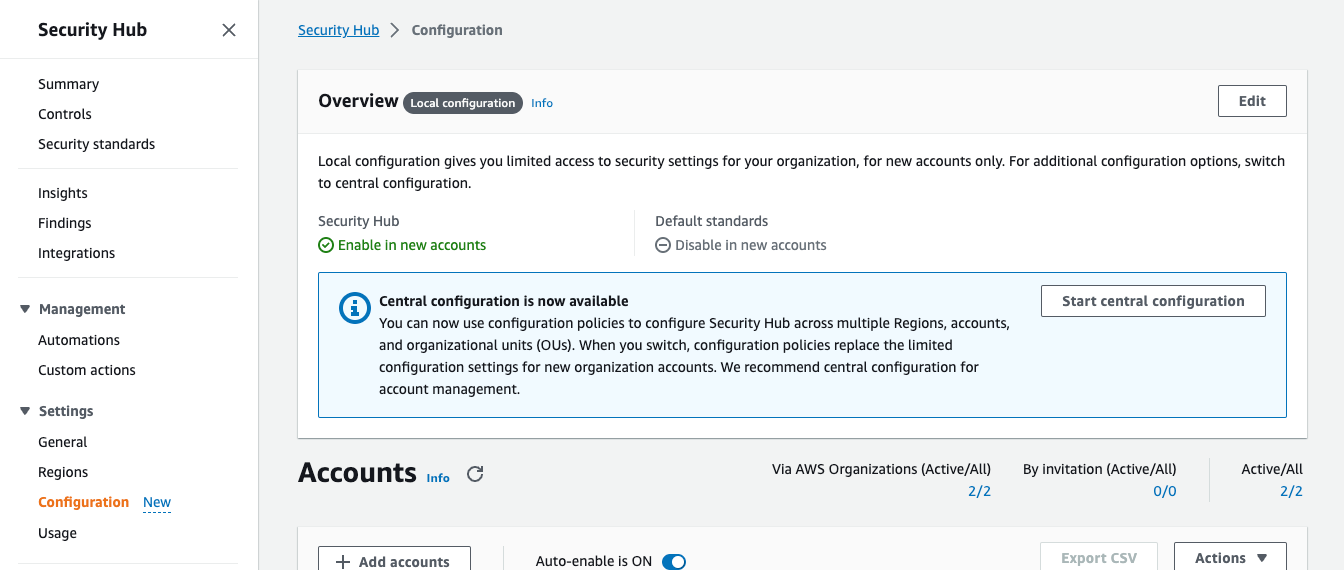
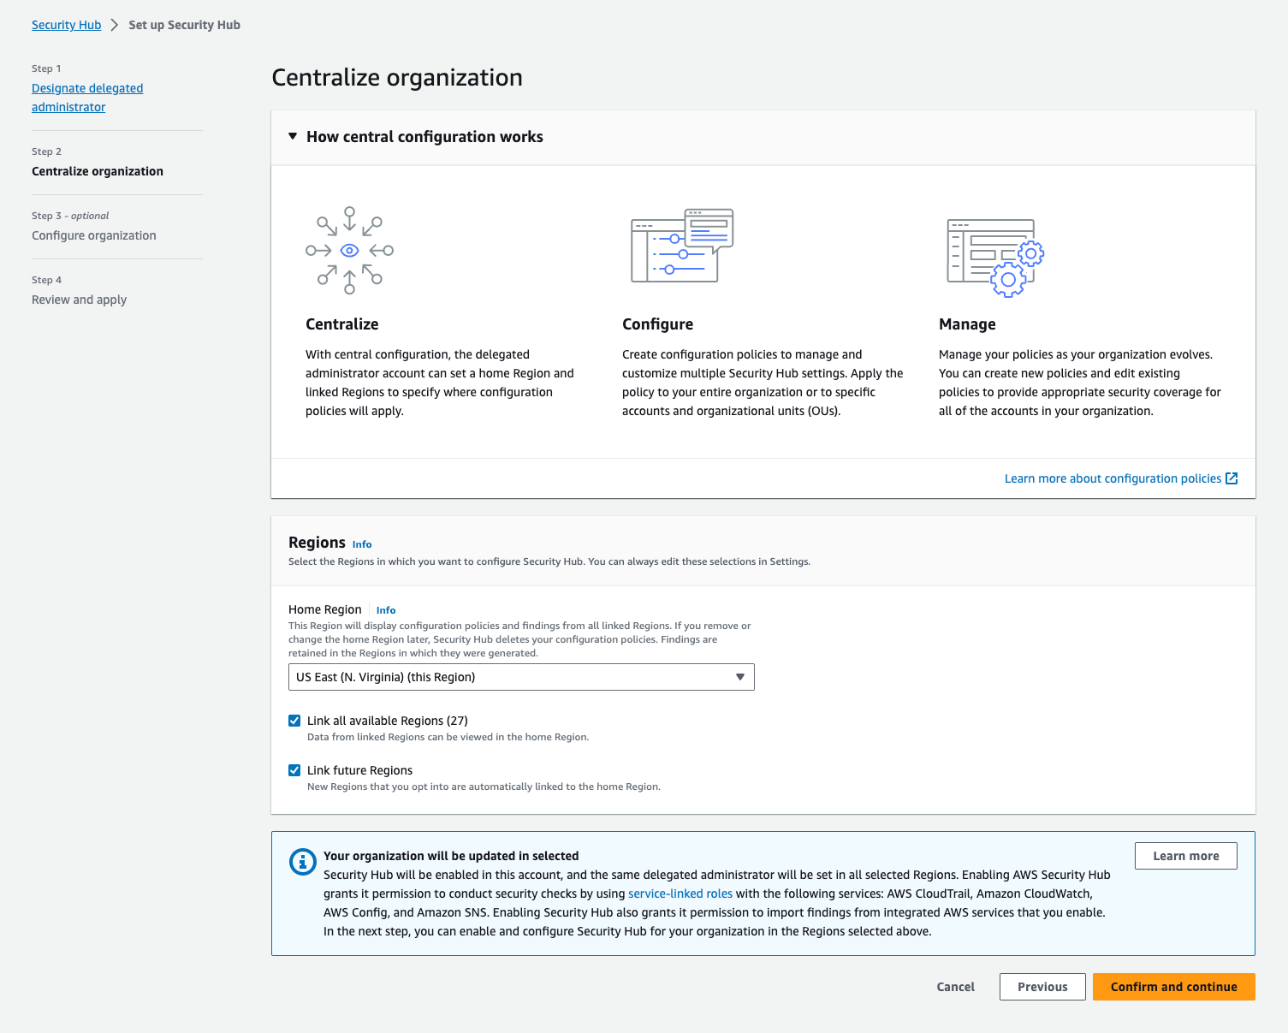
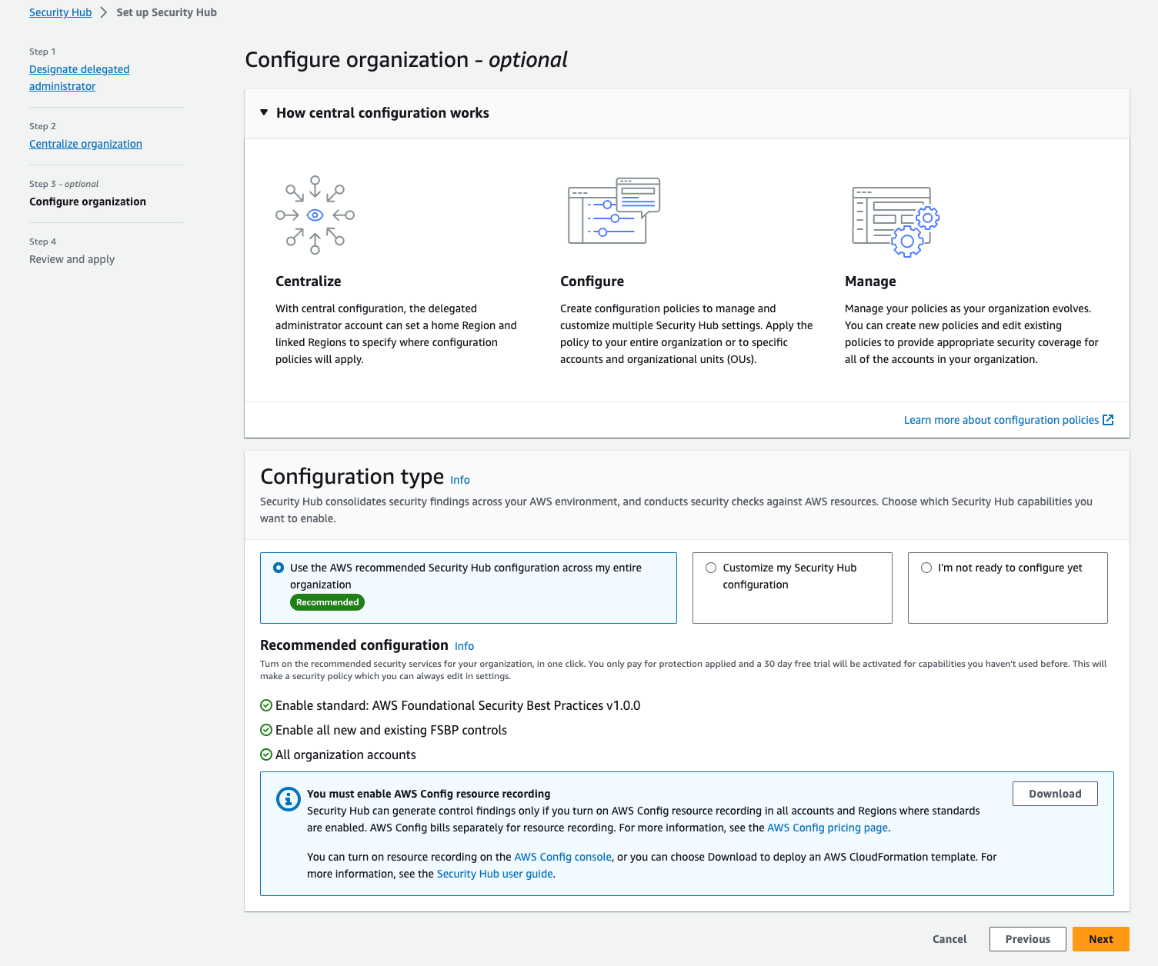
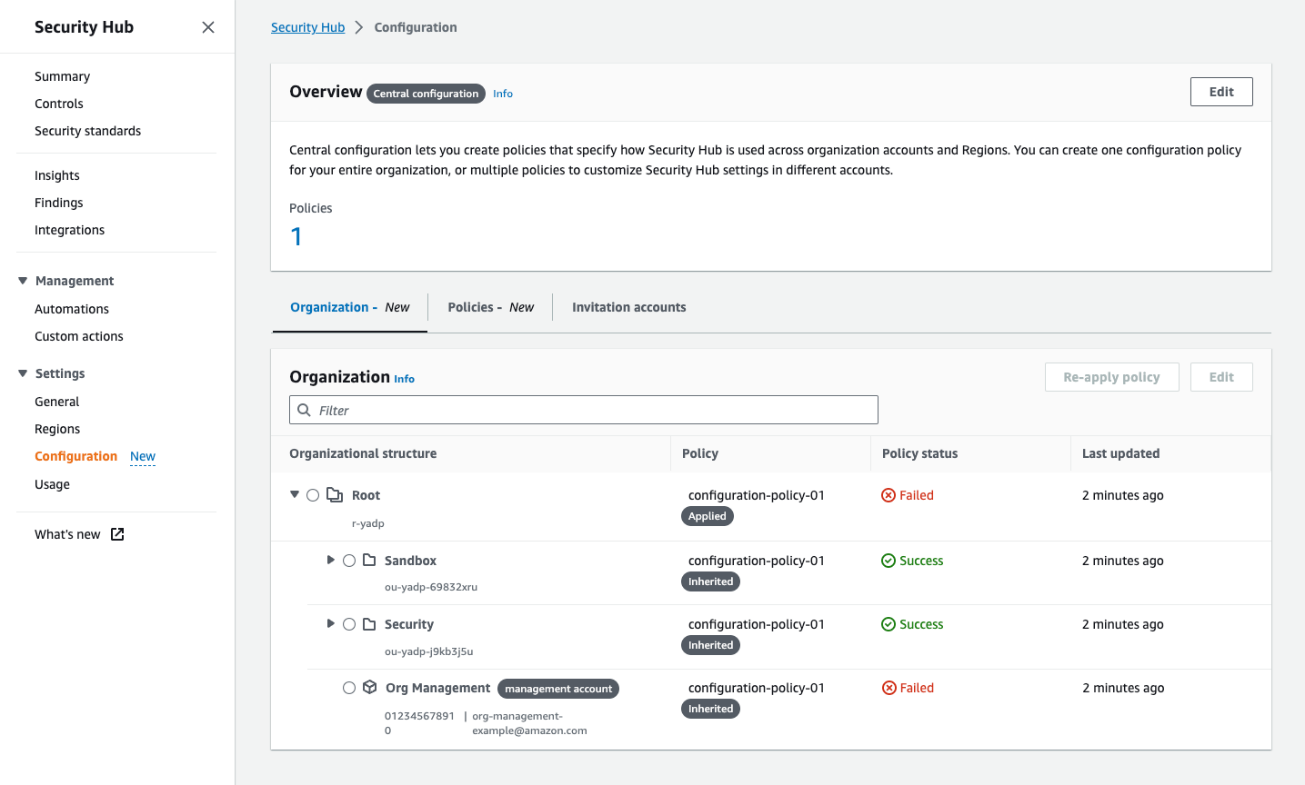 Figure 4: The Organization tab on the Configuration page shows all your organization accounts, if they are being managed by a policy, and the policy status for each account and OU
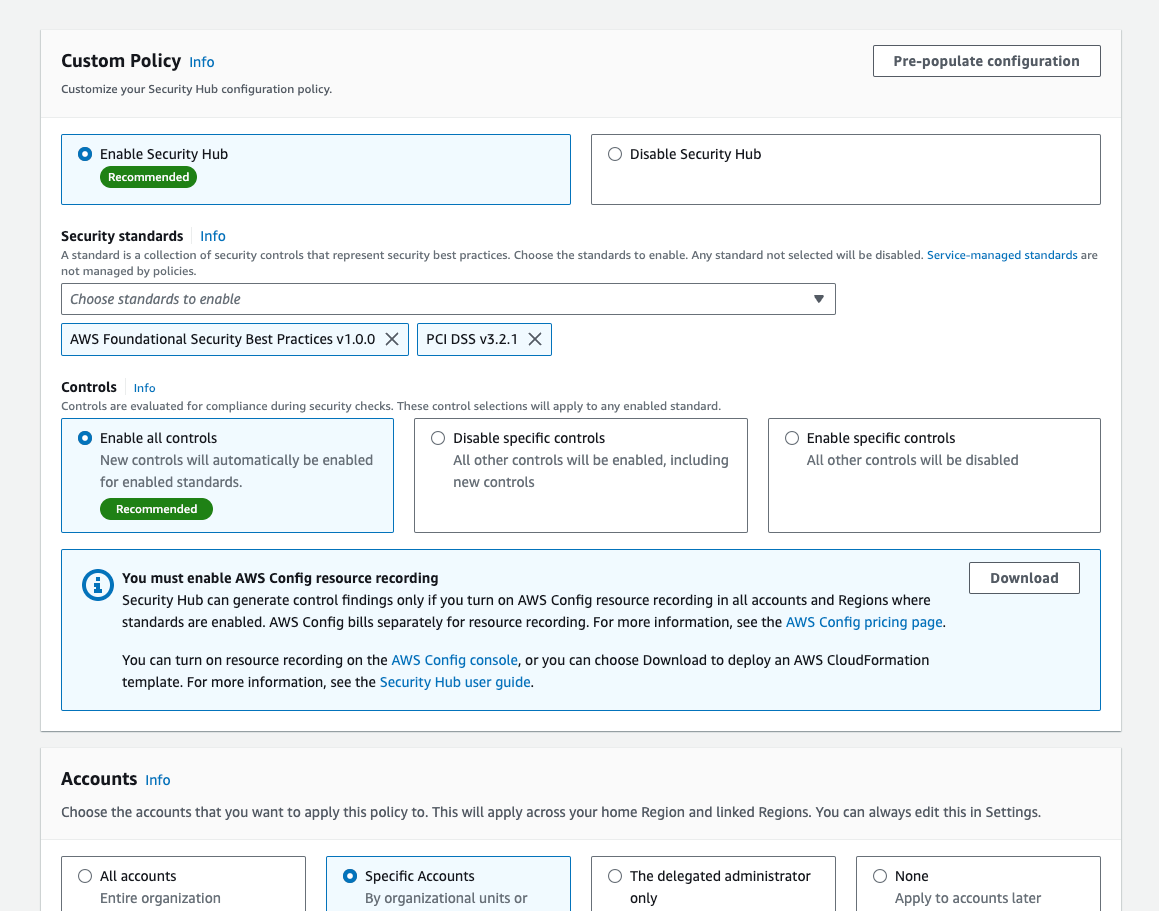
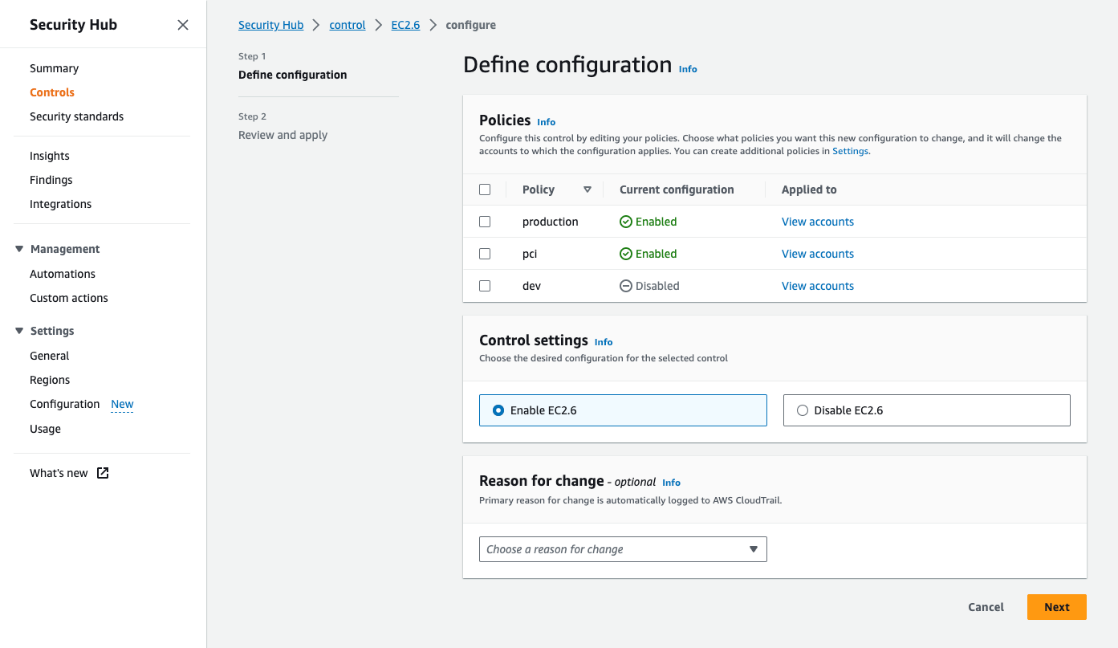


 John Jackson has over 25 years of software experience as a developer, systems architect, and product manager in both startups and large corporations and is the AWS Principal Product Manager responsible for Amazon MWAA.