Tag Archives: AWS CloudFormation

Use new account assignment APIs for AWS SSO to automate multi-account access

Post Syndicated from Akhil Aendapally original https://aws.amazon.com/blogs/security/use-new-account-assignment-apis-for-aws-sso-to-automate-multi-account-access/

In this blog post, we’ll show how you can programmatically assign and audit access to multiple AWS accounts for your AWS Single Sign-On (SSO) users and groups, using the AWS Command Line Interface (AWS CLI) and AWS CloudFormation.

With AWS SSO, you can centrally manage access and user permissions to all of your accounts in AWS Organizations. You can assign user permissions based on common job functions, customize them to meet your specific security requirements, and assign the permissions to users or groups in the specific accounts where they need access. You can create, read, update, and delete permission sets in one place to have consistent role policies across your entire organization. You can then provide access by assigning permission sets to multiple users and groups in multiple accounts all in a single operation.

AWS SSO recently added new account assignment APIs and AWS CloudFormation support to automate access assignment across AWS Organizations accounts. This release addressed feedback from our customers with multi-account environments who wanted to adopt AWS SSO, but faced challenges related to managing AWS account permissions. To automate the previously manual process and save your administration time, you can now use the new AWS SSO account assignment APIs, or AWS CloudFormation templates, to programmatically manage AWS account permission sets in multi-account environments.

With AWS SSO account assignment APIs, you can now build your automation that will assign access for your users and groups to AWS accounts. You can also gain insights into who has access to which permission sets in which accounts across your entire AWS Organizations structure. With the account assignment APIs, your automation system can programmatically retrieve permission sets for audit and governance purposes, as shown in Figure 1.
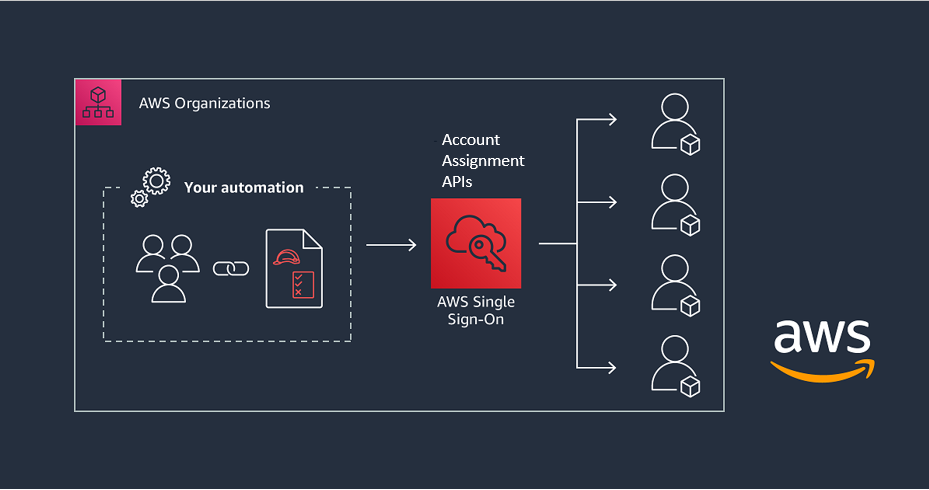
Figure 1: Automating multi-account access with the AWS SSO API and AWS CloudFormation

Figure 1: Automating multi-account access with the AWS SSO API and AWS CloudFormation

Overview

In this walkthrough, we’ll illustrate how to create permission sets, assign permission sets to users and groups in AWS SSO, and grant access for users and groups to multiple AWS accounts by using the AWS Command Line Interface (AWS CLI) and AWS CloudFormation.

To grant user permissions to AWS resources with AWS SSO, you use permission sets. A permission set is a collection of AWS Identity and Access Management (IAM) policies. Permission sets can contain up to 10 AWS managed policies and a single custom policy stored in AWS SSO.

A policy is an object that defines a user’s permissions. Policies contain statements that represent individual access controls (allow or deny) for various tasks. This determines what tasks users can or cannot perform within the AWS account. AWS evaluates these policies when an IAM principal (a user or role) makes a request.

When you provision a permission set in the AWS account, AWS SSO creates a corresponding IAM role on that account, with a trust policy that allows users to assume the role through AWS SSO. With AWS SSO, you can assign more than one permission set to a user in the specific AWS account. Users who have multiple permission sets must choose one when they sign in through the user portal or the AWS CLI. Users will see these as IAM roles.

To learn more about IAM policies, see Policies and permissions in IAM. To learn more about permission sets, see Permission Sets.

Assume you have a company, Example.com, which has three AWS accounts: an organization management account (ExampleOrgMaster), a development account (ExampleOrgDev), and a test account (ExampleOrgTest). Example.com uses AWS Organizations to manage these accounts and has already enabled AWS SSO.

Example.com has the IT security lead, Frank Infosec, who needs PowerUserAccess to the test account (ExampleOrgTest) and SecurityAudit access to the development account (ExampleOrgDev). Alice Developer, the developer, needs full access to Amazon Elastic Compute Cloud (Amazon EC2) and Amazon Simple Storage Service (Amazon S3) through the development account (ExampleOrgDev). We’ll show you how to assign and audit the access for Alice and Frank centrally with AWS SSO, using the AWS CLI.

The flow includes the following steps:

  1. Create three permission sets:
    • PowerUserAccess, with the PowerUserAccess policy attached.
    • AuditAccess, with the SecurityAudit policy attached.
    • EC2-S3-FullAccess, with the AmazonEC2FullAccess and AmazonS3FullAccess policies attached.
  2. Assign permission sets to the AWS account and AWS SSO users:
    • Assign the PowerUserAccess and AuditAccess permission sets to Frank Infosec, to provide the required access to the ExampleOrgDev and ExampleOrgTest accounts.
    • Assign the EC2-S3-FullAccess permission set to Alice Developer, to provide the required permissions to the ExampleOrgDev account.
  3. Retrieve the assigned permissions by using Account Entitlement APIs for audit and governance purposes.

    Note: AWS SSO Permission sets can contain either AWS managed policies or custom policies that are stored in AWS SSO. In this blog we attach AWS managed polices to the AWS SSO Permission sets for simplicity. To help secure your AWS resources, follow the standard security advice of granting least privilege access using AWS SSO custom policy while creating AWS SSO Permission set.
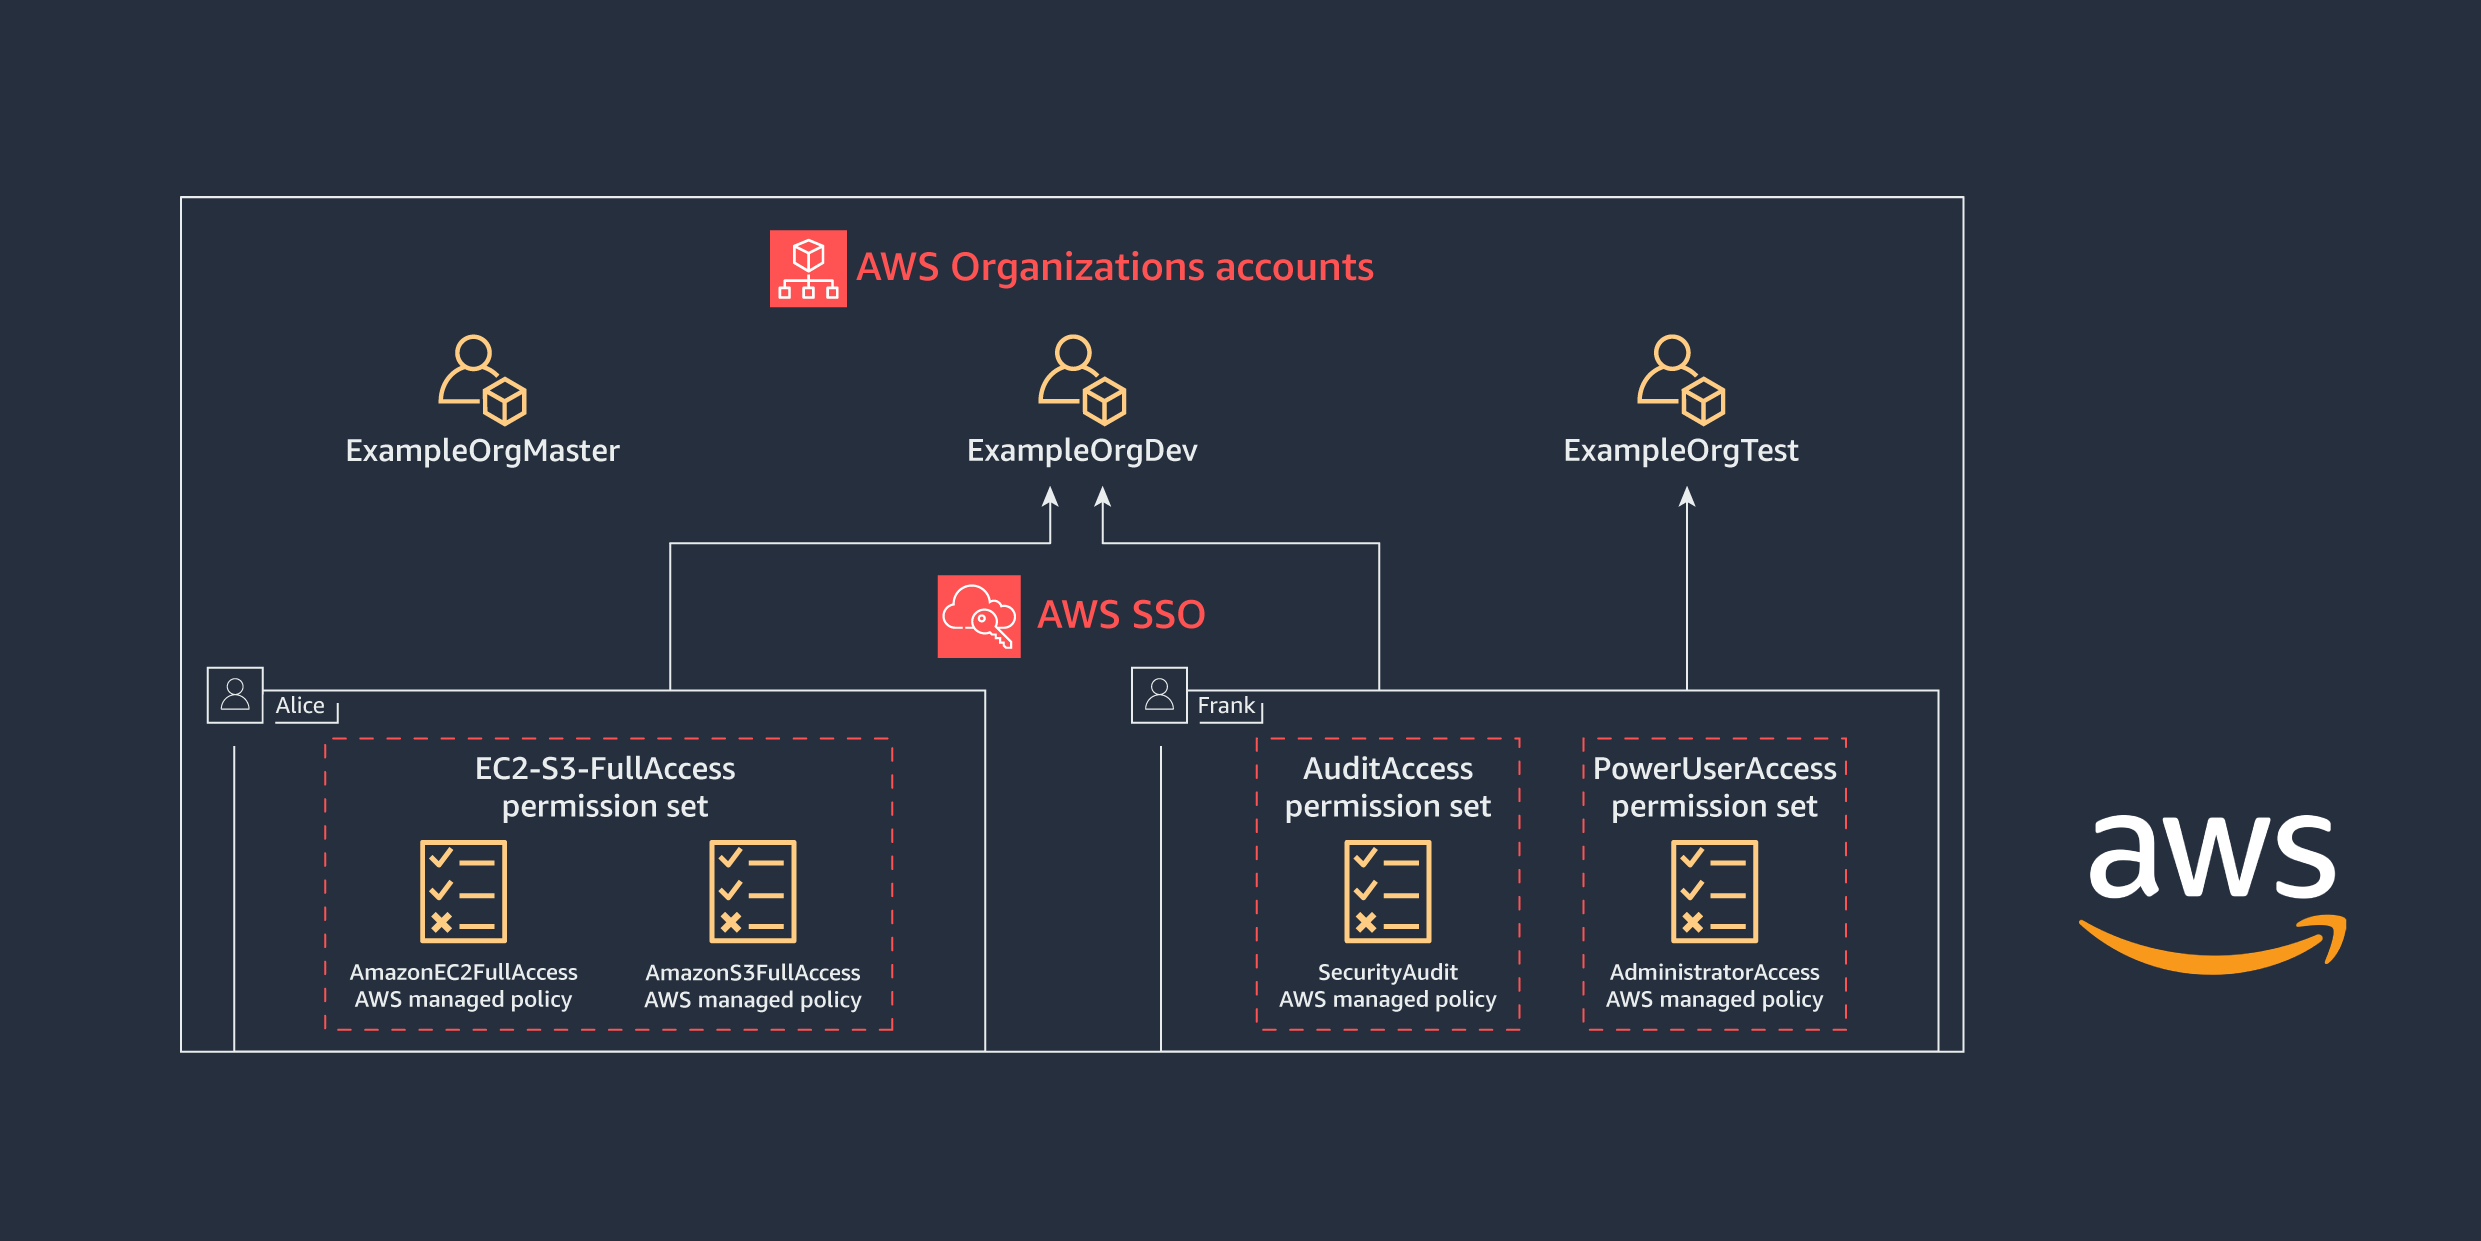
Figure 2: AWS Organizations accounts access for Alice and Frank

Figure 2: AWS Organizations accounts access for Alice and Frank

To help simplify administration of access permissions, we recommend that you assign access directly to groups rather than to individual users. With groups, you can grant or deny permissions to groups of users, rather than having to apply those permissions to each individual. For simplicity, in this blog you’ll assign permissions directly to the users.

Prerequisites

Before you start this walkthrough, complete these steps:

Use the AWS SSO API from the AWS CLI

In order to call the AWS SSO account assignment API by using the AWS CLI, you need to install and configure AWS CLI v2. For more information about AWS CLI installation and configuration, see Installing the AWS CLI and Configuring the AWS CLI.

Step 1: Create permission sets

In this step, you learn how to create EC2-S3FullAccess, AuditAccess, and PowerUserAccess permission sets in AWS SSO from the AWS CLI.

Before you create the permission sets, run the following command to get the Amazon Resource Name (ARN) of the AWS SSO instance and the Identity Store ID, which you will need later in the process when you create and assign permission sets to AWS accounts and users or groups.

aws sso-admin list-instances

Figure 3 shows the results of running the command.

Figure 3: AWS SSO list instances

Figure 3: AWS SSO list instances

Next, create the permission set for the security team (Frank) and dev team (Alice), as follows.

Permission set for Alice Developer (EC2-S3-FullAccess)

Run the following command to create the EC2-S3-FullAccess permission set for Alice, as shown in Figure 4.

aws sso-admin create-permission-set --instance-arn '<Instance ARN>' --name 'EC2-S3-FullAccess' --description 'EC2 and S3 access for developers'
Figure 4: Creating the permission set EC2-S3-FullAccess

Figure 4: Creating the permission set EC2-S3-FullAccess

Permission set for Frank Infosec (AuditAccess)

Run the following command to create the AuditAccess permission set for Frank, as shown in Figure 5.

aws sso-admin create-permission-set --instance-arn '<Instance ARN>' --name 'AuditAccess' --description 'Audit Access for security team on ExampleOrgDev account'
Figure 5: Creating the permission set AuditAccess

Figure 5: Creating the permission set AuditAccess

Permission set for Frank Infosec (PowerUserAccess)

Run the following command to create the PowerUserAccess permission set for Frank, as shown in Figure 6.

aws sso-admin create-permission-set --instance-arn '<Instance ARN>' --name 'PowerUserAccess' --description 'Power User Access for security team on ExampleOrgDev account'
Figure 6: Creating the permission set PowerUserAccess

Figure 6: Creating the permission set PowerUserAccess

Copy the permission set ARN from these responses, which you will need when you attach the managed policies.

Step 2: Assign policies to permission sets

In this step, you learn how to assign managed policies to the permission sets that you created in step 1.

Attach policies to the EC2-S3-FullAccess permission set

Run the following command to attach the amazonec2fullacess AWS managed policy to the EC2-S3-FullAccess permission set, as shown in Figure 7.

aws sso-admin attach-managed-policy-to-permission-set --instance-arn '<Instance ARN>' --permission-set-arn '<Permission Set ARN>' --managed-policy-arn 'arn:aws:iam::aws:policy/amazonec2fullaccess'
Figure 7: Attaching the AWS managed policy amazonec2fullaccess to the EC2-S3-FullAccess permission set

Figure 7: Attaching the AWS managed policy amazonec2fullaccess to the EC2-S3-FullAccess permission set

Run the following command to attach the amazons3fullaccess AWS managed policy to the EC2-S3-FullAccess permission set, as shown in Figure 8.

aws sso-admin attach-managed-policy-to-permission-set --instance-arn '<Instance ARN>' --permission-set-arn '<Permission Set ARN>' --managed-policy-arn 'arn:aws:iam::aws:policy/amazons3fullaccess'
Figure 8: Attaching the AWS managed policy amazons3fullaccess to the EC2-S3-FullAccess permission set

Figure 8: Attaching the AWS managed policy amazons3fullaccess to the EC2-S3-FullAccess permission set

Attach a policy to the AuditAccess permission set

Run the following command to attach the SecurityAudit managed policy to the AuditAccess permission set that you created earlier, as shown in Figure 9.

aws sso-admin attach-managed-policy-to-permission-set --instance-arn '<Instance ARN>' --permission-set-arn '<Permission Set ARN>' --managed-policy-arn 'arn:aws:iam::aws:policy/SecurityAudit'
Figure 9: Attaching the AWS managed policy SecurityAudit to the AuditAccess permission set

Figure 9: Attaching the AWS managed policy SecurityAudit to the AuditAccess permission set

Attach a policy to the PowerUserAccess permission set

The following command is similar to the previous command; it attaches the PowerUserAccess managed policy to the PowerUserAccess permission set, as shown in Figure 10.

aws sso-admin attach-managed-policy-to-permission-set --instance-arn '<Instance ARN>' --permission-set-arn '<Permission Set ARN>' --managed-policy-arn 'arn:aws:iam::aws:policy/PowerUserAccess'
Figure 10: Attaching AWS managed policy PowerUserAccess to the PowerUserAccess permission set

Figure 10: Attaching AWS managed policy PowerUserAccess to the PowerUserAccess permission set

In the next step, you assign users (Frank Infosec and Alice Developer) to their respective permission sets and assign permission sets to accounts.

Step 3: Assign permission sets to users and groups and grant access to AWS accounts

In this step, you assign the AWS SSO permission sets you created to users and groups and AWS accounts, to grant the required access for these users and groups on respective AWS accounts.

To assign access to an AWS account for a user or group, using a permission set you already created, you need the following:

  • The principal ID (the ID for the user or group)
  • The AWS account ID to which you need to assign this permission set

To obtain a user’s or group’s principal ID (UserID or GroupID), you need to use the AWS SSO Identity Store API. The AWS SSO Identity Store service enables you to retrieve all of your identities (users and groups) from AWS SSO. See AWS SSO Identity Store API for more details.

Use the first two commands shown here to get the principal ID for the two users, Alice (Alice’s user name is [email protected]) and Frank (Frank’s user name is [email protected]).

Alice’s user ID

Run the following command to get Alice’s user ID, as shown in Figure 11.

aws identitystore list-users --identity-store-id '<Identity Store ID>' --filter AttributePath='UserName',AttributeValue='[email protected]'
Figure 11: Retrieving Alice’s user ID

Figure 11: Retrieving Alice’s user ID

Frank’s user ID

Run the following command to get Frank’s user ID, as shown in Figure 12.

aws identitystore list-users --identity-store-id '<Identity Store ID>'--filter AttributePath='UserName',AttributeValue='[email protected]'
Figure 12: Retrieving Frank’s user ID

Figure 12: Retrieving Frank’s user ID

Note: To get the principal ID for a group, use the following command.

aws identitystore list-groups --identity-store-id '<Identity Store ID>' --filter AttributePath='DisplayName',AttributeValue='<Group Name>'

Assign the EC2-S3-FullAccess permission set to Alice in the ExampleOrgDev account

Run the following command to assign Alice access to the ExampleOrgDev account using the EC2-S3-FullAccess permission set. This will give Alice full access to Amazon EC2 and S3 services in the ExampleOrgDev account.

Note: When you call the CreateAccountAssignment API, AWS SSO automatically provisions the specified permission set on the account in the form of an IAM policy attached to the AWS SSO–created IAM role. This role is immutable: it’s fully managed by the AWS SSO, and it cannot be deleted or changed by the user even if the user has full administrative rights on the account. If the permission set is subsequently updated, the corresponding IAM policies attached to roles in your accounts won’t be updated automatically. In this case, you will need to call ProvisionPermissionSet to propagate these updates.

aws sso-admin create-account-assignment --instance-arn '<Instance ARN>' --permission-set-arn '<Permission Set ARN>' --principal-id '<user/group ID>' --principal-type '<USER/GROUP>' --target-id '<AWS Account ID>' --target-type AWS_ACCOUNT
Figure 13: Assigning the EC2-S3-FullAccess permission set to Alice on the ExampleOrgDev account

Figure 13: Assigning the EC2-S3-FullAccess permission set to Alice on the ExampleOrgDev account

Assign the AuditAccess permission set to Frank Infosec in the ExampleOrgDev account

Run the following command to assign Frank access to the ExampleOrgDev account using the EC2-S3- AuditAccess permission set.

aws sso-admin create-account-assignment --instance-arn '<Instance ARN>' --permission-set-arn '<Permission Set ARN>' --principal-id '<user/group ID>' --principal-type '<USER/GROUP>' --target-id '<AWS Account ID>' --target-type AWS_ACCOUNT
Figure 14: Assigning the AuditAccess permission set to Frank on the ExampleOrgDev account

Figure 14: Assigning the AuditAccess permission set to Frank on the ExampleOrgDev account

Assign the PowerUserAccess permission set to Frank Infosec in the ExampleOrgTest account

Run the following command to assign Frank access to the ExampleOrgTest account using the PowerUserAccess permission set.

aws sso-admin create-account-assignment --instance-arn '<Instance ARN>' --permission-set-arn '<Permission Set ARN>' --principal-id '<user/group ID>' --principal-type '<USER/GROUP>' --target-id '<AWS Account ID>' --target-type AWS_ACCOUNT
Figure 15: Assigning the PowerUserAccess permission set to Frank on the ExampleOrgTest account

Figure 15: Assigning the PowerUserAccess permission set to Frank on the ExampleOrgTest account

To view the permission sets provisioned on the AWS account, run the following command, as shown in Figure 16.

aws sso-admin list-permission-sets-provisioned-to-account --instance-arn '<Instance ARN>' --account-id '<AWS Account ID>'
Figure 16: View the permission sets (AuditAccess and EC2-S3-FullAccess) assigned to the ExampleOrgDev account

Figure 16: View the permission sets (AuditAccess and EC2-S3-FullAccess) assigned to the ExampleOrgDev account

To review the created resources in the AWS Management Console, navigate to the AWS SSO console. In the list of permission sets on the AWS accounts tab, choose the EC2-S3-FullAccess permission set. Under AWS managed policies, the policies attached to the permission set are listed, as shown in Figure 17.
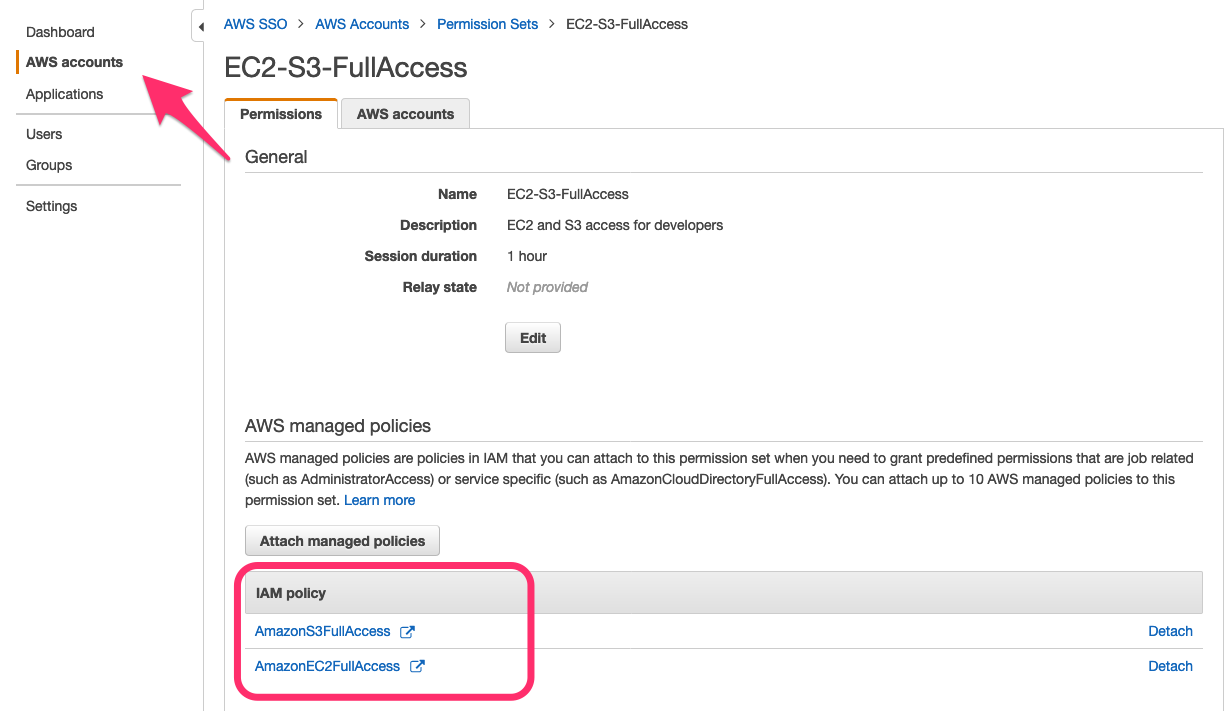
Figure 17: Review the permission set in the AWS SSO console

Figure 17: Review the permission set in the AWS SSO console

To see the AWS accounts, where the EC2-S3-FullAccess permission set is currently provisioned, navigate to the AWS accounts tab, as shown in Figure 18.
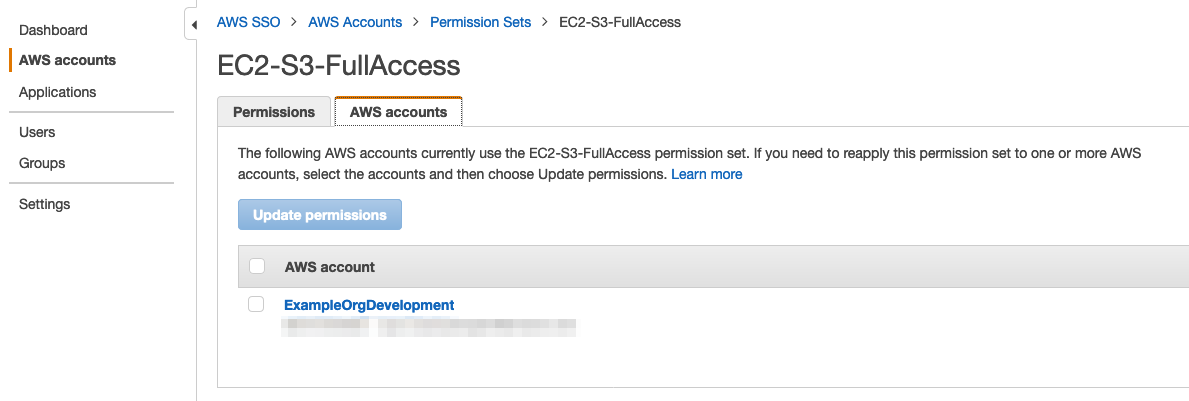
Figure 18: Review permission set account assignment in the AWS SSO console

Figure 18: Review permission set account assignment in the AWS SSO console

Step 4: Audit access

In this step, you learn how to audit access assigned to your users and group by using the AWS SSO account assignment API. In this example, you’ll start from a permission set, review the permissions (AWS-managed policies or a custom policy) attached to the permission set, get the users and groups associated with the permission set, and see which AWS accounts the permission set is provisioned to.

List the IAM managed policies for the permission set

Run the following command to list the IAM managed policies that are attached to a specified permission set, as shown in Figure 19.

aws sso-admin list-managed-policies-in-permission-set --instance-arn '<Instance ARN>' --permission-set-arn '<Permission Set ARN>'
Figure 19: View the managed policies attached to the permission set

Figure 19: View the managed policies attached to the permission set

List the assignee of the AWS account with the permission set

Run the following command to list the assignee (the user or group with the respective principal ID) of the specified AWS account with the specified permission set, as shown in Figure 20.

aws sso-admin list-account-assignments --instance-arn '<Instance ARN>' --account-id '<Account ID>' --permission-set-arn '<Permission Set ARN>'
Figure 20: View the permission set and the user or group attached to the AWS account

Figure 20: View the permission set and the user or group attached to the AWS account

List the accounts to which the permission set is provisioned

Run the following command to list the accounts that are associated with a specific permission set, as shown in Figure 21.

aws sso-admin list-accounts-for-provisioned-permission-set --instance-arn '<Instance ARN>' --permission-set-arn '<Permission Set ARN>'
Figure 21: View AWS accounts to which the permission set is provisioned

Figure 21: View AWS accounts to which the permission set is provisioned

In this section of the post, we’ve illustrated how to create a permission set, assign a managed policy to the permission set, and grant access for AWS SSO users or groups to AWS accounts by using this permission set. In the next section, we’ll show you how to do the same using AWS CloudFormation.

Use the AWS SSO API through AWS CloudFormation

In this section, you learn how to use CloudFormation templates to automate the creation of permission sets, attach managed policies, and use permission sets to assign access for a particular user or group to AWS accounts.

Sign in to your AWS Management Console and create a CloudFormation stack by using the following CloudFormation template. For more information on how to create a CloudFormation stack, see Creating a stack on the AWS CloudFormation console.

//start of Template//
{
    "AWSTemplateFormatVersion": "2010-09-09",
  
    "Description": "AWS CloudFormation template to automate multi-account access with AWS Single Sign-On (Entitlement APIs): Create permission sets, assign access for AWS SSO users and groups to AWS accounts using permission sets. Before you use this template, we assume you have enabled AWS SSO for your AWS Organization, added the AWS accounts to which you want to grant AWS SSO access to your organization, signed in to the AWS Management Console with your AWS Organizations management account credentials, and have the required permissions to use the AWS SSO console.",
  
    "Parameters": {
      "InstanceARN" : {
        "Type" : "String",
        "AllowedPattern": "arn:aws:sso:::instance/(sso)?ins-[a-zA-Z0-9-.]{16}",
        "Description" : "Enter AWS SSO InstanceARN. Ex: arn:aws:sso:::instance/ssoins-xxxxxxxxxxxxxxxx",
        "ConstraintDescription": "must be the name of an existing AWS SSO InstanceARN associated with the management account."
      },
      "ExampleOrgDevAccountId" : {
        "Type" : "String",
        "AllowedPattern": "\\d{12}",
        "Description" : "Enter 12-digit Developer AWS Account ID. Ex: 123456789012"
        },
      "ExampleOrgTestAccountId" : {
        "Type" : "String",
        "AllowedPattern": "\\d{12}",
        "Description" : "Enter 12-digit AWS Account ID. Ex: 123456789012"
        },
      "AliceDeveloperUserId" : {
        "Type" : "String",
        "AllowedPattern": "^([0-9a-f]{10}-|)[A-Fa-f0-9]{8}-[A-Fa-f0-9]{4}-[A-Fa-f0-9]{4}-[A-Fa-f0-9]{4}-[A-Fa-f0-9]{12}$",
        "Description" : "Enter Developer UserId. Ex: 926703446b-f10fac16-ab5b-45c3-86c1-xxxxxxxxxxxx"
        },
        "FrankInfosecUserId" : {
            "Type" : "String",
            "AllowedPattern": "^([0-9a-f]{10}-|)[A-Fa-f0-9]{8}-[A-Fa-f0-9]{4}-[A-Fa-f0-9]{4}-[A-Fa-f0-9]{4}-[A-Fa-f0-9]{12}$",
            "Description" : "Enter Test UserId. Ex: 926703446b-f10fac16-ab5b-45c3-86c1-xxxxxxxxxxxx"
            }
    },
    "Resources": {
        "EC2S3Access": {
            "Type" : "AWS::SSO::PermissionSet",
            "Properties" : {
                "Description" : "EC2 and S3 access for developers",
                "InstanceArn" : {
                    "Ref": "InstanceARN"
                },
                "ManagedPolicies" : ["arn:aws:iam::aws:policy/amazonec2fullaccess","arn:aws:iam::aws:policy/amazons3fullaccess"],
                "Name" : "EC2-S3-FullAccess",
                "Tags" : [ {
                    "Key": "Name",
                    "Value": "EC2S3Access"
                 } ]
              }
        },  
        "SecurityAuditAccess": {
            "Type" : "AWS::SSO::PermissionSet",
            "Properties" : {
                "Description" : "Audit Access for Infosec team",
                "InstanceArn" : {
                    "Ref": "InstanceARN"
                },
                "ManagedPolicies" : [ "arn:aws:iam::aws:policy/SecurityAudit" ],
                "Name" : "AuditAccess",
                "Tags" : [ {
                    "Key": "Name",
                    "Value": "SecurityAuditAccess"
                 } ]
              }
        },    
        "PowerUserAccess": {
            "Type" : "AWS::SSO::PermissionSet",
            "Properties" : {
                "Description" : "Power User Access for Infosec team",
                "InstanceArn" : {
                    "Ref": "InstanceARN"
                },
                "ManagedPolicies" : [ "arn:aws:iam::aws:policy/PowerUserAccess"],
                "Name" : "PowerUserAccess",
                "Tags" : [ {
                    "Key": "Name",
                    "Value": "PowerUserAccess"
                 } ]
              }      
        },
        "EC2S3userAssignment": {
            "Type" : "AWS::SSO::Assignment",
            "Properties" : {
                "InstanceArn" : {
                    "Ref": "InstanceARN"
                },
                "PermissionSetArn" : {
                    "Fn::GetAtt": [
                        "EC2S3Access",
                        "PermissionSetArn"
                     ]
                },
                "PrincipalId" : {
                    "Ref": "AliceDeveloperUserId"
                },
                "PrincipalType" : "USER",
                "TargetId" : {
                    "Ref": "ExampleOrgDevAccountId"
                },
                "TargetType" : "AWS_ACCOUNT"
              }
          },
          "SecurityAudituserAssignment": {
            "Type" : "AWS::SSO::Assignment",
            "Properties" : {
                "InstanceArn" : {
                    "Ref": "InstanceARN"
                },
                "PermissionSetArn" : {
                    "Fn::GetAtt": [
                        "SecurityAuditAccess",
                        "PermissionSetArn"
                     ]
                },
                "PrincipalId" : {
                    "Ref": "FrankInfosecUserId"
                },
                "PrincipalType" : "USER",
                "TargetId" : {
                    "Ref": "ExampleOrgDevAccountId"
                },
                "TargetType" : "AWS_ACCOUNT"
              }
          },
          "PowerUserAssignment": {
            "Type" : "AWS::SSO::Assignment",
            "Properties" : {
                "InstanceArn" : {
                    "Ref": "InstanceARN"
                },
                "PermissionSetArn" : {
                    "Fn::GetAtt": [
                        "PowerUserAccess",
                        "PermissionSetArn"
                     ]
                },
                "PrincipalId" : {
                    "Ref": "FrankInfosecUserId"
                },
                "PrincipalType" : "USER",
                "TargetId" : {
                    "Ref": "ExampleOrgTestAccountId"
                },
                "TargetType" : "AWS_ACCOUNT"
              }
          }
    }
}
//End of Template//

When you create the stack, provide the following information for setting the example permission sets for Frank Infosec and Alice Developer, as shown in Figure 22:

  • The Alice Developer and Frank Infosec user IDs
  • The ExampleOrgDev and ExampleOrgTest account IDs
  • The AWS SSO instance ARN

Then launch the CloudFormation stack.
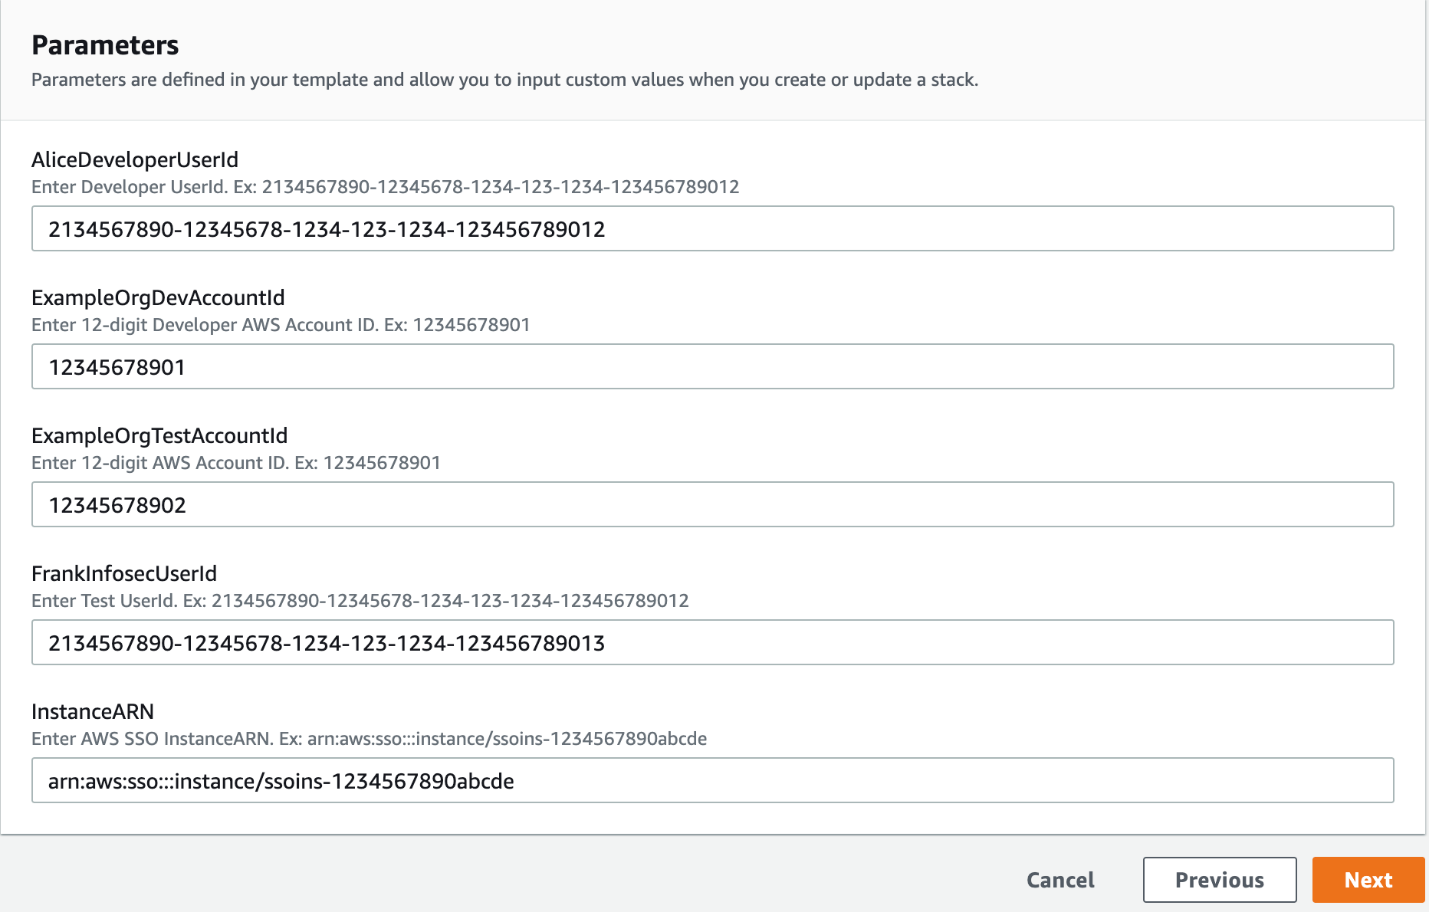
Figure 22: User inputs to launch the CloudFormation template

Figure 22: User inputs to launch the CloudFormation template

AWS CloudFormation creates the resources that are shown in Figure 23.
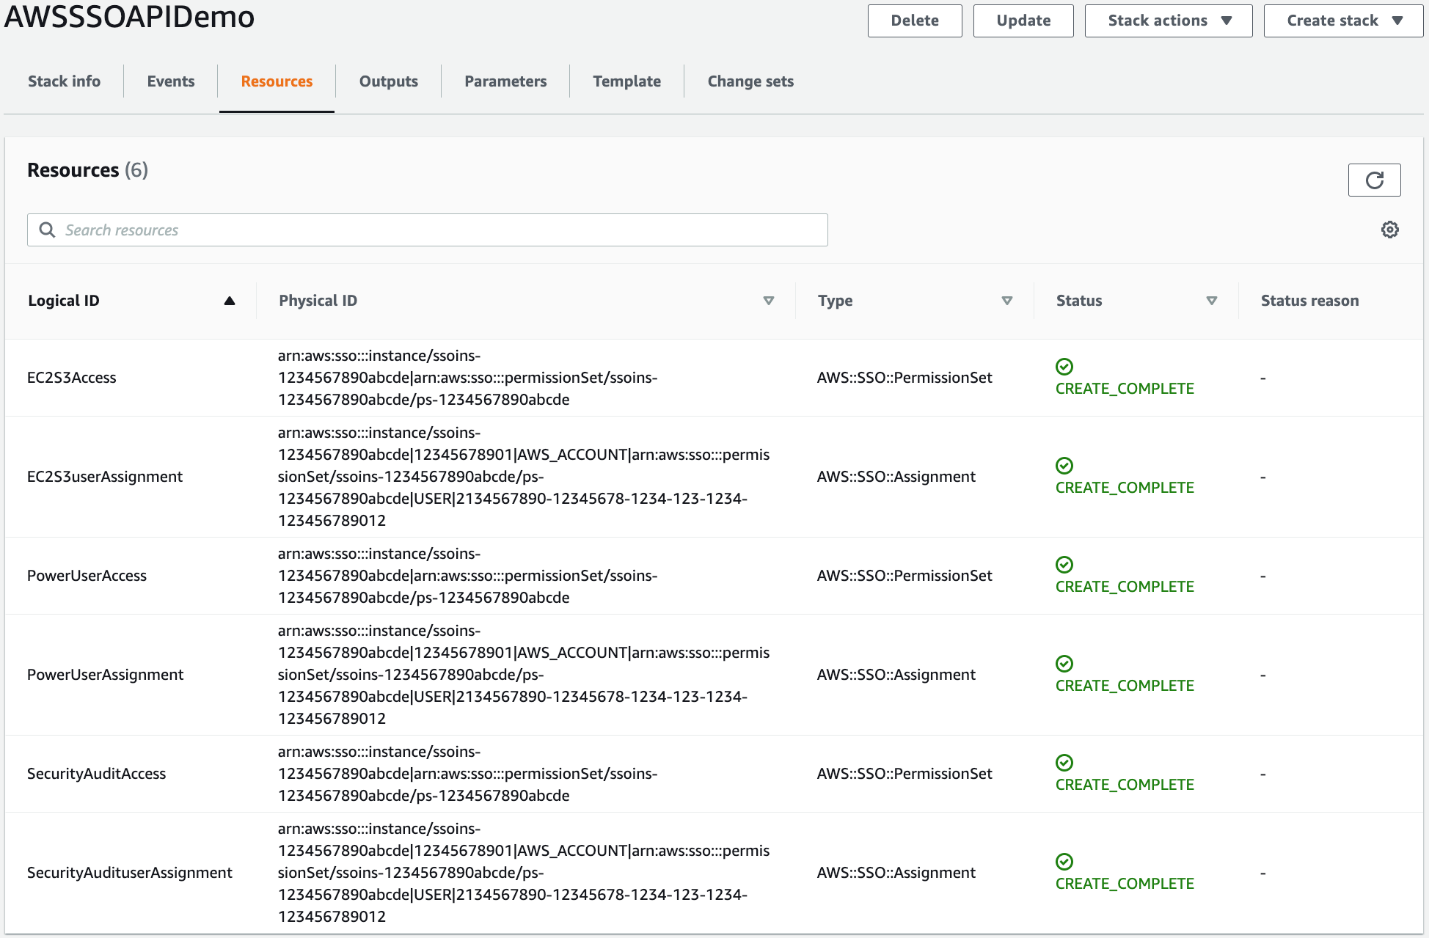
Figure 23: Resources created from the CloudFormation stack

Figure 23: Resources created from the CloudFormation stack

Cleanup

To delete the resources you created by using the AWS CLI, use these commands.

Run the following command to delete the account assignment.

delete-account-assignment --instance-arn '<Instance ARN>' --target-id '<AWS Account ID>' --target-type 'AWS_ACCOUNT' --permission-set-arn '<PermissionSet ARN>' --principal-type '<USER/GROUP>' --principal-id '<user/group ID>'

After the account assignment is deleted, run the following command to delete the permission set.

delete-permission-set --instance-arn '<Instance ARN>' --permission-set-arn '<PermissionSet ARN>'

To delete the resource that you created by using the CloudFormation template, go to the AWS CloudFormation console. Select the appropriate stack you created, and then choose delete. Deleting the CloudFormation stack cleans up the resources that were created.

Summary

In this blog post, we showed how to use the AWS SSO account assignment API to automate the deployment of permission sets, how to add managed policies to permission sets, and how to assign access for AWS users and groups to AWS accounts by using specified permission sets.

To learn more about the AWS SSO APIs available for you, see the AWS Single Sign-On API Reference Guide.

If you have feedback about this post, submit comments in the Comments section below. If you have questions about this post, start a new thread on the AWS SSO forum or contact AWS Support.

Want more AWS Security how-to content, news, and feature announcements? Follow us on Twitter.

Author

Akhil Aendapally

Akhil is a Solutions Architect at AWS focused on helping customers with their AWS adoption. He holds a master’s degree in Network and Computer Security. Akhil has 8+ years of experience working with different cloud platforms, infrastructure automation, and security.

Author

Yuri Duchovny

Yuri is a New York-based Solutions Architect specializing in cloud security, identity, and compliance. He supports cloud transformations at large enterprises, helping them make optimal technology and organizational decisions. Prior to his AWS role, Yuri’s areas of focus included application and networking security, DoS, and fraud protection. Outside of work, he enjoys skiing, sailing, and traveling the world.

Author

Ballu Singh

Ballu is a principal solutions architect at AWS. He lives in the San Francisco Bay area and helps customers architect and optimize applications on AWS. In his spare time, he enjoys reading and spending time with his family.

Author

Nir Ozeri

Nir is a Solutions Architect Manager with Amazon Web Services, based out of New York City. Nir specializes in application modernization, application delivery, and mobile architecture.

Using AWS DevOps Tools to model and provision AWS Glue workflows

Post Syndicated from Nuatu Tseggai original https://aws.amazon.com/blogs/devops/provision-codepipeline-glue-workflows/

This post provides a step-by-step guide on how to model and provision AWS Glue workflows utilizing a DevOps principle known as infrastructure as code (IaC) that emphasizes the use of templates, source control, and automation. The cloud resources in this solution are defined within AWS CloudFormation templates and provisioned with automation features provided by AWS CodePipeline and AWS CodeBuild. These AWS DevOps tools are flexible, interchangeable, and well suited for automating the deployment of AWS Glue workflows into different environments such as dev, test, and production, which typically reside in separate AWS accounts and Regions.

AWS Glue workflows allow you to manage dependencies between multiple components that interoperate within an end-to-end ETL data pipeline by grouping together a set of related jobs, crawlers, and triggers into one logical run unit. Many customers using AWS Glue workflows start by defining the pipeline using the AWS Management Console and then move on to monitoring and troubleshooting using either the console, AWS APIs, or the AWS Command Line Interface (AWS CLI).

Solution overview

The solution uses COVID-19 datasets. For more information on these datasets, see the public data lake for analysis of COVID-19 data, which contains a centralized repository of freely available and up-to-date curated datasets made available by the AWS Data Lake team.

Because the primary focus of this solution showcases how to model and provision AWS Glue workflows using AWS CloudFormation and CodePipeline, we don’t spend much time describing intricate transform capabilities that can be performed in AWS Glue jobs. As shown in the Python scripts, the business logic is optimized for readability and extensibility so you can easily home in on the functions that aggregate data based on monthly and quarterly time periods.

The ETL pipeline reads the source COVID-19 datasets directly and writes only the aggregated data to your S3 bucket.

The solution exposes the datasets in the following tables:

Table Name Description Dataset location Provider
countrycode Lookup table for country codes s3://covid19-lake/static-datasets/csv/countrycode/ Rearc
countypopulation Lookup table for the population of each county s3://covid19-lake/static-datasets/csv/CountyPopulation/ Rearc
state_abv Lookup table for US state abbreviations s3://covid19-lake/static-datasets/json/state-abv/ Rearc
rearc_covid_19_nyt_data_in_usa_us_counties Data on COVID-19 cases at US county level s3://covid19-lake/rearc-covid-19-nyt-data-in-usa/csv/us-counties/ Rearc
rearc_covid_19_nyt_data_in_usa_us_states Data on COVID-19 cases at US state level s3://covid19-lake/rearc-covid-19-nyt-data-in-usa/csv/us-states/ Rearc
rearc_covid_19_testing_data_states_daily Data on COVID-19 cases at US state level s3://covid19-lake/rearc-covid-19-testing-data/csv/states_daily/ Rearc
rearc_covid_19_testing_data_us_daily US total test daily trend s3://covid19-lake/rearc-covid-19-testing-data/csv/us_daily/ Rearc
rearc_covid_19_testing_data_us_total_latest US total tests s3://covid19-lake/rearc-covid-19-testing-data/csv/us-total-latest/ Rearc
rearc_covid_19_world_cases_deaths_testing World total tests s3://covid19-lake/rearc-covid-19-world-cases-deaths-testing/ Rearc
rearc_usa_hospital_beds Hospital beds and their utilization in the US s3://covid19-lake/rearc-usa-hospital-beds/ Rearc
world_cases_deaths_aggregates Monthly and quarterly aggregate of the world s3://<your-S3-bucket-name>/covid19/world-cases-deaths-aggregates/ Aggregate

Prerequisites

This post assumes you have the following:

  • Access to an AWS account
  • The AWS CLI (optional)
  • Permissions to create a CloudFormation stack
  • Permissions to create AWS resources, such as AWS Identity and Access Management (IAM) roles, Amazon Simple Storage Service (Amazon S3) buckets, and various other resources
  • General familiarity with AWS Glue resources (triggers, crawlers, and jobs)

Architecture

The CloudFormation template glue-workflow-stack.yml defines all the AWS Glue resources shown in the following diagram.

architecture diagram showing ETL process

Figure: AWS Glue workflow architecture diagram

Modeling the AWS Glue workflow using AWS CloudFormation

Let’s start by exploring the template used to model the AWS Glue workflow: glue-workflow-stack.yml

We focus on two resources in the following snippet:

  • AWS::Glue::Workflow
  • AWS::Glue::Trigger

From a logical perspective, a workflow contains one or more triggers that are responsible for invoking crawlers and jobs. Building a workflow starts with defining the crawlers and jobs as resources within the template and then associating it with triggers.

Defining the workflow

This is where the definition of the workflow starts. In the following snippet, we specify the type as AWS::Glue::Workflow and the property Name as a reference to the parameter GlueWorkflowName.

Parameters:
  GlueWorkflowName:
    Type: String
    Description: Glue workflow that tracks all triggers, jobs, crawlers as a single entity
    Default: Covid_19

Resources:
  Covid19Workflow:
    Type: AWS::Glue::Workflow
    Properties: 
      Description: Glue workflow that tracks specified triggers, jobs, and crawlers as a single entity
      Name: !Ref GlueWorkflowName

Defining the triggers

This is where we define each trigger and associate it with the workflow. In the following snippet, we specify the property WorkflowName on each trigger as a reference to the logical ID Covid19Workflow.

These triggers allow us to create a chain of dependent jobs and crawlers as specified by the properties Actions and Predicate.

The trigger t_Start utilizes a type of SCHEDULED, which means that it starts at a defined time (in our case, one time a day at 8:00 AM UTC). Every time it runs, it starts the job with the logical ID Covid19WorkflowStarted.

The trigger t_GroupA utilizes a type of CONDITIONAL, which means that it starts when the resources specified within the property Predicate have reached a specific state (when the list of Conditions specified equals SUCCEEDED). Every time t_GroupA runs, it starts the crawlers with the logical ID’s CountyPopulation and Countrycode, per the Actions property containing a list of actions.

  TriggerJobCovid19WorkflowStart:
    Type: AWS::Glue::Trigger
    Properties:
      Name: t_Start
      Type: SCHEDULED
      Schedule: cron(0 8 * * ? *) # Runs once a day at 8 AM UTC
      StartOnCreation: true
      WorkflowName: !Ref GlueWorkflowName
      Actions:
        - JobName: !Ref Covid19WorkflowStarted

  TriggerCrawlersGroupA:
    Type: AWS::Glue::Trigger
    Properties:
      Name: t_GroupA
      Type: CONDITIONAL
      StartOnCreation: true
      WorkflowName: !Ref GlueWorkflowName
      Actions:
        - CrawlerName: !Ref CountyPopulation
        - CrawlerName: !Ref Countrycode
      Predicate:
        Conditions:
          - JobName: !Ref Covid19WorkflowStarted
            LogicalOperator: EQUALS
            State: SUCCEEDED

Provisioning the AWS Glue workflow using CodePipeline

Now let’s explore the template used to provision the CodePipeline resources: codepipeline-stack.yml

This template defines an S3 bucket that is used as the source action for the pipeline. Any time source code is uploaded to a specified bucket, AWS CloudTrail logs the event, which is detected by an Amazon CloudWatch Events rule configured to start running the pipeline in CodePipeline. The pipeline orchestrates CodeBuild to get the source code and provision the workflow.

For more information on any of the available source actions that you can use with CodePipeline, such as Amazon S3, AWS CodeCommit, Amazon Elastic Container Registry (Amazon ECR), GitHub, GitHub Enterprise Server, GitHub Enterprise Cloud, or Bitbucket, see Start a pipeline execution in CodePipeline.

We start by deploying the stack that sets up the CodePipeline resources. This stack can be deployed in any Region where CodePipeline and AWS Glue are available. For more information, see AWS Regional Services.

Cloning the GitHub repo

Clone the GitHub repo with the following command:

$ git clone https://github.com/aws-samples/provision-codepipeline-glue-workflows.git

Deploying the CodePipeline stack

Deploy the CodePipeline stack with the following command:

$ aws cloudformation deploy \
--stack-name codepipeline-covid19 \
--template-file cloudformation/codepipeline-stack.yml \
--capabilities CAPABILITY_NAMED_IAM \
--no-fail-on-empty-changeset \
--region <AWS_REGION>

When the deployment is complete, you can view the pipeline that was provisioned on the CodePipeline console.

CodePipeline console showing the deploy pipeline in failed state

Figure: CodePipeline console

The preceding screenshot shows that the pipeline failed. This is because we haven’t uploaded the source code yet.

In the following steps, we zip and upload the source code, which triggers another (successful) run of the pipeline.

Zipping the source code

Zip the source code containing Glue scripts, CloudFormation templates, and Buildspecs file with the following command:

$ zip -r source.zip . -x images/\* *.history* *.git* *.DS_Store*

You can omit *.DS_Store* from the preceding command if you are not a Mac user.

Uploading the source code

Upload the source code with the following command:

$ aws s3 cp source.zip s3://covid19-codepipeline-source-<AWS_ACCOUNT_ID>-<AWS_REGION>

Make sure to provide your account ID and Region in the preceding command. For example, if your AWS account ID is 111111111111 and you’re using Region us-west-2, use the following command:

$ aws s3 cp source.zip s3://covid19-codepipeline-source-111111111111-us-west-2

Now that the source code has been uploaded, view the pipeline again to see it in action.

CodePipeline console showing the deploy pipeline in success state

Figure: CodePipeline console displaying stage “Deploy” in-progress

Choose Details within the Deploy stage to see the build logs.

CodeBuild console displaying build logs

Figure: CodeBuild console displaying build logs

To modify any of the commands that run within the Deploy stage, feel free to modify: deploy-glue-workflow-stack.yml

Try uploading the source code a few more times. Each time it’s uploaded, CodePipeline starts and runs another deploy of the workflow stack. If nothing has changed in the source code, AWS CloudFormation automatically determines that the stack is already up to date. If something has changed in the source code, AWS CloudFormation automatically determines that the stack needs to be updated and proceeds to run the change set.

Viewing the provisioned workflow, triggers, jobs, and crawlers

To view your workflows on the AWS Glue console, in the navigation pane, under ETL, choose Workflows.

Glue console showing workflows

Figure: Navigate to Workflows

To view your triggers, in the navigation pane, under ETL, choose Triggers.

Glue console showing triggers

Figure: Navigate to Triggers

To view your crawlers, under Data Catalog, choose Crawlers.

Glue console showing crawlers

Figure: Navigate to Crawlers

To view your jobs, under ETL, choose Jobs.

Glue console showing jobs

Figure: Navigate to Jobs

Running the workflow

The workflow runs automatically at 8:00 AM UTC. To start the workflow manually, you can use either the AWS CLI or the AWS Glue console.

To start the workflow with the AWS CLI, enter the following command:

$ aws glue start-workflow-run --name Covid_19 --region <AWS_REGION>

To start the workflow on the AWS Glue console, on the Workflows page, select your workflow and choose Run on the Actions menu.

Glue console run workflow

Figure: AWS Glue console start workflow run

To view the run details of the workflow, choose the workflow on the AWS Glue console and choose View run details on the History tab.

Glue console view run details of a workflow

Figure: View run details

The following screenshot shows a visual representation of the workflow as a graph with your run details.

Glue console showing visual representation of the workflow as a graph.

Figure: AWS Glue console displaying details of successful workflow run

Cleaning up

To avoid additional charges, delete the stack created by the CloudFormation template and the contents of the buckets you created.

1. Delete the contents of the covid19-dataset bucket with the following command:

$ aws s3 rm s3://covid19-dataset-<AWS_ACCOUNT_ID>-<AWS_REGION> --recursive

2. Delete your workflow stack with the following command:

$ aws cloudformation delete-stack --stack-name glue-covid19 --region <AWS_REGION>

To delete the contents of the covid19-codepipeline-source bucket, it’s simplest to use the Amazon S3 console because it makes it easy to delete multiple versions of the object at once.

3. Navigate to the S3 bucket named covid19-codepipeline-source-<AWS_ACCOUNT_ID>- <AWS_REGION>.

4. Choose List versions.

5. Select all the files to delete.

6. Choose Delete and follow the prompts to permanently delete all the objects.

S3 console delete all object versions

Figure: AWS S3 console delete all object versions

7. Delete the contents of the covid19-codepipeline-artifacts bucket:

$ aws s3 rm s3://covid19-codepipeline-artifacts-<AWS_ACCOUNT_ID>-<AWS-REGION> --recursive

8. Delete the contents of the covid19-cloudtrail-logs bucket:

$ aws s3 rm s3://covid19-cloudtrail-logs-<AWS_ACCOUNT_ID>-<AWS-REGION> --recursive

9. Delete the pipeline stack:

$ aws cloudformation delete-stack --stack-name codepipeline-covid19 --region <AWS-REGION>

Conclusion

In this post, we stepped through how to use AWS DevOps tooling to model and provision an AWS Glue workflow that orchestrates an end-to-end ETL pipeline on a real-world dataset.

You can download the source code and template from this Github repository and adapt it as you see fit for your data pipeline use cases. Feel free to leave comments letting us know about the architectures you build for your environment. To learn more about building ETL pipelines with AWS Glue, see the AWS Glue Developer Guide and the AWS Data Analytics learning path.

About the Authors

Nuatu Tseggai

Nuatu Tseggai is a Cloud Infrastructure Architect at Amazon Web Services. He enjoys working with customers to design and build event-driven distributed systems that span multiple services.

Suvojit Dasgupta

Suvojit Dasgupta is a Sr. Customer Data Architect at Amazon Web Services. He works with customers to design and build complex data solutions on AWS.

Data monetization and customer experience optimization using telco data assets: Part 2

Post Syndicated from Vikas Omer original https://aws.amazon.com/blogs/big-data/part-2-data-monetization-and-customer-experience-optimization-using-telco-data-assets/

Part 1 of this series explains the importance of building and implementing a customer experience (CX) management and data monetization strategy for telecom service providers (TSPs), and the major challenges driving these initiatives. It also includes an AWS CloudFormation template to set up a demonstration of the solution using AWS services. It covers transforming and enriching multiple datasets, and offers information about data standardization, baselining an analytics data model to marry different datasets like deep packet inspection (DPI) engine embedded Packet Switch (PS) probe, CRM, subscriptions, media, carrier, device, and network configuration management in the data warehouse with AWS Glue, AWS Lambda, and Amazon Redshift.

In this post, I demonstrate how you can enable data analysts, scientists, and advanced business users to query data from Amazon Redshift or Amazon Simple Storage Service (Amazon S3) directly. I also demonstrate configuring a simple drag-and-drop interface for self-service analytics so you can prepare and publish insights based on enriched data stored in Amazon Redshift or Amazon S3 through Amazon QuickSight.

Solution overview

The following diagram illustrates the workflow of the solution.

In part 1 of this series, we discuss the overall workflow. In this post, we focus on the following steps:

  1. Catalog the processed raw, aggregate, and dimension data in the AWS Glue Data Catalog using the DPI processed data crawler.
  2. Interactively query data directly from Amazon S3 using Amazon Athena and visualize in QuickSight.
  3. Enable self-service analytics using QuickSight to prepare and publish insights based on data residing in the Amazon Redshift cluster.

Querying data using Amazon Redshift

After creating your Amazon Redshift cluster, you can immediately run queries by using the query editor on the Amazon Redshift console. Complete the following steps:

  1. On the Amazon Redshift console, in the navigation pane, choose Clusters.

A cluster with the identifier <redshift database name>-<cloudformation stack> should be present. For this example, the cluster is cemdm-telco.

  1. Choose Editor.
  2. Enter the required credentials to connect to the Amazon Redshift query editor. (Database name, Database user, and Database password are the ones you entered while creating the CloudFormation stack.)

  1. Choose Connect to database.

Upon successful authentication, you’re directed to the query editor.

  1. Run a few queries to check if data is in the tables.

In the following code, <table-name> is the Amazon Redshift table name:

select count(1) from cemdm.<table-name>;

The following query extracts the number of unique subscriber count by age group with Apple devices browsing retail domain websites or apps in or around shopping malls. You can also extract the list of subscribers and micro-segment them by consumption (total data volume) or by adding KPIs like recency and frequency.

select 
  dcd.age_range, 
  count(distinct f.customer_id)as "Unique Subs Count"
from 
  cemdm.f_daily_dpi f
inner join cemdm.d_customer_demographics dcd on f.customer_id = dcd.customer_id
inner join cemdm.d_tac dt on f.tac_code = dt.tac_sid
inner join cemdm.d_device dd on dt.device_sid = dd.device_sid
inner join cemdm.d_dpi_dictionary ddd on f.protocol_id = ddd.app_id
inner join cemdm.d_location dl on f.location_id = dl.location_id
where 
  dd.device_manufacturer = 'Apple' 
and ddd.media_category = 'Retail' 
and location_tier_4 ilike '%mall%'
group by 1 
order by 2 desc;

The following screenshot shows the output.

Unloading processed and enriched data from Amazon Redshift to Amazon S3

Amazon Redshift also includes Amazon Redshift Spectrum, which allows you to directly run SQL queries against exabytes of unstructured data in Amazon S3 data lakes. No loading or transformation is required, and you can use open data formats, including Avro, CSV, Ion, JSON, ORC, and Parquet. Amazon Redshift Spectrum automatically scales query compute capacity based on the data being retrieved, so queries against Amazon S3 run quickly, regardless of dataset size.

Amazon Redshift Spectrum gives you the freedom to store your data where you want, in the format you want, and have it available for processing when you need it. This is particularly helpful if you need to offload cold or historical data on Amazon Redshift to Amazon S3 in open data format. You can still access this data through Amazon Redshift via Amazon Redshift Spectrum plus any other application.

TSP data assets also include a lot of unstructured event data. This data is transient, and only valuable for a short amount of time. Therefore, you can leave it on Amazon S3 and access it from Amazon Redshift directly through Amazon Redshift Spectrum. You can use a lake house architecture approach, where hot, mostly static, and corporate data is in the warehouse, and the events data is in the data lake.

Alternatively, you can analyze data on Amazon S3 using Athena.

  1. Use the queries in the following table (in the Unload Statement column) in the Amazon Redshift query editor to unload data from Amazon Redshift to Amazon S3. For instructions, see Unloading data to Amazon S3. Provide the following information:
    • <aws-stack-name> – The name of the CloudFormation stack
    • <aws-region> – The Region in which you deployed the stack (for example, us-east-1)
    • <s3-bucket-name> – The bucket that you created while deploying the stack
    • <aws-account-id> – The AWS account ID in which you deployed the stack
    • <table-name> – The name of the Amazon Redshift table
Amazon Redshift Table Unload Statement

f_raw_dpi

f_hourly_dpi

unload ('select * from  cemdm.<table-name>') 
       to 's3://<s3-bucket-name>/dpi/processed/<table-name>/' 
       iam_role 'arn:aws:iam::<aws-account-id>:role /RedshiftBasicCustom-<aws-region>-<aws-stack-name>' 
       ALLOWOVERWRITE
       PARQUET 
       PARTITION BY (date_id, hour_id);

f_daily_dpi
unload ('select * from  cemdm.<table-name>') 
       to 's3://<s3-bucket-name>/dpi/processed/f_daily_dpi/' 
       iam_role 'arn:aws:iam::<aws-account-id>:role/RedshiftBasicCustom-<aws-region>-<aws-stack-name>' 
       ALLOWOVERWRITE
       PARQUET 
       PARTITION BY (date_id);

d_customer_demographics

d_device

d_dpi_dictionary

d_location

d_operator_plmn

d_tac

d_tariff_plan

d_tariff_plan_desc

unload ('select * from  cemdm.<table-name>') 
   to 's3://<s3-bucket-name>/dpi/processed/<table-name>/' 
       iam_role 'arn:aws:iam::<aws-account-id>:role /RedshiftBasicCustom-<aws-region>-<aws-stack-name>' 
       ALLOWOVERWRITE
       PARQUET;

Alternatively, you can copy the Amazon Redshift AWS Identity and Access Management (IAM) role ARN to unload data to Amazon S3 from the console under the cluster’s properties.

  1. Verify that the data has been unloaded to Amazon S3 under <s3-bucket-name>/dpi/processed/.
  2. On the AWS Glue console, in the navigation pane, choose Crawlers.
  3. Select DPIProcessedDataCrawler.
  4. Choose Run crawler.

  1. Wait for the crawler to show the status Stopping.

The tables added against the DPIProcessedDataCrawler crawlers should show 11.

  1. Under Databases, choose Tables.
  2. Verify the following 11 tables are created under the cemdm database:
    • processed_f_raw_dpi
    • processed_f_hourly_dpi
    • processed_f_daily_dpi
    • processed_d_customer_demographics
    • processed_d_device
    • processed_d_dpi_dictionary
    • processed_d_location
    • processed_d_operator_plmn
    • processed_d_tac
    • processed_d_tariff_plan
    • processed_d_tariff_plan_desc

Visualizing data using QuickSight

QuickSight is a business analytics service you can use to build visualizations, perform one-time analysis, and get business insights from your data. For more information, see What Is Amazon QuickSight?

To connect QuickSight to Amazon Redshift as your data source, complete the following steps:

  1. Create a private connection from Amazon QuickSight to an Amazon Redshift cluster.

These steps involve creating a new private subnet that the CloudFormation stack already created. Use the private subnet that isn’t used by Amazon Redshift cluster for your QuickSight connection.

QuickSight provides out-of-the-box integration with Amazon Redshift, making it simple to query and visualize your Redshift data. For more information, see Creating a Dataset from an Autodiscovered Amazon Redshift Cluster or Amazon RDS Instance.

  1. For Schema, choose cdmdm.
  2. For Tables, select f_daily_dpi.
  3. Choose Edit/Preview data.

  1. Add data and prepare the following table relationships in the Data Prep Use the information provided to create the relationships between different tables:
Table A Name Table A Attribute Join Type Table B Name Table B Attribute
f_daily_dpi customer_id LEFT d_tariff_plan customer_id
f_daily_dpi tac_code INNER d_tac tac_sid
f_daily_dpi sgsn_plmn_sid INNER d_operator_plmn plmn_sid
f_daily_dpi location_id LEFT d_location location_id
f_daily_dpi protocol_id INNER d_dpi_dictionary app_id
f_daily_dpi customer_id LEFT d_customer_demographics customer_id
d_tariff_plan tariff_plan_id INNER d_tariff_plan_desc tariff_plan_id
d_tac device_sid INNER d_device device_sid

You can join d_operator_plmn with sgsn_plmn_sid and home_plmn_sid, but because the sample data only contains home subscriber data, a second join of f_raw_dpi data with d_operator_plmn on home_plmn_sid and plmn_sid is not present in the given relationship of tables.

The following screenshot shows the table relationships.

  1. Name your analysis CEMDM.
  2. Choose Save & visualize.

The following screenshots demonstrate a few QuickSight analyses created from the dataset we created. For more information about creating analyses in QuickSight, see Working with Analyses. You can divide all analyses across all the available attributes. We use the use case from part 1 of this series.

The following screenshot shows visualizations of user demographics on the Demographics tab.

The following screenshot shows visualizations of user interest on the Interest Analysis tab.

The following screenshot shows visualizations of user locations on the Location tab.

The following screenshot shows visualizations of device information on the Device tab.

The following screenshot shows visualizations of subscription information on the Subscriptions tab.

The following screenshot shows visualizations of roaming users on the Roaming tab.

The following screenshot shows visualizations on the Sub Details tab. You can drill down to subscriber-level details from any dashboard across any dimension or apply global-level filters to narrow down the desired segment.

You can also build these reports using Athena as a data connector. QuickSight provides out-of-the-box integration with Athena, which lets you run SQL queries on top of the metadata in your AWS Glue Data Catalog. For more information, see Creating a Dataset Using Amazon Athena Data.

You can also use Amazon Redshift metadata as a business glossary and visualize it using QuickSight with the following custom SQL:

SELECT * FROM (
  select 
    n.nspname as "Schema",c1.relname as "Table Name", c.attname as "Column Name", 'Attribute' as "Type",
    c.attnum as "Ordinal Position",typnotnull as "Is Not Null",typdefault as "Default Value", t.typname as "Data Type",
    split_part(d.description,'|',1) as "Category", 
    split_part(d.description,'|',2) as "Source",
    split_part(d.description,'|',3) as "Transient/Derived",
    split_part(d.description,'|',4) as "Is PII",
    split_part(d.description,'|',5) as "Is Business Sensitive",
    split_part(d.description,'|',6) as "Description"  
  from pg_catalog.pg_attribute c
  inner join pg_class c1 on c.attrelid=c1.oid
  inner JOIN pg_type t on t.oid=c.atttypid
  inner join pg_catalog.pg_namespace n on c1.relnamespace=n.oid
  inner join pg_catalog.pg_description d on d.objoid=c1.oid AND c.attnum = d.objsubid
  where n.nspname='cemdm' and c.attnum > 0
  UNION ALL
  select 
    pn.nspname as "Schema",pc.relname "Table Name",null as "Column Name", 'Table' as "Type", 
    null as "Ordinal Position",null as "Is Not Null",null as "Default Value",null as "Data Type",
    split_part(pd.description,'|',1) as "Category", 
    split_part(pd.description,'|',2) as "Source",
    split_part(pd.description,'|',3) as "Transient/Derived",
    split_part(pd.description,'|',4) as "Is PII",
    split_part(pd.description,'|',5) as "Is Business Sensitive",
    split_part(pd.description,'|',6) as "Description"
  from pg_catalog.pg_description pd 
  inner join pg_class pc on pd.objoid = pc.oid
  inner join pg_catalog.pg_namespace pn on pc.relnamespace = pn.oid
  where pn.nspname = 'cemdm' and pd.objsubid = 0
) x
order by "Table Name", nvl("Ordinal Position",0);

The following screenshot shows a sample visualization which you can build on QuickSight.

For more information about running custom Amazon Redshift SQL using Amazon QuickSight, see Using the Query Editor.

QuickSight allows creating template from existing analysis. You can use the resulting template to create a dashboard. For more information, see Evolve your analytics with Amazon QuickSight’s new APIs and theming capabilitiesYou can also embed QuickSight dashboards into your own apps, websites, and wikis without the need to provision and manage users (readers) in QuickSight. For more information, see New in Amazon QuickSight – session capacity pricing for large scale deployments, embedding in public websites, and developer portal for embedded analytics.”

Cleaning up

To avoid incurring future charges, delete the resources you created. Manually delete anything created outside of the CloudFormation stack and then the stack itself.

Conclusion

In this post, I demonstrated how data analysts, data scientists, and advanced business users can easily query multiple data sources and generate actionable insights including user interest profiles, segments, and micro-segments. Downstream systems like campaign management systems, customer care portals, and customer-facing applications; internal teams like retention, marketing, CX, and network; and workloads like machine learning can greatly benefit from the insights generated from this solution. You can automate these insights and integrate them with northbound systems, and trigger them based on a schedule or an event.

I also demonstrated how business users are empowered with self-service analytics to help them perform data exploration and publish ready-made insights in the form of dashboards. You can also create stories to drive data-heavy conversations based on enriched data stored in Amazon Redshift or Amazon S3.

Perceiving customer behavior across multiple touchpoints is the key for any business to thrive. And the essence of this solution is to capitalize on data and drive CX and monetization initiatives holistically across your organization. This framework allows you to accelerate your journey towards improving CX and generating new revenue streams by using existing data assets.

You can progressively augment this solution by adding additional data sources to evolve into a customer data platform hosting 360° profiles of individual subscribers correlated from multiple data sources. This solution can further support new and existing marketing, partnerships, loyalty, retention, network planning, and network optimization initiatives to drive revenue growth and improve profitability while keeping subscribers happy and loyal. It also helps you define an organization-wide standard for data visualization, self-service analytics, metadata discovery, and data marketplace.

For more ways to expand this solution, consider the following services:

  • AWS Data Exchange makes it easy to find, subscribe to, and use third-party data in the cloud. You can merge it with in-house data assets to span existing insights across multiple domains.
  • Amazon Pinpoint is a flexible and scalable outbound and inbound marketing communications service. You can connect with customers over channels like email, SMS, push, or voice. You can segment and micro-segment your campaign audience for the right customer and personalize your messages with the right content.

As always, AWS welcomes feedback. This is a wide-open space to explore, so reach out to us if you want to dive deep into understanding how you can build this solution and more on AWS. Please submit comments or questions in the comments section.


About the Author

Vikas Omer is an analytics specialist solutions architect at Amazon Web Services. Vikas has a strong background in analytics, customer experience management (CEM) and data monetization, with over 11 years of experience in the telecommunications industry globally. With six AWS Certifications, including Analytics Specialty, he is a trusted analytics advocate to AWS customers and partners. He loves traveling, meeting customers, and helping them become successful in what they do.

Developing enterprise application patterns with the AWS CDK

Post Syndicated from Krishnakumar Rengarajan original https://aws.amazon.com/blogs/devops/developing-application-patterns-cdk/

Enterprises often need to standardize their infrastructure as code (IaC) for governance, compliance, and quality control reasons. You also need to manage and centrally publish updates to your IaC libraries. In this post, we demonstrate how to use the AWS Cloud Development Kit (AWS CDK) to define patterns for IaC and publish them for consumption in controlled releases using AWS CodeArtifact.

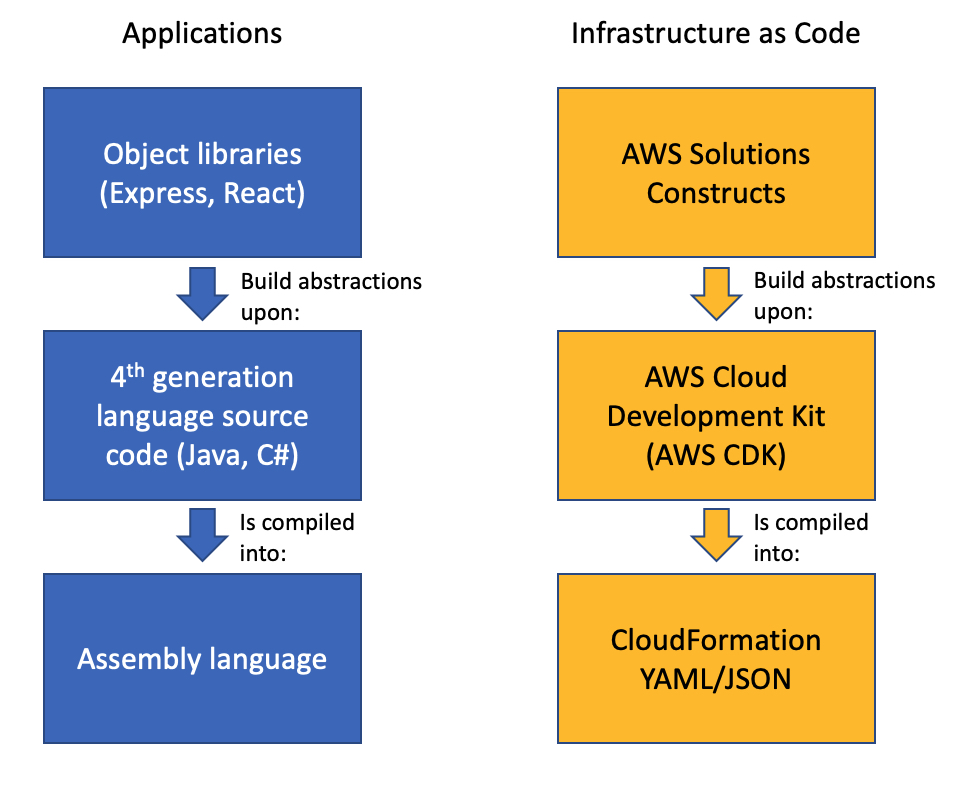
AWS CDK is an open-source software development framework to model and provision cloud application resources in programming languages such as TypeScript, JavaScript, Python, Java, and C#/.Net. The basic building blocks of AWS CDK are called constructs, which map to one or more AWS resources, and can be composed of other constructs. Constructs allow high-level abstractions to be defined as patterns. You can synthesize constructs into AWS CloudFormation templates and deploy them into an AWS account.

AWS CodeArtifact is a fully managed service for managing the lifecycle of software artifacts. You can use CodeArtifact to securely store, publish, and share software artifacts. Software artifacts are stored in repositories, which are aggregated into a domain. A CodeArtifact domain allows organizational policies to be applied across multiple repositories. You can use CodeArtifact with common build tools and package managers such as NuGet, Maven, Gradle, npm, yarn, pip, and twine.

Solution overview

In this solution, we complete the following steps:

  1. Create two AWS CDK pattern constructs in Typescript: one for traditional three-tier web applications and a second for serverless web applications.
  2. Publish the pattern constructs to CodeArtifact as npm packages. npm is the package manager for Node.js.
  3. Consume the pattern construct npm packages from CodeArtifact and use them to provision the AWS infrastructure.

We provide more information about the pattern constructs in the following sections. The source code mentioned in this blog is available in GitHub.

Note: The code provided in this blog post is for demonstration purposes only. You must ensure that it meets your security and production readiness requirements.

Traditional three-tier web application construct

The first pattern construct is for a traditional three-tier web application running on Amazon Elastic Compute Cloud (Amazon EC2), with AWS resources consisting of Application Load Balancer, an Autoscaling group and EC2 launch configuration, an Amazon Relational Database Service (Amazon RDS) or Amazon Aurora database, and AWS Secrets Manager. The following diagram illustrates this architecture.


Traditional stack architecture

Serverless web application construct

The second pattern construct is for a serverless application with AWS resources in AWS Lambda, Amazon API Gateway, and Amazon DynamoDB.

Serverless application architecture

Publishing and consuming pattern constructs

Both constructs are written in Typescript and published to CodeArtifact as npm packages. A semantic versioning scheme is used to version the construct packages. After a package gets published to CodeArtifact, teams can consume them for deploying AWS resources. The following diagram illustrates this architecture.

Pattern constructs

Prerequisites

Before getting started, complete the following steps:

  1. Clone the code from the GitHub repository for the traditional and serverless web application constructs:
    git clone https://github.com/aws-samples/aws-cdk-developing-application-patterns-blog.git
    cd aws-cdk-developing-application-patterns-blog
  2. Configure AWS Identity and Access Management (IAM) permissions by attaching IAM policies to the user, group, or role implementing this solution. The following policy files are in the iam folder in the root of the cloned repo:
    • BlogPublishArtifacts.json – The IAM policy to configure CodeArtifact and publish packages to it.
    • BlogConsumeTraditional.json – The IAM policy to consume the traditional three-tier web application construct from CodeArtifact and deploy it to an AWS account.
    • PublishArtifacts.json – The IAM policy to consume the serverless construct from CodeArtifact and deploy it to an AWS account.

Configuring CodeArtifact

In this step, we configure CodeArtifact for publishing the pattern constructs as npm packages. The following AWS resources are created:

  • A CodeArtifact domain named blog-domain
  • Two CodeArtifact repositories:
    • blog-npm-store – For configuring the upstream NPM repository.
    • blog-repository – For publishing custom packages.

Deploy the CodeArtifact resources with the following code:

cd prerequisites/
rm -rf package-lock.json node_modules
npm install
cdk deploy --require-approval never
cd ..

Log in to the blog-repository. This step is needed for publishing and consuming the npm packages. See the following code:

aws codeartifact login \
     --tool npm \
     --domain blog-domain \
     --domain-owner $(aws sts get-caller-identity --output text --query 'Account') \
     --repository blog-repository

Publishing the pattern constructs

  1. Change the directory to the serverless construct:
    cd serverless
  2. Install the required npm packages:
    rm package-lock.json && rm -rf node_modules
    npm install
    
  3. Build the npm project:
    npm run build
  4. Publish the construct npm package to the CodeArtifact repository:
    npm publish

    Follow the previously mentioned steps for building and publishing a traditional (classic Load Balancer plus Amazon EC2) web app by running these commands in the traditional directory.

    If the publishing is successful, you see messages like the following screenshots. The following screenshot shows the traditional infrastructure.

    Successful publishing of Traditional construct package to CodeArtifact

    The following screenshot shows the message for the serverless infrastructure.

    Successful publishing of Serverless construct package to CodeArtifact

    We just published version 1.0.1 of both the traditional and serverless web app constructs. To release a new version, we can simply update the version attribute in the package.json file in the traditional or serverless folder and repeat the last two steps.

    The following code snippet is for the traditional construct:

    {
        "name": "traditional-infrastructure",
        "main": "lib/index.js",
        "files": [
            "lib/*.js",
            "src"
        ],
        "types": "lib/index.d.ts",
        "version": "1.0.1",
    ...
    }

    The following code snippet is for the serverless construct:

    {
        "name": "serverless-infrastructure",
        "main": "lib/index.js",
        "files": [
            "lib/*.js",
            "src"
        ],
        "types": "lib/index.d.ts",
        "version": "1.0.1",
    ...
    }

Consuming the pattern constructs from CodeArtifact

In this step, we demonstrate how the pattern constructs published in the previous steps can be consumed and used to provision AWS infrastructure.

  1. From the root of the GitHub package, change the directory to the examples directory containing code for consuming traditional or serverless constructs.To consume the traditional construct, use the following code:
    cd examples/traditional

    To consume the serverless construct, use the following code:

    cd examples/serverless
  2. Open the package.json file in either directory and note that the packages and versions we consume are listed in the dependencies section, along with their version.
    The following code shows the traditional web app construct dependencies:

    "dependencies": {
        "@aws-cdk/core": "1.30.0",
        "traditional-infrastructure": "1.0.1",
        "aws-cdk": "1.47.0"
    }

    The following code shows the serverless web app construct dependencies:

    "dependencies": {
        "@aws-cdk/core": "1.30.0",
        "serverless-infrastructure": "1.0.1",
        "aws-cdk": "1.47.0"
    }
  3. Install the pattern artifact npm package along with the dependencies:
    rm package-lock.json && rm -rf node_modules
    npm install
    
  4. As an optional step, if you need to override the default Lambda function code, build the npm project. The following commands build the Lambda function source code:
    cd ../override-serverless
    npm run build
    cd -
  5. Bootstrap the project with the following code:
    cdk bootstrap

    This step is applicable for serverless applications only. It creates the Amazon Simple Storage Service (Amazon S3) staging bucket where the Lambda function code and artifacts are stored.

  6. Deploy the construct:
    cdk deploy --require-approval never

    If the deployment is successful, you see messages similar to the following screenshots. The following screenshot shows the traditional stack output, with the URL of the Load Balancer endpoint.

    Traditional CloudFormation stack outputs

    The following screenshot shows the serverless stack output, with the URL of the API Gateway endpoint.

    Serverless CloudFormation stack outputs

    You can test the endpoint for both constructs using a web browser or the following curl command:

    curl <endpoint output>

    The traditional web app endpoint returns a response similar to the following:

    [{"app": "traditional", "id": 1605186496, "purpose": "blog"}]

    The serverless stack returns two outputs. Use the output named ServerlessStack-v1.Api. See the following code:

    [{"purpose":"blog","app":"serverless","itemId":"1605190688947"}]

  7. Optionally, upgrade to a new version of pattern construct.
    Let’s assume that a new version of the serverless construct, version 1.0.2, has been published, and we want to upgrade our AWS infrastructure to this version. To do this, edit the package.json file and change the traditional-infrastructure or serverless-infrastructure package version in the dependencies section to 1.0.2. See the following code example:

    "dependencies": {
        "@aws-cdk/core": "1.30.0",
        "serverless-infrastructure": "1.0.2",
        "aws-cdk": "1.47.0"
    }

    To update the serverless-infrastructure package to 1.0.2, run the following command:

    npm update

    Then redeploy the CloudFormation stack:

    cdk deploy --require-approval never

Cleaning up

To avoid incurring future charges, clean up the resources you created.

  1. Delete all AWS resources that were created using the pattern constructs. We can use the AWS CDK toolkit to clean up all the resources:
    cdk destroy --force

    For more information about the AWS CDK toolkit, see Toolkit reference. Alternatively, delete the stack on the AWS CloudFormation console.

  2. Delete the CodeArtifact resources by deleting the CloudFormation stack that was deployed via AWS CDK:
    cd prerequisites
    cdk destroy –force
    

Conclusion

In this post, we demonstrated how to publish AWS CDK pattern constructs to CodeArtifact as npm packages. We also showed how teams can consume the published pattern constructs and use them to provision their AWS infrastructure.

This mechanism allows your infrastructure for AWS services to be provisioned from the configuration that has been vetted for quality control and security and governance checks. It also provides control over when new versions of the pattern constructs are released, and when the teams consuming the constructs can upgrade to the newly released versions.

About the Authors

Usman Umar


Usman Umar is a Sr. Applications Architect at AWS Professional Services. He is passionate about developing innovative ways to solve hard technical problems for the customers. In his free time, he likes going on biking trails, doing car modifications, and spending time with his family.


Krishnakumar Rengarajan


Krishnakumar Rengarajan is a DevOps Consultant with AWS Professional Services. He enjoys working with customers and focuses on building and delivering automated solutions that enables customers on their AWS cloud journeys.

Accelerating Amazon Redshift federated query to Amazon Aurora MySQL with AWS CloudFormation

Post Syndicated from BP Yau original https://aws.amazon.com/blogs/big-data/accelerating-amazon-redshift-federated-query-to-amazon-aurora-mysql-with-aws-cloudformation/

Amazon Redshift federated query allows you to combine data from one or more Amazon Relational Database Service (Amazon RDS) for MySQL and Amazon Aurora MySQL databases with data already in Amazon Redshift. You can also combine such data with data in an Amazon Simple Storage Service (Amazon S3) data lake.

This post shows you how to set up Aurora MySQL and Amazon Redshift with a TPC-DS dataset so you can take advantage of Amazon Redshift federated query using AWS CloudFormation. You can use the environment you set up in this post to experiment with various use cases in the post Announcing Amazon Redshift federated querying to Amazon Aurora MySQL and Amazon RDS for MySQL.

Benefits of using CloudFormation templates

The standard workflow for setting up Amazon Redshift federated query involves six steps. For more information, see Querying data with federated queries in Amazon Redshift. With a CloudFormation template, you can condense these manual procedures into a few steps listed in a text file. The declarative code in the file captures the intended state of the resources that you want to create and allows you to automate the setup of AWS resources to support Amazon Redshift federated query. You can further enhance this template to become the single source of truth for your infrastructure.

A CloudFormation template acts as an accelerator. It helps you automate the deployment of technology and infrastructure in a safe and repeatable manner across multiple Regions and accounts with the least amount of effort and time.

Architecture overview

The following diagram illustrates the solution architecture.

The following diagram illustrates the solution architecture.

The CloudFormation template provisions the following components in the architecture:

  • VPC
  • Subnets
  • Route tables
  • Internet gateway
  • Amazon Linux bastion host
  • Secrets
  • Aurora for MySQL cluster with TPC-DS dataset preloaded
  • Amazon Redshift cluster with TPC-DS dataset preloaded
  • Amazon Redshift IAM role with required permissions

Prerequisites

Before you create your resources in AWS CloudFormation, you must complete the following prerequisites:

Setting up resources with AWS CloudFormation

This post provides a CloudFormation template as a general guide. You can review and customize it to suit your needs. Some of the resources that this stack deploys incur costs when in use.

To create your resources, complete the following steps:

  1. Sign in to the console.
  2. Choose the us-east-1 Region in which to create the stack.
  3. Choose Launch Stack:
  4. Choose Next.

This automatically launches AWS CloudFormation in your AWS account with a template. It prompts you to sign in as needed. You can view the CloudFormation template from within the console.

  1. For Stack name, enter a stack name.
  2. For Session, leave as the default.
  3. For ec2KeyPair, choose the key pair you created earlier.
  4. Choose Next.

This automatically launches AWS CloudFormation in your AWS account with a template.

  1. On the next screen, choose Next.
  2. Review the details on the final screen and select I acknowledge that AWS CloudFormation might create IAM resources.
  3. Choose Create.

Stack creation can take up to 45 minutes.

  1. After the stack creation is complete, on the Outputs tab of the stack, record the value of the key for the following components, which you use in a later step:
  • AuroraClusterEndpoint
  • AuroraSecretArn
  • RedshiftClusterEndpoint
  • RedshiftClusterRoleArn

As of this writing, this feature is in public preview. You can create a snapshot of your Amazon Redshift cluster created by the stack and restore the snapshot as a new cluster in the sql_preview maintenance track with the same configuration.

You can create a snapshot of your Amazon Redshift cluster created by the stack and restore the snapshot as a new cluster

You’re now ready to log in to both the Aurora MySQL and Amazon Redshift cluster and run some basic commands to test them.

Logging in to the clusters using the Amazon Linux bastion host

The following steps assume that you use a computer with an SSH client to connect to the bastion host. For more information about connecting using various clients, see Connect to your Linux instance.

  1. Move the private key of the EC2 key pair (that you saved previously) to a location on your SSH client, where you are connecting to the Amazon Linux bastion host.
  2. Change the permission of the private key using the following code, so that it’s not publicly viewable:
    chmod 400 <private key file name; for example, bastion-key.pem>

  1. On the Amazon EC2 console, choose Instances.
  2. Choose the Amazon Linux bastion host that the CloudFormation stack created.
  3. Choose Connect.
  4. Copy the value for SSHCommand.
  5. On the SSH client, change the directory to the location where you saved the EC2 private key, and enter the SSHCommand value.
  6. On the console, open the AWS Secrets Manager dashboard.
  7. Choose the secret secretAuroraMasterUser-*.
  8. Choose Retrieve secret value.
  9. Record the password under Secret key/value, which you use to log in to the Aurora MySQL cluster.
  10. Choose the secret SecretRedshiftMasterUser.
  11. Choose Retrieve secret value.
  12. Record the password under Secret key/value, which you use to log in to the Amazon Redshift cluster.
  13. Log in to both Aurora MySQL using the MySQL Command-Line Client and Amazon Redshift using query editor.

The CloudFormation template has already set up MySQL Command-Line Client binaries on the Amazon Linux bastion host.

  1. On the Amazon Redshift console, choose Editor.
  2. Choose Query editor.
  3. For Connection, choose Create new connection.
  4. For Cluster, choose the Amazon Redshift cluster.
  5. For Database name, enter your database.
  6. Enter the database user and password recorded earlier.
  7. Choose Connect to database.

Choose Connect to database.

  1. Enter the following SQL command:
    select "table" from svv_table_info where schema='public';

You should see 25 tables as the output.

You should see 25 tables as the output.

  1. Launch a command prompt session of the bastion host and enter the following code (substitute <AuroraClusterEndpoint> with the value from the AWS CloudFormation output):
    mysql --host=<AuroraClusterEndpoint> --user=awsuser --password=<database user password recorded earlier>

  1. Enter the following SQL command:
    use tpc;
    show tables;
    

You should see the following eight tables as the output:

mysql> use tpc;
Reading table information for completion of table and column names
You can turn off this feature to get a quicker startup with -A

Database changed
mysql> show tables;
+------------------------+
| Tables_in_tpc          |
+------------------------+
| customer               |
| customer_address       |
| household_demographics |
| income_band            |
| item                   |
| promotion              |
| web_page               |
| web_sales              |
+------------------------+
8 rows in set (0.01 sec)

Completing federated query setup

The final step is to create an external schema to connect to the Aurora MySQL instance. The following example code creates an external schema statement that you need to run on your Amazon Redshift cluster to complete this step:

CREATE EXTERNAL SCHEMA IF NOT EXISTS mysqlfq 
FROM MYSQL 
DATABASE 'tpc' 
URI '<AuroraClusterEndpoint>' 
PORT 3306 
IAM_ROLE '<IAMRole>' 
SECRET_ARN '<SecretARN>'

Use the following parameters:

  • URI – The AuroraClusterEndpoint value from the CloudFormation stack outputs. The value is in the format <stackname>-cluster.<randomcharacter>.us-east-1.rds.amazonaws.com.
  • IAM_Role – The RedshiftClusterRoleArn value from the CloudFormation stack outputs. The value is in the format arn:aws:iam::<accountnumber>:role/<stackname>-RedshiftClusterRole-<randomcharacter>.
  • Secret_ARN – The AuroraSecretArn value from the CloudFormation stack outputs. The value is in the format arn:aws:secretsmanager:us-east-1:<accountnumber>: secret:secretAuroraMasterUser-<randomcharacter>. 

Federated query test

Now that you have set up federated query, you can start testing the feature using the TPC-DS dataset that was preloaded into both Aurora MySQL and Amazon Redshift.

For example, the following query aggregates the total net sales by product category and class from the web_sales fact table and date and item dimension tables. Tables web_sales and date are stored in Amazon Redshift, and the item table is stored in Aurora MySQL:

select
    sum(ws_net_paid
    ) as total_sum, i_category, i_class, 0 as g_category, 0 as g_class  
from
    web_sales ,date_dim d1 ,mysqlfq.item 
where
    d1.d_month_seq between 1205 
    and 1205+11 
    and d1.d_date_sk = ws_sold_date_sk 
    and i_item_sk = ws_item_sk 
group
    by i_category,i_class ; 

You can continue to experiment with the dataset and explore the three main use cases in the post [exact name of post title with embedded link].

Cleaning up

When you’re finished, delete the CloudFormation stack, because some of the AWS resources in this walkthrough incur a cost if you continue to use them. Complete the following steps:

  1. On the AWS CloudFormation console, choose Stacks.
  2. Choose the stack you launched in this walkthrough. The stack must be currently running.
  3. In the stack details pane, choose Delete.
  4. Choose Delete stack.

Summary

This post showed you how to automate the creation of an Aurora MySQL and Amazon Redshift cluster preloaded with the TPC-DS dataset, the prerequisites for the new Amazon Redshift federated query feature using AWS CloudFormation, and a single manual step to complete the setup. It also provided an example federated query using the TPC-DS dataset, which you can use to accelerate your learning and adoption of the new feature. You can continue to modify the CloudFormation templates from this post to support your business needs.

If you have any questions or suggestions, please leave a comment.


About the Authors

BP Yau is an Analytics Specialist Solutions Architect at AWS. His role is to help customers architect big data solutions to process data at scale. Before AWS, he helped Amazon.com Supply Chain Optimization Technologies migrate its Oracle data warehouse to Amazon Redshift and build its next generation big data analytics platform using AWS technologies.


Srikanth Sopirala is a Sr. Specialist Solutions Architect, Analytics at AWS. He is passionate about helping customers build scalable data and analytics solutions in the cloud.


Zhouyi Yang is a Software Development Engineer for Amazon Redshift Query Processing team. He’s passionate about gaining new knowledge about large databases and has worked on SQL language features such as federated query and IAM role privilege control. In his spare time, he enjoys swimming, tennis, and reading.


Entong Shen is a Senior Software Development Engineer for Amazon Redshift. He has been working on MPP databases for over 8 years and has focused on query optimization, statistics, and SQL language features such as stored procedures and federated query. In his spare time, he enjoys listening to music of all genres and working in his succulent garden.


Easily configure Amazon DevOps Guru across multiple accounts and Regions using AWS CloudFormation StackSets

Post Syndicated from Nikunj Vaidya original https://aws.amazon.com/blogs/devops/configure-devops-guru-multiple-accounts-regions-using-cfn-stacksets/

As applications become increasingly distributed and complex, operators need more automated practices to maintain application availability and reduce the time and effort spent on detecting, debugging, and resolving operational issues.

Enter Amazon DevOps Guru (preview).

Amazon DevOps Guru is a machine learning (ML) powered service that gives you a simpler way to improve an application’s availability and reduce expensive downtime. Without involving any complex configuration setup, DevOps Guru automatically ingests operational data in your AWS Cloud. When DevOps Guru identifies a critical issue, it automatically alerts you with a summary of related anomalies, the likely root cause, and context on when and where the issue occurred. DevOps Guru also, when possible, provides prescriptive recommendations on how to remediate the issue.

Using Amazon DevOps Guru is easy and doesn’t require you to have any ML expertise. To get started, you need to configure DevOps Guru and specify which AWS resources to analyze. If your applications are distributed across multiple AWS accounts and AWS Regions, you need to configure DevOps Guru for each account-Region combination. Though this may sound complex, it’s in fact very simple to do so using AWS CloudFormation StackSets. This post walks you through the steps to configure DevOps Guru across multiple AWS accounts or organizational units, using AWS CloudFormation StackSets.


Solution overview

The goal of this post is to provide you with sample templates to facilitate onboarding Amazon DevOps Guru across multiple AWS accounts. Instead of logging into each account and enabling DevOps Guru, you use AWS CloudFormation StackSets from the primary account to enable DevOps Guru across multiple accounts in a single AWS CloudFormation operation. When it’s enabled, DevOps Guru monitors your associated resources and provides you with detailed insights for anomalous behavior along with intelligent recommendations to mitigate and incorporate preventive measures.

We consider various options in this post for enabling Amazon DevOps Guru across multiple accounts and Regions:

  • All resources across multiple accounts and Regions
  • Resources from specific CloudFormation stacks across multiple accounts and Regions
  • For All resources in an organizational unit

In the following diagram, we launch the AWS CloudFormation StackSet from a primary account to enable Amazon DevOps Guru across two AWS accounts and carry out operations to generate insights. The StackSet uses a single CloudFormation template to configure DevOps Guru, and deploys it across multiple accounts and regions, as specified in the command.

Figure: Shows enabling of DevOps Guru using CloudFormation StackSets

Figure: Shows enabling of DevOps Guru using CloudFormation StackSets

When Amazon DevOps Guru is enabled to monitor your resources within the account, it uses a combination of vended Amazon CloudWatch metrics, AWS CloudTrail logs, and specific patterns from its ML models to detect an anomaly. When the anomaly is detected, it generates an insight with the recommendations.

Figure: Shows DevOps Guru generating Insights based upon ingested metrics

Figure: Shows DevOps Guru monitoring the resources and generating insights for anomalies detected


Prerequisites

To complete this post, you should have the following prerequisites:

  • Two AWS accounts. For this post, we use the account numbers 111111111111 (primary account) and 222222222222. We will carry out the CloudFormation operations and monitoring of the stacks from this primary account.
  • To use organizations instead of individual accounts, identify the organization unit (OU) ID that contains at least one AWS account.
  • Access to a bash environment, either using an AWS Cloud9 environment or your local terminal with the AWS Command Line Interface (AWS CLI) installed.
  • AWS Identity and Access Management (IAM) roles for AWS CloudFormation StackSets.
  • Knowledge of CloudFormation StackSets


(a) Using an AWS Cloud9 environment or AWS CLI terminal
We recommend using AWS Cloud9 to create an environment to get access to the AWS CLI from a bash terminal. Make sure you select Linux2 as the operating system for the AWS Cloud9 environment.

Alternatively, you may use your bash terminal in your favorite IDE and configure your AWS credentials in your terminal.

(b) Creating IAM roles

If you are using Organizations for account management, you would not need to create the IAM roles manually and instead use Organization based trusted access and SLRs. You may skip the sections (b), (c) and (d). If not using Organizations, please read further.

Before you can deploy AWS CloudFormation StackSets, you must have the following IAM roles:

  • AWSCloudFormationStackSetAdministrationRole
  • AWSCloudFormationStackSetExecutionRole

The IAM role AWSCloudFormationStackSetAdministrationRole should be created in the primary account whereas AWSCloudFormationStackSetExecutionRole role should be created in all the accounts where you would like to run the StackSets.

If you’re already using AWS CloudFormation StackSets, you should already have these roles in place. If not, complete the following steps to provision these roles.

(c) Creating the AWSCloudFormationStackSetAdministrationRole role
To create the AWSCloudFormationStackSetAdministrationRole role, sign in to your primary AWS account and go to the AWS Cloud9 terminal.

Execute the following command to download the file:

curl -O https://s3.amazonaws.com/cloudformation-stackset-sample-templates-us-east-1/AWSCloudFormationStackSetAdministrationRole.yml

Execute the following command to create the stack:

aws cloudformation create-stack \
--stack-name AdminRole \
--template-body file:///$PWD/AWSCloudFormationStackSetAdministrationRole.yml \
--capabilities CAPABILITY_NAMED_IAM \
--region us-east-1

(d) Creating the AWSCloudFormationStackSetExecutionRole role
You now create the role AWSCloudFormationStackSetExecutionRole in the primary account and other target accounts where you want to enable DevOps Guru. For this post, we create it for our two accounts and two Regions (us-east-1 and us-east-2).

Execute the following command to download the file:

curl -O https://s3.amazonaws.com/cloudformation-stackset-sample-templates-us-east-1/AWSCloudFormationStackSetExecutionRole.yml

Execute the following command to create the stack:

aws cloudformation create-stack \
--stack-name ExecutionRole \
--template-body file:///$PWD/AWSCloudFormationStackSetExecutionRole.yml \
--parameters ParameterKey=AdministratorAccountId,ParameterValue=111111111111 \
--capabilities CAPABILITY_NAMED_IAM \
--region us-east-1

Now that the roles are provisioned, you can use AWS CloudFormation StackSets in the next section.


Running AWS CloudFormation StackSets to enable DevOps Guru

With the required IAM roles in place, now you can deploy the stack sets to enable DevOps Guru across multiple accounts.

As a first step, go to your bash terminal and clone the GitHub repository to access the CloudFormation templates:

git clone https://github.com/aws-samples/amazon-devopsguru-samples
cd amazon-devopsguru-samples/enable-devopsguru-stacksets


(a) Configuring Amazon SNS topics for DevOps Guru to send notifications for operational insights

If you want to receive notifications for operational insights generated by Amazon DevOps Guru, you need to configure an Amazon Simple Notification Service (Amazon SNS) topic across multiple accounts. If you have already configured SNS topics and want to use them, identify the topic name and directly skip to the step to enable DevOps Guru.

Note for Central notification target: You may prefer to configure an SNS Topic in the central AWS account so that all Insight notifications are sent to a single target. In such a case, you would need to modify the central account SNS topic policy to allow other accounts to send notifications.

To create your stack set, enter the following command (provide an email for receiving insights):

aws cloudformation create-stack-set \
--stack-set-name CreateDevOpsGuruTopic \
--template-body file:///$PWD/CreateSNSTopic.yml \
--parameters ParameterKey=EmailAddress,ParameterValue=<[email protected]> \
--region us-east-1

Instantiate AWS CloudFormation StackSets instances across multiple accounts and multiple Regions (provide your account numbers and Regions as needed):

aws cloudformation create-stack-instances \
--stack-set-name CreateDevOpsGuruTopic \
--accounts '["111111111111","222222222222"]' \
--regions '["us-east-1","us-east-2"]' \
--operation-preferences FailureToleranceCount=0,MaxConcurrentCount=1

After running this command, the SNS topic devops-guru is created across both the accounts. Go to the email address specified and confirm the subscription by clicking the Confirm subscription link in each of the emails that you receive. Your SNS topic is now fully configured for DevOps Guru to use.

Figure: Shows creation of SNS topic to receive insights from DevOps Guru

Figure: Shows creation of SNS topic to receive insights from DevOps Guru


(b) Enabling DevOps Guru

Let us first examine the CloudFormation template format to enable DevOps Guru and configure it to send notifications over SNS topics. See the following code snippet:

Resources:
  DevOpsGuruMonitoring:
    Type: AWS::DevOpsGuru::ResourceCollection
    Properties:
      ResourceCollectionFilter:
        CloudFormation:
          StackNames: *

  DevOpsGuruNotification:
    Type: AWS::DevOpsGuru::NotificationChannel
    Properties:
      Config:
        Sns:
          TopicArn: arn:aws:sns:us-east-1:111111111111:SnsTopic


When the StackNames property is fed with a value of *, it enables DevOps Guru for all CloudFormation stacks. However, you can enable DevOps Guru for only specific CloudFormation stacks by providing the desired stack names as shown in the following code:


Resources:
  DevOpsGuruMonitoring:
    Type: AWS::DevOpsGuru::ResourceCollection
    Properties:
      ResourceCollectionFilter:
        CloudFormation:
          StackNames:
          - StackA
          - StackB


For the CloudFormation template in this post, we provide the names of the stacks using the parameter inputs. To enable the AWS CLI to accept a list of inputs, we need to configure the input type as CommaDelimitedList, instead of a base string. We also provide the parameter SnsTopicName, which the template substitutes into the TopicArn property.

See the following code:

AWSTemplateFormatVersion: 2010-09-09
Description: Enable Amazon DevOps Guru

Parameters:
  CfnStackNames:
    Type: CommaDelimitedList
    Description: Comma separated names of the CloudFormation Stacks for DevOps Guru to analyze.
    Default: "*"

  SnsTopicName:
    Type: String
    Description: Name of SNS Topic

Resources:
  DevOpsGuruMonitoring:
    Type: AWS::DevOpsGuru::ResourceCollection
    Properties:
      ResourceCollectionFilter:
        CloudFormation:
          StackNames: !Ref CfnStackNames

  DevOpsGuruNotification:
    Type: AWS::DevOpsGuru::NotificationChannel
    Properties:
      Config:
        Sns:
          TopicArn: !Sub arn:aws:sns:${AWS::Region}:${AWS::AccountId}:${SnsTopicName}


Now that we reviewed the CloudFormation syntax, we will use this template to implement the solution. For this post, we will consider three use cases for enabling Amazon DevOps Guru:

(i) For all resources across multiple accounts and Regions

(ii) For all resources from specific CloudFormation stacks across multiple accounts and Regions

(iii) For all resources in an organization

Let us review each of the above points in detail.

(i) Enabling DevOps Guru for all resources across multiple accounts and Regions

Note: Carry out the following steps in your primary AWS account.

You can use the CloudFormation template (EnableDevOpsGuruForAccount.yml) from the current directory, create a stack set, and then instantiate AWS CloudFormation StackSets instances across desired accounts and Regions.

The following command creates the stack set:

aws cloudformation create-stack-set \
--stack-set-name EnableDevOpsGuruForAccount \
--template-body file:///$PWD/EnableDevOpsGuruForAccount.yml \
--parameters ParameterKey=CfnStackNames,ParameterValue=* \
ParameterKey=SnsTopicName,ParameterValue=devops-guru \
--region us-east-1

The following command instantiates AWS CloudFormation StackSets instances across multiple accounts and Regions:

aws cloudformation create-stack-instances \
--stack-set-name EnableDevOpsGuruForAccount \
--accounts '["111111111111","222222222222"]' \
--regions '["us-east-1","us-east-2"]' \
--operation-preferences FailureToleranceCount=0,MaxConcurrentCount=1


The following screenshot of the AWS CloudFormation console in the primary account running StackSet, shows the stack set deployed in both accounts.

Figure: Screenshot for deployed StackSet and Stack instances

Figure: Screenshot for deployed StackSet and Stack instances


The following screenshot of the Amazon DevOps Guru console shows DevOps Guru is enabled to monitor all CloudFormation stacks.

Figure: Screenshot of DevOps Guru dashboard showing DevOps Guru enabled for all CloudFormation stacks

Figure: Screenshot of DevOps Guru dashboard showing DevOps Guru enabled for all CloudFormation stacks


(ii) Enabling DevOps Guru for specific CloudFormation stacks for individual accounts

Note: Carry out the following steps in your primary AWS account

In this use case, we want to enable Amazon DevOps Guru only for specific CloudFormation stacks for individual accounts. We use the AWS CloudFormation StackSets override parameters feature to rerun the stack set with specific values for CloudFormation stack names as parameter inputs. For more information, see Override parameters on stack instances.

If you haven’t created the stack instances for individual accounts, use the create-stack-instances AWS CLI command and pass the parameter overrides. If you have already created stack instances, update the existing stack instances using update-stack-instances and pass the parameter overrides. Replace the required account number, Regions, and stack names as needed.

In account 111111111111, create instances with the parameter override with the following command, where CloudFormation stacks STACK-NAME-1 and STACK-NAME-2 belong to this account in us-east-1 Region:

aws cloudformation create-stack-instances \
--stack-set-name  EnableDevOpsGuruForAccount \
--accounts '["111111111111"]' \
--parameter-overrides ParameterKey=CfnStackNames,ParameterValue=\"<STACK-NAME-1>,<STACK-NAME-2>\" \
--regions '["us-east-1"]' \
--operation-preferences FailureToleranceCount=0,MaxConcurrentCount=1

Update the instances with the following command:

aws cloudformation update-stack-instances \
--stack-set-name EnableDevOpsGuruForAccount \
--accounts '["111111111111"]' \
--parameter-overrides ParameterKey=CfnStackNames,ParameterValue=\"<STACK-NAME-1>,<STACK-NAME-2>\" \
--regions '["us-east-1"]' \
--operation-preferences FailureToleranceCount=0,MaxConcurrentCount=1


In account 222222222222, create instances with the parameter override with the following command, where CloudFormation stacks STACK-NAME-A and STACK-NAME-B belong to this account in the us-east-1 Region:

aws cloudformation create-stack-instances \
--stack-set-name  EnableDevOpsGuruForAccount \
--accounts '["222222222222"]' \
--parameter-overrides ParameterKey=CfnStackNames,ParameterValue=\"<STACK-NAME-A>,<STACK-NAME-B>\" \
--regions '["us-east-1"]' \
--operation-preferences FailureToleranceCount=0,MaxConcurrentCount=1

Update the instances with the following command:

aws cloudformation update-stack-instances \
--stack-set-name EnableDevOpsGuruForAccount \
--accounts '["222222222222"]' \
--parameter-overrides ParameterKey=CfnStackNames,ParameterValue=\"<STACK-NAME-A>,<STACK-NAME-B>\" \
--regions '["us-east-1"]' \
--operation-preferences FailureToleranceCount=0,MaxConcurrentCount=1


The following screenshot of the DevOps Guru console shows that DevOps Guru is enabled for only two CloudFormation stacks.

Figure: Screenshot of DevOps Guru dashboard showing DevOps Guru enabled for only two CloudFormation stacks

Figure: Screenshot of DevOps Guru dashboard with DevOps Guru enabled for two CloudFormation stacks


(iii) Enabling DevOps Guru for all resources in an organization

Note: Carry out the following steps in your primary AWS account

If you’re using AWS Organizations, you can take advantage of the AWS CloudFormation StackSets feature support for Organizations. This way, you don’t need to add or remove stacks when you add or remove accounts from the organization. For more information, see New: Use AWS CloudFormation StackSets for Multiple Accounts in an AWS Organization.

The following example shows the command line using multiple Regions to demonstrate the use. Update the OU as needed. If you need to use additional Regions, you may have to create an SNS topic in those Regions too.

To create a stack set for an OU and across multiple Regions, enter the following command:

aws cloudformation create-stack-set \
--stack-set-name EnableDevOpsGuruForAccount \
--template-body file:///$PWD/EnableDevOpsGuruForAccount.yml \
--parameters ParameterKey=CfnStackNames,ParameterValue=* \
ParameterKey=SnsTopicName,ParameterValue=devops-guru \
--region us-east-1 \
--permission-model SERVICE_MANAGED \
--auto-deployment Enabled=true,RetainStacksOnAccountRemoval=true

Instantiate AWS CloudFormation StackSets instances for an OU and across multiple Regions with the following command:

aws cloudformation create-stack-instances \
--stack-set-name  EnableDevOpsGuruForAccount \
--deployment-targets OrganizationalUnitIds='["<organizational-unit-id>"]' \
--regions '["us-east-1","us-east-2"]' \
--operation-preferences FailureToleranceCount=0,MaxConcurrentCount=1

In this way, you can run CloudFormation StackSets to enable and configure DevOps Guru across multiple accounts, Regions, with simple and easy steps.


Reviewing DevOps Guru insights

Amazon DevOps Guru monitors for anomalies in the resources in the CloudFormation stacks that are enabled for monitoring. The following screenshot shows the initial dashboard.

Figure: Screenshot of DevOps Guru dashboard

Figure: Screenshot of DevOps Guru dashboard

On enabling DevOps Guru, it may take up to 24 hours to analyze the resources and baseline the normal behavior. When it detects an anomaly, it highlights the impacted CloudFormation stack, logs insights that provide details about the metrics indicating an anomaly, and prints actionable recommendations to mitigate the anomaly.

Figure: Screenshot of DevOps Guru dashboard showing ongoing reactive insight

Figure: Screenshot of DevOps Guru dashboard showing ongoing reactive insight

The following screenshot shows an example of an insight (which now has been resolved) that was generated for the increased latency for an ELB. The insight provides various sections in which it provides details about the metrics, the graphed anomaly along with the time duration, potential related events, and recommendations to mitigate and implement preventive measures.

Figure: Screenshot for an Insight generated about ELB Latency

Figure: Screenshot for an Insight generated about ELB Latency


Cleaning up

When you’re finished walking through this post, you should clean up or un-provision the resources to avoid incurring any further charges.

  1. On the AWS CloudFormation StackSets console, choose the stack set to delete.
  2. On the Actions menu, choose Delete stacks from StackSets.
  3. After you delete the stacks from individual accounts, delete the stack set by choosing Delete StackSet.
  4. Un-provision the environment for AWS Cloud9.


Conclusion

This post reviewed how to enable Amazon DevOps Guru using AWS CloudFormation StackSets across multiple AWS accounts or organizations to monitor the resources in existing CloudFormation stacks. Upon detecting an anomaly, DevOps Guru generates an insight that includes the vended CloudWatch metric, the CloudFormation stack in which the resource existed, and actionable recommendations.

We hope this post was useful to you to onboard DevOps Guru and that you try using it for your production needs.


About the Authors

Author's profile photo


Nikunj Vaidya is a Sr. Solutions Architect with Amazon Web Services, focusing in the area of DevOps services. He builds technical content for the field enablement and offers technical guidance to the customers on AWS DevOps solutions and services that would streamline the application development process, accelerate application delivery, and enable maintaining a high bar of software quality.


Nuatu Tseggai is a Cloud Infrastructure Architect at Amazon Web Services. He enjoys working with customers to design and build event-driven distributed systems that span multiple services.


ICYMI: Serverless pre:Invent 2020

Post Syndicated from James Beswick original https://aws.amazon.com/blogs/compute/icymi-serverless-preinvent-2020/

During the last few weeks, the AWS serverless team has been releasing a wave of new features in the build-up to AWS re:Invent 2020. This post recaps some of the most important releases for serverless developers.

re:Invent is virtual and free to all attendees in 2020 – register here. See the complete list of serverless sessions planned and join the serverless DA team live on Twitch. Also, follow your DAs on Twitter for live recaps and Q&A during the event.

AWS re:Invent 2020

AWS Lambda

We launched Lambda Extensions in preview, enabling you to more easily integrate monitoring, security, and governance tools into Lambda functions. You can also build your own extensions that run code during Lambda lifecycle events, and there is an example extensions repo for starting development.

You can now send logs from Lambda functions to custom destinations by using Lambda Extensions and the new Lambda Logs API. Previously, you could only forward logs after they were written to Amazon CloudWatch Logs. Now, logging tools can receive log streams directly from the Lambda execution environment. This makes it easier to use your preferred tools for log management and analysis, including Datadog, Lumigo, New Relic, Coralogix, Honeycomb, or Sumo Logic.

Lambda Extensions API

Lambda launched support for Amazon MQ as an event source. Amazon MQ is a managed broker service for Apache ActiveMQ that simplifies deploying and scaling queues. This integration increases the range of messaging services that customers can use to build serverless applications. The event source operates in a similar way to using Amazon SQS or Amazon Kinesis. In all cases, the Lambda service manages an internal poller to invoke the target Lambda function.

We also released a new layer to make it simpler to integrate Amazon CodeGuru Profiler. This service helps identify the most expensive lines of code in a function and provides recommendations to help reduce cost. With this update, you can enable the profiler by adding the new layer and setting environment variables. There are no changes needed to the custom code in the Lambda function.

Lambda announced support for AWS PrivateLink. This allows you to invoke Lambda functions from a VPC without traversing the public internet. It provides private connectivity between your VPCs and AWS services. By using VPC endpoints to access the Lambda API from your VPC, this can replace the need for an Internet Gateway or NAT Gateway.

For developers building machine learning inferencing, media processing, high performance computing (HPC), scientific simulations, and financial modeling in Lambda, you can now use AVX2 support to help reduce duration and lower cost. By using packages compiled for AVX2 or compiling libraries with the appropriate flags, your code can then benefit from using AVX2 instructions to accelerate computation. In the blog post’s example, enabling AVX2 for an image-processing function increased performance by 32-43%.

Lambda now supports batch windows of up to 5 minutes when using SQS as an event source. This is useful for workloads that are not time-sensitive, allowing developers to reduce the number of Lambda invocations from queues. Additionally, the batch size has been increased from 10 to 10,000. This is now the same as the batch size for Kinesis as an event source, helping Lambda-based applications process more data per invocation.

Code signing is now available for Lambda, using AWS Signer. This allows account administrators to ensure that Lambda functions only accept signed code for deployment. Using signing profiles for functions, this provides granular control over code execution within the Lambda service. You can learn more about using this new feature in the developer documentation.

Amazon EventBridge

You can now use event replay to archive and replay events with Amazon EventBridge. After configuring an archive, EventBridge automatically stores all events or filtered events, based upon event pattern matching logic. You can configure a retention policy for archives to delete events automatically after a specified number of days. Event replay can help with testing new features or changes in your code, or hydrating development or test environments.

EventBridge archived events

EventBridge also launched resource policies that simplify managing access to events across multiple AWS accounts. This expands the use of a policy associated with event buses to authorize API calls. Resource policies provide a powerful mechanism for modeling event buses across multiple account and providing fine-grained access control to EventBridge API actions.

EventBridge resource policies

EventBridge announced support for Server-Side Encryption (SSE). Events are encrypted using AES-256 at no additional cost for customers. EventBridge also increased PutEvent quotas to 10,000 transactions per second in US East (N. Virginia), US West (Oregon), and Europe (Ireland). This helps support workloads with high throughput.

AWS Step Functions

Synchronous Express Workflows have been launched for AWS Step Functions, providing a new way to run high-throughput Express Workflows. This feature allows developers to receive workflow responses without needing to poll services or build custom solutions. This is useful for high-volume microservice orchestration and fast compute tasks communicating via HTTPS.

The Step Functions service recently added support for other AWS services in workflows. You can now integrate API Gateway REST and HTTP APIs. This enables you to call API Gateway directly from a state machine as an asynchronous service integration.

Step Functions now also supports Amazon EKS service integration. This allows you to build workflows with steps that synchronously launch tasks in EKS and wait for a response. In October, the service also announced support for Amazon Athena, so workflows can now query data in your S3 data lakes.

These new integrations help minimize custom code and provide built-in error handling, parameter passing, and applying recommended security settings.

AWS SAM CLI

The AWS Serverless Application Model (AWS SAM) is an AWS CloudFormation extension that makes it easier to build, manage, and maintains serverless applications. On November 10, the AWS SAM CLI tool released version 1.9.0 with support for cached and parallel builds.

By using sam build --cached, AWS SAM no longer rebuilds functions and layers that have not changed since the last build. Additionally, you can use sam build --parallel to build functions in parallel, instead of sequentially. Both of these new features can substantially reduce the build time of larger applications defined with AWS SAM.

Amazon SNS

Amazon SNS announced support for First-In-First-Out (FIFO) topics. These are used with SQS FIFO queues for applications that require strict message ordering with exactly once processing and message deduplication. This is designed for workloads that perform tasks like bank transaction logging or inventory management. You can also use message filtering in FIFO topics to publish updates selectively.

SNS FIFO

AWS X-Ray

X-Ray now integrates with Amazon S3 to trace upstream requests. If a Lambda function uses the X-Ray SDK, S3 sends tracing headers to downstream event subscribers. With this, you can use the X-Ray service map to view connections between S3 and other services used to process an application request.

AWS CloudFormation

AWS CloudFormation announced support for nested stacks in change sets. This allows you to preview changes in your application and infrastructure across the entire nested stack hierarchy. You can then review those changes before confirming a deployment. This is available in all Regions supporting CloudFormation at no extra charge.

The new CloudFormation modules feature was released on November 24. This helps you develop building blocks with embedded best practices and common patterns that you can reuse in CloudFormation templates. Modules are available in the CloudFormation registry and can be used in the same way as any native resource.

Amazon DynamoDB

For customers using DynamoDB global tables, you can now use your own encryption keys. While all data in DynamoDB is encrypted by default, this feature enables you to use customer managed keys (CMKs). DynamoDB also announced support for global tables in the Europe (Milan) and Europe (Stockholm) Regions. This feature enables you to scale global applications for local access in workloads running in different Regions and replicate tables for higher availability and disaster recovery (DR).

The DynamoDB service announced the ability to export table data to data lakes in Amazon S3. This enables you to use services like Amazon Athena and AWS Lake Formation to analyze DynamoDB data with no custom code required. This feature does not consume table capacity and does not impact performance and availability. To learn how to use this feature, see this documentation.

AWS Amplify and AWS AppSync

You can now use existing Amazon Cognito user pools and identity pools for Amplify projects, making it easier to build new applications for an existing user base. AWS Amplify Console, which provides a fully managed static web hosting service, is now available in the Europe (Milan), Middle East (Bahrain), and Asia Pacific (Hong Kong) Regions. This service makes it simpler to bring automation to deploying and hosting single-page applications and static sites.

AWS AppSync enabled AWS WAF integration, making it easier to protect GraphQL APIs against common web exploits. You can also implement rate-based rules to help slow down brute force attacks. Using AWS Managed Rules for AWS WAF provides a faster way to configure application protection without creating the rules directly. AWS AppSync also recently expanded service availability to the Asia Pacific (Hong Kong), Middle East (Bahrain), and China (Ningxia) Regions, making the service now available in 21 Regions globally.

Still looking for more?

Join the AWS Serverless Developer Advocates on Twitch throughout re:Invent for live Q&A, session recaps, and more! See this page for the full schedule.

For more serverless learning resources, visit Serverless Land.

Fast and Cost-Effective Image Manipulation with Serverless Image Handler

Post Syndicated from Ajay Swamy original https://aws.amazon.com/blogs/architecture/fast-and-cost-effective-image-manipulation-with-serverless-image-handler/

As a modern company, you most likely have both a web-based and mobile app platform to provide content to customers who view it on a range of devices. This means you need to store multiple versions of images, depending on the device. The resulting image management can be a headache as it can be expensive and cumbersome to manage.

Serverless Image Handler (SIH) is an AWS Solution Implementation you use to store a single version of every image featured in your content, while dynamically delivering different versions at runtime based on your end user’s device. The solution simplifies code, saves on storage costs, and is ideal for use with web applications and mobile apps. SIH features include the ability to resize images, change background colors, apply formatting, and add watermarks.

Architecture overview

The SIH solution utilizes an AWS CloudFormation template to deploy the solution within minutes, and it’s for those of you who have multiple image assets needing an option to dynamically change or manipulate customer-facing images. SIH deploys best-in-class AWS services such as Amazon CloudFront, Amazon API Gateway, and AWS Lambda functions, and it connects to your Amazon Simple Storage Service (Amazon S3) bucket for storage.

Deploying this solution with the default parameters builds the following environment in AWS Cloud:

SIH: Emvironment in AWS Cloud-2

SIH uses the following AWS services:

  • Amazon CloudFront to quickly and securely  deliver images to your end users at scale
  • AWS Lambda to run code for image manipulation without the need for provisioning or managing servers (thereby reducing costs and overhead)
  • Your Amazon S3 bucket for storage of your image assets
  • AWS Secrets Manager to support the signing of image URLs so that image access is protected

How does Serverless Image Handler work?

When an HTTP request is received from a customer device, it is passed from CloudFront to API Gateway, and then forwarded to the Lambda function for processing. If the image is cached by CloudFront because of an earlier request, CloudFront will return the cached image instead of forwarding the request to the API Gateway. This reduces latency and eliminates the cost of reprocessing the image.

Requests that are not cached are passed to the API Gateway, and the entire request is forwarded to the Lambda function. The Lambda function retrieves the original image from your Amazon S3 bucket and uses Sharp (the open source image processing software) to return a modified version of the image to the API Gateway. SIH also utilizes Thumbor to apply dynamic filters on the fly. Additionally, the solution generates a CloudFront domain name that supports caching in CloudFront. The newly manipulated image is now cached at CloudFront for easy access and retrieval. The end-to-end request and response can be secured by using the solution’s signed URL feature via AWS Secrets Manager, which allows you to prevent unauthorized use of your proprietary images.

Lastly, SIH uses Amazon Rekognition for face detection in images submitted for smart cropping, allowing for easy cropping for specific content and image needs.

Code example of image manipulation

Please refer to the SIH implementation guide to quickly set up and use SIH. Using Node.js, you can create an image request as illustrated below. The code block specifies the image location as myImageBucket and specifies edits of grayscale :true to change the image to grayscale.

const imageRequest = JSON.stringify({
    bucket: “myImageBucket”,
    key: “myImage.jpg”,
    edits: {
        grayscale: true
    }
});

const url = `${CloudFrontUrl}/${Buffer.from(imageRequest).toString(‘base64’)}`;

With the generated URL, SIH can serve the grayscale image.

Conclusion

If you’re looking for a fast and cost-effective solution for image management, Serverless Image Handler provides a great way to manipulate and serve images on the fly with speed and security. Learn more about SIH and watch the accompanying Solving with AWS Solutions video below.

Automate thousands of mainframe tests on AWS with the Micro Focus Enterprise Suite

Post Syndicated from Kevin Yung original https://aws.amazon.com/blogs/devops/automate-mainframe-tests-on-aws-with-micro-focus/

Micro Focus – AWS Advanced Technology Parnter, they are a global infrastructure software company with 40 years of experience in delivering and supporting enterprise software.

We have seen mainframe customers often encounter scalability constraints, and they can’t support their development and test workforce to the scale required to support business requirements. These constraints can lead to delays, reduce product or feature releases, and make them unable to respond to market requirements. Furthermore, limits in capacity and scale often affect the quality of changes deployed, and are linked to unplanned or unexpected downtime in products or services.

The conventional approach to address these constraints is to scale up, meaning to increase MIPS/MSU capacity of the mainframe hardware available for development and testing. The cost of this approach, however, is excessively high, and to ensure time to market, you may reject this approach at the expense of quality and functionality. If you’re wrestling with these challenges, this post is written specifically for you.

To accompany this post, we developed an AWS prescriptive guidance (APG) pattern for developer instances and CI/CD pipelines: Mainframe Modernization: DevOps on AWS with Micro Focus.

Overview of solution

In the APG, we introduce DevOps automation and AWS CI/CD architecture to support mainframe application development. Our solution enables you to embrace both Test Driven Development (TDD) and Behavior Driven Development (BDD). Mainframe developers and testers can automate the tests in CI/CD pipelines so they’re repeatable and scalable. To speed up automated mainframe application tests, the solution uses team pipelines to run functional and integration tests frequently, and uses systems test pipelines to run comprehensive regression tests on demand. For more information about the pipelines, see Mainframe Modernization: DevOps on AWS with Micro Focus.

In this post, we focus on how to automate and scale mainframe application tests in AWS. We show you how to use AWS services and Micro Focus products to automate mainframe application tests with best practices. The solution can scale your mainframe application CI/CD pipeline to run thousands of tests in AWS within minutes, and you only pay a fraction of your current on-premises cost.

The following diagram illustrates the solution architecture.

Mainframe DevOps On AWS Architecture Overview, on the left is the conventional mainframe development environment, on the left is the CI/CD pipelines for mainframe tests in AWS

Figure: Mainframe DevOps On AWS Architecture Overview


Best practices

Before we get into the details of the solution, let’s recap the following mainframe application testing best practices:

  • Create a “test first” culture by writing tests for mainframe application code changes
  • Automate preparing and running tests in the CI/CD pipelines
  • Provide fast and quality feedback to project management throughout the SDLC
  • Assess and increase test coverage
  • Scale your test’s capacity and speed in line with your project schedule and requirements

Automated smoke test

In this architecture, mainframe developers can automate running functional smoke tests for new changes. This testing phase typically “smokes out” regression of core and critical business functions. You can achieve these tests using tools such as py3270 with x3270 or Robot Framework Mainframe 3270 Library.

The following code shows a feature test written in Behave and test step using py3270:

# home_loan_calculator.feature
Feature: calculate home loan monthly repayment
  the bankdemo application provides a monthly home loan repayment caculator 
  User need to input into transaction of home loan amount, interest rate and how many years of the loan maturity.
  User will be provided an output of home loan monthly repayment amount

  Scenario Outline: As a customer I want to calculate my monthly home loan repayment via a transaction
      Given home loan amount is <amount>, interest rate is <interest rate> and maturity date is <maturity date in months> months 
       When the transaction is submitted to the home loan calculator
       Then it shall show the monthly repayment of <monthly repayment>

    Examples: Homeloan
      | amount  | interest rate | maturity date in months | monthly repayment |
      | 1000000 | 3.29          | 300                     | $4894.31          |


# home_loan_calculator_steps.py
import sys, os
from py3270 import Emulator
from behave import *

@given("home loan amount is {amount}, interest rate is {rate} and maturity date is {maturity_date} months")
def step_impl(context, amount, rate, maturity_date):
    context.home_loan_amount = amount
    context.interest_rate = rate
    context.maturity_date_in_months = maturity_date

@when("the transaction is submitted to the home loan calculator")
def step_impl(context):
    # Setup connection parameters
    tn3270_host = os.getenv('TN3270_HOST')
    tn3270_port = os.getenv('TN3270_PORT')
	# Setup TN3270 connection
    em = Emulator(visible=False, timeout=120)
    em.connect(tn3270_host + ':' + tn3270_port)
    em.wait_for_field()
	# Screen login
    em.fill_field(10, 44, 'b0001', 5)
    em.send_enter()
	# Input screen fields for home loan calculator
    em.wait_for_field()
    em.fill_field(8, 46, context.home_loan_amount, 7)
    em.fill_field(10, 46, context.interest_rate, 7)
    em.fill_field(12, 46, context.maturity_date_in_months, 7)
    em.send_enter()
    em.wait_for_field()    

    # collect monthly replayment output from screen
    context.monthly_repayment = em.string_get(14, 46, 9)
    em.terminate()

@then("it shall show the monthly repayment of {amount}")
def step_impl(context, amount):
    print("expected amount is " + amount.strip() + ", and the result from screen is " + context.monthly_repayment.strip())
assert amount.strip() == context.monthly_repayment.strip()

To run this functional test in Micro Focus Enterprise Test Server (ETS), we use AWS CodeBuild.

We first need to build an Enterprise Test Server Docker image and push it to an Amazon Elastic Container Registry (Amazon ECR) registry. For instructions, see Using Enterprise Test Server with Docker.

Next, we create a CodeBuild project and uses the Enterprise Test Server Docker image in its configuration.

The following is an example AWS CloudFormation code snippet of a CodeBuild project that uses Windows Container and Enterprise Test Server:

  BddTestBankDemoStage:
    Type: AWS::CodeBuild::Project
    Properties:
      Name: !Sub '${AWS::StackName}BddTestBankDemo'
      LogsConfig:
        CloudWatchLogs:
          Status: ENABLED
      Artifacts:
        Type: CODEPIPELINE
        EncryptionDisabled: true
      Environment:
        ComputeType: BUILD_GENERAL1_LARGE
        Image: !Sub "${EnterpriseTestServerDockerImage}:latest"
        ImagePullCredentialsType: SERVICE_ROLE
        Type: WINDOWS_SERVER_2019_CONTAINER
      ServiceRole: !Ref CodeBuildRole
      Source:
        Type: CODEPIPELINE
        BuildSpec: bdd-test-bankdemo-buildspec.yaml

In the CodeBuild project, we need to create a buildspec to orchestrate the commands for preparing the Micro Focus Enterprise Test Server CICS environment and issue the test command. In the buildspec, we define the location for CodeBuild to look for test reports and upload them into the CodeBuild report group. The following buildspec code uses custom scripts DeployES.ps1 and StartAndWait.ps1 to start your CICS region, and runs Python Behave BDD tests:

version: 0.2
phases:
  build:
    commands:
      - |
        # Run Command to start Enterprise Test Server
        CD C:\
        .\DeployES.ps1
        .\StartAndWait.ps1

        py -m pip install behave

        Write-Host "waiting for server to be ready ..."
        do {
          Write-Host "..."
          sleep 3  
        } until(Test-NetConnection 127.0.0.1 -Port 9270 | ? { $_.TcpTestSucceeded } )

        CD C:\tests\features
        MD C:\tests\reports
        $Env:Path += ";c:\wc3270"

        $address=(Get-NetIPAddress -AddressFamily Ipv4 | where { $_.IPAddress -Match "172\.*" })
        $Env:TN3270_HOST = $address.IPAddress
        $Env:TN3270_PORT = "9270"
        
        behave.exe --color --junit --junit-directory C:\tests\reports
reports:
  bankdemo-bdd-test-report:
    files: 
      - '**/*'
    base-directory: "C:\\tests\\reports"

In the smoke test, the team may run both unit tests and functional tests. Ideally, these tests are better to run in parallel to speed up the pipeline. In AWS CodePipeline, we can set up a stage to run multiple steps in parallel. In our example, the pipeline runs both BDD tests and Robot Framework (RPA) tests.

The following CloudFormation code snippet runs two different tests. You use the same RunOrder value to indicate the actions run in parallel.

#...
        - Name: Tests
          Actions:
            - Name: RunBDDTest
              ActionTypeId:
                Category: Build
                Owner: AWS
                Provider: CodeBuild
                Version: 1
              Configuration:
                ProjectName: !Ref BddTestBankDemoStage
                PrimarySource: Config
              InputArtifacts:
                - Name: DemoBin
                - Name: Config
              RunOrder: 1
            - Name: RunRbTest
              ActionTypeId:
                Category: Build
                Owner: AWS
                Provider: CodeBuild
                Version: 1
              Configuration:
                ProjectName : !Ref RpaTestBankDemoStage
                PrimarySource: Config
              InputArtifacts:
                - Name: DemoBin
                - Name: Config
              RunOrder: 1  
#...

The following screenshot shows the example actions on the CodePipeline console that use the preceding code.

Screenshot of CodePipeine parallel execution tests using a same run order value

Figure – Screenshot of CodePipeine parallel execution tests

Both DBB and RPA tests produce jUnit format reports, which CodeBuild can ingest and show on the CodeBuild console. This is a great way for project management and business users to track the quality trend of an application. The following screenshot shows the CodeBuild report generated from the BDD tests.

CodeBuild report generated from the BDD tests showing 100% pass rate

Figure – CodeBuild report generated from the BDD tests

Automated regression tests

After you test the changes in the project team pipeline, you can automatically promote them to another stream with other team members’ changes for further testing. The scope of this testing stream is significantly more comprehensive, with a greater number and wider range of tests and higher volume of test data. The changes promoted to this stream by each team member are tested in this environment at the end of each day throughout the life of the project. This provides a high-quality delivery to production, with new code and changes to existing code tested together with hundreds or thousands of tests.

In enterprise architecture, it’s commonplace to see an application client consuming web services APIs exposed from a mainframe CICS application. One approach to do regression tests for mainframe applications is to use Micro Focus Verastream Host Integrator (VHI) to record and capture 3270 data stream processing and encapsulate these 3270 data streams as business functions, which in turn are packaged as web services. When these web services are available, they can be consumed by a test automation product, which in our environment is Micro Focus UFT One. This uses the Verastream server as the orchestration engine that translates the web service requests into 3270 data streams that integrate with the mainframe CICS application. The application is deployed in Micro Focus Enterprise Test Server.

The following diagram shows the end-to-end testing components.

Regression Test the end-to-end testing components using ECS Container for Exterprise Test Server, Verastream Host Integrator and UFT One Container, all integration points are using Elastic Network Load Balancer

Figure – Regression Test Infrastructure end-to-end Setup

To ensure we have the coverage required for large mainframe applications, we sometimes need to run thousands of tests against very large production volumes of test data. We want the tests to run faster and complete as soon as possible so we reduce AWS costs—we only pay for the infrastructure when consuming resources for the life of the test environment when provisioning and running tests.

Therefore, the design of the test environment needs to scale out. The batch feature in CodeBuild allows you to run tests in batches and in parallel rather than serially. Furthermore, our solution needs to minimize interference between batches, a failure in one batch doesn’t affect another running in parallel. The following diagram depicts the high-level design, with each batch build running in its own independent infrastructure. Each infrastructure is launched as part of test preparation, and then torn down in the post-test phase.

Regression Tests in CodeBuoild Project setup to use batch mode, three batches running in independent infrastructure with containers

Figure – Regression Tests in CodeBuoild Project setup to use batch mode

Building and deploying regression test components

Following the design of the parallel regression test environment, let’s look at how we build each component and how they are deployed. The followings steps to build our regression tests use a working backward approach, starting from deployment in the Enterprise Test Server:

  1. Create a batch build in CodeBuild.
  2. Deploy to Enterprise Test Server.
  3. Deploy the VHI model.
  4. Deploy UFT One Tests.
  5. Integrate UFT One into CodeBuild and CodePipeline and test the application.

Creating a batch build in CodeBuild

We update two components to enable a batch build. First, in the CodePipeline CloudFormation resource, we set BatchEnabled to be true for the test stage. The UFT One test preparation stage uses the CloudFormation template to create the test infrastructure. The following code is an example of the AWS CloudFormation snippet with batch build enabled:

#...
        - Name: SystemsTest
          Actions:
            - Name: Uft-Tests
              ActionTypeId:
                Category: Build
                Owner: AWS
                Provider: CodeBuild
                Version: 1
              Configuration:
                ProjectName : !Ref UftTestBankDemoProject
                PrimarySource: Config
                BatchEnabled: true
                CombineArtifacts: true
              InputArtifacts:
                - Name: Config
                - Name: DemoSrc
              OutputArtifacts:
                - Name: TestReport                
              RunOrder: 1
#...

Second, in the buildspec configuration of the test stage, we provide a build matrix setting. We use the custom environment variable TEST_BATCH_NUMBER to indicate which set of tests runs in each batch. See the following code:

version: 0.2
batch:
  fast-fail: true
  build-matrix:
    static:
      ignore-failure: false
    dynamic:
      env:
        variables:
          TEST_BATCH_NUMBER:
            - 1
            - 2
            - 3 
phases:
  pre_build:
commands:
#...

After setting up the batch build, CodeBuild creates multiple batches when the build starts. The following screenshot shows the batches on the CodeBuild console.

Regression tests Codebuild project ran in batch mode, three batches ran in prallel successfully

Figure – Regression tests Codebuild project ran in batch mode

Deploying to Enterprise Test Server

ETS is the transaction engine that processes all the online (and batch) requests that are initiated through external clients, such as 3270 terminals, web services, and websphere MQ. This engine provides support for various mainframe subsystems, such as CICS, IMS TM and JES, as well as code-level support for COBOL and PL/I. The following screenshot shows the Enterprise Test Server administration page.

Enterprise Server Administrator window showing configuration for CICS

Figure – Enterprise Server Administrator window

In this mainframe application testing use case, the regression tests are CICS transactions, initiated from 3270 requests (encapsulated in a web service). For more information about Enterprise Test Server, see the Enterprise Test Server and Micro Focus websites.

In the regression pipeline, after the stage of mainframe artifact compiling, we bake in the artifact into an ETS Docker container and upload the image to an Amazon ECR repository. This way, we have an immutable artifact for all the tests.

During each batch’s test preparation stage, a CloudFormation stack is deployed to create an Amazon ECS service on Windows EC2. The stack uses a Network Load Balancer as an integration point for the VHI’s integration.

The following code is an example of the CloudFormation snippet to create an Amazon ECS service using an Enterprise Test Server Docker image:

#...
  EtsService:
    DependsOn:
    - EtsTaskDefinition
    - EtsContainerSecurityGroup
    - EtsLoadBalancerListener
    Properties:
      Cluster: !Ref 'WindowsEcsClusterArn'
      DesiredCount: 1
      LoadBalancers:
        -
          ContainerName: !Sub "ets-${AWS::StackName}"
          ContainerPort: 9270
          TargetGroupArn: !Ref EtsPort9270TargetGroup
      HealthCheckGracePeriodSeconds: 300          
      TaskDefinition: !Ref 'EtsTaskDefinition'
    Type: "AWS::ECS::Service"

  EtsTaskDefinition:
    Properties:
      ContainerDefinitions:
        -
          Image: !Sub "${AWS::AccountId}.dkr.ecr.us-east-1.amazonaws.com/systems-test/ets:latest"
          LogConfiguration:
            LogDriver: awslogs
            Options:
              awslogs-group: !Ref 'SystemsTestLogGroup'
              awslogs-region: !Ref 'AWS::Region'
              awslogs-stream-prefix: ets
          Name: !Sub "ets-${AWS::StackName}"
          cpu: 4096
          memory: 8192
          PortMappings:
            -
              ContainerPort: 9270
          EntryPoint:
          - "powershell.exe"
          Command: 
          - '-F'
          - .\StartAndWait.ps1
          - 'bankdemo'
          - C:\bankdemo\
          - 'wait'
      Family: systems-test-ets
    Type: "AWS::ECS::TaskDefinition"
#...

Deploying the VHI model

In this architecture, the VHI is a bridge between mainframe and clients.

We use the VHI designer to capture the 3270 data streams and encapsulate the relevant data streams into a business function. We can then deliver this function as a web service that can be consumed by a test management solution, such as Micro Focus UFT One.

The following screenshot shows the setup for getCheckingDetails in VHI. Along with this procedure we can also see other procedures (eg calcCostLoan) defined that get generated as a web service. The properties associated with this procedure are available on this screen to allow for the defining of the mapping of the fields between the associated 3270 screens and exposed web service.

example of VHI designer to capture the 3270 data streams and encapsulate the relevant data streams into a business function getCheckingDetails

Figure – Setup for getCheckingDetails in VHI

The following screenshot shows the editor for this procedure and is initiated by the selection of the Procedure Editor. This screen presents the 3270 screens that are involved in the business function that will be generated as a web service.

VHI designer Procedure Editor shows the procedure

Figure – VHI designer Procedure Editor shows the procedure

After you define the required functional web services in VHI designer, the resultant model is saved and deployed into a VHI Docker image. We use this image and the associated model (from VHI designer) in the pipeline outlined in this post.

For more information about VHI, see the VHI website.

The pipeline contains two steps to deploy a VHI service. First, it installs and sets up the VHI models into a VHI Docker image, and it’s pushed into Amazon ECR. Second, a CloudFormation stack is deployed to create an Amazon ECS Fargate service, which uses the latest built Docker image. In AWS CloudFormation, the VHI ECS task definition defines an environment variable for the ETS Network Load Balancer’s DNS name. Therefore, the VHI can bootstrap and point to an ETS service. In the VHI stack, it uses a Network Load Balancer as an integration point for UFT One test integration.

The following code is an example of a ECS Task Definition CloudFormation snippet that creates a VHI service in Amazon ECS Fargate and integrates it with an ETS server:

#...
  VhiTaskDefinition:
    DependsOn:
    - EtsService
    Type: AWS::ECS::TaskDefinition
    Properties:
      Family: systems-test-vhi
      NetworkMode: awsvpc
      RequiresCompatibilities:
        - FARGATE
      ExecutionRoleArn: !Ref FargateEcsTaskExecutionRoleArn
      Cpu: 2048
      Memory: 4096
      ContainerDefinitions:
        - Cpu: 2048
          Name: !Sub "vhi-${AWS::StackName}"
          Memory: 4096
          Environment:
            - Name: esHostName 
              Value: !GetAtt EtsInternalLoadBalancer.DNSName
            - Name: esPort
              Value: 9270
          Image: !Ref "${AWS::AccountId}.dkr.ecr.us-east-1.amazonaws.com/systems-test/vhi:latest"
          PortMappings:
            - ContainerPort: 9680
          LogConfiguration:
            LogDriver: awslogs
            Options:
              awslogs-group: !Ref 'SystemsTestLogGroup'
              awslogs-region: !Ref 'AWS::Region'
              awslogs-stream-prefix: vhi

#...

Deploying UFT One Tests

UFT One is a test client that uses each of the web services created by the VHI designer to orchestrate running each of the associated business functions. Parameter data is supplied to each function, and validations are configured against the data returned. Multiple test suites are configured with different business functions with the associated data.

The following screenshot shows the test suite API_Bankdemo3, which is used in this regression test process.

the screenshot shows the test suite API_Bankdemo3 in UFT One test setup console, the API setup for getCheckingDetails

Figure – API_Bankdemo3 in UFT One Test Editor Console

For more information, see the UFT One website.

Integrating UFT One and testing the application

The last step is to integrate UFT One into CodeBuild and CodePipeline to test our mainframe application. First, we set up CodeBuild to use a UFT One container. The Docker image is available in Docker Hub. Then we author our buildspec. The buildspec has the following three phrases:

  • Setting up a UFT One license and deploying the test infrastructure
  • Starting the UFT One test suite to run regression tests
  • Tearing down the test infrastructure after tests are complete

The following code is an example of a buildspec snippet in the pre_build stage. The snippet shows the command to activate the UFT One license:

version: 0.2
batch: 
# . . .
phases:
  pre_build:
    commands:
      - |
        # Activate License
        $process = Start-Process -NoNewWindow -RedirectStandardOutput LicenseInstall.log -Wait -File 'C:\Program Files (x86)\Micro Focus\Unified Functional Testing\bin\HP.UFT.LicenseInstall.exe' -ArgumentList @('concurrent', 10600, 1, ${env:AUTOPASS_LICENSE_SERVER})        
        Get-Content -Path LicenseInstall.log
        if (Select-String -Path LicenseInstall.log -Pattern 'The installation was successful.' -Quiet) {
          Write-Host 'Licensed Successfully'
        } else {
          Write-Host 'License Failed'
          exit 1
        }
#...

The following command in the buildspec deploys the test infrastructure using the AWS Command Line Interface (AWS CLI)

aws cloudformation deploy --stack-name $stack_name `
--template-file cicd-pipeline/systems-test-pipeline/systems-test-service.yaml `
--parameter-overrides EcsCluster=$cluster_arn `
--capabilities CAPABILITY_IAM

Because ETS and VHI are both deployed with a load balancer, the build detects when the load balancers become healthy before starting the tests. The following AWS CLI commands detect the load balancer’s target group health:

$vhi_health_state = (aws elbv2 describe-target-health --target-group-arn $vhi_target_group_arn --query 'TargetHealthDescriptions[0].TargetHealth.State' --output text)
$ets_health_state = (aws elbv2 describe-target-health --target-group-arn $ets_target_group_arn --query 'TargetHealthDescriptions[0].TargetHealth.State' --output text)          

When the targets are healthy, the build moves into the build stage, and it uses the UFT One command line to start the tests. See the following code:

$process = Start-Process -Wait  -NoNewWindow -RedirectStandardOutput UFTBatchRunnerCMD.log `
-FilePath "C:\Program Files (x86)\Micro Focus\Unified Functional Testing\bin\UFTBatchRunnerCMD.exe" `
-ArgumentList @("-source", "${env:CODEBUILD_SRC_DIR_DemoSrc}\bankdemo\tests\API_Bankdemo\API_Bankdemo${env:TEST_BATCH_NUMBER}")

The next release of Micro Focus UFT One (November or December 2020) will provide an exit status to indicate a test’s success or failure.

When the tests are complete, the post_build stage tears down the test infrastructure. The following AWS CLI command tears down the CloudFormation stack:


#...
	post_build:
	  finally:
	  	- |
		  Write-Host "Clean up ETS, VHI Stack"
		  #...
		  aws cloudformation delete-stack --stack-name $stack_name
          aws cloudformation wait stack-delete-complete --stack-name $stack_name

At the end of the build, the buildspec is set up to upload UFT One test reports as an artifact into Amazon Simple Storage Service (Amazon S3). The following screenshot is the example of a test report in HTML format generated by UFT One in CodeBuild and CodePipeline.

UFT One HTML report shows regression testresult and test detals

Figure – UFT One HTML report

A new release of Micro Focus UFT One will provide test report formats supported by CodeBuild test report groups.

Conclusion

In this post, we introduced the solution to use Micro Focus Enterprise Suite, Micro Focus UFT One, Micro Focus VHI, AWS developer tools, and Amazon ECS containers to automate provisioning and running mainframe application tests in AWS at scale.

The on-demand model allows you to create the same test capacity infrastructure in minutes at a fraction of your current on-premises mainframe cost. It also significantly increases your testing and delivery capacity to increase quality and reduce production downtime.

A demo of the solution is available in AWS Partner Micro Focus website AWS Mainframe CI/CD Enterprise Solution. If you’re interested in modernizing your mainframe applications, please visit Micro Focus and contact AWS mainframe business development at [email protected].

References

Micro Focus


Peter Woods

Peter Woods

Peter has been with Micro Focus for almost 30 years, in a variety of roles and geographies including Technical Support, Channel Sales, Product Management, Strategic Alliances Management and Pre-Sales, primarily based in Europe but for the last four years in Australia and New Zealand. In his current role as Pre-Sales Manager, Peter is charged with driving and supporting sales activity within the Application Modernization and Connectivity team, based in Melbourne.

Leo Ervin

Leo Ervin

Leo Ervin is a Senior Solutions Architect working with Micro Focus Enterprise Solutions working with the ANZ team. After completing a Mathematics degree Leo started as a PL/1 programming with a local insurance company. The next step in Leo’s career involved consulting work in PL/1 and COBOL before he joined a start-up company as a technical director and partner. This company became the first distributor of Micro Focus software in the ANZ region in 1986. Leo’s involvement with Micro Focus technology has continued from this distributorship through to today with his current focus on cloud strategies for both DevOps and re-platform implementations.

Kevin Yung

Kevin Yung

Kevin is a Senior Modernization Architect in AWS Professional Services Global Mainframe and Midrange Modernization (GM3) team. Kevin currently is focusing on leading and delivering mainframe and midrange applications modernization for large enterprise customers.

Rapid and flexible Infrastructure as Code using the AWS CDK with AWS Solutions Constructs

Post Syndicated from Biff Gaut original https://aws.amazon.com/blogs/devops/rapid-flexible-infrastructure-with-solutions-constructs-cdk/

Introduction

As workloads move to the cloud and all infrastructure becomes virtual, infrastructure as code (IaC) becomes essential to leverage the agility of this new world. JSON and YAML are the powerful, declarative modeling languages of AWS CloudFormation, allowing you to define complex architectures using IaC. Just as higher level languages like BASIC and C abstracted away the details of assembly language and made developers more productive, the AWS Cloud Development Kit (AWS CDK) provides a programming model above the native template languages, a model that makes developers more productive when creating IaC. When you instantiate CDK objects in your Typescript (or Python, Java, etc.) application, those objects “compile” into a YAML template that the CDK deploys as an AWS CloudFormation stack.

AWS Solutions Constructs take this simplification a step further by providing a library of common service patterns built on top of the CDK. These multi-service patterns allow you to deploy multiple resources with a single object, resources that follow best practices by default – both independently and throughout their interaction.

Comparison of an Application stack with Assembly Language, 4th generation language and Object libraries such as Hibernate with an IaC stack of CloudFormation, AWS CDK and AWS Solutions Constructs

Application Development Stack vs. IaC Development Stack

Solution overview

To demonstrate how using Solutions Constructs can accelerate the development of IaC, in this post you will create an architecture that ingests and stores sensor readings using Amazon Kinesis Data Streams, AWS Lambda, and Amazon DynamoDB.

An architecture diagram showing sensor readings being sent to a Kinesis data stream. A Lambda function will receive the Kinesis records and store them in a DynamoDB table.

Prerequisite – Setting up the CDK environment

Tip – If you want to try this example but are concerned about the impact of changing the tools or versions on your workstation, try running it on AWS Cloud9. An AWS Cloud9 environment is launched with an AWS Identity and Access Management (AWS IAM) role and doesn’t require configuring with an access key. It uses the current region as the default for all CDK infrastructure.

To prepare your workstation for CDK development, confirm the following:

  • Node.js 10.3.0 or later is installed on your workstation (regardless of the language used to write CDK apps).
  • You have configured credentials for your environment. If you’re running locally you can do this by configuring the AWS Command Line Interface (AWS CLI).
  • TypeScript 2.7 or later is installed globally (npm -g install typescript)

Before creating your CDK project, install the CDK toolkit using the following command:

npm install -g aws-cdk

Create the CDK project

  1. First create a project folder called stream-ingestion with these two commands:

mkdir stream-ingestion
cd stream-ingestion

  1. Now create your CDK application using this command:

npx [email protected] init app --language=typescript

Tip – This example will be written in TypeScript – you can also specify other languages for your projects.

At this time, you must use the same version of the CDK and Solutions Constructs. We’re using version 1.68.0 of both based upon what’s available at publication time, but you can update this with a later version for your projects in the future.

Let’s explore the files in the application this command created:

  • bin/stream-ingestion.ts – This is the module that launches the application. The key line of code is:

new StreamIngestionStack(app, 'StreamIngestionStack');

This creates the actual stack, and it’s in StreamIngestionStack that you will write the CDK code that defines the resources in your architecture.

  • lib/stream-ingestion-stack.ts – This is the important class. In the constructor of StreamIngestionStack you will add the constructs that will create your architecture.

During the deployment process, the CDK uploads your Lambda function to an Amazon S3 bucket so it can be incorporated into your stack.

  1. To create that S3 bucket and any other infrastructure the CDK requires, run this command:

cdk bootstrap

The CDK uses the same supporting infrastructure for all projects within a region, so you only need to run the bootstrap command once in any region in which you create CDK stacks.

  1. To install the required Solutions Constructs packages for our architecture, run the these two commands from the command line:

npm install @aws-solutions-constructs/[email protected]

Write the code

First you will write the Lambda function that processes the Kinesis data stream messages.

  1. Create a folder named lambda under stream-ingestion
  2. Within the lambda folder save a file called lambdaFunction.js with the following contents:
var AWS = require("aws-sdk");

// Create the DynamoDB service object
var ddb = new AWS.DynamoDB({ apiVersion: "2012-08-10" });

AWS.config.update({ region: process.env.AWS_REGION });

// We will configure our construct to 
// look for the .handler function
exports.handler = async function (event) {
  try {
    // Kinesis will deliver records 
    // in batches, so we need to iterate through
    // each record in the batch
    for (let record of event.Records) {
      const reading = parsePayload(record.kinesis.data);
      await writeRecord(record.kinesis.partitionKey, reading);
    };
  } catch (err) {
    console.log(`Write failed, err:\n${JSON.stringify(err, null, 2)}`);
    throw err;
  }
  return;
};

// Write the provided sensor reading data to the DynamoDB table
async function writeRecord(partitionKey, reading) {

  var params = {
    // Notice that Constructs automatically sets up 
    // an environment variable with the table name.
    TableName: process.env.DDB_TABLE_NAME,
    Item: {
      partitionKey: { S: partitionKey },  // sensor Id
      timestamp: { S: reading.timestamp },
      value: { N: reading.value}
    },
  };

  // Call DynamoDB to add the item to the table
  await ddb.putItem(params).promise();
}

// Decode the payload and extract the sensor data from it
function parsePayload(payload) {

  const decodedPayload = Buffer.from(payload, "base64").toString(
    "ascii"
  );

  // Our CLI command will send the records to Kinesis
  // with the values delimited by '|'
  const payloadValues = decodedPayload.split("|", 2)
  return {
    value: payloadValues[0],
    timestamp: payloadValues[1]
  }
}

We won’t spend a lot of time explaining this function – it’s pretty straightforward and heavily commented. It receives an event with one or more sensor readings, and for each reading it extracts the pertinent data and saves it to the DynamoDB table.

You will use two Solutions Constructs to create your infrastructure:

The aws-kinesisstreams-lambda construct deploys an Amazon Kinesis data stream and a Lambda function.

  • aws-kinesisstreams-lambda creates the Kinesis data stream and Lambda function that subscribes to that stream. To support this, it also creates other resources, such as IAM roles and encryption keys.

The aws-lambda-dynamodb construct deploys a Lambda function and a DynamoDB table.

  • aws-lambda-dynamodb creates an Amazon DynamoDB table and a Lambda function with permission to access the table.
  1. To deploy the first of these two constructs, replace the code in lib/stream-ingestion-stack.ts with the following code:
import * as cdk from "@aws-cdk/core";
import * as lambda from "@aws-cdk/aws-lambda";
import { KinesisStreamsToLambda } from "@aws-solutions-constructs/aws-kinesisstreams-lambda";

import * as ddb from "@aws-cdk/aws-dynamodb";
import { LambdaToDynamoDB } from "@aws-solutions-constructs/aws-lambda-dynamodb";

export class StreamIngestionStack extends cdk.Stack {
  constructor(scope: cdk.Construct, id: string, props?: cdk.StackProps) {
    super(scope, id, props);

    const kinesisLambda = new KinesisStreamsToLambda(
      this,
      "KinesisLambdaConstruct",
      {
        lambdaFunctionProps: {
          // Where the CDK can find the lambda function code
          runtime: lambda.Runtime.NODEJS_10_X,
          handler: "lambdaFunction.handler",
          code: lambda.Code.fromAsset("lambda"),
        },
      }
    );

    // Next Solutions Construct goes here
  }
}

Let’s explore this code:

  • It instantiates a new KinesisStreamsToLambda object. This Solutions Construct will launch a new Kinesis data stream and a new Lambda function, setting up the Lambda function to receive all the messages in the Kinesis data stream. It will also deploy all the additional resources and policies required for the architecture to follow best practices.
  • The third argument to the constructor is the properties object, where you specify overrides of default values or any other information the construct needs. In this case you provide properties for the encapsulated Lambda function that informs the CDK where to find the code for the Lambda function that you stored as lambda/lambdaFunction.js earlier.
  1. Now you’ll add the second construct that connects the Lambda function to a new DynamoDB table. In the same lib/stream-ingestion-stack.ts file, replace the line // Next Solutions Construct goes here with the following code:
    // Define the primary key for the new DynamoDB table
    const primaryKeyAttribute: ddb.Attribute = {
      name: "partitionKey",
      type: ddb.AttributeType.STRING,
    };

    // Define the sort key for the new DynamoDB table
    const sortKeyAttribute: ddb.Attribute = {
      name: "timestamp",
      type: ddb.AttributeType.STRING,
    };

    const lambdaDynamoDB = new LambdaToDynamoDB(
      this,
      "LambdaDynamodbConstruct",
      {
        // Tell construct to use the Lambda function in
        // the first construct rather than deploy a new one
        existingLambdaObj: kinesisLambda.lambdaFunction,
        tablePermissions: "Write",
        dynamoTableProps: {
          partitionKey: primaryKeyAttribute,
          sortKey: sortKeyAttribute,
          billingMode: ddb.BillingMode.PROVISIONED,
          removalPolicy: cdk.RemovalPolicy.DESTROY
        },
      }
    );

    // Add autoscaling
    const readScaling = lambdaDynamoDB.dynamoTable.autoScaleReadCapacity({
      minCapacity: 1,
      maxCapacity: 50,
    });

    readScaling.scaleOnUtilization({
      targetUtilizationPercent: 50,
    });

Let’s explore this code:

  • The first two const objects define the names and types for the partition key and sort key of the DynamoDB table.
  • The LambdaToDynamoDB construct instantiated creates a new DynamoDB table and grants access to your Lambda function. The key to this call is the properties object you pass in the third argument.
    • The first property sent to LambdaToDynamoDB is existingLambdaObj – by setting this value to the Lambda function created by KinesisStreamsToLambda, you’re telling the construct to not create a new Lambda function, but to grant the Lambda function in the other Solutions Construct access to the DynamoDB table. This illustrates how you can chain many Solutions Constructs together to create complex architectures.
    • The second property sent to LambdaToDynamoDB tells the construct to limit the Lambda function’s access to the table to write only.
    • The third property sent to LambdaToDynamoDB is actually a full properties object defining the DynamoDB table. It provides the two attribute definitions you created earlier as well as the billing mode. It also sets the RemovalPolicy to DESTROY. This policy setting ensures that the table is deleted when you delete this stack – in most cases you should accept the default setting to protect your data.
  • The last two lines of code show how you can use statements to modify a construct outside the constructor. In this case we set up auto scaling on the new DynamoDB table, which we can access with the dynamoTable property on the construct we just instantiated.

That’s all it takes to create the all resources to deploy your architecture.

  1. Save all the files, then compile the Typescript into a CDK program using this command:

npm run build

  1. Finally, launch the stack using this command:

cdk deploy

(Enter “y” in response to Do you wish to deploy all these changes (y/n)?)

You will see some warnings where you override CDK default values. Because you are doing this intentionally you may disregard these, but it’s always a good idea to review these warnings when they occur.

Tip – Many mysterious CDK project errors stem from mismatched versions. If you get stuck on an inexplicable error, check package.json and confirm that all CDK and Solutions Constructs libraries have the same version number (with no leading caret ^). If necessary, correct the version numbers, delete the package-lock.json file and node_modules tree and run npm install. Think of this as the “turn it off and on again” first response to CDK errors.

You have now deployed the entire architecture for the demo – open the CloudFormation stack in the AWS Management Console and take a few minutes to explore all 12 resources that the program deployed (and the 380 line template generated to created them).

Feed the Stream

Now use the CLI to send some data through the stack.

Go to the Kinesis Data Streams console and copy the name of the data stream. Replace the stream name in the following command and run it from the command line.

aws kinesis put-records \
--stream-name StreamIngestionStack-KinesisLambdaConstructKinesisStreamXXXXXXXX-XXXXXXXXXXXX \
--records \
PartitionKey=1301,'Data=15.4|2020-08-22T01:16:36+00:00' \
PartitionKey=1503,'Data=39.1|2020-08-22T01:08:15+00:00'

Tip – If you are using the AWS CLI v2, the previous command will result in an “Invalid base64…” error because v2 expects the inputs to be Base64 encoded by default. Adding the argument --cli-binary-format raw-in-base64-out will fix the issue.

To confirm that the messages made it through the service, open the DynamoDB console – you should see the two records in the table.

Now that you’ve got it working, pause to think about what you just did. You deployed a system that can ingest and store sensor readings and scale to handle heavy loads. You did that by instantiating two objects – well under 60 lines of code. Experiment with changing some property values and deploying the changes by running npm run build and cdk deploy again.

Cleanup

To clean up the resources in the stack, run this command:

cdk destroy

Conclusion

Just as languages like BASIC and C allowed developers to write programs at a higher level of abstraction than assembly language, the AWS CDK and AWS Solutions Constructs allow us to create CloudFormation stacks in Typescript, Java, or Python instead JSON or YAML. Just as there will always be a place for assembly language, there will always be situations where we want to write CloudFormation templates manually – but for most situations, we can now use the AWS CDK and AWS Solutions Constructs to create complex and complete architectures in a fraction of the time with very little code.

AWS Solutions Constructs can currently be used in CDK applications written in Typescript, Javascript, Java and Python and will be available in C# applications soon.

About the Author

Biff Gaut has been shipping software since 1983, from small startups to large IT shops. Along the way he has contributed to 2 books, spoken at several conferences and written many blog posts. He is now a Principal Solutions Architect at AWS working on the AWS Solutions Constructs team, helping customers deploy better architectures more quickly.

Building a cross-account CI/CD pipeline for single-tenant SaaS solutions

Post Syndicated from Rafael Ramos original https://aws.amazon.com/blogs/devops/cross-account-ci-cd-pipeline-single-tenant-saas/

With the increasing demand from enterprise customers for a pay-as-you-go consumption model, more and more independent software vendors (ISVs) are shifting their business model towards software as a service (SaaS). Usually this kind of solution is architected using a multi-tenant model. It means that the infrastructure resources and applications are shared across multiple customers, with mechanisms in place to isolate their environments from each other. However, you may not want or can’t afford to share resources for security or compliance reasons, so you need a single-tenant environment.

To achieve this higher level of segregation across the tenants, it’s recommended to isolate the environments on the AWS account level. This strategy brings benefits, such as no network overlapping, no account limits sharing, and simplified usage tracking and billing, but it comes with challenges from an operational standpoint. Whereas multi-tenant solutions require management of a single shared production environment, single-tenant installations consist of dedicated production environments for each customer, without any shared resources across the tenants. When the number of tenants starts to grow, delivering new features at a rapid pace becomes harder to accomplish, because each new version needs to be manually deployed on each tenant environment.

This post describes how to automate this deployment process to deliver software quickly, securely, and less error-prone for each existing tenant. I demonstrate all the steps to build and configure a CI/CD pipeline using AWS CodeCommit, AWS CodePipeline, AWS CodeBuild, and AWS CloudFormation. For each new version, the pipeline automatically deploys the same application version on the multiple tenant AWS accounts.

There are different caveats to build such cross-account CI/CD pipelines on AWS. Because of that, I use AWS Command Line Interface (AWS CLI) to manually go through the process and demonstrate in detail the various configuration aspects you have to handle, such as artifact encryption, cross-account permission granting, and pipeline actions.

Single-tenancy vs. multi-tenancy

One of the first aspects to consider when architecting your SaaS solution is its tenancy model. Each brings their own benefits and architectural challenges. On multi-tenant installations, each customer shares the same set of resources, including databases and applications. With this mode, you can use the servers’ capacity more efficiently, which generally leads to significant cost-saving opportunities. On the other hand, you have to carefully secure your solution to prevent a customer from accessing sensitive data from another. Designing for high availability becomes even more critical on multi-tenant workloads, because more customers are affected in the event of downtime.

Because the environments are by definition isolated from each other, single-tenant solutions are simpler to design when it comes to security, networking isolation, and data segregation. Likewise, you can customize the applications per customer, and have different versions for specific tenants. You also have the advantage of eliminating the noisy-neighbor effect, and can plan the infrastructure for the customer’s scalability requirements. As a drawback, in comparison with multi-tenant, the single-tenant model is operationally more complex because you have more servers and applications to maintain.

Which tenancy model to choose depends ultimately on whether you can meet your customer needs. They might have specific governance requirements, be bound to a certain industry regulation, or have compliance criteria that influences which model they can choose. For more information about modeling your SaaS solutions, see SaaS on AWS.

Solution overview

To demonstrate this solution, I consider a fictitious single-tenant ISV with two customers: Unicorn and Gnome. It uses one central account where the tools reside (Tooling account), and two other accounts, each representing a tenant (Unicorn and Gnome accounts). As depicted in the following architecture diagram, when a developer pushes code changes to CodeCommit, Amazon CloudWatch Events  triggers the CodePipeline CI/CD pipeline, which automatically deploys a new version on each tenant’s AWS account. It ensures that the fictitious ISV doesn’t have the operational burden to manually re-deploy the same version for each end-customers.

Architecture diagram of a CI/CD pipeline for single-tenant SaaS solutions

For illustration purposes, the sample application I use in this post is an AWS Lambda function that returns a simple JSON object when invoked.

Prerequisites

Before getting started, you must have the following prerequisites:

Setting up the Git repository

Your first step is to set up your Git repository.

  1. Create a CodeCommit repository to host the source code.

The CI/CD pipeline is automatically triggered every time new code is pushed to that repository.

  1. Make sure Git is configured to use IAM credentials to access AWS CodeCommit via HTTP by running the following command from the terminal:
git config --global credential.helper '!aws codecommit credential-helper $@'
git config --global credential.UseHttpPath true
  1. Clone the newly created repository locally, and add two files in the root folder: index.js and application.yaml.

The first file is the JavaScript code for the Lambda function that represents the sample application. For our use case, the function returns a JSON response object with statusCode: 200 and the body Hello!\n. See the following code:

exports.handler = async (event) => {
    const response = {
        statusCode: 200,
        body: `Hello!\n`,
    };
    return response;
};

The second file is where the infrastructure is defined using AWS CloudFormation. The sample application consists of a Lambda function, and we use AWS Serverless Application Model (AWS SAM) to simplify the resources creation. See the following code:

AWSTemplateFormatVersion: '2010-09-09'
Transform: 'AWS::Serverless-2016-10-31'
Description: Sample Application.

Parameters:
    S3Bucket:
        Type: String
    S3Key:
        Type: String
    ApplicationName:
        Type: String
        
Resources:
    SampleApplication:
        Type: 'AWS::Serverless::Function'
        Properties:
            FunctionName: !Ref ApplicationName
            Handler: index.handler
            Runtime: nodejs12.x
            CodeUri:
                Bucket: !Ref S3Bucket
                Key: !Ref S3Key
            Description: Hello Lambda.
            MemorySize: 128
            Timeout: 10
  1. Push both files to the remote Git repository.

Creating the artifact store encryption key

By default, CodePipeline uses server-side encryption with an AWS Key Management Service (AWS KMS) managed customer master key (CMK) to encrypt the release artifacts. Because the Unicorn and Gnome accounts need to decrypt those release artifacts, you need to create a customer managed CMK in the Tooling account.

From the terminal, run the following command to create the artifact encryption key:

aws kms create-key --region <YOUR_REGION>

This command returns a JSON object with the key ARN property if run successfully. Its format is similar to arn:aws:kms:<YOUR_REGION>:<TOOLING_ACCOUNT_ID>:key/<KEY_ID>. Record this value to use in the following steps.

The encryption key has been created manually for educational purposes only, but it’s considered a best practice to have it as part of the Infrastructure as Code (IaC) bundle.

Creating an Amazon S3 artifact store and configuring a bucket policy

Our use case uses Amazon Simple Storage Service (Amazon S3) as artifact store. Every release artifact is encrypted and stored as an object in an S3 bucket that lives in the Tooling account.

To create and configure the artifact store, follow these steps in the Tooling account:

  1. From the terminal, create an S3 bucket and give it a unique name:
aws s3api create-bucket \
    --bucket <BUCKET_UNIQUE_NAME> \
    --region <YOUR_REGION> \
    --create-bucket-configuration LocationConstraint=<YOUR_REGION>
  1. Configure the bucket to use the customer managed CMK created in the previous step. This makes sure the objects stored in this bucket are encrypted using that key, replacing <KEY_ARN> with the ARN property from the previous step:
aws s3api put-bucket-encryption \
    --bucket <BUCKET_UNIQUE_NAME> \
    --server-side-encryption-configuration \
        '{
            "Rules": [
                {
                    "ApplyServerSideEncryptionByDefault": {
                        "SSEAlgorithm": "aws:kms",
                        "KMSMasterKeyID": "<KEY_ARN>"
                    }
                }
            ]
        }'
  1. The artifacts stored in the bucket need to be accessed from the Unicorn and Gnome Configure the bucket policies to allow cross-account access:
aws s3api put-bucket-policy \
    --bucket <BUCKET_UNIQUE_NAME> \
    --policy \
        '{
            "Version": "2012-10-17",
            "Statement": [
                {
                    "Action": [
                        "s3:GetBucket*",
                        "s3:List*"
                    ],
                    "Effect": "Allow",
                    "Principal": {
                        "AWS": [
                            "arn:aws:iam::<UNICORN_ACCOUNT_ID>:root",
                            "arn:aws:iam::<GNOME_ACCOUNT_ID>:root"
                        ]
                    },
                    "Resource": [
                        "arn:aws:s3:::<BUCKET_UNIQUE_NAME>"
                    ]
                },
                {
                    "Action": [
                        "s3:GetObject*"
                    ],
                    "Effect": "Allow",
                    "Principal": {
                        "AWS": [
                            "arn:aws:iam::<UNICORN_ACCOUNT_ID>:root",
                            "arn:aws:iam::<GNOME_ACCOUNT_ID>:root"
                        ]
                    },
                    "Resource": [
                        "arn:aws:s3:::<BUCKET_UNIQUE_NAME>/CrossAccountPipeline/*"
                    ]
                }
            ]
        }' 

This S3 bucket has been created manually for educational purposes only, but it’s considered a best practice to have it as part of the IaC bundle.

Creating a cross-account IAM role in each tenant account

Following the security best practice of granting least privilege, each action declared on CodePipeline should have its own IAM role.  For this use case, the pipeline needs to perform changes in the Unicorn and Gnome accounts from the Tooling account, so you need to create a cross-account IAM role in each tenant account.

Repeat the following steps for each tenant account to allow CodePipeline to assume role in those accounts:

  1. Configure a named CLI profile for the tenant account to allow running commands using the correct access keys.
  2. Create an IAM role that can be assumed from another AWS account, replacing <TENANT_PROFILE_NAME> with the profile name you defined in the previous step:
aws iam create-role \
    --role-name CodePipelineCrossAccountRole \
    --profile <TENANT_PROFILE_NAME> \
    --assume-role-policy-document \
        '{
            "Version": "2012-10-17",
            "Statement": [
                {
                    "Effect": "Allow",
                    "Principal": {
                        "AWS": "arn:aws:iam::<TOOLING_ACCOUNT_ID>:root"
                    },
                    "Action": "sts:AssumeRole"
                }
            ]
        }'
  1. Create an IAM policy that grants access to the artifact store S3 bucket and to the artifact encryption key:
aws iam create-policy \
    --policy-name CodePipelineCrossAccountArtifactReadPolicy \
    --profile <TENANT_PROFILE_NAME> \
    --policy-document \
        '{
            "Version": "2012-10-17",
            "Statement": [
                {
                    "Action": [
                        "s3:GetBucket*",
                        "s3:ListBucket"
                    ],
                    "Resource": [
                        "arn:aws:s3:::<BUCKET_UNIQUE_NAME>"
                    ],
                    "Effect": "Allow"
                },
                {
                    "Action": [
                        "s3:GetObject*",
                        "s3:Put*"
                    ],
                    "Resource": [
                        "arn:aws:s3:::<BUCKET_UNIQUE_NAME>/CrossAccountPipeline/*"
                    ],
                    "Effect": "Allow"
                },
                {
                    "Action": [ 
                        "kms:DescribeKey", 
                        "kms:GenerateDataKey*", 
                        "kms:Encrypt", 
                        "kms:ReEncrypt*", 
                        "kms:Decrypt" 
                    ], 
                    "Resource": "<KEY_ARN>",
                    "Effect": "Allow"
                }
            ]
        }'
  1. Attach the CodePipelineCrossAccountArtifactReadPolicy IAM policy to the CodePipelineCrossAccountRole IAM role:
aws iam attach-role-policy \
    --profile <TENANT_PROFILE_NAME> \
    --role-name CodePipelineCrossAccountRole \
    --policy-arn arn:aws:iam::<TENANT_ACCOUNT_ID>:policy/CodePipelineCrossAccountArtifactReadPolicy
  1. Create an IAM policy that allows to pass the IAM role CloudFormationDeploymentRole to CloudFormation and to perform CloudFormation actions on the application Stack:
aws iam create-policy \
    --policy-name CodePipelineCrossAccountCfnPolicy \
    --profile <TENANT_PROFILE_NAME> \
    --policy-document \
        '{
            "Version": "2012-10-17",
            "Statement": [
                {
                    "Action": [
                        "iam:PassRole"
                    ],
                    "Resource": "arn:aws:iam::<TENANT_ACCOUNT_ID>:role/CloudFormationDeploymentRole",
                    "Effect": "Allow"
                },
                {
                    "Action": [
                        "cloudformation:*"
                    ],
                    "Resource": "arn:aws:cloudformation:<YOUR_REGION>:<TENANT_ACCOUNT_ID>:stack/SampleApplication*/*",
                    "Effect": "Allow"
                }
            ]
        }'
  1. Attach the CodePipelineCrossAccountCfnPolicy IAM policy to the CodePipelineCrossAccountRole IAM role:
aws iam attach-role-policy \
    --profile <TENANT_PROFILE_NAME> \
    --role-name CodePipelineCrossAccountRole \
    --policy-arn arn:aws:iam::<TENANT_ACCOUNT_ID>:policy/CodePipelineCrossAccountCfnPolicy

Additional configuration is needed in the Tooling account to allow access, which you complete later on.

Creating a deployment IAM role in each tenant account

After CodePipeline assumes the CodePipelineCrossAccountRole IAM role into the tenant account, it triggers AWS CloudFormation to provision the infrastructure based on the template defined in the application.yaml file. For that, AWS CloudFormation needs to assume an IAM role that grants privileges to create resources into the tenant AWS account.

Repeat the following steps for each tenant account to allow AWS CloudFormation to create resources in those accounts:

  1. Create an IAM role that can be assumed by AWS CloudFormation:
aws iam create-role \
    --role-name CloudFormationDeploymentRole \
    --profile <TENANT_PROFILE_NAME> \
    --assume-role-policy-document \
        '{
            "Version": "2012-10-17",
            "Statement": [
                {
                    "Effect": "Allow",
                    "Principal": {
                        "Service": "cloudformation.amazonaws.com"
                    },
                    "Action": "sts:AssumeRole"
                }
            ]
        }'
  1. Create an IAM policy that grants permissions to create AWS resources:
aws iam create-policy \
    --policy-name CloudFormationDeploymentPolicy \
    --profile <TENANT_PROFILE_NAME> \
    --policy-document \
        '{
            "Version": "2012-10-17",
            "Statement": [
                {
                    "Action": "iam:PassRole",
                    "Resource": "arn:aws:iam::<TENANT_ACCOUNT_ID>:role/*",
                    "Effect": "Allow"
                },
                {
                    "Action": [
                        "iam:GetRole",
                        "iam:CreateRole",
                        "iam:DeleteRole",
                        "iam:AttachRolePolicy",
                        "iam:DetachRolePolicy"
                    ],
                    "Resource": "arn:aws:iam::<TENANT_ACCOUNT_ID>:role/*",
                    "Effect": "Allow"
                },
                {
                    "Action": "lambda:*",
                    "Resource": "*",
                    "Effect": "Allow"
                },
                {
                    "Action": "codedeploy:*",
                    "Resource": "*",
                    "Effect": "Allow"
                },
                {
                    "Action": [
                        "s3:GetObject*",
                        "s3:GetBucket*",
                        "s3:List*"
                    ],
                    "Resource": [
                        "arn:aws:s3:::<BUCKET_UNIQUE_NAME>",
                        "arn:aws:s3:::<BUCKET_UNIQUE_NAME>/*"
                    ],
                    "Effect": "Allow"
                },
                {
                    "Action": [
                        "kms:Decrypt",
                        "kms:DescribeKey"
                    ],
                    "Resource": "<KEY_ARN>",
                    "Effect": "Allow"
                },
                {
                    "Action": [
                        "cloudformation:CreateStack",
                        "cloudformation:DescribeStack*",
                        "cloudformation:GetStackPolicy",
                        "cloudformation:GetTemplate*",
                        "cloudformation:SetStackPolicy",
                        "cloudformation:UpdateStack",
                        "cloudformation:ValidateTemplate"
                    ],
                    "Resource": "arn:aws:cloudformation:<YOUR_REGION>:<TENANT_ACCOUNT_ID>:stack/SampleApplication*/*",
                    "Effect": "Allow"
                },
                {
                    "Action": [
                        "cloudformation:CreateChangeSet"
                    ],
                    "Resource": "arn:aws:cloudformation:<YOUR_REGION>:aws:transform/Serverless-2016-10-31",
                    "Effect": "Allow"
                }
            ]
        }'

The granted permissions in this IAM policy depend on the resources your application needs to be provisioned. Because the application in our use case consists of a simple Lambda function, the IAM policy only needs permissions over Lambda. The other permissions declared are to access and decrypt the Lambda code from the artifact store, use AWS CodeDeploy to deploy the function, and create and attach the Lambda execution role.

  1. Attach the IAM policy to the IAM role:
aws iam attach-role-policy \
    --profile <TENANT_PROFILE_NAME> \
    --role-name CloudFormationDeploymentRole \
    --policy-arn arn:aws:iam::<TENANT_ACCOUNT_ID>:policy/CloudFormationDeploymentPolicy

Configuring an artifact store encryption key

Even though the IAM roles created in the tenant accounts declare permissions to use the CMK encryption key, that’s not enough to have access to the key. To access the key, you must update the CMK key policy.

From the terminal, run the following command to attach the new policy:

aws kms put-key-policy \
    --key-id <KEY_ARN> \
    --policy-name default \
    --region <YOUR_REGION> \
    --policy \
        '{
             "Id": "TenantAccountAccess",
             "Version": "2012-10-17",
             "Statement": [
                {
                    "Sid": "Enable IAM User Permissions",
                    "Effect": "Allow",
                    "Principal": {
                        "AWS": "arn:aws:iam::<TOOLING_ACCOUNT_ID>:root"
                    },
                    "Action": "kms:*",
                    "Resource": "*"
                },
                {
                    "Effect": "Allow",
                    "Principal": {
                        "AWS": [
                            "arn:aws:iam::<GNOME_ACCOUNT_ID>:role/CloudFormationDeploymentRole",
                            "arn:aws:iam::<GNOME_ACCOUNT_ID>:role/CodePipelineCrossAccountRole",
                            "arn:aws:iam::<UNICORN_ACCOUNT_ID>:role/CloudFormationDeploymentRole",
                            "arn:aws:iam::<UNICORN_ACCOUNT_ID>:role/CodePipelineCrossAccountRole"
                        ]
                    },
                    "Action": [
                        "kms:Decrypt",
                        "kms:DescribeKey"
                    ],
                    "Resource": "*"
                }
             ]
         }'

Provisioning the CI/CD pipeline

Each CodePipeline workflow consists of two or more stages, which are composed by a series of parallel or serial actions. For our use case, the pipeline is made up of four stages:

  • Source – Declares CodeCommit as the source control for the application code.
  • Build – Using CodeBuild, it installs the dependencies and builds deployable artifacts. In this use case, the sample application is too simple and this stage is used for illustration purposes.
  • Deploy_Dev – Deploys the sample application on a sandbox environment. At this point, the deployable artifacts generated at the Build stage are used to create a CloudFormation stack and deploy the Lambda function.
  • Deploy_Prod – Similar to Deploy_Dev, at this stage the sample application is deployed on the tenant production environments. For that, it contains two actions (one per tenant) that are run in parallel. CodePipeline uses CodePipelineCrossAccountRole to assume a role on the tenant account, and from there, CloudFormationDeploymentRole is used to effectively deploy the application.

To provision your resources, complete the following steps from the terminal:

  1. Download the CloudFormation pipeline template:
curl -LO https://cross-account-ci-cd-pipeline-single-tenant-saas.s3.amazonaws.com/pipeline.yaml
  1. Deploy the CloudFormation stack using the pipeline template:
aws cloudformation deploy \
    --template-file pipeline.yaml \
    --region <YOUR_REGION> \
    --stack-name <YOUR_PIPELINE_STACK_NAME> \
    --capabilities CAPABILITY_IAM \
    --parameter-overrides \
        ArtifactBucketName=<BUCKET_UNIQUE_NAME> \
        ArtifactEncryptionKeyArn=<KMS_KEY_ARN> \
        UnicornAccountId=<UNICORN_TENANT_ACCOUNT_ID> \
        GnomeAccountId=<GNOME_TENANT_ACCOUNT_ID> \
        SampleApplicationRepositoryName=<YOUR_CODECOMMIT_REPOSITORY_NAME> \
        RepositoryBranch=<YOUR_CODECOMMIT_MAIN_BRANCH>

This is the list of the required parameters to deploy the template:

    • ArtifactBucketName – The name of the S3 bucket where the deployment artifacts are to be stored.
    • ArtifactEncryptionKeyArn – The ARN of the customer managed CMK to be used as artifact encryption key.
    • UnicornAccountId – The AWS account ID for the first tenant (Unicorn) where the application is to be deployed.
    • GnomeAccountId – The AWS account ID for the second tenant (Gnome) where the application is to be deployed.
    • SampleApplicationRepositoryName – The name of the CodeCommit repository where source changes are detected.
    • RepositoryBranch – The name of the CodeCommit branch where source changes are detected. The default value is master in case no value is provided.
  1. Wait for AWS CloudFormation to create the resources.

When stack creation is complete, the pipeline starts automatically.

For each existing tenant, an action is declared within the Deploy_Prod stage. The following code is a snippet of how these actions are configured to deploy the application on a different account:

RoleArn: !Sub arn:aws:iam::${UnicornAccountId}:role/CodePipelineCrossAccountRole
Configuration:
    ActionMode: CREATE_UPDATE
    Capabilities: CAPABILITY_IAM,CAPABILITY_AUTO_EXPAND
    StackName: !Sub SampleApplication-unicorn-stack-${AWS::Region}
    RoleArn: !Sub arn:aws:iam::${UnicornAccountId}:role/CloudFormationDeploymentRole
    TemplatePath: CodeCommitSource::application.yaml
    ParameterOverrides: !Sub | 
        { 
            "ApplicationName": "SampleApplication-Unicorn",
            "S3Bucket": { "Fn::GetArtifactAtt" : [ "ApplicationBuildOutput", "BucketName" ] },
            "S3Key": { "Fn::GetArtifactAtt" : [ "ApplicationBuildOutput", "ObjectKey" ] }
        }

The code declares two IAM roles. The first one is the IAM role assumed by the CodePipeline action to access the tenant AWS account, whereas the second is the IAM role used by AWS CloudFormation to create AWS resources in the tenant AWS account. The ParameterOverrides configuration declares where the release artifact is located. The S3 bucket and key are in the Tooling account and encrypted using the customer managed CMK. That’s why it was necessary to grant access from external accounts using a bucket and KMS policies.

Besides the CI/CD pipeline itself, this CloudFormation template declares IAM roles that are used by the pipeline and its actions. The main IAM role is named CrossAccountPipelineRole, which is used by the CodePipeline service. It contains permissions to assume the action roles. See the following code:

{
    "Action": "sts:AssumeRole",
    "Effect": "Allow",
    "Resource": [
        "arn:aws:iam::<TOOLING_ACCOUNT_ID>:role/<PipelineSourceActionRole>",
        "arn:aws:iam::<TOOLING_ACCOUNT_ID>:role/<PipelineApplicationBuildActionRole>",
        "arn:aws:iam::<TOOLING_ACCOUNT_ID>:role/<PipelineDeployDevActionRole>",
        "arn:aws:iam::<UNICORN_ACCOUNT_ID>:role/CodePipelineCrossAccountRole",
        "arn:aws:iam::<GNOME_ACCOUNT_ID>:role/CodePipelineCrossAccountRole"
    ]
}

When you have more tenant accounts, you must add additional roles to the list.

After CodePipeline runs successfully, test the sample application by invoking the Lambda function on each tenant account:

aws lambda invoke --function-name SampleApplication --profile <TENANT_PROFILE_NAME> --region <YOUR_REGION> out

The output should be:

{
    "StatusCode": 200,
    "ExecutedVersion": "$LATEST"
}

Cleaning up

Follow these steps to delete the components and avoid future incurring charges:

  1. Delete the production application stack from each tenant account:
aws cloudformation delete-stack --profile <TENANT_PROFILE_NAME> --region <YOUR_REGION> --stack-name SampleApplication-<TENANT_NAME>-stack-<YOUR_REGION>
  1. Delete the dev application stack from the Tooling account:
aws cloudformation delete-stack --region <YOUR_REGION> --stack-name SampleApplication-dev-stack-<YOUR_REGION>
  1. Delete the pipeline stack from the Tooling account:
aws cloudformation delete-stack --region <YOUR_REGION> --stack-name <YOUR_PIPELINE_STACK_NAME>
  1. Delete the customer managed CMK from the Tooling account:
aws kms schedule-key-deletion --region <YOUR_REGION> --key-id <KEY_ARN>
  1. Delete the S3 bucket from the Tooling account:
aws s3 rb s3://<BUCKET_UNIQUE_NAME> --force
  1. Optionally, delete the IAM roles and policies you created in the tenant accounts

Conclusion

This post demonstrated what it takes to build a CI/CD pipeline for single-tenant SaaS solutions isolated on the AWS account level. It covered how to grant cross-account access to artifact stores on Amazon S3 and artifact encryption keys on AWS KMS using policies and IAM roles. This approach is less error-prone because it avoids human errors when manually deploying the exact same application for multiple tenants.

For this use case, we performed most of the steps manually to better illustrate all the steps and components involved. For even more automation, consider using the AWS Cloud Development Kit (AWS CDK) and its pipeline construct to create your CI/CD pipeline and have everything as code. Moreover, for production scenarios, consider having integration tests as part of the pipeline.

Rafael Ramos

Rafael Ramos

Rafael is a Solutions Architect at AWS, where he helps ISVs on their journey to the cloud. He spent over 13 years working as a software developer, and is passionate about DevOps and serverless. Outside of work, he enjoys playing tabletop RPG, cooking and running marathons.

Integrating AWS CloudFormation Guard into CI/CD pipelines

Post Syndicated from Sergey Voinich original https://aws.amazon.com/blogs/devops/integrating-aws-cloudformation-guard/

In this post, we discuss and build a managed continuous integration and continuous deployment (CI/CD) pipeline that uses AWS CloudFormation Guard to automate and simplify pre-deployment compliance checks of your AWS CloudFormation templates. This enables your teams to define a single source of truth for what constitutes valid infrastructure definitions, to be compliant with your company guidelines and streamline AWS resources’ deployment lifecycle.

We use the following AWS services and open-source tools to set up the pipeline:

Solution overview

The CI/CD workflow includes the following steps:

  1. A code change is committed and pushed to the CodeCommit repository.
  2. CodePipeline automatically triggers a CodeBuild job.
  3. CodeBuild spins up a compute environment and runs the phases specified in the buildspec.yml file:
  4. Clone the code from the CodeCommit repository (CloudFormation template, rule set for CloudFormation Guard, buildspec.yml file).
  5. Clone the code from the CloudFormation Guard repository on GitHub.
  6. Provision the build environment with necessary components (rust, cargo, git, build-essential).
  7. Download CloudFormation Guard release from GitHub.
  8. Run a validation check of the CloudFormation template.
  9. If the validation is successful, pass the control over to CloudFormation and deploy the stack. If the validation fails, stop the build job and print a summary to the build job log.

The following diagram illustrates this workflow.

Architecture Diagram

Architecture Diagram of CI/CD Pipeline with CloudFormation Guard

Prerequisites

For this walkthrough, complete the following prerequisites:

Creating your CodeCommit repository

Create your CodeCommit repository by running a create-repository command in the AWS CLI:

aws codecommit create-repository --repository-name cfn-guard-demo --repository-description "CloudFormation Guard Demo"

The following screenshot indicates that the repository has been created.

CodeCommit Repository

CodeCommit Repository has been created

Populating the CodeCommit repository

Populate your repository with the following artifacts:

  1. A buildspec.yml file. Modify the following code as per your requirements:
version: 0.2
env:
  variables:
    # Definining CloudFormation Teamplate and Ruleset as variables - part of the code repo
    CF_TEMPLATE: "cfn_template_file_example.yaml"
    CF_ORG_RULESET:  "cfn_guard_ruleset_example"
phases:
  install:
    commands:
      - apt-get update
      - apt-get install build-essential -y
      - apt-get install cargo -y
      - apt-get install git -y
  pre_build:
    commands:
      - echo "Setting up the environment for AWS CloudFormation Guard"
      - echo "More info https://github.com/aws-cloudformation/cloudformation-guard"
      - echo "Install Rust"
      - curl https://sh.rustup.rs -sSf | sh -s -- -y
  build:
    commands:
       - echo "Pull GA release from github"
       - echo "More info https://github.com/aws-cloudformation/cloudformation-guard/releases"
       - wget https://github.com/aws-cloudformation/cloudformation-guard/releases/download/1.0.0/cfn-guard-linux-1.0.0.tar.gz
       - echo "Extract cfn-guard"
       - tar xvf cfn-guard-linux-1.0.0.tar.gz .
  post_build:
    commands:
       - echo "Validate CloudFormation template with cfn-guard tool"
       - echo "More information https://github.com/aws-cloudformation/cloudformation-guard/blob/master/cfn-guard/README.md"
       - cfn-guard-linux/cfn-guard check --rule_set $CF_ORG_RULESET --template $CF_TEMPLATE --strict-checks
artifacts:
  files:
    - cfn_template_file_example.yaml
  name: guard_templates
  1. An example of a rule set file (cfn_guard_ruleset_example) for CloudFormation Guard. Modify the following code as per your requirements:
#CFN Guard rules set example

#List of multiple references
let allowed_azs = [us-east-1a,us-east-1b]
let allowed_ec2_instance_types = [t2.micro,t3.nano,t3.micro]
let allowed_security_groups = [sg-08bbcxxc21e9ba8e6,sg-07b8bx98795dcab2]

#EC2 Policies
AWS::EC2::Instance AvailabilityZone IN %allowed_azs
AWS::EC2::Instance ImageId == ami-0323c3dd2da7fb37d
AWS::EC2::Instance InstanceType IN %allowed_ec2_instance_types
AWS::EC2::Instance SecurityGroupIds == ["sg-07b8xxxsscab2"]
AWS::EC2::Instance SubnetId == subnet-0407a7casssse558

#EBS Policies
AWS::EC2::Volume AvailabilityZone == us-east-1a
AWS::EC2::Volume Encrypted == true
AWS::EC2::Volume Size == 50 |OR| AWS::EC2::Volume Size == 100
AWS::EC2::Volume VolumeType == gp2
  1. An example of a CloudFormation template file (.yaml). Modify the following code as per your requirements:
AWSTemplateFormatVersion: "2010-09-09"
Description: "EC2 instance with encrypted EBS volume for AWS CloudFormation Guard Testing"

Resources:

 EC2Instance:
    Type: AWS::EC2::Instance
    Properties:
      ImageId: 'ami-0323c3dd2da7fb37d'
      AvailabilityZone: 'us-east-1a'
      KeyName: "your-ssh-key"
      InstanceType: 't3.micro'
      SubnetId: 'subnet-0407a7xx68410e558'
      SecurityGroupIds:
        - 'sg-07b8b339xx95dcab2'
      Volumes:
         - 
          Device: '/dev/sdf'
          VolumeId: !Ref EBSVolume
      Tags:
       - Key: Name
         Value: cfn-guard-ec2

 EBSVolume:
   Type: AWS::EC2::Volume
   Properties:
     Size: 100
     AvailabilityZone: 'us-east-1a'
     Encrypted: true
     VolumeType: gp2
     Tags:
       - Key: Name
         Value: cfn-guard-ebs
   DeletionPolicy: Snapshot

Outputs:
  InstanceID:
    Description: The Instance ID
    Value: !Ref EC2Instance
  Volume:
    Description: The Volume ID
    Value: !Ref  EBSVolume
AWS CodeCommit

Optional CodeCommit Repository Structure

The following screenshot shows a potential CodeCommit repository structure.

Creating a CodeBuild project

Our CodeBuild project orchestrates around CloudFormation Guard and runs validation checks of our CloudFormation templates as a phase of the CI process.

  1. On the CodeBuild console, choose Build projects.
  2. Choose Create build projects.
  3. For Project name, enter your project name.
  4. For Description, enter a description.
AWS CodeBuild

Create CodeBuild Project

  1. For Source provider, choose AWS CodeCommit.
  2. For Repository, choose the CodeCommit repository you created in the previous step.
AWS CodeBuild

Define the source for your CodeBuild Project

To setup CodeBuild environment we will use managed image based on Ubuntu 18.04

  1. For Environment Image, select Managed image.
  2. For Operating system, choose Ubuntu.
  3. For Service role¸ select New service role.
  4. For Role name, enter your service role name.
CodeBuild Environment

Setup the environment, the OS image and other settings for the CodeBuild

  1. Leave the default settings for additional configuration, buildspec, batch configuration, artifacts, and logs.

You can also use CodeBuild with custom build environments to help you optimize billing and improve the build time.

Creating IAM roles and policies

Our CI/CD pipeline needs two AWS Identity and Access Management (IAM) roles to run properly: one role for CodePipeline to work with other resources and services, and one role for AWS CloudFormation to run the deployments that passed the validation check in the CodeBuild phase.

Creating permission policies

Create your permission policies first. The following code is the policy in JSON format for CodePipeline:

{
    "Version": "2012-10-17",
    "Statement": [
        {
            "Sid": "VisualEditor0",
            "Effect": "Allow",
            "Action": [
                "codecommit:UploadArchive",
                "codecommit:CancelUploadArchive",
                "codecommit:GetCommit",
                "codecommit:GetUploadArchiveStatus",
                "codecommit:GetBranch",
                "codestar-connections:UseConnection",
                "codebuild:BatchGetBuilds",
                "codedeploy:CreateDeployment",
                "codedeploy:GetApplicationRevision",
                "codedeploy:RegisterApplicationRevision",
                "codedeploy:GetDeploymentConfig",
                "codedeploy:GetDeployment",
                "codebuild:StartBuild",
                "codedeploy:GetApplication",
                "s3:*",
                "cloudformation:*",
                "ec2:*"
            ],
            "Resource": "*"
        },
        {
            "Sid": "VisualEditor1",
            "Effect": "Allow",
            "Action": "iam:PassRole",
            "Resource": "*",
            "Condition": {
                "StringEqualsIfExists": {
                    "iam:PassedToService": [
                        "cloudformation.amazonaws.com",
                        "ec2.amazonaws.com"
                    ]
                }
            }
        }
    ]
}

To create your policy for CodePipeline, run the following CLI command:

aws iam create-policy --policy-name CodePipeline-Cfn-Guard-Demo --policy-document file://CodePipelineServiceRolePolicy_example.json

Capture the policy ARN that you get in the output to use in the next steps.

The following code is the policy in JSON format for AWS CloudFormation:

{
    "Version": "2012-10-17",
    "Statement": [
        {
            "Sid": "VisualEditor0",
            "Effect": "Allow",
            "Action": "iam:CreateServiceLinkedRole",
            "Resource": "*",
            "Condition": {
                "StringEquals": {
                    "iam:AWSServiceName": [
                        "autoscaling.amazonaws.com",
                        "ec2scheduled.amazonaws.com",
                        "elasticloadbalancing.amazonaws.com"
                    ]
                }
            }
        },
        {
            "Sid": "VisualEditor1",
            "Effect": "Allow",
            "Action": [
                "s3:GetObjectAcl",
                "s3:GetObject",
                "cloudwatch:*",
                "ec2:*",
                "autoscaling:*",
                "s3:List*",
                "s3:HeadBucket"
            ],
            "Resource": "*"
        }
    ]
}

Create the policy for AWS CloudFormation by running the following CLI command:

aws iam create-policy --policy-name CloudFormation-Cfn-Guard-Demo --policy-document file://CloudFormationRolePolicy_example.json

Capture the policy ARN that you get in the output to use in the next steps.

Creating roles and trust policies

The following code is the trust policy for CodePipeline in JSON format:

{
  "Version": "2012-10-17",
  "Statement": [
    {
      "Effect": "Allow",
      "Principal": {
        "Service": "codepipeline.amazonaws.com"
      },
      "Action": "sts:AssumeRole"
    }
  ]
}

Create your role for CodePipeline with the following CLI command:

aws iam create-role --role-name CodePipeline-Cfn-Guard-Demo-Role --assume-role-policy-document file://RoleTrustPolicy_CodePipeline.json

Capture the role name for the next step.

The following code is the trust policy for AWS CloudFormation in JSON format:

{
  "Version": "2012-10-17",
  "Statement": [
    {
      "Sid": "",
      "Effect": "Allow",
      "Principal": {
        "Service": "cloudformation.amazonaws.com"
      },
      "Action": "sts:AssumeRole"
    }
  ]
}

Create your role for AWS CloudFormation with the following CLI command:

aws iam create-role --role-name CF-Cfn-Guard-Demo-Role --assume-role-policy-document file://RoleTrustPolicy_CloudFormation.json

Capture the role name for the next step.


Finally, attach the permissions policies created in the previous step to the IAM roles you created:

aws iam attach-role-policy --role-name CodePipeline-Cfn-Guard-Demo-Role  --policy-arn "arn:aws:iam::<AWS Account Id >:policy/CodePipeline-Cfn-Guard-Demo"

aws iam attach-role-policy --role-name CF-Cfn-Guard-Demo-Role  --policy-arn "arn:aws:iam::<AWS Account Id>:policy/CloudFormation-Cfn-Guard-Demo"

Creating a pipeline

We can now create our pipeline to assemble all the components into one managed, continuous mechanism.

  1. On the CodePipeline console, choose Pipelines.
  2. Choose Create new pipeline.
  3. For Pipeline name, enter a name.
  4. For Service role, select Existing service role.
  5. For Role ARN, choose the service role you created in the previous step.
  6. Choose Next.
CodePipeline Setup

Setting Up CodePipeline environment

  1. In the Source section, for Source provider, choose AWS CodeCommit.
  2. For Repository name¸ enter your repository name.
  3. For Branch name, choose master.
  4. For Change detection options, select Amazon CloudWatch Events.
  5. Choose Next.
AWS CodePipeline Source

Adding CodeCommit to CodePipeline

  1. In the Build section, for Build provider, choose AWS CodeBuild.
  2. For Project name, choose the CodeBuild project you created.
  3. For Build type, select Single build.
  4. Choose Next.
CodePipeline Build Stage

Adding Build Project to Pipeline Stage

Now we will create a deploy stage in our CodePipeline to deploy CloudFormation templates that passed the CloudFormation Guard inspection in the CI stage.

  1. In the Deploy section, for Deploy provider, choose AWS CloudFormation.
  2. For Action mode¸ choose Create or update stack.
  3. For Stack name, choose any stack name.
  4. For Artifact name, choose BuildArtifact.
  5. For File name, enter the CloudFormation template name in your CodeCommit repository (In case of our demo it is cfn_template_file_example.yaml).
  6. For Role name, choose the role you created earlier for CloudFormation.
CodePipeline - Deploy Stage

Adding deploy stage to CodePipeline

22. In the next step review your selections for the pipeline to be created. The stages and action providers in each stage are shown in the order that they will be created. Click Create pipeline. Our CodePipeline is ready.

Validating the CI/CD pipeline operation

Our CodePipeline has two basic flows and outcomes. If the CloudFormation template complies with our CloudFormation Guard rule set file, the resources in the template deploy successfully (in our use case, we deploy an EC2 instance with an encrypted EBS volume).

CloudFormation Deployed

CloudFormation Console

If our CloudFormation template doesn’t comply with the policies specified in our CloudFormation Guard rule set file, our CodePipeline stops at the CodeBuild step and you see an error in the build job log indicating the resources that are non-compliant:

[EBSVolume] failed because [Encrypted] is [false] and the permitted value is [true]
[EC2Instance] failed because [t3.2xlarge] is not in [t2.micro,t3.nano,t3.micro] for [InstanceType]
Number of failures: 2

Note: To demonstrate the above functionality I changed my CloudFormation template to use unencrypted EBS volume and switched the EC2 instance type to t3.2xlarge which do not adhere to the rules that we specified in the Guard rule set file

Cleaning up

To avoid incurring future charges, delete the resources that we have created during the walkthrough:

  • CloudFormation stack resources that were deployed by the CodePipeline
  • CodePipeline that we have created
  • CodeBuild project
  • CodeCommit repository

Conclusion

In this post, we covered how to integrate CloudFormation Guard into CodePipeline and fully automate pre-deployment compliance checks of your CloudFormation templates. This allows your teams to have an end-to-end automated CI/CD pipeline with minimal operational overhead and stay compliant with your organizational infrastructure policies.

Cross-account and cross-region deployment using GitHub actions and AWS CDK

Post Syndicated from DAMODAR SHENVI WAGLE original https://aws.amazon.com/blogs/devops/cross-account-and-cross-region-deployment-using-github-actions-and-aws-cdk/

GitHub Actions is a feature on GitHub’s popular development platform that helps you automate your software development workflows in the same place you store code and collaborate on pull requests and issues. You can write individual tasks called actions, and combine them to create a custom workflow. Workflows are custom automated processes that you can set up in your repository to build, test, package, release, or deploy any code project on GitHub.

A cross-account deployment strategy is a CI/CD pattern or model in AWS. In this pattern, you have a designated AWS account called tools, where all CI/CD pipelines reside. Deployment is carried out by these pipelines across other AWS accounts, which may correspond to dev, staging, or prod. For more information about a cross-account strategy in reference to CI/CD pipelines on AWS, see Building a Secure Cross-Account Continuous Delivery Pipeline.

In this post, we show you how to use GitHub Actions to deploy an AWS Lambda-based API to an AWS account and Region using the cross-account deployment strategy.

Using GitHub Actions may have associated costs in addition to the cost associated with the AWS resources you create. For more information, see About billing for GitHub Actions.

Prerequisites

Before proceeding any further, you need to identify and designate two AWS accounts required for the solution to work:

  • Tools – Where you create an AWS Identity and Access Management (IAM) user for GitHub Actions to use to carry out deployment.
  • Target – Where deployment occurs. You can call this as your dev/stage/prod environment.

You also need to create two AWS account profiles in ~/.aws/credentials for the tools and target accounts, if you don’t already have them. These profiles need to have sufficient permissions to run an AWS Cloud Development Kit (AWS CDK) stack. They should be your private profiles and only be used during the course of this use case. So, it should be fine if you want to use admin privileges. Don’t share the profile details, especially if it has admin privileges. I recommend removing the profile when you’re finished with this walkthrough. For more information about creating an AWS account profile, see Configuring the AWS CLI.

Solution overview

You start by building the necessary resources in the tools account (an IAM user with permissions to assume a specific IAM role from the target account to carry out deployment). For simplicity, we refer to this IAM role as the cross-account role, as specified in the architecture diagram.

You also create the cross-account role in the target account that trusts the IAM user in the tools account and provides the required permissions for AWS CDK to bootstrap and initiate creating an AWS CloudFormation deployment stack in the target account. GitHub Actions uses the tools account IAM user credentials to the assume the cross-account role to carry out deployment.

In addition, you create an AWS CloudFormation execution role in the target account, which AWS CloudFormation service assumes in the target account. This role has permissions to create your API resources, such as a Lambda function and Amazon API Gateway, in the target account. This role is passed to AWS CloudFormation service via AWS CDK.

You then configure your tools account IAM user credentials in your Git secrets and define the GitHub Actions workflow, which triggers upon pushing code to a specific branch of the repo. The workflow then assumes the cross-account role and initiates deployment.

The following diagram illustrates the solution architecture and shows AWS resources across the tools and target accounts.

Architecture diagram

Creating an IAM user

You start by creating an IAM user called git-action-deployment-user in the tools account. The user needs to have only programmatic access.

  1. Clone the GitHub repo aws-cross-account-cicd-git-actions-prereq and navigate to folder tools-account. Here you find the JSON parameter file src/cdk-stack-param.json, which contains the parameter CROSS_ACCOUNT_ROLE_ARN, which represents the ARN for the cross-account role we create in the next step in the target account. In the ARN, replace <target-account-id> with the actual account ID for your designated AWS target account.                                             Replace <target-account-id> with designated AWS account id
  2. Run deploy.sh by passing the name of the tools AWS account profile you created earlier. The script compiles the code, builds a package, and uses the AWS CDK CLI to bootstrap and deploy the stack. See the following code:
cd aws-cross-account-cicd-git-actions-prereq/tools-account/
./deploy.sh "<AWS-TOOLS-ACCOUNT-PROFILE-NAME>"

You should now see two stacks in the tools account: CDKToolkit and cf-GitActionDeploymentUserStack. AWS CDK creates the CDKToolkit stack when we bootstrap the AWS CDK app. This creates an Amazon Simple Storage Service (Amazon S3) bucket needed to hold deployment assets such as a CloudFormation template and Lambda code package. cf-GitActionDeploymentUserStack creates the IAM user with permission to assume git-action-cross-account-role (which you create in the next step). On the Outputs tab of the stack, you can find the user access key and the AWS Secrets Manager ARN that holds the user secret. To retrieve the secret, you need to go to Secrets Manager. Record the secret to use later.

Stack that creates IAM user with its secret stored in secrets manager

Creating a cross-account IAM role

In this step, you create two IAM roles in the target account: git-action-cross-account-role and git-action-cf-execution-role.

git-action-cross-account-role provides required deployment-specific permissions to the IAM user you created in the last step. The IAM user in the tools account can assume this role and perform the following tasks:

  • Upload deployment assets such as the CloudFormation template and Lambda code package to a designated S3 bucket via AWS CDK
  • Create a CloudFormation stack that deploys API Gateway and Lambda using AWS CDK

AWS CDK passes git-action-cf-execution-role to AWS CloudFormation to create, update, and delete the CloudFormation stack. It has permissions to create API Gateway and Lambda resources in the target account.

To deploy these two roles using AWS CDK, complete the following steps:

  1. In the already cloned repo from the previous step, navigate to the folder target-account. This folder contains the JSON parameter file cdk-stack-param.json, which contains the parameter TOOLS_ACCOUNT_USER_ARN, which represents the ARN for the IAM user you previously created in the tools account. In the ARN, replace <tools-account-id> with the actual account ID for your designated AWS tools account.                                             Replace <tools-account-id> with designated AWS account id
  2. Run deploy.sh by passing the name of the target AWS account profile you created earlier. The script compiles the code, builds the package, and uses the AWS CDK CLI to bootstrap and deploy the stack. See the following code:
cd ../target-account/
./deploy.sh "<AWS-TARGET-ACCOUNT-PROFILE-NAME>"

You should now see two stacks in your target account: CDKToolkit and cf-CrossAccountRolesStack. AWS CDK creates the CDKToolkit stack when we bootstrap the AWS CDK app. This creates an S3 bucket to hold deployment assets such as the CloudFormation template and Lambda code package. The cf-CrossAccountRolesStack creates the two IAM roles we discussed at the beginning of this step. The IAM role git-action-cross-account-role now has the IAM user added to its trust policy. On the Outputs tab of the stack, you can find these roles’ ARNs. Record these ARNs as you conclude this step.

Stack that creates IAM roles to carry out cross account deployment

Configuring secrets

One of the GitHub actions we use is aws-actions/configure-aws-credentials@v1. This action configures AWS credentials and Region environment variables for use in the GitHub Actions workflow. The AWS CDK CLI detects the environment variables to determine the credentials and Region to use for deployment.

For our cross-account deployment use case, aws-actions/configure-aws-credentials@v1 takes three pieces of sensitive information besides the Region: AWS_ACCESS_KEY_ID, AWS_ACCESS_KEY_SECRET, and CROSS_ACCOUNT_ROLE_TO_ASSUME. Secrets are recommended for storing sensitive pieces of information in the GitHub repo. It keeps the information in an encrypted format. For more information about referencing secrets in the workflow, see Creating and storing encrypted secrets.

Before we continue, you need your own empty GitHub repo to complete this step. Use an existing repo if you have one, or create a new repo. You configure secrets in this repo. In the next section, you check in the code provided by the post to deploy a Lambda-based API CDK stack into this repo.

  1. On the GitHub console, navigate to your repo settings and choose the Secrets tab.
  2. Add a new secret with name as TOOLS_ACCOUNT_ACCESS_KEY_ID.
  3. Copy the access key ID from the output OutGitActionDeploymentUserAccessKey of the stack GitActionDeploymentUserStack in tools account.
  4. Enter the ID in the Value field.                                                                                                                                                                Create secret
  5. Repeat this step to add two more secrets:
    • TOOLS_ACCOUNT_SECRET_ACCESS_KEY (value retrieved from the AWS Secrets Manager in tools account)
    • CROSS_ACCOUNT_ROLE (value copied from the output OutCrossAccountRoleArn of the stack cf-CrossAccountRolesStack in target account)

You should now have three secrets as shown below.

All required git secrets

Deploying with GitHub Actions

As the final step, first clone your empty repo where you set up your secrets. Download and copy the code from the GitHub repo into your empty repo. The folder structure of your repo should mimic the folder structure of source repo. See the following screenshot.

Folder structure of the Lambda API code

We can take a detailed look at the code base. First and foremost, we use Typescript to deploy our Lambda API, so we need an AWS CDK app and AWS CDK stack. The app is defined in app.ts under the repo root folder location. The stack definition is located under the stack-specific folder src/git-action-demo-api-stack. The Lambda code is located under the Lambda-specific folder src/git-action-demo-api-stack/lambda/ git-action-demo-lambda.

We also have a deployment script deploy.sh, which compiles the app and Lambda code, packages the Lambda code into a .zip file, bootstraps the app by copying the assets to an S3 bucket, and deploys the stack. To deploy the stack, AWS CDK has to pass CFN_EXECUTION_ROLE to AWS CloudFormation; this role is configured in src/params/cdk-stack-param.json. Replace <target-account-id> with your own designated AWS target account ID.

Update cdk-stack-param.json in git-actions-cross-account-cicd repo with TARGET account id

Finally, we define the Git Actions workflow under the .github/workflows/ folder per the specifications defined by GitHub Actions. GitHub Actions automatically identifies the workflow in this location and triggers it if conditions match. Our workflow .yml file is named in the format cicd-workflow-<region>.yml, where <region> in the file name identifies the deployment Region in the target account. In our use case, we use us-east-1 and us-west-2, which is also defined as an environment variable in the workflow.

The GitHub Actions workflow has a standard hierarchy. The workflow is a collection of jobs, which are collections of one or more steps. Each job runs on a virtual machine called a runner, which can either be GitHub-hosted or self-hosted. We use the GitHub-hosted runner ubuntu-latest because it works well for our use case. For more information about GitHub-hosted runners, see Virtual environments for GitHub-hosted runners. For more information about the software preinstalled on GitHub-hosted runners, see Software installed on GitHub-hosted runners.

The workflow also has a trigger condition specified at the top. You can schedule the trigger based on the cron settings or trigger it upon code pushed to a specific branch in the repo. See the following code:

name: Lambda API CICD Workflow
# This workflow is triggered on pushes to the repository branch master.
on:
  push:
    branches:
      - master

# Initializes environment variables for the workflow
env:
  REGION: us-east-1 # Deployment Region

jobs:
  deploy:
    name: Build And Deploy
    # This job runs on Linux
    runs-on: ubuntu-latest
    steps:
      # Checkout code from git repo branch configured above, under folder $GITHUB_WORKSPACE.
      - name: Checkout
        uses: actions/checkout@v2
      # Sets up AWS profile.
      - name: Configure AWS credentials
        uses: aws-actions/configure-aws-credentials@v1
        with:
          aws-access-key-id: ${{ secrets.TOOLS_ACCOUNT_ACCESS_KEY_ID }}
          aws-secret-access-key: ${{ secrets.TOOLS_ACCOUNT_SECRET_ACCESS_KEY }}
          aws-region: ${{ env.REGION }}
          role-to-assume: ${{ secrets.CROSS_ACCOUNT_ROLE }}
          role-duration-seconds: 1200
          role-session-name: GitActionDeploymentSession
      # Installs CDK and other prerequisites
      - name: Prerequisite Installation
        run: |
          sudo npm install -g [email protected]
          cdk --version
          aws s3 ls
      # Build and Deploy CDK application
      - name: Build & Deploy
        run: |
          cd $GITHUB_WORKSPACE
          ls -a
          chmod 700 deploy.sh
          ./deploy.sh

For more information about triggering workflows, see Triggering a workflow with events.

We have configured a single job workflow for our use case that runs on ubuntu-latest and is triggered upon a code push to the master branch. When you create an empty repo, master branch becomes the default branch. The workflow has four steps:

  1. Check out the code from the repo, for which we use a standard Git action actions/checkout@v2. The code is checked out into a folder defined by the variable $GITHUB_WORKSPACE, so it becomes the root location of our code.
  2. Configure AWS credentials using aws-actions/configure-aws-credentials@v1. This action is configured as explained in the previous section.
  3. Install your prerequisites. In our use case, the only prerequisite we need is AWS CDK. Upon installing AWS CDK, we can do a quick test using the AWS Command Line Interface (AWS CLI) command aws s3 ls. If cross-account access was successfully established in the previous step of the workflow, this command should return a list of buckets in the target account.
  4. Navigate to root location of the code $GITHUB_WORKSPACE and run the deploy.sh script.

You can check in the code into the master branch of your repo. This should trigger the workflow, which you can monitor on the Actions tab of your repo. The commit message you provide is displayed for the respective run of the workflow.

Workflow for region us-east-1 Workflow for region us-west-2

You can choose the workflow link and monitor the log for each individual step of the workflow.

Git action workflow steps

In the target account, you should now see the CloudFormation stack cf-GitActionDemoApiStack in us-east-1 and us-west-2.

Lambda API stack in us-east-1 Lambda API stack in us-west-2

The API resource URL DocUploadRestApiResourceUrl is located on the Outputs tab of the stack. You can invoke your API by choosing this URL on the browser.

API Invocation Output

Clean up

To remove all the resources from the target and tools accounts, complete the following steps in their given order:

  1. Delete the CloudFormation stack cf-GitActionDemoApiStack from the target account. This step removes the Lambda and API Gateway resources and their associated IAM roles.
  2. Delete the CloudFormation stack cf-CrossAccountRolesStack from the target account. This removes the cross-account role and CloudFormation execution role you created.
  3. Go to the CDKToolkit stack in the target account and note the BucketName on the Output tab. Empty that bucket and then delete the stack.
  4. Delete the CloudFormation stack cf-GitActionDeploymentUserStack from tools account. This removes cross-account-deploy-user IAM user.
  5. Go to the CDKToolkit stack in the tools account and note the BucketName on the Output tab. Empty that bucket and then delete the stack.

Security considerations

Cross-account IAM roles are very powerful and need to be handled carefully. For this post, we strictly limited the cross-account IAM role to specific Amazon S3 and CloudFormation permissions. This makes sure that the cross-account role can only do those things. The actual creation of Lambda, API Gateway, and Amazon DynamoDB resources happens via the AWS CloudFormation IAM role, which AWS  CloudFormation assumes in the target AWS account.

Make sure that you use secrets to store your sensitive workflow configurations, as specified in the section Configuring secrets.

Conclusion

In this post we showed how you can leverage GitHub’s popular software development platform to securely deploy to AWS accounts and Regions using GitHub actions and AWS CDK.

Build your own GitHub Actions CI/CD workflow as shown in this post.

About the author


Damodar Shenvi Wagle is a Cloud Application Architect at AWS Professional Services. His areas of expertise include architecting serverless solutions, ci/cd and automation.

Integrating AWS CloudFormation security tests with AWS Security Hub and AWS CodeBuild reports

Post Syndicated from Vesselin Tzvetkov original https://aws.amazon.com/blogs/security/integrating-aws-cloudformation-security-tests-with-aws-security-hub-and-aws-codebuild-reports/

The concept of infrastructure as code, by using pipelines for continuous integration and delivery, is fundamental for the development of cloud infrastructure. Including code quality and vulnerability scans in the pipeline is essential for the security of this infrastructure as code. In one of our previous posts, How to build a CI/CD pipeline for container vulnerability scanning with Trivy and AWS Security Hub, you learned how to scan containers to efficiently identify Common Vulnerabilities and Exposures (CVEs) and work with your developers to address them.

In this post, we’ll continue this topic, and also introduce a method for integrating open source tools that find potentially insecure patterns in your AWS CloudFormation templates with both AWS Security Hub and AWS CodeBuild reports. We’ll be using Stelligent’s open source tool CFN-Nag. We also show you how you can extend the solution to use AWS CloudFormation Guard (currently in preview).

One reason to use this integration is that it gives both security and development teams visibility into potential security risks, and resources that are insecure or non-compliant to your company policy, before they’re deployed.

Solution benefit and deliverables

In this solution, we provide you with a ready-to-use template for performing scanning of your AWS CloudFormation templates by using CFN-Nag. This tool has more than 140 predefined patterns, such as AWS Identity and Access Management (IAM) rules that are too permissive (wildcards), security group rules that are too permissive (wildcards), access logs that aren’t enabled, or encryption that isn’t enabled. You can additionally define your own rules to match your company policy as described in the section later in this post, by using custom profiles and exceptions, and suppressing false positives.

Our solution enables you to do the following:

  • Integrate CFN-Nag in a CodeBuild project, scanning the infrastructure code for more than 140 possible insecure patterns, and classifying them as warnings or a failing test.
  • Learn how to integrate AWS CloudFormation Guard (CFN-Guard). You need to define your scanning rules in this case.
  • Generate CodeBuild reports, so that developers can easily identify failed security tests. In our sample, the build process fails if any critical findings are identified.
  • Import to Security Hub the aggregated finding per code branch, so that security professionals can easily spot vulnerable code in repositories and branches. For every branch, we import one aggregated finding.
  • Store the original scan report in an Amazon Simple Storage Service (Amazon S3) bucket for auditing purposes.

Note: in this solution, the AWS CloudFormation scanning tools won’t scan your application code that is running at AWS Lambda functions, Amazon Elastic Container Service (Amazon ECS), or Amazon Elastic Compute Cloud (Amazon EC2) instances.

Architecture

Figure 1 shows the architecture of the solution. The main steps are as follows:

  1. Your pipeline is triggered when new code is pushed to CodeCommit (which isn’t part of the template) to start a new build.
  2. The build process scans the AWS CloudFormation templates by using the cfn_nag_scan or cfn-guard command as defined by the build job.
  3. A Lambda function is invoked, and the scan report is sent to it.
  4. The scan report is published in an S3 bucket via the Lambda function.
  5. The Lambda function aggregates the findings report per repository and git branch and imports the report to Security Hub. The Lambda function also suppresses any previous findings related to this current repo and branch. The severity of the finding is calculated by the number of findings and a weight coefficient that depends on whether the finding is designated as warning or critical.
  6. Finally, the Lambda function generates the CodeBuild test report in JUnit format and returns it to CodeBuild. This report only includes information about any failed tests.
  7. CodeBuild creates a new test report from the new findings under the SecurityReports test group.
Figure 1: Solution architecture

Figure 1: Solution architecture

Walkthrough

To get started, you need to set up the sample solution that scans one of your repositories by using CFN-Nag or CFN-Guard.

To set up the sample solution

  1. Log in to your AWS account if you haven’t done so already. Choose Launch Stack to launch the AWS CloudFormation console with the prepopulated AWS CloudFormation demo template. Choose Next.

    Select the Launch Stack button to launch the templateAdditionally, you can find the latest code on GitHub.

  2. Fill in the stack parameters as shown in Figure 2:
    • CodeCommitBranch: The name of the branch to be monitored, for example refs/heads/master.
    • CodeCommitUrl: The clone URL of the CodeCommit repo that you want to monitor. It must be in the same Region as the stack being launched.
    • TemplateFolder: The folder in your repo that contains the AWS CloudFormation templates.
    • Weight coefficient for failing: The weight coefficient for a failing violation in the template.
    • Weight coefficient for warning: The weight coefficient for a warning in the template.
    • Security tool: The static analysis tool that is used to analyze the templates (CFN-Nag or CFN-Guard).
    • Fail build: Whether to fail the build when security findings are detected.
    • S3 bucket with sources: This bucket contains all sources, such as the Lambda function and templates. You can keep the default text if you’re not customizing the sources.
    • Prefix for S3 bucket with sources: The prefix for all objects. You can keep the default if you’re not customizing the sources.
Figure 2: AWS CloudFormation stack

Figure 2: AWS CloudFormation stack

View the scan results

After you execute the CodeBuild project, you can view the results in three different ways depending on your preferences: CodeBuild report, Security Hub, or the original CFN-Nag or CFN-Guard report.

CodeBuild report

In the AWS Management Console, go to CodeBuild and choose Report Groups. You can find the report you are interested in under SecurityReports. Both failures and warnings are represented as failed tests and are prefixed with W(Warning) or F(Failure), respectively, as shown in Figure 3. Successful tests aren’t part of the report because they aren’t provided by CFN-Nag reports.

Figure 3: AWS CodeBuild report

Figure 3: AWS CodeBuild report

In the CodeBuild navigation menu, under Report groups, you can see an aggregated view of all scans. There you can see a historical view of the pass rate of your tests, as shown in Figure 4.

Figure 4: AWS CodeBuild Group

Figure 4: AWS CodeBuild Group

Security Hub findings

In the AWS Management Console, go to Security Hub and select the Findings view. The aggregated finding per branch has the title CFN scan repo:name:branch with Company Personal and Product Default. The name and branch are placeholders for the repo and branch name. There is one active finding per repo and branch. All previous reports for this repo and branch are suppressed, so that by default you see only the last ones. If necessary, you can see the previous reports by removing the selection filter in the Security Hub finding console. Figure 5 shows an example of the Security Hub findings.

Figure 5: Security Hub findings

Figure 5: Security Hub findings

Original scan report

Lastly, you can find the original scan report in the S3 bucket aws-sec-build-reports-hash. You can also find a reference to this object in the associated Security Hub finding source URL. The S3 object key is constructed as follows.


cfn-nag-report/repo:source_repository/branch:branch_short/cfn-nag-createdAt.json

where source_repository is the name of the repository, branch_short is the name of the branch, and createdAt is the report date.

The following screen capture shows a sample view of the content.

Figure 6: CFN_NAG report sample

Figure 6: CFN_NAG report sample

Security Hub severity and weight coefficients

The Lambda function aggregates CFN-Nag findings to one Security Hub finding per branch and repo. We consider that in this way you get the best visibility without losing orientation in too many findings if you have a large code base.

The Security Hub finding severity is calculated as follows:

  • CFN-Nag critical findings are weighted (multiplied) by 20 and the warnings by 1.
  • The sum of all CFN-Nag findings multiplied by their weighted coefficient results in the severity of the Security Hub finding.

The severity label or normalized severity (from 0 to 100) (see AWS Security Finding Format (ASFF) for more information) is calculated from the summed severity. We implemented the following convention:

  • If the severity is more than 100 points, the label is set as CRITICAL (100).
  • If the severity is lower than 100, the normalized severity and label are mapped as described in AWS Security Finding Format (ASFF).

Your company might have a different way to calculate the severity. If you want to adjust the weight coefficients, change the stack parameter. If you want to adjust the mapping of the CFN-Nag findings to Security hub severity, then you’ll need to adapt the Lambda’s calculateSeverity Python function.

Using custom profiles and exceptions, and suppressing false positives

You can customize CFN-Nag to use a certain rule set by including the specific list of rules to apply (called a profile) within the repository. Customizing rule sets is useful because developers or applications might have different security considerations or risk profiles in specific applications. Additionally the operator might prefer to exclude rules that are prone to introducing false positives.

To add a custom profile, you can modify the cfn_nag_scan command specified in the CodeBuild buildspec.yml file. Use the –profile-path command argument to point to the file that contains the list of rules to use, as shown in the following code sample.


cfn_nag_scan --fail-on-warnings –profile-path .cfn_nag.profile  --input-path  ${TemplateFolder} -o json > ./report/cfn_nag.out.json

Where .cfn_nag.profile file contains one rule identifier per line:


F2
F3
F5
W11

You can find the full list of available rules using cfn_nag_rules command.

You can also choose instead to use a global deny list of rules, or directly suppress findings per resource by using Metadata tags in each AWS CloudFormation resource. For more information, see the CFN-Nag GitHub repository.

Integrating with AWS CloudFormation Guard

The integration with AWS CloudFormation Guard (CFN-Guard) follows the same architecture pattern as CFN-Nag. The ImportToSecurityHub Lambda function can process both CFN-Nag and CFN-Guard results to import to Security Hub and generate a CodeBuild report.

To deploy the CFN-Guard tool

  1. In the AWS Management Console, go to CloudFormation, and then choose Update the previous stack deployed.
  2. Choose Next, and then change the SecurityTool parameter to cfn-guard.
  3. Continue to navigate through the console and deploy the stack.

This creates a new buildspec.yml file that uses the cfn-guard command line interface (CLI) to scan all AWS CloudFormation templates in the source repository. The scans use an example rule set found in the CFN-Guard repository.

You can choose to generate the rule set for the AWS CloudFormation templates that are required by the scanning engine and add the rule set to your repository as described on the GitHub page for AWS CloudFormation Guard. The rule set must reflect your company security policy. This can be one set for all templates, or dependent on the security profile of the application.

You can use your own rule set by modifying the cfn-guard –rule_path parameter to point to a file from within your repository, as follows.


cfn-guard --rule_set .cfn_guard.ruleset --template  "$template" > ./report/template_report

Troubleshooting

If the build report fails, you can find the CloudBuild run logs in the CodeBuild Build history. The build will fail if critical security findings are detected in the templates.

Additionally, the Lambda function execution logs can be found in the CloudWatch Log group aws/lambda/ImportToSecurityHub.

Summary

In this post, you learned how to scan the AWS CloudFormation templates for resources that are potentially insecure or not compliant to your company policy in a CodeBuild project, import the findings to Security Hub, and generate CodeBuild test reports. Integrating this solution to your pipelines can help multiple teams within your organization detect potential security risks in your infrastructure code before its deployed to your AWS environments. If you would like to extend the solution further and need support, contact AWS professional services or an Amazon Partner Network (APN) Partner. If you have technical questions, please use the AWS Security Hub or AWS CodeBuild forums.

If you have feedback about this post, submit comments in the Comments section below.

Want more AWS Security how-to content, news, and feature announcements? Follow us on Twitter.

Author

Vesselin Tzvetkov

Vesselin is senior security consultant at AWS Professional Services and is passionate about security architecture and engineering innovative solutions. Outside of technology, he likes classical music, philosophy, and sports. He holds a Ph.D. in security from TU-Darmstadt and a M.S. in electrical engineering from Bochum University in Germany.

Author

Joaquin Manuel Rinaudo

Joaquin is a Senior Security Consultant with AWS Professional Services. He is passionate about building solutions that help developers improve their software quality. Prior to AWS, he worked across multiple domains in the security industry, from mobile security to cloud and compliance related topics. In his free time, Joaquin enjoys spending time with family and reading science-fiction novels.

Automated CloudFormation Testing Pipeline with TaskCat and CodePipeline

Post Syndicated from Raleigh Hansen original https://aws.amazon.com/blogs/devops/automated-cloudformation-testing-pipeline-with-taskcat-and-codepipeline/

Researchers at Academic Medical Centers (AMCs) use programs such as Observational Health Data Sciences and Informatics (OHDSI) and Research Electronic Data Capture (REDCap) to interact with healthcare data. Our internal team at AWS has provided solutions such as OHDSI-on-AWS and REDCap environments on AWS to help clinicians analyze healthcare data in the AWS Cloud. Occasionally, these solutions break due to a change in some portion of the solution (e.g. updated services). The Automated Solutions Testing Pipeline enables our team to take a proactive approach to discovering these breaks and their cause in order to expedite the repair process.

OHDSI-on-AWS provides these AMCs with the ability to store and analyze observational health data in the AWS cloud. REDCap is a web application for managing surveys and databases with HIPAA-compliant environments. Using our solutions, these programs can be spun up easily on the AWS infrastructure using AWS CloudFormation templates.

Updates to AWS services and other program libraries can cause the CloudFormation template to fail during deployment. Other times, the outputs may not be operating correctly, or the template may not work on every AWS region. This can create a negative customer experience. Some customers may discover this kind of break and decide to not move forward with using the solution. Other customers may not even realize the solution is broken, so they might be unknowingly working with an uncooperative environment. Furthermore, we cannot always provide fast support to the customers who contact us about broken solutions. To meet our team’s needs and the needs of our customers, we decided to focus our efforts on taking a CI/CD approach to maintain these solutions. We developed the Automated Testing Pipeline which regularly tests solution deployment and changes to source files.
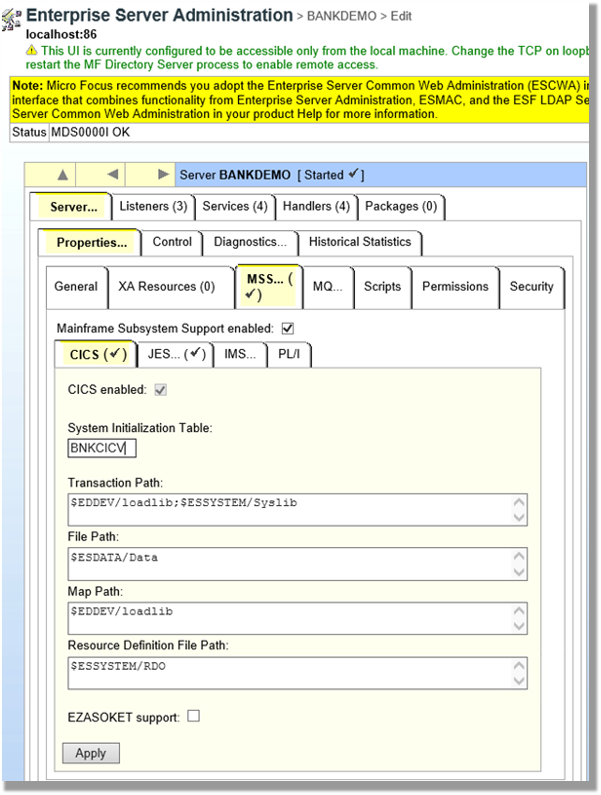
This post shows the features of the Automated Testing Pipeline and provides resources to help you get started using it with your AWS account.

Overview of Automated Testing Pipeline Solution

The Automated Testing Pipeline solution as a whole is designed to automatically deploy CloudFormation templates, run tests against the deployed environments, send notifications if an issue is discovered, and allow for insightful testing data to be easily explored.

CloudFormation templates to be tested are stored in an Amazon S3 bucket. Custom test scripts and TaskCat deployment configuration are stored in an AWS CodeCommit repository.

The pipeline is triggered in one of three ways: an update to the CloudFormation Template in S3, an Amazon CloudWatch events rule, and an update to the testing source code repository. Once the pipeline has been triggered, AWS CodeBuild pulls the source code to deploy the CloudFormation template, test the deployed environment, and store the results in an S3 bucket. If any failures are discovered, subscribers to the failure topic are notified. The following diagram shows its overall architecture.

Diagram of Automated Testing Pipeline architecture

Diagram of Automated Testing Pipeline architecture

In order to create the Automated Testing Pipeline, two interns collaborated over the course of 5 weeks to produce the architecture and custom test scripts. We divided the work of constructing a serverless architecture and writing out test scripts for the output urls for OHDSI-on-AWS and REDCap environments on AWS.

The following tasks were completed to build out the Automated Testing Pipeline solution:

  • Setup AWS IAM roles for accessing AWS resources securely
  • Create CloudWatch events to trigger AWS CodePipeline
  • Setup CodePipeline and CodeBuild to run TaskCat and testing scripts
  • Configure TaskCat to deploy CloudFormation solutions in various AWS Regions
  • Write test scripts to interact with CloudFormation solutions’ deployed environments
  • Subscribe to receive emails detailing test results
  • Create a CloudFormation template for the Automated Testing Pipeline

The architecture can be extended to test any CloudFormation stack. For this particular use case, we wrote the test scripts specifically to test the urls output by the CloudFormation solutions. The Automated Testing Pipeline has the following features:

  • Deployed in a single AWS Region, with the exception of the tested CloudFormation solution
  • Has a serverless architecture operating at the AWS Region level
  • Deploys a pipeline which can deploy and test the CloudFormation solution
  • Creates CloudWatch events to activate the pipeline on a schedule or when the solution is updated
  • Creates an Amazon SNS topic for notifying subscribers when there are errors
  • Includes code for running TaskCat and scripts to test solution functionality
  • Built automatically in minutes
  • Low in cost with free tier benefits

The pipeline is triggered automatically when an event occurs. These events include a change to the CloudFormation solution template, a change to the code in the testing repository, and an alarm set off by a regular schedule. Additional events can be added in the CloudWatch console.

When the pipeline is triggered, the testing environment is set up by CodeBuild. CodeBuild uses a build specification file kept within our source repository to set up the environment and run the test scripts. We created a CodeCommit repository to host the test scripts alongside the build specification. The build specification includes commands run TaskCat — an open-source tool for testing the deployment of CloudFormation templates. TaskCat provides the ability to test the deployment of the CloudFormation solution, but we needed custom test scripts to ensure that we can interact with the deployed environment as expected. If the template is successfully deployed, CodeBuild handles running the test scripts against the CloudFormation solution environment. In our case, the environment is accessed via urls output by the CloudFormation solution.

We used a Selenium WebDriver for interacting with the web pages given by the output urls. This allowed us to programmatically navigate a headless web browser in the serverless environment and gave us the ability to use text output by JavaScript functions to understand the state of the test. You can see this interaction occurring in the code snippet below.

def log_in(driver, user, passw, link, btn_path, title):
    """Enter username and password then submit to log in

        :param driver: webdriver for Chrome page
        :param user: username as String
        :param passw: password as String
        :param link: url for page being tested as String
        :param btn_path: xpath to submit button
        :param title: expected page title upon successful sign in
        :return: success String tuple if log in completed, failure description tuple String otherwise
    """
    try:
        # post username and password data
        driver.find_element_by_xpath("//input[ @name='username' ]").send_keys(user)
        driver.find_element_by_xpath("//input[ @name='password' ]").send_keys(passw)

        # click sign in button and wait for page update
        driver.find_element_by_xpath(btn_path).click()
    except NoSuchElementException:
        return 'FAILURE', 'Unable to access page elements'

    try:
        WebDriverWait(driver, 20).until(ec.url_changes(link))
        WebDriverWait(driver, 20).until(ec.title_is(title))
    except TimeoutException as e:
        print("Timeout occurred (" + e + ") while attempting to sign in to " + driver.current_url)
        if "Sign In" in driver.title or "invalid user" in driver.page_source.lower():
            return 'FAILURE', 'Incorrect username or password'
        else:
            return 'FAILURE', 'Sign in attempt timed out'

    return 'SUCCESS', 'Sign in complete'

We store the test results in JSON format for ease of parsing. TaskCat generates a dashboard which we customize to display these test results. We are able to insert our JSON results into the dashboard in order to make it easy to find errors and access log files. This dashboard is a static html file that can be hosted on an S3 bucket. In addition, messages are published to topics in SNS whenever an error occurs which provide a link to this dashboard.

Dashboard containing descriptions of tests and their results

Customized TaskCat dashboard

In true CI/CD fashion, this end-to-end design automatically performs tasks that would otherwise be performed manually. We have shown how deploying solutions, testing solutions, notifying maintainers, and providing a results dashboard are all actions handled entirely by the Automated Testing Pipeline.

Getting Started with the Automated Testing Pipeline

Prerequisite tasks to complete before deploying the pipeline:

Once the prerequisite tasks are completed, the pipeline is ready to be deployed. Detailed information about deployment, altering the source code to fit your use case, and troubleshooting issues can be found at the GitHub page for the Automated Testing Pipeline.

For those looking to jump right into deployment, click the Launch Stack button below.

Button to click to deploy the Automated Testing Pipeline via CloudFormation

Tasks to complete after deployment:

  • Subscribe to SNS topic for error messages
  • Update the code to match the parameters and CloudFormation template that were chosen
  • Skip this step if you are testing OHDSI-on-AWS. Upload the desired CloudFormation template to the created source S3 Bucket
  • Push the source code to the created CodeCommit Repository

After the code is pushed to the CodeCommit repository and the CloudFormation template has been uploaded to S3, the pipeline will run automatically. You can visit the CodePipeline console to confirm that the pipeline is running with an “in progress” status.
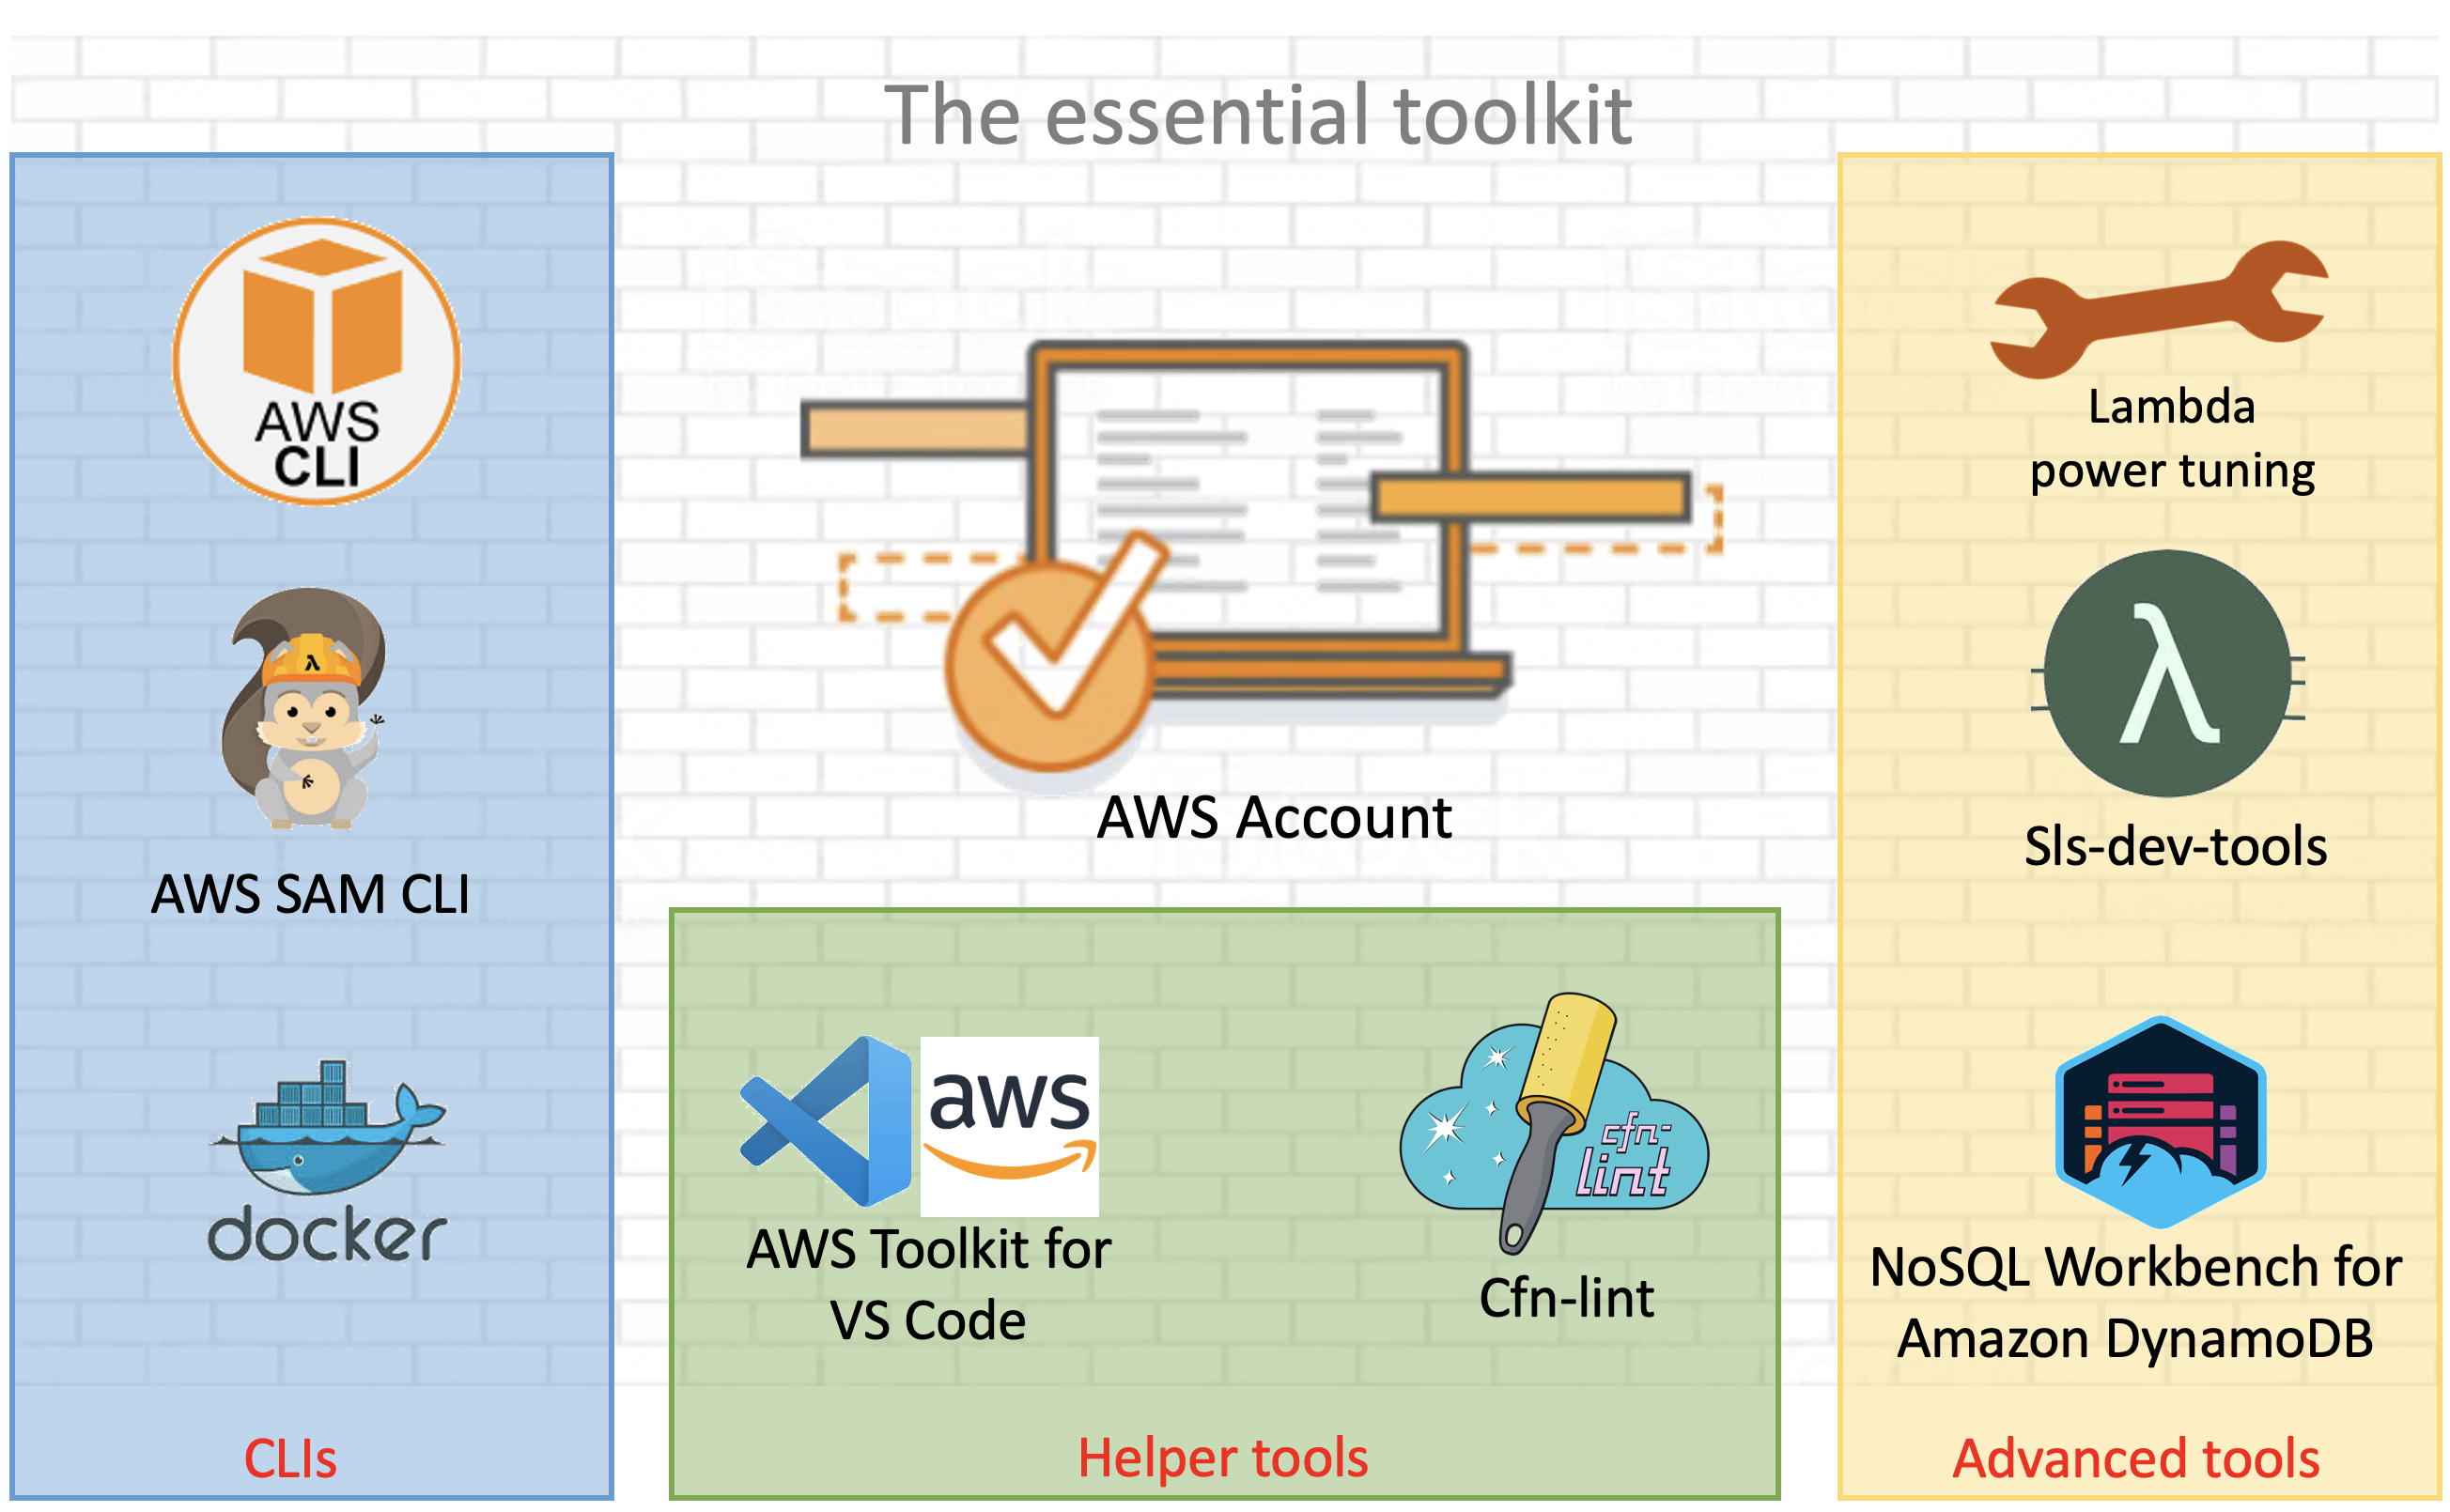
You may desire to alter various aspects of the Automated Testing Pipeline to better fit your use case. Listed below are some actions you can take to modify the solution to fit your needs:

  • Go to CloudWatch Events and update rules for automatically started the pipeline.
  • Scale out testing by providing custom testing scripts or altering the existing ones.
  • Test a different CloudFormation template by uploading it to the source S3 bucket created and configuring the pipeline accordingly. Custom test scripts will likely be required for this use case.

Challenges Addressed by the Automated Testing Pipeline

The Automated Testing Pipeline directly addresses the challenges we faced with maintaining our OHDSI and REDCap solutions. Additionally, the pipeline can be used whenever there is a need to test CloudFormation templates that are being used on a regular basis or are distributed to other users. Listed below is the set of specific challenges we faced maintaining CloudFormation solutions and how the pipeline addresses them.

Table describing challenges faced with their direct solution offered by Testing Pipeline

The desire to better serve our customers guided our decision to create the Automated Testing Pipeline. For example, we know that source code used to build the OHDSI-on-AWS environment changes on occasion. Some of these changes have caused the environment to stop functioning correctly. This left us with cases where our customers had to either open an issue on GitHub or reach out to AWS directly for support. Our customers depend on OHDSI-on-AWS functioning properly, so fixing issues is of high priority to our team. The ability to run tests regularly allows us to take action without depending on notice from our customers. Now, we can be the first ones to know if something goes wrong and get to fixing it sooner.

“This automation will help us better monitor the CloudFormation-based projects our customers depend on to ensure they’re always in working order.” — James Wiggins, EDU HCLS SA Manager

Cleaning Up

If you decide to quit using the Automated Testing Pipeline, follow the steps below to get rid of the resources associated with it in your AWS account.

  • Delete CloudFormation solution root Stack
  • Delete pipeline CloudFormation Stack
  • Delete ATLAS S3 Bucket if OHDSI-on-AWS was chosen

Deleting the pipeline CloudFormation stack handles removing the resources associated with its architecture. Depending on the CloudFormation template chosen for testing, additional resources associated with it may need to be removed. Visit our GitHub page for more information on removing resources.

Conclusion

The ability to continuously test preexisting solutions on AWS has great benefits for our team and our customers. The automated nature of this testing frees up time for us and our customers, and the dashboard makes issues more visible and easier to resolve. We believe that sharing this story can benefit anyone facing challenges maintaining CloudFormation solutions in AWS. Check out the Getting Started with the Automated Testing Pipeline section of this post to deploy the solution.

Additional Resources

More information about the key services and open-source software used in our pipeline can be found at the following documentation pages:

About the Authors

Raleigh Hansen is a former Solutions Architect Intern on the Academic Medical Centers team at AWS. She is passionate about solving problems and improving upon existing systems. She also adores spending time with her two cats.

Dan Le is a former Solutions Architect Intern on the Academic Medical Centers team at AWS. He is passionate about technology and enjoys doing art and music.

Jump-starting your serverless development environment

Post Syndicated from Benjamin Smith original https://aws.amazon.com/blogs/compute/jump-starting-your-serverless-development-environment/

Developers building serverless applications often wonder how they can jump-start their local development environment. This blog post provides a broad guide for those developers wanting to set up a development environment for building serverless applications.

serverless development environment

AWS and open source tools for a serverless development environment .

To use AWS Lambda and other AWS services, create and activate an AWS account.

Command line tooling

Command line tools are scripts, programs, and libraries that enable rapid application development and interactions from within a command line shell.

The AWS CLI

The AWS Command Line Interface (AWS CLI) is an open source tool that enables developers to interact with AWS services using a command line shell. In many cases, the AWS CLI increases developer velocity for building cloud resources and enables automating repetitive tasks. It is an important piece of any serverless developer’s toolkit. Follow these instructions to install and configure the AWS CLI on your operating system.

AWS enables you to build infrastructure with code. This provides a single source of truth for AWS resources. It enables development teams to use version control and create deployment pipelines for their cloud infrastructure. AWS CloudFormation provides a common language to model and provision these application resources in your cloud environment.

AWS Serverless Application Model (AWS SAM CLI)

AWS Serverless Application Model (AWS SAM) is an extension for CloudFormation that further simplifies the process of building serverless application resources.

It provides shorthand syntax to define Lambda functions, APIs, databases, and event source mappings. During deployment, the AWS SAM syntax is transformed into AWS CloudFormation syntax, enabling you to build serverless applications faster.

The AWS SAM CLI is an open source command line tool used to locally build, test, debug, and deploy serverless applications defined with AWS SAM templates.

Install AWS SAM CLI on your operating system.

Test the installation by initializing a new quick start project with the following command:

$ sam init
  1. Choose 1 for the “Quick Start Templates
  2. Choose 1 for the “Node.js runtime
  3. Use the default name.

The generated /sam-app/template.yaml contains all the resource definitions for your serverless application. This includes a Lambda function with a REST API endpoint, along with the necessary IAM permissions.

Resources:
  HelloWorldFunction:
    Type: AWS::Serverless::Function # More info about Function Resource: https://github.com/awslabs/serverless-application-model/blob/master/versions/2016-10-31.md#awsserverlessfunction
    Properties:
      CodeUri: hello-world/
      Handler: app.lambdaHandler
      Runtime: nodejs12.x
      Events:
        HelloWorld:
          Type: Api # More info about API Event Source: https://github.com/awslabs/serverless-application-model/blob/master/versions/2016-10-31.md#api
          Properties:
            Path: /hello
            Method: get

Deploy this application using the AWS SAM CLI guided deploy:

$ sam deploy -g

Local testing with AWS SAM CLI

The AWS SAM CLI requires Docker containers to simulate the AWS Lambda runtime environment on your local development environment. To test locally, install Docker Engine and run the Lambda function with following command:

$ sam local invoke "HelloWorldFunction" -e events/event.json

The first time this function is invoked, Docker downloads the lambci/lambda:nodejs12.x container image. It then invokes the Lambda function with a pre-defined event JSON file.

Helper tools

There are a number of open source tools and packages available to help you monitor, author, and optimize your Lambda-based applications. Some of the most popular tools are shown in the following list.

Template validation tooling

CloudFormation Linter is a validation tool that helps with your CloudFormation development cycle. It analyses CloudFormation YAML and JSON templates to resolve and validate intrinsic functions and resource properties. By analyzing your templates before deploying them, you can save valuable development time and build automated validation into your deployment release cycle.

Follow these instructions to install the tool.

Once, installed, run the cfn-lint command with the path to your AWS SAM template provided as the first argument:

cfn-lint template.yaml
AWS SAM template validation with cfn-lint

AWS SAM template validation with cfn-lint

The following example shows that the template is not valid because the !GettAtt function does not evaluate correctly.

IDE tooling

Use AWS IDE plugins to author and invoke Lambda functions from within your existing integrated development environment (IDE). AWS IDE toolkits are available for PyCharm, IntelliJ. Visual Studio.

The AWS Toolkit for Visual Studio Code provides an integrated experience for developing serverless applications. It enables you to invoke Lambda functions, specify function configurations, locally debug, and deploy—all conveniently from within the editor. The toolkit supports Node.js, Python, and .NET.

The AWS Toolkit for Visual Studio Code

From Visual Studio Code, choose the Extensions icon on the Activity Bar. In the Search Extensions in Marketplace box, enter AWS Toolkit and then choose AWS Toolkit for Visual Studio Code as shown in the following example. This opens a new tab in the editor showing the toolkit’s installation page. Choose the Install button in the header to add the extension.

AWS Toolkit extension for Visual Studio Code

AWS Toolkit extension for Visual Studio Code

AWS Cloud9

Another option to build a development environment without having to install anything locally is to use AWS Cloud9. AWS Cloud9 is a cloud-based integrated development environment (IDE) for writing, running, and debugging code from within the browser.

It provides a seamless experience for developing serverless applications. It has a preconfigured development environment that includes AWS CLI, AWS SAM CLI, SDKs, code libraries, and many useful plugins. AWS Cloud9 also provides an environment for locally testing and debugging AWS Lambda functions. This eliminates the need to upload your code to the Lambda console. It allows developers to iterate on code directly, saving time, and improving code quality.

Follow this guide to set up AWS Cloud9 in your AWS environment.

Advanced tooling

Efficient configuration of Lambda functions is critical when expecting optimal cost and performance of your serverless applications. Lambda allows you to control the memory (RAM) allocation for each function.

Lambda charges based on the number of function requests and the duration, the time it takes for your code to run. The price for duration depends on the amount of RAM you allocate to your function. A smaller RAM allocation may reduce the performance of your application if your function is running compute-heavy workloads. If performance needs outweigh cost, you can increase the memory allocation.

Cost and performance optimization tooling

AWS Lambda power tuner is an open source tool that uses an AWS Step Functions state machine to suggest cost and performance optimizations for your Lambda functions. It invokes a given function with multiple memory configurations. It analyzes the execution log results to determine and suggest power configurations that minimize cost and maximize performance.

To deploy the tool:

  1. Clone the repository as follows:
    $ git clone https://github.com/alexcasalboni/aws-lambda-power-tuning.git
  2. Create an Amazon S3 bucket and enter the deployment configurations in /scripts/deploy.sh:
    # config
    BUCKET_NAME=your-sam-templates-bucket
    STACK_NAME=lambda-power-tuning
    PowerValues='128,512,1024,1536,3008'
  3. Run the deploy.sh script from your terminal, this uses the AWS SAM CLI to deploy the application:
    $ bash scripts/deploy.sh
  4. Run the power tuning tool from the terminal using the AWS CLI:
    aws stepfunctions start-execution \
    --state-machine-arn arn:aws:states:us-east-1:0123456789:stateMachine:powerTuningStateMachine-Vywm3ozPB6Am \
    --input "{\"lambdaARN\": \"arn:aws:lambda:us-east-1:1234567890:function:testytest\", \"powerValues\":[128,256,512,1024,2048],\"num\":50,\"payload\":{},\"parallelInvocation\":true,\"strategy\":\"cost\"}" \
    --output json
  5. The Step Functions execution output produces a link to a visual summary of the suggested results:

    AWS Lambda power tuning results

    AWS Lambda power tuning results

Monitoring and debugging tooling

Sls-dev-tools is an open source serverless tool that delivers serverless metrics directly to the terminal. It provides developers with feedback on their serverless application’s metrics and key bindings that deploy, open, and manipulate stack resources. Bringing this data directly to your terminal or IDE, reduces context switching between the developer environment and the web interfaces. This can increase application development speed and improve user experience.

Follow these instructions to install the tool onto your development environment.

To open the tool, run the following command:

$ Sls-dev-tools

Follow the in-terminal interface to choose which stack to monitor or edit.

The following example shows how the tool can be used to invoke a Lambda function with a custom payload from within the IDE.

Invoke an AWS Lambda function with a custom payload using sls-dev-tools

Invoke an AWS Lambda function with a custom payload using sls-dev-tools

Serverless database tooling

NoSQL Workbench for Amazon DynamoDB is a GUI application for modern database development and operations. It provides a visual IDE tool for data modeling and visualization with query development features to help build serverless applications with Amazon DynamoDB tables. Define data models using one or more tables and visualize the data model to see how it works in different scenarios. Run or simulate operations and generate the code for Python, JavaScript (Node.js), or Java.

Choose the correct operating system link to download and install NoSQL Workbench on your development machine.

The following example illustrates a connection to a DynamoDB table. A data scan is built using the GUI, with Node.js code generated for inclusion in a Lambda function:

Connecting to an Amazon DynamoBD table with NoSQL Workbench for AmazonDynamoDB

Connecting to an Amazon DynamoDB table with NoSQL Workbench for Amazon DynamoDB

Generating query code with NoSQL Workbench for Amazon DynamoDB

Generating query code with NoSQL Workbench for Amazon DynamoDB

Conclusion

Building serverless applications allows developers to focus on business logic instead of managing and operating infrastructure. This is achieved by using managed services. Developers often struggle with knowing which tools, libraries, and frameworks are available to help with this new approach to building applications. This post shows tools that builders can use to create a serverless developer environment to help accelerate software development.

This list represents AWS and open source tools but does not include our APN Partners. For partner offers, check here.

Read more to start building serverless applications.